Google Photos is a handy pre-installed cloud storage app that allows you to backup your photos and videos. As far as Android users are concerned, there is hardly any need to look for an alternative app for saving their precious photos and memories. It automatically saves your photos on the cloud and thus ensures that your data remains safe in case of any unforeseen circumstances like theft, loss, or damage.
However, just like every other app, Google Foto might act out at times. One of the most concerning problems is times when it stops uploading photos to the cloud. You wouldn’t even be aware that the automatic upload feature has stopped working, and your photos aren’t getting backed up. However, there is no reason to panic just yet as we are here to provide you with a number of solutions and fixes for this problem.
Correggi Google Foto che non carica le foto su Android
1. Enable Auto-Sync Feature for Google Photos
By default, the automatic sync setting for Google Photos is always enabled. However, it is possible that you might have accidentally turned it off. This will prevent Google Photos from uploading photos to the cloud. This setting needs to be enabled in order to upload and download photos from Google Photos. Follow the steps given below to see how:
Vedi anche:
Quanto costa riparare lo schermo del telefono rotto su Android
10 modi per risolvere l'errore Impossibile accedere a Spotify
Correggi l'errore che l'invito del calendario iPhone non può essere inviato
8 modi per risolvere i messaggi di testo Android bloccati durante il download
Fix Can’t Change Messenger Profile Pic on Android
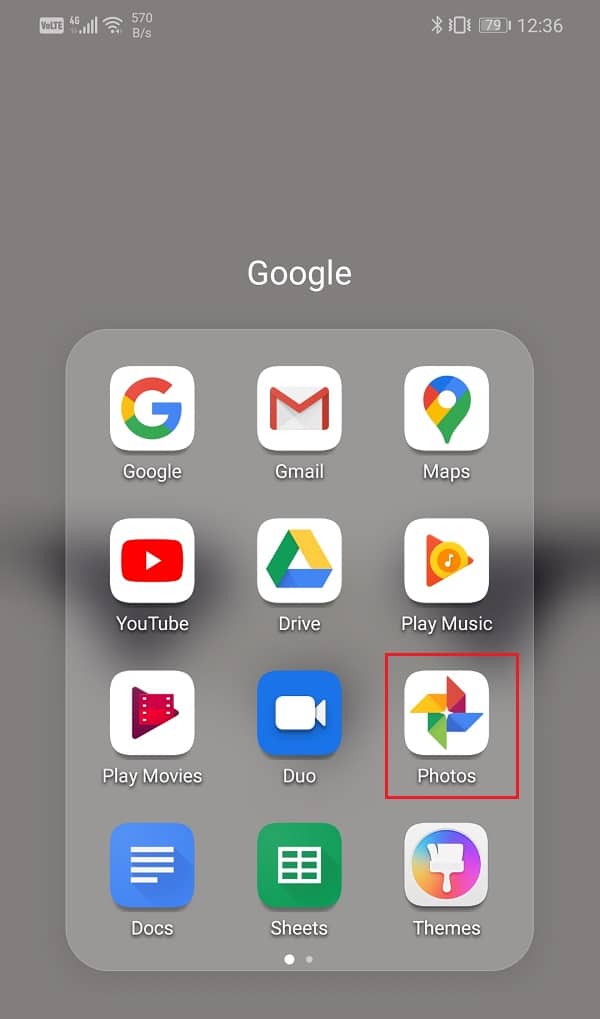
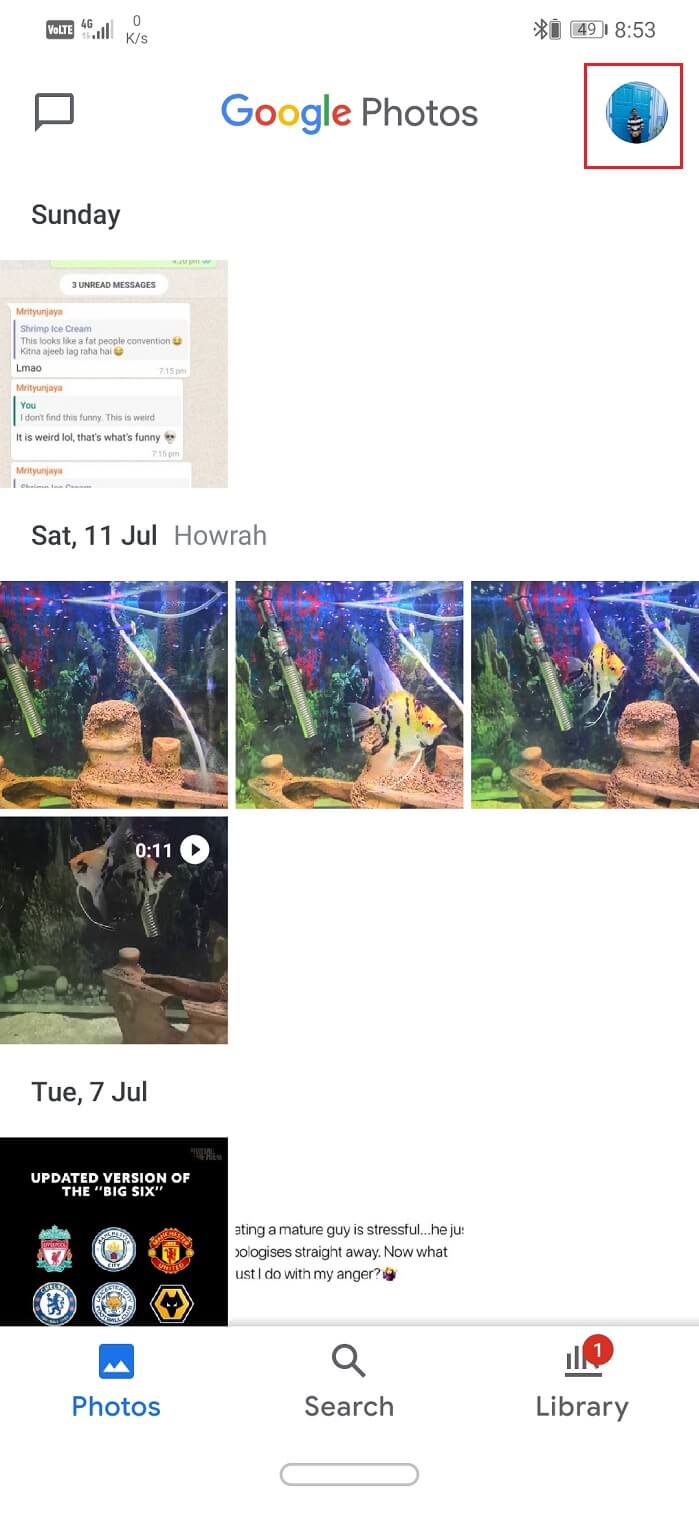
1. Innanzitutto, apri Google Foto sul dispositivo.
2. Ora tocca il tuo immagine del profilo in alto a destra angolo.
3. Successivamente, fare clic su Impostazioni foto opzione.
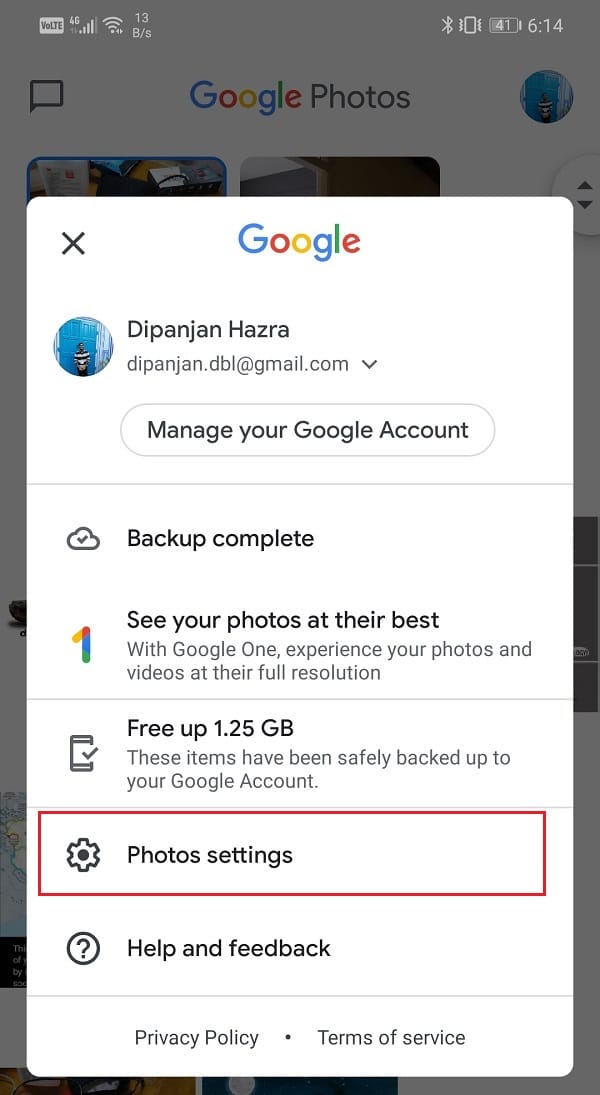
4. Qui, tocca il Backup e sincronizzazione opzione.
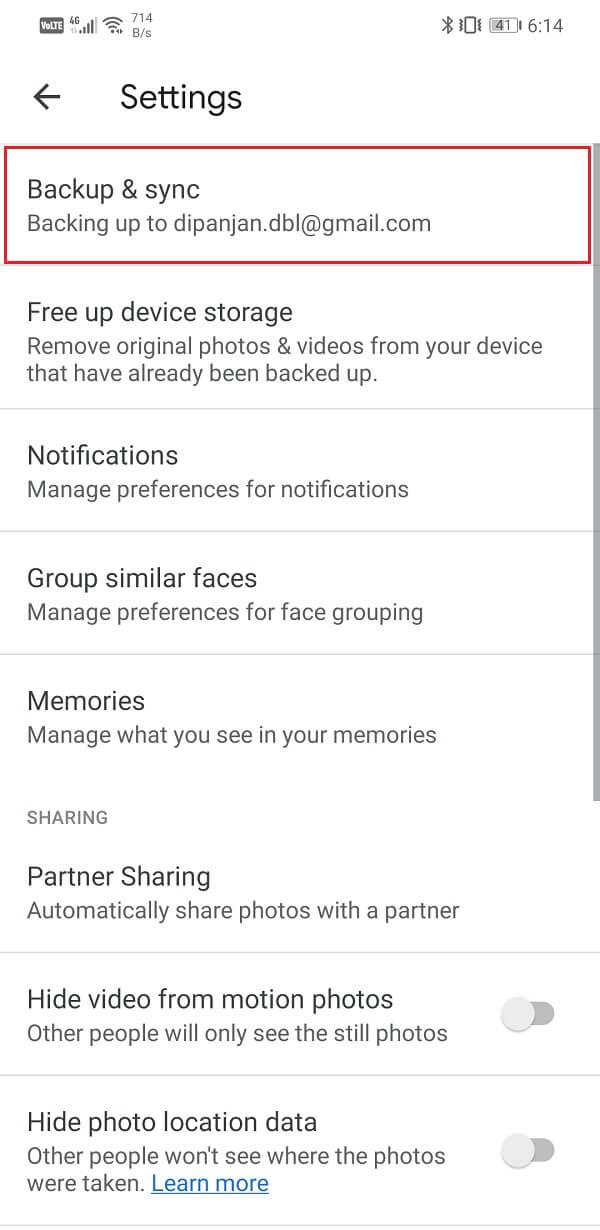
5. Adesso attiva l'interruttore accanto a Backup e sincronizzazione impostazione per abilitarlo.
6. See if this fixes Google Photos not uploading photos on Android issue, otherwise, proceed to the next solution in the list.
2. Make sure the Internet is working properly
La funzione di Google Foto è quella di scansionare automaticamente le foto del dispositivo e caricarle sul cloud storage, e per farlo è necessaria una connessione Internet stabile. Assicurati che la rete Wi-Fi a cui sei connesso funzioni correttamente. Il modo più semplice per verificare la connettività Internet è aprire YouTube e vedere se un video viene riprodotto senza buffering.
Oltre a ciò, Google Foto ha un limite dati giornaliero impostato per il caricamento di foto se utilizzi la rete dati. Questo limite dati esiste per garantire che i dati cellulari non vengano consumati eccessivamente. Tuttavia, se Google Foto non carica le tue foto, ti suggeriamo di disabilitare le restrizioni sui dati di qualsiasi tipo. Seguire i passaggi indicati di seguito per vedere come:
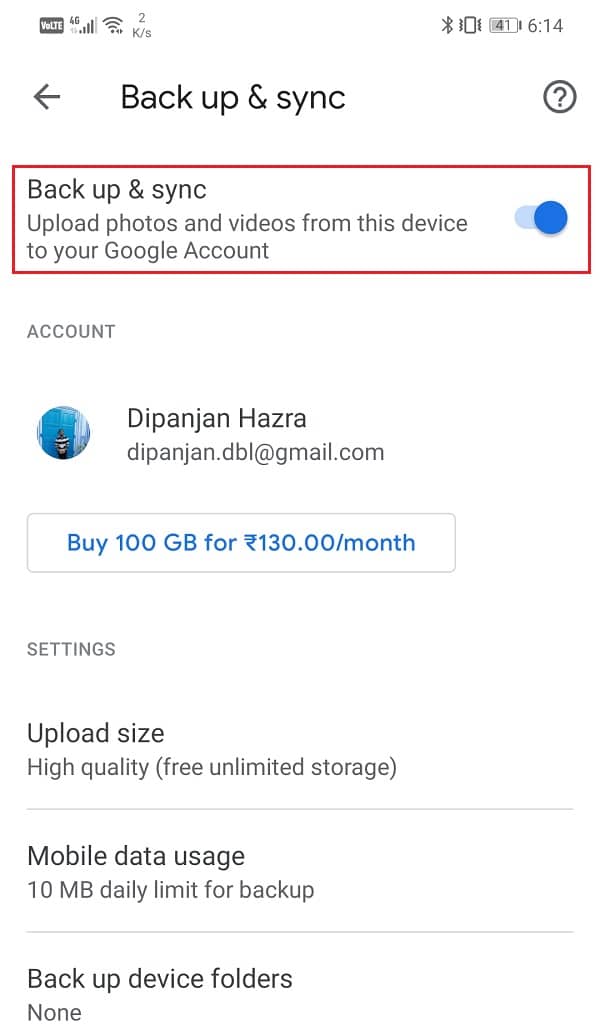
1. Aperto Google Foto sul dispositivo.
2. Adesso tocca la tua immagine del profilo nell'angolo in alto a destra.
3. Successivamente, fare clic su Impostazioni foto opzione.
4. Qui, tocca il Backup e sincronizzazione opzione.
5. Ora seleziona il Utilizzo dei dati mobili opzione.
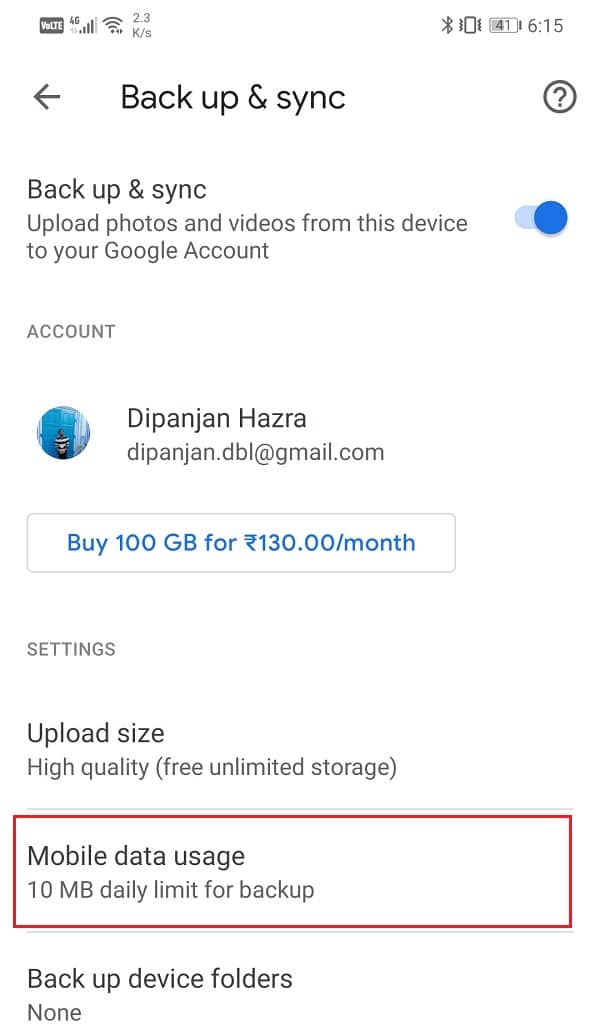
6. Qui, seleziona il Illimitato opzione sotto il limite giornaliero per la scheda Backup.

3. Aggiorna l'app
Ogni volta che un'app inizia a funzionare male, la regola d'oro dice di aggiornarla. Questo perché quando viene segnalato un errore, gli sviluppatori dell'app rilasciano un nuovo aggiornamento con correzioni di bug per risolvere i diversi tipi di problemi. È possibile che l'aggiornamento di Google Foto ti aiuti a risolvere il problema delle foto che non vengono caricate. Segui i passaggi indicati di seguito per aggiornare l'app Google Foto.
1. Vai alla Play Store.
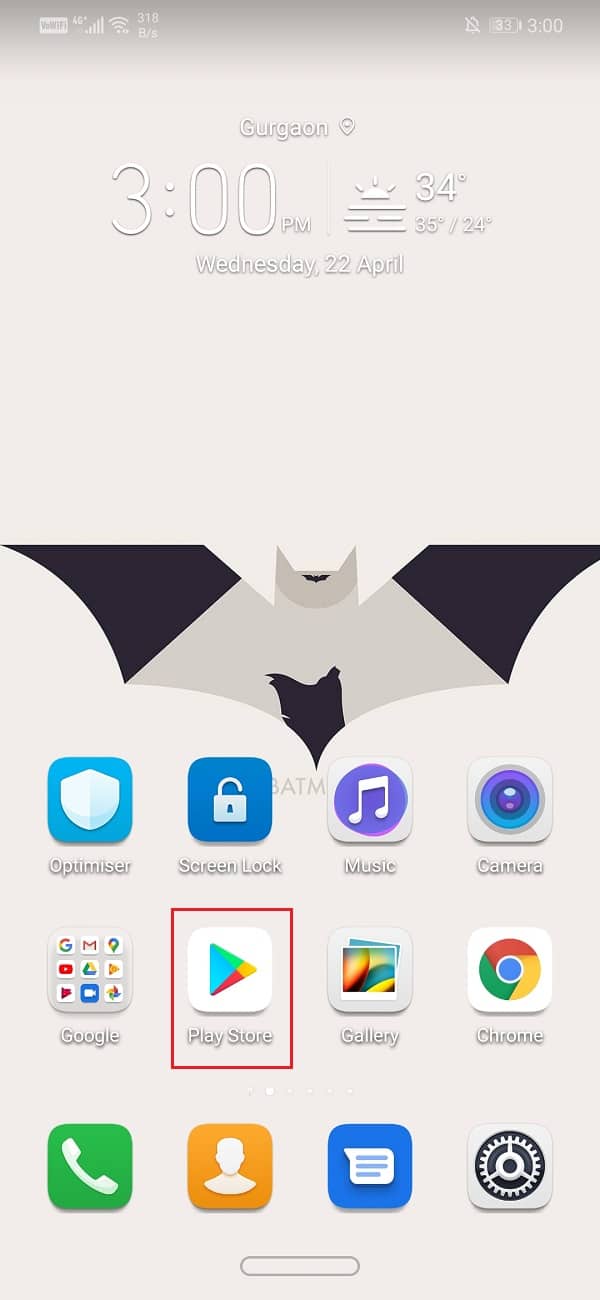
2. In alto a sinistra troverai tre linee orizzontali. Fare clic su di essi.
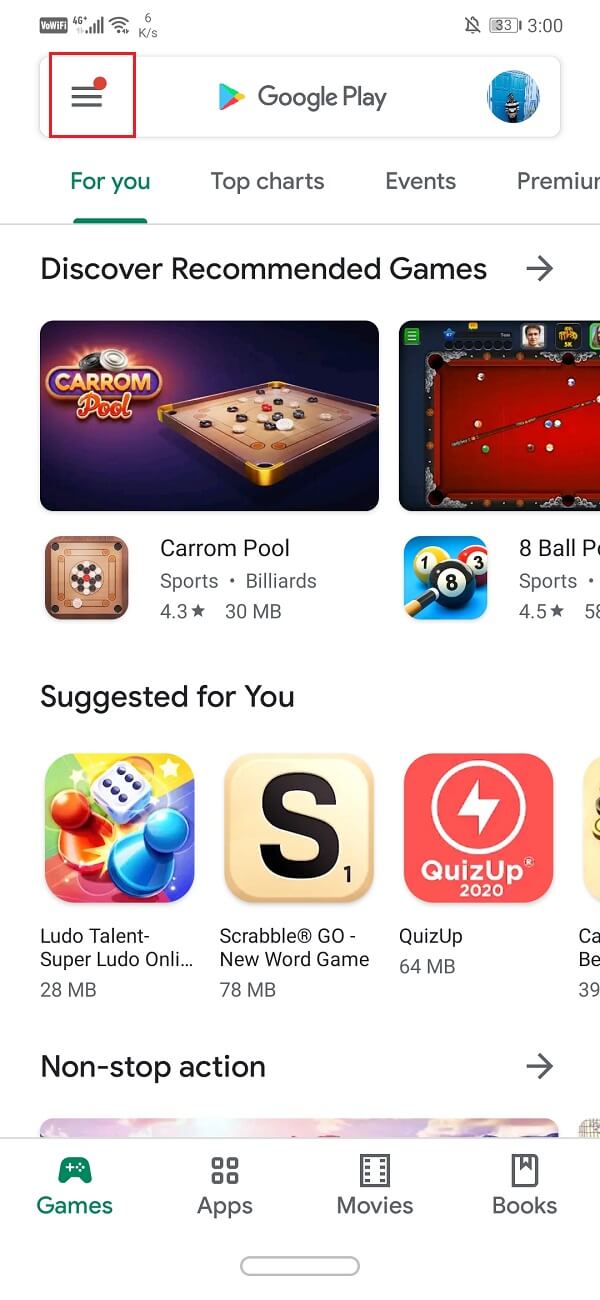
3. Ora, fare clic su "Le mie app e i miei giochi" opzione.
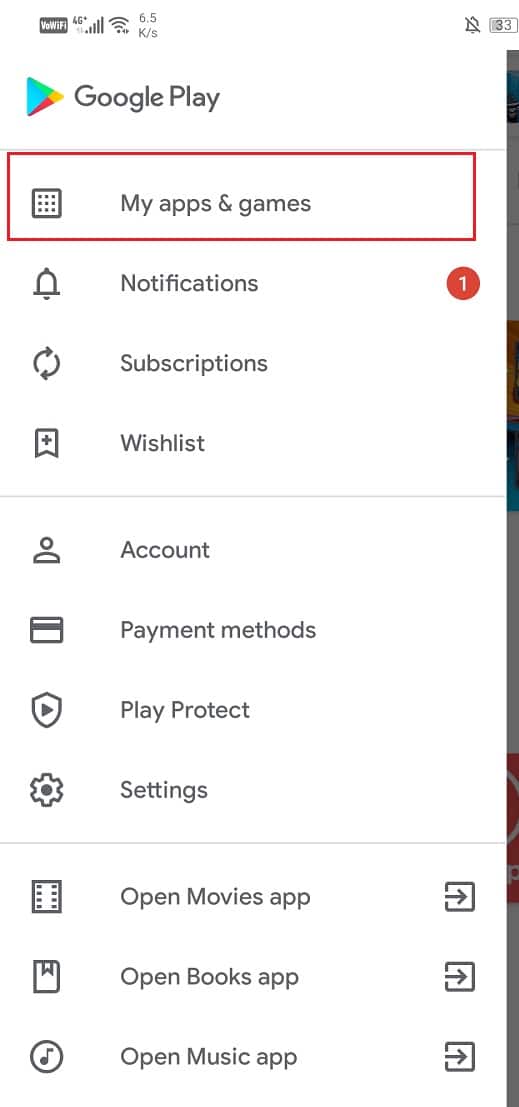
4. Cercare Google Foto e controlla se ci sono aggiornamenti in sospeso.
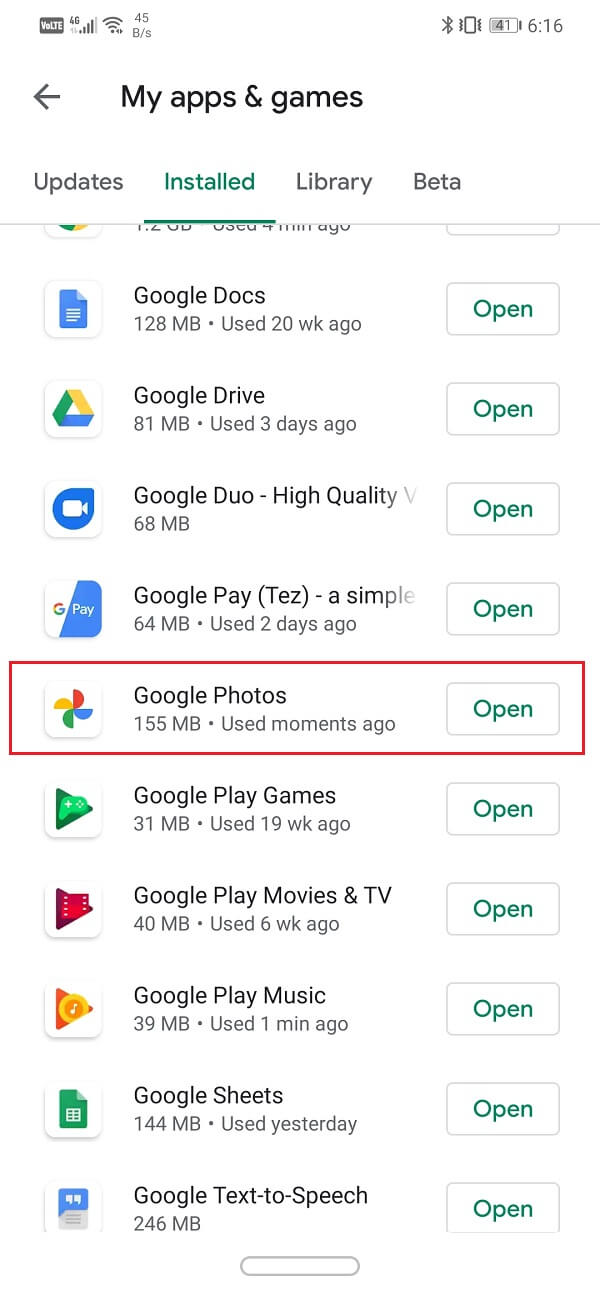
5. Se sì, fare clic su update pulsante.
6. Una volta aggiornata l'app, controlla se le foto vengono caricate come al solito o meno.
Leggi anche: How to Delete Apps on your Android phone
4. Clear Cache and Data for Google Photos
Un'altra soluzione classica a tutti i problemi relativi alle app Android è cancellare la cache e cancellare i dati per l'app malfunzionante. I file di cache vengono generati da ogni app per ridurre i tempi di caricamento dello schermo e consentire l'apertura dell'app più velocemente. Nel corso del tempo il volume dei file di cache continua ad aumentare. Questi file di cache vengono spesso danneggiati e causano il malfunzionamento dell'app. È buona norma eliminare di tanto in tanto la vecchia cache e i file di dati.
Ciò non influirà sulle foto o sui video salvati sul cloud. Lascerà semplicemente il posto a nuovi file di cache, che verranno generati una volta eliminati quelli vecchi. Segui i passaggi indicati di seguito per svuotare la cache e svuotare i dati dell'app Google Foto.
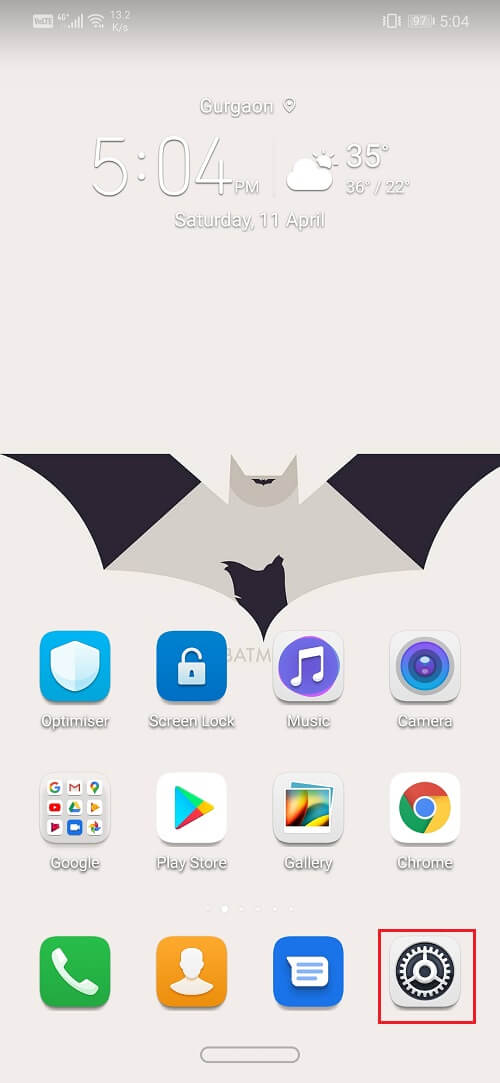
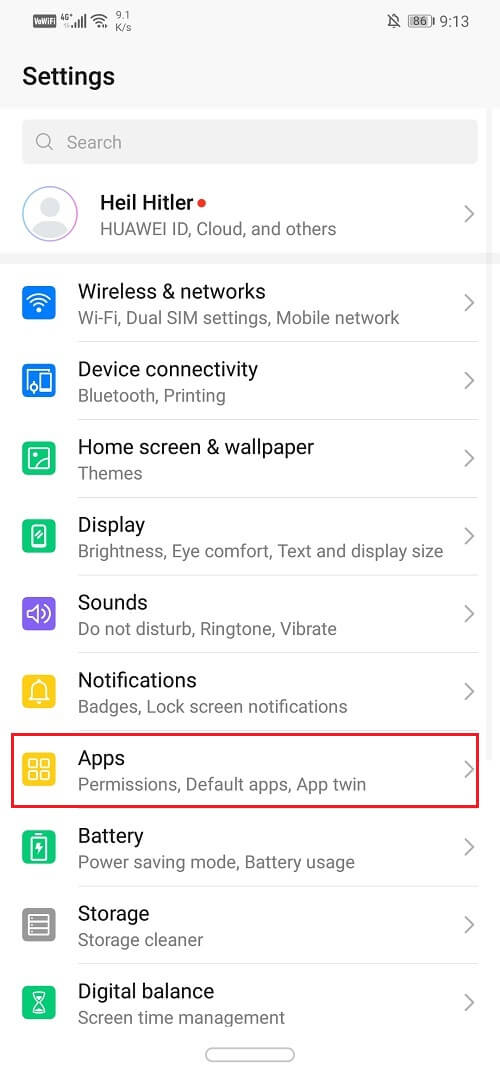
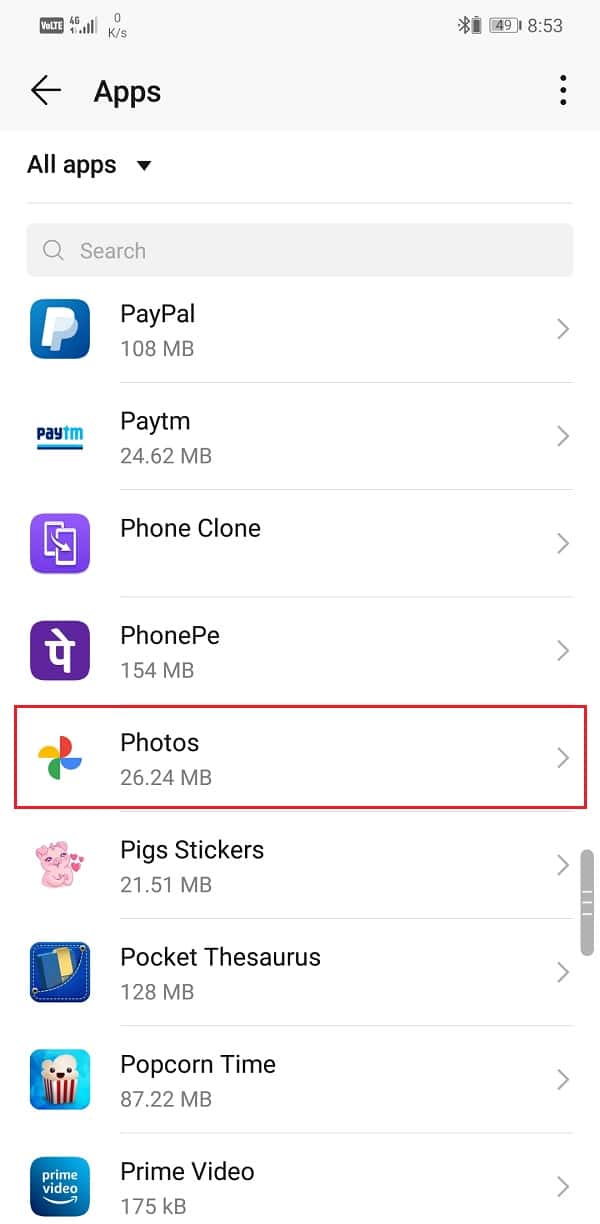
1. Vai alla Impostazioni profilo sul tuo telefono.
2. Clicca sul Apps opzione per visualizzare l'elenco delle app installate sul tuo dispositivo.
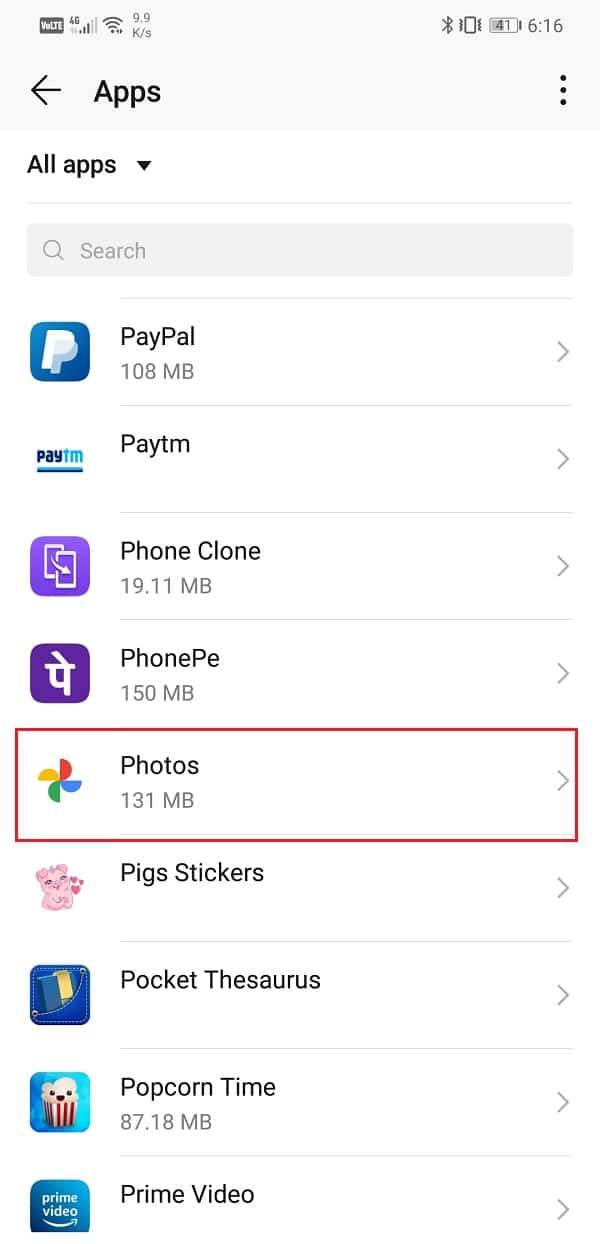
3. Ora cerca Google Foto and tap on it to open the app settings.
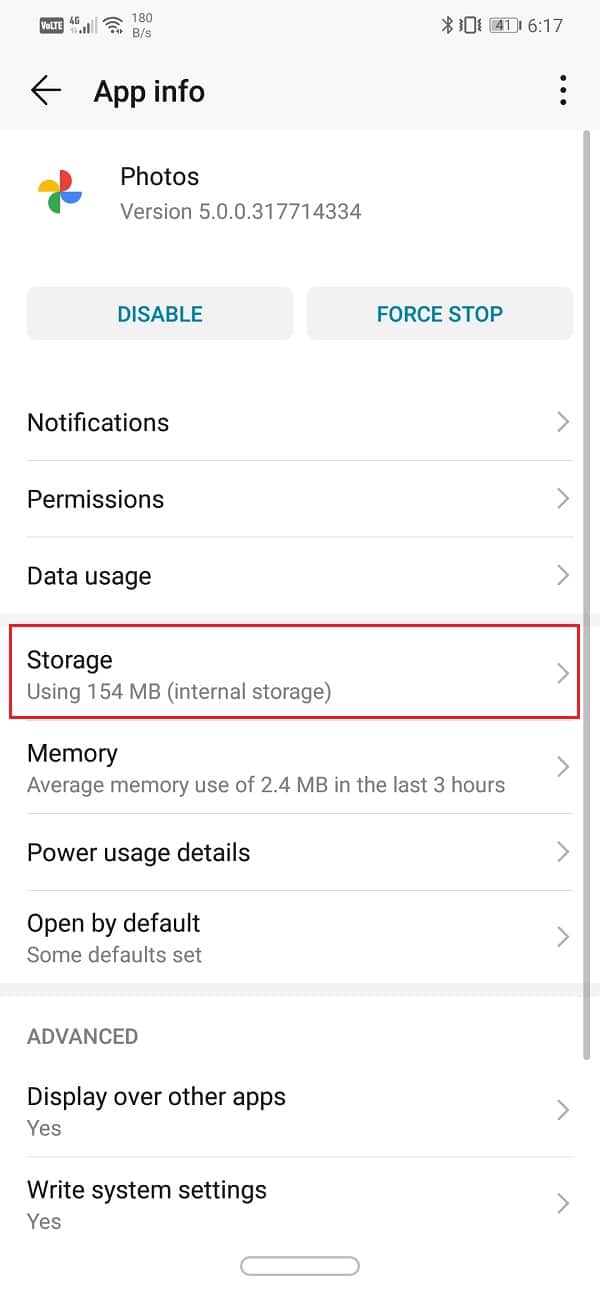
4. Clicca sul Archiviazione opzione.
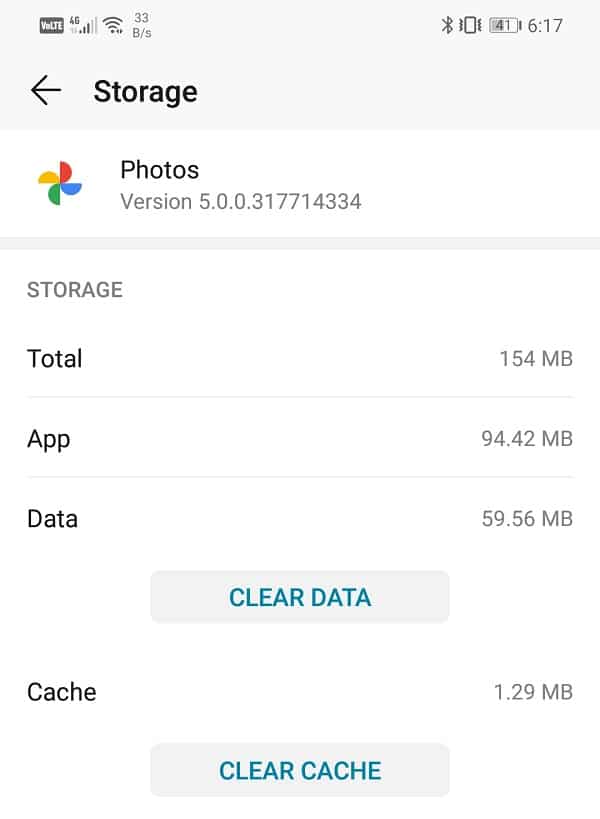
5. Qui troverai l'opzione per Cancella cache e cancella dati. Fare clic sui rispettivi pulsanti e i file della cache di Google Foto verranno eliminati.
5. Change the Upload Quality of Photos
Just like every other cloud storage drive, Google Photos has certain storage restrictions. You are entitled to free 15 GB di spazio di archiviazione sul cloud per caricare le tue foto. Oltre a ciò, dovrai pagare per qualsiasi spazio aggiuntivo che desideri utilizzare.
Queste però sono le condizioni per caricare foto e video nella loro qualità originale, cioè la dimensione del file rimane inalterata. Il vantaggio di scegliere questa opzione è che non vi è alcuna perdita di qualità dovuta alla compressione e otterrai esattamente la stessa foto nella sua risoluzione originale quando la scarichi dal cloud. È possibile che lo spazio libero che ti è stato assegnato sia stato completamente esaurito e quindi le foto non vengano più caricate.
Ora puoi pagare per spazio extra o scendere a compromessi con la qualità dei caricamenti per continuare a eseguire il backup delle tue foto sul cloud. Google Foto ha due opzioni alternative per la dimensione di caricamento e queste sono "Alta qualità" e "Express”. The most interesting point about these options is that they offer unlimited storage space.
If you are willing to compromise a little with the quality of the image, Google Photos will allow you to store as many photos or videos as you want. We would suggest you select a High-Quality option for future uploads. It compresses the image to a resolution of 16 MP, and videos are compressed to high definition. In case you are planning to print these images via Windows 11, then the quality of the print would be good up to 24 x 16 in.
This is quite good a deal in exchange for unlimited storage space. Follow the steps given below to alter your preference for the upload quality on Google Photos.
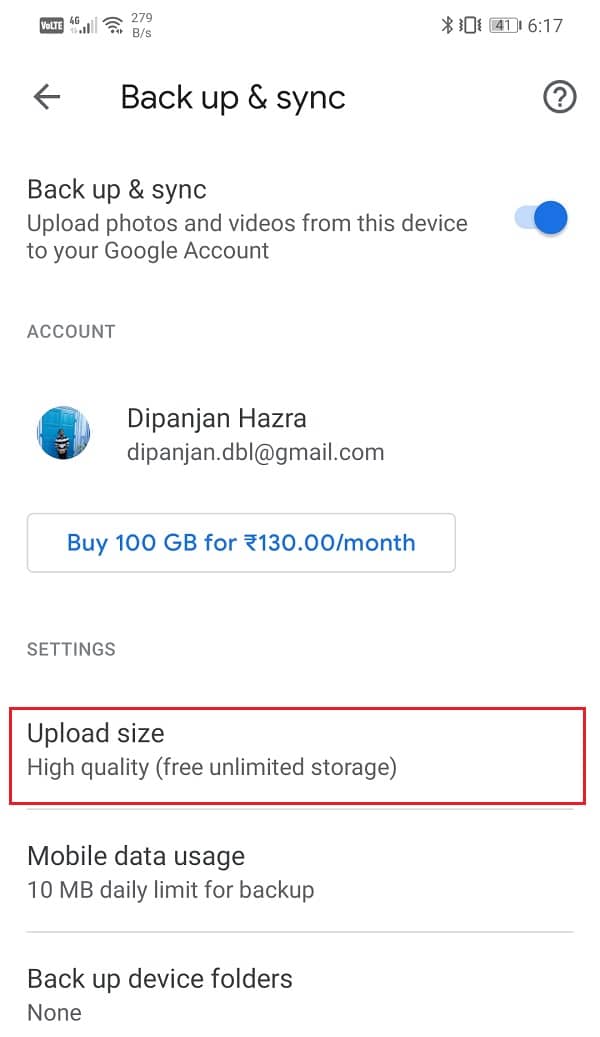
1. Innanzitutto, apri Google Foto sul dispositivo.
2. Ora tocca il tuo immagine del profilo nell'angolo in alto a destra.
3. Successivamente, fare clic su Impostazioni foto opzione.
4. Qui, tocca il Backup e sincronizzazione opzione.
5. In Impostazioni troverai l'opzione chiamata "Dimensioni caricamento". Cliccaci sopra.
6. Ora, tra le opzioni fornite, seleziona Alta qualità come scelta preferita per gli aggiornamenti futuri.
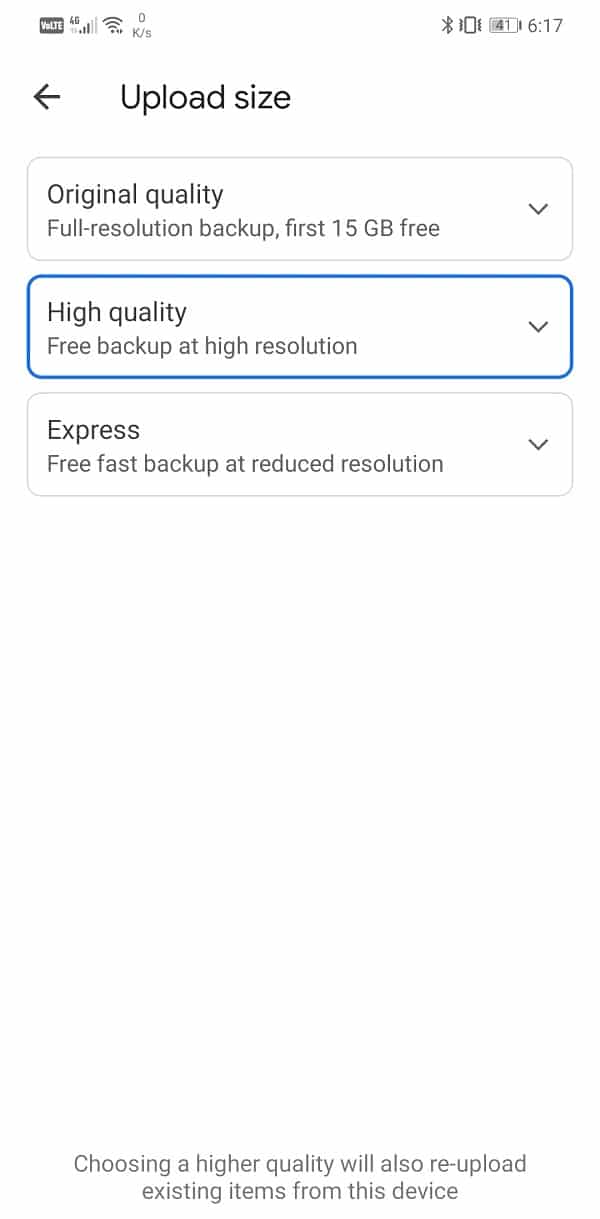
7. Ciò ti garantirà spazio di archiviazione illimitato e risolverà il problema delle foto che non vengono caricate su Google Foto.
6. Uninstall the App and then Re-install
If nothing else works, then it is probably time for a fresh start. Now, had it been some third-party app installed from the Play Store, then you could have just uninstalled the app. However, since Google Photos is a pre-installed system app, you can’t simply uninstall it. What you can do is uninstall updated for the app. This will leave behind the original version of the Google Photos app that was installed on your device by the manufacturer. Follow the steps given below to see how:
1. Apri il Impostazioni profilo sul tuo telefono.
2. Ora, seleziona il Apps opzione.
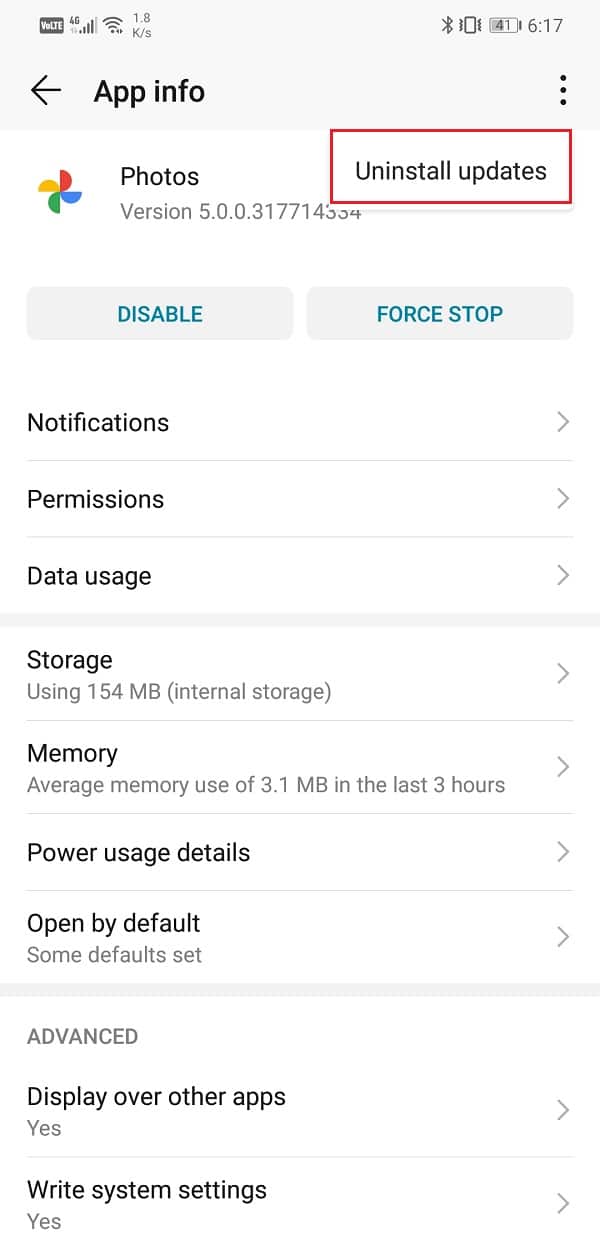
3. Ora, seleziona il App Google Foto dall'elenco delle app.
4. On the top right-hand side of the screen, you can see tre punti verticali, cliccaci sopra.
5. Infine, toccare il disinstallare gli aggiornamenti pulsante.
6. Now, you may need to riavvia il dispositivo dopodichè.
7. When the device starts again, open Google Foto.
8. You might be prompted to update the app to its latest version. Do it, and that should solve the problem.
Consigliato:
Well, that’ a wrap. We hope that you were able to find a suitable solution that fixed your problem. However, if you are still facing the same problem, then it is most likely due to server related issues on Google’s side. Sometimes, Google servers are down that prevent apps like Photos or Gmail to malfunction.
Since Google Photos uploads your photos and videos on the cloud, it needs access to the Google servers. If they are not working due to any technical complication, Google Photos will not be able to upload your photos on the cloud. The only thing that you can do is in this situation is to wait for some while and hope that the servers are back up soon. You can also write to Google Customer support to notify them about your problem and hope that they fix it as quickly as possible.

