Fix Windows Modules Installer Worker High CPU Usage
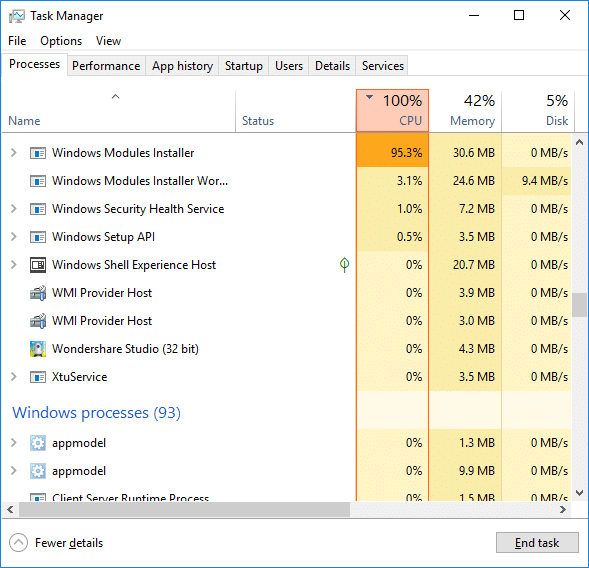
If you are facing the High CPU Usage by Windows Modules Installer Worker, then don’t worry as thousands of other users are also facing the similar problem and therefore, there are many working fixes which we will be discussing today in this article. To verify if you are facing this issue open Task Manager (Ctrl + Shift + Esc) and you will find that the Windows Modules Installer Worker is consuming High CPU or Disk Usage.

עצת Pro: You may leave your PC overnight or for a few hours to see the issue rectify itself once the Windows is finished downloading and installing updates.
What is Windows Modules Installer worker (WMIW)?
Windows Modules Installer worker (WMIW) is a service which takes cares of automatically installing Windows Update. According to its service description, WMIW is a system process that enables automatic installation, modification, and removal of Windows updates and optional components.
This process is responsible for finding new Windows Update automatically and installing them. As you might be aware that Windows 10 automatically install newer builds (i.e. 1803 etc.) via Windows Updates, so this process is responsible for installing these updates in the background.
Although this process is called Windows Modules Installer worker (WMIW) and you will see the same name in the Processes tab in the Task Manager, but if you switch to Details tab, then you will find the name of the file as TiWorker.exe.
Why Is Windows Modules Installer worker Using So Much CPU?
As Windows Modules Installer worker (TiWorker.exe) runs continuously in the background, sometimes it might utilize high CPU or disk usage when installing or uninstalling Windows Updates. But if its constantly using high CPU then the Windows Modules Installer worker may have become unresponsive while checking new updates. As a result, you may be experiencing lags, or your system might hang or freeze completely.
The first thing users do when they experience freezing, or lagging issues on their system is to restart their PC, but I assure you that this strategy won’t work in this case. This is because the issue will not resolve by itself until and unless you fix the underlying cause.
Fix Windows Modules Installer Worker High CPU Usage
הקפד ליצור נקודת שחזור למקרה שמשהו ישתבש.
Windows Modules Installer Worker (WMIW) is an important service, and it should not be disabled. WMIW or TiWorker.exe is not a virus or malware, and you cannot just delete this service from your PC. So without wasting any time let’s see How to Fix Windows Modules Installer Worker High CPU Usage בעזרת מדריך פתרון הבעיות המפורט למטה.
שיטה 1: הפעל את פותר הבעיות של Windows Update
1. הקש על מקש Windows + I כדי לפתוח הגדרות ואז לחץ על סמל עדכון ואבטחה.
![]()
2. מהתפריט השמאלי, בחר פתרון תחת “קום והולך" לחץ על Windows Update.
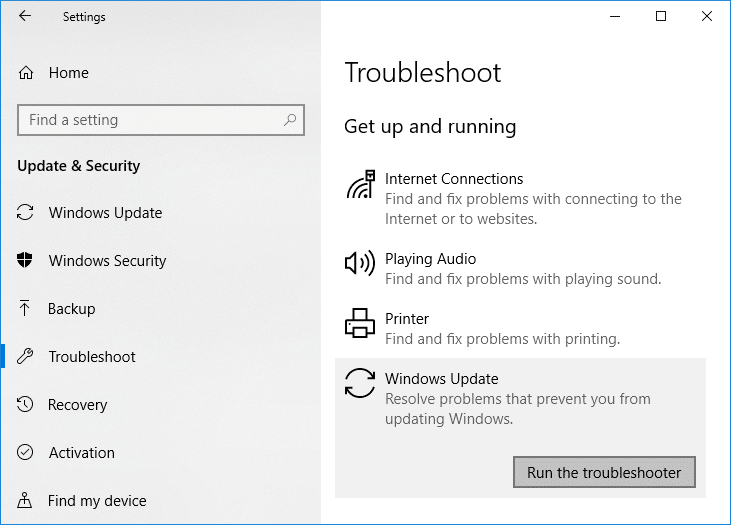
3. כעת לחץ על “הפעל את פותר הבעיות" תחת Windows Update.
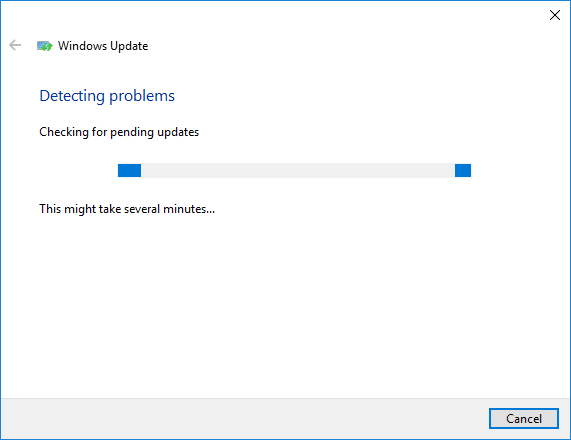
4. Let the troubleshooter run, and it will automatically fix any issues found with Windows Update taking forever.
Method 2: Manually Check for Windows Updates
1. הקש על מקש Windows + I ואז בחר עדכון ואבטחה.
2. בצד שמאל, לוחצים על התפריט Windows Update.
3. כעת לחץ על "בדקו אם יש עדכונים" כדי לבדוק אם יש עדכונים זמינים.

4. אם ממתינים עדכונים, לחץ על הורד והתקן עדכונים.

5. לאחר הורדת העדכונים, התקן אותם, ו-Windows שלך יהפוך לעדכני.
Method 3: Configure Windows Update to Manual
זְהִירוּת: This method will switch Windows Update from automatically installing the new updates to the manual. This means you have to manually check for Windows Update (weekly or monthly) to keep your PC secure. But follow this method, and you can again set the Updates to Automatic once the issue is resolved.
1. הקש על מקש Windows + R ואז הקלד services.msc ולחץ על Enter.

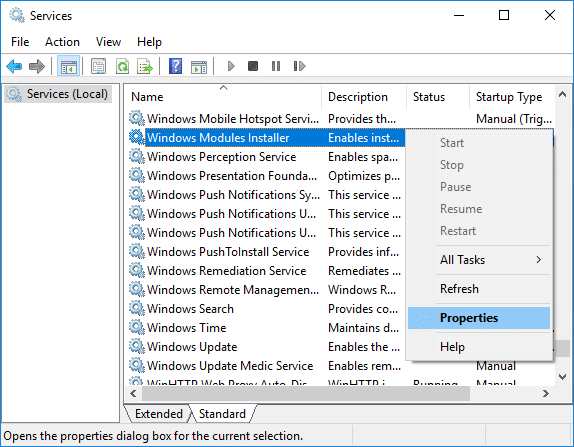
2. Scroll down and find מודולים של Windows Installer service in the list.
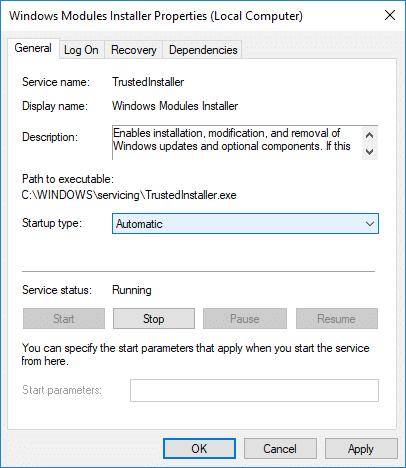
3. לחץ לחיצה ימנית על שירות Windows Modules Installer ובחר נכסים.
4. עכשיו לחץ על עצור then from the סוג הפעלה drop-down select מדריך ל.
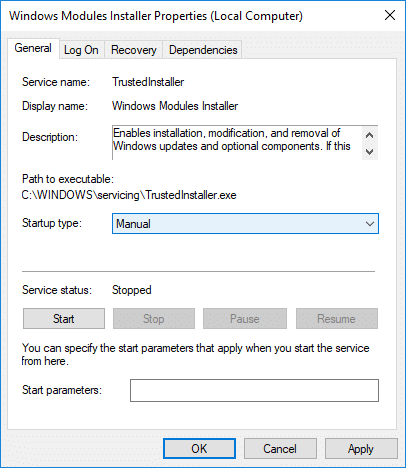
5. לחץ על החל ולאחר מכן לחץ על אישור.
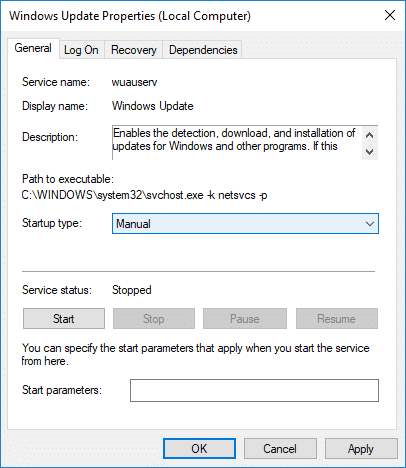
6. Similarly, follow the same step for the Windows Update service.
7. הפעל מחדש את המחשב כדי לשמור שינויים.
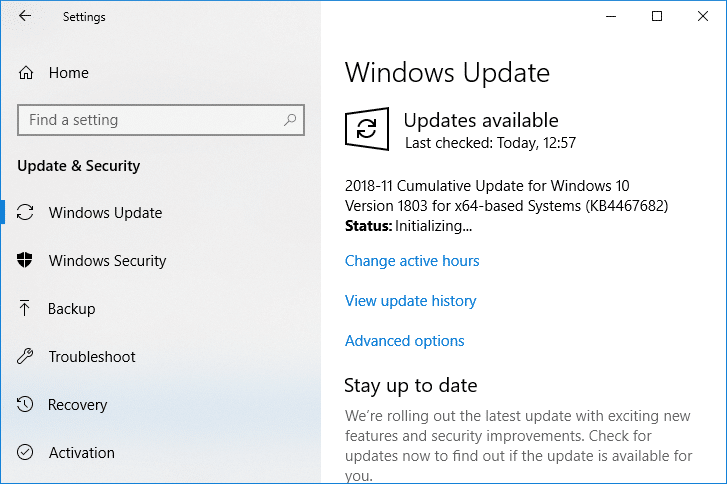
8. שוב לבדוק ל Windows Updates Manually and install any pending updates.
9. Once is done, again go back to services.msc window and open the Windows Modules Installer & Windows Update Properties חלון.
10. הגדר את סוג הפעלה ל מכני עם סלילה אוטומטית ולחץ על הַתחָלָה. Then click Apply followed by OK.
11. הפעל מחדש את המחשב כדי לשמור שינויים.
שיטה 4: הפעל את פותר הבעיות בתחזוקת המערכת
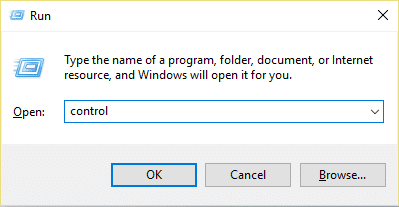
1. הקש על מקש Windows + R ואז הקלד control והקש על Enter כדי לפתוח לוח בקרה.
2. חפש פתרון בעיות ולחץ על פתרון תקלות.

3. לאחר מכן לחץ על כל המוצרים בחלונית השמאלית.
4. לחץ על “System Maintenance” להפעיל את System Maintenance Troubleshooter.

5. פותר הבעיות עשוי להיות מסוגל Fix Windows Modules Installer Worker High CPU Usage, but if it didn’t, then you need to run System Performance Troubleshooter.
6. פתח את שורת הפקודה. המשתמש יכול לבצע שלב זה על ידי חיפוש 'cmd' ולאחר מכן הקש Enter.

7. הקלד את הפקודה הבאה ב-cmd והקש Enter:
msdt.exe / מזהה
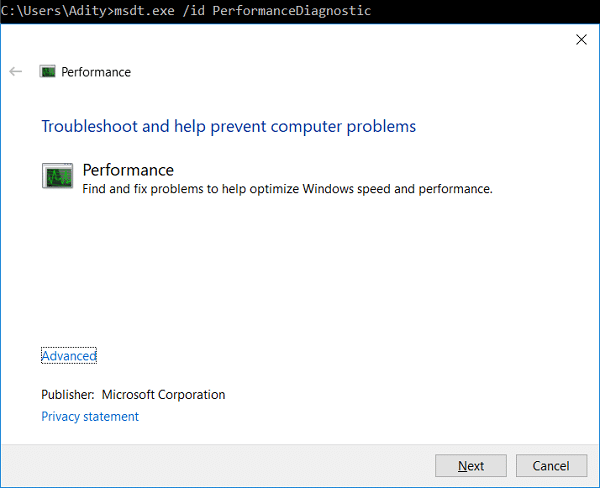
8. Follow the on-screen instruction to run the troubleshooter and fix any issues find the System.
9. Finally, exit the cmd and reboot your PC.
Method 5: Disable Automatic Maintenance
Sometimes Automatic Maintenance can conflict with the Windows Modules Installer Worker service, so try to disable Automatic Maintenance using this guide and see if this fixes your issue.
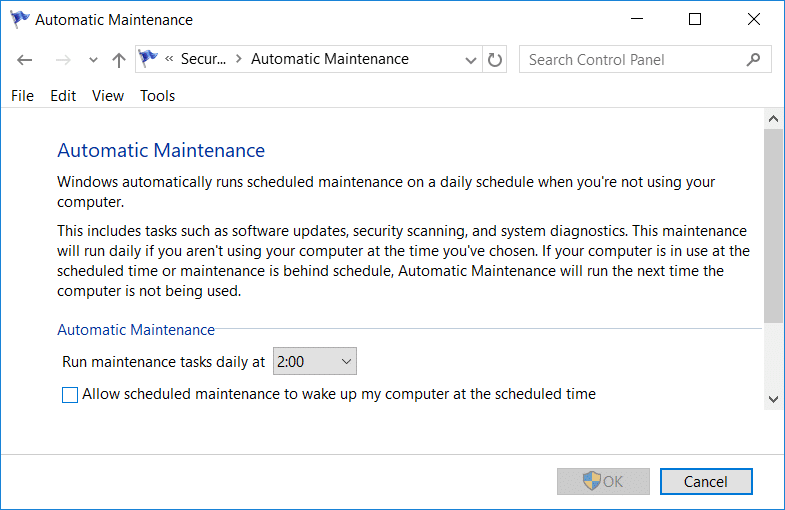
Although disabling Automatic Maintenance is not a good idea, but there might be some case where you need to actually disable it, for example, if your PC freezes during automatic maintenance or Windows Modules Installer Worker High CPU Usage issue then you should disable maintenance to troubleshoot the issue.
Method 6: Run System File Checker and DISM
1. פתח את שורת הפקודה. המשתמש יכול לבצע שלב זה על ידי חיפוש 'cmd' ולאחר מכן הקש Enter.
2. כעת הקלד את הדברים הבאים ב-cmd ולחץ על Enter:
Sfc /scannow sfc /scannow /offbootdir=c: /offwindir=c:windows (אם למעלה נכשל אז נסה את זה)

3. המתן לסיום התהליך שלמעלה ולאחר שתסיים, הפעל מחדש את המחשב.
4. פתח שוב את cmd והקלד את הפקודה הבאה ולחץ על Enter אחרי כל אחת מהן:
Dism /Online /Cleanup-Image /CheckHealth Dism /Online /Cleanup-Image /ScanHealth Dism /Online /Cleanup-Image /RestoreHealth

5. תן לפקודה DISM לפעול והמתן עד שהיא תסתיים.
6. אם הפקודה שלמעלה לא עובדת, נסה את הפקודה הבאה:
Dism /Image:C:offline /Cleanup-Image /RestoreHealth /Source:c:testmountwindows Dism /Online /Cleanup-Image /RestoreHealth /Source:c:testmountwindows /LimitAccess
הערה: החלף את ה-C:RepairSourceWindows במקור התיקון שלך (דיסק התקנה או שחזור של Windows).
7. הפעל מחדש את המחשב כדי לשמור שינויים ולראות אם אתה מסוגל לעשות זאת Fix Windows Modules Installer Worker High CPU Usage.
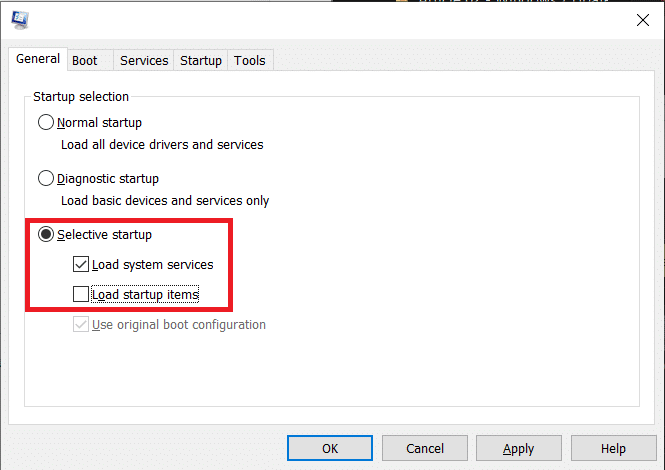
שיטה 7: בצע אתחול נקי
Sometimes 3rd party software can conflict with Windows and can cause the issue. To Fix Windows Modules Installer Worker High CPU Usage issue, עליך לבצע אתחול נקי במחשב האישי שלך ולאבחן את הבעיה שלב אחר שלב.
Method 8: Set your WiFi as Metered Connection
הערה: This will stop Windows Automatic Update, and you will need to manually check for Updates.
1. הקש על מקש Windows + I כדי לפתוח הגדרות ואז לחץ על רשת ואינטרנט.

2. מהתפריט השמאלי, בחר Wi-Fi.
3. Under Wi-Fi, קליק on your currently connected network (WiFi).
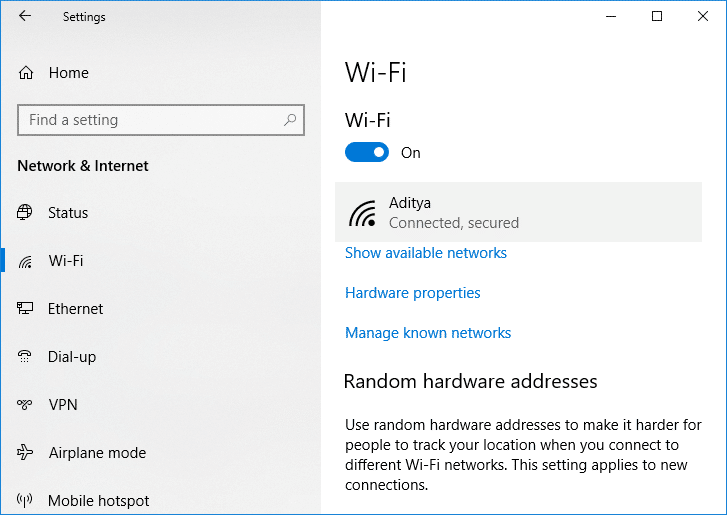
4. Scroll down to Metered connection and הפעל את המתג תחת “הגדר כהגדרת מדרג
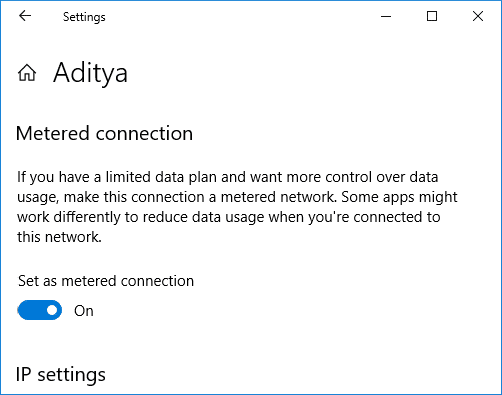
5. Close Settings and reboot your PC to save changes.
מומלץ:
זהו, יש לך בהצלחה Fix Windows Modules Installer Worker High CPU Usage אבל אם עדיין יש לך שאלות כלשהן בנוגע למדריך זה, אל תהסס לשאול אותם בקטע של התגובה.
