כיצד לתקן שגיאת בדיקת DHCP נכשלה ב-Chromebook

Do you get the DHCP lookup failed error in Chromebook when you are attempting to connect to a network? No need to worry! Through this guide, you are going to learn how to fix DHCP Lookup Failed error in Chromebook.
מהו Chromebook? What is DHCP Lookup Failed error in Chromebook?
Chromebook is a new generation of computers that are designed to execute tasks in a manner that is quicker and easier than the existing computers. They run on Chrome מערכת הפעלה that includes the finest features of Google along with cloud storage, and enhanced data protection.
Dynamic Host Configuration Protocol, abbreviated as DHCP, is a mechanism for device configuration on the internet. It allocates IP addresses and allows default gateways to facilitate quick and smooth connections between various devices on the IP network. This error pops up while connecting to a network. It basically means that your device, in this case, Chromebook, is not able to retrieve any information related to IP addresses from the DHCP server.
כיצד לתקן שגיאת בדיקת DHCP נכשלה ב-Chromebook
What causes DHCP Lookup Failed שגיאה in Chromebook?
There are not many known causes of this issue. However, some of them are:
- VPN – VPN masks your IP address and may cause this issue.
- Wi-Fi extenders – They generally don’t gel well with Chromebooks.
- Modem/Router Settings – This too, will cause connectivity problems and result in DHCP Lookup failed error.
- מערכת ההפעלה של Chrome מיושנת – Using an outdated version of any operating system is bound to create problems on the associated device.
Let’s get to fixing this error with the easiest and quickest methods explained below.
Method 1: Update Chrome OS
Updating your Chromebook from time to time is a great way to fix any errors related to Chrome OS. This would keep the operating system in tune with the latest software and will also prevent glitches and crashes. You can rectify Chrome OS-related issues by upgrading the firmware as:
1. כדי לפתוח את הודעה בתפריט, לחץ על זְמַן icon from the bottom-right corner.
2. כעת, לחץ על ציוד icon to access הגדרות Chromebook.
3. From the left panel, select the option titled אודות מערכת ההפעלה של Chrome.
4. לחץ בדקו אם יש עדכונים button, as highlighted.
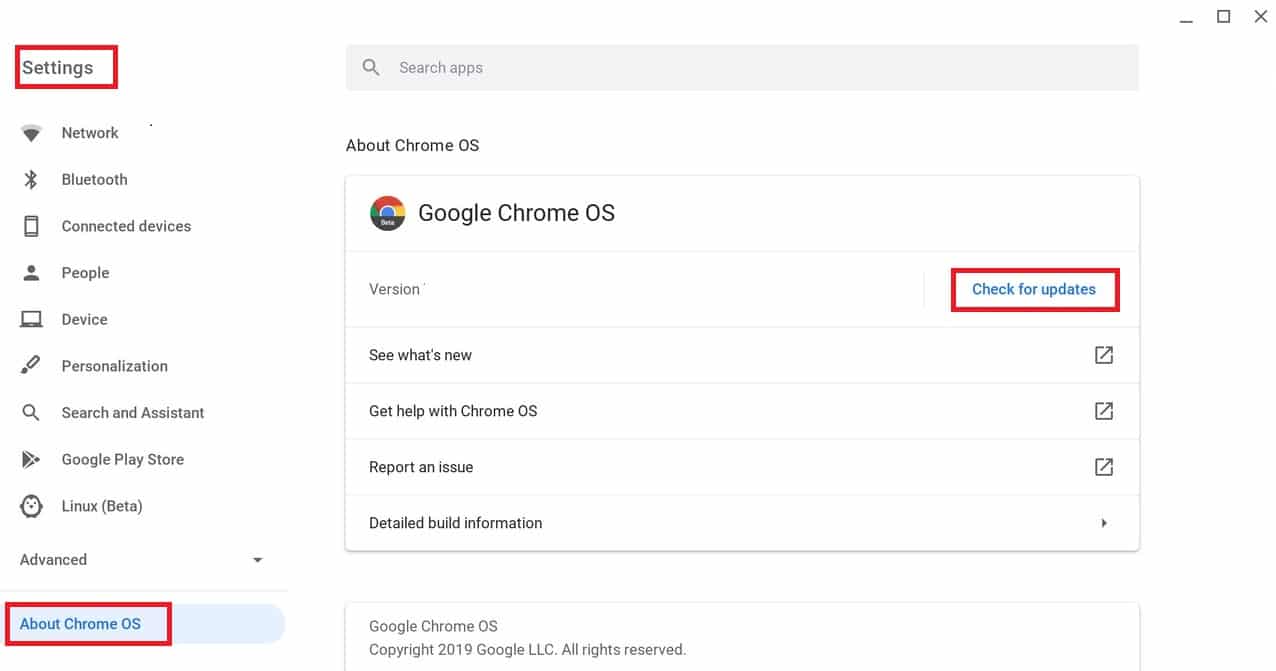
5. הפעל מחדש the PC and see whether the DHCP lookup issue is resolved.
גם לקרוא: כיצד להסיר חשבון מ-Chromebook
Method 2: Restart Chromebook and router
Restarting devices is an efficient way to fix minor errors, as it gives your device time to reset itself. Hence, in this method, we are going to restart both, router and Chromebook to possibly fix this issue. Just follow these simple steps:
1. ראשית, לכבות את ה-Chromebook.

2.לכבות the modem/router and לנתק זה מאספקת החשמל.
3. חכה a few seconds before you מחדש it to the power source.
4. חכה for the lights on the modem/router to stabilize.
5. עכשיו, להדליק the Chromebook and לְחַבֵּר it to the Wi-Fi network.
Verify if the error DHCP lookup failed in Chromebook is fixed. If not, try the next solution.
גם לקרוא: Fix DHCP is not enabled for WiFi in Windows 10
Method 3: Use Google Name Server or Automatic Name Server
The device will display the DHCP lookup error if it is unable to interact with the DHCP server or IP addresses on a שרת ה- DNS. Therefore, you can use the Google Name server or Automatic Name Server to solve this problem. Let’s see how to do this:
Option 1: Using Google Name Server
1. נווט ל Chrome Network settings מ תפריט הודעות כפי שהוסבר ב השיטה 1.
2. תַחַת הגדרות רשת, בחר את Wi-Fi אוֹפְּצִיָה.
3. לחץ על חץ ימני available next to the רשת to which you are unable to connect.
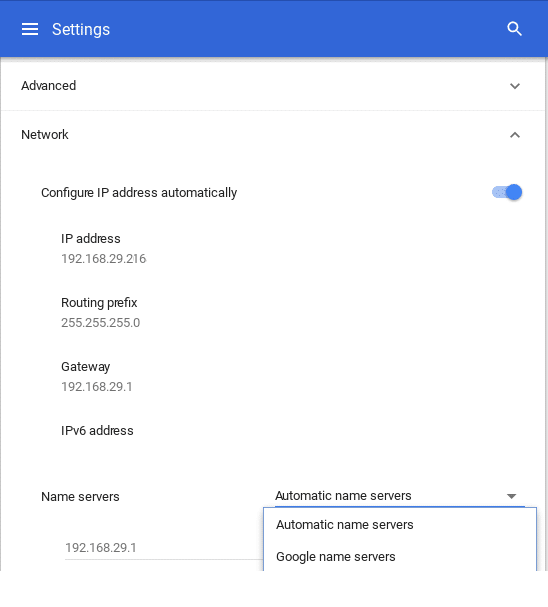
4. Scroll down to locate and select the שם שרת אוֹפְּצִיָה.
5. לחץ הנפתח תיבה ובחר Google Name Servers from the given menu, as shown.
Check whether the Samsung TV Wi-Fi connection issue has been rectified by reconnecting it to the Wi-Fi network.
Option 2: Using Automatic Name Server
1. If the DHCP lookup failed error persists even after utilizing Google Name Server, הפעלה מחדש ה-Chromebook.
2. כעת, המשך ל- הגדרות רשת page as you did earlier.
3. גלול מטה אל ה- שם שרתים label. This time, choose Automatic Name Servers from the drop-down menu. Refer to pic given above for clarity.
4. התחבר מחדש to the Wi-Fi- network and verify if the DHCP problem has been resolved.
Option 3: Using Manual Configuration
1. If using either server didn’t solve this problem, go to the הגדרות רשת שוב פעם.
2. Here, toggle off the הגדר את כתובת ה- IP באופן אוטומטי אפשרות, כפי שמתואר.
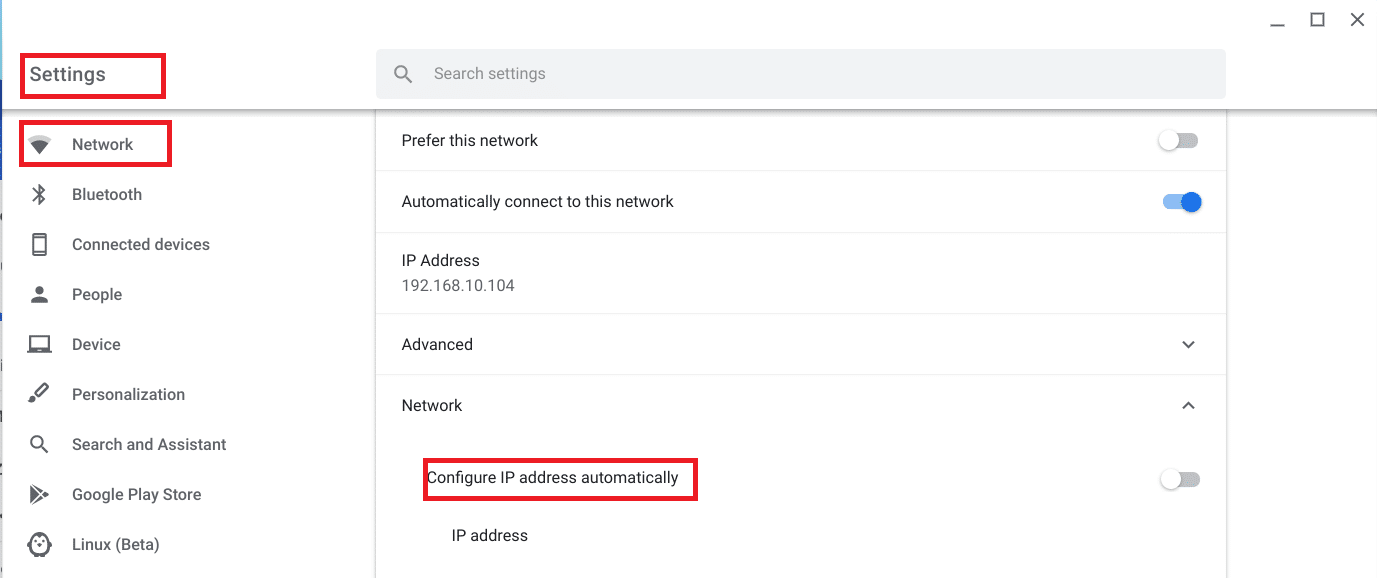
3. כעת, הגדר את Chromebook IP address manually.
4. הפעל מחדש the device and reconnect.
The DHCP lookup failed error in Chromebook error should be fixed by now.
Method 4: Reconnect to the Wi-fi network
Another easy method to fix DHCP lookup failed error in Chromebook is to disconnect it from your Wi-Fi network and reconnect it afterward.
Let’s see how you can do this:
1. לחץ Wi-Fi symbol in the lower right corner of the Chromebook screen.
2. בחר שלך Wi-Fi network name. Click on הגדרות.
3. In the Network Settings window, נתק הרשת.
4. הפעל מחדש ה-Chromebook שלך.
5. לבסוף, לְחַבֵּר it to the same network and continue using the device as usual.
Move to the next method if this does not fix the DHCP lookup failed error in Chromebook.
גם לקרוא: תקן גישה מוגבלת או ללא קישוריות WiFi ב-Windows 10
Method 5: Change Frequency Band of the Wi-Fi network
It is possible that your computer doesn’t support the Wi-Fi frequency that your router offers. However, you can change frequency settings manually to meet the frequency standards of the network, if your service provider supports this change. Let’s see how to do this:
1. לְהַשִׁיק Chrome ונווט אל router website. התחבר לחשבון שלך.
2. נווט אל הגדרות אלחוטיות לחץ על הכרטיסייה ובחר את החלף להקה אוֹפְּצִיָה.
3. לבחור 5GHz, if the default setting was 2.4GHz, או להפך.
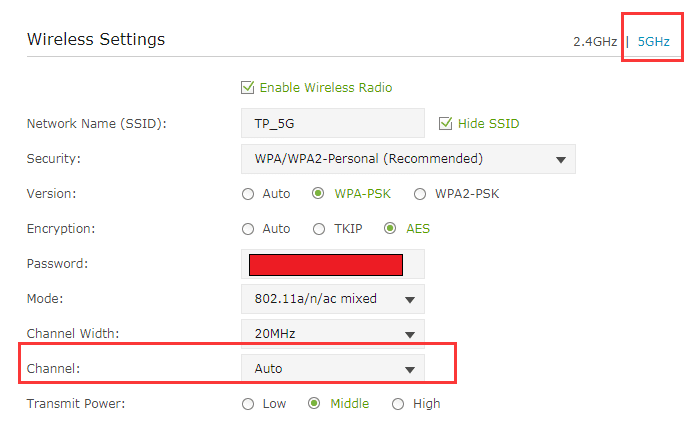
4. לבסוף, להציל all changes and exit.
5. הפעל מחדש your Chromebook and connect to the network.
Check whether the DHCP issue is now rectified..
Method 6: Increase DHCP range of Network Address
We observed that removing certain devices from the wi-fi network or manually increasing the number of devices limit helped rectify this issue. Here’s how to do it:
1. In any דפדפן אינטרנט, נווט אל שלך router website ו התחבר עם האישורים שלך.
2. המשך אל הגדרות DHCP TAB.
3. הרחב את ה- DHCP IP range.
For example, if the higher range is 192.168.1.250, expand it to 192.168.1.254, כפי שמוצג.
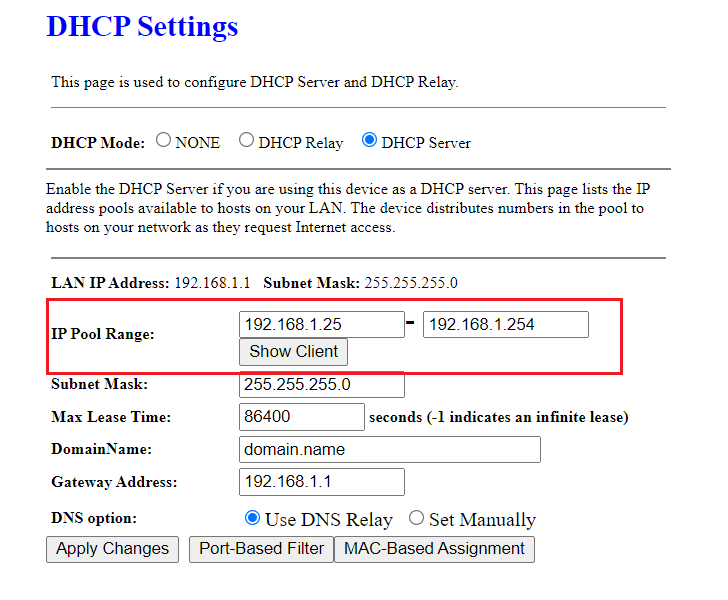
4. שמור השינויים ו יציאה דף האינטרנט.
If the error DHCP lookup failed still pops up, you could try any of the succeeding methods.
Method 7: Disable VPN to fix DHCP Lookup Failed error in Chromebook
If you use a proxy or a VPN to connect to the internet, it may cause conflict with the wireless network. Proxy and VPN have been known to cause DHCP lookup failed error in Chromebook on numerous occasions. You can turn it off temporarily to fix it.
1. לחץ באמצעות לחצן העכבר הימני על ה- VPN client.
2. למתג כבוי the VPN, as highlighted.
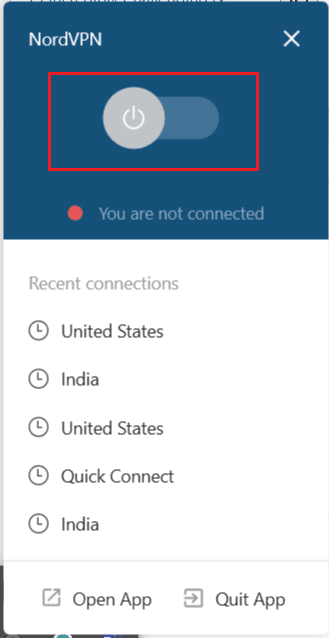
3. Alternatively, you can הסרה it, if it is no longer needed.
גם לקרוא: לא ניתן להגיע לאתר תיקון, לא ניתן למצוא את ה-IP של השרת
Method 8: Connect without Wi-Fi Extender and/or Repeater
Wi-fi extenders or repeaters are great when it comes to extending the Wi-Fi connectivity range. However, these devices have also been known to cause certain errors like the DHCP lookup error. Therefore, make sure that you connect to Wi-Fi straight from the router.
Method 9: Use Chromebook Connectivity Diagnostics
If you can still connect to the DHCP server and are still getting the same error message, Chromebook comes with an in-built Connectivity Diagnostics tool that will assist you in diagnosing and resolving connectivity issues. Here’s how you can use it:
1. Search for diagnostics in the Start Menu.
2. Click on the Chromebook Connectivity Diagnostics from the search results.
3. לחץ Run Diagnostics link to start running the tests.
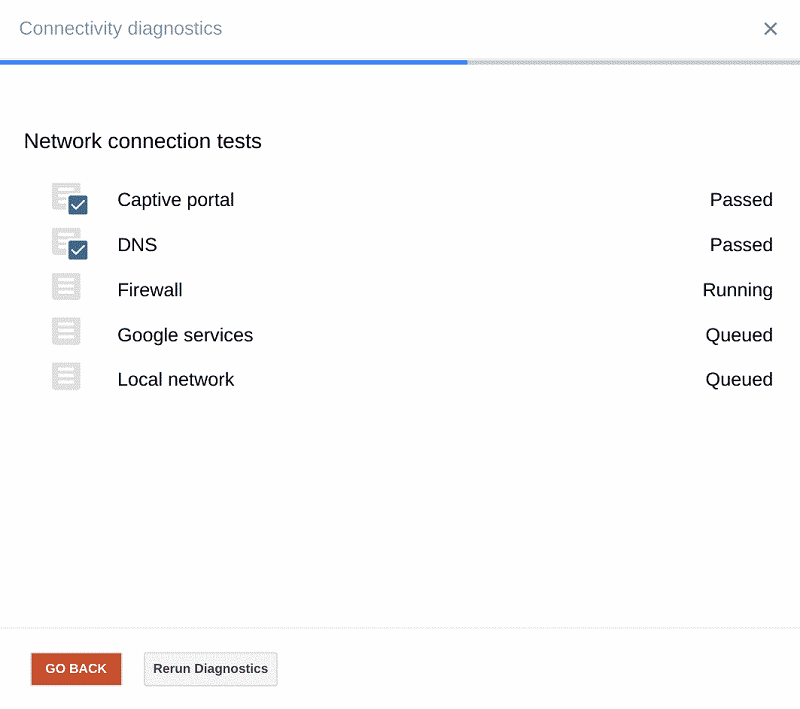
4. The app performs the following tests one by one:
- פורטל שבוי
- DNS
- Firewall
- שירותי Google
- רשת מקומית
5. Allow the tool to diagnose the issue. The connection diagnostics tool will perform a variety of tests and rectify issues אם בכלל.
Method 10: Remove all Preferred Networks
Chromebook OS, like any other operating system, retains network credentials to allow you to connect to the same network without entering the password every time to do so. As we connect to more Wi-Fi networks, Chromebook keeps storing more & more passwords. It also creates a list of preferred networks depending on past connections and data usage. This causes network stuffing. Hence, it is advisable to remove these saved preferred networks and check if the issue persists. Follow the steps given below to do the same:
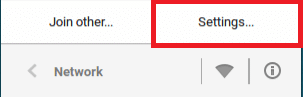
1. עבור ל אזור סטטוס on your screen and click the רשת Icon then select הגדרות.
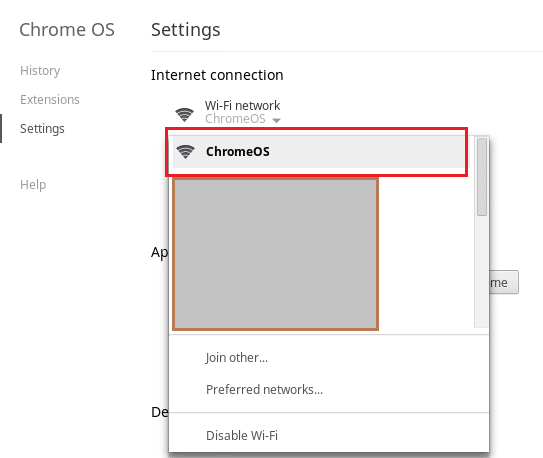
2. בתוך ה חיבור לאינטרנט option, you will find a Wi-Fi network. Click on it.
3. לאחר מכן, בחר רשתות מועדפות. A complete list of all saved networks will be shown here.
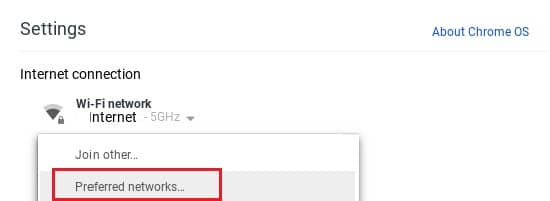
4. When you hover over the names of the network, you will see an X mark. Click on it to להסיר the preferred network.

6. Repeat this process to להסיר each Preferred Network בנפרד.
7. Once the list is cleared, connect to the desired Wi-Fi network by verifying the password.
This should solve the DHCP lookup failed issue. If it doesn’t, proceed to the next solution.
Method 11: Reset the Router to fix DHCP Lookup Failed error in Chromebook
The DHCP problem might be caused by corrupt firmware on your router/modem. In such cases, you can always reset the router by pressing the reset button of the router. This restores the router to default settings and might fix the DHCP lookup failed in Chromebook error. Let’s see how to do it:
1. להדליק your router/modem
2. אתר את ריזt button. It is a tiny button located on the backside or right-hand side of the router and looks like this:
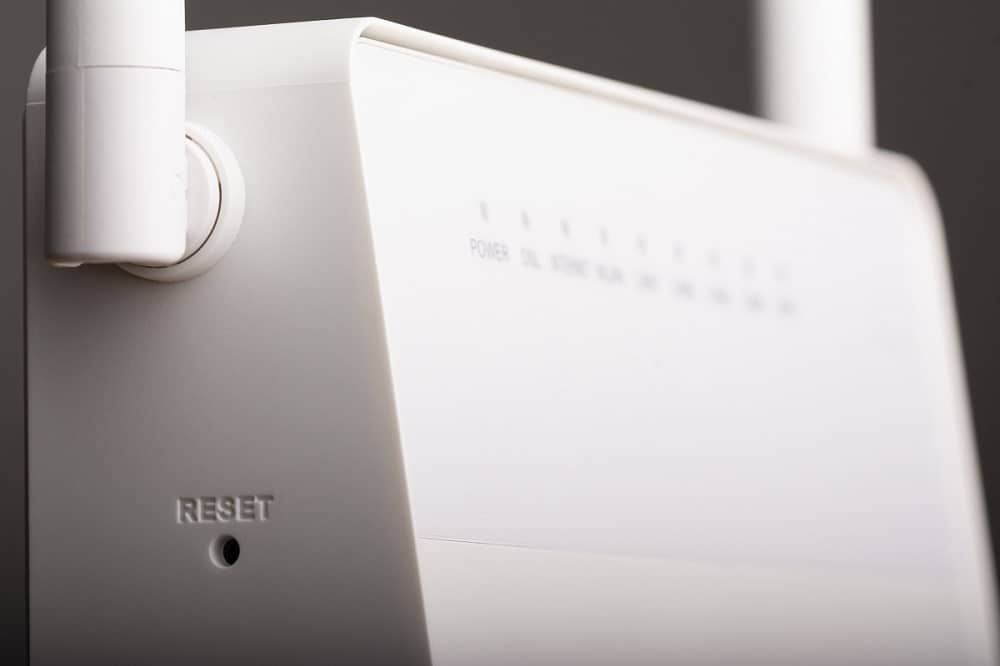
3. כעת, הקש על לאתחל button with a paper pin/safety pin.
4. Wait for the router to reset completely for approximately 30 seconds.
5. לבסוף, להדליק the router and reconnect Chromebook.
Now check if you’re able to fix DHCP lookup failed error in Chromebook.
Method 12: Contact Chromebook Customer Support
If you have tried all of the methods listed above and are still unable to resolve the lookup problem, you should contact official customer support. You can also receive more information from the Chromebook Help center.
מומלץ:
אנו מקווים שהצלחת fix the DHCP lookup failed error on Chromebook. Let us know which method worked for you the best. Have any queries/suggestions? Drop them in the comment section below.