- in ウィンドウズ by
Automatically disable Touchpad when Mouse is connected

If you use a traditional mouse over Touchpad, you could automatically disable touchpad when you plug in the USB Mouse. This can be easily done via Mouse Properties in Control Panel where you have a label called “Leave touchpad on when a mouse is connected”, so you need to uncheck this option and you’re good to go. If you have Windows 8.1 with the latest update, you could easily configure this option right from PC settings.
This option makes it easier for users to navigate and you don’t need to worry about accidental touch or click over touchpad when using a USB Mouse. So without wasting any time let’s see How to Automatically disable Touchpad when Mouse is Connected in Windows 10 with the help of the below-listed guide.
Automatically disable Touchpad when Mouse is connected
何か問題が発生した場合に備えて、必ず復元ポイントを作成してください。
Method 1: Disable Touchpad when Mouse is connected via Settings
1. Windows キー + I を押して開きます 設定 次にをクリックしてください デバイス。

2. 左側のメニューから、 タッチパッド。
3. Under Touchpad チェックしない 「マウスが接続されているときにタッチパッドをオンのままにする"
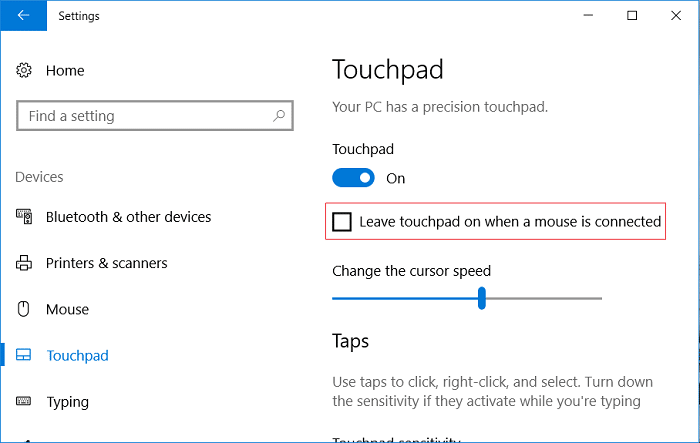
4. PC を再起動して変更を保存します。
Method 2: Disable Touchpad when Mouse is connected via Mouse Properties
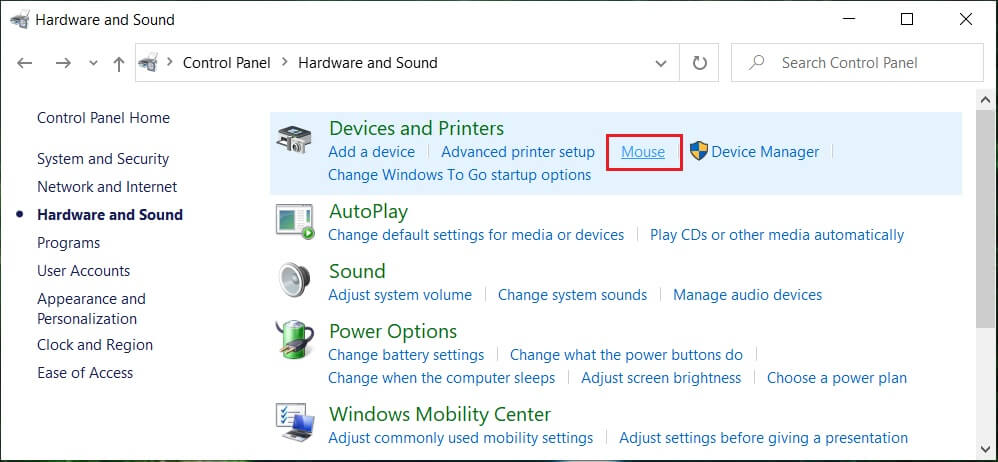
1. Windows キー + Q を押して検索を表示し、次のように入力します。 コントロール、 をクリックします。入力したコードが正しければ、MFAの設定は正常に完了します コントロールパネル 検索結果から

2.次に、をクリックします ハードウェアとサウンド。

3. Under Devices and Printers click on マウス。
4.に切り替え ELAN or Device Settings タブを押してから チェックしない 「Disable internal pointing device when the external USB pointing device is attached"オプション。
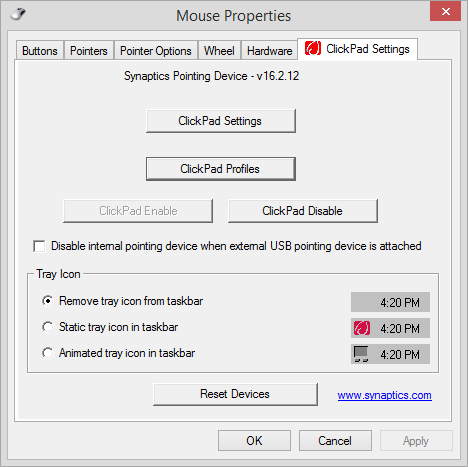
5. 「適用」をクリックし、続いて「適用」をクリックします。 [OK]をクリックします。
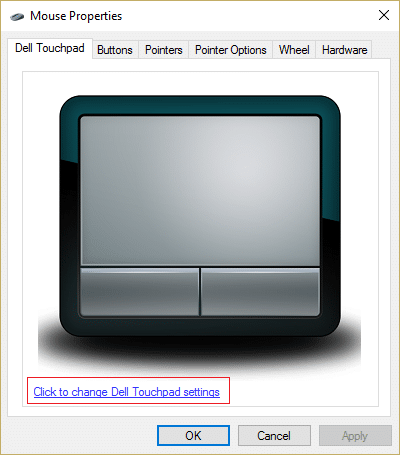
Method 3: Disable Dell Touchpad when Mouse is connected
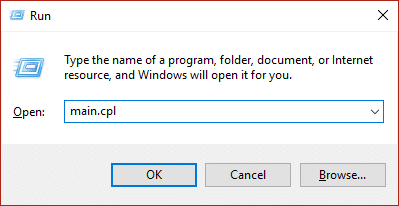
1. Windows キー + R を押して、次のように入力します。 main.cplと Enterキーを押して開きます マウスのプロパティ。
2. Under Dell Touchpad tab, click on “Click to change Dell Touchpad settings"
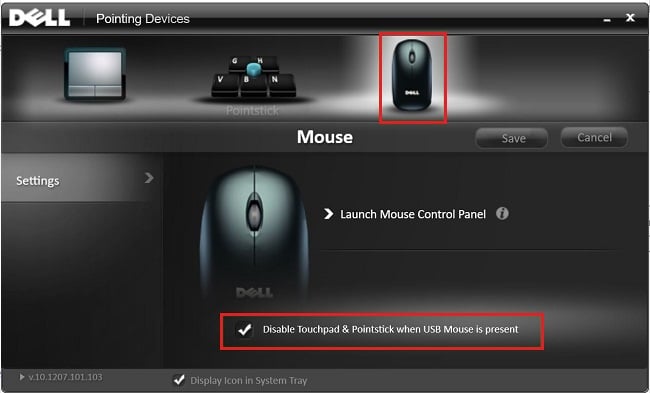
3. From Pointing Devices, select the Mouse picture from the top.
4.「」にチェックマークを付けますDisable Touchpad when USB mouse is present"
5. PC を再起動して変更を保存します。
Method 4: Disable Touchpad when Mouse is connected via Registry
1. Windows キー + R を押して、次のように入力します。 regeditを Enter キーを押してレジストリ エディターを開きます。

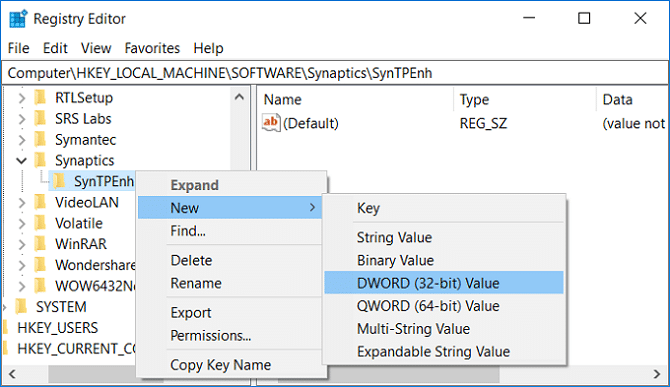
2. 次のレジストリ キーに移動します。
HKEY_LOCAL_MACHINESOFTWARESynapticsSynTPEnh
3.を右クリックします SynTPEnh 次に選択する 新規 > DWORD (32 ビット) 値。
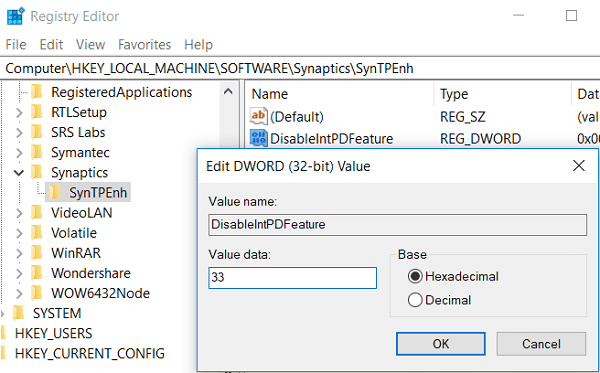
4. Name this DWORD as DisableIntPDFeature and then double click on it to change its value.
5.確認する Hexadecimal is selected under Base then 値を33に変更します [OK]をクリックします。
6. PC を再起動して変更を保存します。
Method 5: Disable Touchpad when Mouse is Connected in Windows 8.1
1. Press Windows Key + C key to open 設定 チャーム。
2。 選択 PCの設定を変更 than from the left-hand menu click on PC and Devices.
3.次に、をクリックします マウスとタッチパッド, then from the right window look for an option labelled as “マウスが接続されているときにタッチパッドをオンのままにする"
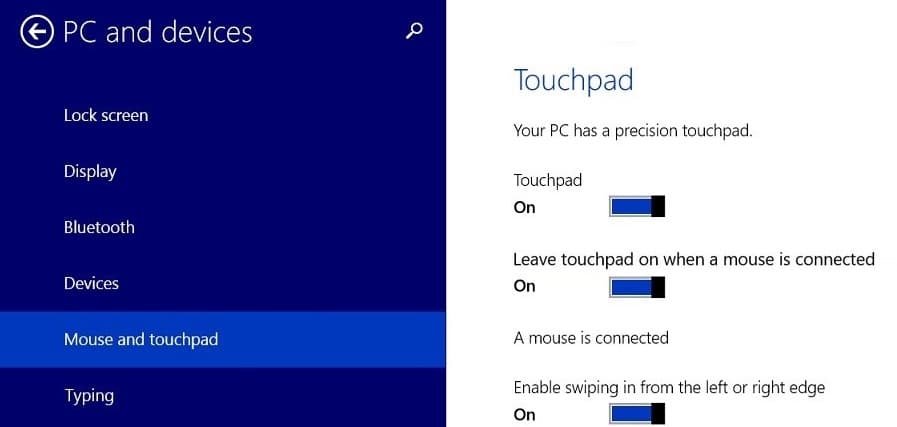
4。 必ず disable or turn off the toggle for this option.
5. Reboot your PC to save changes, and this will automatically disable Touchpad when Mouse is connected.
推奨:
これで成功です Disable Touchpad when Mouse is Connected in Windows 10 ただし、このガイドに関してまだご質問がある場合は、コメント欄でお気軽にお問い合わせください。