- in ウィンドウズ by
Change Diagnostic and Usage Data Settings in Windows 10

Change Diagnostic and Usage Data Settings in Windows 10: You must be aware of the Diagnostic and Usage Data Settings which allows Microsoft to collect performance and usage information which helps Microsoft to troubleshoot issues with Windows and improve their product & services and resolve bugs as soon as possible. But the best part of this feature is that you can actually control the amount of diagnostic and usage data sent to Microsoft from your system.
You can select to only send basic diagnostic information which contains info about your device, its settings, and capabilities or you can select the Full diagnostic information which contains all the information about your system. You can also delete the Windows Diagnostic Data that Microsoft has collected from your device. Anyway, without wasting any time let’s see How to Change Diagnostic and Usage Data Settings in Windows 10 with the help of the below-listed tutorial.
Change Diagnostic and Usage Data Settings in Windows 10
何か問題が発生した場合に備えて、必ず復元ポイントを作成してください。
The initial settings can be configured during the Windows Setup when you get to Choose privacy settings for your device simply enable the toggle for Diagnostics to select “Full” and leave it disabled if you want to set Diagnostic and usage data collection policy to “Basic”.
Method 1: Change Diagnostic and Usage Data Settings in Settings App
1.Windows キー + I を押して開きます 設定 次にをクリックしてください Privacy icon.
2.左側のメニューから 診断とフィードバック。
3.Now either select Basic or Full for the Diagnostic and usage data.
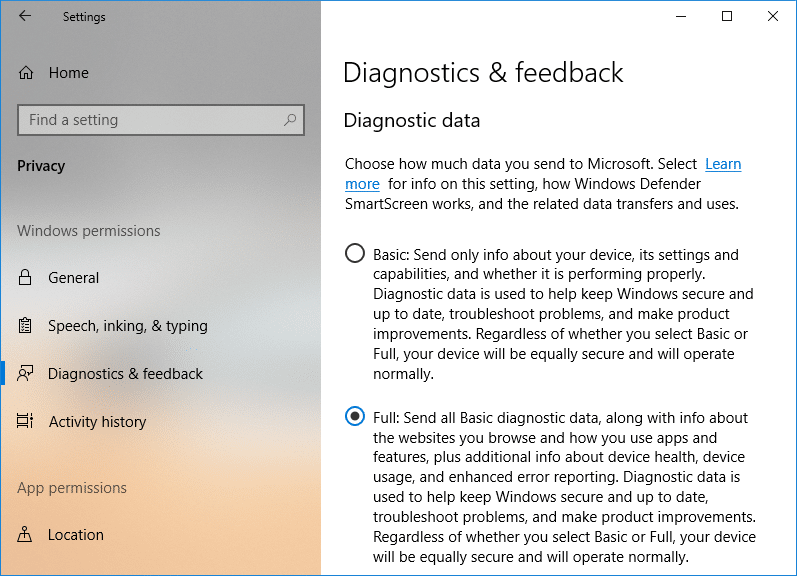
注: By default, the setting is set to “Full”.
4.Once finished, close the setting and reboot your PC.
また読む: Quest Diagnostics はウォークインを行いますか?
Method 2: Change Diagnostic and Usage Data Settings in Registry Editor
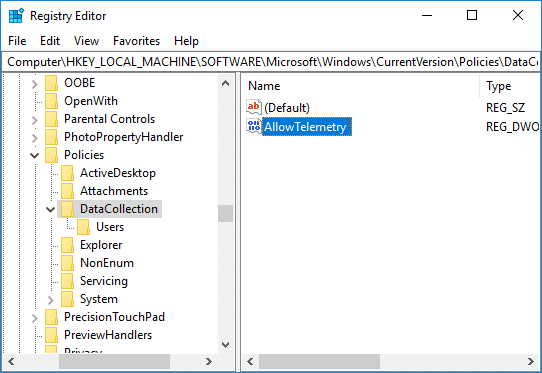
1.Windows キー + R を押してから、次のように入力します。 regeditを Enterキーを押して開きます レジストリエディタ。

2.次のレジストリ キーに移動します。
HKEY_LOCAL_MACHINESOFTWAREMicrosoftWindowsCurrentVersionPoliciesDataCollection
3.必ず選択してください データ収集 次に、右側のウィンドウペインで、 AllowTelemetry DWORD.
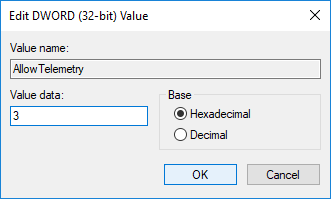
4.Now make sure to change the value of the AllowTelemetry DWORD according to:
0 = Security (Enterprise and Education editions only)
1 = Basic
2 = Enhanced
3 = Full (Recommended)
5.Once done, make sure to click OK and close registry editor.
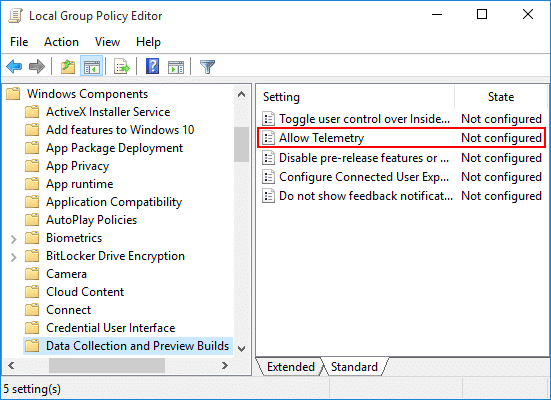
Method 3: Change Diagnostic and Usage Data Settings in Group Policy Editor
1.Windows キー + R を押してから、次のように入力します。 gpedit.mscを Enterキーを押して開きます グループ ポリシー エディター。
2.次のパスに移動します。
Computer ConfigurationAdministrative TemplatesWindows ComponentsData Collection and Preview Builds
3.Make sure to select Data Collection and Preview Builds then in right window pane double-click on Allow Telemetry Policy.
4.Now to restore default diagnostic and usage data collection setting simply select Not Configured or Disabled for Allow Telemetry policy and click OK.

5.If you want to force a diagnostic and usage data collection setting then 有効を選択します for Allow Telemetry policy and then under Options select Security (Enterprise Only), Basic, Enhanced, or Full.
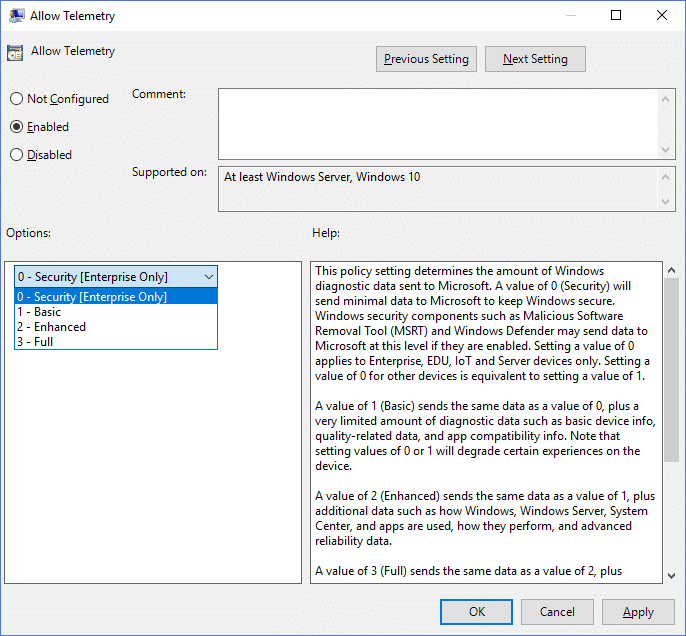
6.[適用]、[OK] の順にクリックします。
7.When finished, reboot your PC to save changes.
推奨:
それはあなたがうまく学んだことです How to Change Diagnostic and Usage Data Settings in Windows 10 ただし、このチュートリアルに関してまだご質問がある場合は、コメントセクションでお気軽にお問い合わせください。