- in ウィンドウズ by
Fix Windows 10 install Fails With Error C1900101-4000D

Fix Windows 10 install Fails With Error C1900101-4000D: If you’re trying to upgrade to Windows 10 but the install fails with error code C1900101-4000D then don’t worry as it occurs because the Windows installer cannot access important files required for installation. Sometimes this error is also caused because of a conflict during installation but you can’t be sure as there is no error message accompanying this error.
0xC1900101-0x4000D
The installation failed in the SECOND_BOOT phase with an error during MIGRATE_DATA operation
While there is no definite fix for this issue but users seem to be recommending a clean installation of Windows 10 which should only be used as a last resort. So without wasting any time let’s see How to Fix Windows 10 install Fails With Error C1900101-4000D with the help of below-listed troubleshooting guide.
Fix Windows 10 install Fails With Error C1900101-4000D
前提条件
a)Make sure to Update all drivers, including graphic, sound, BIOS, USB devices, printers, etc before the installing Windows 10.
b)Remove all external USB devices such as pen drive, external hard disk, USB keyboard & mouse, USB printer and all peripherals.
c)Use an ethernet cable instead of WiFi and disable WiFi until the update is complete.
Method 1: Temporarily Disable Antivirus and Firewall before attempting Upgrade
1. を右クリックします。 ウイルス対策プログラムのアイコン システムトレイから選択し、 無効にする。

2.次に、期間を選択します。 ウイルス対策は無効のままになります。

注: 15 分や 30 分など、可能な限り短い時間を選択します。
3.Once done, again try to upgrade your PC and check if the error resolves or not.
4.Type control in the Windows Search then click on コントロールパネル 検索結果から。

5.次に、 をクリックします。 システムとセキュリティ。
6.次に、をクリックします Windowsファイアウォール。

7.左側のウィンドウペインで をクリックします。 Windows ファイアウォールをオンまたはオフにします。

8.「Windows ファイアウォールをオフにする」を選択し、PC を再起動します。 Again try to upgrade your PC and see if you’re able to Fix Windows 10 install Fails With Error C1900101-4000D.
上記の方法が機能しない場合は、まったく同じ手順に従ってファイアウォールを再度有効にしてください。
Method 2: Remove any hyphens from your computer or machine name
1.Windows キー + R を押してから、次のように入力します。 sysdm.cplと Enterキーを押して開きます システムプロパティ。

2.Make sure you’re under [コンピューター名]タブ 次にをクリックしてください 変更する ボタンをクリックします。
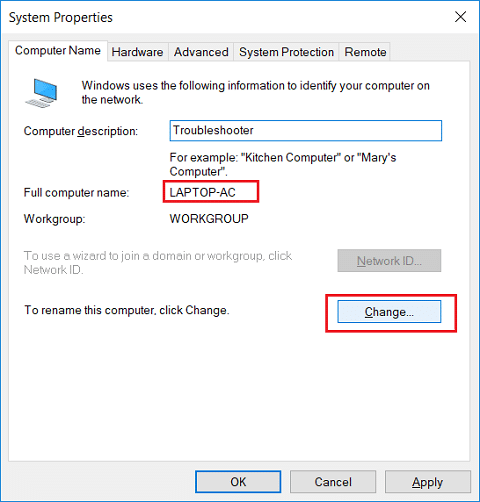
3.Make sure your machine name is simple no periods or hyphens or dashes.
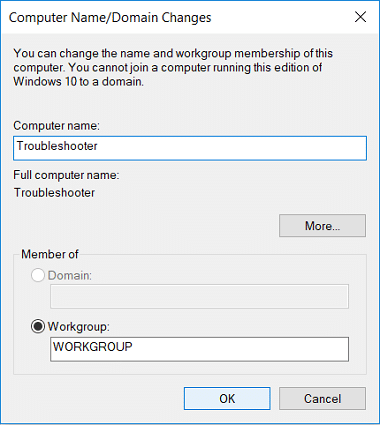
4.Click OK then Apply followed by OK.
5. PC を再起動して変更を保存します。
方法 3: Windows が最新であることを確認する
1.Windows キー + I を押して選択します。 更新とセキュリティ。

2.次に、もう一度クリックします アップデートの確認 保留中のアップデートがあれば必ずインストールしてください。

3.アップデートがインストールされたら、PCを再起動して、できるかどうかを確認します。 Fix Windows 10 install Fails With Error C1900101-4000D.
方法4:クリーンブートを実行する
This would make sure that if any 3rd party application is conflicting with Windows update then you will be able to successfully install Windows Updates inside Clean Boot. Sometimes 3rd party software can conflict with Windows Update and therefore cause Windows Update to be Stuck. In order, Fix Windows 10 install Fails With Error C1900101-4000D、PC でクリーン ブートを実行し、問題を段階的に診断する必要があります。

方法5:Windows10メディア作成ツールを使用してアップグレードする
1.Download Media Creation Tool here.
2.Backup your data from system partition and save your license key.
3.Start the tool and choose to 今すぐこの PC をアップグレードしてください。
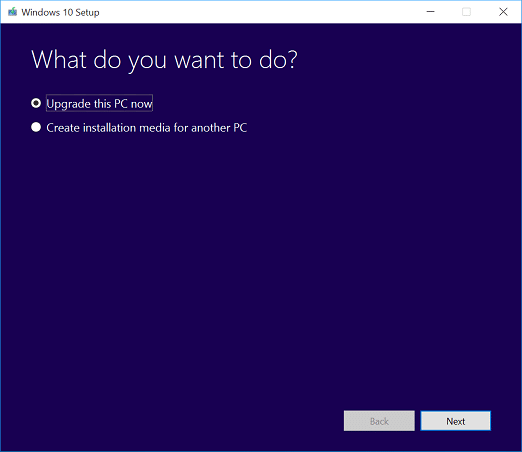
4.Accept the license terms.
5.After the installer is ready, choose to 個人のファイルとアプリを保管してください。
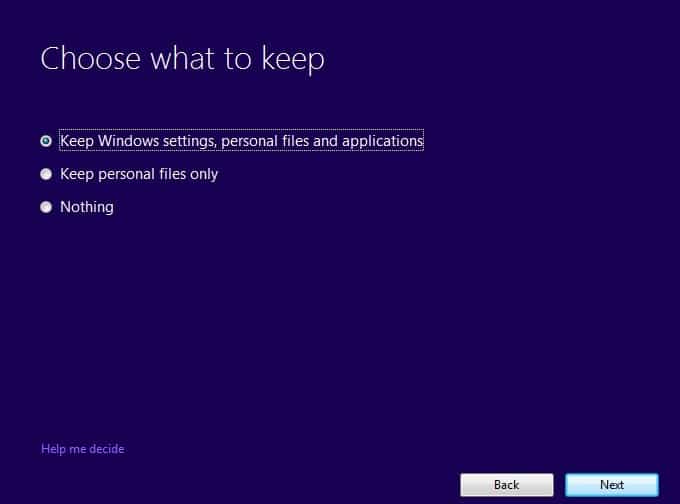
6.The PC will restart few times and your PC would be successfully upgraded.
方法 6: SFC と DISM を実行する
1.Windowsキー+ Xを押してからクリックします コマンドプロンプト(管理者)。

2.次に、cmd に次のように入力して、Enter キーを押します。
Sfc /scannow sfc /scannow /offbootdir=c: /offwindir=c:windows (上記が失敗した場合は、これを試してください)

3.上記のプロセスが終了するのを待ち、完了したら PC を再起動します。
4.再度 cmd を開き、次のコマンドを入力し、各コマンドの後に Enter キーを押します。
a) Dism /Online /Cleanup-Image /CheckHealth b) Dism /Online /Cleanup-Image /ScanHealth c) Dism /Online /Cleanup-Image /RestoreHealth

5. DISM コマンドを実行し、完了するまで待ちます。
6. 上記のコマンドが機能しない場合は、以下を試してください。
Dism /Image:C:offline /Cleanup-Image /RestoreHealth /Source:c:testmountwindows Dism /Online /Cleanup-Image /RestoreHealth /Source:c:testmountwindows /LimitAccess
注: C:RepairSourceWindows を修復ソース (Windows インストールまたはリカバリ ディスク) の場所に置き換えます。
7. PC を再起動して変更を保存し、保存できるかどうかを確認します。 Fix Windows 10 install Fails With Error C1900101-4000D.
Method 7: Reset Windows Updates Components
1.Windows キー + X を押して選択します。 コマンドプロンプト(管理者)
2.次のコマンドを入力して Windows Update サービスを停止し、各コマンドの後に Enter キーを押します。
ネットストップ
net stop cryptSvc
ネットストップビット
net stop msiserver

3.次に、次のコマンドを入力して SoftwareDistribution フォルダーの名前を変更し、Enter キーを押します。
ren C:WindowsSoftwareDistribution SoftwareDistribution.old
ren C:WindowsSystem32catroot2 catroot2.old

4.最後に、次のコマンドを入力して Windows Update サービスを開始し、各サービスの後に Enter キーを押します。
ネットスタートwuauserv
net start cryptSvc
ネットスタートビット
net start msiserver

5.PC を再起動して変更を保存し、保存できるかどうかを確認します。 Fix Windows 10 install Fails With Error C1900101-4000D.
Method 8: Delete Registry for Mounted Images
1.Windows キー + R を押してから、次のように入力します。 regeditを Enter キーを押してレジストリ エディターを開きます。

2.次のレジストリ キーに移動します。
HKEY_LOCAL_MACHINESOFTWAREMicrosoftWIMMountMounted Images
3.Select Mounted Images then in the right window pane right-click on (Default) and select Delete.
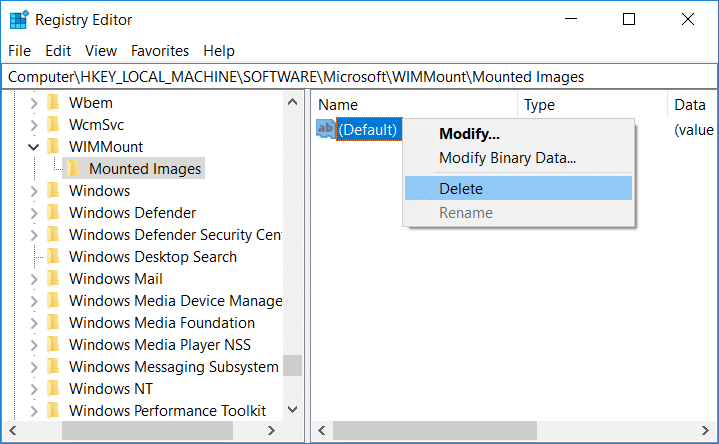
4.Exit Registry Editor and reboot your PC to save changes.
Method 9: Disable Wi-Fi Adapter and CD/DVD Drive
1.Windows キー + R を押してから、次のように入力します。 devmgmt.msc Enter キーを押して、デバイス マネージャーを開きます。

2.Expand DVD/CD-ROM drivesを右クリックします。 CD / DVDドライブ をクリックして デバイスを無効にします。

3.Similarly, expand Network adapters then right-click on your WiFi アダプタと選択 デバイスを無効にします。
4.Again try to run Windows 10 setup and see if you’re able to Fix Windows 10 install Fails With Error C1900101-4000D.
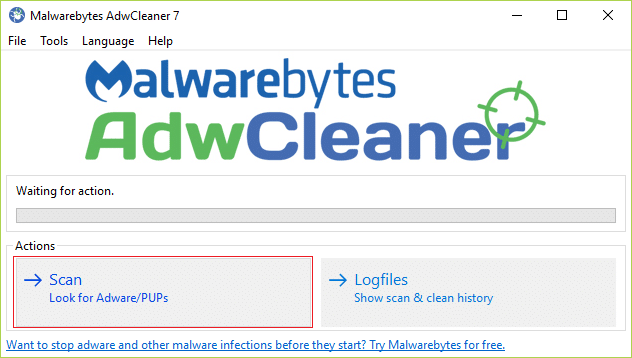
Method 10: Run Malwarebytes and AdwCleaner
Malwarebytes is a powerful on-demand scanner which should remove browser hijackers, adware and other types of malware from your PC. It is important to note that Malwarebytes will run alongside antivirus software without conflicts. To install and run Malwarebytes Anti-Malware, go to this article and follow each and every step.
1.Download AdwCleaner from this link.
2.Once the download is complete, double-click on the adwcleaner.exe file プログラムを実行します。
3.「同意する」ボタンから accept the license agreement.
4.On the next screen, click the スキャンボタン アクションの下。
5.Now, wait for the AdwCleaner to search for PUPs and other malicious programs.
6.Once the scan is complete, click 石斑魚 in order to clean your system of such files.
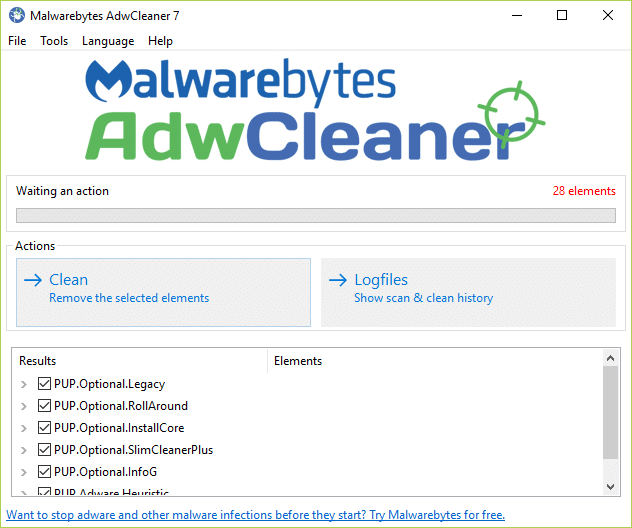
7.Save any work you might be doing as your PC will need to reboot, click OK to reboot your PC.
8.Once the computer reboots, a log file will open which will list all of the files, folders, registry keys, etc that were removed in the previous step.
推奨:
これで成功です Fix Windows 10 install Fails With Error C1900101-4000D ただし、このガイドに関してまだご質問がある場合は、コメント欄でお気軽にお問い合わせください。