Windows 10-ში სხვა აპის მიერ გამოყენებული კამერის შესწორება

Several users have faced camera used by another app issue when they are trying to access camera in Skype or other similar applications. This issue occurs both in inbuilt and external camera devices and it is reported on versions of Windows 7, 8.1, 10, and 11. To be more precise, this issue is faced after the 20H2 update of the Windows Operating System. The camera in use issue is not specific to any particular application on your device but it occurs on your PC for many reasons. In this guide, you will learn effective troubleshooting methods that will help you fix camera is being used by another application issue.
How to Fix Camera In Use by Another App in Windows 10
Here are some valid reasons that contribute to the camera used by another app problem. You are advised to analyze the reasons deeply so that you could follow appropriate troubleshooting methods to resolve the problem so easily.
- დაკარგული, მოძველებული ან შეუთავსებელი კამერის დრაივერები.
- The files and cache in-camera application are corrupt or incompatible with your Operating System.
- Camera access is not granted in your Windows 10 PC.
- Antivirus programs may restrict camera access.
- კორუმპირებული კამერის აპლიკაცია.
- Some other programs on PC are using your camera.
- კამერის პარამეტრები არ არის შესაბამისი.
- Windows Defender Firewall is blocking Camera access.
- Webcam security features are contributing to the error.
We have investigated several technical forums regarding the camera used by another app issue and thereby analyzed the troubleshooting hacks to fix the problem.
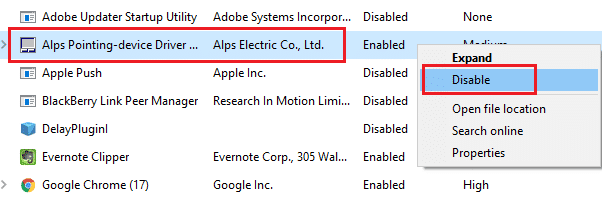
Method 1: Close Programs that Use Camera
The camera in your device can only be used by one application at a time. If you guess that other applications are using the camera, you are advised to close all background applications that are active on your device. You can either exit from all programs by closing all of them one by one or by Task Manager. To do so, follow our guide on How to End Task in Windows 10.
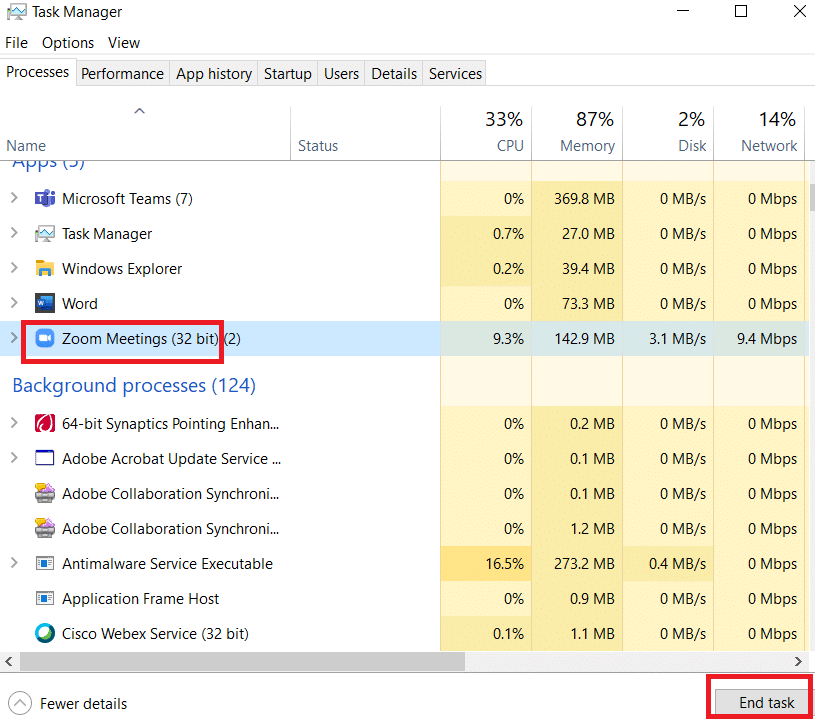
In addition, you are advised to disable start-up programs on your Windows 10 PC. To implement the task, follow our guide on 4 Ways to Disable Startup Programs in Windows 10
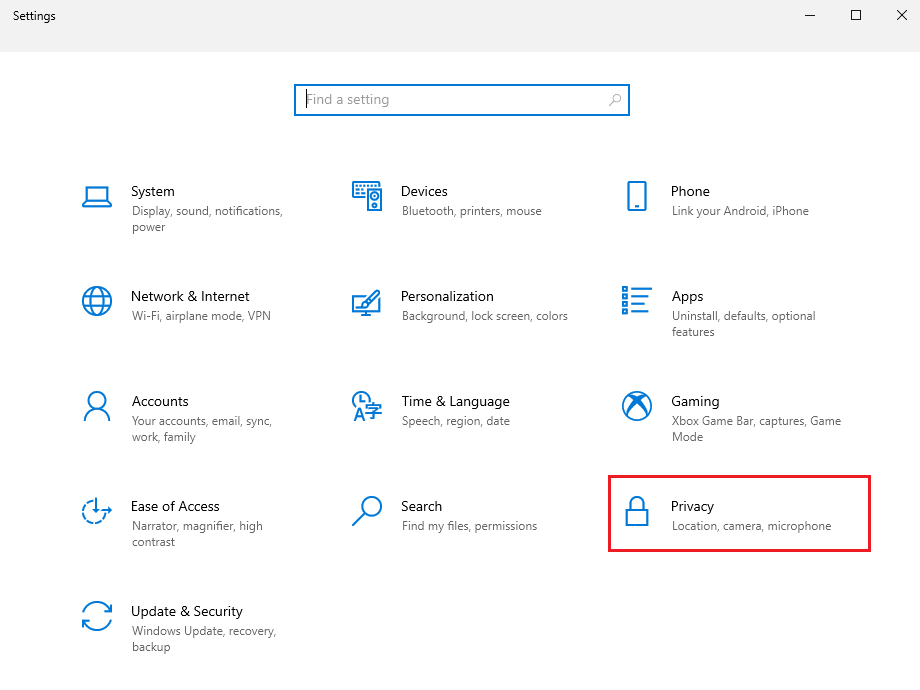
მეთოდი 2: კამერაზე წვდომის დაშვება
If you are experiencing a camera used by another app issue in your Windows 10 computer, there are some chances that access to the camera is not granted appropriately. Also, you can easily fix this issue by allowing access to the camera in Windows Settings. Here are a few steps to grant permission.
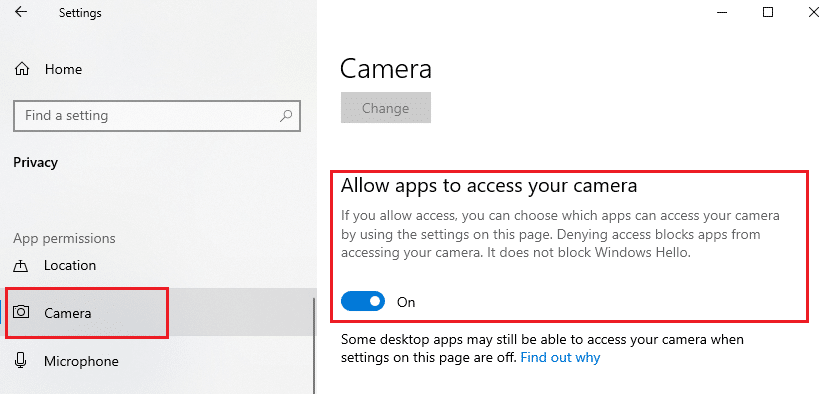
1. You can launch Windows- ის პარამეტრები დაჭერით Windows + I კლავიშები ერთდროულად.
2. შემდეგ, აირჩიეთ Privacy ვარიანტი, როგორც ნაჩვენებია.
3. შემდეგ, მარცხენა პანელში, მოძებნეთ და აირჩიეთ კამერა ვარიანტი.
შენიშვნა: დარწმუნდით თქვენი კამერის წვდომისთვის აპების დაშვება პარამეტრი ჩართულია, როგორც ნაჩვენებია.
ასევე წაიკითხე: როგორ გამოვასწოროთ Omegle კამერა არ მუშაობს
მეთოდი 3: გაუშვით Hardware & Devices Troubleshooter
If you find your Windows 10 computer is facing any hardware-related issues, it can be easily sorted by running აპარატურისა და მოწყობილობების პრობლემების გადაჭრა. All the issues identified by the troubleshooter will be automatically resolved by the troubleshooter itself. For instance, if there are any corrupt settings in your PC and if there are any specific changes intended to be done, the troubleshooter helps you a lot. Follow our guide to Run Hardware and Devices Troubleshooter to fix issues and implement the steps as instructed.
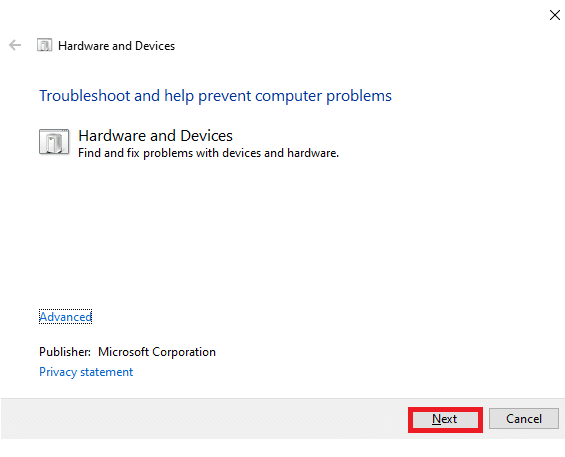
Once you have fixed all the suggestions mentioned at the end of the troubleshooting process, check if you have fixed camera used by another app issue.
მეთოდი 4: ჩართეთ კამერის მოწყობილობის დრაივერი
If you have accidentally disabled the webcam or camera in your device settings, you will face camera in use issue. So, if you have disabled the webcam in your device, enable it on your computer as instructed below.
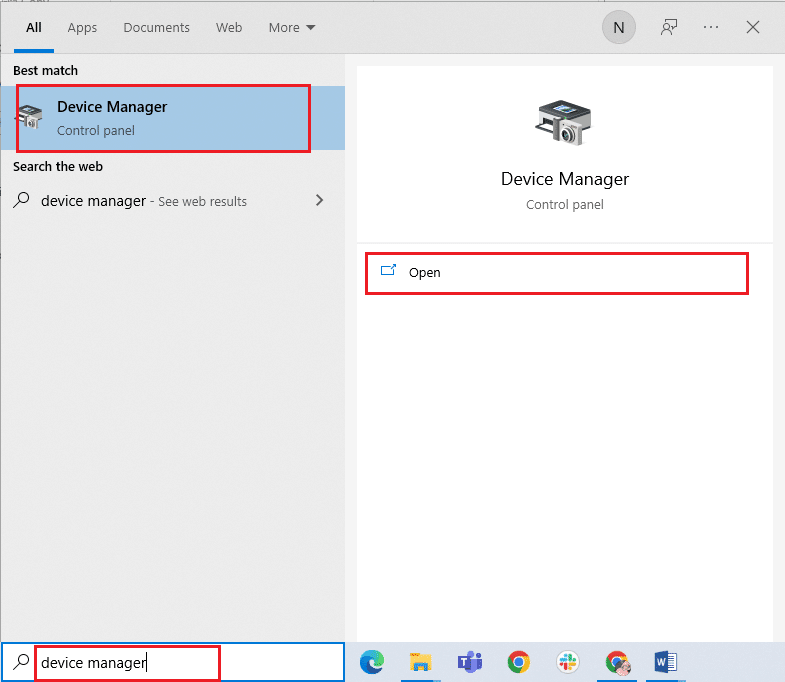
1. დააჭირეთ Windows გასაღები და ტიპის Device Manager. შემდეგ, დააჭირეთ ღილაკს ღიაა.
2. როგორც კი Device Manager ფანჯარა იხსნება, ორჯერ დააწკაპუნეთ კამერები განყოფილება მისი გაფართოებისთვის.
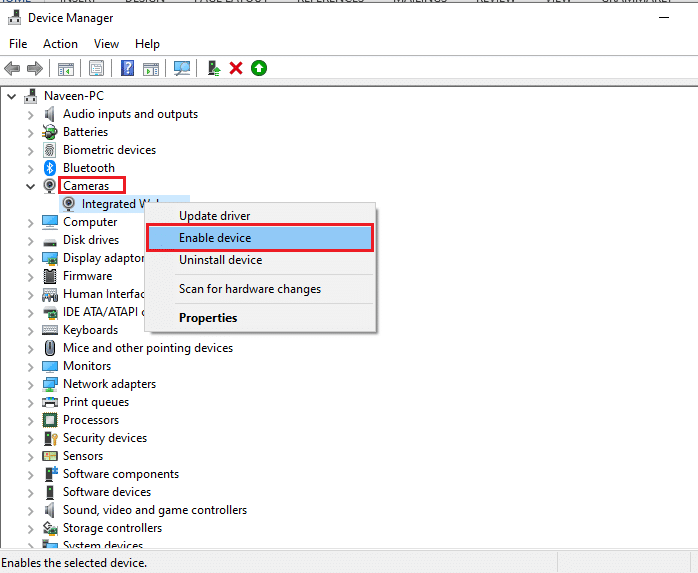
3. ახლა დააწკაპუნეთ მაუსის მარჯვენა ღილაკით თქვენს კამერის მოწყობილობაზე და აირჩიეთ მოწყობილობის ჩართვა ვარიანტი.
ასევე წაიკითხე: 8 Best Webcam for Streaming in India (2022)
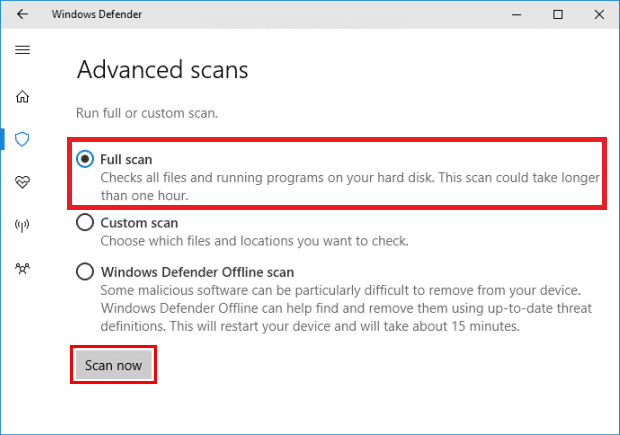
მეთოდი 5: გაუშვით მავნე პროგრამების სკანირება
Several Microsoft experts suggest that, scanning PC will help you maintain your computer threat free. If there are any virus or malware intrusions in your PC, you cannot use external and internal hardware devices. Hence, you are advised to scan your computer as instructed in our guide on How do I Run a Virus Scan on my Computer?
ასევე, თუ გსურთ წაშალოთ მავნე პროგრამები თქვენი კომპიუტერიდან, შეამოწმეთ ჩვენი სახელმძღვანელო როგორ ამოიღოთ მავნე პროგრამები თქვენი კომპიუტერიდან Windows 10-ში.
მეთოდი 6: Windows-ის განახლება
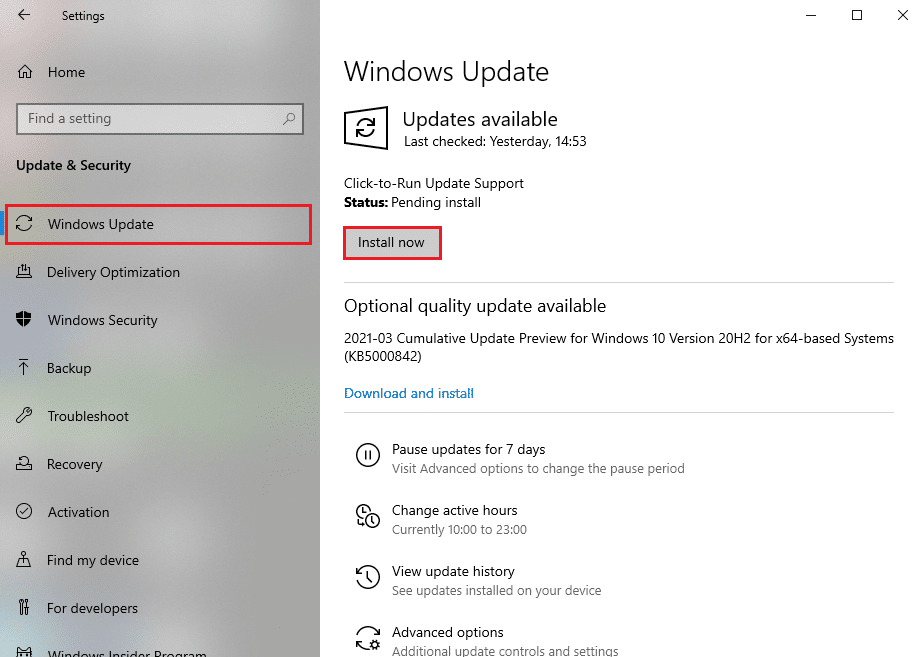
Also, if there are any bugs in your PC, they can only be fixed after a Windows update. Microsoft releases regular updates to fix all these bugs thereby sorting camera is being used by another application issue. Hence, ensure if you have updated your Windows Operating System and if there are any updates pending in action, use our guide to Download and Install Windows 10 Latest Update.
Windows ოპერაციული სისტემის განახლების შემდეგ, შეამოწმეთ, შეგიძლიათ თუ არა თქვენს კამერაზე წვდომა.
ასევე წაიკითხე: როგორ გავასწოროთ Google Meet-ში ნაპოვნი კამერა
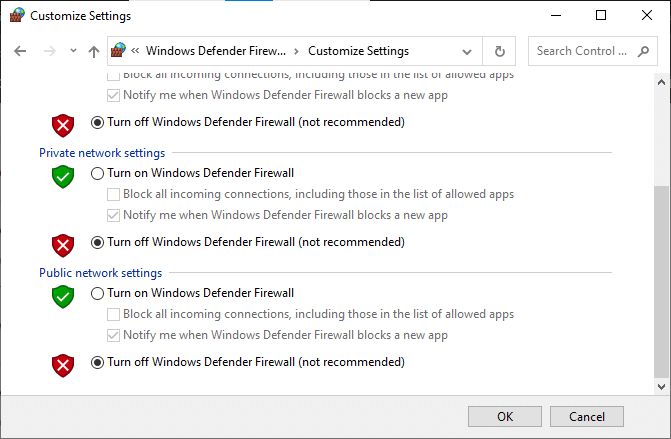
Method 7: Disable Windows Firewall
Sometimes, Windows Defender Firewall in your computer might prevent camera access, for some security reasons. If in case, camera has been blocked by Windows Defender Firewall, you have to enable it or disable the Firewall securities temporarily from your computer. If you do not know how to disable Windows Defender Firewall, our guide to Disable Windows 10 Firewall will help you do so.
თქვენს კამერაზე წვდომის შემდეგ, დარწმუნდით, რომ კვლავ ჩართეთ Firewall კომპლექტი, რადგან კომპიუტერი უსაფრთხოების პროგრამის გარეშე ყოველთვის საფრთხეს წარმოადგენს.
Method 8: Update or Rollback Camera Drivers
If there are any incompatible or outdated camera drivers in your computer, you will face camera in use issue. To fix the problem, either update the camera drivers or roll back them if necessary.
ვარიანტი I: დრაივერების განახლება
1. ტიპი Device Manager in the Windows 10 search menu and click on ღიაა.
2. შემდეგ ორჯერ დააწკაპუნეთ კამერები მისი გაფართოება.
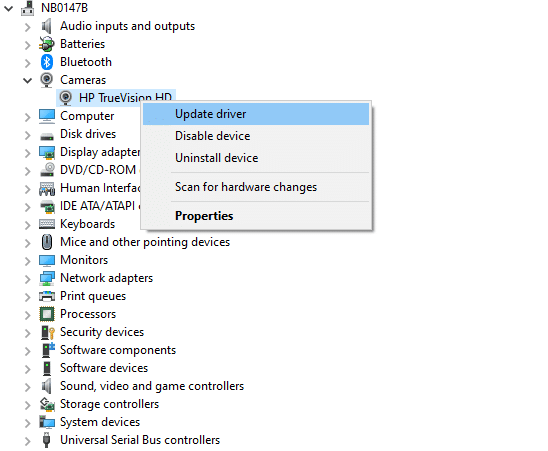
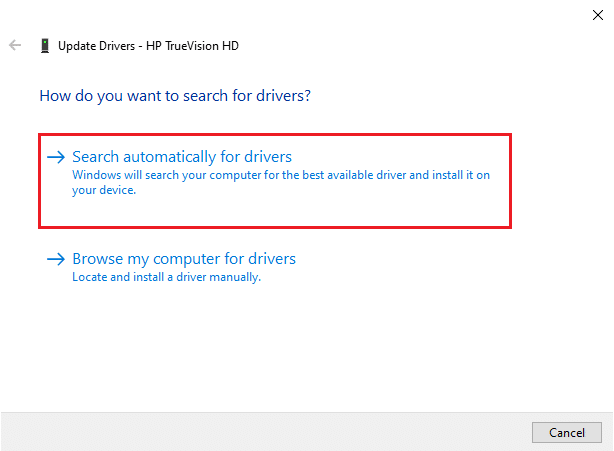
3. ახლა დააწკაპუნეთ მაუსის მარჯვენა ღილაკით თქვენი მძღოლი (say HP TrueVision HD) and then select განახლების მძღოლი.
4. ახლა, დააჭირეთ ღილაკს ავტომატურად მოძებნეთ მძღოლები. This will identify and install the apt drivers automatically.
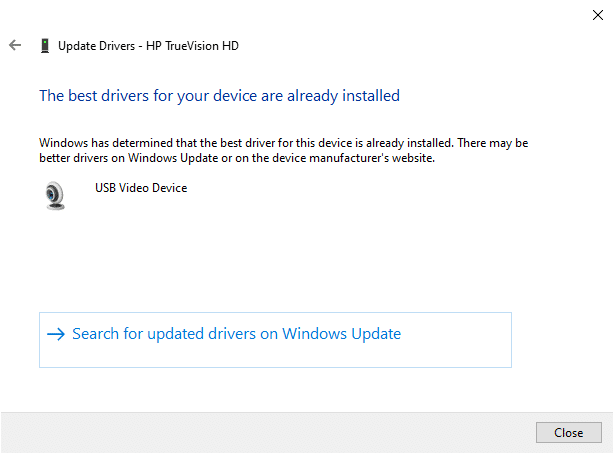
5A. If there are updates pending to be installed, the update will be successful.
5B. You will get თქვენი მოწყობილობის საუკეთესო დრაივერები უკვე დაინსტალირებულია message if the drivers are already updated.
6. Exit the window and გადატვირთეთ თქვენი კომპიუტერი.
ასევე წაიკითხე: შეასწორეთ ეს მოწყობილობა გამოიყენება სხვა აპლიკაციის ხმის შეცდომით
Option II: Rollback Drivers
1. As you did earlier, open Device Manager და გააფართოვეთ კამერები სექცია.
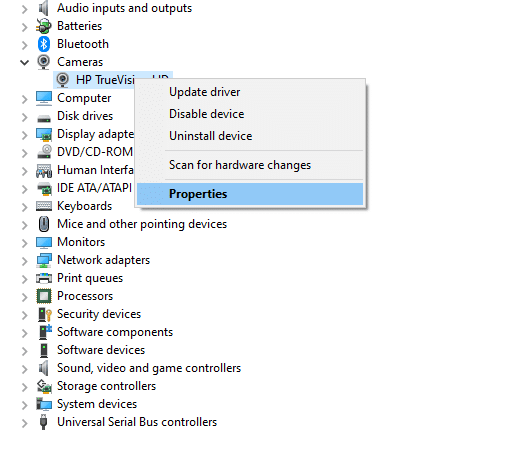
2. მარჯვენა ღილაკით დააჭირეთ ღილაკს მძღოლი და აირჩიეთ განცხადებები ვარიანტი.
3. გადახვიდეთ მძღოლის ჩანართი და დააჭირეთ Roll უკანა მძღოლი.
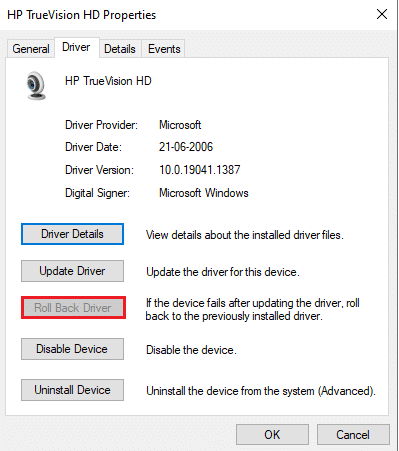
4. დაწკაპეთ OK ცვლილებების შენახვა.
5. ბოლოს დააწკაპუნეთ დიახ in the prompt and გადატვირთვა your computer. Now, you can access your camera.
ასევე წაიკითხე: რა არის მოწყობილობის დრაივერი? Როგორ მუშაობს?
მეთოდი 9: განაახლეთ აპლიკაციები
You must make sure whether all the applications associated with the Microsoft Store are updated to its latest version. This will ensure if all the inter related apps are up to its latest version thereby fixing camera used by another app problem. Follow the steps as instructed.
1. ტიპი Microsoft Store საძიებო მენიუში და დააწკაპუნეთ ღიაა.
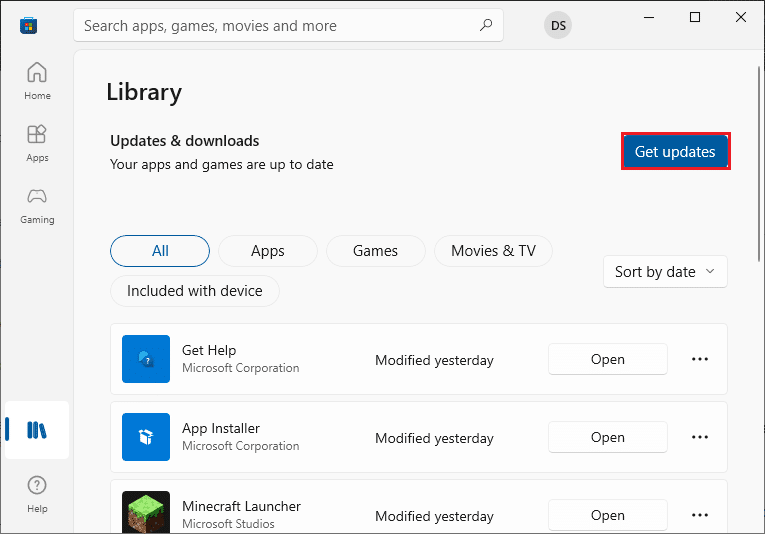
2. შემდეგში Microsoft Store ფანჯარა, დააჭირეთ ღილაკს ბიბლიოთეკა ხატულა, როგორც ნაჩვენებია.
![]()
3. ახლა, დააჭირეთ ღილაკს მიიღეთ განახლებები ღილაკი, როგორც ნაჩვენებია.
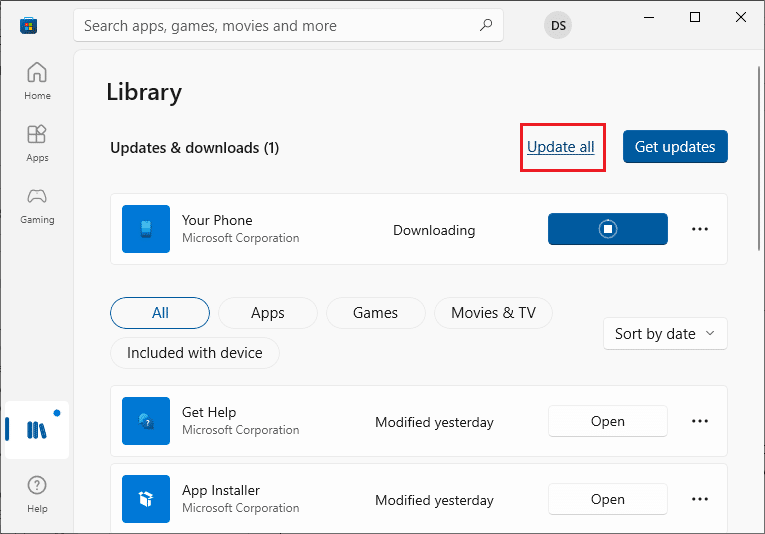
4. შემდეგ დააჭირეთ ღილაკს Ყველაფრის განახლება ღილაკს.
5. დაელოდეთ სანამ მიიღებთ თქვენი აპები და თამაშები განახლებულია სწრაფი.
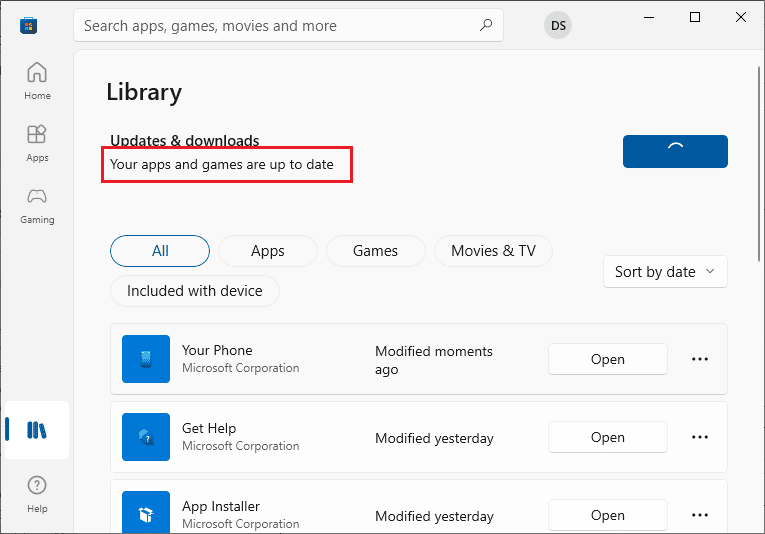
After updating the apps, check if you have fixed the problem.
მეთოდი 10: პრობლემური აპების ხელახლა ინსტალაცია
For app related problems that are causing you camera is being used by another application issue, you have no other options than to reinstall them. Here are few instructions to reinstall problematic applications in Microsoft Store.
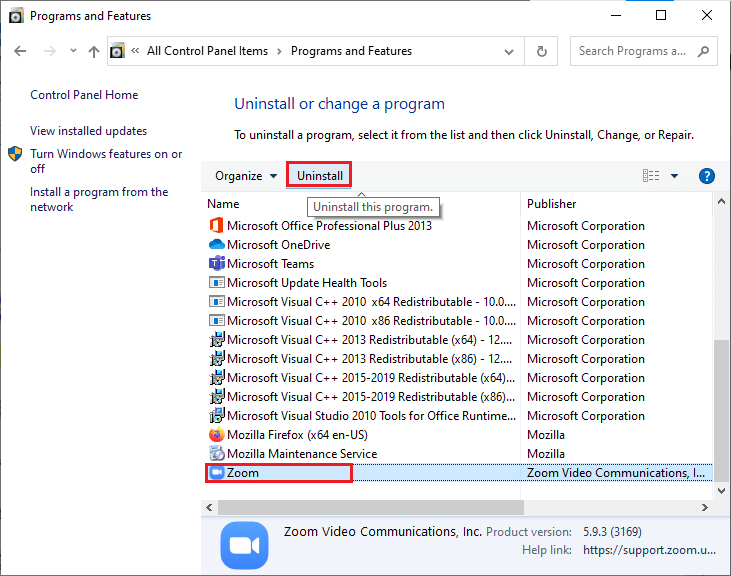
შენიშვნა: ამ სახელმძღვანელოში Zoom მაგალითად აღებულია.
1. ტიპი პანელი საძიებო მენიუში და დააწკაპუნეთ ღიაა.
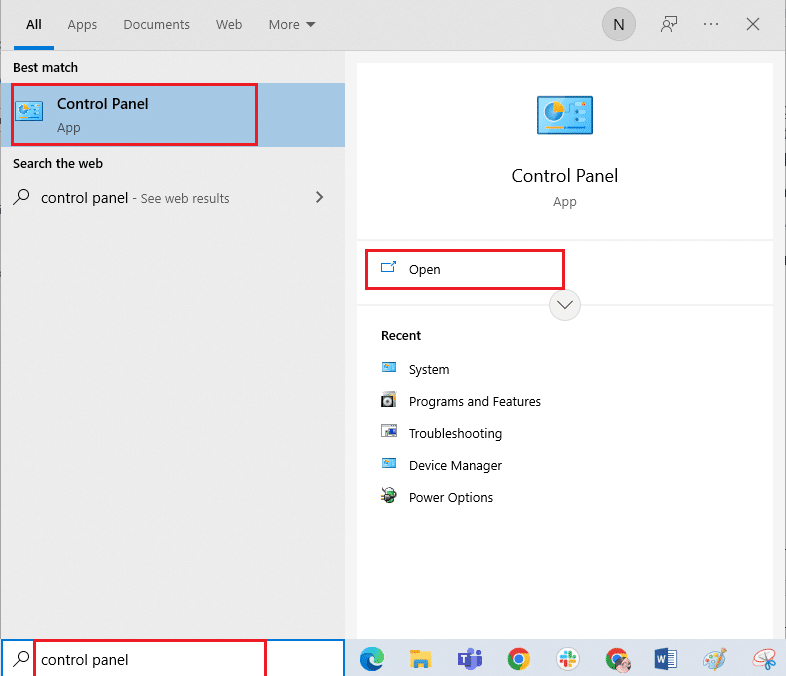
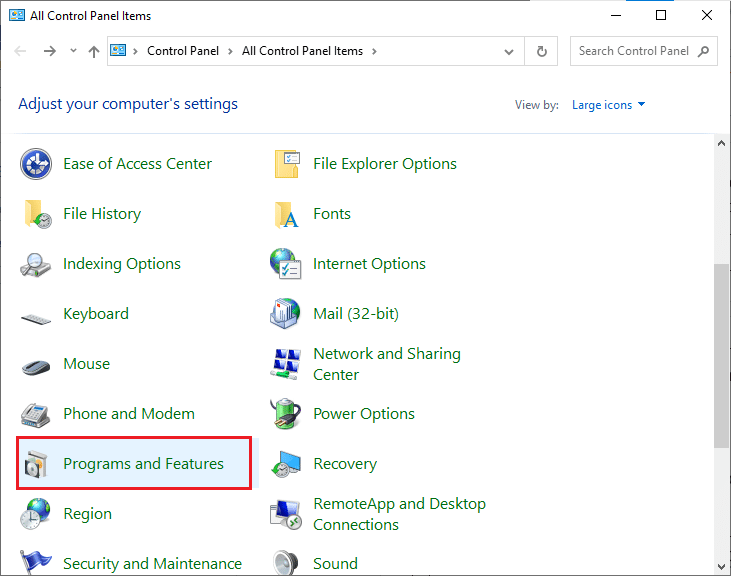
2. უცნობია ნახვა > დიდი ხატების მიხედვით, შემდეგ დააჭირეთ პროგრამები და ფუნქციები ვარიანტი.
3. ახლა, დააჭირეთ ღილაკს Zoom და აირჩიეთ Uninstall ვარიანტი.
4. დაადასტურეთ მოთხოვნა ასეთის არსებობის შემთხვევაში და გადატვირთეთ თქვენი კომპიუტერი აპლიკაციის სრული დეინსტალაციის შემდეგ.
5. Download Zoom from the ოფიციალური საიტი.

6. ახლა გადადით ჩემი ჩამოტვირთვები და აწარმოებს ZoomInstaller setup file. Wait until the app gets installed on your PC. Now, you can access the camera in the newly installed app.
ასევე წაიკითხე: შეასწორეთ კამერა, რომელიც არ მუშაობს გუნდებზე
მეთოდი 11: ხელახლა დაარეგისტრირეთ კამერა
If none of the above-discussed methods have helped you, then have a try to re-register your camera as instructed below. There are two methods to implement the task.
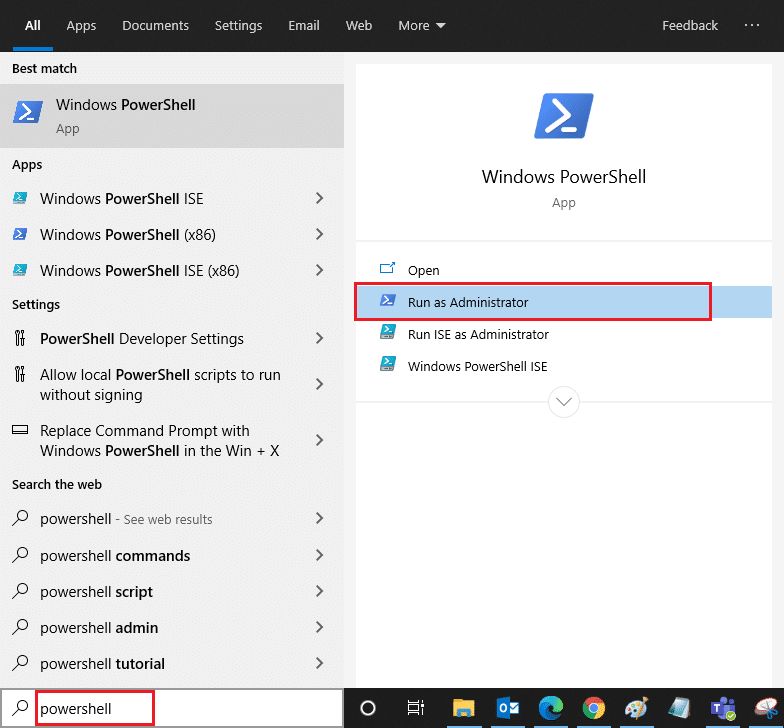
ვარიანტი I: Windows PowerShell-ის მეშვეობით
1. ტიპი Powershell საძიებო ზოლში და დააწკაპუნეთ ადმინისტრატორის სახელით გაშვება როგორც ნაჩვენებია.
2. Then, type the following command and hit შეიყვანეთ გასაღები.
Get-AppxPackage -allusers Microsoft.WindowsCamera | Foreach {Add-AppxPackage -DisableDevelopmentMode -რეგისტრაცია "$($_.InstallLocation)AppXManifest.xml"}
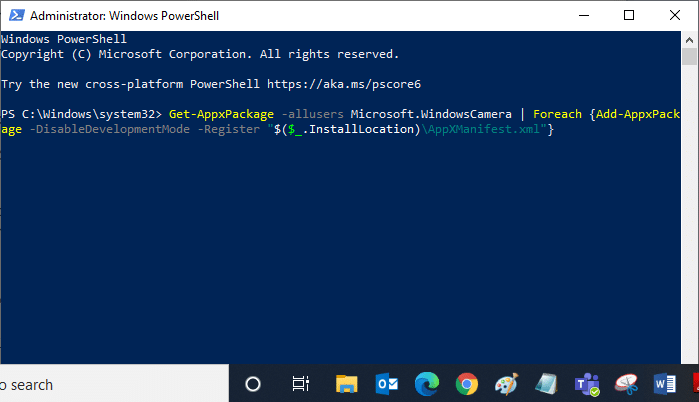
3. Wait until the common execution is successful and check if you have fixed camera in use issue .
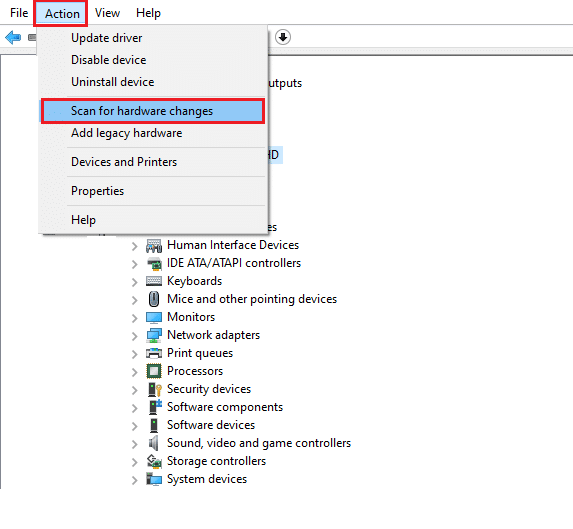
ვარიანტი II: მოწყობილობის მენეჯერის მეშვეობით
1. ღია Device Manager Windows საძიებო ზოლიდან.
2. ახლა გააფართოვეთ კამერები განყოფილება მასზე ორჯერ დაწკაპუნებით.
3. Then, right-click on the camera driver (e.g. HP TrueVision HD) და აირჩიეთ მოწყობილობის წაშლა ვარიანტი.

4. ახლა გადართეთ აქცია tab და აირჩიეთ სკანირება ტექნიკის ცვლილებებისთვის ვარიანტი.
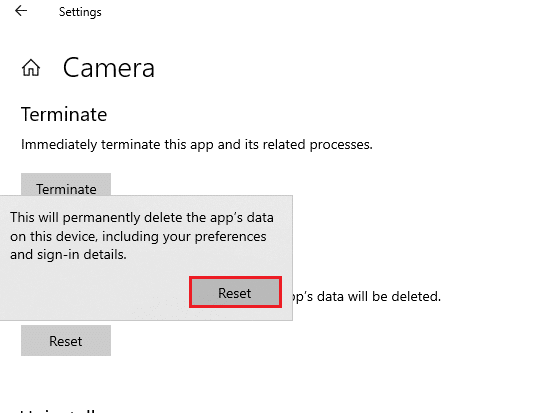
მეთოდი 12: კამერის აპის გადატვირთვა
You can also try resetting your camera application to fix camera used by another app issue. Follow as instructed below
1. დააჭირეთ Windows გასაღებიტიპი კამერადა დააწკაპუნეთ აპლიკაციის პარამეტრები.
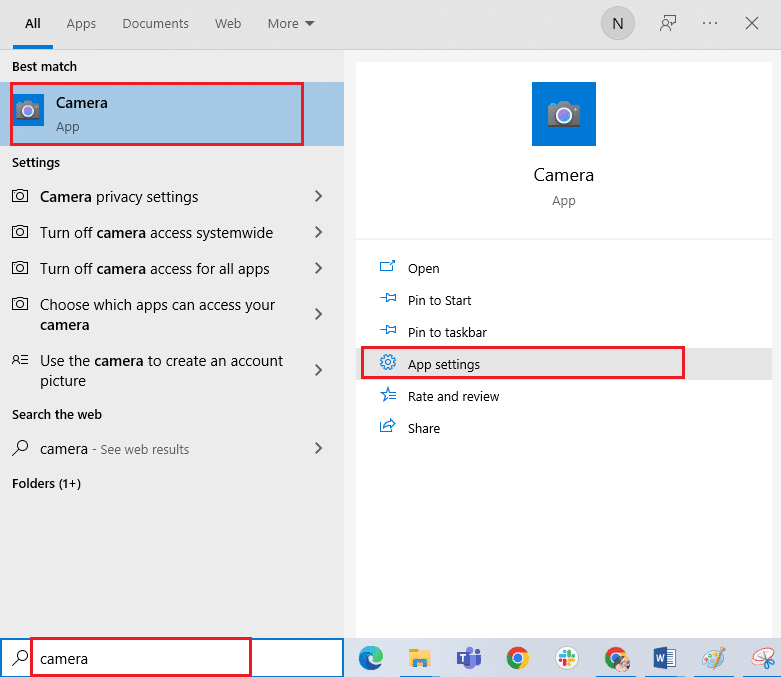
2. შემდეგ დააწკაპუნეთ აღდგენა ვარიანტი, როგორც ხაზგასმულია.
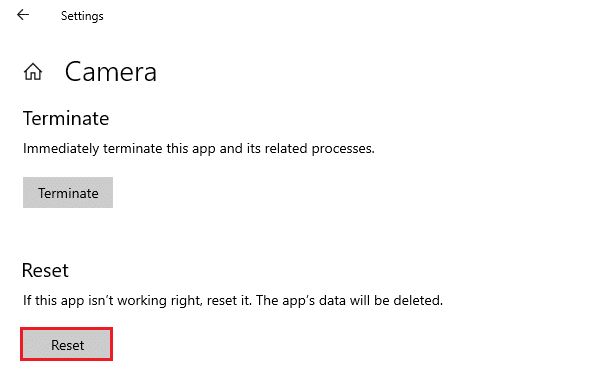
3. შემდეგი, დაადასტურეთ ნებისმიერი მოთხოვნა დაწკაპუნებით აღდგენა.
ასევე წაიკითხე: შეასწორეთ ლეპტოპის კამერა, რომელიც არ არის აღმოჩენილი Windows 10-ზე
მეთოდი 13: სისტემის აღდგენა
If there are any incompatible Windows updates on your computer, your PC will not work as usual it does. So, restore your computer to a state whether everything was working fine. Here are some instructions to restore your PC. To do so, follow our guide on How to use System Restore on Windows 10 and implement the instructions as demonstrated.
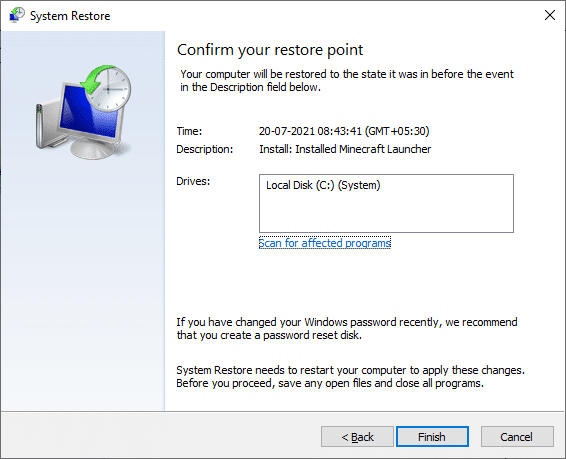
Windows 10 კომპიუტერის აღდგენის შემდეგ შეამოწმეთ, შეგიძლიათ თუ არა კამერის გამოყენება.
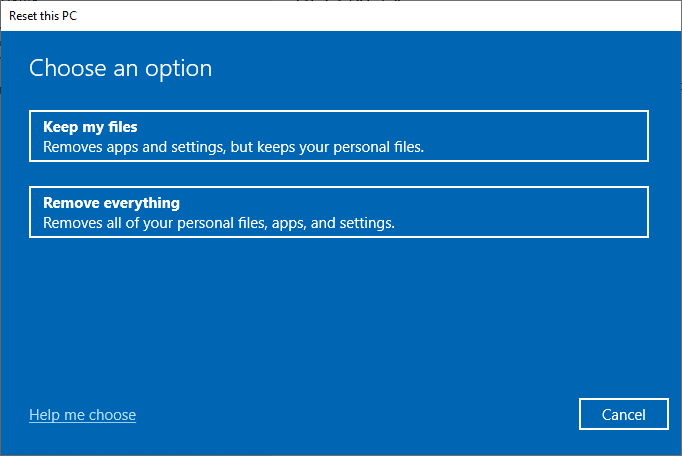
Method 14: Clean Install Windows 10
If none of the methods have helped you fix the said issue, then you have to clean install your Windows Operating System. To clean boot your computer, implement the steps as instructed in our guide to do a Clean Install of Windows 10
რეკომენდებული:
It would be really frustrating not being able to access your camera in the middle of the meetings, but now you would have fixed კამერა გამოიყენება by another app issue in Windows 10. Keep visiting our page for more cool tips & tricks and leave your comments below. Also, if you have any queries/suggestions regarding this article, then feel free to drop them in the comments section.