Fix Computer does not start until restarted multiple times

Fix Computer does not start until restarted multiple times: There seems to be a new issue with PC users, which is when they first turn ON their PC the power comes ON, fans start to spin but everything suddenly stops and PC never gets a display, in short, PC automatically turned OFF without any warning. Now if the user, powers off the PC and then turned it back ON, the computer boots normally without any additional issues. Basically, Computer does not start until restarted multiple times which is very annoying for basic Windows users.
Sometimes you need to boot up to 4-5 time before you could see the display or even boot your PC, but there is no guarantee that it will boot. Now living in this uncertainty, that you may or may not be able to use your PC next day is not such a good thing, so you need to address this problem immediately.
Now there are only a few issues which can cause this problem, so you can definitely troubleshoot this issue easily. The problem sometimes can be related to software like the main culprit seems to be Fast Startup in many cases and disabling it seems to fix the issue. But if this doesn’t fix the issue then you can be sure that the issue is related to hardware. In hardware, this can be a memory issue, faulty power supply, BIOS Settings or CMOS battery dried up, etc. So without wasting any time let’s see how to Fix Computer does not start until restarted multiple times with the help of the below-listed guide.
Fix Computer does not start until restarted multiple times
დარწმუნდით, რომ შექმენით აღდგენის წერტილი, თუ რამე არასწორედ მოხდება.
შენიშვნა: Some of the methods require expert supervision as you can seriously damage your PC while performing the steps, so if you don’t know what you’re doing then take your laptop/PC to a service repair center. If your PC is under warranty then opening the case can temper/void the warranty.
მეთოდი 1: გამორთეთ სწრაფი გაშვება
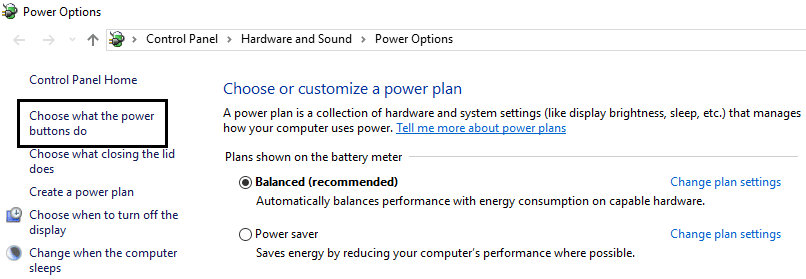
1.Press Windows Key + R then type control and hit Enter to open Მართვის პანელი.

2.Click on აპარატურა და ხმა შემდეგ დააჭირეთ დენის პარამეტრები.
3. შემდეგ მარცხენა ფანჯრის ფანჯრიდან აირჩიეთ “ამოირჩიეთ დენის ღილაკები."
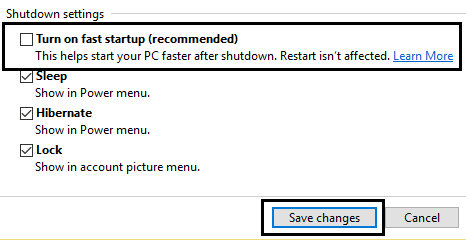
4. ახლა დააწკაპუნეთ "პარამეტრების შეცვლა, რომლებიც ამჟამად მიუწვდომელია."

5. მოხსენით მონიშვნა "ჩართეთ სწრაფი გაშვება”და დააჭირეთ ცვლილებების შენახვას.
მეთოდი 2: გაუშვით ავტომატური შეკეთება
1.ჩადეთ Windows 10 ჩამტვირთავი ინსტალაციის DVD და განაახლეთ კომპიუტერი.
2.When prompted to დააჭირეთ ნებისმიერ ღილაკს CD ან DVD-დან ჩატვირთვისთვის დააჭირეთ ნებისმიერ ღილაკს გასაგრძელებლად.

3. აირჩიეთ თქვენი ენის პარამეტრები და დააწკაპუნეთ შემდეგი. დააჭირეთ შეკეთებას თქვენი კომპიუტერი ქვედა მარცხენა მხარეს.

4. არჩევის ოფციის ეკრანზე დააწკაპუნეთ პრობლემების.

5. პრობლემების მოგვარების ეკრანზე დააწკაპუნეთ გაფართოებული ვარიანტი.
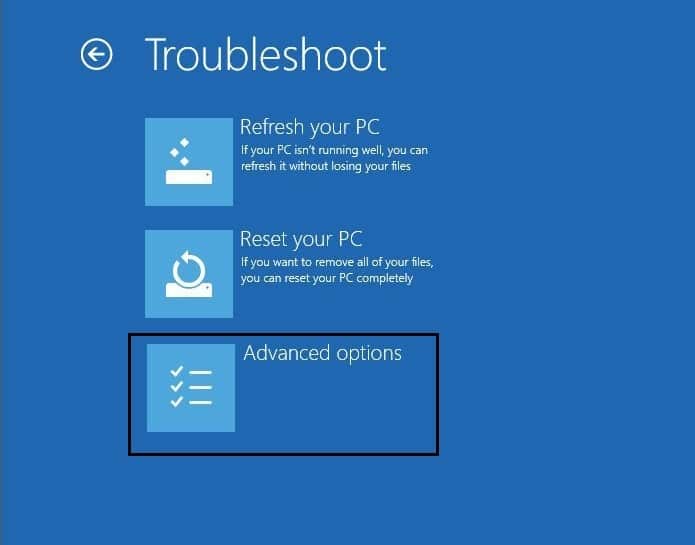
6. გაფართოებული პარამეტრების ეკრანზე დააწკაპუნეთ ავტომატური შეკეთება ან გაშვების შეკეთება.
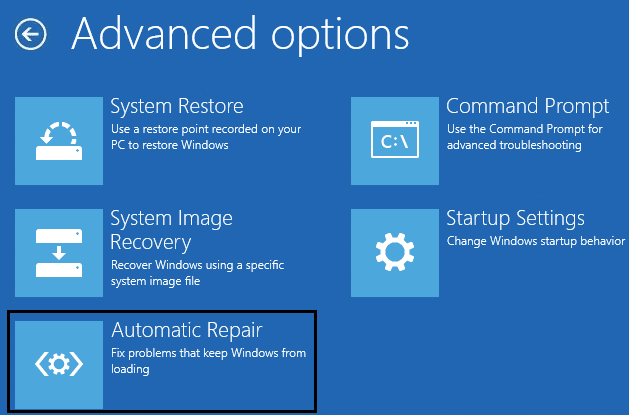
7.დაელოდეთ სანამ Windows ავტომატური/გაშვების შეკეთება დასრულება
8.გადატვირთეთ და წარმატებით გააკეთეთ Fix Computer does not start until restarted multiple times issue, თუ არა, გააგრძელე.
აგრეთვე წაიკითხეთ როგორ დავაფიქსიროთ ავტომატური შეკეთება ვერ შეაკეთა თქვენი კომპიუტერი.
მეთოდი 3: გადააყენეთ BIOS ნაგულისხმევ პარამეტრებზე
1.Turn off your laptop, then turn it on and simultaneously დააჭირეთ F2, DEL ან F12 (დამოკიდებულია თქვენი მწარმოებლის მიხედვით) შესვლისას BIOS დაყენება.

2.Now you’ll need to find the reset option to ჩატვირთეთ ნაგულისხმევი კონფიგურაცია და მას შეიძლება დაერქვას ნაგულისხმევად გადატვირთვა, ქარხნული პარამეტრების ჩატვირთვა, BIOS-ის პარამეტრების გასუფთავება, დაყენების ნაგულისხმევის ჩატვირთვა ან მსგავსი რამ.

3.Select it with your arrow keys, press Enter, and confirm the operation. Your BIOS ახლა გამოიყენებს მას ნაგულისხმევი პარამეტრები.
4.Once you’re logged into Windows see if you’re able to Fix Computer does not start until restarted multiple times issue.
Method 4: Check if hard disk is failing
In many cases, the issue occurs because of the failing hard disk and to check if this is the problem here you need to disconnect the hard disk from your PC and connect it to another PC and try to boot from it. If you can boot from the hard disk without any issue on the other PC then you can be sure that the issue is not related to it.
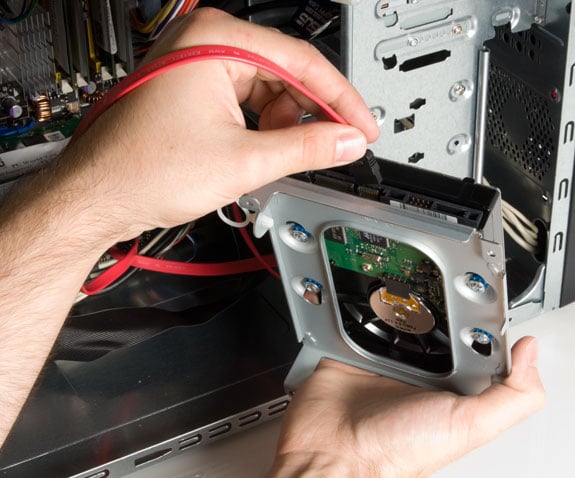
Another way to test your hard disk is download and burn the SeaTools for DOS on a CD then run the test to check if your hard disk is failing or not. You will need to set the first boot to CD/DVD from BIOS in order for this to work.
მეთოდი 5: შეამოწმეთ კვების წყარო
A faulty or failing Power Supply is generally the cause for PC not starting at the first boot. Because if the power consumption of hard disk is not met, it won’t get enough power to run and subsequently you may need to restart the PC several times before it can take the adequate power from PSU. In this case, you may need to replace the power supply with a new one or you could borrow a spare power supply to test if this is the case here.
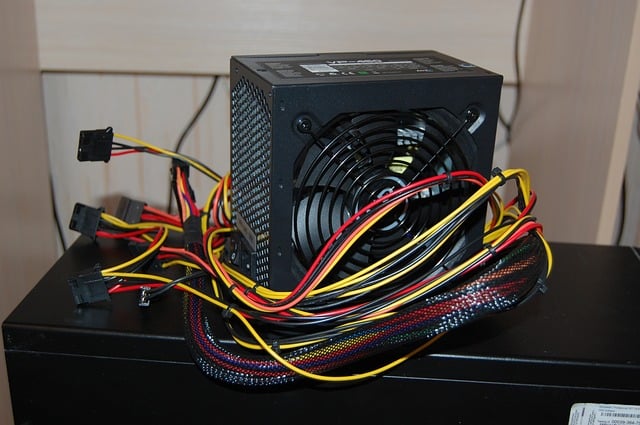
If you have recently installed a new hardware such as video card then chances are the PSU is not able to deliver the necessary power needed by the graphic card. Just temporary remove the hardware and see if this fixes the issue. If the issue is resolved then in order to use the graphic card you may need to purchase a higher voltage Power Supply Unit.
Method 6: Replace CMOS battery
If CMOS battery has dried up or no longer deliver powers then your PC won’t start and after few days it will eventually start hanging up. In order to fix the issue, it’s advised to replace your CMOS battery.
მეთოდი 7: ATX გადატვირთვა
შენიშვნა: ეს პროცესი ძირითადად ეხება ლეპტოპებს, ასე რომ, თუ თქვენ გაქვთ კომპიუტერი, დატოვეთ ეს მეთოდი.
1.Power off your laptop then remove the power cord, leave it for few minutes.
2.ახლა ამოიღეთ ბატარეა უკნიდან და ხანგრძლივად დააჭირეთ ჩართვის ღილაკს 15-20 წამის განმავლობაში.
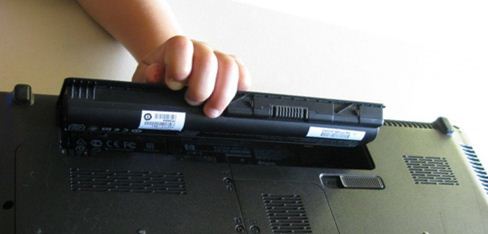
შენიშვნა: ჯერ არ დააკავშიროთ დენის კაბელი, ჩვენ გეტყვით როდის უნდა გააკეთოთ ეს.
3.Now plug in თქვენი დენის კაბელი (ბატარეა არ უნდა იყოს ჩასმული) და სცადეთ თქვენი ლეპტოპის ჩატვირთვა.
4.If it’s boot properly then again turn off your laptop. Put in the battery and again start your laptop.
If the problem is still there again turn off your laptop, remove power cord & battery. Press & hold the power button for 15-20 seconds and then insert the battery. Power on the laptop and this should fix the issue.
Now if any of the above methods weren’t helpful then it means the problem is with your motherboard and unfortunately, you need to replace it in order to fix the issue.
რეკომენდებული:
ეს არის ის, რაც თქვენ წარმატებით გაქვთ Fix Computer does not start until restarted multiple times issue მაგრამ თუ თქვენ ჯერ კიდევ გაქვთ რაიმე შეკითხვა ამ სახელმძღვანელოსთან დაკავშირებით, მოგერიდებათ ჰკითხოთ მათ კომენტარების განყოფილებაში.