Windows 10-ში დაწყების მენიუ არ მუშაობს

If you have recently updated or upgraded to Windows 10, then chances are your Start Menu may not work properly, making it impossible for users to navigate around Windows 10. Users are experiencing various issues with Start Menu such as Start Menu does not open, Start Button is not working, or Start Menu freezes etc. If your Start Menu isn’t working then don’t worry as today we will see a way to fix this issue.
This exact cause is different for different users because each user has a different system configuration and environment. But the problem can be related to anything like corrupted user account or drivers, damaged system files, etc. So without wasting any time, let’s see How to Fix Start Menu Not Working in Windows 10 with the help of the below-listed tutorial.
დარწმუნდით, რომ შექმენით აღდგენის წერტილი, თუ რამე არასწორედ მოხდება.
To run Command Prompt as an administrator, press Ctrl + Shift + Esc to open Task Manager. Then click on ფაილი აირჩიეთ ახალი დავალების განხორციელება. ტიპი cmd.exe და მონიშნე "შექმენით ეს ამოცანა ადმინისტრაციული პრივილეგიებით” then click OK. Similarly, to open PowerShell, type powershell.exe and again checkmark the above field then hit Enter.

მეთოდი 1: გადატვირთეთ Windows Explorer
1. დაჭერა Ctrl + Shift + Esc გასაღებები ერთად გასაშვებად Პროცესების ადმინისტრატორი.
2. იპოვნე explorer.exe სიაში, შემდეგ დააწკაპუნეთ მასზე მარჯვენა ღილაკით და აირჩიეთ დავალების დასრულება.

3. ახლა ეს დახურავს Explorer და ხელახლა გაუშვებს მას, დააწკაპუნეთ ფაილი > ახალი დავალების გაშვება.
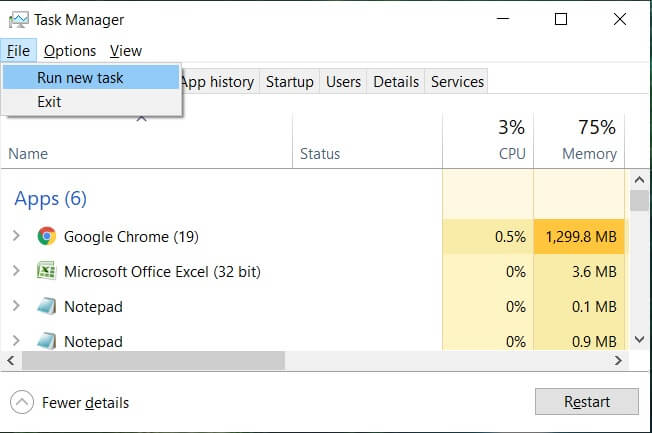
4. ტიპი explorer.exe და დააჭირეთ OK, რომ გადატვირთოთ Explorer.

5. Exit Task Manager and see if you’re able to Fix Start Menu Not Working in Windows 10.
6. If you’re still facing the issue, then log out from your account and re-login.
7. დაჭერა Ctrl+Shift+Del key at the same time and click on Signout.
8. Type in your password to login to Windows and see if you’re able to fix the issue.
Method 2: Create a new local administrator account
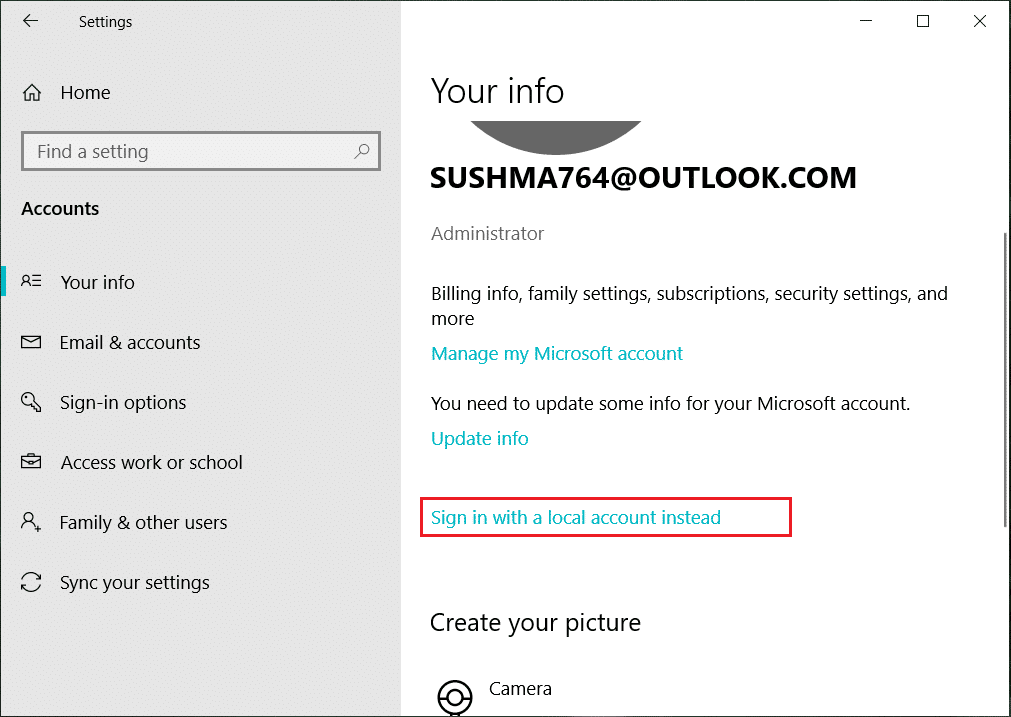
თუ ხელმოწერილი ხართ Microsoft-ის ანგარიშზე, მაშინ ჯერ წაშალეთ ამ ანგარიშის ბმული შემდეგი გზით:
1. დააჭირეთ Windows Key + R და შემდეგ ჩაწერეთ „ms- პარამეტრები:” (ბრჭყალების გარეშე) და დააჭირეთ Enter.
2. აირჩიეთ ანგარიში > სანაცვლოდ შედით ადგილობრივი ანგარიშით.
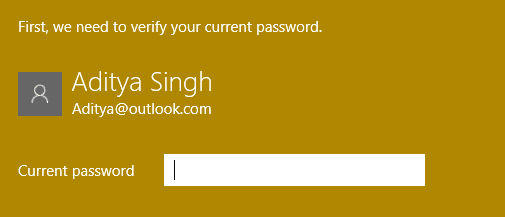
3. ჩაწერეთ თქვენი Microsoft- ის ანგარიშის პაროლი და დაწკაპეთ შემდეგი.
4. აირჩიეთ ა ახალი ანგარიშის სახელი და პაროლი, და შემდეგ აირჩიეთ Finish და გადით.
#1. Create the new administrator account:
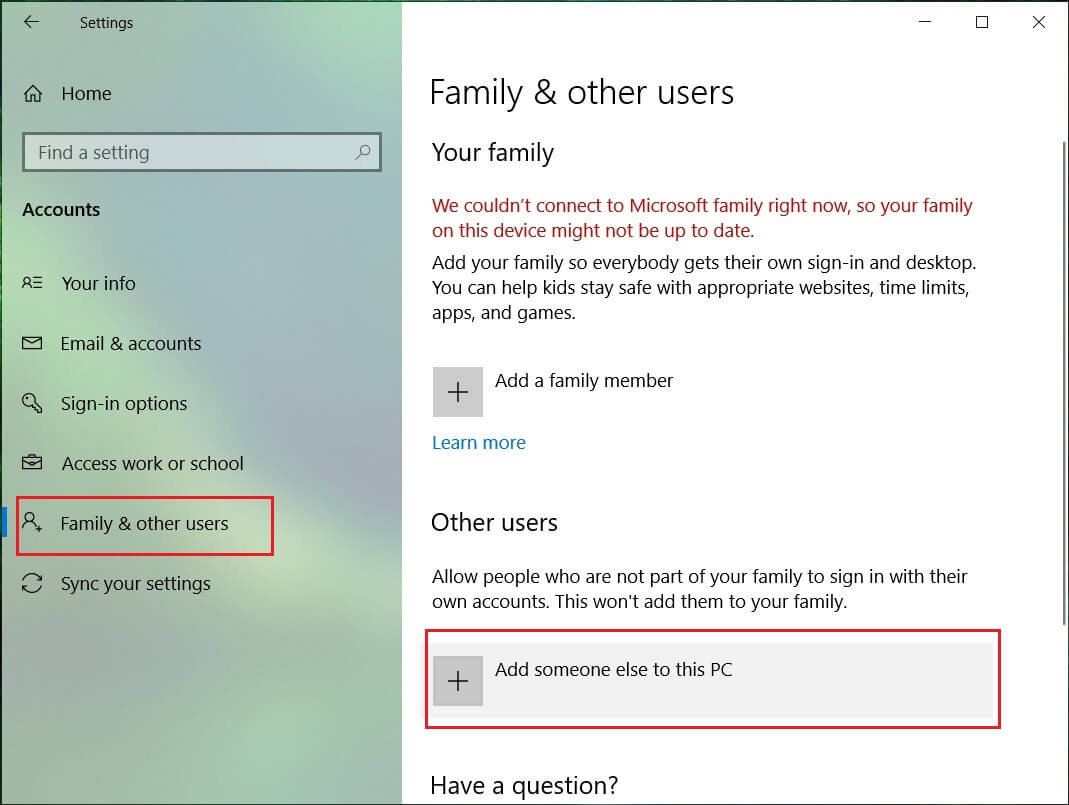
1. დააჭირეთ Windows Key + I გასახსნელად Settings და შემდეგ დააწკაპუნეთ ანგარიშები.
2. შემდეგ გადადით ოჯახი და სხვა ადამიანები.
3. სხვა ადამიანების ქვეშ დააწკაპუნეთ „დაამატეთ ვინმე ამ კომპიუტერს."
4. შემდეგი, მიუთითეთ სახელი user and a password then select Next.
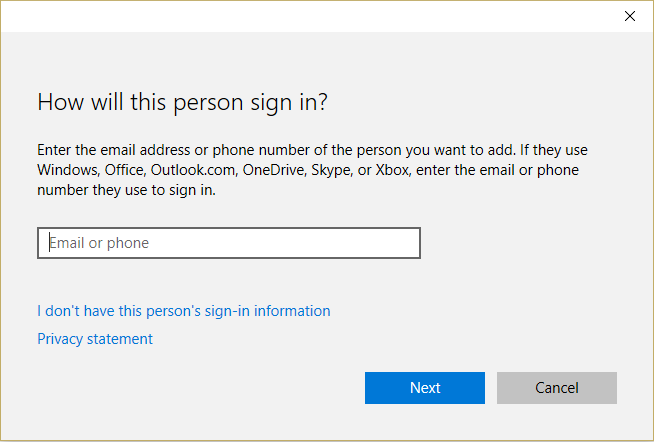
5. მითითებული მომხმარებლის სახელი და პაროლი, მაშინ აირჩიეთ შემდეგი> დასრულება.
#2. Next, make the new account an administrator account:
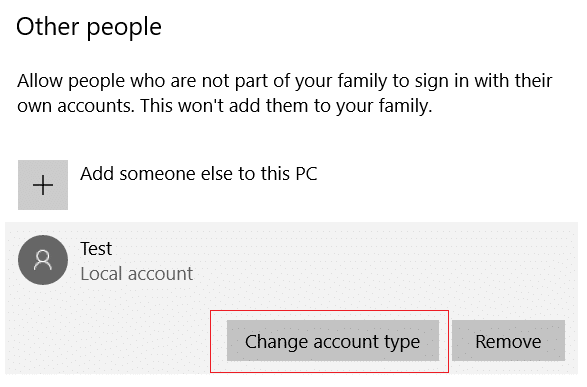
1. ისევ გახსენი Windows- ის პარამეტრები და დააჭირეთ ანგარიში.

2. წასვლა ოჯახი და სხვა ადამიანების ჩანართი.
3. სხვა ადამიანები ირჩევენ თქვენს მიერ ახლახან შექმნილ ანგარიშს და შემდეგ აირჩიეთ ა შეცვალეთ ანგარიშის ტიპი.
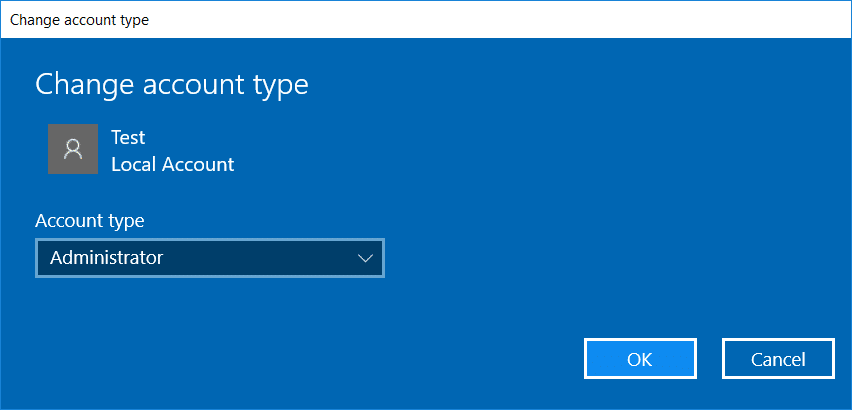
4. ანგარიშის ტიპის ქვეშ აირჩიეთ Administrator შემდეგ დააჭირეთ OK.
#3. If the issue persists try deleting the old administrator account:
1. შემდეგ კვლავ გადადით Windows Settings-ზე ანგარიში > ოჯახი და სხვა ადამიანები.
2. სხვა მომხმარებლების განყოფილებაში აირჩიეთ ძველი ადმინისტრატორის ანგარიში, დააწკაპუნეთ ამოღება, და აირჩიეთ წაშალეთ ანგარიში და მონაცემები.

3. If you were using a Microsoft account to sign in before, you can associate it with the new administrator by following the next step.
4. In Windows პარამეტრები > ანგარიშები, ამის ნაცვლად აირჩიეთ შესვლა Microsoft-ის ანგარიშით და შეიყვანეთ თქვენი ანგარიშის ინფორმაცია.
საბოლოოდ, თქვენ უნდა შეძლოთ Windows 10-ში დაწყების მენიუ არ მუშაობს as this step seems to fix the issue in most cases.
If you continue to experience Start Menu’s issue, it’s recommended to download and run Start Menu Troubleshooter.
1. Download and run Start Menu Troubleshooter.
2. ორჯერ დააწკაპუნეთ გადმოწერილი ფაილი და შემდეგ დააჭირეთ შემდეგი.
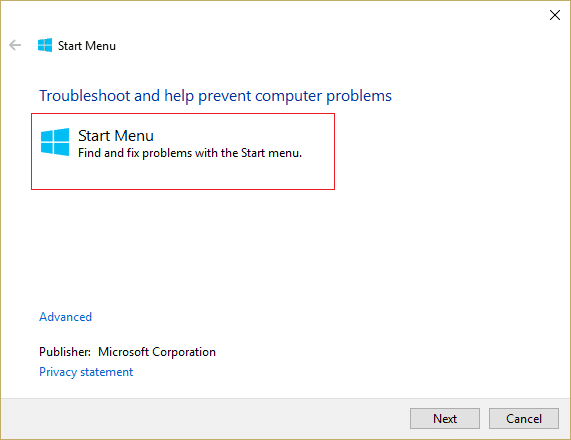
3. Let it finds and automatically Fixes Start Menu Not Working in Windows 10.
Method 4: Run System File Checker (SFC) and Check Disk
1. გახსენით Command Prompt. მომხმარებელს შეუძლია შეასრულოს ეს ნაბიჯი ძიებით "სმდ" შემდეგ დააჭირეთ Enter- ს.

2. ახლა ჩაწერეთ შემდეგი cmd-ში და დააჭირეთ enter:
Sfc /scannow sfc /scannow /offbootdir=c: /offwindir=c:windows

3. დაელოდეთ ზემოაღნიშნული პროცესის დასრულებას და დასრულების შემდეგ გადატვირთეთ კომპიუტერი.
4. შემდეგ გაუშვით CHKDSK დან შეასწორეთ ფაილური სისტემის შეცდომები Check Disk Utility-ით (CHKDSK).
5. დაასრულეთ ზემოაღნიშნული პროცესი და კვლავ გადატვირთეთ კომპიუტერი ცვლილებების შესანახად.
Method 5: Force Cortana to Rebuild Settings
Open Command Prompt with administrative rights then type the following one by one and hit Enter after each command:
CD /d "%LOCALAPPDATA%PackagesMicrosoft.Windows.Cortana_cw5n1h2txyewy"
Taskkill /F /IM SearchUI.exe
RD /S /Q Settings
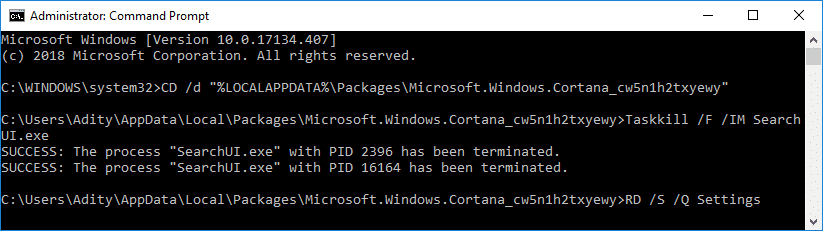
This will force Cortana to rebuild the settings and will Fix Start Menu and Cortana Not Working in Windows 10.
If the issue is still not resolved, follow this guide to fix any issues related to Cortana.
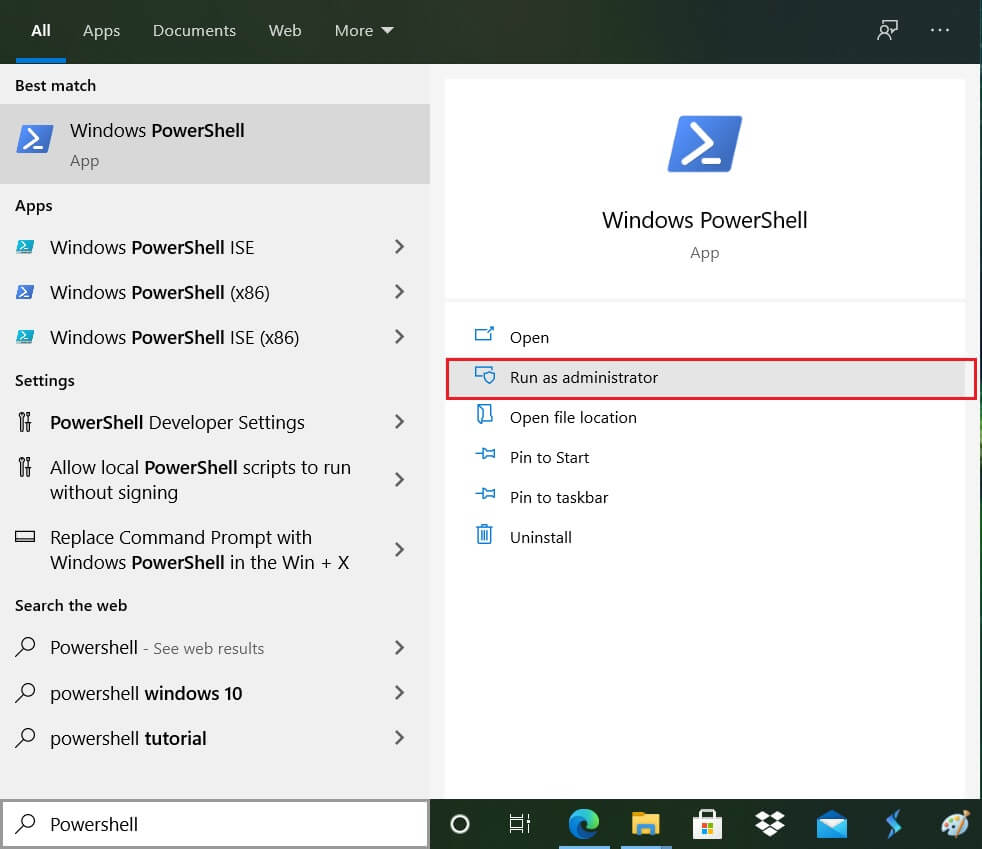
Method 6: Re-Register Windows App
1. ტიპი PowerShell Windows Search-ში, დააწკაპუნეთ მარჯვენა ღილაკით PowerShell-ზე და აირჩიეთ Ადმინისტრატორის სახელით გაშვება.
2. ახლა ჩაწერეთ შემდეგი ბრძანება PowerShell ფანჯარაში:
Get-AppXPackage -AllUsers | Foreach {Add-AppxPackage -DisableDevelopmentMode -Register "$ ($ _. InstallLocation) AppXManifest.xml"}

3. დაელოდეთ Powershell-მა შეასრულოს ზემოაღნიშნული ბრძანება და უგულებელყოთ რამდენიმე შეცდომა, რომელიც შეიძლება გამოჩნდეს.
4. გადატვირთეთ კომპიუტერი ცვლილებების შესანახად.
მეთოდი 7: რეესტრის შესწორება
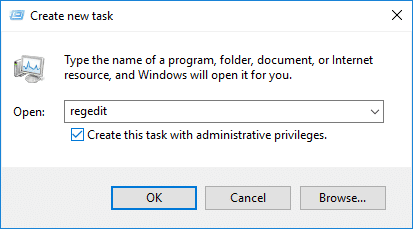
1. Press Ctrl + Shift + Esc to open Task Manager then click on ფაილი და აირჩიეთ ახალი დავალების შესრულება.
2. ტიპი regedit და მონიშნე "შექმენით ეს ამოცანა ადმინისტრაციული პრივილეგიებით” then click OK.
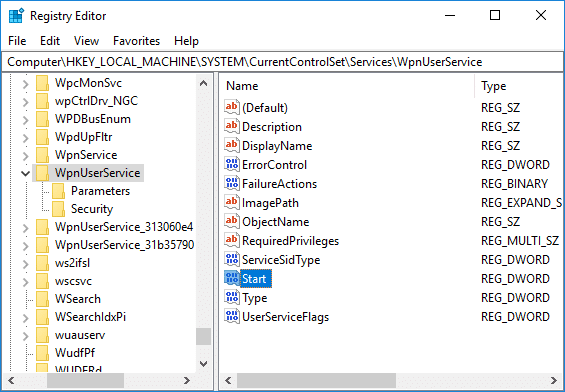
3. Now navigate to the following registry key in the Registry Editor:
ComputerHKEY_LOCAL_MACHINESYSTEMCurrentControlSetServicesWpnUserService
4. დარწმუნდით, რომ აირჩიეთ WpnUserService then in the right window double-click on the დაიწყეთ DWORD.
5. Change its value to 4 then click OK.
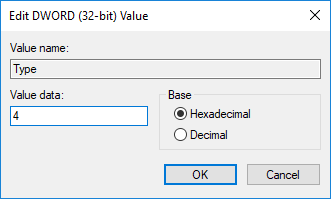
6. გადატვირთეთ კომპიუტერი ცვლილებების შესანახად.
მეთოდი 8: Windows 10-ის განახლება ან გადატვირთვა
შენიშვნა: If you can’t access your PC, restart your PC a few times until you start ავტომატური შეკეთება. შემდეგ ნავიგაცია პრობლემის მოგვარება > ამ კომპიუტერის გადატვირთვა > ყველაფრის ამოღება.
1. დააჭირეთ Windows Key + I გასახსნელად Settings და შემდეგ დააწკაპუნეთ განახლებისა და უსაფრთხოების ხატულა.
![]()
2. მარცხენა მენიუდან აირჩიეთ აღდგენა.
3. ქვეშ აღადგინეთ ეს კომპიუტერი, დააწკაპუნეთ "დაწყება"ღილაკი.

4. აირჩიეთ ვარიანტი შეინახეთ ჩემი ფაილი.

5. For the next step, you might be asked to insert Windows 10 installation media, so ensure you have it ready.
6. Now, select your Windows version and click მხოლოდ დისკზე, სადაც Windows არის დაინსტალირებული > remove my files.

5. დაწკაპეთ გადატვირთვის ღილაკი.
6. მიჰყევით ეკრანზე მითითებებს გადატვირთვის დასასრულებლად.
რეკომენდებული:
ეს არის ის, რაც თქვენ წარმატებით გაქვთ Windows 10-ში დაწყების მენიუ არ მუშაობს მაგრამ თუ თქვენ ჯერ კიდევ გაქვთ რაიმე შეკითხვა ამ გაკვეთილთან დაკავშირებით, მოგერიდებათ ჰკითხოთ მათ კომენტარების განყოფილებაში.