Fix Windows 10 install Fails With Error C1900101-4000D

Fix Windows 10 install Fails With Error C1900101-4000D: If you’re trying to upgrade to Windows 10 but the install fails with error code C1900101-4000D then don’t worry as it occurs because the Windows installer cannot access important files required for installation. Sometimes this error is also caused because of a conflict during installation but you can’t be sure as there is no error message accompanying this error.
0xC1900101-0x4000D
The installation failed in the SECOND_BOOT phase with an error during MIGRATE_DATA operation
While there is no definite fix for this issue but users seem to be recommending a clean installation of Windows 10 which should only be used as a last resort. So without wasting any time let’s see How to Fix Windows 10 install Fails With Error C1900101-4000D with the help of below-listed troubleshooting guide.
Fix Windows 10 install Fails With Error C1900101-4000D
წინაპირობები
a)Make sure to Update all drivers, including graphic, sound, BIOS, USB devices, printers, etc before the installing Windows 10.
b)Remove all external USB devices such as pen drive, external hard disk, USB keyboard & mouse, USB printer and all peripherals.
c)Use an ethernet cable instead of WiFi and disable WiFi until the update is complete.
Method 1: Temporarily Disable Antivirus and Firewall before attempting Upgrade
1. დააწკაპუნეთ მაუსის მარჯვენა ღილაკით ანტივირუსული პროგრამის ხატულა სისტემის უჯრიდან და აირჩიეთ გამორთვა.

2.შემდეგი, აირჩიეთ დრო, რომლისთვისაც ანტივირუსი გამორთული დარჩება.

შენიშვნა: აირჩიეთ ყველაზე მცირე დრო, მაგალითად 15 წუთი ან 30 წუთი.
3.Once done, again try to upgrade your PC and check if the error resolves or not.
4.Type control in the Windows Search then click on პანელი ძებნის შედეგიდან.

5. შემდეგი, დააწკაპუნეთ Სისტემა და უსაფრთხოება.
6. შემდეგ დააწკაპუნეთ Windows Firewall.

7.ახლა მარცხენა ფანჯრის ფანჯრიდან დააწკაპუნეთ ჩართეთ ან გამორთეთ Windows Firewall.

8.აირჩიეთ გამორთეთ Windows Firewall და გადატვირთეთ კომპიუტერი. Again try to upgrade your PC and see if you’re able to Fix Windows 10 install Fails With Error C1900101-4000D.
თუ ზემოთ მოყვანილი მეთოდი არ მუშაობს, დარწმუნდით, რომ მიჰყევით ზუსტად იგივე ნაბიჯებს თქვენი Firewall-ის ხელახლა ჩართვისთვის.
Method 2: Remove any hyphens from your computer or machine name
1. დააჭირეთ Windows Key + R და შემდეგ ჩაწერეთ sysdm.cpl და დააჭირეთ Enter- ს გასახსნელად სისტემის თვისებები.

2.Make sure you’re under კომპიუტერის სახელის ჩანართი შემდეგ დააჭირეთ შეცვლა ღილაკს ბოლოში.
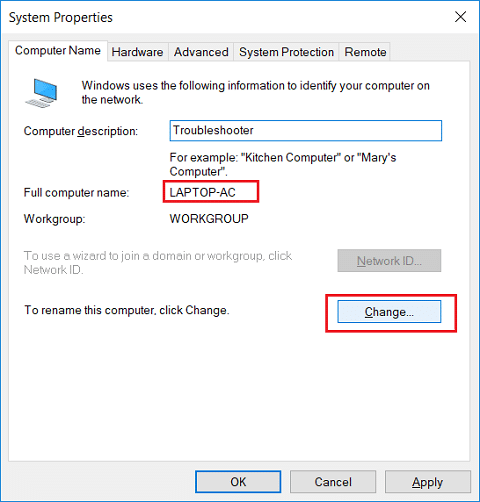
3.Make sure your machine name is simple no periods or hyphens or dashes.
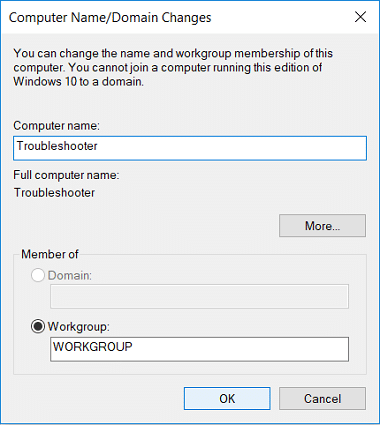
4.Click OK then Apply followed by OK.
5. გადატვირთეთ კომპიუტერი ცვლილებების შესანახად.
მეთოდი 3: დარწმუნდით, რომ Windows განახლებულია
1. დააჭირეთ Windows Key + I და შემდეგ აირჩიეთ განახლება და უსაფრთხოება.

2. შემდეგი, კვლავ დააწკაპუნეთ შეამოწმოთ განახლებები და დარწმუნდით, რომ დააინსტალირეთ ნებისმიერი მომლოდინე განახლება.

3. განახლებების დაინსტალირების შემდეგ გადატვირთეთ კომპიუტერი და ნახეთ, შეძლებთ თუ არა Fix Windows 10 install Fails With Error C1900101-4000D.
მეთოდი 4: შეასრულეთ სუფთა ჩექმა
This would make sure that if any 3rd party application is conflicting with Windows update then you will be able to successfully install Windows Updates inside Clean Boot. Sometimes 3rd party software can conflict with Windows Update and therefore cause Windows Update to be Stuck. In order, Fix Windows 10 install Fails With Error C1900101-4000D, თქვენ უნდა შეასრულოთ სუფთა ჩატვირთვა თქვენს კომპიუტერზე და დაადგინოთ პრობლემა ეტაპობრივად.

Method 5: Upgrade using Windows 10 Media Creation Tool
1.Download Media Creation Tool here.
2.Backup your data from system partition and save your license key.
3.Start the tool and choose to Upgrade this PC now.
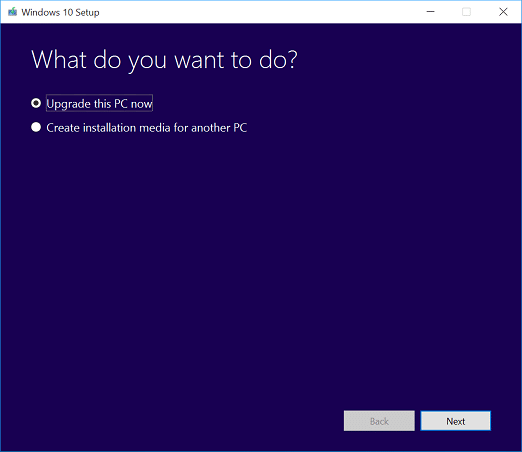
4.Accept the license terms.
5.After the installer is ready, choose to Keep personal files and apps.
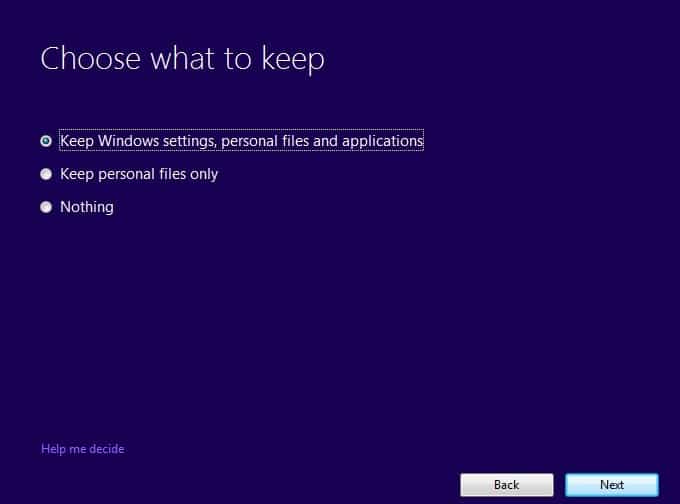
6.The PC will restart few times and your PC would be successfully upgraded.
მეთოდი 6: გაუშვით SFC და DISM
1. დააჭირეთ Windows Key + X და შემდეგ დააწკაპუნეთ ბრძანების ხაზი (ადმინისტრატორი).

2. ახლა ჩაწერეთ შემდეგი cmd-ში და დააჭირეთ Enter:
Sfc /scannow sfc /scannow /offbootdir=c: /offwindir=c:windows (თუ ზემოთ ვერ მოხერხდა, სცადეთ ეს)

3. დაელოდეთ ზემოაღნიშნული პროცესის დასრულებას და დასრულების შემდეგ გადატვირთეთ კომპიუტერი.
4. ისევ გახსენით cmd და აკრიფეთ შემდეგი ბრძანება და თითოეულის შემდეგ დააჭირეთ Enter:
ა) Dism /Online /Cleanup-Image /CheckHealth ბ) Dism /ონლაინ /Cleanup-Image /ScanHealth გ) Dism /ონლაინ /Cleanup-Image /RestoreHealth

5.გაუშვით DISM ბრძანება და დაელოდეთ მის დასრულებას.
6. თუ ზემოაღნიშნული ბრძანება არ მუშაობს, მაშინ სცადეთ შემდეგი:
Dism /Image:C:offline /Cleanup-Image /RestoreHealth /Source:c:testmountwindows Dism /ონლაინ /Cleanup-Image /RestoreHealth /წყარო:c:testmountwindows /LimitAccess
შენიშვნა: შეცვალეთ C:RepairSourceWindows თქვენი სარემონტო წყაროს მდებარეობით (Windows Installation ან Recovery Disc).
7. გადატვირთეთ კომპიუტერი, რომ შეინახოთ ცვლილებები და ნახოთ, შეძლებთ თუ არა Fix Windows 10 install Fails With Error C1900101-4000D.
Method 7: Reset Windows Updates Components
1. დააჭირეთ Windows Key + X და შემდეგ აირჩიეთ ბრძანების მოთხოვნა (Admin).
2. ახლა ჩაწერეთ შემდეგი ბრძანებები Windows Update Services-ის შესაჩერებლად და შემდეგ დააჭირეთ Enter თითოეული მათგანის შემდეგ:
net stop wuauserv
net stop cryptSvc
წმინდა გაჩერება ბიტი
net stop msiserver

3.შემდეგი, ჩაწერეთ შემდეგი ბრძანება SoftwareDistribution Folder-ის გადარქმევის მიზნით და შემდეგ დააჭირეთ Enter:
ren C: WindowsSoftwareDistribution SoftwareDistribution.old
ren C: WindowsSystem32catroot2 catroot2.old

4. და ბოლოს, აკრიფეთ შემდეგი ბრძანება Windows Update Services-ის დასაწყებად და თითოეულის შემდეგ დააჭირეთ Enter:
წმინდა დაწყება wuauserv
net start cryptSvc
წმინდა დაწყება ბიტი
net start msiserver

5. გადატვირთეთ თქვენი კომპიუტერი ცვლილებების შესანახად და შეამოწმეთ თუ შეგიძლიათ Fix Windows 10 install Fails With Error C1900101-4000D.
Method 8: Delete Registry for Mounted Images
1. დააჭირეთ Windows Key + R და შემდეგ ჩაწერეთ regedit და დააჭირეთ Enter-ს რეესტრის რედაქტორის გასახსნელად.

2. გადადით შემდეგ რეესტრის გასაღებზე:
HKEY_LOCAL_MACHINESOFTWAREMicrosoftWIMMountMounted Images
3. აირჩიეთ Mounted Images then in the right window pane right-click on (Default) and select Delete.
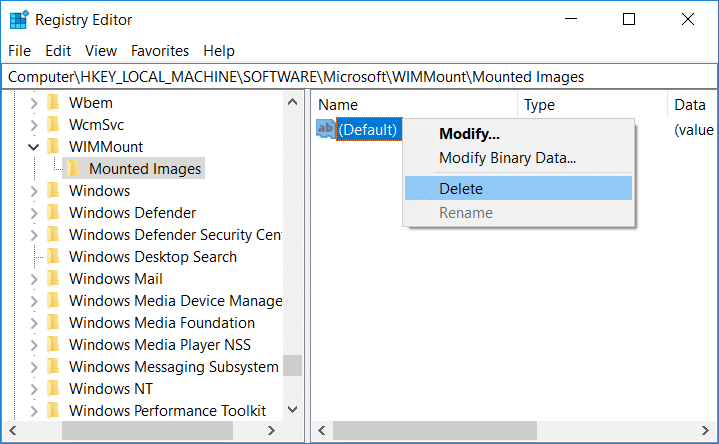
4.Exit Registry Editor and reboot your PC to save changes.
Method 9: Disable Wi-Fi Adapter and CD/DVD Drive
1. დააჭირეთ Windows Key + R და შემდეგ ჩაწერეთ devmgmt.msc და დააჭირეთ Enter, რომ გახსნათ მოწყობილობის მენეჯერი.

2.Expand DVD/CD-ROM drives, შემდეგ დააწკაპუნეთ მარჯვენა ღილაკით თქვენს CD/DVD დისკი და აირჩიეთ გამორთეთ მოწყობილობა.

3.Similarly, expand Network adapters then right-click on your WiFi ადაპტერი და აირჩიეთ გამორთეთ მოწყობილობა.
4.Again try to run Windows 10 setup and see if you’re able to Fix Windows 10 install Fails With Error C1900101-4000D.
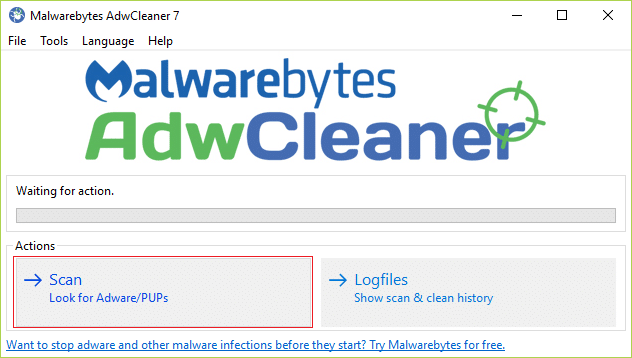
Method 10: Run Malwarebytes and AdwCleaner
Malwarebytes არის ძლიერი მოთხოვნის სკანერი, რომელმაც უნდა წაშალოს ბრაუზერის გამტაცებლები, adware და სხვა სახის მავნე პროგრამები თქვენი კომპიუტერიდან. მნიშვნელოვანია აღინიშნოს, რომ Malwarebytes იმუშავებს ანტივირუსულ პროგრამასთან ერთად კონფლიქტების გარეშე. Malwarebytes Anti-Malware-ის ინსტალაციისა და გასაშვებად, გადადით ამ სტატიაზე და მიჰყევით თითოეულ ნაბიჯს.
1.Download AdwCleaner from this link.
2.Once the download is complete, double-click on the adwcleaner.exe file პროგრამის გასაშვებად.
3. დააწკაპუნეთ "ვეთანხმები”ღილაკს accept the license agreement.
4.On the next screen, click the სკანირების ღილაკი under Actions.
5.Now, wait for the AdwCleaner to search for PUPs and other malicious programs.
6. სკანირების დასრულების შემდეგ დააწკაპუნეთ სუფთა in order to clean your system of such files.
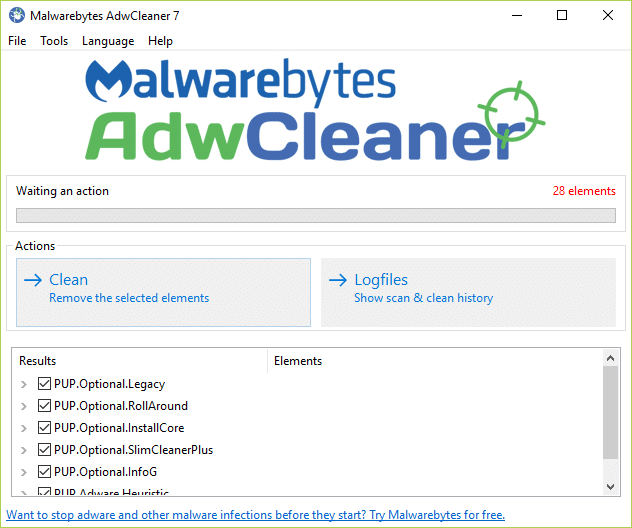
7.Save any work you might be doing as your PC will need to reboot, click OK to reboot your PC.
8.Once the computer reboots, a log file will open which will list all of the files, folders, registry keys, etc that were removed in the previous step.
რეკომენდებული:
ეს არის ის, რაც თქვენ წარმატებით გაქვთ Fix Windows 10 install Fails With Error C1900101-4000D მაგრამ თუ თქვენ ჯერ კიდევ გაქვთ რაიმე შეკითხვა ამ სახელმძღვანელოსთან დაკავშირებით, მოგერიდებათ ჰკითხოთ მათ კომენტარების განყოფილებაში.