Windows 10 жүйесінде MultiVersus іске қосылмағанын түзетіңіз

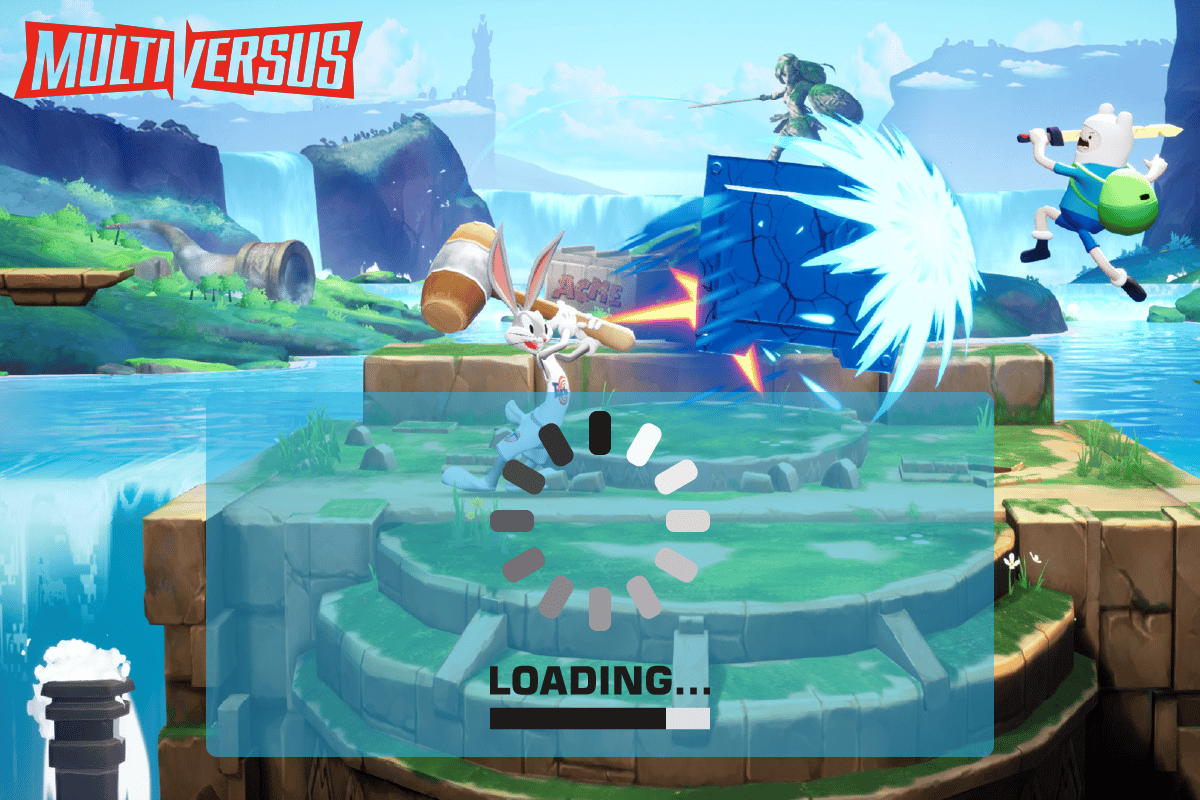
MultiVersus is a famous online multiplayer fighting game that is rocking today’s gaming world. Yet, few users complain about the MultiVersus not launching issue when the game is launched on their Windows 10 PC. If you are in the same boat, the troubleshooting hacks discussed in this article will help you sail the problem.
How to Fix MultiVersus Not Launching in Windows 10
If you are vexed by MultiVersus won’t launch issue in your Windows 10 computer, here are a few possible reasons why you must analyze them carefully to sort out the problem.
- ДК ойынның негізгі талаптарына сәйкес келмейді.
- Кейбір басқа фондық бағдарлама ойынға кедергі келтіруде.
- Сіз драйверлердің расталмаған нұсқасын пайдаланып жатырсыз.
- Ойынның графикалық параметрлері қате конфигурацияланған.
- Зиянды бағдарламалар мен вирустардың болуы.
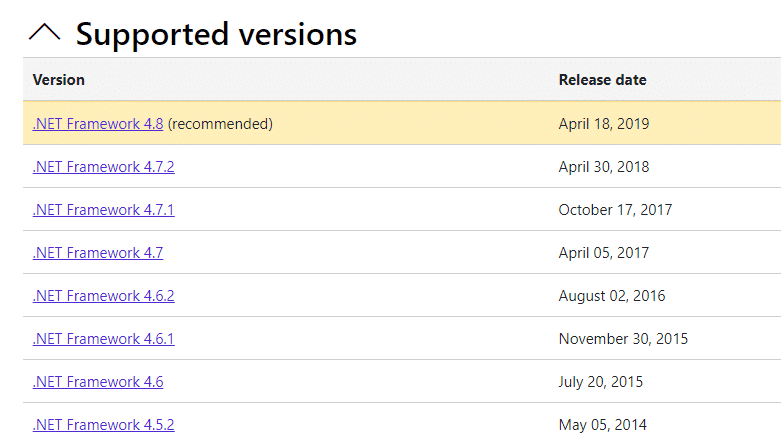
- .NET негізі және операциялық жүйесі соңғы нұсқасына жаңартылмаған.
- DirectX нұсқасы жаңартылмаған.
- Оверклокинг.
- Ойынның қате конфигурацияланбаған немесе бүлінген орнату файлдары да мәселені тудырады.
- Microsoft C++ қайта таралатын файлдар ойынмен және компьютермен үйлесімді емес.
Here are a few possible troubleshooting methods that will help you fix the discussed issue.
1-әдіс: Ақауларды жоюдың негізгі әдістері
Аталған мәселені шешу үшін осы негізгі ақаулықтарды жою әдістерін орындаңыз.
1А. Жүйе талаптарын тексеріңіз
Мульти қарсы Ең төменгі жүйелік талаптар
- Орталық Есептеуіш Бөлім: Intel Core i5-2300 or AMD FX-8350
- Жедел Жадтау Құрылғысы: 4 ГБ
- ВИДЕО КАРТА: Nvidia GeForce GTX 550 Ti or AMD Radeon HD 5850 | Intel UHD 750
- ПИКСЕЛЬ ШЕЙДЕРЛЕР: 5.0
- ШЫҒЫ РЕҢЕКТЕР: 5.0
- ТЕГІН ДИСК КЕҢІСТІГІ: 6 ГБ
- АРНАЛҒАН БЕЙНЕ ЖАД: 1024 МБ
Мульти қарсы Ұсынылған талаптар
- Орталық Есептеуіш Бөлім: Intel Core i5-3470 немесе AMD Ryzen 3 1200
- Жедел Жадтау Құрылғысы: 8 ГБ
- ВИДЕО КАРТА: Nvidia GeForce GTX 660 or AMD Radeon R9 270
- ПИКСЕЛЬ ШЕЙДЕРЛЕР: 5.0
- ШЫҒЫ РЕҢЕКТЕР: 5.0
- ТЕГІН ДИСК КЕҢІСТІГІ: 6 ГБ
- АРНАЛҒАН БЕЙНЕ ЖАД: 2048 МБ
1B. Check your internet connection
Unstable internet connection leads to MultiVersus is not working issue, also if there are any obstacles between your router and your computer, they may interfere with the wireless signal and will cause intermittent connection problems.
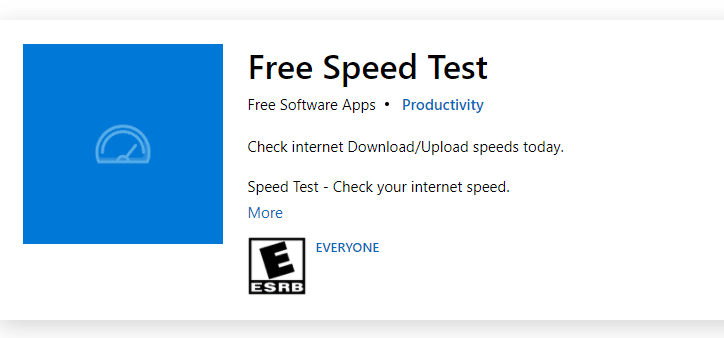
Сіз а жылдамдықты сынау дұрыс қосылу үшін қажетті желі жылдамдығының оңтайлы деңгейін білу.
Құрылғының төмендегі шарттарға сәйкес келетініне көз жеткізіңіз.
- Желіңіздің сигнал күшін табыңыз және ол өте төмен болса, жол арасындағы барлық кедергілерді жойыңыз.
- Бір желіге қосылған тым көп құрылғыларды болдырмаңыз.
- Әрқашан Интернет провайдері (ISP) растаған модемді/маршрутизаторды сатып алыңыз және оларда қайшылықтар болмайды.
- Қолданбаңыз ескі, сынған немесе зақымдалған кабельдер. Қажет болса, кабельдерді ауыстырыңыз.
- Модемнен маршрутизаторға және модемнен қабырғаға баратын сымдар тұрақты және кедергі жоқ екеніне көз жеткізіңіз.
Интернетке қосылуда қандай да бір мәселелер туындаса, ақаулықтарды жою үшін Windows 10 жүйесінде желіге қосылу ақауларын жою жолы нұсқаулығын қараңыз.
1C. Stop Overclocking
- Every high-end computer is built with the option of Overclocking which helps in outputting more juice than your specifications that you already have. Running the graphics card or processor faster than the default speed refers to overclocking.
- Бұл жағдайда компьютер белгілі бір уақыттан кейін ең жоғары температураға жетеді. Компьютер мұны анықтайды және ол салқындағанша сағат жылдамдығын қалыпты жылдамдыққа реттейді. Олар суығаннан кейін сағат жылдамдығы қайтадан жоғарылайды.
- Бұл сіздің компьютеріңіздің өнімділігін арттырады және егер сізде қуатты компьютер болмаса, үлкен көмек болады.
- It must be noted that all the games do not support overclocking. The same applies to MultiVersus. So, you must try disabling all overclocking on your computer and try launching the game. If it launches well, the issue is fixed.
1D. Зиянды бағдарламаны сканерлеуді іске қосыңыз
The presence of a virus or malware attack will result in gaming problems on your computer. If in case, the virus attack is very severe, you cannot connect to any online game continuously at all. To resolve the problem, you have to remove the virus or malware completely from your Windows 10 computer.
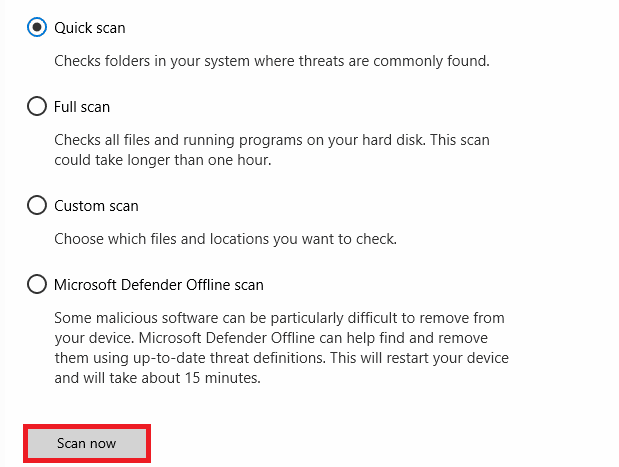
Сізге нұсқаулықта көрсетілгендей компьютерді сканерлеу ұсынылады. Компьютерде вирусты сканерлеуді қалай іске қосуға болады?
Сондай-ақ, компьютеріңізден зиянды бағдарламаны жойғыңыз келсе, Windows 10 жүйесінде компьютерден зиянды бағдарламаны қалай жоюға болады деген нұсқаулықты қараңыз.
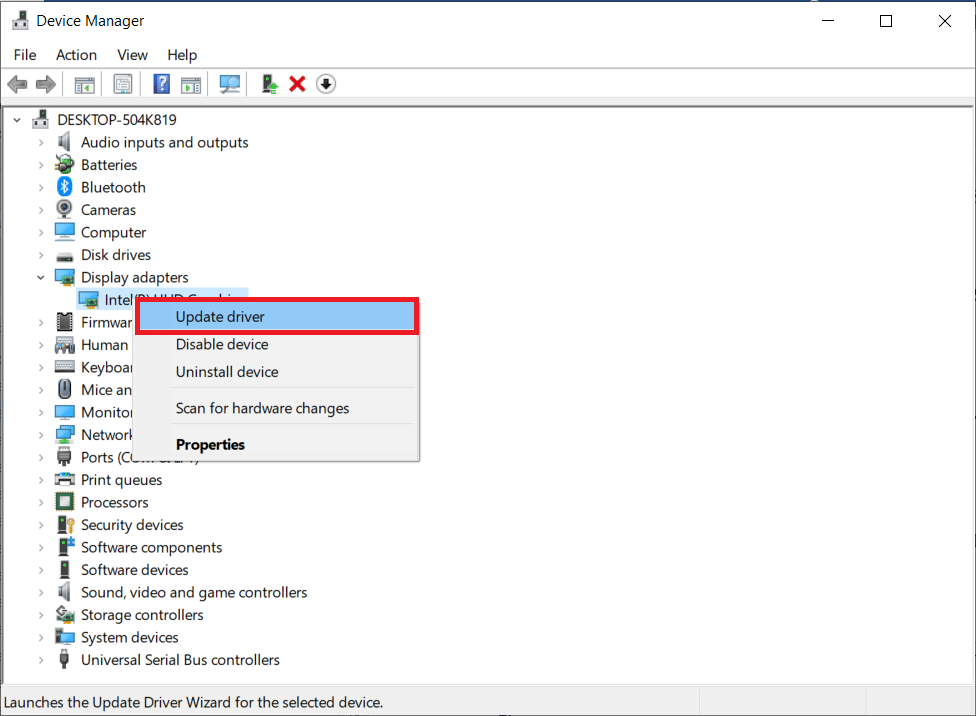
1E. Update GPU Drivers
Graphical drivers are responsible for heavy graphical images and video processing games. If you face any launching conflicts in the MultiVersus game, make sure you use an updated version of device drivers, as they serve as a link between the hardware and Operating System of your PC. Many users have suggested that updating drivers have fixed MultiVersus not working issue. Read and implement the steps instructed in our guide 4 Ways to Update Graphics Drivers in Windows 10 to do so.
Сондай-ақ оқыңыз: Құрылғыңыз үшін Windows табылған драйверлерді түзетіңіз, бірақ қатеге тап болдыңыз
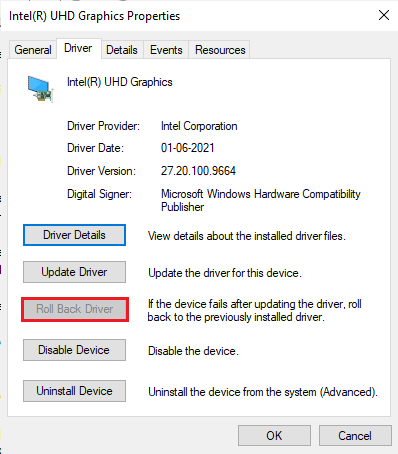
1F. Roll Back GPU Drivers
Sometimes, the current version of GPU drivers may cause the discussed launching issue in MultiVersus, and in this case, you have to restore previous versions of installed drivers. This process is called драйверлерді кері қайтару және Windows 10 жүйесінде драйверлерді қалай қайтару туралы нұсқаулықты орындау арқылы компьютер драйверлерін бұрынғы күйіне оңай қайтаруға болады.
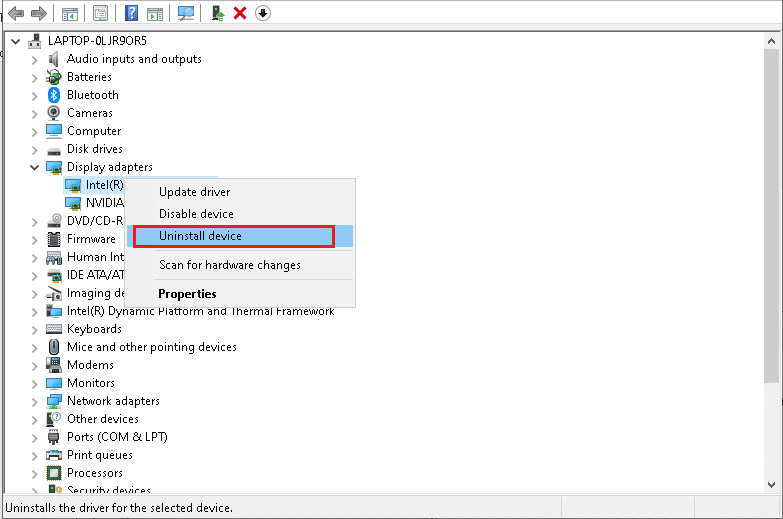
1G. Reinstall GPU Driver
If you still face MultiVersus not starting issue after updating your GPU drivers, then reinstall device drivers to fix any incompatibility issues. There are several ways to reinstall drivers on your computer. Yet, you can easily reinstall Graphical drivers as instructed in our guide How to Uninstall and Reinstall Drivers on Windows 10.
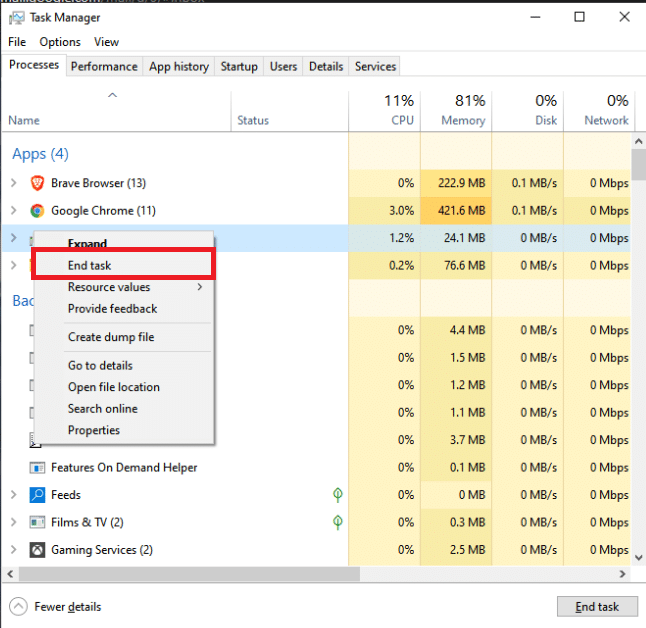
1H. End Background Processes
Several users have confirmed that MultiVersus not starting on PC can be resolved by closing all the background tasks running on your PC. To implement the task, follow our guide How to End Task in Windows 10, and proceed as instructed.
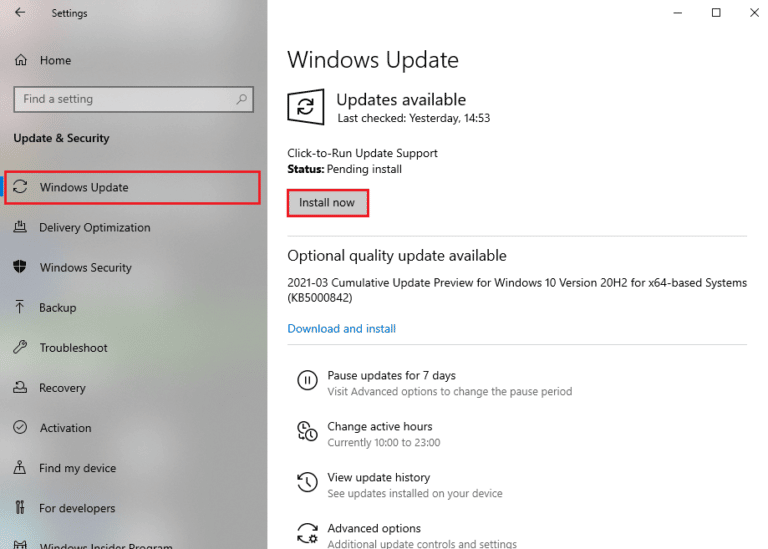
1I. Update Windows
You can also eradicate bugs in your computer and game by updating your Operating System. Always ensure if you have updated your Windows Operating System and if any updates are pending in action, use our guide How to Download and Install Windows 10 Latest Update
1J. Disable Antivirus Temporarily (If Applicable)
Some incompatible antivirus programs installed on your computer will cause MultiVersus launching problem. To avoid conflicts, you must ensure the security settings of your Windows 10 computer and check if they are stable or not. To find whether the antivirus suite is the reason for the discussed issue, disable it once and try connecting to a network.
Windows 10 жүйесінде антивирусты уақытша өшіру туралы нұсқаулықты оқыңыз және антивирустық бағдарламаны компьютерде уақытша өшіру үшін нұсқауларды орындаңыз.
Компьютеріңіздегі антивирустық бағдарламаны өшіргеннен кейін мәселеңізді түзететін болсаңыз, бағдарламаны компьютерден толығымен жою ұсынылады.
Read our guide Force Uninstall Programs which won’t Uninstall in Windows 10 to uninstall your antivirus program on your computer.
Сондай-ақ оқыңыз: Windows 10 жүйесінде McAfee LiveSafe бағдарламасын қалай жоюға болады
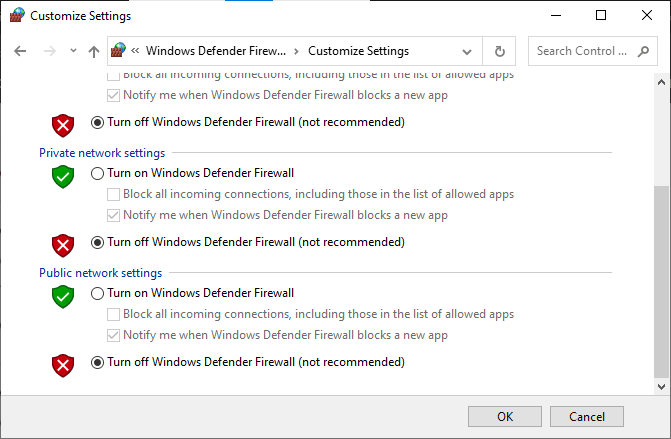
1K. Turn Off Windows Defender Firewall (Not Recommended)
Your computer will face MultiVersus is not working issue, due to an over-protective firewall suite in the Windows 10 PC. To resolve the problem, you can either add a new rule for your game, whitelist the game or as the last fix, disable the firewall temporarily.
Our guide on How to Disable Windows 10 Firewall will help you.
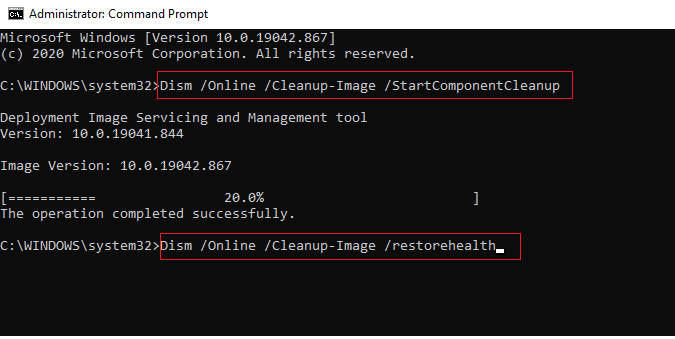
1л. Жүйе файлдарын жөндеу
If there are any missing or damaged files on your Windows 10 PC, you will face MultiVersus takes forever to launch issue. Yet, you are repairing these corrupt files by using inbuilt utilities namely, Жүйелік файл тексергіші және Қолдануды басқару және басқару.
Windows 10 жүйесінде жүйелік файлдарды жөндеу туралы нұсқаулықты оқып шығыңыз және барлық бүлінген файлдарды жөндеу үшін нұсқауларды орындаңыз.
Method 2: Run MultiVersus Game as Administrator
If MultiVersus does not have required administrative privileges, a few essential features of the game will be limited causing you MultiVersus not launching issue whenever you open the game or install any updates. Follow the below-mentioned instructions to run the game as an administrator.
1. тінтуірдің оң жағын басыңыз MultiVersus shortcut Жұмыс үстелінде.
Ескерту: Сіз сондай -ақ баруға болады орнату каталогы және оны тінтуірдің оң жағымен басыңыз.
2. Содан кейін, таңдаңыз Сипаттар опция.
3. Енді келесіге өтіңіз сыйысымдылық қойындысын нұқыңыз Бұл бағдарламаны әкімші ретінде іске қосыңыз.
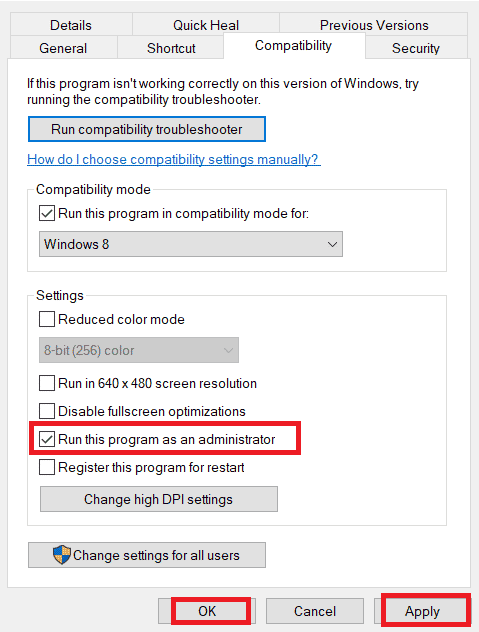
4. Соңында түймесін басыңыз Қолдану> OK өзгерістерді сақтау.
Check if you have fixed MultiVersus launching issues.
Сондай-ақ оқыңыз: Windows 10 жүйесінде WoW іске қосылуы мәңгілікке созылады
3-әдіс: Ойын процесінің басымдығын өзгерту
The preference of an application or process tells the computer the importance and if it should be given preference over the others while allocating the resources. The priority of every application is normal except the system processes, by default. MultiVersus might crash if it didn’t get enough resources.
1. Түймесін басыңыз Ctrl + Shift + Esc пернелері ашу үшін бірге Тапсырмалар панелі.
2. Енді іздеңіз MultiVersus process.
3. Содан кейін басымдылықты өзгертіңіз Жоғары басымдық және бұл жұмыс істейтінін тексеріңіз.
Ескерту: Басымдылықты абайлап өзгертіңіз, себебі процестің басымдылығын абайсызда өзгерту жүйеңізді өте баяу немесе тұрақсыз етуі мүмкін.
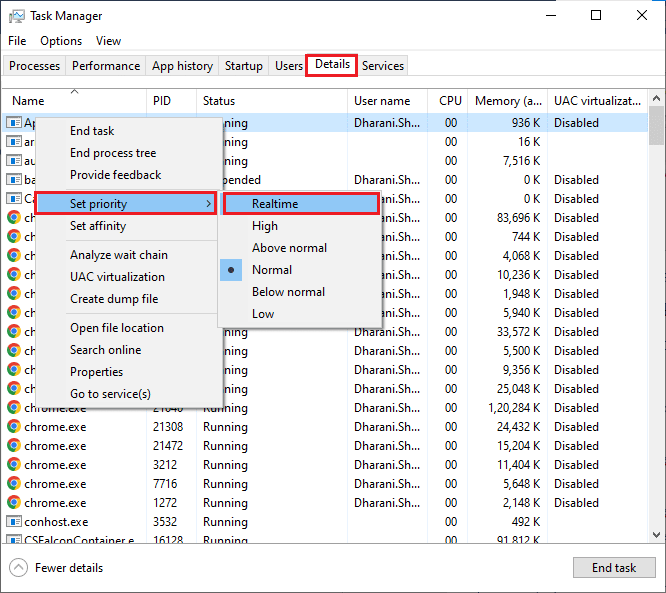
4. жабыңыз Тапсырмалар менеджері және қайта жүктеу Сіздің компьютеріңіз.
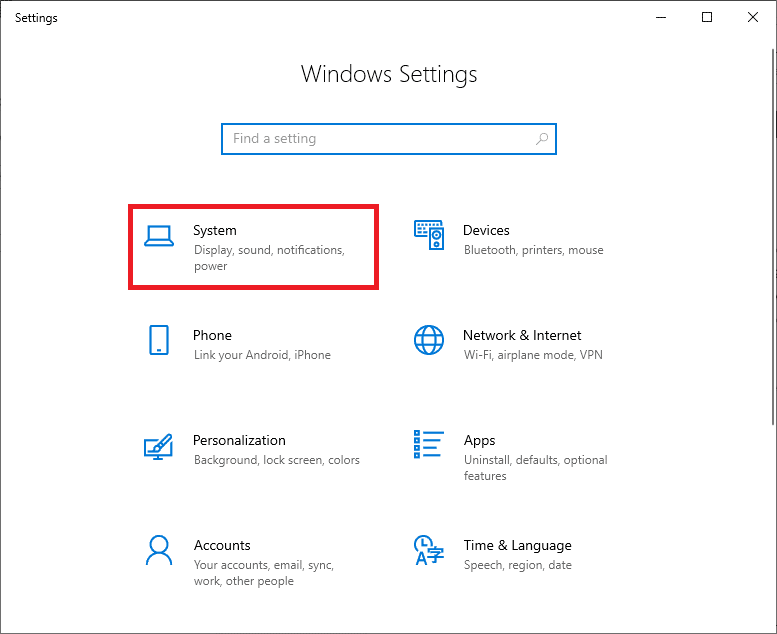
4-әдіс: Жоғары өнімділікті орнату
You can also optimize your game when setting your high-performance power plan settings. These power plans are developed to manage the power settings on portable settings. Follow the below-mentioned instructions to use high-performance power plan settings in your system.
1. Түймесін басыңыз Windows + I пернелері бір уақытта ашу Windows параметрлері.
2. Енді, басыңыз жүйе орнату.
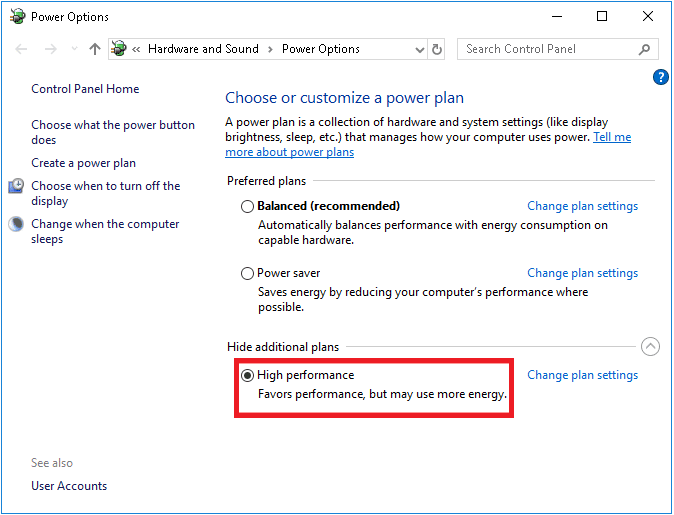
3. Енді опциясын таңдаңыз Қуат және ұйқы параметрін таңдап, шертіңіз Қосымша қуат параметрлері астында Қатысты параметрлер.
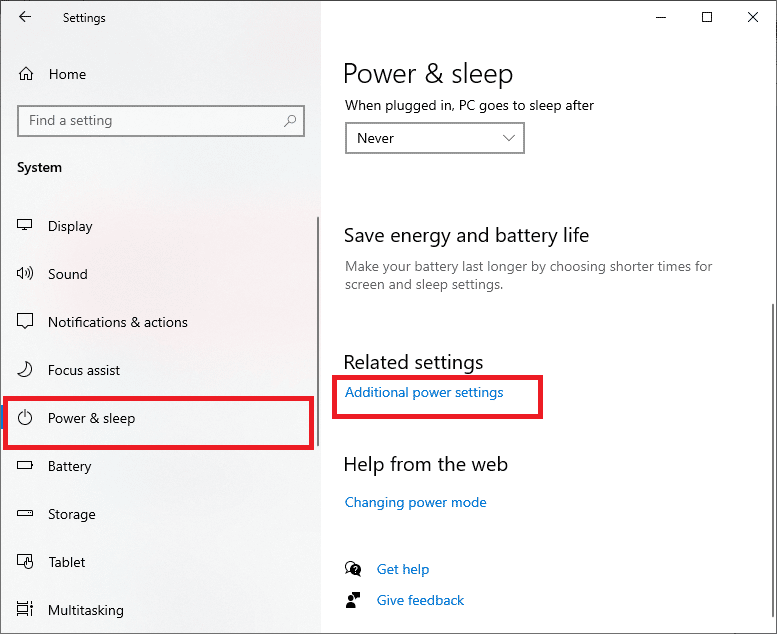
4. Енді таңдаңыз Жоғары сапалы опция астында Жоғары қосымша жоспарлар төмендегі суретте көрсетілгендей.
Now you have optimized your system, check if you have fixed MultiVersus won’t launch on startup issue.
Сондай-ақ оқыңыз: Steam жүйесінде жоқ жүктелген файлдар қатесін түзетіңіз
Method 5: Update Steam App & MultiVersus Game
If you use an outdated Steam application, you cannot access any games smoothly. Hence always make sure you use an updated version of Steam and MultiVersus game before launching it.
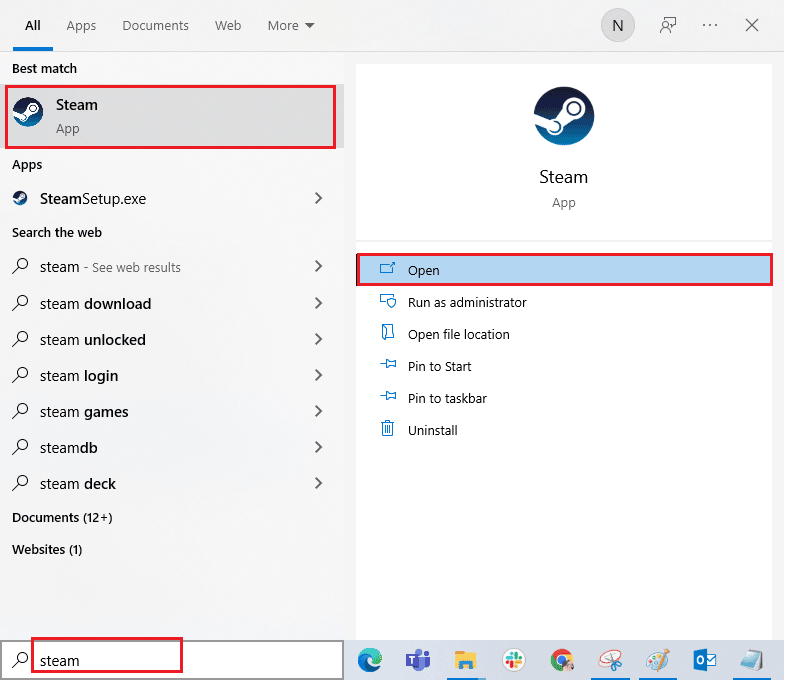
1. хит Windows кілті және түрі бу, содан кейін нұқыңыз Ашық.
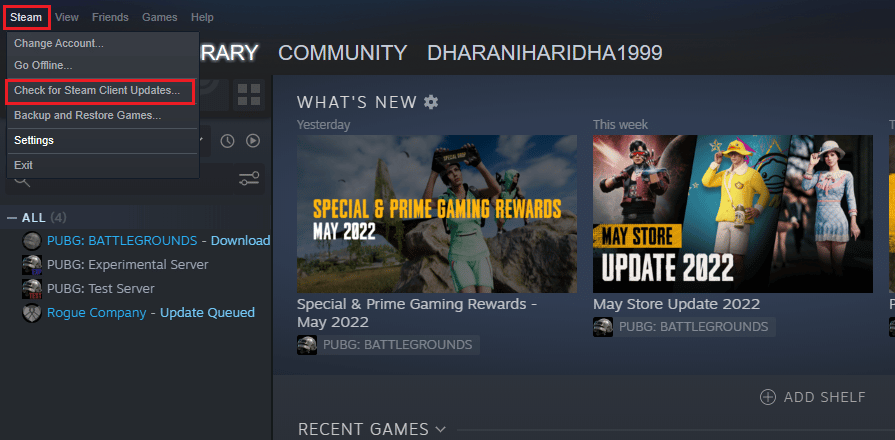
2. Енді, басыңыз бу экранның жоғарғы сол жақ бұрышында, одан кейін Steam клиентінің жаңартуларын тексеріңіз… төменде көрсетілгендей.
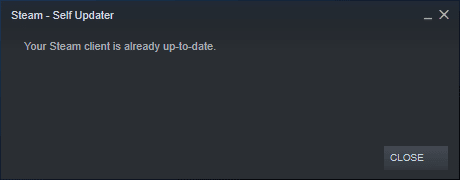
3. Жүктеп алынатын жаңа жаңартуларыңыз болса, оларды орнатып, тексеріңіз Steam клиентіңіз жаңартылған.
4. Енді, Steam-ді қайта іске қосыңыз және мәселе қазір шешілгенін тексеріңіз.
Likewise, it is always essential that your game run at its latest version to avoid any conflicts. Until your game is updated, you cannot log in to MultiVersus servers successfully.
Кімге ойыныңызды жаңартыңыз, follow the below-mentioned steps.
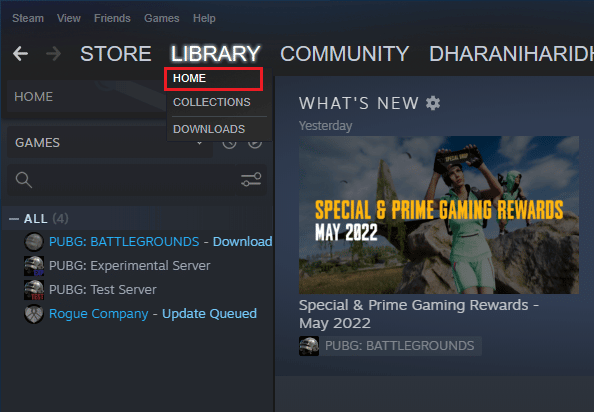
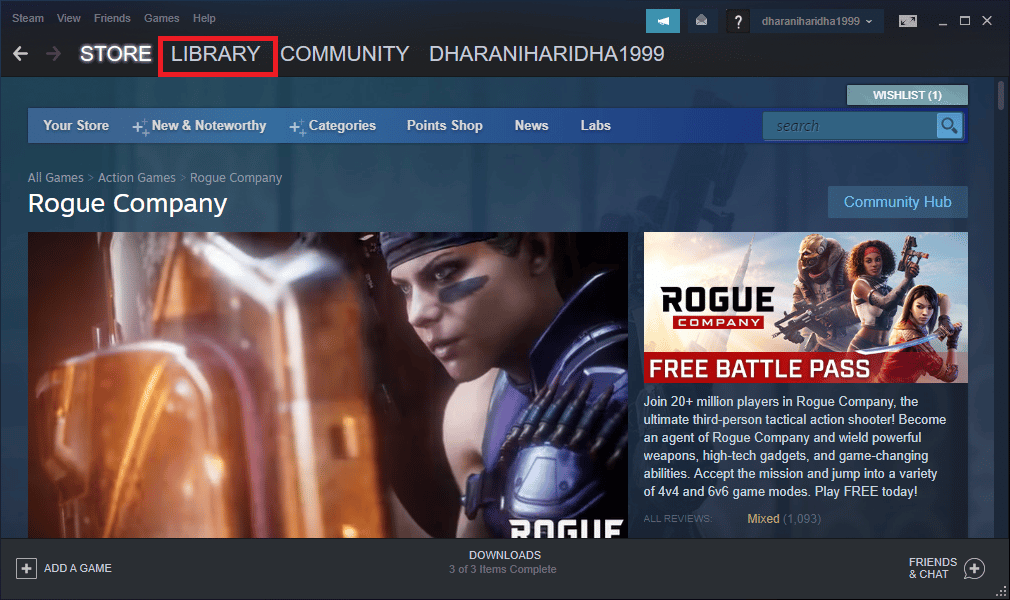
1. Іске қосу бу және өтіңіз КІТАПХАНА.
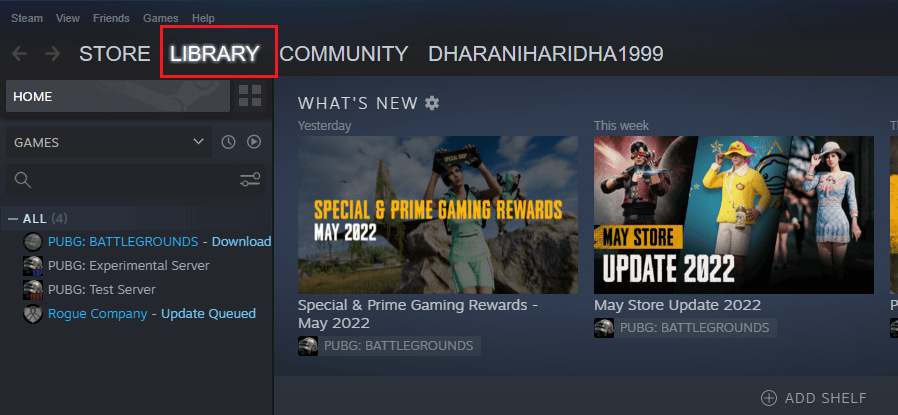
2. Енді, басыңыз HOME and search for MultiVersus.
3. Содан кейін ойынды тінтуірдің оң жақ түймешігімен басып, таңдаңыз Сипаттар… опция.

4. Енді келесіге ауысыңыз Жаңартылған қойындысын басып, қандай да бір жаңартулардың әрекетте тұрғанын тексеріңіз. Олай болса, соңғы жаңартуларды жүктеп алу үшін экрандағы нұсқауларды орындаңыз.
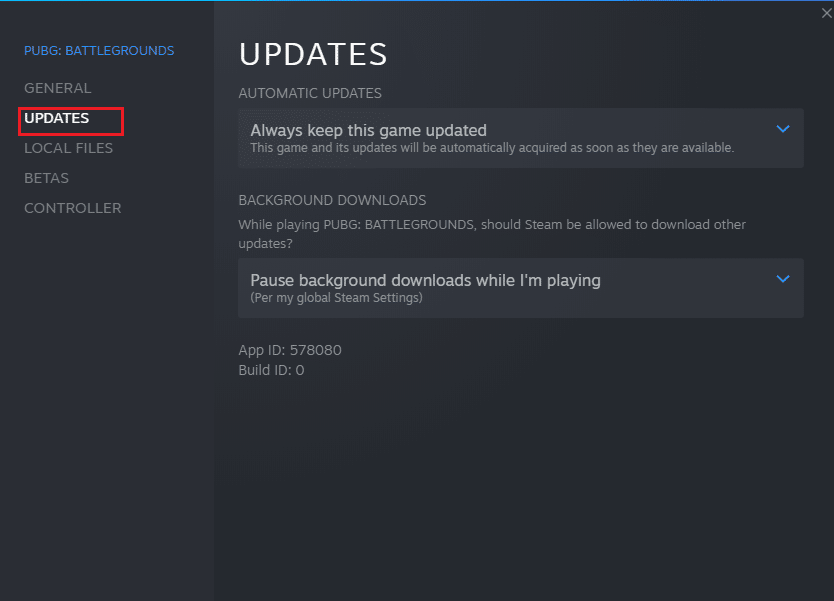
After an update, check if MultiVersus not launching issue is fixed.
6-әдіс: Толық экранды оңтайландыруларды өшіріңіз
Few users have suggested that disabling full-screen optimizations on PC has helped them fix MultiVersus is not launching issue. Follow as instructed.
1. Navigate to the Steam КІТАПХАНА мәзірі.
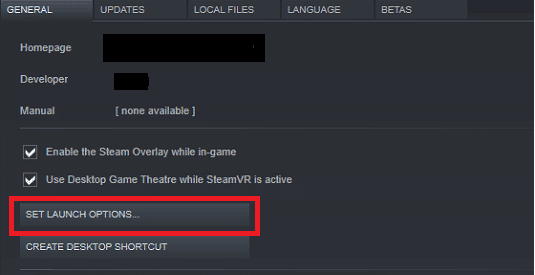
2. Now, right-click on the MultiVersus game and click on Сипаттар…
3. Енді келесіге ауысыңыз ЖАЛПЫ қойындысын нұқыңыз ІСКЕ ҚОСУ ОПЦИЯЛАРЫН ОРНАТУ… бейнеленгендей.
4. Енді кеңейтілген пайдаланушы ескертуімен жаңа терезе ашылады. Ойынды терезе режимінде ашу үшін теріңіз – терезелі параметр.
5. Енді өзгертулерді басу арқылы сақтаңыз OK және Сипаттар терезесінен шығыңыз.
6. Енді, қайта іске қосыңыз ойын and ensure that it runs in windowed mode.
Ескерту: Сіз сондай-ақ шарлауға болады ІСКЕ ҚОСУ ОПЦИЯЛАРЫН ОРНАТЫҢЫЗ… қайталап, соңғы параметрдің орнына келесі параметрлерді теріңіз.
–терезелі -w 1024
7. Now, save the changes by clicking on OK.
Бұл параметр ойынды терезе режимінде іске қосуды орнатады.
Сондай-ақ оқыңыз: Windows 10 жүйесінде Steam қолданбасының конфигурациясын түзетіңіз
7-әдіс: Ойын ішіндегі қабаттасуды өшіріңіз
The Steam Overlay is a piece of Steam that allows the users to access friends list, and web browser and allows in-game purchasing. It is a significant tool, yet it sometimes triggers MultiVersus not launching on startup issue. If you want to solve this problem, then turn off the Steam game overlay.
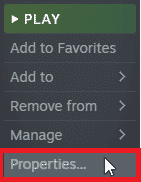
1. ашыңыз бу қолданбаны таңдап, шертіңіз КІТАПХАНА.
2. Енді тінтуірдің оң жақ түймешігін басыңыз Мульти қарсы батырмасын басыңыз және Сипаттар…

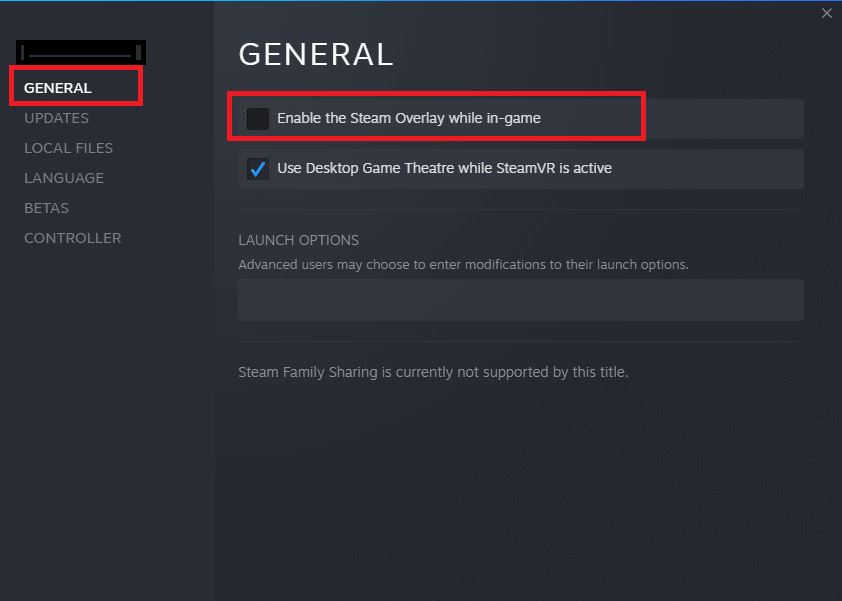
3. Енді келесіге ауысыңыз ЖАЛПЫ tab and uncheck the box containing Enable the Steam Overlay while in-game.
4. Соңында, ойынды қайта іске қосыңыз and check if the MultiVersus launching issue is solved.
8-әдіс: Ойын файлдарының тұтастығын тексеріңіз
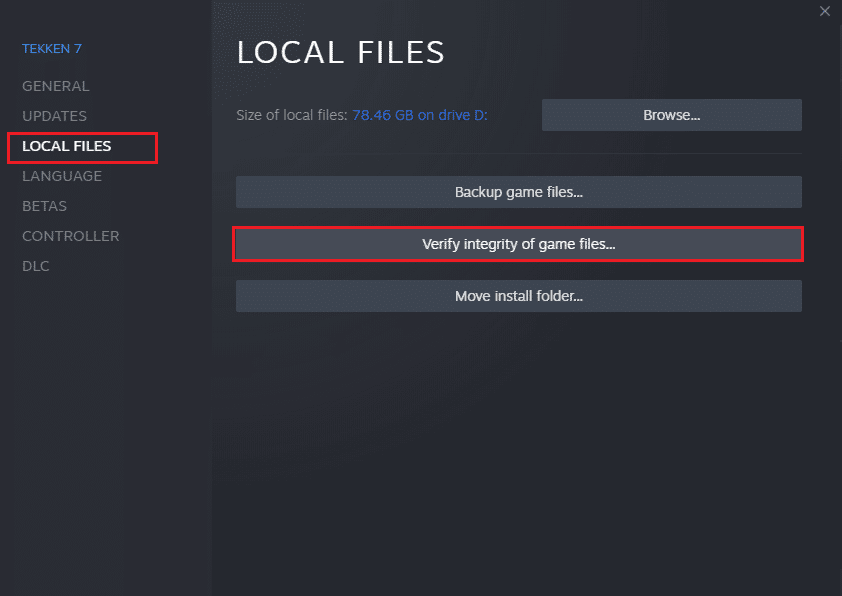
We have seen many cases in which the game files are either missing or corrupt or it had incomplete installations. Users could also experience MultiVersus not starting on PC issue if they are interrupted by the update process or if the game files are being moved. In this method, you will be opening Steam and using the built-in function for verifying the integrity of the game. It will be replaced if the application finds something. Read our guide on how to verify integrity of game files on Steam.
Сондай-ақ оқыңыз: Windows 10 жүйесінде Steam Client Bootstrapper жауап бермейтінін түзетіңіз
9-әдіс: .NET Framework жаңарту
.NET framework in Windows 10 computer is essential for uninterrupted service of modern apps and games. Many games have an auto-update feature for the .NET framework, and thus it will be updated automatically whenever an update is available. In another case, if an update prompts in your PC, you can manually install the latest version of the .NET framework, as discussed below, to fix MultiVersus not launching issue.
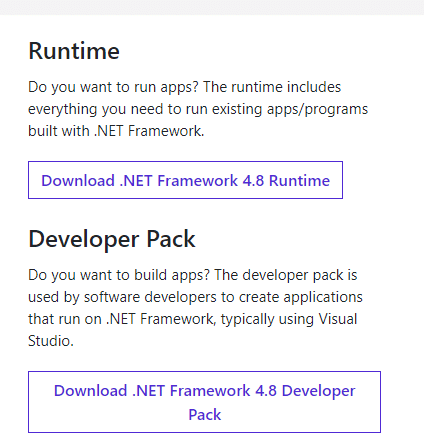
1. Тексеріңіз жаңа жаңартулар үшін .NET жақтауы -дан Microsoft-тың ресми сайты.
2. Қандай да бір жаңартулар болса, сәйкес/ұсынылған сілтеме жасап, басыңыз .NET Framework 4.8 жұмыс уақытын жүктеп алыңыз опция.
Ескерту: Баспаңыз .NET Framework 4.8 әзірлеушілер бумасын жүктеп алыңыз өйткені оны бағдарламалық жасақтама жасаушылар пайдаланады.
3. Бару Менің жүктеп алуларым, double-click on the setup file to run the downloaded file and follow the экрандағы нұсқаулар to install the .NET framework successfully on your Windows PC. Once done, check if you have fixed the discussed issue or not.
10-әдіс: DirectX жаңарту
To enjoy a seamless multimedia experience on MultiVersus, you have to make sure whether DirectX is installed, and it is updated to its latest version. DirectX helps you improve the visual media experience for graphical games and applications especially. It is worth updating DirectX needed for this game.
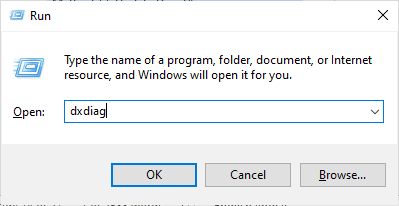
1. түймесін басыңыз Windows + R пернелері бір уақытта іске қосу үшін жүгіру тілқатысу терезесі.
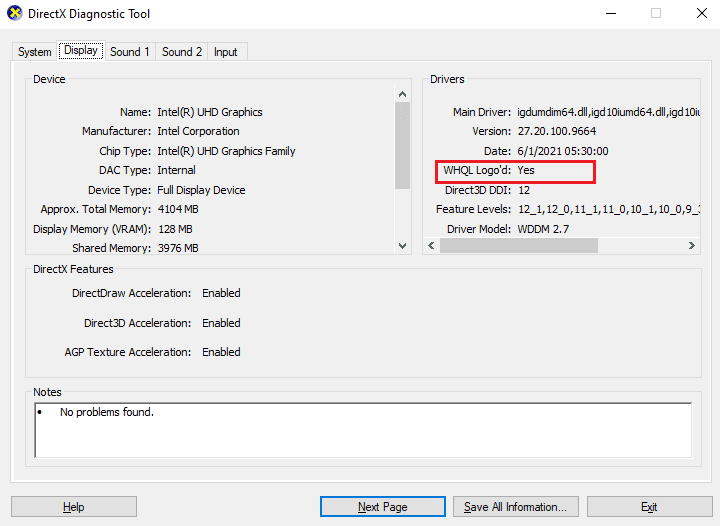
2. Түрі dxdiag түймесін басыңыз Кілт сөзді енгізіңіз ашу DirectX диагностикалық құралы.
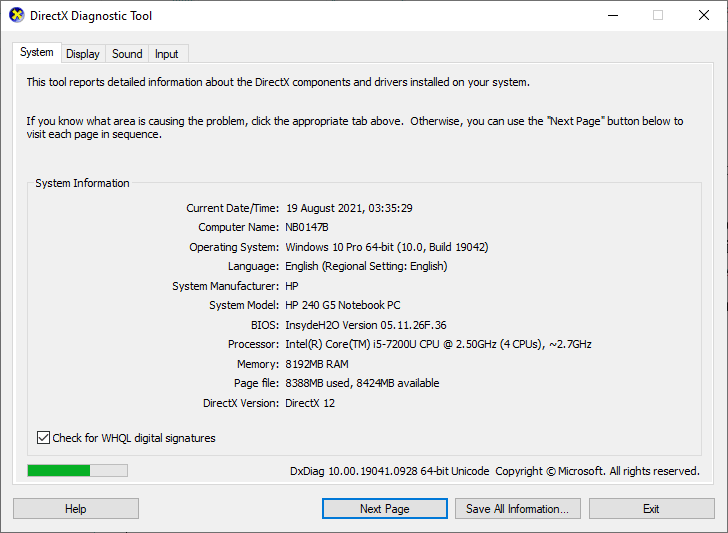
3. Тексеріңіз DirectX нұсқасы, if it contains DirectX 12 әлде жоқ па.
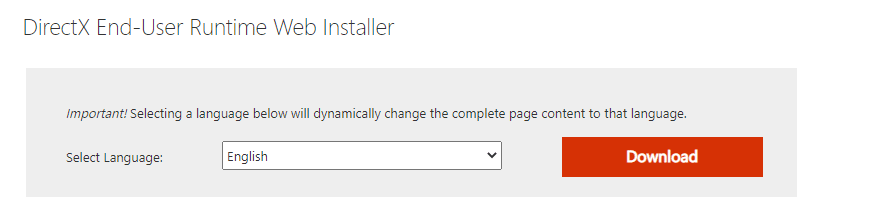
4. If you do not have DirectX 12 in your system, download and install it from the DirectX жүктеп алу беті экрандағы нұсқауларды орындау арқылы.
After installing DirectX, check if the issue occurs again.
Ескерту: қамтамасыз ету WHQL цифрлық қолтаңбасын тексеріңіз қорапшасы белгіленеді жүйе қойындысын және барлық қойындыларда бар-жоғын тексеріңіз WHQL Logo'd деп орнатылады иә.
11-әдіс: Microsoft Visual C++ қайта бөлінетін жөндеу
Alternately, you can try to repair the Microsoft Visual C++ Redistributable packages to fix MultiVersus not launching issue as follows:
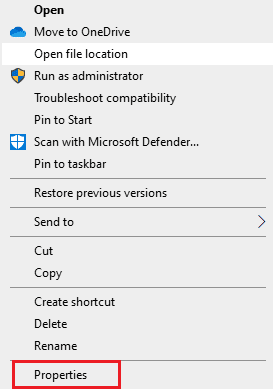
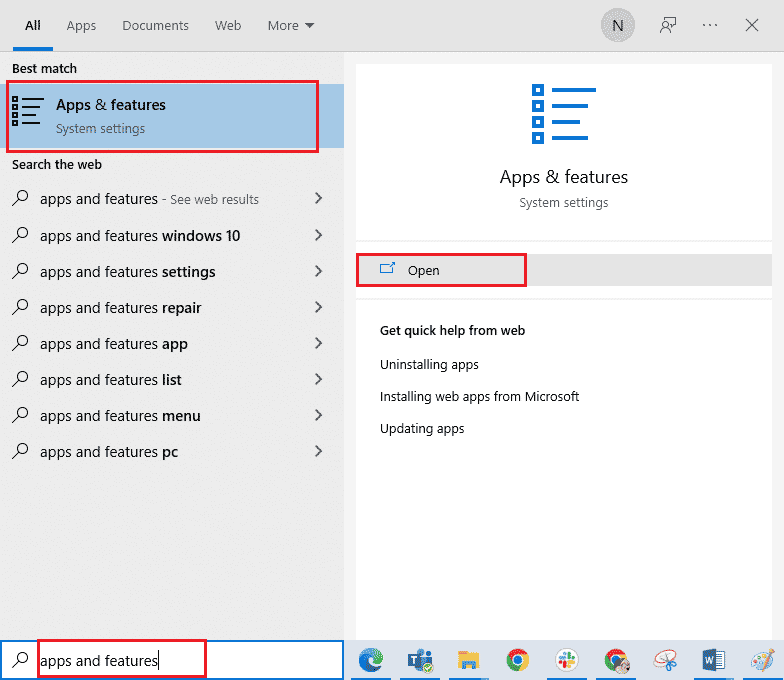
1. түймесін басыңыз Windows кілті, теріңіз Қолданбалар мен мүмкіндіктер, содан кейін нұқыңыз ашық.
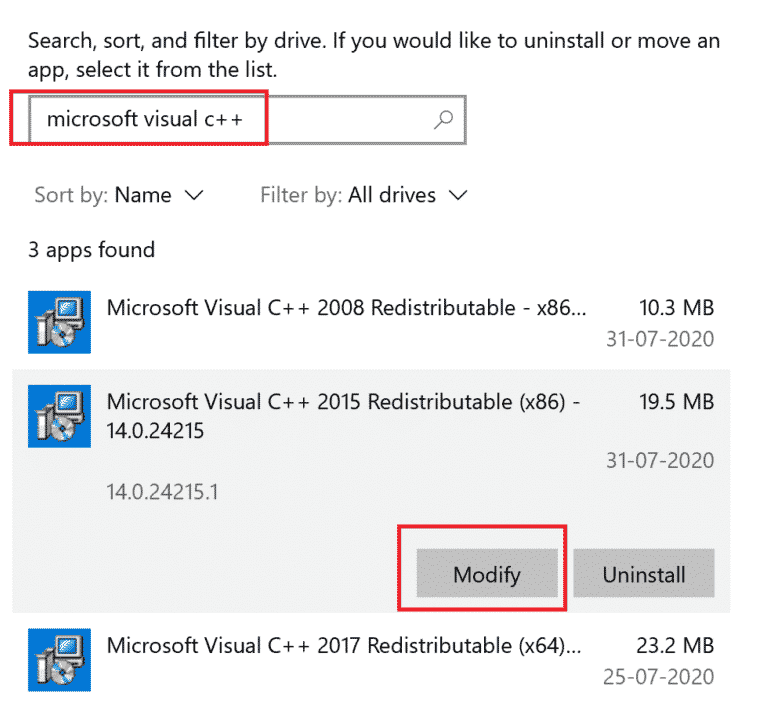
2. Іздеу Microsoft Visual C ++ қайта таратылатын пакет.
3. Then, select the package, and click on Өзгерту опция.
4. Содан кейін түймесін басыңыз иә үстінде Пайдаланушы тіркелгісін басқару тілқатысу терезесі.
5. In the pop-up window that appears, click on жөндеу. Процесті аяқтауды күтіңіз.
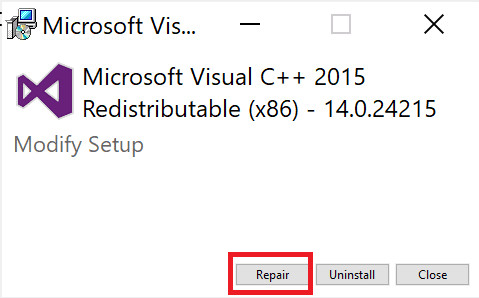
6. Repeat the above steps to modify all the Microsoft Visual C++ Redistributable packages.
7. Соңында, компьютерді қайта іске қосыңыз.
Open the application that you were unable to open previously. If this did not work, try reinstalling the C++ redistributable instead.
Сондай-ақ оқыңыз: Microsoft Visual C++ 2015 қайта бөлінетін орнату қатесін түзетіңіз 0x80240017
12-әдіс: Microsoft Visual C++ Redistributable бағдарламасын қайта орнатыңыз
If the previous method of repairing the Microsoft C++ Visual Redistributable did not fix MultiVersus won’t launch issue, then you will have to reinstall the redistributable. Follow the given steps to uninstall & then install these again.
1. ашыңыз Қолданбалар мен мүмкіндіктер жүйе параметрлері.
2. Таңдаңыз Microsoft Visual C ++ қайта таратылатын package, then click on Uninstall опция.
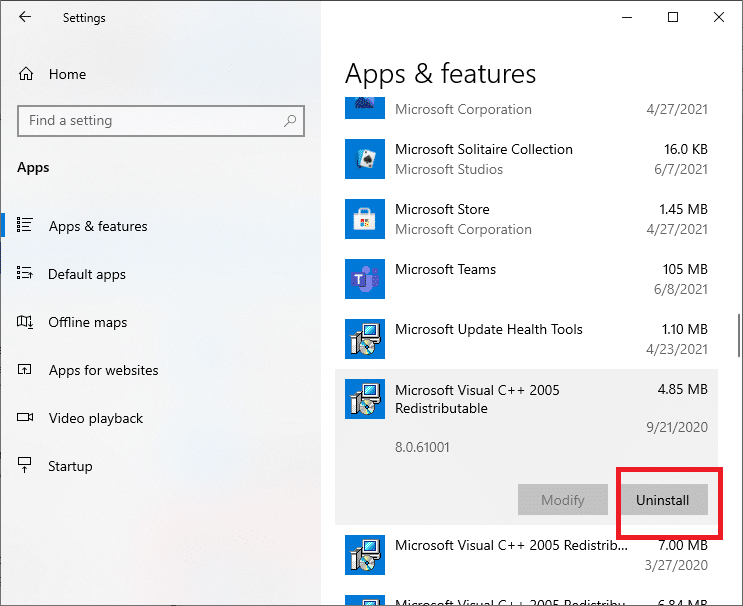
3. Басыңыз Uninstall option again to confirm and remove the package.
Ескерту: Make sure to uninstall all the Microsoft Visual C++ Redistributable packages.
4. түймесін басыңыз Windows кілті, теріңіз Командалық шақыру, содан кейін нұқыңыз Әкімші ретінде іске қосыңыз.
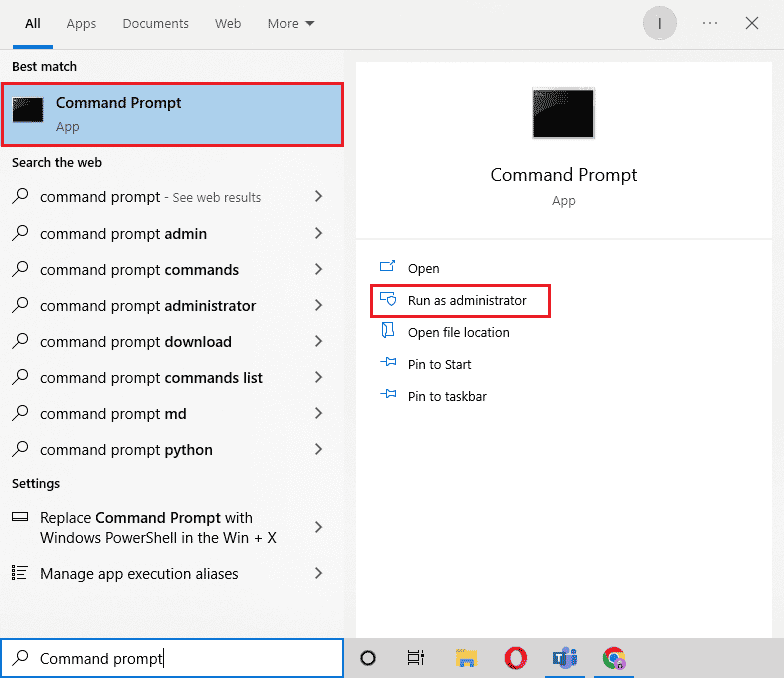
5. Келесіні теріңіз командалар және баспасөз кіру кілт әрқайсысынан кейін:
DISM /online /Cleanup-Image /StartComponentCleanup
DISM /online /Cleanup-Image /RestoreHealth
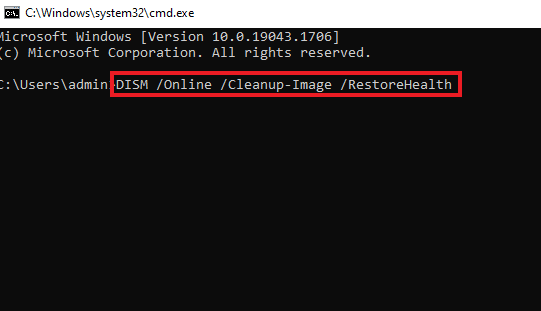
6. Процесс аяқталғаннан кейін, компьютерді қайта жүктеңіз.
7. Содан кейін мына сайтқа кіріңіз Microsoft Visual C++ Redistributable webpage to download the latest C++ package as shown here.
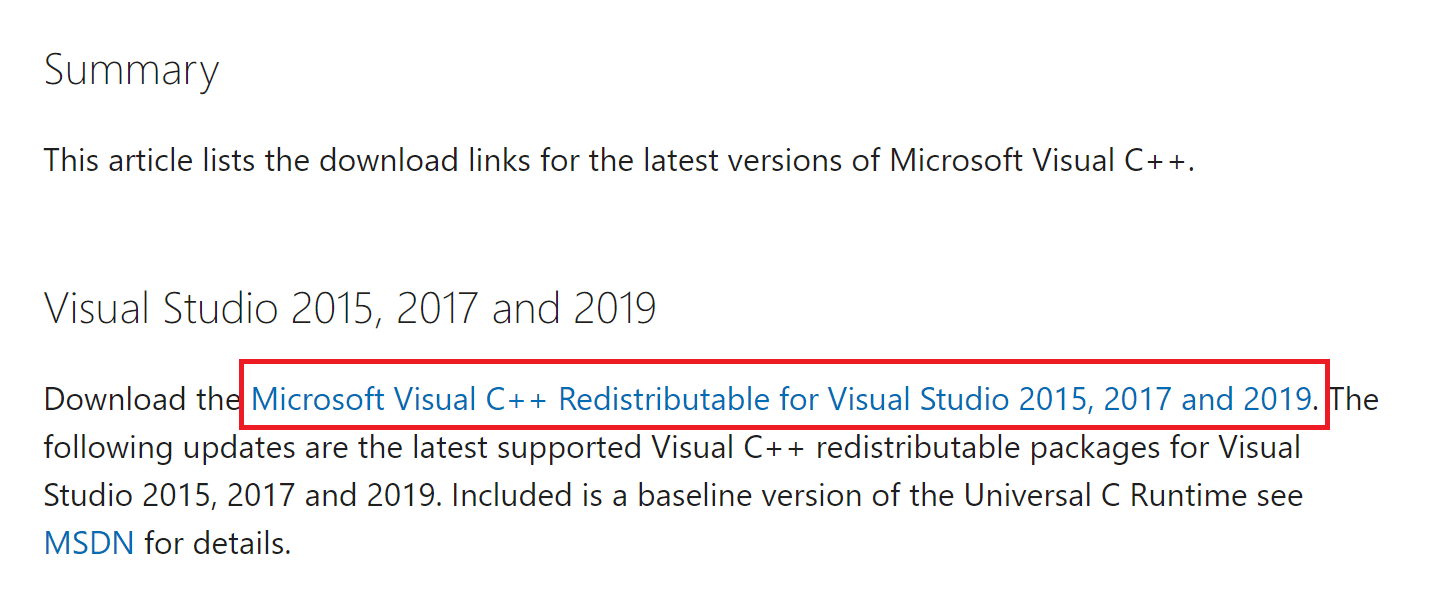
8. Once downloaded, open the жүктелген файл by double-clicking on it in Менің жүктеп алуларым. орнату the package by following the on-screen instructions.
9. Once the installation is complete, finally компьютерді қайта іске қосыңыз.
Ұсынылған:
Бұл нұсқаулық пайдалы болды және сіз түзете аласыз деп үміттенеміз MultiVersus not launching issue on your Windows 10 PC. Let us know which method worked for you the best. Feel free to reach out to us with your queries and suggestions via the comments section below.