Fix MultiVersus Not Launching in Windows 10

MultiVersus is a famous online multiplayer fighting game that is rocking today’s gaming world. Yet, few users complain about the MultiVersus not launching issue when the game is launched on their Windows 10 PC. If you are in the same boat, the troubleshooting hacks discussed in this article will help you sail the problem.
How to Fix MultiVersus Not Launching in Windows 10
If you are vexed by MultiVersus won’t launch issue in your Windows 10 computer, here are a few possible reasons why you must analyze them carefully to sort out the problem.
- កុំព្យូទ័រមិនបំពេញតាមតម្រូវការមូលដ្ឋាននៃហ្គេមទេ។
- កម្មវិធីផ្ទៃខាងក្រោយមួយចំនួនផ្សេងទៀតកំពុងរំខានដល់ហ្គេម។
- អ្នកកំពុងប្រើកំណែដែលមិនបានផ្ទៀងផ្ទាត់នៃកម្មវិធីបញ្ជា។
- ការកំណត់ក្រាហ្វិកនៃហ្គេមត្រូវបានកំណត់ខុស។
- វត្តមាននៃមេរោគ និងមេរោគ។
- ក្របខ័ណ្ឌ .NET និងប្រព័ន្ធប្រតិបត្តិការមិនត្រូវបានធ្វើបច្ចុប្បន្នភាពទៅកំណែចុងក្រោយបំផុតរបស់ពួកគេទេ។
- កំណែ DirectX មិនទាន់សម័យទេ។
- Overclocking ។
- រាល់ឯកសារដំឡើងខុស ឬខូចនៃហ្គេមក៏បណ្តាលឱ្យមានបញ្ហាដែរ។
- ឯកសារដែលអាចចែកចាយឡើងវិញរបស់ Microsoft C++ មិនត្រូវគ្នាជាមួយហ្គេម និងកុំព្យូទ័រទេ។
Here are a few possible troubleshooting methods that will help you fix the discussed issue.
វិធីសាស្រ្តទី 1: វិធីសាស្រ្តដោះស្រាយបញ្ហាជាមូលដ្ឋាន
អនុវត្តតាមវិធីដោះស្រាយបញ្ហាជាមូលដ្ឋានទាំងនេះ ដើម្បីដោះស្រាយបញ្ហាខាងលើ។
1A. Check System Requirements
ពហុធៀប តម្រូវការប្រព័ន្ធអប្បបរមា។
- ស៊ីភីយូ៖ Intel Core i5-2300 ឬ AMD FX-8350
- អង្គចងចាំ៖ 4 ជីកាបៃ
- កាតវីដេអូ: Nvidia GeForce GTX 550 Ti or AMD Radeon HD 5850 | Intel UHD 750
- ស្រមោល PIXEL: 5.0
- ស្រមោល VERTEX: 5.0
- កន្លែងទំនេរឌីស៖ 6 ជីកាបៃ
- RAM វីដេអូដែលបានកំណត់: 1024 MB
ពហុធៀប តម្រូវការអនុសាសន៏
- ស៊ីភីយូ: Intel Core i5-3470 or AMD Ryzen 3 1200
- អង្គចងចាំ៖ 8 ជីកាបៃ
- កាតវីដេអូ: Nvidia GeForce GTX 660 or AMD Radeon R9 270
- ស្រមោល PIXEL: 5.0
- ស្រមោល VERTEX: 5.0
- កន្លែងទំនេរឌីស៖ 6 ជីកាបៃ
- RAM វីដេអូដែលបានកំណត់: 2048 MB
1B. Check your internet connection
Unstable internet connection leads to MultiVersus is not working issue, also if there are any obstacles between your router and your computer, they may interfere with the wireless signal and will cause intermittent connection problems.
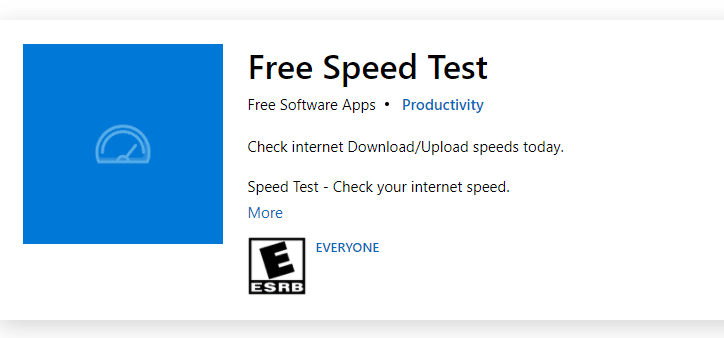
អ្នកអាចដំណើរការ a ល្បឿនសាកល្បង ដើម្បីដឹងពីកម្រិតល្អបំផុតនៃល្បឿនបណ្តាញដែលត្រូវការសម្រាប់ការតភ្ជាប់ត្រឹមត្រូវ។
ត្រូវប្រាកដថាឧបករណ៍របស់អ្នកបំពេញតាមលក្ខណៈវិនិច្ឆ័យខាងក្រោម។
- ស្វែងរកកម្លាំងសញ្ញានៃបណ្តាញរបស់អ្នក ហើយប្រសិនបើវាទាបខ្លាំង សូមសម្អាតរាល់ការស្ទះនៅចន្លោះផ្លូវ។
- ជៀសវាងឧបករណ៍ច្រើនពេកដែលភ្ជាប់ទៅបណ្តាញតែមួយ។
- តែងតែទិញម៉ូដឹម/រ៉ោតទ័រដែលផ្ទៀងផ្ទាត់ដោយអ្នកផ្តល់សេវាអ៊ីនធឺណិត (ISP) របស់អ្នក ហើយពួកគេមិនមានការប៉ះទង្គិចទេ។
- កុំប្រើ ខ្សែចាស់ ខូច ឬខូច។ ជំនួសខ្សែប្រសិនបើចាំបាច់។
- ត្រូវប្រាកដថាខ្សែភ្លើងពីម៉ូឌឹមទៅរ៉ោតទ័រ និងម៉ូដឹមទៅជញ្ជាំងមានស្ថេរភាព និងគ្មានការរំខាន។
ប្រសិនបើមានបញ្ហាការតភ្ជាប់អ៊ីនធឺណិត សូមពិនិត្យមើលការណែនាំរបស់យើង របៀបដោះស្រាយបញ្ហាការតភ្ជាប់បណ្តាញនៅលើ Windows 10 ដើម្បីដោះស្រាយបញ្ហាដូចគ្នា។
1C. Stop Overclocking
- Every high-end computer is built with the option of Overclocking which helps in outputting more juice than your specifications that you already have. Running the graphics card or processor faster than the default speed refers to overclocking.
- នៅពេលវាកើតឡើង កុំព្យូទ័ររបស់អ្នកនឹងឡើងដល់សីតុណ្ហភាពអតិបរមាបន្ទាប់ពីពេលជាក់លាក់ណាមួយ។ កុំព្យូទ័រចាប់សញ្ញានេះ ហើយកែតម្រូវល្បឿននាឡិកាទៅល្បឿនធម្មតារហូតដល់វាត្រជាក់ចុះ។ ល្បឿននាឡិកាត្រូវបានកើនឡើងម្តងទៀត បន្ទាប់ពីពួកគេត្រជាក់ចុះ។
- វាបង្កើនដំណើរការកុំព្យូទ័ររបស់អ្នក និងជាជំនួយដ៏ល្អ ប្រសិនបើអ្នកមិនមានកុំព្យូទ័រដ៏មានឥទ្ធិពល។
- It must be noted that all the games do not support overclocking. The same applies to MultiVersus. So, you must try disabling all overclocking on your computer and try launching the game. If it launches well, the issue is fixed.
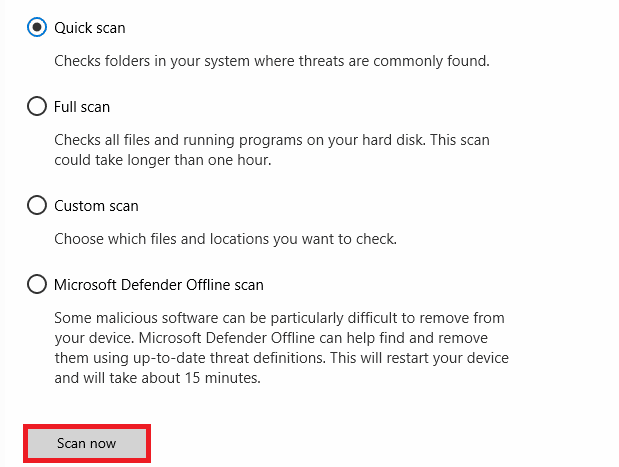
1D. ដំណើរការស្កេនមេរោគ
The presence of a virus or malware attack will result in gaming problems on your computer. If in case, the virus attack is very severe, you cannot connect to any online game continuously at all. To resolve the problem, you have to remove the virus or malware completely from your Windows 10 computer.
អ្នកត្រូវបានណែនាំឱ្យស្កេនកុំព្យូទ័ររបស់អ្នកដូចដែលបានណែនាំនៅក្នុងការណែនាំរបស់យើងតើខ្ញុំដំណើរការស្កេនមេរោគនៅលើកុំព្យូទ័ររបស់ខ្ញុំដោយរបៀបណា?
ដូចគ្នានេះផងដែរ ប្រសិនបើអ្នកចង់លុបមេរោគចេញពីកុំព្យូទ័ររបស់អ្នក សូមពិនិត្យមើលការណែនាំរបស់យើង របៀបលុបមេរោគចេញពីកុំព្យូទ័ររបស់អ្នកនៅក្នុង Windows 10។
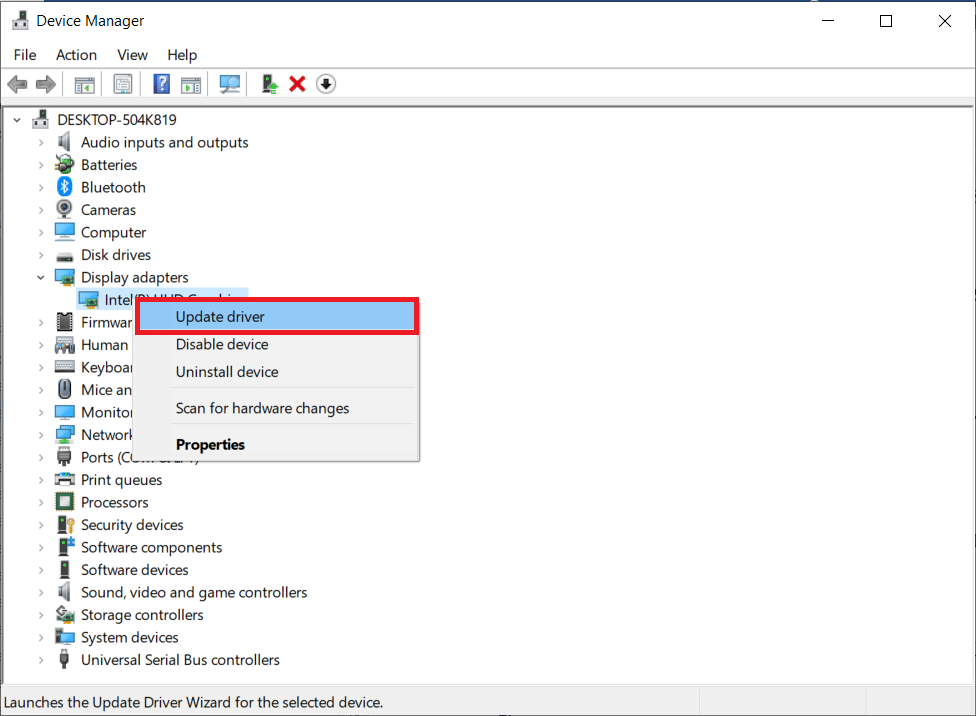
1E. Update GPU Drivers
Graphical drivers are responsible for heavy graphical images and video processing games. If you face any launching conflicts in the MultiVersus game, make sure you use an updated version of device drivers, as they serve as a link between the hardware and Operating System of your PC. Many users have suggested that updating drivers have fixed MultiVersus not working issue. Read and implement the steps instructed in our guide 4 Ways to Update Graphics Drivers in Windows 10 to do so.
សូមអានផងដែរ: ជួសជុល Windows ដែលបានរកឃើញ Drivers សម្រាប់ឧបករណ៍របស់អ្នក ប៉ុន្តែបានជួបប្រទះបញ្ហាមួយ។
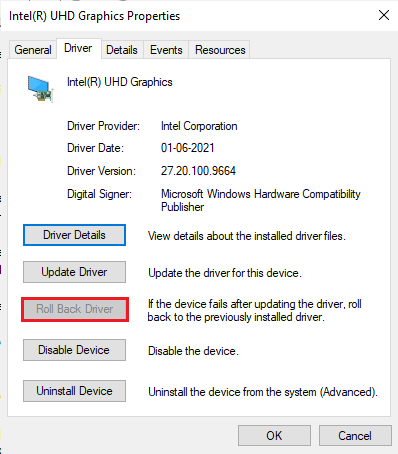
1F. Roll Back GPU Drivers
Sometimes, the current version of GPU drivers may cause the discussed launching issue in MultiVersus, and in this case, you have to restore previous versions of installed drivers. This process is called ការត្រលប់មកវិញរបស់អ្នកបើកបរ ហើយអ្នកអាចត្រឡប់កម្មវិធីបញ្ជាកុំព្យូទ័ររបស់អ្នកត្រឡប់ទៅសភាពមុនបានយ៉ាងងាយដោយធ្វើតាមការណែនាំរបស់យើងអំពីរបៀប Rollback Drivers នៅលើ Windows 10។
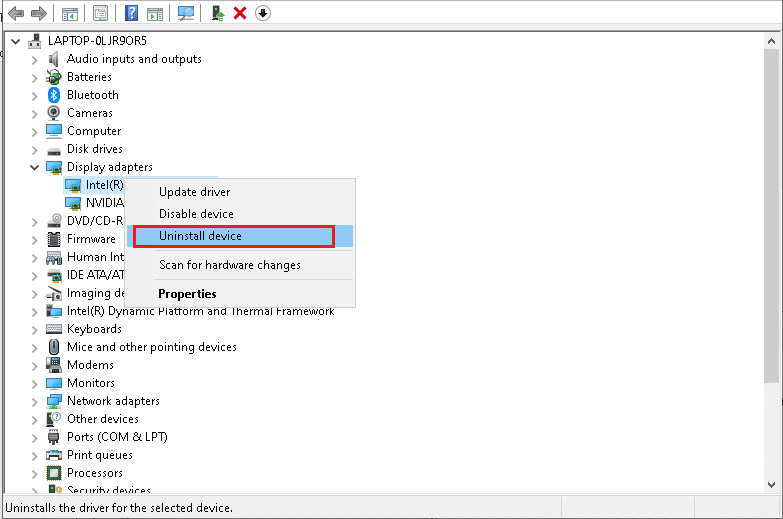
1G. Reinstall GPU Driver
If you still face MultiVersus not starting issue after updating your GPU drivers, then reinstall device drivers to fix any incompatibility issues. There are several ways to reinstall drivers on your computer. Yet, you can easily reinstall Graphical drivers as instructed in our guide How to Uninstall and Reinstall Drivers on Windows 10.
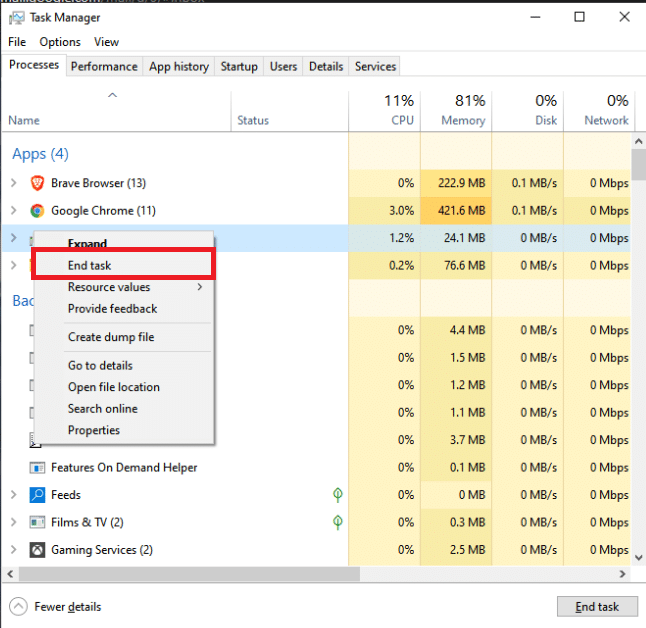
1H. End Background Processes
Several users have confirmed that MultiVersus not starting on PC can be resolved by closing all the background tasks running on your PC. To implement the task, follow our guide How to End Task in Windows 10, and proceed as instructed.
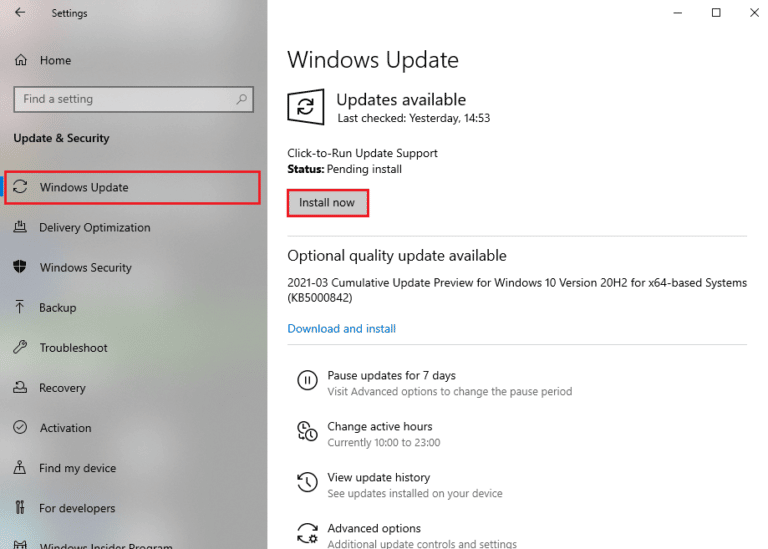
1I. Update Windows
You can also eradicate bugs in your computer and game by updating your Operating System. Always ensure if you have updated your Windows Operating System and if any updates are pending in action, use our guide How to Download and Install Windows 10 Latest Update
1J. Disable Antivirus Temporarily (If Applicable)
Some incompatible antivirus programs installed on your computer will cause MultiVersus launching problem. To avoid conflicts, you must ensure the security settings of your Windows 10 computer and check if they are stable or not. To find whether the antivirus suite is the reason for the discussed issue, disable it once and try connecting to a network.
សូមអានការណែនាំរបស់យើងអំពី របៀបបិទកំចាត់មេរោគជាបណ្តោះអាសន្ននៅលើ Windows 10 ហើយធ្វើតាមការណែនាំដើម្បីបិទកម្មវិធីកំចាត់មេរោគរបស់អ្នកជាបណ្តោះអាសន្ននៅលើកុំព្យូទ័ររបស់អ្នក។
If you have a fix for your problem after disabling the antivirus program on your computer, you are advised to uninstall the program completely from your PC.
Read our guide Force Uninstall Programs which won’t Uninstall in Windows 10 to uninstall your antivirus program on your computer.
សូមអានផងដែរ: របៀបលុប McAfee LiveSafe នៅក្នុង Windows 10
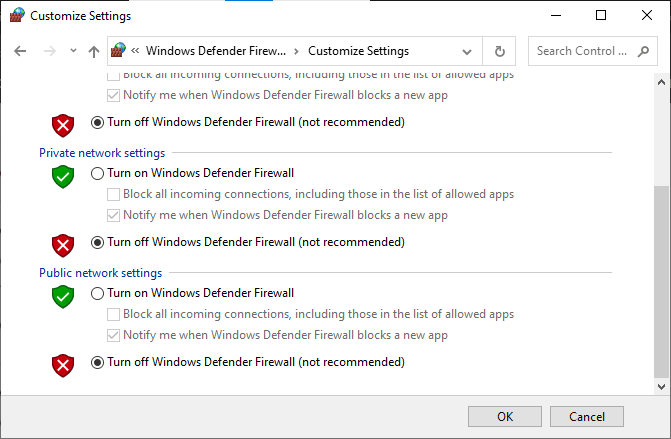
1K. Turn Off Windows Defender Firewall (Not Recommended)
Your computer will face MultiVersus is not working issue, due to an over-protective firewall suite in the Windows 10 PC. To resolve the problem, you can either add a new rule for your game, whitelist the game or as the last fix, disable the firewall temporarily.
Our guide on How to Disable Windows 10 Firewall will help you.
1L ជួសជុលឯកសារប្រព័ន្ធ
If there are any missing or damaged files on your Windows 10 PC, you will face MultiVersus takes forever to launch issue. Yet, you are repairing these corrupt files by using inbuilt utilities namely, កម្មវិធីពិនិត្យឯកសារប្រព័ន្ធ និង សេវានិងការគ្រប់គ្រងរូបភាពដែលប្រើ.
សូមអានការណែនាំរបស់យើងអំពីរបៀបជួសជុលឯកសារប្រព័ន្ធនៅលើ Windows 10 ហើយធ្វើតាមជំហានដូចដែលបានណែនាំដើម្បីជួសជុលឯកសារខូចទាំងអស់របស់អ្នក។
Method 2: Run MultiVersus Game as Administrator
If MultiVersus does not have required administrative privileges, a few essential features of the game will be limited causing you MultiVersus not launching issue whenever you open the game or install any updates. Follow the below-mentioned instructions to run the game as an administrator.
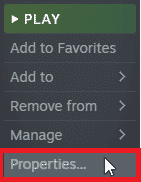
ចុចកណ្ដុរស្ដាំលើប៊ូតុង MultiVersus shortcut នៅលើ Desktop ។
ចំណាំ: អ្នកក៏អាចចូលទៅកាន់ ថតដំឡើង ហើយចុចខាងស្តាំលើវា។
2. បន្ទាប់មកសូមជ្រើសរើស លក្ខណៈសម្បត្តិ ជម្រើស។
3. ឥឡូវនេះ សូមផ្លាស់ទីទៅ ភាពឆបគ្នា ផ្ទាំងហើយចុចលើ ដំណើរការកម្មវិធីនេះក្នុងនាមជាអ្នកគ្រប់គ្រង.
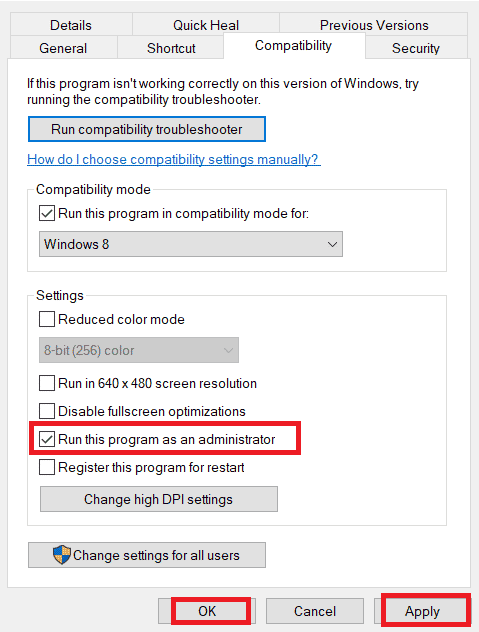
4. ជាចុងក្រោយចុចលើ អនុវត្ត> យល់ព្រម ដើម្បីរក្សាទុកការផ្លាស់ប្តូរ។
Check if you have fixed MultiVersus launching issues.
សូមអានផងដែរ: Fix WoW Takes Forever to Launch in Windows 10
វិធីទី 3៖ ផ្លាស់ប្តូរអាទិភាពដំណើរការហ្គេម
The preference of an application or process tells the computer the importance and if it should be given preference over the others while allocating the resources. The priority of every application is normal except the system processes, by default. MultiVersus might crash if it didn’t get enough resources.
1 ។ ចុចប៊ូតុង បញ្ជា (Ctrl) + ប្ដូរ (Shift) + គ្រាប់ចុចគេច (Esc) រួមគ្នាដើម្បីបើក របារភារកិច្ច.
2. ឥឡូវនេះ ស្វែងរក MultiVersus process.
3. បន្ទាប់មកប្តូរអាទិភាពទៅ អាទិភាពខ្ពស់។ ហើយពិនិត្យមើលថាតើវាដំណើរការឬអត់។
ចំណាំ: ផ្លាស់ប្តូរអាទិភាពដោយប្រយ័ត្នប្រយែង ព្រោះការផ្លាស់ប្តូរអាទិភាពនៃដំណើរការដោយមិនធ្វេសប្រហែស អាចធ្វើឱ្យប្រព័ន្ធរបស់អ្នកយឺត ឬមិនស្ថិតស្ថេរ។
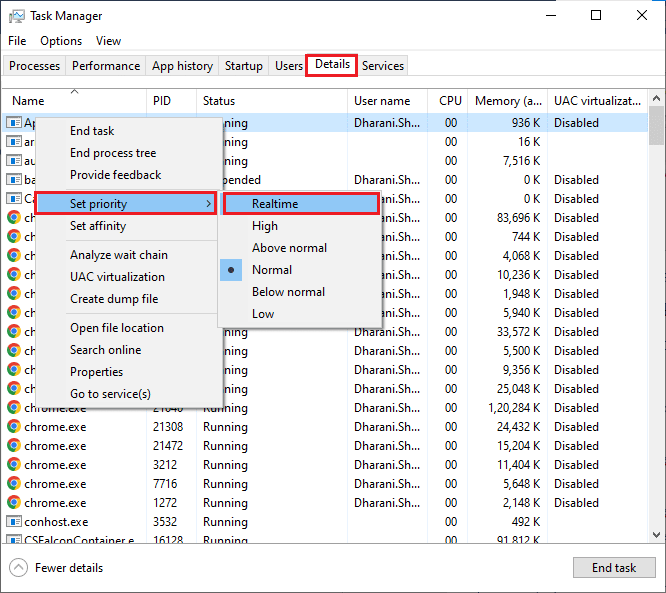
4. បិទ កម្មវិធីគ្រប់គ្រងភារកិច្ច និង ចាប់ផ្ដើមឡើងវិញ កុំព្យូទ័ររបស់អ្នក។
វិធីសាស្រ្តទី 4: កំណត់ប្រសិទ្ធភាពខ្ពស់។
You can also optimize your game when setting your high-performance power plan settings. These power plans are developed to manage the power settings on portable settings. Follow the below-mentioned instructions to use high-performance power plan settings in your system.
1 ។ ចុចប៊ូតុង គ្រាប់ចុច Windows + I ក្នុងពេលដំណាលគ្នាដើម្បីបើក ការកំណត់វីនដូ។
2. ឥឡូវចុចលើ ប្រព័ន្ធ ការកំណត់។
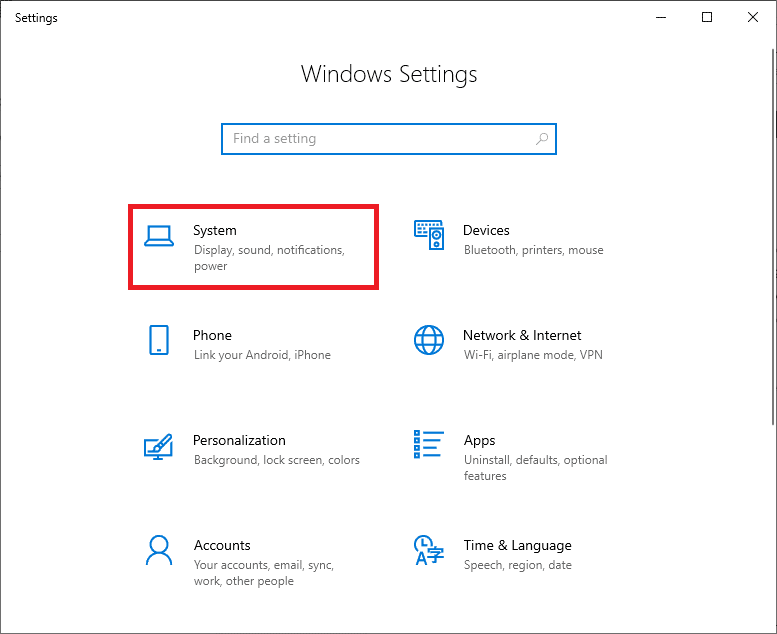
3. ឥឡូវនេះ សូមជ្រើសរើស ថាមពលនិងដំណេក ជម្រើសហើយចុចលើ។ ការកំណត់ថាមពលបន្ថែម ក្រោមការ ការកំណត់ដែលទាក់ទង។.
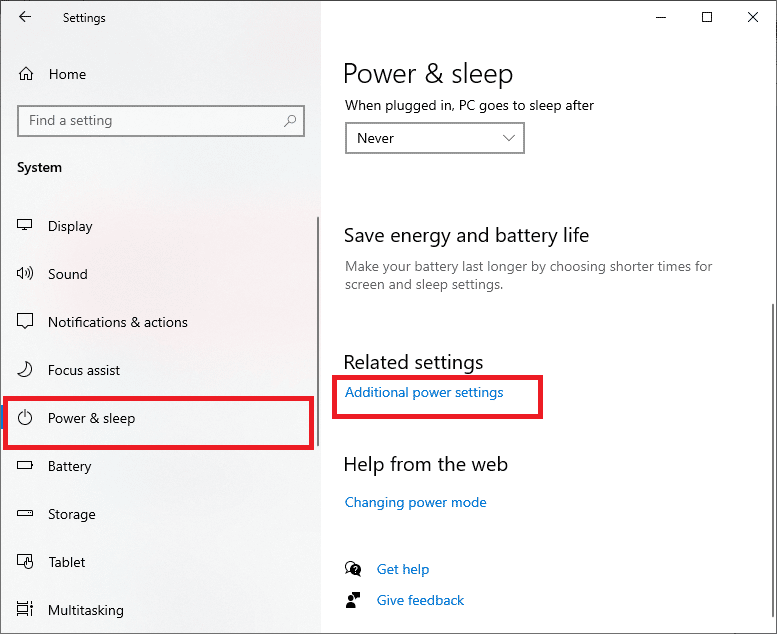
4. ឥឡូវនេះ សូមជ្រើសរើស ដំណើរការខ្ពស់ ជម្រើសនៅក្រោម ផែនការបន្ថែមខ្ពស់។ ដូចបង្ហាញក្នុងរូបភាពខាងក្រោម។
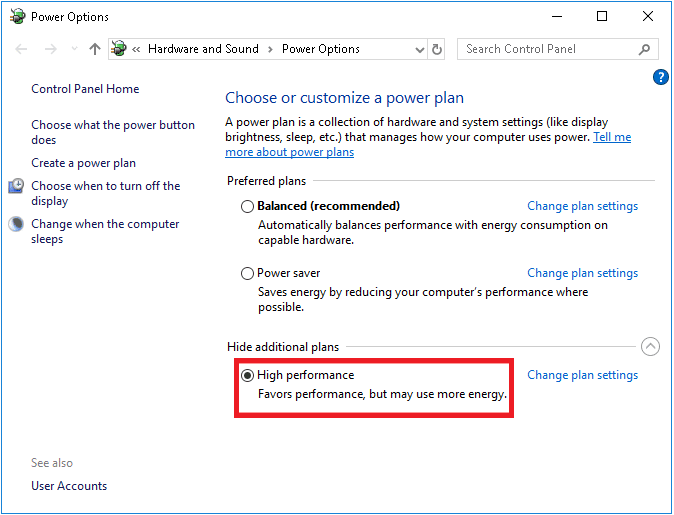
Now you have optimized your system, check if you have fixed MultiVersus won’t launch on startup issue.
សូមអានផងដែរ: ជួសជុលកំហុសឯកសារដែលបានទាញយកដែលបាត់នៅលើ Steam
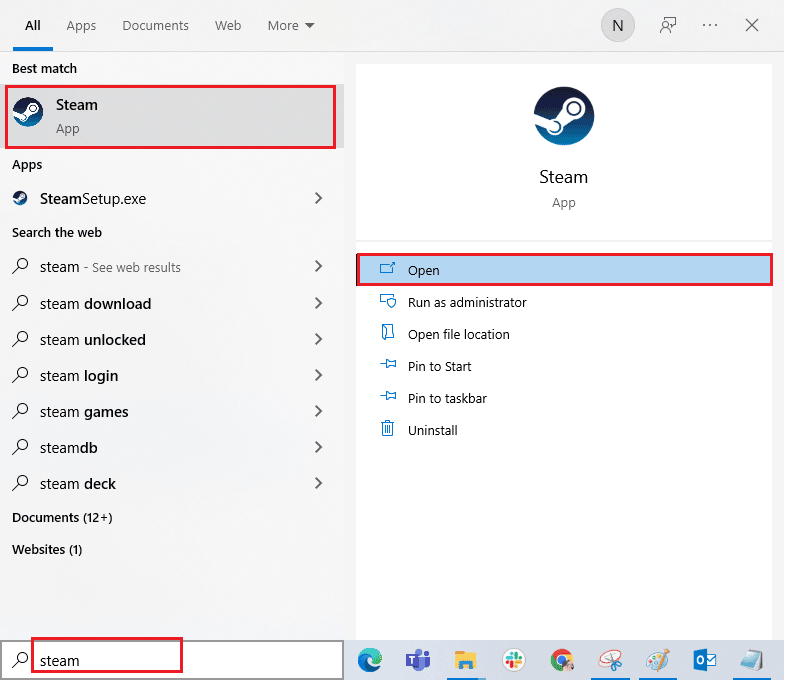
Method 5: Update Steam App & MultiVersus Game
If you use an outdated Steam application, you cannot access any games smoothly. Hence always make sure you use an updated version of Steam and MultiVersus game before launching it.
1 ។ ចុច គ្រាប់វីនដូ និងវាយ ចំហាយរួចចុចលើ បើក។
2. ឥឡូវចុចលើ ចំហាយ នៅជ្រុងខាងឆ្វេងខាងលើនៃអេក្រង់តាមពីក្រោយ ពិនិត្យមើលការអាប់ដេតអតិថិជន Steam… ដូចដែលបានបន្លិចខាងក្រោម។
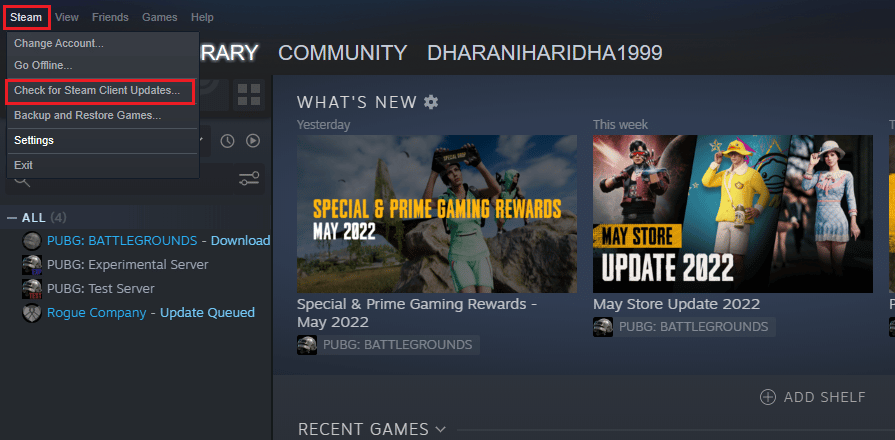
3. ប្រសិនបើអ្នកមានការអាប់ដេតថ្មីណាមួយដែលត្រូវទាញយក សូមដំឡើងពួកវា ហើយធានា ម៉ាស៊ីនភ្ញៀវ Steam របស់អ្នកគឺទាន់សម័យ.
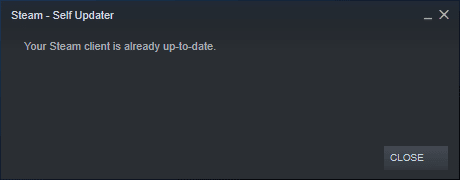
4. ឥឡូវនេះ បើកដំណើរការ Steam ឡើងវិញ ហើយពិនិត្យមើលថាតើបញ្ហាត្រូវបានដោះស្រាយឥឡូវនេះ។
Likewise, it is always essential that your game run at its latest version to avoid any conflicts. Until your game is updated, you cannot log in to MultiVersus servers successfully.
ទៅ ធ្វើបច្ចុប្បន្នភាពហ្គេមរបស់អ្នក។អនុវត្តតាមជំហានដែលបានរៀបរាប់ខាងក្រោម។
1 ។ បើកដំណើរការ ចំហាយ និងរុករកទៅ បណ្ណាល័យ.
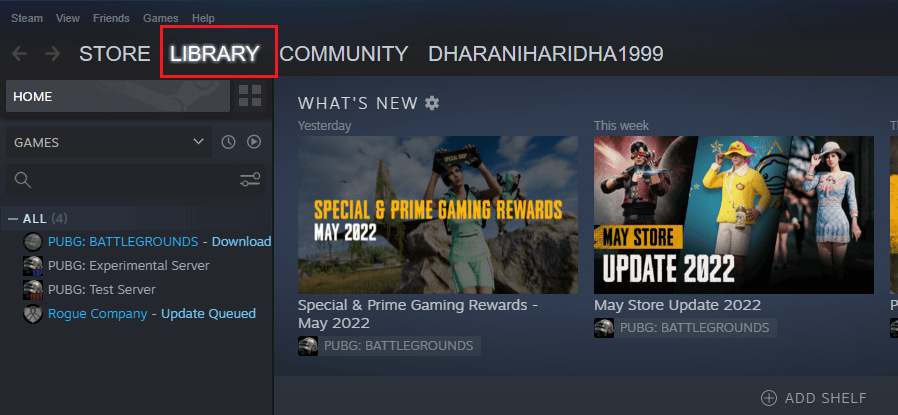
2. ឥឡូវចុចលើ ទំព័រដើម and search for MultiVersus.
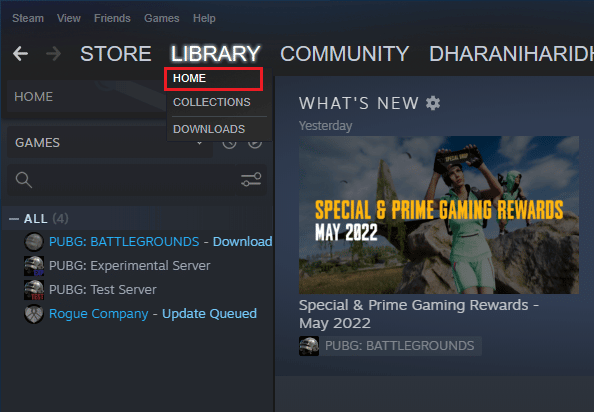
3. បន្ទាប់មកចុចខាងស្តាំលើហ្គេម ហើយជ្រើសរើស លក្ខណៈសម្បត្តិ… ជម្រើស។

4. ឥឡូវនេះ សូមប្តូរទៅ ទាន់សម័យ ផ្ទាំង ហើយពិនិត្យមើលថាតើការអាប់ដេតណាមួយកំពុងរង់ចាំនៅក្នុងសកម្មភាព។ បើដូច្នេះមែន សូមធ្វើតាមការណែនាំនៅលើអេក្រង់ ដើម្បីទាញយកការអាប់ដេតចុងក្រោយបំផុត។
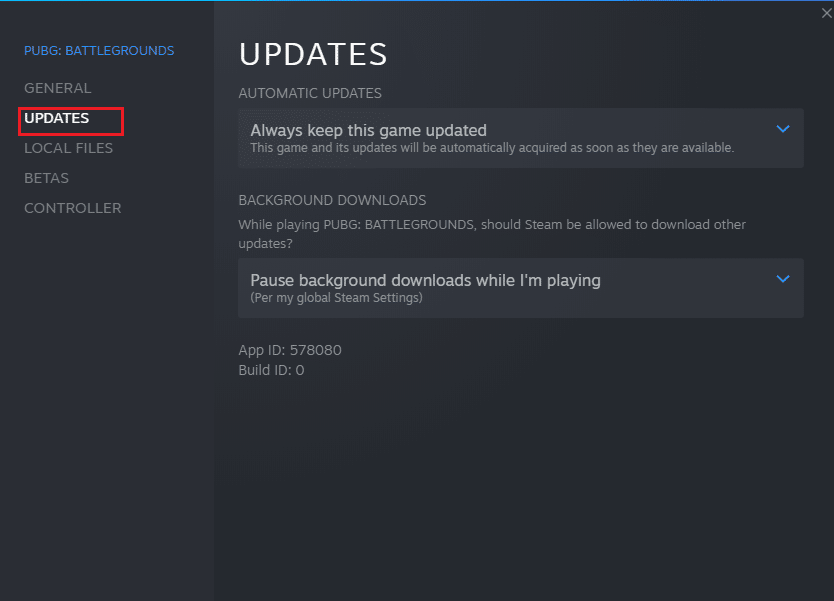
After an update, check if MultiVersus not launching issue is fixed.
វិធីទី ៦៖ បិទការបង្កើនប្រសិទ្ធភាពពេញអេក្រង់
Few users have suggested that disabling full-screen optimizations on PC has helped them fix MultiVersus is not launching issue. Follow as instructed.
1. Navigate to the Steam បណ្ណាល័យ ម៉ឺនុយ។
2. Now, right-click on the MultiVersus game and click on លក្ខណៈសម្បត្តិ…
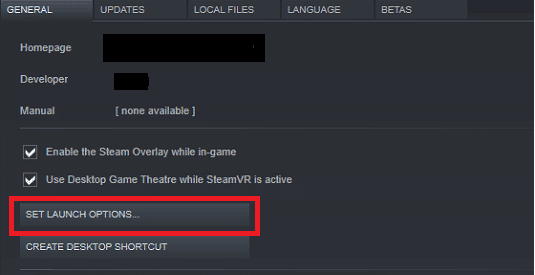
3. ឥឡូវនេះ សូមប្តូរទៅ ទូទៅ ផ្ទាំងហើយចុចលើ កំណត់ជម្រើសបើកដំណើរការ... ដូចដែលបានបង្ហាញ។
4. ឥឡូវនេះ បង្អួចថ្មីមួយនឹងត្រូវបានបើកជាមួយនឹងការព្រមានអ្នកប្រើប្រាស់កម្រិតខ្ពស់។ ដើម្បីបើកហ្គេមក្នុងទម្រង់បង្អួច សូមវាយពាក្យ - បង្អួច ប៉ារ៉ាម៉ែត្រ។
5. ឥឡូវនេះ រក្សាទុកការផ្លាស់ប្តូរដោយចុច OK ហើយចេញពីបង្អួចលក្ខណសម្បត្តិ។
6. ឥឡូវនេះ បើកដំណើរការឡើងវិញ ល្បែង and ensure that it runs in windowed mode.
ចំណាំ: You can also navigate to កំណត់ជម្រើសបើកដំណើរការ… ម្តងទៀត ហើយវាយប៉ារ៉ាម៉ែត្រខាងក្រោមជំនួសឱ្យប៉ារ៉ាម៉ែត្រចុងក្រោយ។
- បង្អួច -w 1024
7. Now, save the changes by clicking on OK.
ប៉ារ៉ាម៉ែត្រនេះនឹងកំណត់ហ្គេមត្រូវបានបើកដំណើរការក្នុងទម្រង់បង្អួច។
សូមអានផងដែរ: ជួសជុលការកំណត់រចនាសម្ព័ន្ធកម្មវិធី Steam ដែលមិនមាននៅក្នុង Windows 10
វិធីទី ៧៖ បិទការលាបលើហ្គេម
The Steam Overlay is a piece of Steam that allows the users to access friends list, and web browser and allows in-game purchasing. It is a significant tool, yet it sometimes triggers MultiVersus not launching on startup issue. If you want to solve this problem, then turn off the Steam game overlay.
1 ។ បើក ចំហាយ ហើយចុចលើ បណ្ណាល័យ.
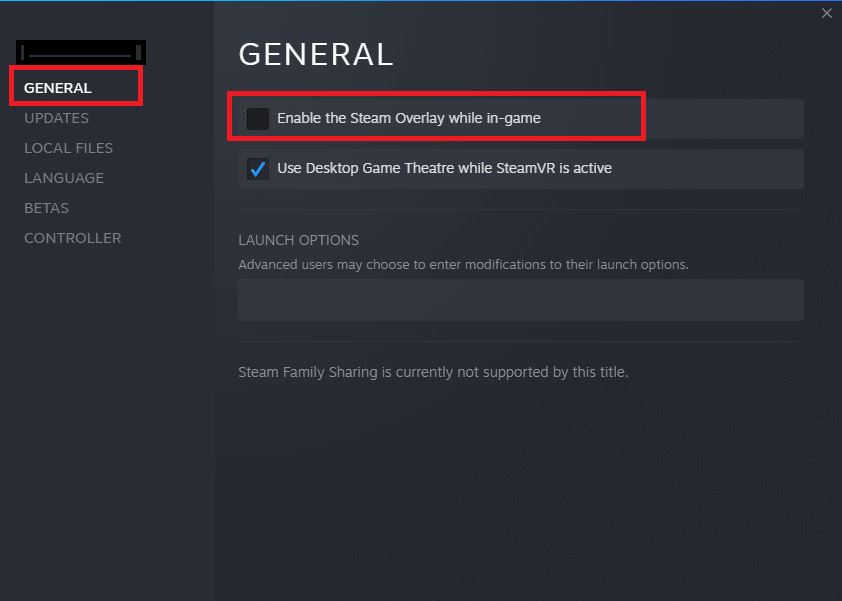
2. ឥឡូវនេះ ចុចកណ្ដុរស្ដាំលើ ពហុធៀប ហើយចុចលើ លក្ខណៈសម្បត្តិ…

3. ឥឡូវនេះ សូមប្តូរទៅ ទូទៅ ផ្ទាំង ហើយដោះធីកប្រអប់ដែលមាន បើកដំណើរការ Steam Overlay ពេលនៅក្នុងហ្គេម។
4. ទីបំផុត ចាប់ផ្តើមហ្គេមឡើងវិញ and check if the MultiVersus launching issue is solved.
វិធីទី 8៖ ផ្ទៀងផ្ទាត់ភាពត្រឹមត្រូវនៃឯកសារហ្គេម
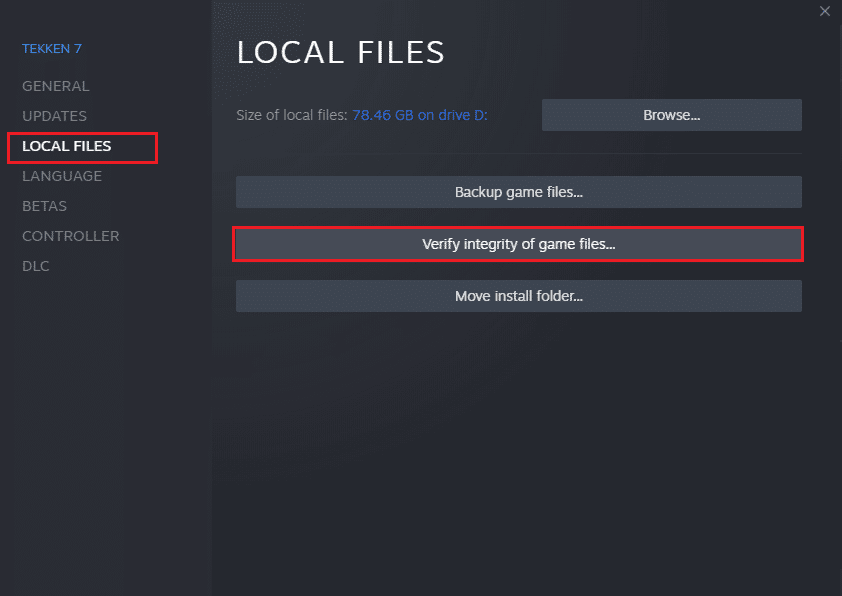
We have seen many cases in which the game files are either missing or corrupt or it had incomplete installations. Users could also experience MultiVersus not starting on PC issue if they are interrupted by the update process or if the game files are being moved. In this method, you will be opening Steam and using the built-in function for verifying the integrity of the game. It will be replaced if the application finds something. Read our guide on how to verify integrity of game files on Steam.
សូមអានផងដែរ: ជួសជុល Steam Client Bootstrapper មិនឆ្លើយតបនៅក្នុង Windows 10
វិធីសាស្រ្តទី 9: ធ្វើបច្ចុប្បន្នភាព .NET Framework
.NET framework in Windows 10 computer is essential for uninterrupted service of modern apps and games. Many games have an auto-update feature for the .NET framework, and thus it will be updated automatically whenever an update is available. In another case, if an update prompts in your PC, you can manually install the latest version of the .NET framework, as discussed below, to fix MultiVersus not launching issue.
ពិនិត្យរកមើល ធ្វើឱ្យទាន់សម័យថ្មី សម្រាប់ ក្របខ័ណ្ឌណេត ពីទំព័រ គេហទំព័រផ្លូវការរបស់ Microsoft.
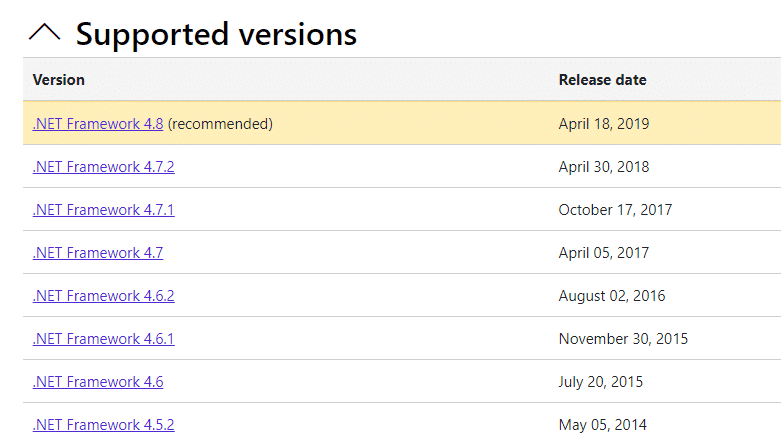
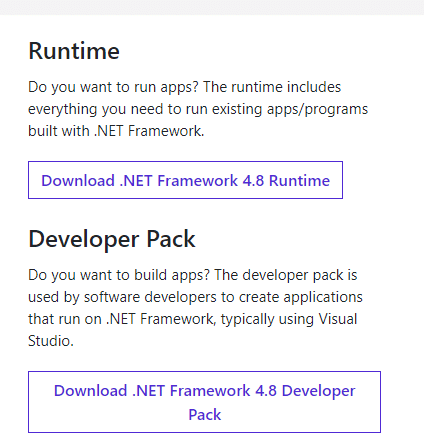
2. ប្រសិនបើមានការអាប់ដេតណាមួយ ចុចលើពាក្យដែលត្រូវគ្នា/បានផ្ដល់អនុសាសន៍ link ហើយចុច ទាញយក .NET Framework 4.8 Runtime ជម្រើស។
ចំណាំ: កុំចុចលើ ទាញយក .NET Framework 4.8 Developer Pack ដូចដែលវាត្រូវបានប្រើដោយអ្នកអភិវឌ្ឍន៍កម្មវិធី។
3 ។ ទៅ ការទាញយករបស់ខ្ញុំ, ចុចពីរដងលើឯកសារដំឡើង ដើម្បីដំណើរការឯកសារដែលបានទាញយក ហើយធ្វើតាម សេចក្តីណែនាំលើអេក្រង់ to install the .NET framework successfully on your Windows PC. Once done, check if you have fixed the discussed issue or not.
វិធីទី ៥៖ ធ្វើបច្ចុប្បន្នភាព DirectX
To enjoy a seamless multimedia experience on MultiVersus, you have to make sure whether DirectX is installed, and it is updated to its latest version. DirectX helps you improve the visual media experience for graphical games and applications especially. It is worth updating DirectX needed for this game.
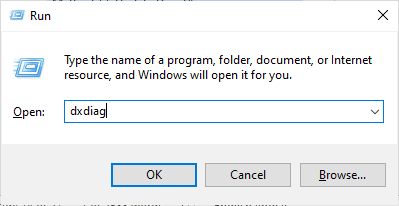
1. វាយ គ្រាប់ចុចវីនដូ + អាន ក្នុងពេលដំណាលគ្នាដើម្បីបើកដំណើរការ រត់ ប្រអប់។
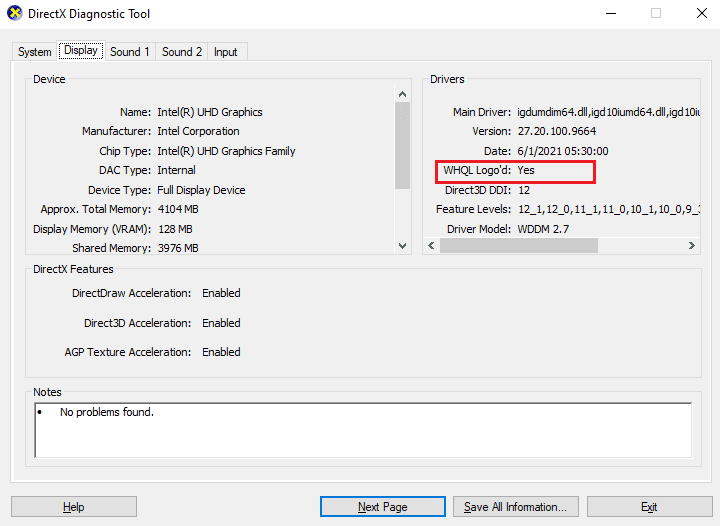
2 ។ វាយ dxdiag ។ ហើយចុចប៊ូតុង បញ្ចូលលេខកូដ បើក ឧបករណ៍វិនិច្ឆ័យរោគដោយផ្ទាល់.
3. ពិនិត្យមើលឯកសារ កំណែ DirectX, if it contains DirectX 12 ឬមិនបាន។
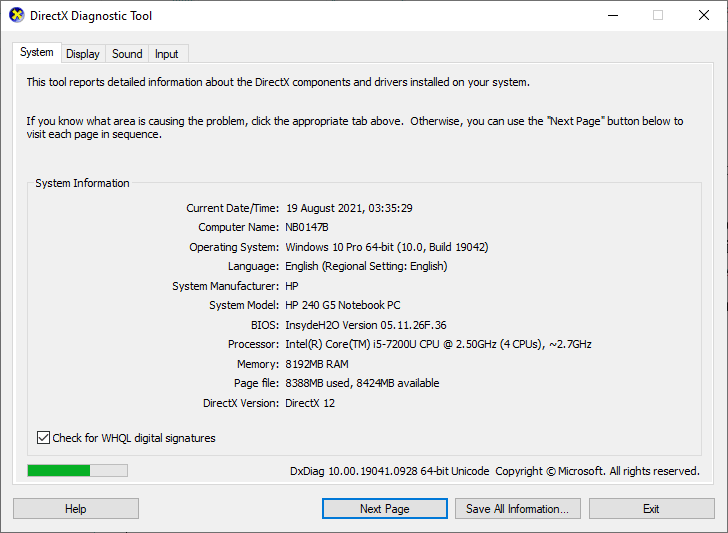
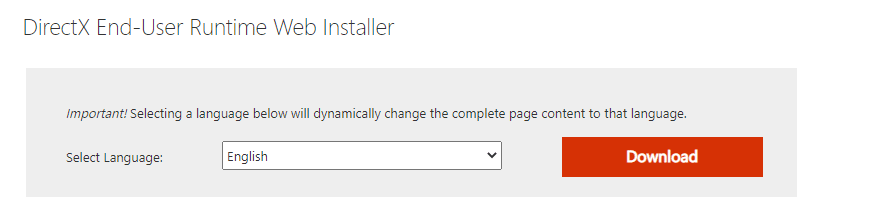
4. If you do not have DirectX 12 in your system, download and install it from the ទំព័រទាញយក DirectX ដោយធ្វើតាមការណែនាំនៅលើអេក្រង់។
After installing DirectX, check if the issue occurs again.
ចំណាំ: ធានាឱ្យបាននូវ ពិនិត្យមើលហត្ថលេខាឌីជីថល WHQL ប្រអប់ត្រូវបានពិនិត្យ ប្រព័ន្ធ ផ្ទាំង និងនៅក្នុងផ្ទាំងទាំងអស់ សូមពិនិត្យមើលថាតើ និមិត្តសញ្ញា WHQL ត្រូវបានកំណត់ទៅ បាទ.
វិធីសាស្រ្តទី 11: ជួសជុល Microsoft Visual C ++ Redistributable
Alternately, you can try to repair the Microsoft Visual C++ Redistributable packages to fix MultiVersus not launching issue as follows:
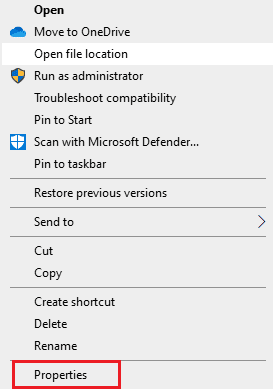
1. វាយ គ្រាប់វីនដូវាយ កម្មវិធីនិងលក្ខណៈពិសេសរួចចុចលើ បើកទូលាយ.
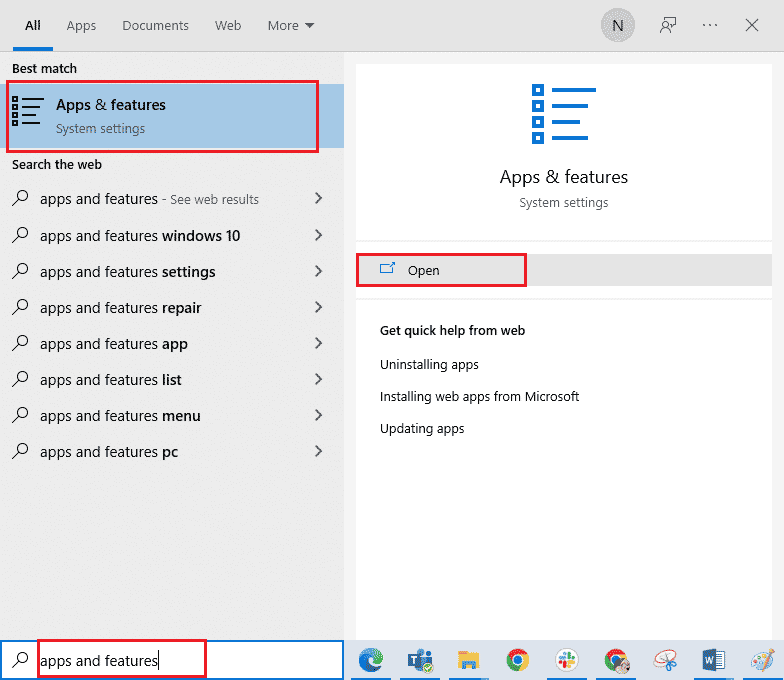
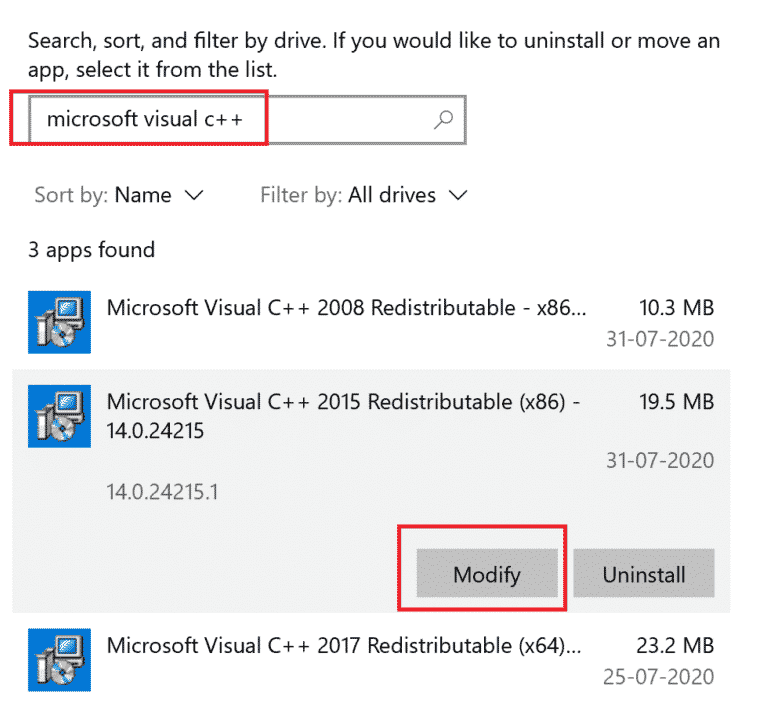
ស្វែងរក ការចែកចាយរបស់ Microsoft Visual C ++ នីមួយៗ.
3. Then, select the package, and click on កែប្រែ ជម្រើស។
4. បន្ទាប់មកចុច បាទ នៅលើ ការគ្រប់គ្រងគណនីអ្នកប្រើប្រាស់ ប្រអប់។
5. In the pop-up window that appears, click on ជួសជុល. រង់ចាំដំណើរការបញ្ចប់។
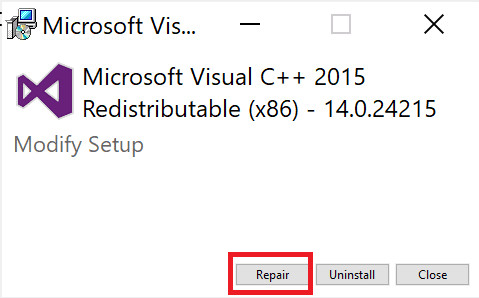
6. Repeat the above steps to modify all the Microsoft Visual C++ Redistributable packages.
7. ទីបំផុត ចាប់ផ្ដើមកុំព្យូទ័រឡើងវិញ.
Open the application that you were unable to open previously. If this did not work, try reinstalling the C++ redistributable instead.
សូមអានផងដែរ: Fix Microsoft Visual C++ 2015 Redistributable Setup Fails Error 0x80240017
វិធីសាស្រ្តទី 12: ដំឡើង Microsoft Visual C ++ ឡើងវិញដែលអាចចែកចាយបាន។
If the previous method of repairing the Microsoft C++ Visual Redistributable did not fix MultiVersus won’t launch issue, then you will have to reinstall the redistributable. Follow the given steps to uninstall & then install these again.
1 ។ បើក កម្មវិធីនិងលក្ខណៈពិសេស ការកំណត់ប្រព័ន្ធ។
2 ។ ជ្រើសយក ការចែកចាយរបស់ Microsoft Visual C ++ package, then click on លុប ជម្រើស។
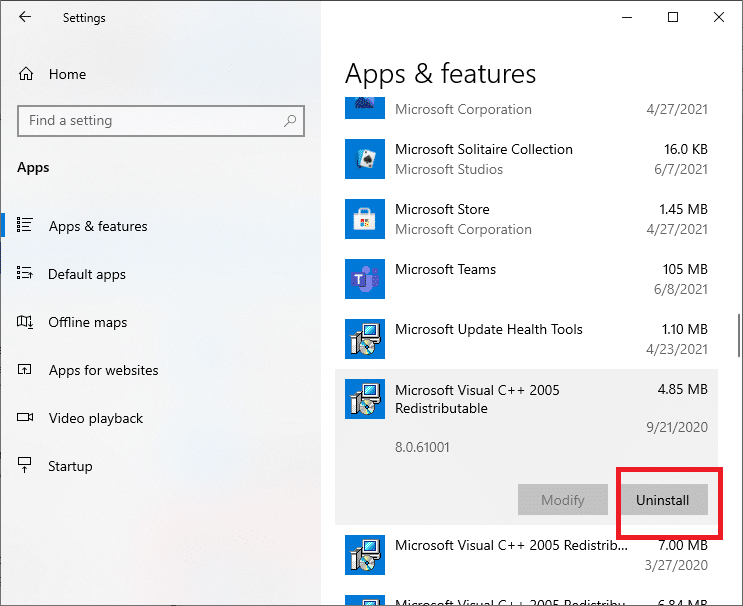
3 ។ ចុចលើ លុប option again to confirm and remove the package.
ចំណាំ: Make sure to uninstall all the Microsoft Visual C++ Redistributable packages.
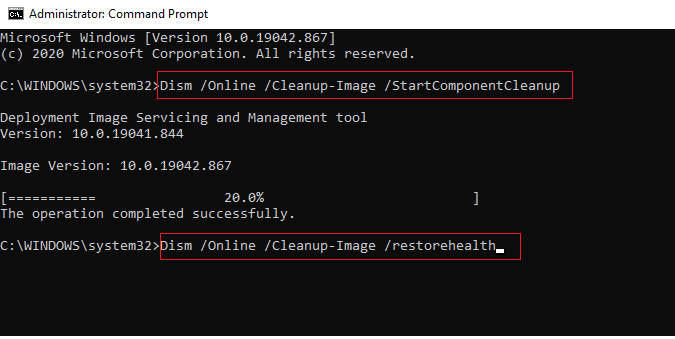
4. វាយ គ្រាប់វីនដូវាយ ប្រអប់បញ្ចូលពាក្យបញ្ជារួចចុចលើ រត់ជាអ្នកគ្រប់គ្រង.
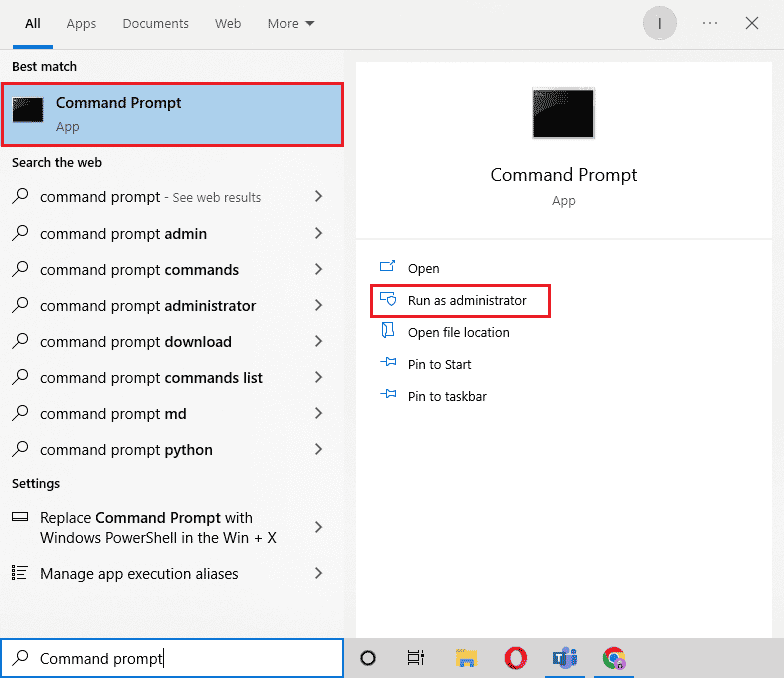
5. វាយបញ្ចូលដូចខាងក្រោម ពាក្យបញ្ជា ហើយចុច បញ្ចូល គន្លឹះ បន្ទាប់ពីគ្នា:
DISM /online /Cleanup-Image /StartComponentCleanup
DISM /online /Cleanup-Image /RestoreHealth
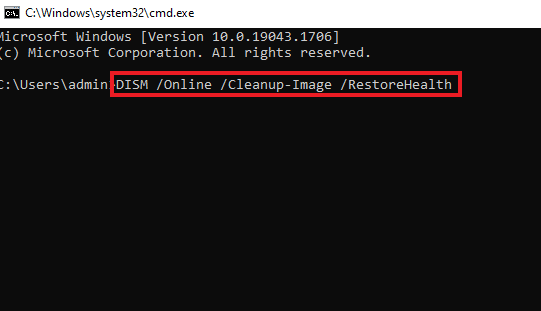
6. នៅពេលដែលដំណើរការនេះត្រូវបានបញ្ចប់។ ចាប់ផ្ដើមកុំព្យូទ័រឡើងវិញ.
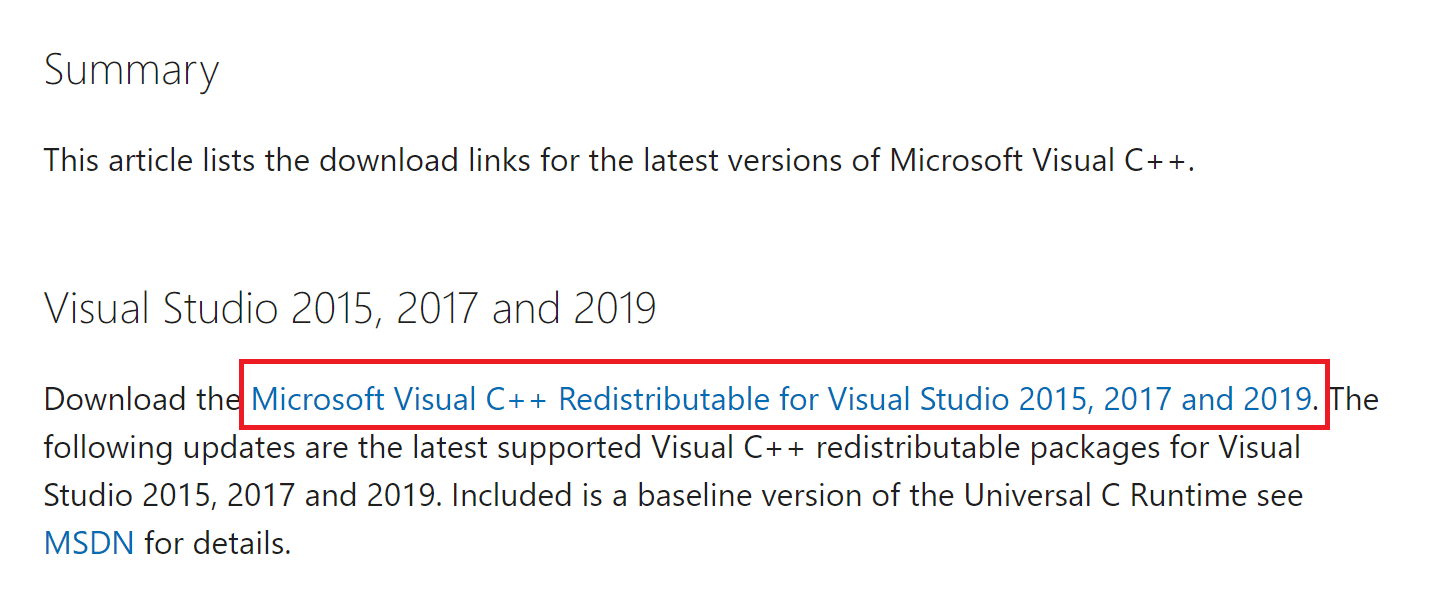
7. បន្ទាប់សូមទស្សនា Microsoft Visual C++ Redistributable webpage to download the latest C++ package as shown here.
8. Once downloaded, open the ឯកសារដែលបានទាញយក by double-clicking on it in ការទាញយករបស់ខ្ញុំ. ដំឡើង the package by following the on-screen instructions.
9. Once the installation is complete, finally ចាប់ផ្ដើមកុំព្យូទ័រឡើងវិញ.
បានផ្ដល់អនុសាសន៍:
យើងសង្ឃឹមថាការណែនាំនេះមានប្រយោជន៍ ហើយអ្នកអាចជួសជុលបាន។ MultiVersus not launching issue on your Windows 10 PC. Let us know which method worked for you the best. Feel free to reach out to us with your queries and suggestions via the comments section below.