WmiPrvSE is the acronym for Windows Management Instrumentation Provider Service. Windows Management Instrumentation (WMI) is a component of the Microsoft Windows operating system that provides management information and control in an enterprise environment. Many people believe it’s a virus as sometimes WmiPrvSE.exe causes high CPU usage, but it’s not a virus or malware instead WmiPrvSE.exe is manufactured by Microsoft itself.
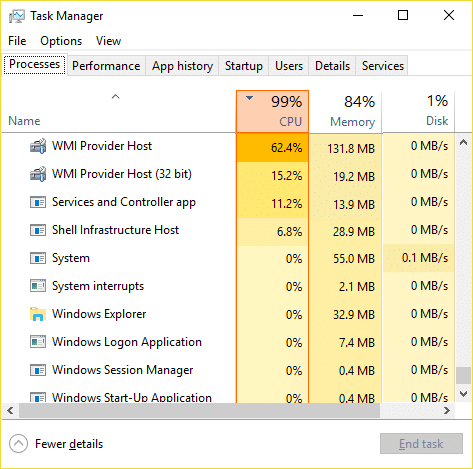
The main problem is that the Windows freezes or stuck when WmiPrvSE.exe is taking many system resources, and all the other apps or programs are left with a little or no resources at all. This will cause your PC to become sluggish, and you won’t be able to use it all, at last, you will have to reboot your PC. Even after a reboot, sometimes this issue will not be resolved, and you will again face the same problem. So without wasting any time let’s see how to actually Fix High CPU Usage by WmiPrvSE.exe with the below-listed troubleshooting guide.
Fix High CPU Usage by WmiPrvSE.exe
혹시라도 문제가 생길 경우를 대비해 복원 지점을 만들어 두시기 바랍니다.
Method 1: Restart Windows Management Instrumentation Service
1. Windows 키 + R을 누른 다음 입력 services.msc를 Enter를 누르십시오.

2. 찾기 Windows Management Instrumentation Service in the list then right-click on it and select 다시 시작합니다.
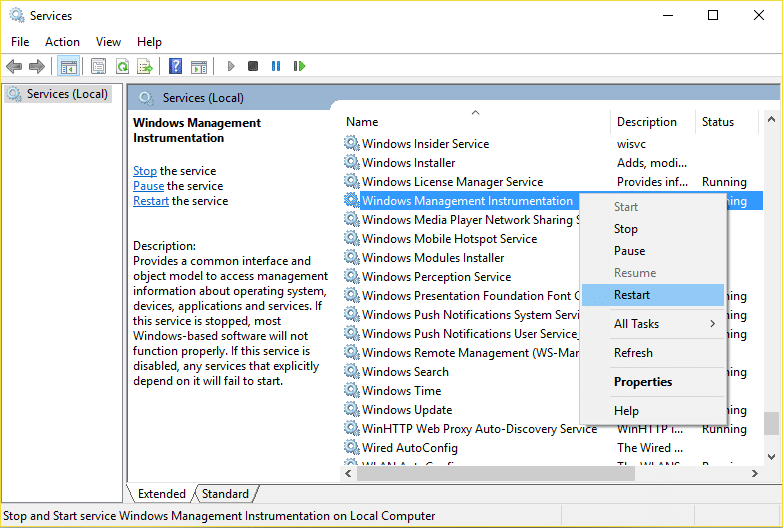
3. This will restart all the service associated with WMI services and Fix High CPU Usage by WmiPrvSE.exe.
Method 2: Restart Other Services associated with WMI
1. Press Windows Key + X then select 명령 프롬프트 (Admin).

2. Type the following into cmd and hit Enter after each one:
넷 스톱 iphlpsvc
순 중지 wscsvc
에서 net stop winmgmt를
넷 시작 winmgmt
순 시작 wscsvc
순 시작 iphlpsvc
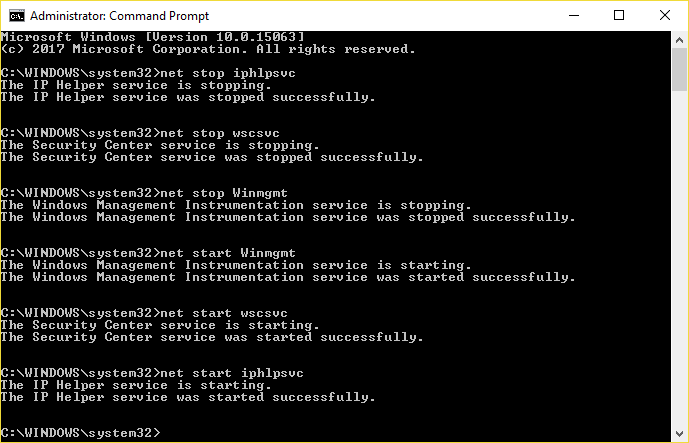
3. PC를 재부팅하여 변경 사항을 저장합니다.
방법 3: CCleaner 및 Malwarebytes 실행
1. 다운로드 및 설치 CCleaner를 & Malwarebytes.
2. 멀웨어 바이트 실행 시스템에서 유해한 파일을 검색하도록 합니다. 맬웨어가 발견되면 자동으로 제거합니다.

3. 이제 CCleaner를 실행하고 주문 청소.
4. 사용자 지정 청소에서 창 탭 then make sure to checkmark defaults and click 분석.

5. 분석이 완료되면 삭제할 파일을 확실히 제거해야 합니다.

6. 마지막으로 클리너 실행 버튼을 누르고 CCleaner가 과정을 실행하도록 합니다.
7. 시스템을 더 청소하려면 레지스트리 탭을 선택하십시오, 다음이 확인되었는지 확인합니다.

8. 클릭 문제 스캔 버튼을 누르고 CCleaner가 스캔하도록 허용한 다음 선택한 문제 수정 버튼을 클릭합니다.

9. CCleaner가 "레지스트리에 대한 변경 사항을 백업하시겠습니까?" 예를 선택하십시오..
10. 백업이 완료되면 선택한 모든 문제 수정 버튼을 클릭합니다.
11. PC를 다시 시작하여 변경 사항을 저장합니다.
Method 4: Run System Maintenance Troubleshooter
1. Windows 키 + X를 누르고 다음을 클릭합니다. 제어판.

2. Search Troubleshoot and click on 문제 해결.

3. Next, click on view all in the left pane.
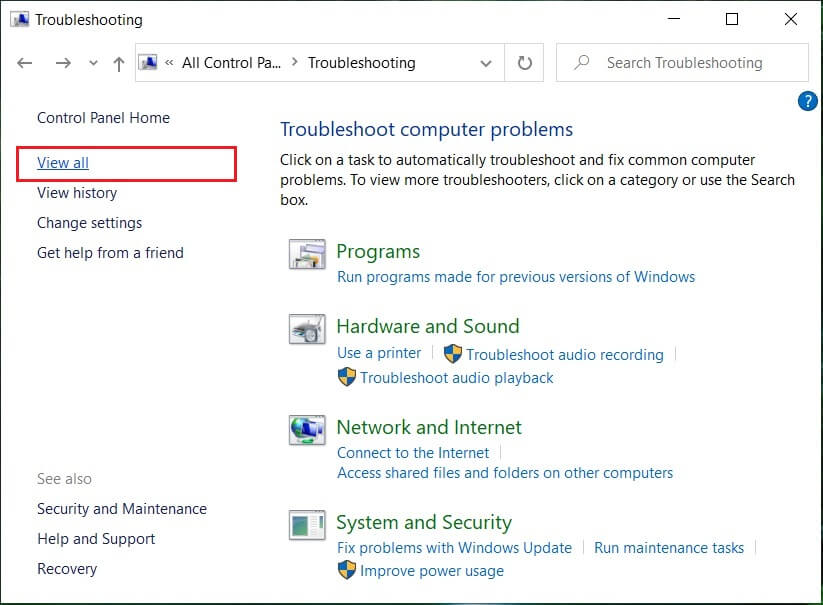
4. Click and run the Troubleshooter for System Maintenance.

5. The Troubleshooter may be able to Fix High CPU Usage by WmiPrvSE.exe.
Method 5: Locate the process manually using Event Viewer
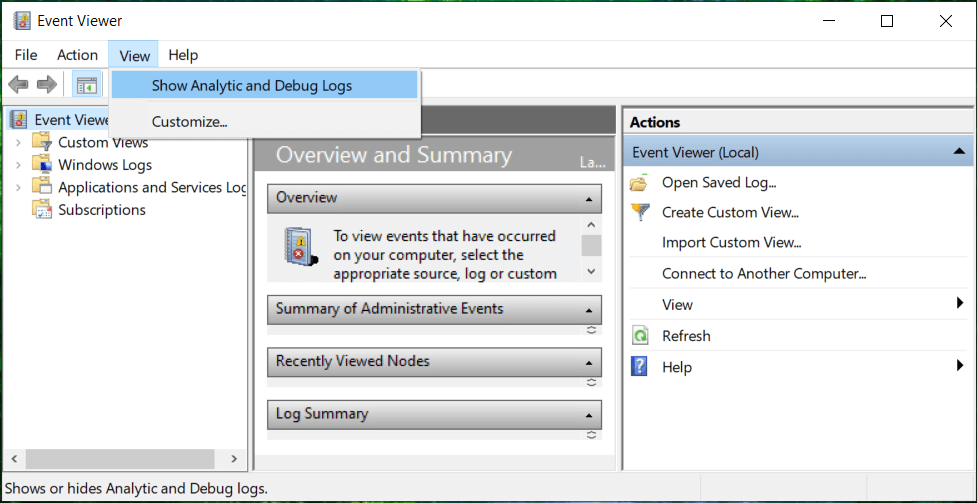
1. Windows 키 + R을 누른 다음 입력 eventvwr.msc Enter 키를 눌러 엽니 다. 이벤트 뷰어.

2. From the top menu, click on 관측 다음을 선택하십시오. Show Analytic and Debug Logs option.
3. Now, from the left pane navigate to the following by double-clicking on each of them:
Applications and Services Logs > Microsoft > Windows > WMI-Activity
4. Once you are under WMI-Activity folder (make sure you have expanded it by double-clicking on it) select Operationally.
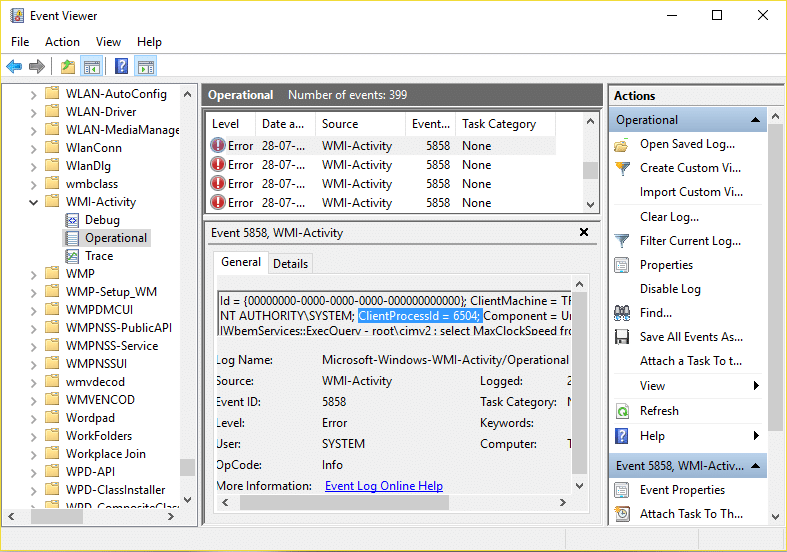
5. In the right window pane select 오류 under Operational and General tab look for the 클라이언트 프로세스 ID for that particular service.
6. Now we have the Process Id of the particular service causing High CPU usage, we need to disable this particular service 이 문제를 해결하십시오.
7. 프레스 Ctrl + Shift + Esc를 together to open Task Manager.

8.로 전환 서비스 탭 찾아 Process Id which you noted above.
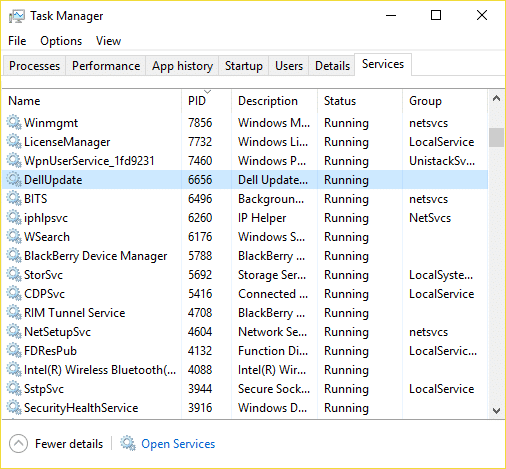
9. The service with the corresponding Process ID is the culprit, so once you find it go to Control Panel > Uninstall a Program.
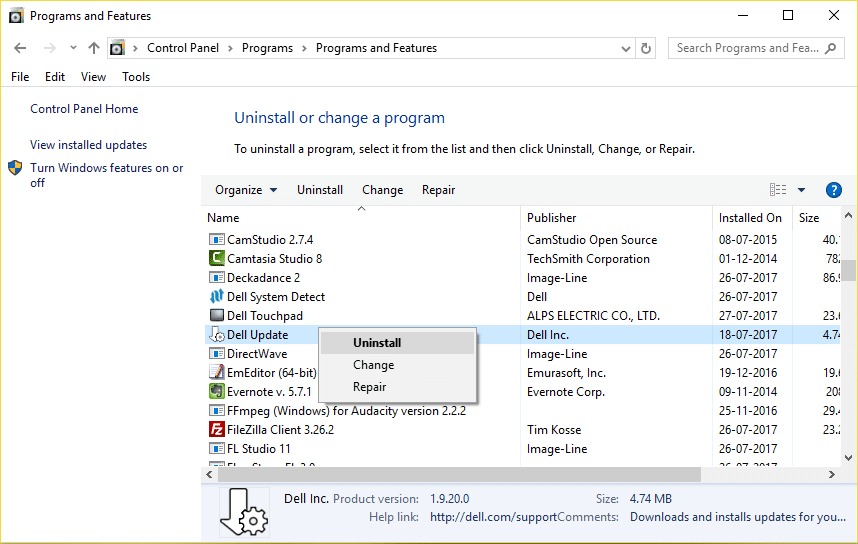
10. Uninstall the particular program or service associated with above Process ID then reboot your PC.
권장 사항 :
그게 당신이 성공적으로 Fix High CPU Usage by WmiPrvSE.exe 그러나 이 게시물과 관련하여 여전히 질문이 있는 경우 댓글 섹션에서 자유롭게 질문하세요.

