Fix Windows Modules Installer Worker High CPU Usage
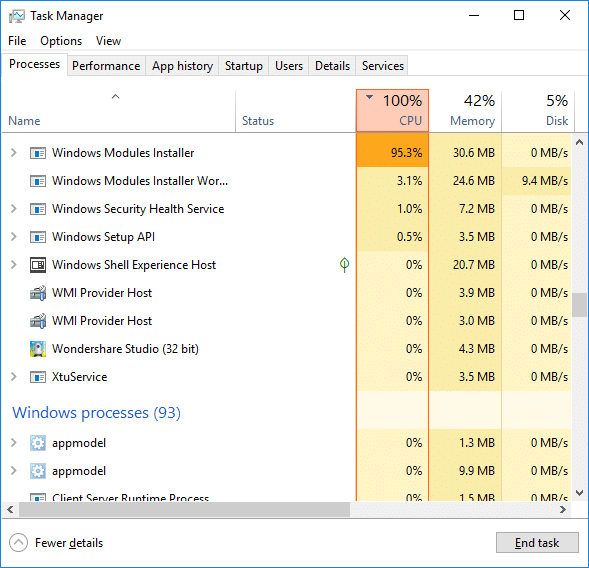
If you are facing the High CPU Usage by Windows Modules Installer Worker, then don’t worry as thousands of other users are also facing the similar problem and therefore, there are many working fixes which we will be discussing today in this article. To verify if you are facing this issue open Task Manager (Ctrl + Shift + Esc) and you will find that the Windows Modules Installer Worker is consuming High CPU or Disk Usage.

Про учу: You may leave your PC overnight or for a few hours to see the issue rectify itself once the Windows is finished downloading and installing updates.
What is Windows Modules Installer worker (WMIW)?
Windows Modules Installer worker (WMIW) is a service which takes cares of automatically installing Windows Update. According to its service description, WMIW is a system process that enables automatic installation, modification, and removal of Windows updates and optional components.
This process is responsible for finding new Windows Update automatically and installing them. As you might be aware that Windows 10 automatically install newer builds (i.e. 1803 etc.) via Windows Updates, so this process is responsible for installing these updates in the background.
Although this process is called Windows Modules Installer worker (WMIW) and you will see the same name in the Processes tab in the Task Manager, but if you switch to Details tab, then you will find the name of the file as TiWorker.exe.
Why Is Windows Modules Installer worker Using So Much CPU?
As Windows Modules Installer worker (TiWorker.exe) runs continuously in the background, sometimes it might utilize high CPU or disk usage when installing or uninstalling Windows Updates. But if its constantly using high CPU then the Windows Modules Installer worker may have become unresponsive while checking new updates. As a result, you may be experiencing lags, or your system might hang or freeze completely.
The first thing users do when they experience freezing, or lagging issues on their system is to restart their PC, but I assure you that this strategy won’t work in this case. This is because the issue will not resolve by itself until and unless you fix the underlying cause.
Fix Windows Modules Installer Worker High CPU Usage
Бир нерсе туура эмес болуп калса, калыбына келтирүү чекитин түзүүнү унутпаңыз.
Windows Modules Installer Worker (WMIW) is an important service, and it should not be disabled. WMIW or TiWorker.exe is not a virus or malware, and you cannot just delete this service from your PC. So without wasting any time let’s see How to Fix Windows Modules Installer Worker High CPU Usage төмөндө келтирилген көйгөйлөрдү чечүү боюнча колдонмонун жардамы менен.
Метод 1: Windows Update Troubleshooter иштетиңиз
1. Ачуу үчүн Windows баскычын + I басыңыз Орнотуулар андан кийин чыкылдатыңыз Жаңыртуу жана Коопсуздук сөлөкөтү.
![]()
2. Сол жактагы менюдан тандаңыз жоюу астында “Тур да, иштеп” басыңыз Windows Update.
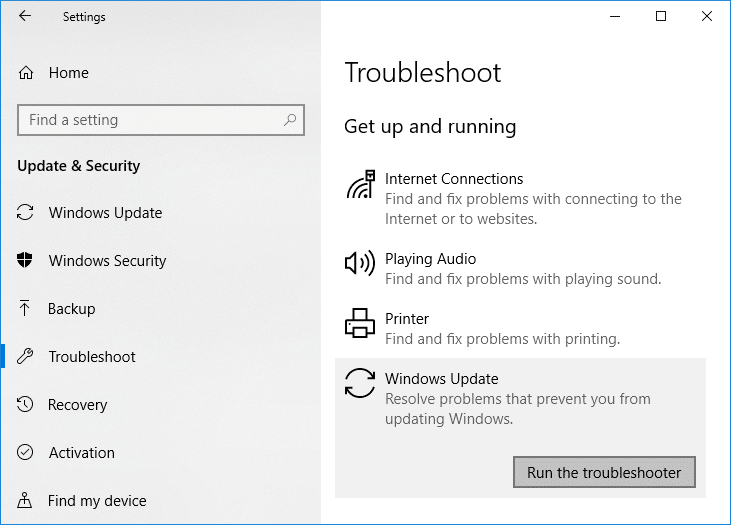
3. Эми “чечкичти иштеткенде” under Windows Update.
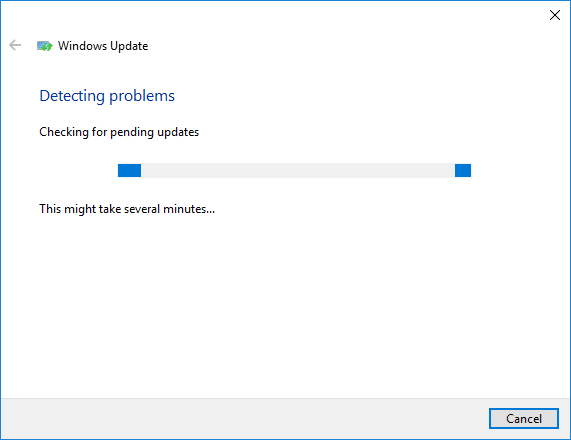
4. Let the troubleshooter run, and it will automatically fix any issues found with Windows Update taking forever.
Method 2: Manually Check for Windows Updates
1. Windows Key + I баскычтарын басыңыз, анан тандаңыз Жаңыртуу жана Коопсуздук.
2. Сол жактагы меню чыкылдатат Windows Update.
3. Эми “билүү үчүн текшерүү” баскычын басып, жеткиликтүү жаңыртууларды текшериңиз.

4. Эгерде кандайдыр бир жаңыртуулар күтүлсө, анда чыкылдатыңыз Жаңыртууларды жүктөп алыңыз жана орнотуңуз.

5. Жаңыртуулар жүктөлүп алынгандан кийин, аларды орнотуңуз, ошондо сиздин Windows жаңыртылган болот.
Method 3: Configure Windows Update to Manual
Эскертүү: This method will switch Windows Update from automatically installing the new updates to the manual. This means you have to manually check for Windows Update (weekly or monthly) to keep your PC secure. But follow this method, and you can again set the Updates to Automatic once the issue is resolved.
1.Press Windows Key + R анан териңиз services.msc -ди.

2. Scroll down and find Windows Modules орноткуч service in the list.
3. чыкылдатып, оң баскычты чыкылдатыңыз Windows Modules Installer service жана тандоо Касиеттери.
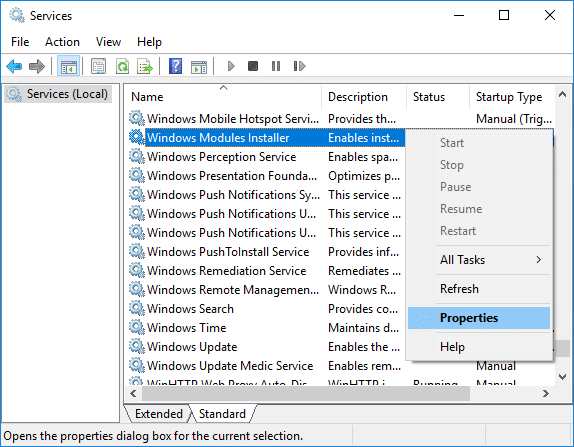
4. Эми чыкылдатыңыз токтотуу then from the Startup түрү drop-down select Колдонмо.
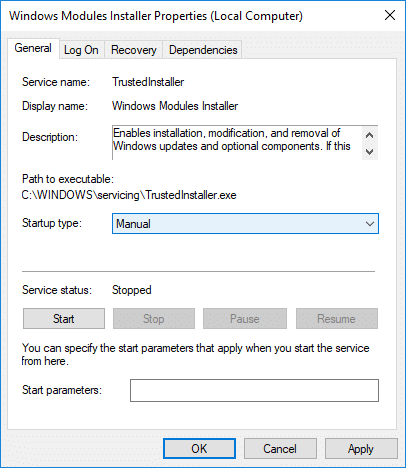
5. Колдонуу, андан кийин чыкылдатыңыз OK.
6. Similarly, follow the same step for the Windows Update service.
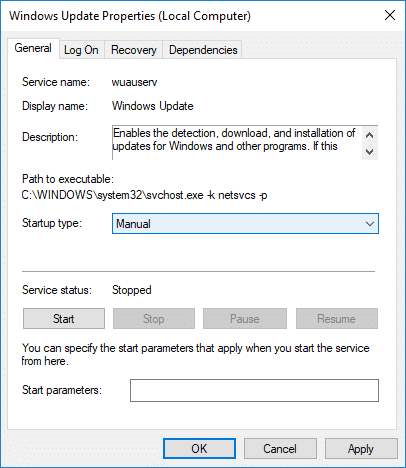
7. Өзгөртүүлөрдү сактоо үчүн компьютериңизди өчүрүп күйгүзүңүз.
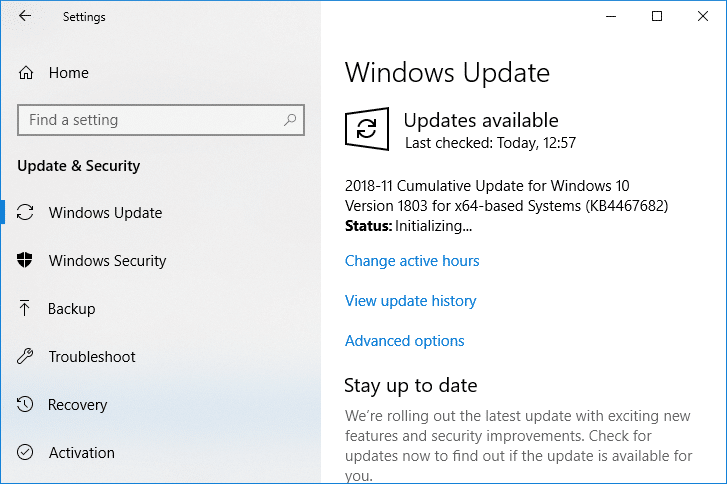
8. Дагы үчүн текшерүү Windows Updates Manually and install any pending updates.
9. Once is done, again go back to services.msc window and open the Windows Modules Installer & Windows Update Properties терезе.
10. орнотуңуз Startup түрү үчүн автоматтык жана чыкылдатуу баштоо. Then click Apply followed by OK.
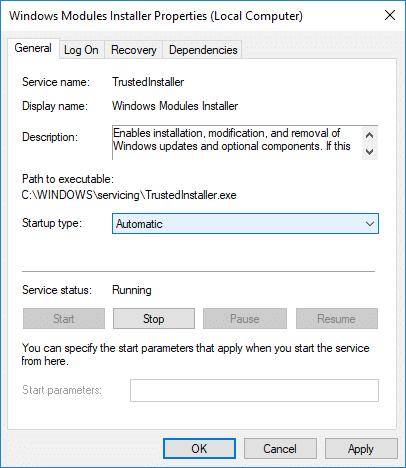
11. Өзгөртүүлөрдү сактоо үчүн компьютериңизди өчүрүп күйгүзүңүз.
Метод 4: Системаны тейлөөдө көйгөйлөрдү чечүүчүнү иштетиңиз
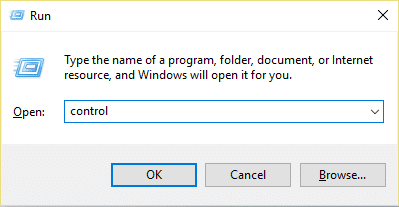
1. Windows Key + R баскычтарын басыңыз, андан кийин башкарууну териңиз жана ачуу үчүн Enter баскычын басыңыз Control Panel.
2. Кыйынчылыктарды аныктоону издеп, чыкылдатыңыз Кыйынчылыктарды оңдоо.

3. Андан кийин, чыкылдатыңыз баарын көрүү сол панелинде.
4. Click жөнүндө “System Maintenance” иштетүү System Maintenance Troubleshooter.

5. Кыйынчылыктарды оңдоочу мүмкүн болушу мүмкүн Fix Windows Modules Installer Worker High CPU Usage, but if it didn’t, then you need to run System Performance Troubleshooter.
6. Буйрук сапты ачыңыз. Колдонуучу бул кадамды издөө аркылуу аткара алат 'cmd' анан басып.

7. cmdге төмөнкү буйрукту терип, Enter баскычын басыңыз:
msdt.exe / ID PerformanceDiagnostic
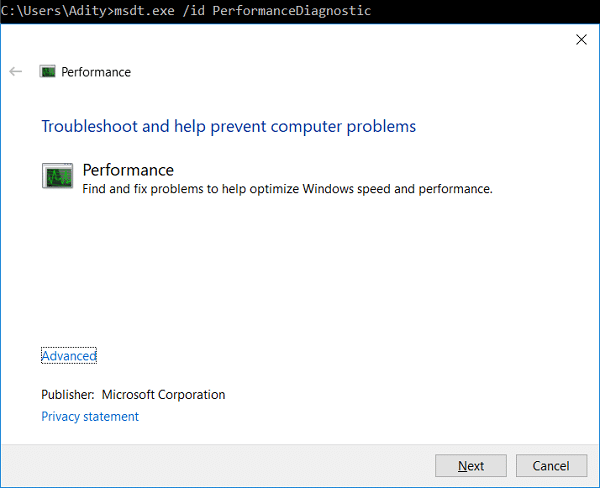
8. Follow the on-screen instruction to run the troubleshooter and fix any issues find the System.
9. Finally, exit the cmd and reboot your PC.
Method 5: Disable Automatic Maintenance
Sometimes Automatic Maintenance can conflict with the Windows Modules Installer Worker service, so try to disable Automatic Maintenance using this guide and see if this fixes your issue.
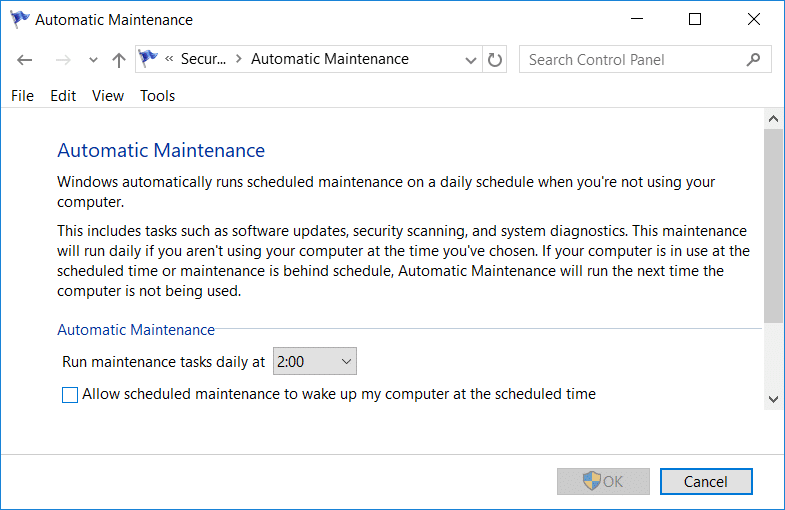
Although disabling Automatic Maintenance is not a good idea, but there might be some case where you need to actually disable it, for example, if your PC freezes during automatic maintenance or Windows Modules Installer Worker High CPU Usage issue then you should disable maintenance to troubleshoot the issue.
Method 6: Run System File Checker and башкаруу
1. Буйрук сапты ачыңыз. Колдонуучу бул кадамды издөө аркылуу аткара алат 'cmd' анан басып.
2. Эми cmdге төмөнкүнү териңиз жана enter баскычын басыңыз:
Sfc /scannow sfc /scannow /offbootdir=c: /offwindir=c:windows (Эгер жогоруда аткарылбаса, анда муну байкап көрүңүз)

3. Жогорудагы процесс бүткүчө күтө туруңуз жана бүткөндөн кийин компьютериңизди өчүрүп күйгүзүңүз.
4. Кайрадан cmd ачып, төмөнкү буйрукту териңиз жана ар биринин артынан enter баскычын басыңыз:
Dism /Online /Cleanup-Image /CheckHealth Dism /Online /Cleanup-Image /ScanHealth Dism /Online /Cleanup-Image /RestoreHealth

5. DISM буйругун иштетиңиз жана анын бүтүшүн күтүңүз.
6. Эгерде жогорудагы буйрук иштебесе, анда төмөнкүнү аракет кылып көрүңүз:
Dism /Image:C:offline /Cleanup-Image /RestoreHealth /Булак:c:testmountwindows Dism /Online /Cleanup-Image /RestoreHealth /Булак:c:testmountwindows /LimitAccess
Эскертүү: C:RepairSourceWindows'ту оңдоо булагы менен алмаштырыңыз (Windows орнотуу же калыбына келтирүү диски).
7. Өзгөртүүлөрдү сактоо үчүн компьютериңизди өчүрүп күйгүзүңүз жана мүмкүнбү же жокпу, көрүңүз Fix Windows Modules Installer Worker High CPU Usage.
Метод 7: Таза жүктөө
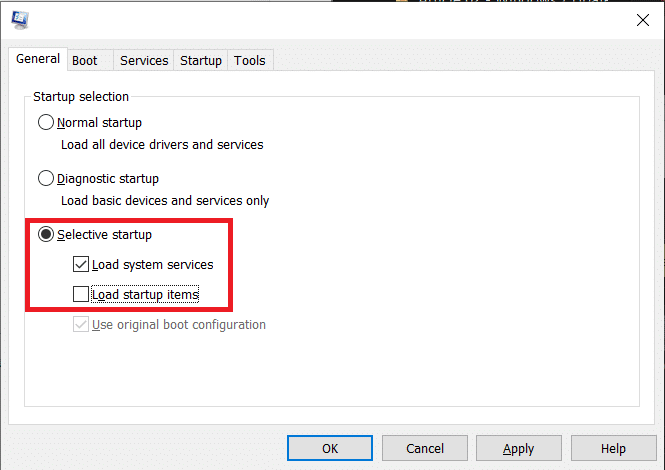
Sometimes 3rd party software can conflict with Windows and can cause the issue. To Fix Windows Modules Installer Worker High CPU Usage issue, сиз компьютериңизде таза жүктөөнү аткарып, маселени кадам сайын диагноздооңуз керек.
Method 8: Set your WiFi as Metered Connection
Эскертүү: This will stop Windows Automatic Update, and you will need to manually check for Updates.
1. Ачуу үчүн Windows баскычын + I басыңыз Орнотуулар андан кийин чыкылдатыңыз Тармак жана Интернет.

2. Сол жактагы менюдан тандаңыз Wi-Fi.
3. Under Wi-Fi, чыкылдатуу on your currently connected network (WiFi).
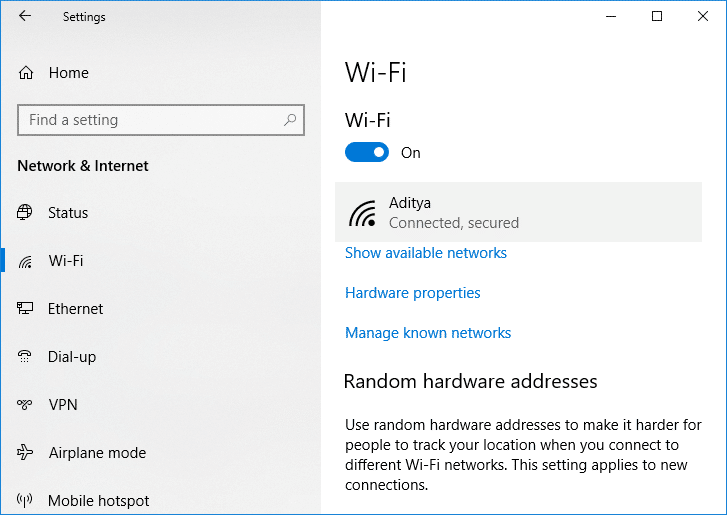
4. Scroll down to Metered connection and которуштурууну иштетүү астында “Ченелген байланыштуу катары коюу".
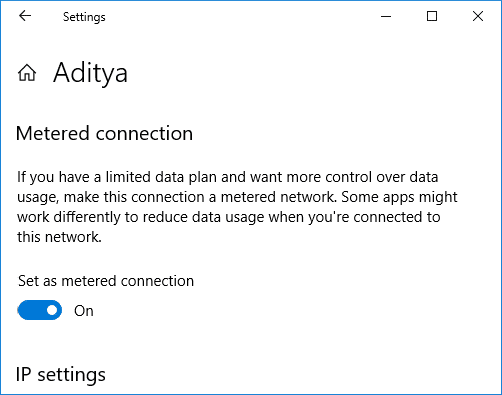
5. Close Settings and reboot your PC to save changes.
сунушталат:
Болду, сиз ийгиликтүү болдуңуз Fix Windows Modules Installer Worker High CPU Usage бирок бул окуу куралы боюнча дагы эле кандайдыр бир суроолоруңуз болсо, аларды комментарийлер бөлүмүнөн сурасаңыз болот.
