7 ວິທີການແກ້ໄຂຂະບວນການສໍາຄັນທີ່ເສຍຊີວິດໃນ Windows 10

7 Ways to Fix Critical Process Died in Windows 10: Critical Process Died is a Blue Screen of Death Error (BSOD) with an error message Critical_Process_Died and a stop error 0x000000EF. The main cause of this error is that the process which was supposed to run the Windows Operating System ended abruptly and thus the BSOD error. There is no information available on this error on Microsoft website apart from this:
“The CRITICAL_PROCESS_DIED bug check has a value of 0x000000EF. This indicates that a critical system process died.”
The other reason why you could see this BSOD error is that when an unauthorized program tries to modify a data related to the critical component of Windows then the Operating System immediately steps in, causing the Critical Process Died error to stop this unauthorized change.
Now you know all about the Critical Process Died error but what causes this error on your PC? Well, the main culprit seems to be outdated, incompatible or a buggy driver. This error can also be caused because of the bad memory sector. So without wasting any time let’s see How to Fix Critical Process Died in Windows 10 with the help of the below-listed tutorial.
Fix Critical Process Died in Windows 10
ໃຫ້ແນ່ໃຈວ່າສ້າງຈຸດຟື້ນຟູພຽງແຕ່ໃນກໍລະນີທີ່ມີບາງຢ່າງຜິດພາດ.
If you can’t access your PC then start Windows in Safe Mode using this guide and then try the following fixes.
ວິທີທີ່ 1: ດໍາເນີນການ CCleaner ແລະ Antimalware
1.ດາວໂຫລດແລະຕິດຕັ້ງ CCleaner & Malwarebytes.
2.Run Malwarebytes ແລະປ່ອຍໃຫ້ມັນສະແກນລະບົບຂອງທ່ານສໍາລັບໄຟລ໌ອັນຕະລາຍ.
3.ຖ້າຫາກວ່າ malware ຖືກພົບເຫັນ, ມັນຈະເອົາໃຫ້ເຂົາເຈົ້າອັດຕະໂນມັດ.
4.Now run CCleaner and in the “ສະອາດ” ພາກ, ພາຍໃຕ້ແຖບ Windows, ພວກເຮົາແນະນໍາໃຫ້ກວດເບິ່ງການເລືອກຕໍ່ໄປນີ້ເພື່ອເຮັດຄວາມສະອາດ:

5.ເມື່ອໃດທີ່ທ່ານໄດ້ເຮັດໃຫ້ແນ່ໃຈວ່າຈຸດທີ່ເຫມາະສົມແມ່ນການກວດສອບ, ພຽງແຕ່ຄລິກໃສ່ ດໍາເນີນ Cleaner, and let CCleaner run its course.
6. ເພື່ອເຮັດຄວາມສະອາດລະບົບຂອງທ່ານຕື່ມອີກເລືອກແຖບ Registry ແລະໃຫ້ແນ່ໃຈວ່າມີການກວດສອບຕໍ່ໄປນີ້:

7. ເລືອກ ສະແກນຫາບັນຫາ and allow CCleaner to scan, then click Fix Selected Issues.
8. ເມື່ອ CCleaner ຖາມ “Do you want backup changes to the registry?” select Yes.
9. ເມື່ອການສໍາຮອງຂໍ້ມູນຂອງທ່ານສໍາເລັດ, ເລືອກແກ້ໄຂບັນຫາທີ່ເລືອກທັງຫມົດ.
10.Restart PC ຂອງທ່ານແລະເບິ່ງວ່າທ່ານສາມາດເຮັດໄດ້ Fix Critical Process Died in Windows 10.
ວິທີທີ່ 2: ດໍາເນີນການ SFC ແລະ DISM Tool
1.ກົດ Windows Key + X ແລ້ວກົດໃສ່ Command Prompt (Admin).

2. ຕອນນີ້ພິມໃສ່ໃນ cmd ແລະກົດ enter:
Sfc / scannow sfc /scannow /offbootdir=c: /offwindir=c:windows (ຖ້າຂ້າງເທິງນີ້ລົ້ມເຫລວ, ໃຫ້ລອງອັນນີ້)

3.ລໍຖ້າສໍາລັບຂະບວນການຂ້າງເທິງນີ້ເພື່ອສໍາເລັດຮູບແລະເຮັດເມື່ອ restart PC ຂອງທ່ານ.
4. ເປີດ cmd ອີກເທື່ອໜຶ່ງ ແລະພິມຄຳສັ່ງຕໍ່ໄປນີ້ແລ້ວກົດ enter ຫຼັງຈາກແຕ່ລະອັນ:
a) Dism /Online /Cleanup-Image /CheckHealth b) Dism /Online /Cleanup-Image /ScanHealth c) Dism /Online /Cleanup-Image /RestoreHealth

5.ໃຫ້ຄຳສັ່ງ DISM ແລ່ນ ແລະລໍຖ້າໃຫ້ມັນສຳເລັດ.
6. ຖ້າຄໍາສັ່ງຂ້າງເທິງນີ້ໃຊ້ບໍ່ໄດ້, ໃຫ້ພະຍາຍາມຕໍ່ໄປນີ້:
Dism / ຮູບພາບ:C:offline /Cleanup-Image /RestoreHealth /Source:c:testmountwindows Dism /Online /Cleanup-Image /RestoreHealth /Source:c:testmountwindows /LimitAccess
ຫມາຍເຫດ: ປ່ຽນແທນ C:RepairSourceWindows ກັບສະຖານທີ່ຂອງແຫຼ່ງສ້ອມແປງຂອງທ່ານ (ການຕິດຕັ້ງ Windows ຫຼື Recovery Disc).
7.Reboot PC ຂອງທ່ານເພື່ອບັນທຶກການປ່ຽນແປງແລະເບິ່ງວ່າທ່ານສາມາດ Fix Critical Process Died in Windows 10 Issue.
ວິທີທີ່ 3: ດໍາເນີນການ Clean Boot
Sometimes 3rd party software can conflict with Windows and can cause the issue. In order to Fix Critical Process Died issue, ທ່ານຈໍາເປັນຕ້ອງໄດ້ດໍາເນີນການທໍາຄວາມສະອາດ boot ໃນ PC ຂອງທ່ານແລະວິນິດໄສບັນຫາຂັ້ນຕອນທີ.

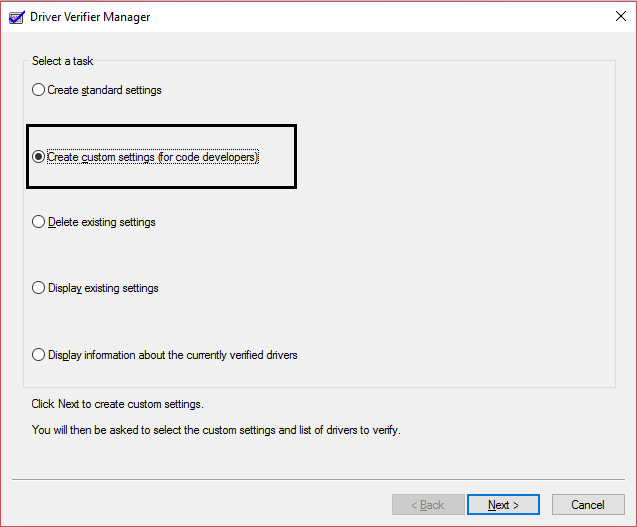
ວິທີທີ 4: ເປີດໃຊ້ Driver Verifier
ວິທີການນີ້ແມ່ນເປັນປະໂຫຍດພຽງແຕ່ຖ້າຫາກວ່າທ່ານສາມາດເຂົ້າສູ່ລະບົບ Windows ຂອງທ່ານເປັນປົກກະຕິບໍ່ໄດ້ຢູ່ໃນໂຫມດປອດໄພ. ຕໍ່ໄປ, ໃຫ້ແນ່ໃຈວ່າຈະສ້າງຈຸດການຟື້ນຟູລະບົບ.
ວິທີທີ່ 5: ອັບເດດໄດເວີທີ່ລ້າສະໄຫມ
1.ກົດ Windows Key + R ແລ້ວພິມ devmgmtmsc ແລະກົດ Enter ເພື່ອເປີດ ຕົວຈັດການອຸປະກອນ.

2.Click the arrow on the left side of each category to expand it and see the list of devices in it.
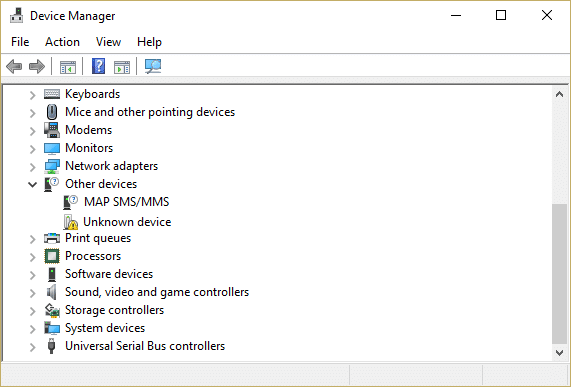
3.Now check if any of the devices have a yellow exclamation mark next to it.
4.If any device has a yellow exclamation mark then this means they have outdated drivers.
5.To fix this, right-click on such ອຸປະກອນ ແລະເລືອກເອົາ ຖອນການຕິດຕັ້ງ.
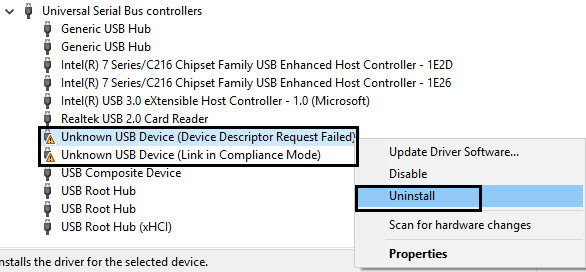
5.Restart your PC to apply changes and Windows will automatically install the default drivers for the above device.
Method 6: Disable Sleep and Hibernate
1.ປະເພດ ການຄວບຄຸມ ໃນ Windows Search ຫຼັງຈາກນັ້ນໃຫ້ຄລິກໃສ່ ກະດານການຄວບຄຸມ ຈາກຜົນການຄົ້ນຫາ.

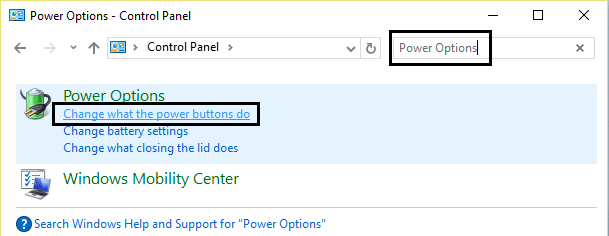
2.In Control Panel then type ຕົວເລືອກພະລັງງານ in the search.
2.In Power Options, click change what the power button do.
3.ຕໍ່ໄປ, ຄລິກ ປ່ຽນການຕັ້ງຄ່າທີ່ບໍ່ມີຢູ່ໃນປະຈຸບັນ ການເຊື່ອມຕໍ່.

4.ໃຫ້ແນ່ໃຈວ່າ Uncheck Sleep and Hibernate.
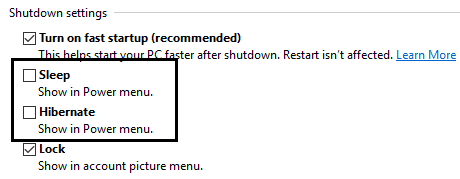
5.Click save changes and restart your PC.
ວິທີ 7: ໂຫຼດຂໍ້ມູນຄືນໃໝ່ ຫຼື ຣີເຊັດ Windows 10
ຫມາຍເຫດ: ຖ້າຫາກວ່າທ່ານບໍ່ສາມາດເຂົ້າເຖິງ PC ຂອງທ່ານ, restart PC ຂອງທ່ານສອງສາມຄັ້ງຈົນກ່ວາທ່ານຈະເລີ່ມຕົ້ນ ການສ້ອມແປງອັດຕະໂນມັດ. ຫຼັງຈາກນັ້ນນໍາທາງໄປຫາ ແກ້ໄຂບັນຫາ> ປັບ PC ນີ້> ເອົາທັງຫມົດ.
1.ກົດ Windows Key + I ເພື່ອເປີດ Settings ຈາກນັ້ນຄລິກທີ່ ໄອຄອນອັບເດດ ແລະຄວາມປອດໄພ.
![]()
2.ຈາກເມນູຊ້າຍມືເລືອກ ການຟື້ນຕົວ.
3.ພາຍໃຕ້ Reset this PC ໃຫ້ຄລິກໃສ່ "ໄດ້ຮັບການເລີ່ມຕົ້ນປຸ່ມ”.

4.ເລືອກທາງເລືອກທີ່ຈະ ຮັກສາໄຟລ໌ຂອງຂ້ອຍ.

5. ສໍາລັບຂັ້ນຕອນຕໍ່ໄປທ່ານອາດຈະຖືກຖາມໃຫ້ໃສ່ສື່ການຕິດຕັ້ງ Windows 10, ດັ່ງນັ້ນໃຫ້ແນ່ໃຈວ່າທ່ານມີມັນພ້ອມ.
6.ໃນປັດຈຸບັນ, ເລືອກເອົາສະບັບ Windows ຂອງທ່ານແລະຄລິກໃສ່ ຢູ່ເທິງໄດທີ່ຕິດຕັ້ງ Windows ເທົ່ານັ້ນ > ພຽງແຕ່ເອົາໄຟລ໌ຂອງຂ້ອຍອອກ.

5. ກົດທີ່ ປຸ່ມຣີເຊັດ.
6.Follow the instructions on the screen to complete the reset or refresh.
ແນະນໍາໃຫ້:
ນັ້ນແມ່ນທ່ານໄດ້ສໍາເລັດຜົນ Fix Critical Process Died in Windows 10 but if you still have any queries regarding this post then feel free to ask them in the comments section.