ແກ້ໄຂ MultiVersus ບໍ່ເປີດຕົວໃນ Windows 10

MultiVersus is a famous online multiplayer fighting game that is rocking today’s gaming world. Yet, few users complain about the MultiVersus not launching issue when the game is launched on their Windows 10 PC. If you are in the same boat, the troubleshooting hacks discussed in this article will help you sail the problem.
How to Fix MultiVersus Not Launching in Windows 10
If you are vexed by MultiVersus won’t launch issue in your Windows 10 computer, here are a few possible reasons why you must analyze them carefully to sort out the problem.
- PC ບໍ່ຕອບສະຫນອງຄວາມຕ້ອງການພື້ນຖານຂອງເກມ.
- ບາງໂຄງການພື້ນຖານອື່ນໆກໍາລັງແຊກແຊງກັບເກມ.
- ທ່ານກຳລັງໃຊ້ໄດເວີເວີຊັ່ນທີ່ບໍ່ໄດ້ຮັບການຢືນຢັນ.
- ການຕັ້ງຄ່າຮູບພາບຂອງເກມແມ່ນຖືກຕັ້ງຄ່າຜິດ.
- ປະກົດຕົວຂອງ malware ແລະໄວຣັສ.
- ກອບ .NET ແລະລະບົບປະຕິບັດການບໍ່ໄດ້ຖືກປັບປຸງເປັນເວີຊັນຫຼ້າສຸດຂອງພວກເຂົາ.
- ລຸ້ນ DirectX ບໍ່ທັນສະໄໝ.
- Overclocking.
- ໄຟລ໌ການຕິດຕັ້ງທີ່ຜິດ ຫຼືເສຍຫາຍຂອງເກມກໍ່ເຮັດໃຫ້ເກີດບັນຫານຳ.
- ໄຟລ໌ Microsoft C++ redistributable ບໍ່ເຂົ້າກັນໄດ້ກັບເກມ ແລະ PC.
Here are a few possible troubleshooting methods that will help you fix the discussed issue.
ວິທີທີ່ 1: ວິທີການແກ້ໄຂບັນຫາພື້ນຖານ
ປະຕິບັດຕາມວິທີການແກ້ໄຂບັນຫາພື້ນຖານເຫຼົ່ານີ້ເພື່ອແກ້ໄຂບັນຫາດັ່ງກ່າວ.
1A. Check System Requirements
Multi Versus ຄວາມຕ້ອງການຂອງລະບົບ ຕຳ ່ສຸດ
- CPU: Intel Core i5-2300 or AMD FX-8350
- RAM: 4 GB
- ບັດວີດີໂອ: Nvidia GeForce GTX 550 Ti or AMD Radeon HD 5850 | Intel UHD 750
- PIXEL Shaders: 5.0
- VERTEX ຮົ່ມ: 5.0
- ພື້ນທີ່ດິສກ໌ຟຣີ: 6 GB
- RAM ວິດີໂອສະເພາະ: 1024 MB
Multi Versus ຂໍ້ກໍານົດແນະນໍາ
- CPU: Intel Core i5-3470 ຫຼື AMD Ryzen 3 1200
- RAM: 8 GB
- ບັດວີດີໂອ: Nvidia GeForce GTX 660 or AMD Radeon R9 270
- PIXEL Shaders: 5.0
- VERTEX ຮົ່ມ: 5.0
- ພື້ນທີ່ດິສກ໌ຟຣີ: 6 GB
- RAM ວິດີໂອສະເພາະ: 2048 MB
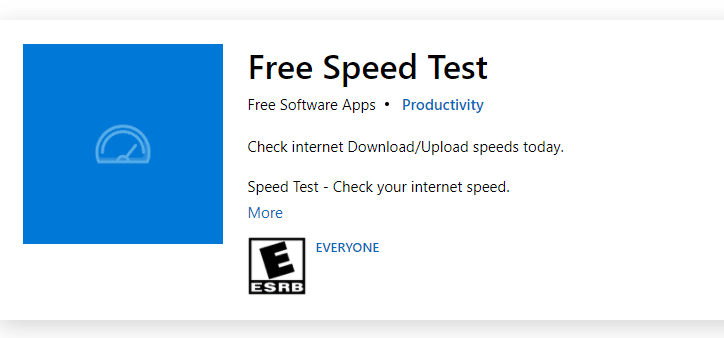
1B. Check your internet connection
Unstable internet connection leads to MultiVersus is not working issue, also if there are any obstacles between your router and your computer, they may interfere with the wireless signal and will cause intermittent connection problems.
ທ່ານສາມາດດໍາເນີນການ a speed test ເພື່ອຮູ້ລະດັບຄວາມໄວເຄືອຂ່າຍທີ່ດີທີ່ສຸດທີ່ຕ້ອງການສໍາລັບການເຊື່ອມຕໍ່ທີ່ເຫມາະສົມ.
ໃຫ້ແນ່ໃຈວ່າອຸປະກອນຂອງທ່ານພໍໃຈກັບເງື່ອນໄຂຂ້າງລຸ່ມນີ້.
- ຊອກຫາຄວາມແຮງສັນຍານຂອງເຄືອຂ່າຍຂອງທ່ານແລະຖ້າມັນຕ່ໍາຫຼາຍ, ລ້າງສິ່ງກີດຂວາງທັງຫມົດໃນລະຫວ່າງທາງ.
- ຫຼີກເວັ້ນອຸປະກອນທີ່ເຊື່ອມຕໍ່ກັບເຄືອຂ່າຍດຽວກັນຫຼາຍເກີນໄປ.
- ຊື້ໂມເດັມ/ເຣົາເຕີທີ່ຢັ້ງຢືນໂດຍຜູ້ໃຫ້ບໍລິການອິນເຕີເນັດ (ISP) ຂອງເຈົ້າສະເໝີ ແລະບໍ່ມີຂໍ້ຂັດແຍ່ງ.
- ຢ່າໃຊ້ ສາຍໄຟເກົ່າ, ແຕກ, ຫຼືເສຍຫາຍ. ປ່ຽນສາຍໄຟຖ້າຈໍາເປັນ.
- ກວດໃຫ້ແນ່ໃຈວ່າສາຍໄຟຈາກໂມເດັມຫາເຣົາເຕີ ແລະໂມເດັມໄປຫາຝາແມ່ນມີຄວາມໝັ້ນຄົງ ແລະບໍ່ມີສິ່ງລົບກວນ.
ຖ້າມີບັນຫາການເຊື່ອມຕໍ່ອິນເຕີເນັດ, ໃຫ້ກວດເບິ່ງຄູ່ມືຂອງພວກເຮົາ ວິທີການແກ້ໄຂບັນຫາການເຊື່ອມຕໍ່ເຄືອຂ່າຍໃນ Windows 10 ເພື່ອແກ້ໄຂບັນຫາດຽວກັນ.
1C. Stop Overclocking
- Every high-end computer is built with the option of Overclocking which helps in outputting more juice than your specifications that you already have. Running the graphics card or processor faster than the default speed refers to overclocking.
- ເມື່ອສິ່ງນີ້ເກີດຂຶ້ນ, ຄອມພິວເຕີຂອງທ່ານຈະຮອດອຸນຫະພູມສູງສຸດຫຼັງຈາກເວລາໃດຫນຶ່ງ. ຄອມພິວເຕີກວດພົບສິ່ງນີ້ ແລະປັບຄວາມໄວໂມງເປັນຄວາມໄວປົກກະຕິຈົນກວ່າມັນຈະເຢັນລົງ. ຄວາມໄວໂມງແມ່ນເພີ່ມຂຶ້ນອີກເທື່ອຫນຶ່ງຫຼັງຈາກທີ່ພວກມັນເຢັນລົງ.
- ນີ້ຈະເພີ່ມປະສິດທິພາບຂອງຄອມພິວເຕີຂອງທ່ານແລະເປັນການຊ່ວຍເຫຼືອທີ່ດີຖ້າຫາກວ່າທ່ານບໍ່ມີຄອມພິວເຕີປະສິດທິພາບ.
- It must be noted that all the games do not support overclocking. The same applies to MultiVersus. So, you must try disabling all overclocking on your computer and try launching the game. If it launches well, the issue is fixed.
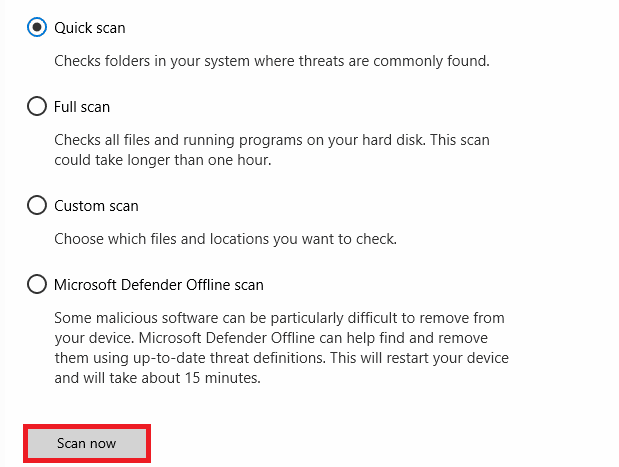
1D. ດໍາເນີນການສະແກນ Malware
The presence of a virus or malware attack will result in gaming problems on your computer. If in case, the virus attack is very severe, you cannot connect to any online game continuously at all. To resolve the problem, you have to remove the virus or malware completely from your Windows 10 computer.
ເຈົ້າໄດ້ຖືກແນະນໍາໃຫ້ສະແກນຄອມພິວເຕີຂອງທ່ານຕາມຄໍາແນະນໍາຂອງພວກເຮົາ ຂ້ອຍຈະດໍາເນີນການສະແກນໄວຣັສໃນຄອມພິວເຕີຂອງຂ້ອຍໄດ້ແນວໃດ?
ນອກຈາກນັ້ນ, ຖ້າທ່ານຕ້ອງການລຶບ malware ອອກຈາກຄອມພິວເຕີຂອງທ່ານ, ໃຫ້ກວດເບິ່ງຄູ່ມືຂອງພວກເຮົາ ວິທີການລົບ Malware ຈາກ PC ຂອງທ່ານໃນ Windows 10.
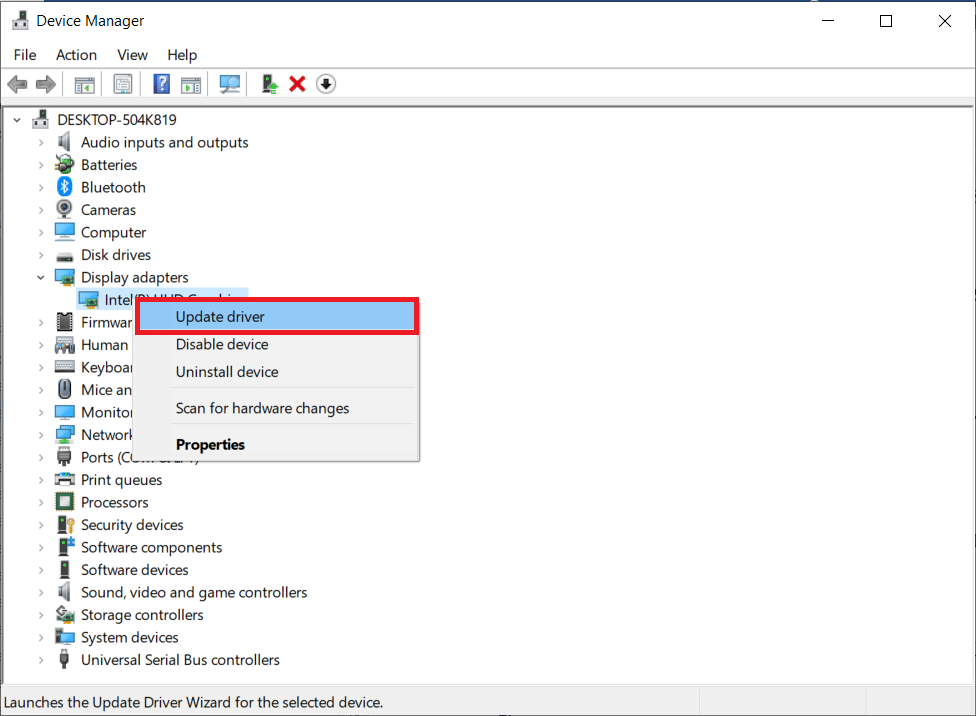
1E. Update GPU Drivers
Graphical drivers are responsible for heavy graphical images and video processing games. If you face any launching conflicts in the MultiVersus game, make sure you use an updated version of device drivers, as they serve as a link between the hardware and Operating System of your PC. Many users have suggested that updating drivers have fixed MultiVersus not working issue. Read and implement the steps instructed in our guide 4 Ways to Update Graphics Drivers in Windows 10 to do so.
ຍັງອ່ານ: ແກ້ໄຂໄດເວີທີ່ພົບ Windows ສໍາລັບອຸປະກອນຂອງທ່ານແຕ່ພົບຂໍ້ຜິດພາດ
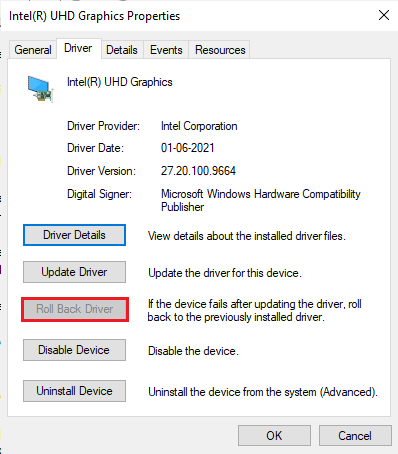
1F. Roll Back GPU Drivers
Sometimes, the current version of GPU drivers may cause the discussed launching issue in MultiVersus, and in this case, you have to restore previous versions of installed drivers. This process is called rollback ຂອງຄົນຂັບລົດ ແລະທ່ານສາມາດມ້ວນຄືນໄດເວີຄອມພິວເຕີຂອງທ່ານກັບສະພາບເດີມຂອງພວກເຂົາໄດ້ຢ່າງງ່າຍດາຍໂດຍການປະຕິບັດຕາມຄໍາແນະນໍາຂອງພວກເຮົາ ວິທີການ Rollback Drivers ໃນ Windows 10.
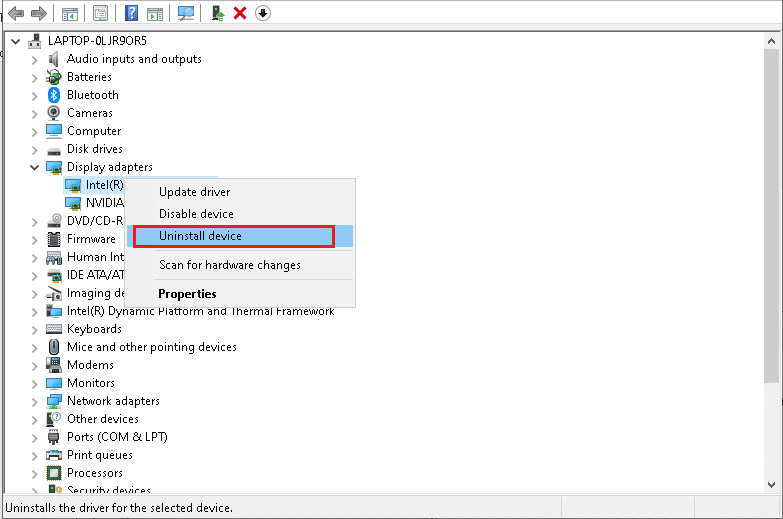
1G. Reinstall GPU Driver
If you still face MultiVersus not starting issue after updating your GPU drivers, then reinstall device drivers to fix any incompatibility issues. There are several ways to reinstall drivers on your computer. Yet, you can easily reinstall Graphical drivers as instructed in our guide How to Uninstall and Reinstall Drivers on Windows 10.
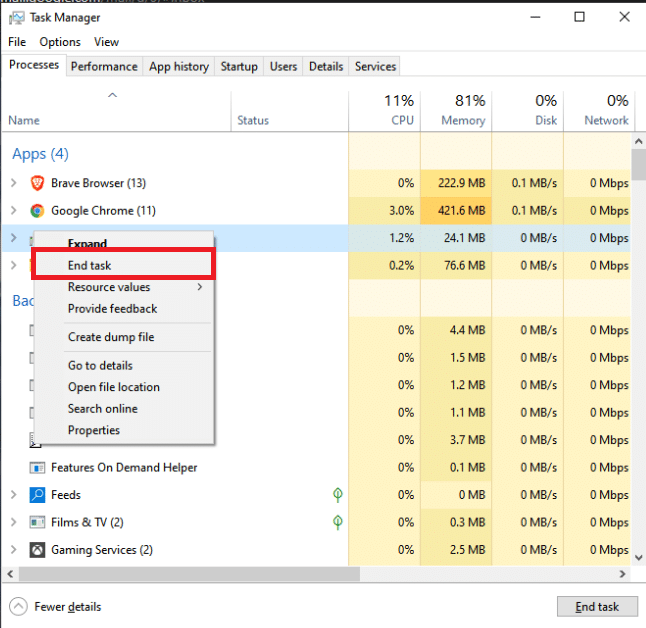
1H. End Background Processes
Several users have confirmed that MultiVersus not starting on PC can be resolved by closing all the background tasks running on your PC. To implement the task, follow our guide How to End Task in Windows 10, and proceed as instructed.
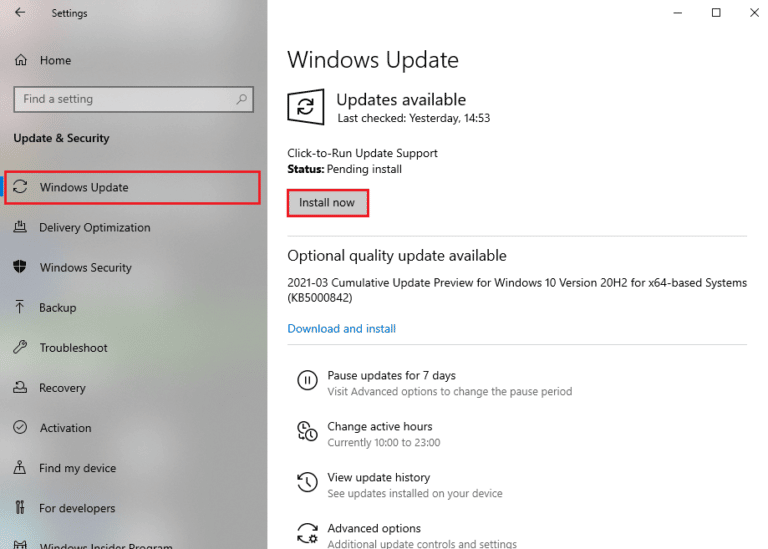
1I. Update Windows
You can also eradicate bugs in your computer and game by updating your Operating System. Always ensure if you have updated your Windows Operating System and if any updates are pending in action, use our guide How to Download and Install Windows 10 Latest Update
1J. Disable Antivirus Temporarily (If Applicable)
Some incompatible antivirus programs installed on your computer will cause MultiVersus launching problem. To avoid conflicts, you must ensure the security settings of your Windows 10 computer and check if they are stable or not. To find whether the antivirus suite is the reason for the discussed issue, disable it once and try connecting to a network.
ອ່ານຄູ່ມືຂອງພວກເຮົາກ່ຽວກັບວິທີການປິດການໃຊ້ງານ Antivirus ຊົ່ວຄາວໃນ Windows 10 ແລະປະຕິບັດຕາມຄໍາແນະນໍາເພື່ອປິດການທໍາງານໂຄງການ Antivirus ຊົ່ວຄາວໃນ PC ຂອງທ່ານ.
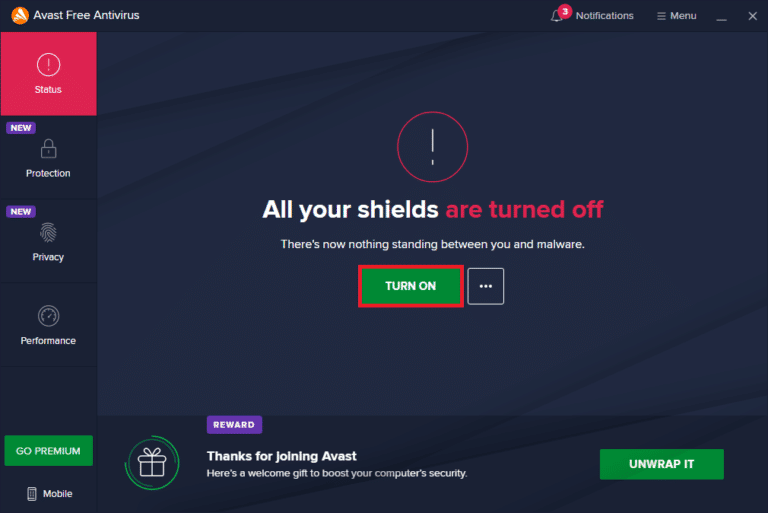
ຖ້າຫາກທ່ານມີການແກ້ໄຂບັນຫາຂອງທ່ານຫຼັງຈາກການປິດການທໍາງານຂອງໂຄງການ antivirus ໃນຄອມພິວເຕີຂອງທ່ານ, ທ່ານໄດ້ຖືກແນະນໍາໃຫ້ຖອນການຕິດຕັ້ງໂຄງການຈາກ PC ຂອງທ່ານຫມົດ.
Read our guide Force Uninstall Programs which won’t Uninstall in Windows 10 to uninstall your antivirus program on your computer.
ຍັງອ່ານ: ວິທີການຖອນການຕິດຕັ້ງ McAfee LiveSafe ໃນ Windows 10
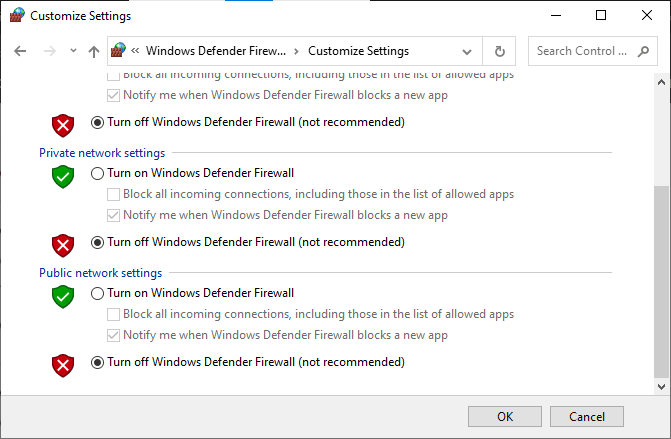
1K. Turn Off Windows Defender Firewall (Not Recommended)
Your computer will face MultiVersus is not working issue, due to an over-protective firewall suite in the Windows 10 PC. To resolve the problem, you can either add a new rule for your game, whitelist the game or as the last fix, disable the firewall temporarily.
Our guide on How to Disable Windows 10 Firewall will help you.
1L. Repair System Files
If there are any missing or damaged files on your Windows 10 PC, you will face MultiVersus takes forever to launch issue. Yet, you are repairing these corrupt files by using inbuilt utilities namely, System File Checker ແລະ ການບໍລິການແລະການຄຸ້ມຄອງຮູບພາບທີ່ໃຊ້ Deployment Image.
ອ່ານຄູ່ມືຂອງພວກເຮົາກ່ຽວກັບວິທີການສ້ອມແປງໄຟລ໌ລະບົບໃນ Windows 10 ແລະປະຕິບັດຕາມຂັ້ນຕອນຕາມຄໍາແນະນໍາເພື່ອສ້ອມແປງໄຟລ໌ທີ່ເສຍຫາຍທັງຫມົດຂອງທ່ານ.
Method 2: Run MultiVersus Game as Administrator
If MultiVersus does not have required administrative privileges, a few essential features of the game will be limited causing you MultiVersus not launching issue whenever you open the game or install any updates. Follow the below-mentioned instructions to run the game as an administrator.
1. ກົດຂວາໃສ່ປຸ່ມ MultiVersus shortcut ໃນ Desktop.
ຫມາຍເຫດ: ເຈົ້າຍັງສາມາດໄປທີ່ ໄດເລກະທໍລີການຕິດຕັ້ງ ແລະກົດຂວາໃສ່ມັນ.
2. ຈາກນັ້ນ, ເລືອກ ອະສັງຫາ ທາງເລືອກ.
3. ໃນປັດຈຸບັນ, ຍ້າຍໄປທີ່ ເຂົ້າກັນໄດ້ ແຖບແລະຄລິກໃສ່ ດໍາເນີນໂຄງການນີ້ເປັນຜູ້ບໍລິຫານ.
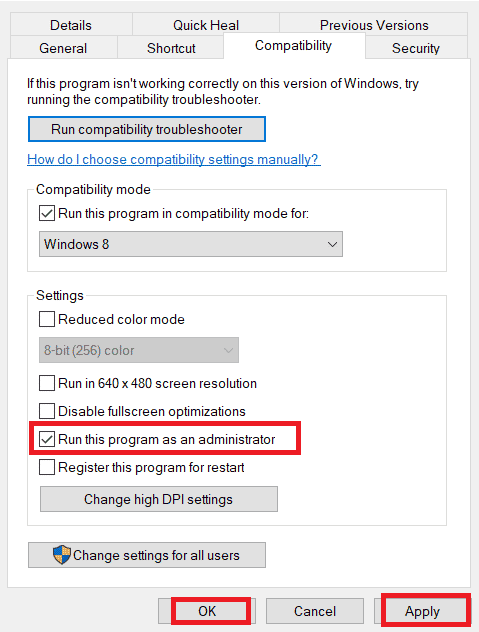
4. ສຸດທ້າຍ, ໃຫ້ຄລິກໃສ່ ສະ ໝັກ> OK ເພື່ອຊ່ວຍປະຢັດການປ່ຽນແປງ.
Check if you have fixed MultiVersus launching issues.
ຍັງອ່ານ: Fix WoW Takes Forever to Launch in Windows 10
ວິທີທີ 3: ປ່ຽນບູລິມະສິດຂະບວນການເກມ
The preference of an application or process tells the computer the importance and if it should be given preference over the others while allocating the resources. The priority of every application is normal except the system processes, by default. MultiVersus might crash if it didn’t get enough resources.
ກົດປຸ່ມ Ctrl + Shift + Esc ປຸ່ມ ຮ່ວມກັນເພື່ອເປີດ Taskbar.
2. ໃນປັດຈຸບັນ, ຊອກຫາ MultiVersus process.
3. ຈາກນັ້ນປ່ຽນບູລິມະສິດເປັນ ບູລິມະສິດສູງ ແລະກວດເບິ່ງວ່ານີ້ເຮັດວຽກຫຼືບໍ່.
ຫມາຍເຫດ: ປ່ຽນແປງບູລິມະສິດດ້ວຍຄວາມລະມັດລະວັງ ເພາະການປ່ຽນບູລິມະສິດຂອງຂະບວນການຢ່າງບໍ່ສົນໃຈອາດເຮັດໃຫ້ລະບົບຂອງເຈົ້າຊ້າ ຫຼື ບໍ່ສະຖຽນໄດ້.
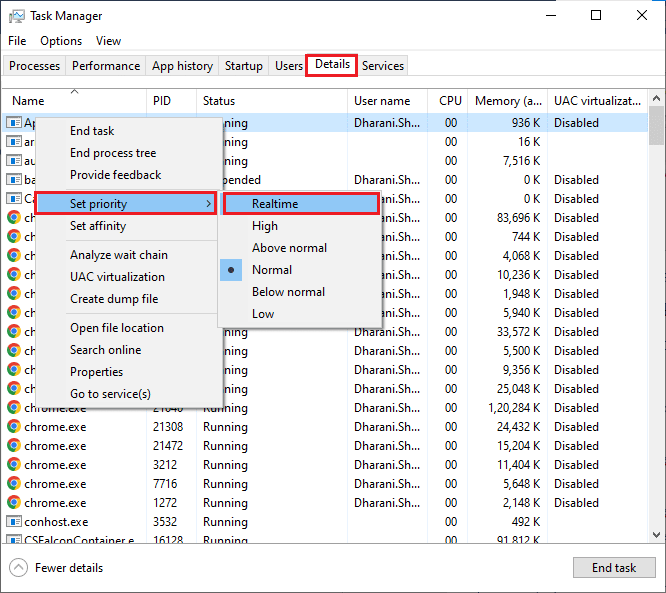
4. ປິດ ຕົວຈັດການວຽກ ແລະ reboot ຄອມພິວເຕີຂອງທ່ານ.
ວິທີການ 4: ກໍານົດປະສິດທິພາບສູງ
You can also optimize your game when setting your high-performance power plan settings. These power plans are developed to manage the power settings on portable settings. Follow the below-mentioned instructions to use high-performance power plan settings in your system.
ກົດປຸ່ມ ປຸ່ມ Windows + I ພ້ອມໆກັນທີ່ຈະເປີດ ການຕັ້ງຄ່າ Windows.
2. ດຽວນີ້ກົດເຂົ້າໄປ ລະບົບ ຕັ້ງ.
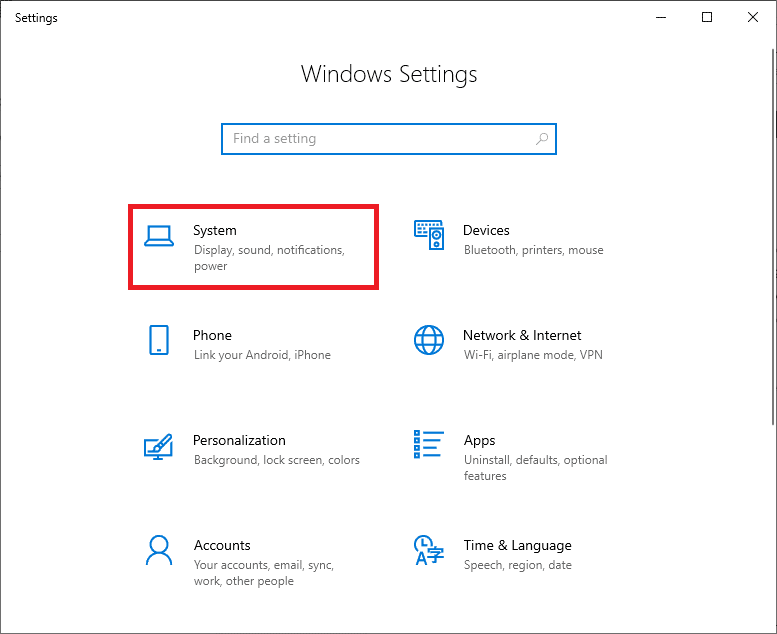
3. ໃນປັດຈຸບັນ, ເລືອກເອົາ ພະລັງງານ & ນອນ ທາງເລືອກແລະໃຫ້ຄລິກໃສ່ ການຕັ້ງຄ່າພະລັງງານເພີ່ມເຕີມ ພາຍໃຕ້ການ ການຕັ້ງຄ່າທີ່ກ່ຽວຂ້ອງ.
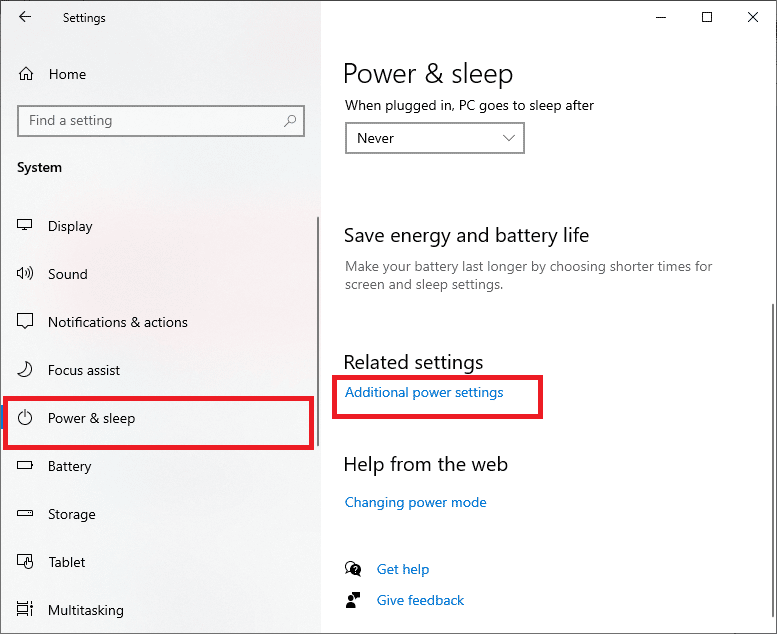
4. ໃນປັດຈຸບັນ, ເລືອກເອົາ ສູງປະສິດທິພາບ ທາງເລືອກພາຍໃຕ້ ແຜນການເພີ່ມເຕີມສູງ ດັ່ງທີ່ສະແດງຢູ່ໃນຮູບຂ້າງລຸ່ມນີ້.
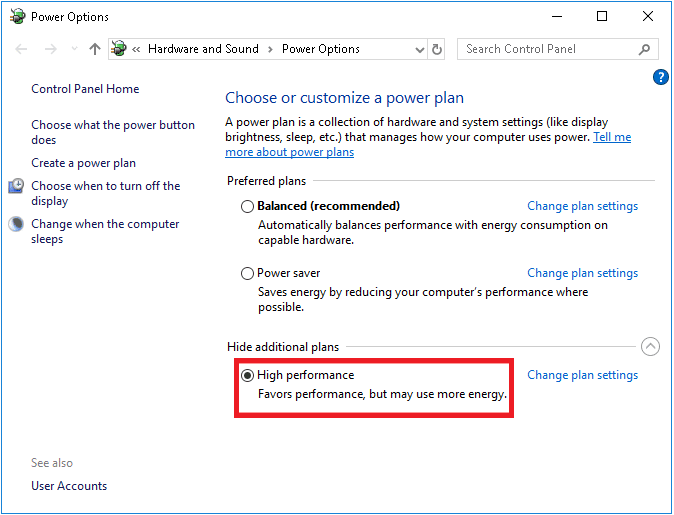
Now you have optimized your system, check if you have fixed MultiVersus won’t launch on startup issue.
ຍັງອ່ານ: ແກ້ໄຂຂໍ້ຜິດພາດຂອງໄຟລ໌ດາວໂຫຼດທີ່ຫາຍໄປໃນ Steam
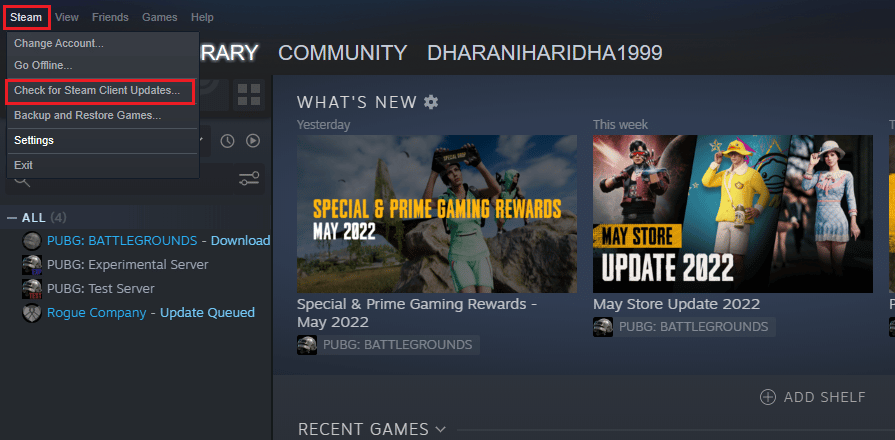
Method 5: Update Steam App & MultiVersus Game
If you use an outdated Steam application, you cannot access any games smoothly. Hence always make sure you use an updated version of Steam and MultiVersus game before launching it.
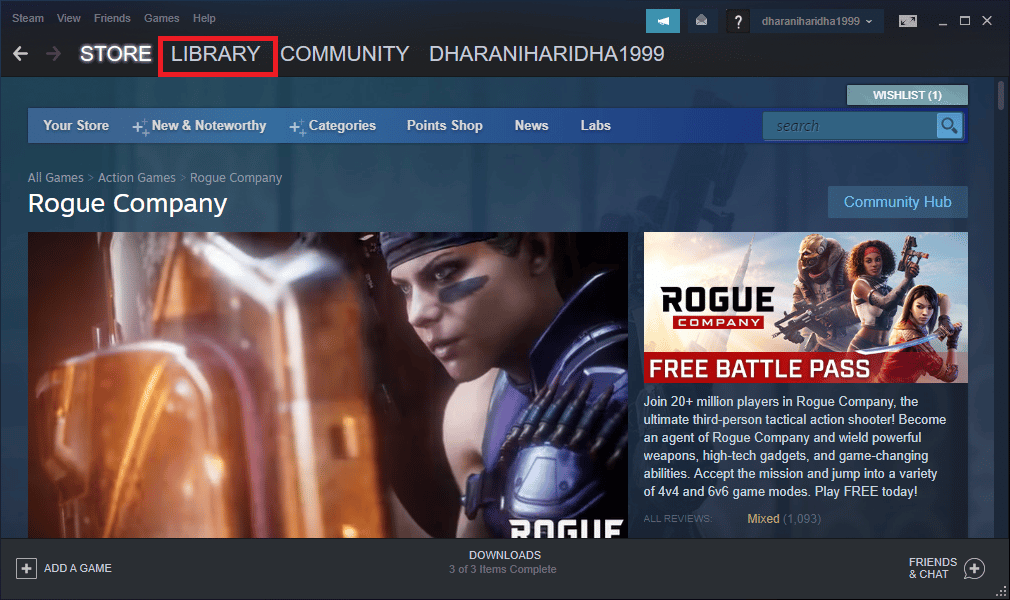
1 ຕີ ປຸ່ມ Windows ແລະປະເພດ ໄອນ້ໍາ, ຫຼັງຈາກນັ້ນໃຫ້ຄລິກໃສ່ ເປີດ.
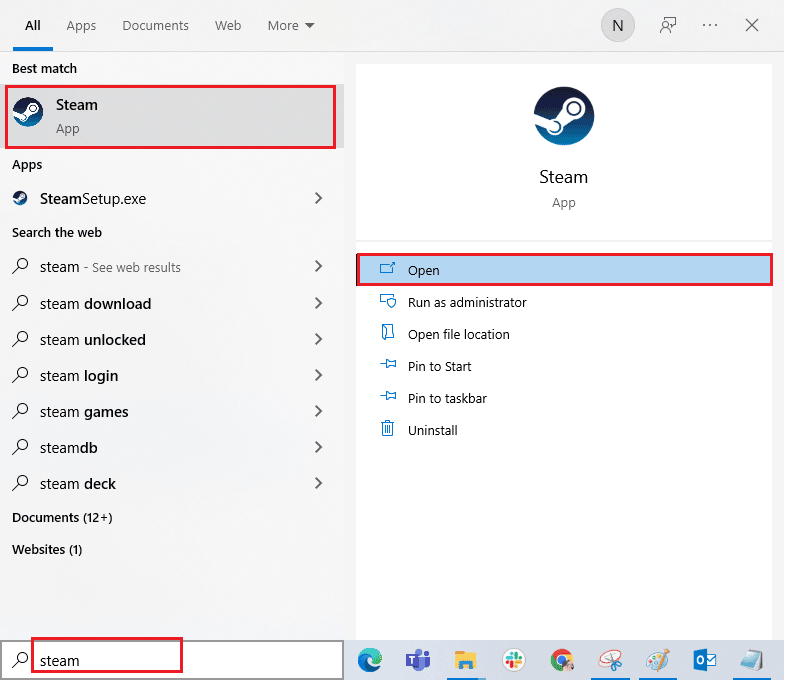
2. ດຽວນີ້ກົດເຂົ້າໄປ ໄອນ້ໍາ ຢູ່ໃນມຸມຊ້າຍເທິງຂອງຫນ້າຈໍຕິດຕາມດ້ວຍ ກວດເບິ່ງການອັບເດດ Steam Client… ດັ່ງທີ່ເນັ້ນໃສ່ຂ້າງລຸ່ມນີ້.
3. ຖ້າທ່ານມີການປັບປຸງໃຫມ່ທີ່ຈະດາວໂຫລດ, ຕິດຕັ້ງພວກມັນແລະຮັບປະກັນ ລູກຄ້າ Steam ຂອງທ່ານແມ່ນອັບເດດແລ້ວ.
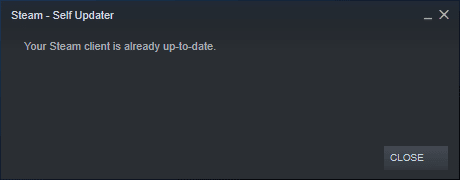
4. ດຽວນີ້, ເປີດ Steam ຄືນໃໝ່ ແລະກວດເບິ່ງວ່າບັນຫາໄດ້ຖືກແກ້ໄຂແລ້ວບໍ.
Likewise, it is always essential that your game run at its latest version to avoid any conflicts. Until your game is updated, you cannot log in to MultiVersus servers successfully.
To ອັບເດດເກມຂອງເຈົ້າ, follow the below-mentioned steps.
1 ເປີດຕົວ ໄອນ້ໍາ ແລະທ່ອງໄປຫາ ຫໍສະຫມຸດ.
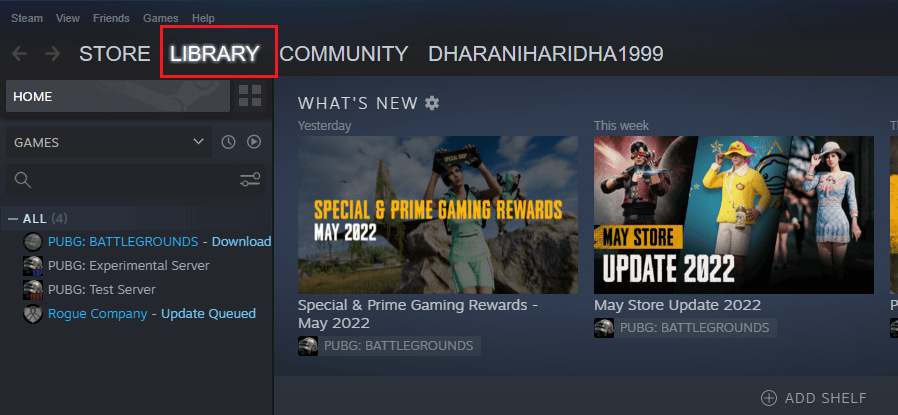
2. ດຽວນີ້ກົດເຂົ້າໄປ ຫນ້າທໍາອິດ and search for MultiVersus.
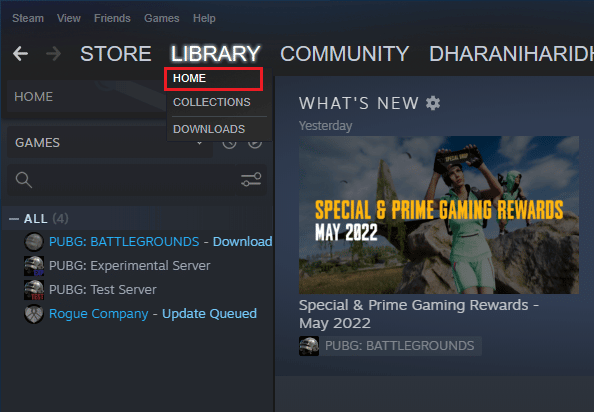
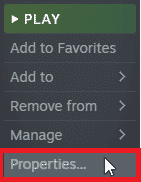
3. ຫຼັງຈາກນັ້ນ, ໃຫ້ຄລິກຂວາໃສ່ເກມແລະເລືອກເອົາ ຄຸນສົມບັດ… ທາງເລືອກ.

4. ໃນປັດຈຸບັນ, ສະຫຼັບກັບ ການປັບປຸງ ແຖບແລະກວດເບິ່ງວ່າມີການປັບປຸງໃດໆທີ່ຍັງຄ້າງຢູ່ໃນການປະຕິບັດ. ຖ້າເປັນດັ່ງນັ້ນ, ປະຕິບັດຕາມຄໍາແນະນໍາໃນຫນ້າຈໍເພື່ອດາວໂຫລດການປັບປຸງຫລ້າສຸດ.
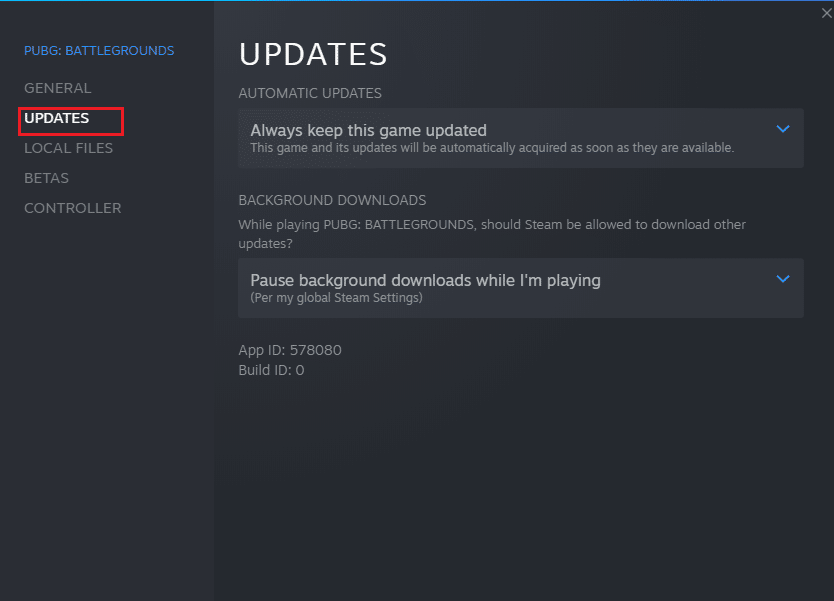
After an update, check if MultiVersus not launching issue is fixed.
ວິທີທີ 6: ປິດໃຊ້ງານການເພີ່ມປະສິດທິພາບເຕັມຈໍ
Few users have suggested that disabling full-screen optimizations on PC has helped them fix MultiVersus is not launching issue. Follow as instructed.
1. Navigate to the Steam ຫໍສະຫມຸດ ເມນູ.
2. Now, right-click on the MultiVersus game and click on ຄຸນສົມບັດ…
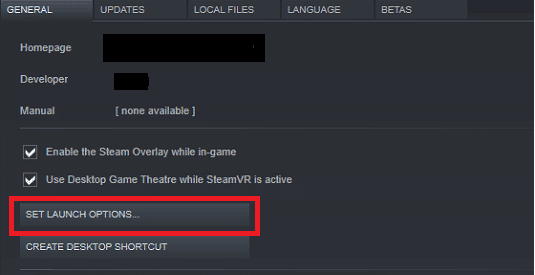
3. ໃນປັດຈຸບັນ, ສະຫຼັບກັບ ທົ່ວໄປ ແຖບແລະຄລິກໃສ່ ຕັ້ງຄ່າຕົວເລືອກການເປີດຕົວ... ດັ່ງທີ່ອະທິບາຍ.
4. ໃນປັດຈຸບັນ, ປ່ອງຢ້ຽມໃຫມ່ຈະຖືກເປີດດ້ວຍການເຕືອນຜູ້ໃຊ້ແບບພິເສດ. ເພື່ອເປີດເກມໃນຮູບແບບປ່ອງຢ້ຽມ, ພິມ - ປ່ອງຢ້ຽມ ພາລາມິເຕີ.
5. ໃນປັດຈຸບັນ, ບັນທຶກການປ່ຽນແປງໂດຍການຄລິກ OK ແລະອອກຈາກປ່ອງຢ້ຽມຄຸນສົມບັດ.
6. ດຽວນີ້, ເປີດ ໃໝ່ ເກມ and ensure that it runs in windowed mode.
ຫມາຍເຫດ: You can also navigate to ຕັ້ງຄ່າຕົວເລືອກການເປີດຕົວ… ອີກເທື່ອໜຶ່ງ ແລະພິມພາລາມິເຕີຕໍ່ໄປນີ້ແທນພາຣາມິເຕີສຸດທ້າຍ.
-windowed -w 1024
7. Now, save the changes by clicking on OK.
ພາຣາມິເຕີນີ້ຈະຕັ້ງເກມໃຫ້ເປີດຢູ່ໃນໂໝດ windowed.
ຍັງອ່ານ: ແກ້ໄຂການຕັ້ງຄ່າແອັບ Steam ທີ່ບໍ່ສາມາດໃຊ້ໄດ້ໃນ Windows 10
ວິທີທີ 7: ປິດການວາງຊ້ອນໃນເກມ
The Steam Overlay is a piece of Steam that allows the users to access friends list, and web browser and allows in-game purchasing. It is a significant tool, yet it sometimes triggers MultiVersus not launching on startup issue. If you want to solve this problem, then turn off the Steam game overlay.
1. ເປີດ ໄອນ້ໍາ app ແລະໃຫ້ຄລິກໃສ່ ຫໍສະຫມຸດ.
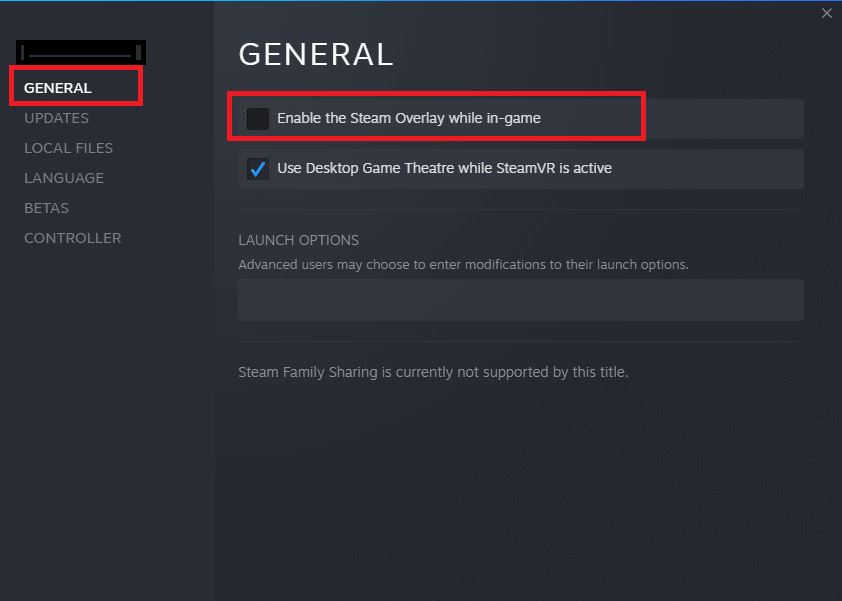
2. ໃນປັດຈຸບັນ, ຄລິກຂວາໃສ່ Multi Versus ແລະຄລິກໃສ່ ຄຸນສົມບັດ…

3. ໃນປັດຈຸບັນ, ສະຫຼັບກັບ ທົ່ວໄປ tab and uncheck the box containing Enable the Steam Overlay while in-game.
4. ສຸດທ້າຍ, ເປີດເກມຄືນໃຫມ່ and check if the MultiVersus launching issue is solved.
ວິທີທີ 8: ກວດສອບຄວາມສົມບູນຂອງໄຟລ໌ເກມ
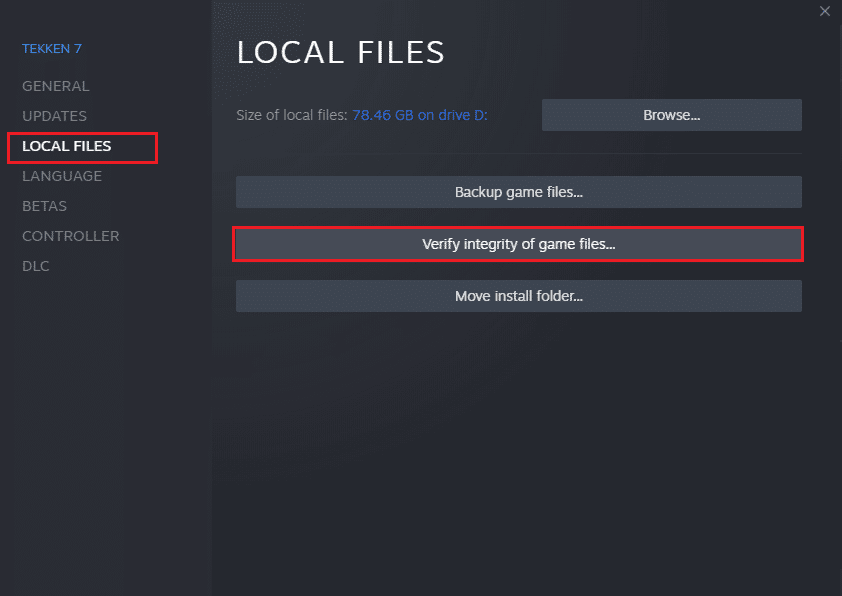
We have seen many cases in which the game files are either missing or corrupt or it had incomplete installations. Users could also experience MultiVersus not starting on PC issue if they are interrupted by the update process or if the game files are being moved. In this method, you will be opening Steam and using the built-in function for verifying the integrity of the game. It will be replaced if the application finds something. Read our guide on how to verify integrity of game files on Steam.
ຍັງອ່ານ: ແກ້ໄຂ Steam Client Bootstrapper ບໍ່ຕອບສະໜອງໃນ Windows 10
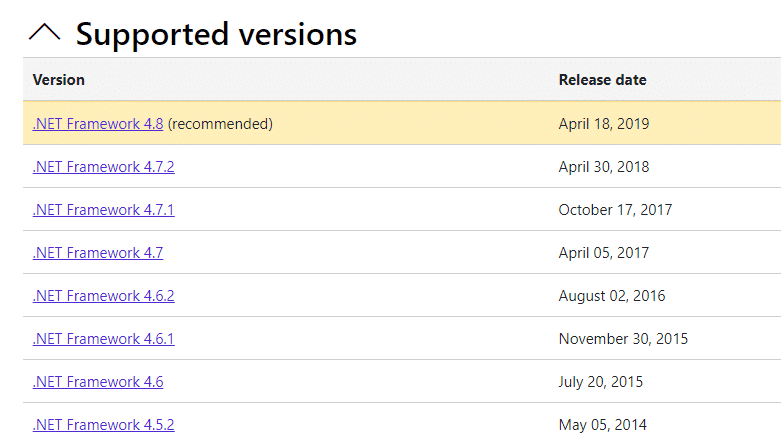
ວິທີທີ 9: ອັບເດດ .NET Framework
.NET framework in Windows 10 computer is essential for uninterrupted service of modern apps and games. Many games have an auto-update feature for the .NET framework, and thus it will be updated automatically whenever an update is available. In another case, if an update prompts in your PC, you can manually install the latest version of the .NET framework, as discussed below, to fix MultiVersus not launching issue.
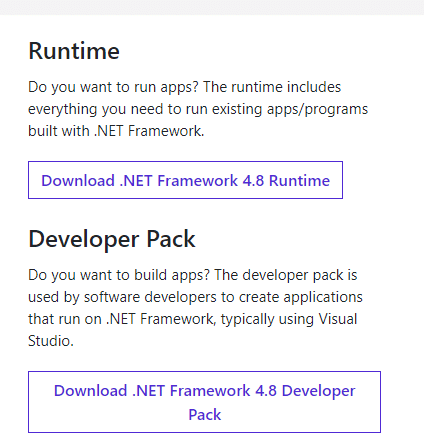
1. ກວດເບິ່ງ ການປັບປຸງໃຫມ່ ສໍາລັບ ຂອບ ຈາກ ເວັບໄຊທ໌ທາງການຂອງ Microsoft.
2. ຖ້າຫາກວ່າມີການປັບປຸງໃດຫນຶ່ງ, ໃຫ້ຄລິກໃສ່ທີ່ສອດຄ້ອງກັນ /ແນະນໍາໃຫ້ link ແລະຄລິກ ດາວໂຫລດ .NET Framework 4.8 Runtime ທາງເລືອກ.
ຫມາຍເຫດ: ຢ່າຄລິກໃສ່ ດາວໂຫລດ .NET Framework 4.8 Developer Pack ຍ້ອນວ່າມັນຖືກນໍາໃຊ້ໂດຍຜູ້ພັດທະນາຊອບແວ.
3. ໄປຫາ ການດາວໂຫຼດຂອງຂ້ອຍ, double-click on the setup file to run the downloaded file and follow the ຄຳ ແນະ ນຳ ໃນ ໜ້າ ຈໍ to install the .NET framework successfully on your Windows PC. Once done, check if you have fixed the discussed issue or not.
ວິທີ 10: ອັບເດດ DirectX
To enjoy a seamless multimedia experience on MultiVersus, you have to make sure whether DirectX is installed, and it is updated to its latest version. DirectX helps you improve the visual media experience for graphical games and applications especially. It is worth updating DirectX needed for this game.
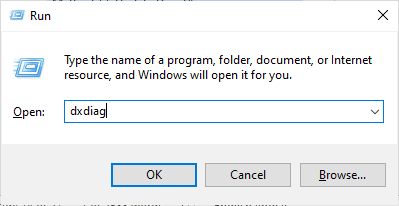
1. ຕີໄດ້ ປຸ່ມ Windows + R ພ້ອມກັນເພື່ອເປີດຕົວ ການດໍາເນີນງານ ກ່ອງໂຕ້ຕອບ
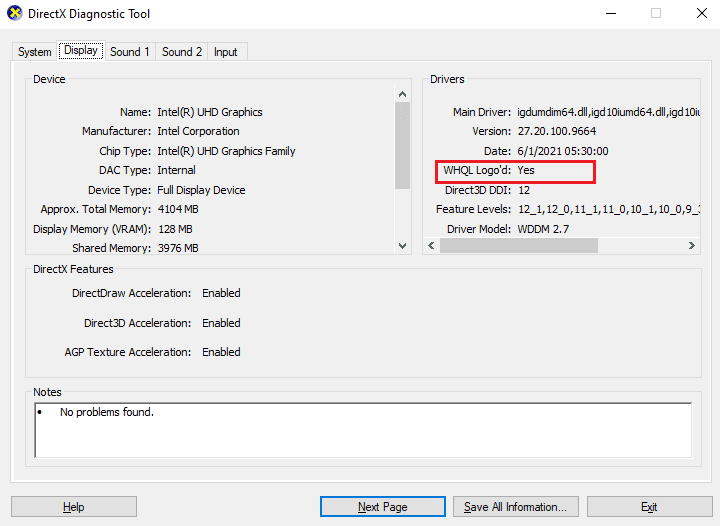
2 ປະເພດ dxdiag ແລະກົດປຸ່ມ ໃສ່ລະຫັດ ເພື່ອເປີດ ເຄື່ອງມືວິນິດໄສ DirectX.
3. ກວດເບິ່ງ ລຸ້ນ DirectX, if it contains DirectX 12 ຫຼືບໍ່.
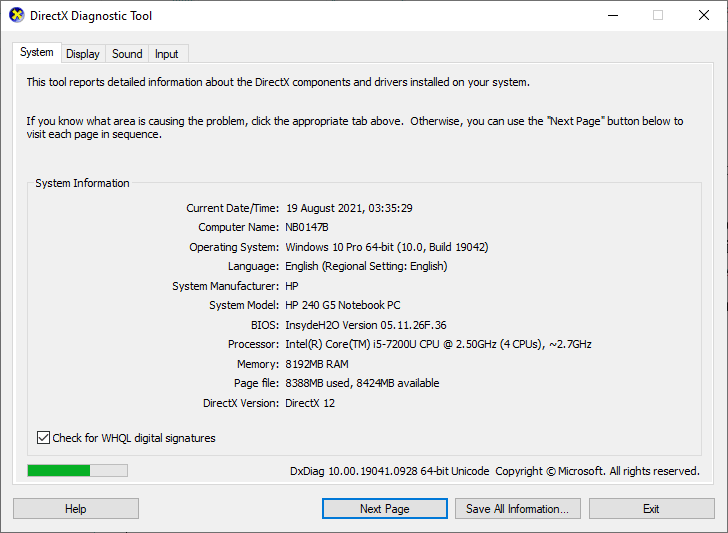
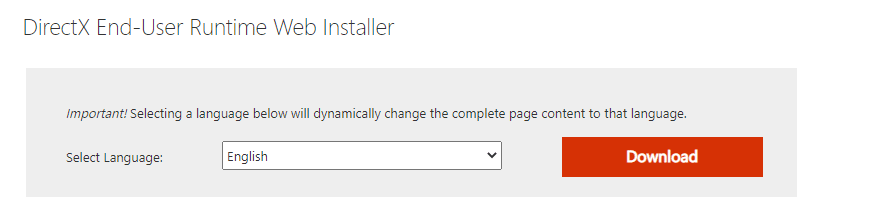
4. If you do not have DirectX 12 in your system, download and install it from the ຫນ້າດາວໂຫລດ DirectX ໂດຍປະຕິບັດຕາມຄໍາແນະນໍາໃນຫນ້າຈໍ.
After installing DirectX, check if the issue occurs again.
ຫມາຍເຫດ: ຮັບປະກັນ ກວດເບິ່ງລາຍເຊັນດິຈິຕອນ WHQL ກ່ອງຖືກເຊັກອິນ ລະບົບ tab ແລະໃນແຖບທັງຫມົດ, ກວດເບິ່ງວ່າ ໂລໂກ້ WHQL ຖືກຕັ້ງເປັນ ແມ່ນແລ້ວ.
ວິທີທີ 11: ສ້ອມແປງ Microsoft Visual C++ Redistributable
Alternately, you can try to repair the Microsoft Visual C++ Redistributable packages to fix MultiVersus not launching issue as follows:
1. ຕີໄດ້ ປຸ່ມ Windows, ປະເພດ ແອັບ Apps ແລະຄຸນລັກສະນະຕ່າງໆ, ຫຼັງຈາກນັ້ນໃຫ້ຄລິກໃສ່ ເປີດ.
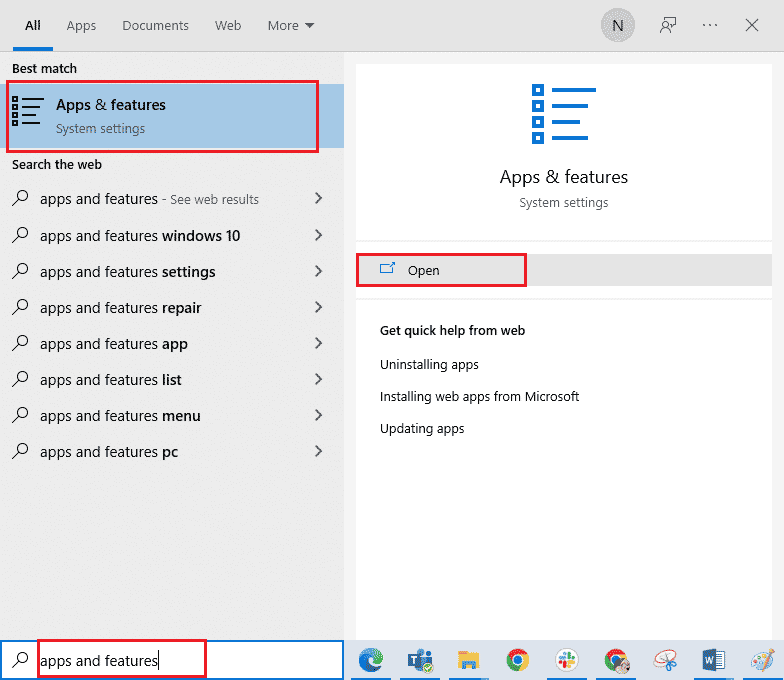
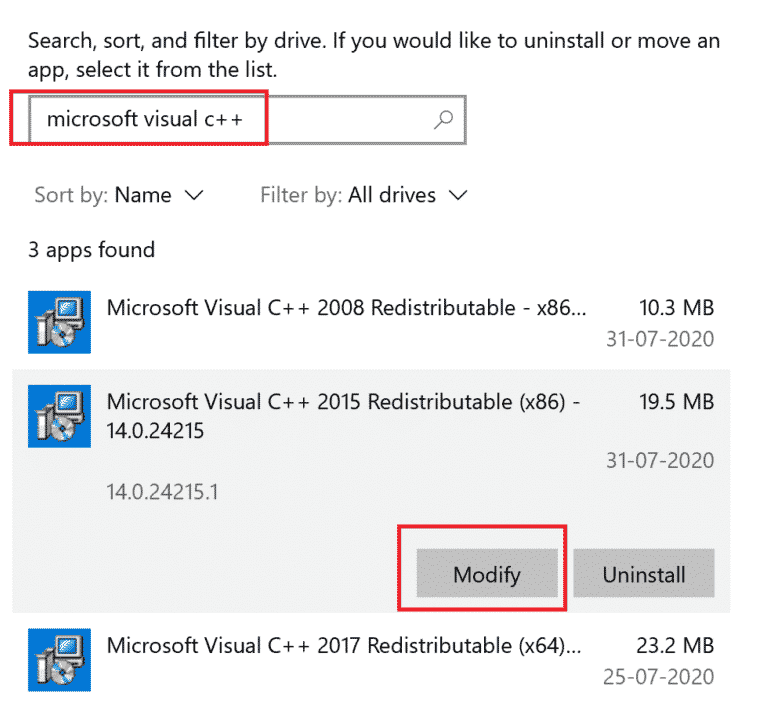
2. ຄົ້ນຫາ ການແຈກຢາຍ Microsoft Visual C ++ ຊຸດ.
3. Then, select the package, and click on ແກ້ໄຂ ທາງເລືອກ.
4. ຫຼັງຈາກນັ້ນ, ໃຫ້ຄລິກໃສ່ ແມ່ນແລ້ວ ກ່ຽວກັບ User Account Control ກ່ອງໂຕ້ຕອບ
5. In the pop-up window that appears, click on ການສ້ອມແປງສະຫມາຊິກ ລໍຖ້າຂະບວນການທີ່ຈະສໍາເລັດ.
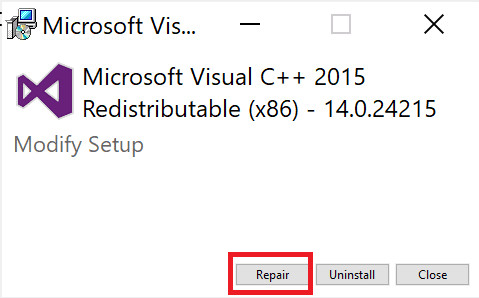
6. Repeat the above steps to modify all the Microsoft Visual C++ Redistributable packages.
7. ສຸດທ້າຍ, restart PC.
Open the application that you were unable to open previously. If this did not work, try reinstalling the C++ redistributable instead.
ຍັງອ່ານ: Fix Microsoft Visual C++ 2015 Redistributable Setup Fails Error 0x80240017
ວິທີທີ 12: ຕິດຕັ້ງ Microsoft Visual C++ Redistributable ຄືນໃໝ່
If the previous method of repairing the Microsoft C++ Visual Redistributable did not fix MultiVersus won’t launch issue, then you will have to reinstall the redistributable. Follow the given steps to uninstall & then install these again.
1. ເປີດ ແອັບ Apps ແລະຄຸນລັກສະນະຕ່າງໆ ການຕັ້ງຄ່າລະບົບ.
2 ເລືອກເອົາ ການແຈກຢາຍ Microsoft Visual C ++ package, then click on ຖອນການຕິດຕັ້ງ ທາງເລືອກ.
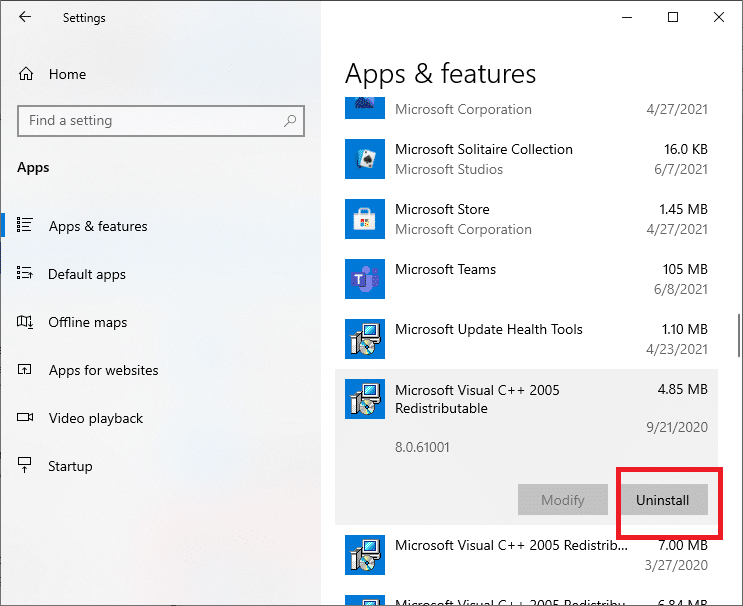
3 ໃຫ້ຄລິກໃສ່ ຖອນການຕິດຕັ້ງ option again to confirm and remove the package.
ຫມາຍເຫດ: Make sure to uninstall all the Microsoft Visual C++ Redistributable packages.
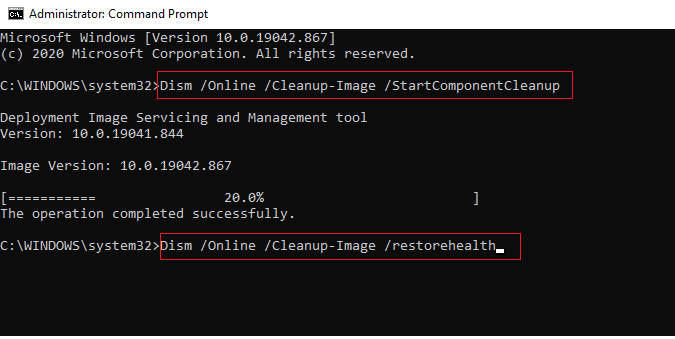
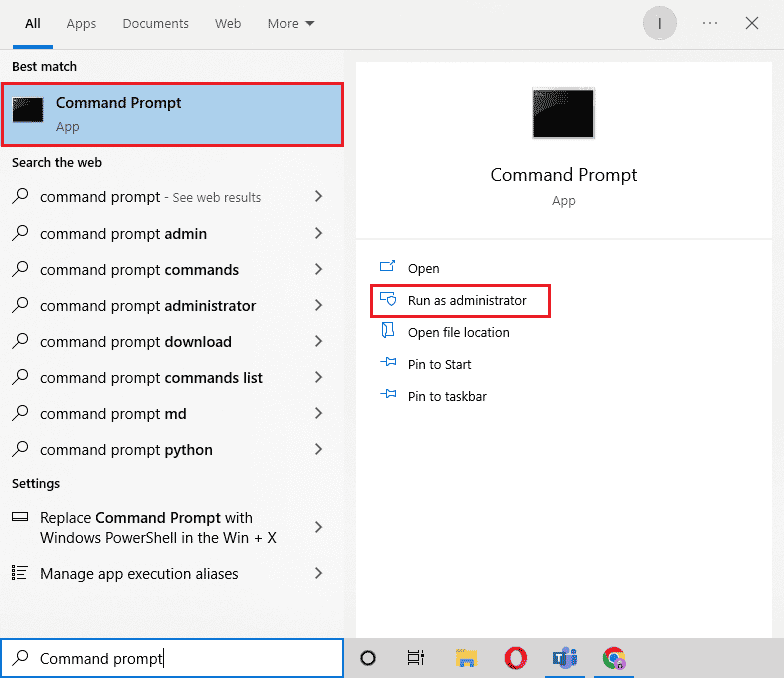
4. ຕີໄດ້ ປຸ່ມ Windows, ປະເພດ Command Prompt, ຫຼັງຈາກນັ້ນໃຫ້ຄລິກໃສ່ ດໍາເນີນການບໍລິຫານ.
5. ພິມຕໍ່ໄປນີ້ ຄໍາສັ່ງ ແລະກົດ ກະລຸນາໃສ່ ທີ່ສໍາຄັນ ຫຼັງຈາກແຕ່ລະ:
DISM /online /Cleanup-Image /StartComponentCleanup
DISM /online /Cleanup-Image /RestoreHealth
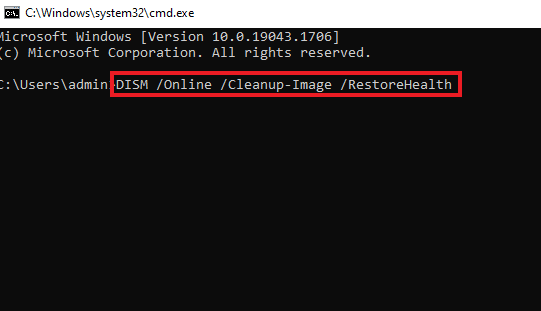
6. ເມື່ອຂະບວນການສໍາເລັດ, reboot PC ໄດ້.
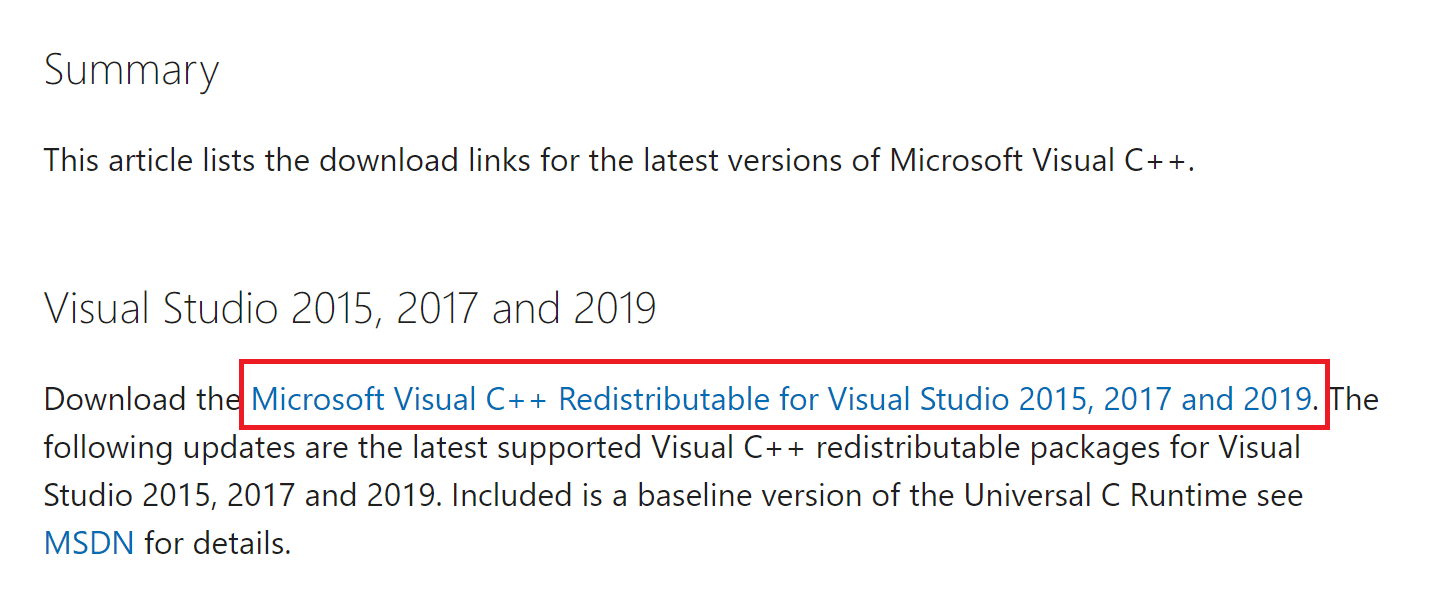
7. ຕໍ່ໄປ, ໄປຢ້ຽມຢາມ Microsoft Visual C++ Redistributable webpage to download the latest C++ package as shown here.
8. Once downloaded, open the ດາວໂຫຼດໄຟລ໌ by double-clicking on it in ການດາວໂຫຼດຂອງຂ້ອຍ. ຕິດຕັ້ງ the package by following the on-screen instructions.
9. Once the installation is complete, finally restart PC.
ແນະນໍາໃຫ້:
ພວກເຮົາຫວັງວ່າຄູ່ມືນີ້ເປັນປະໂຫຍດແລະທ່ານສາມາດແກ້ໄຂໄດ້ MultiVersus not launching issue on your Windows 10 PC. Let us know which method worked for you the best. Feel free to reach out to us with your queries and suggestions via the comments section below.