ແກ້ໄຂ Snap Camera ບໍ່ມີຂໍ້ຜິດພາດໃນການປ້ອນຂໍ້ມູນຂອງກ້ອງຖ່າຍຮູບ

Are you having a fun video call with your friends and trying to use the Snap Camera app to your video call software, but you are not able to do so? Do you have an issue using the Snap Camera app, and are you receiving an error message? Don’t worry. This page will explain the reasons and the methods to solve the Snap Camera not working issue. In this article, you will come across methods to solve the problems, like Snap Camera isn’t working and Snap Camera no available camera input error. Continue reading!
How to Fix Snap Camera No Available Camera Input Error
If you cannot use your camera on the Snap Camera app, there may be some issues with the connection. The reasons are listed below:
- ການເຊື່ອມຕໍ່ Wi-Fi ບໍ່ສະຖຽນ: The Snap Camera app uses a lot of your Internet connection, and a high-speed and stable Wi-Fi network is required to use it. So, if your Wi-Fi connection is fluctuating, the Snap Camera may show a black screen to others.
- Camera Permission: Since Snap Camera requires camera permission on your PC, you have to ensure that permission is given to the app.
- Order of Launching Apps: If you have opened your video call software first and then your Snap Camera app, there is a high chance for the software to throw errors. For example, if you have opened the Google Meet website first, then the Snap Camera app, the screen will get stuck.
- Outdated Snap Camera App: If your Snap Camera app is outdated, then the app may not be used to connect with your video call software.
- ແອັບພື້ນຫຼັງ: You must have noticed that a regular video call gets disrupted when other apps are open on your PC. Thus, apps in the background can slow down the connection between the Snap Camera app and your video call software.
- Longer Usage of Video Call Software: If your video call software is used for a longer time, then the Snap Camera gets disrupted, leading to the pages being stuck. This can make your account appear frozen to your team on the call.
- Incompatibility in Windows: The app Snap Camera is to be downloaded on a PC that has higher compatibility with your PC. Older versions of Windows, such as Windows 7, cannot support such apps of huge data size.
- Outdated Webcam Driver: If the installed webcam driver is outdated, it may pose a technical problem to run an app like Snap Camera.
- Corrupt Cache Files: As the Snap Camera app is used from time to time, it is advisable to clear the cache files on your PC. Though it is not dangerous, it can slow down the speed of your PC.
ຂັ້ນຕອນການແກ້ໄຂບັນຫາພື້ນຖານ
The basic troubleshooting methods to fix the Snap Camera not working issue are mentioned here. It is advised to implement these methods first and then experiment using the other methods.
- Close all the unnecessary applications running in the background using the Task Manager.
- It is necessary to have a stable Internet connection with good speed to use the Snap Camera on your video call software. It is advised to check the Wi-Fi connection and connect your PC to a good Wi-Fi connection.
- Ensure that your Webcam or Integrated Camera is working ແລະເປີດ.
- Before installation, it is advised to check if your PC can handle the Snap Camera App. Check the Windows version on your PC and install the Snap Camera app after ensuring that your PC meets the requirements.
- Close the Snap Camera and video call application and restart them in the right order, Snap Camera and then the video call application.
- At times, the Snap Camera app may have stuck and may not support a particular lens. Try different lenses to see if any lens will work, and wait for some time for the app to imbibe the change of your choice.
- Restarting your PC can solve the issue and bring your PC back to working mode.
- If you have many cameras input devices on your PC, then special care has to be given in choosing the camera input. Select the camera you would like to use from the drop-down menu on the Settings page on the Snap Camera app.
- ມັນເປັນສິ່ງສໍາຄັນທີ່ຈະ ensure that you have selected Snap Camera in the drop-down list of Camera settings in the video call application. If you have selected any other connected camera, you wouldn’t be able to use your Snap Camera on the software.
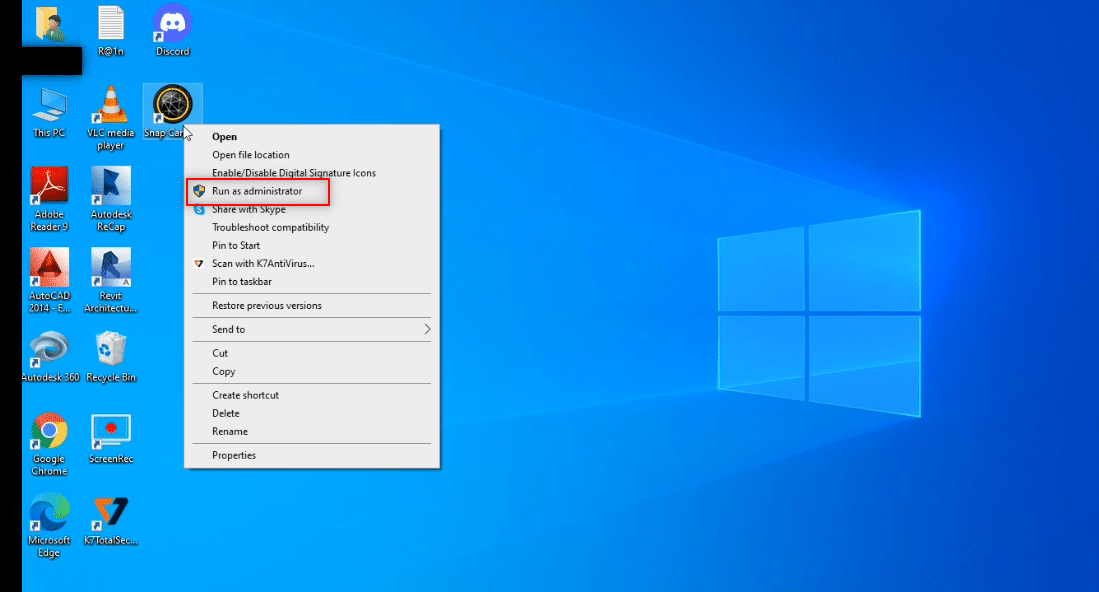
Method 1: Run Snap Camera as Administrator
If you are continuously facing issues using the Snap Camera app, run the app as an Administrator. Follow the below steps.
1 ກົດປຸ່ມ ປຸ່ມ Windows + D simultaneously to open your system desktop.
2. ກົດຂວາໃສ່ປຸ່ມ Snap Camera app icon ໃນ desktop ແລະເລືອກເອົາ Run as Administrator
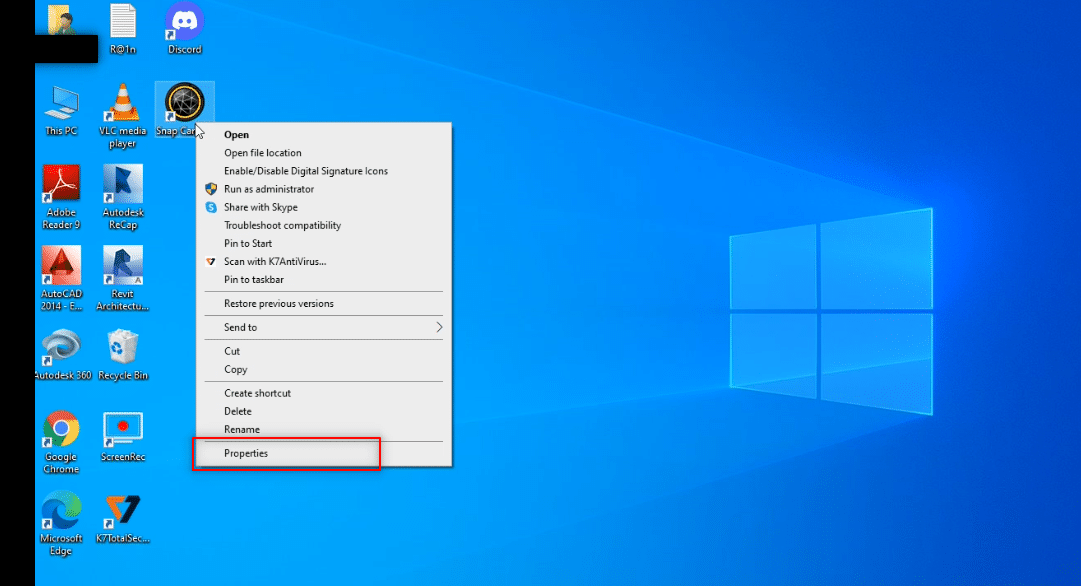
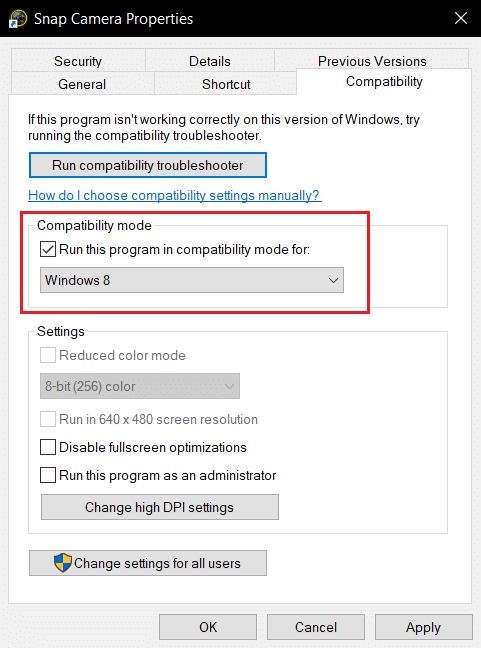
Method 2: Run Snap Camera in Compatibility Mode
If the problem lies in the incompatibility of Windows with the Snap Camera app, you can run the app in Compatibility mode. This method, however, doesn’t guarantee the quality of pictures you can get in the advanced version. Follow the steps mentioned below.
1. ກົດຂວາໃສ່ປຸ່ມ Snap Camera app icon ໃນ desktop.
2 ເລືອກ ອະສັງຫາ ຢູ່ໃນເມນູແບບເລື່ອນລົງ.
3. ທ່ອງໄປຫາ ເຂົ້າກັນໄດ້ tab
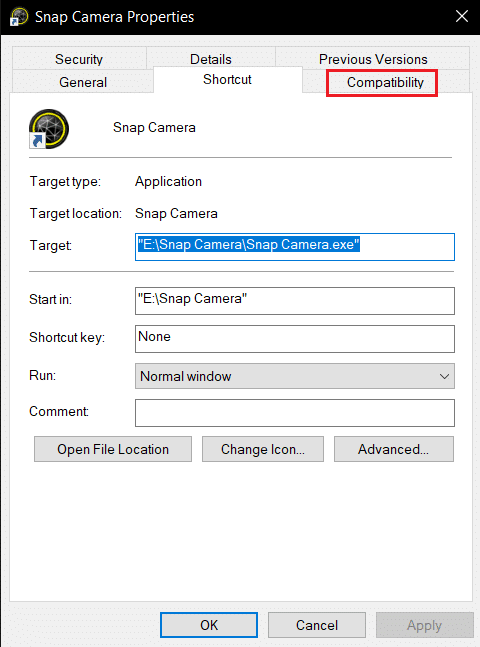
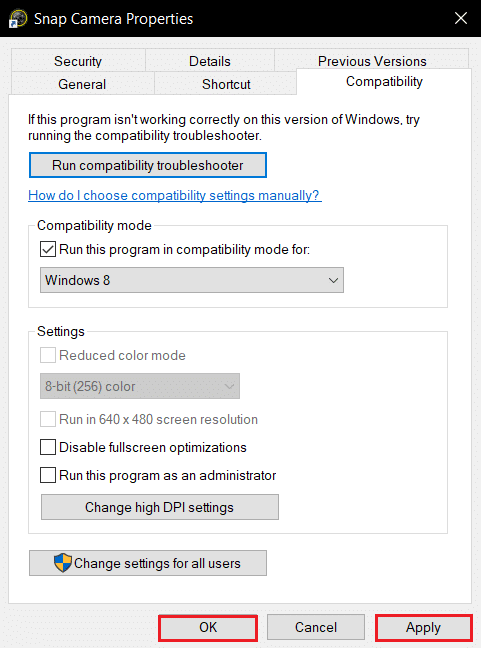
4. Check the box next to the setting ດໍາເນີນໂຄງການນີ້ໃນຮູບແບບທີ່ເຫມາະສົມສໍາລັບ:
5. ຄລິກ ສະຫມັກຂໍເອົາ ແລະຫຼັງຈາກນັ້ນ OK buttons to impart the changes.
Method 3: Update Snap Camera
To update the Snap Camera app on your PC, follow the steps mentioned in this method.
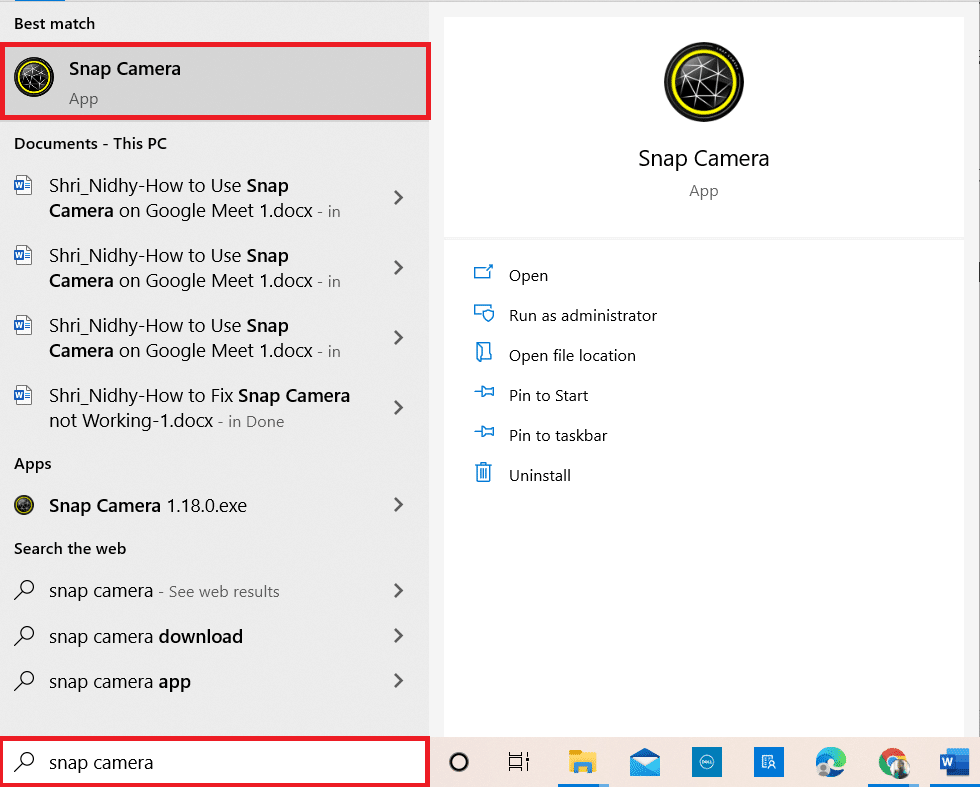
ກົດປຸ່ມ ປຸ່ມ Windowsທີ່ຢູ່ ປະເພດ ກ້ອງຖ່າຍຮູບ Snap ແລະເປີດຕົວມັນ.
2 ໃຫ້ຄລິກໃສ່ ການຕັ້ງຄ່າ at the top right of the Snap Camera app.

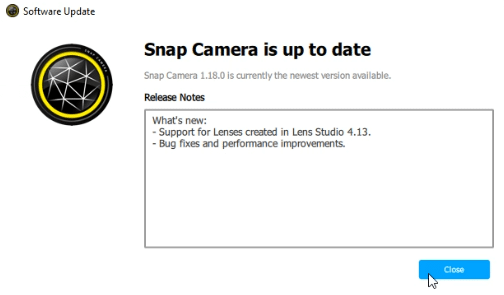
3. In the left pane, click on the tab ກວດສອບການປັບປຸງ.
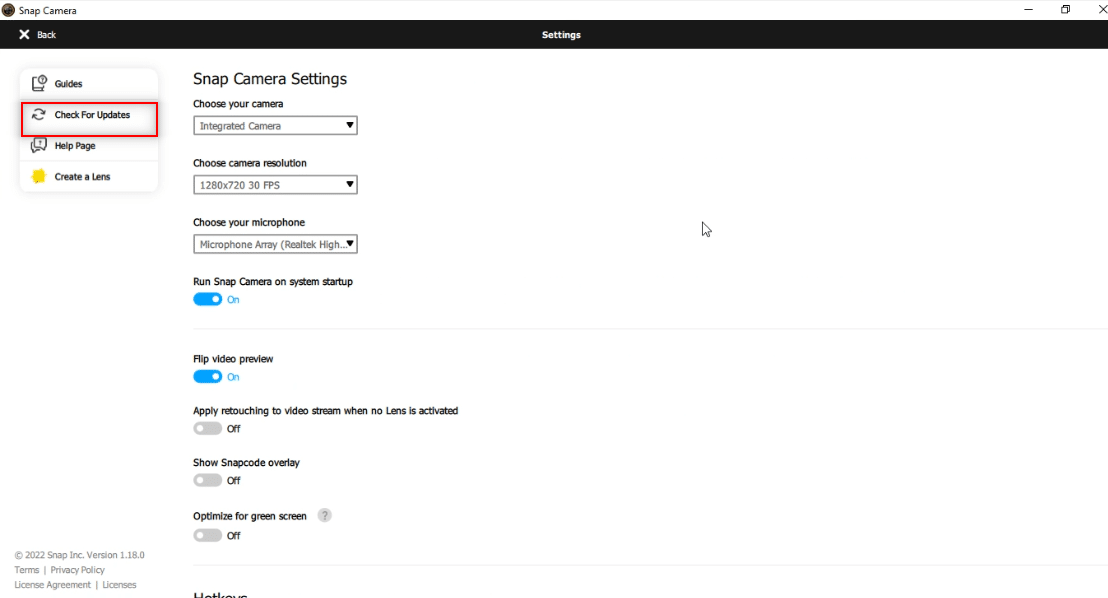
4A. If the app is updated to its latest version, you will receive a message, Snap Camera is up to date.
4B. If there is an update available for the app, it will prompt you to another window. Follow the on-screen instructions to update the app.
ຍັງອ່ານ: ແກ້ໄຂກ້ອງຖ່າຍຮູບແລັບທັອບທີ່ບໍ່ໄດ້ກວດພົບໃນ Windows 10
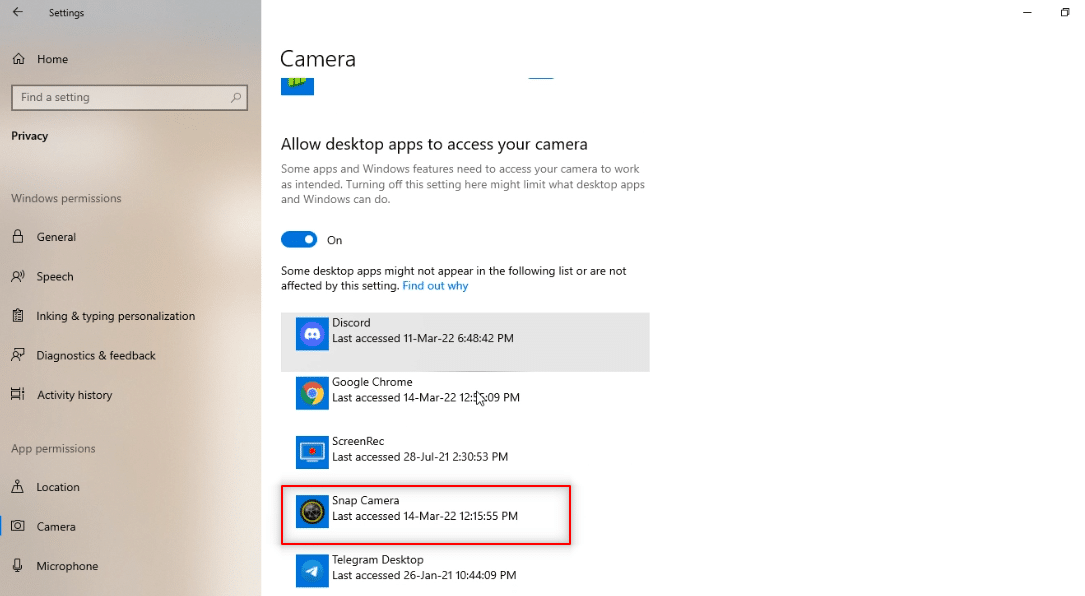
Method 4: Allow Camera Permissions for Snap Camera
You need to ensure that the Camera permission is given to the Snap Camera app to use it on your video call software. Follow the steps below to provide permission to the app.
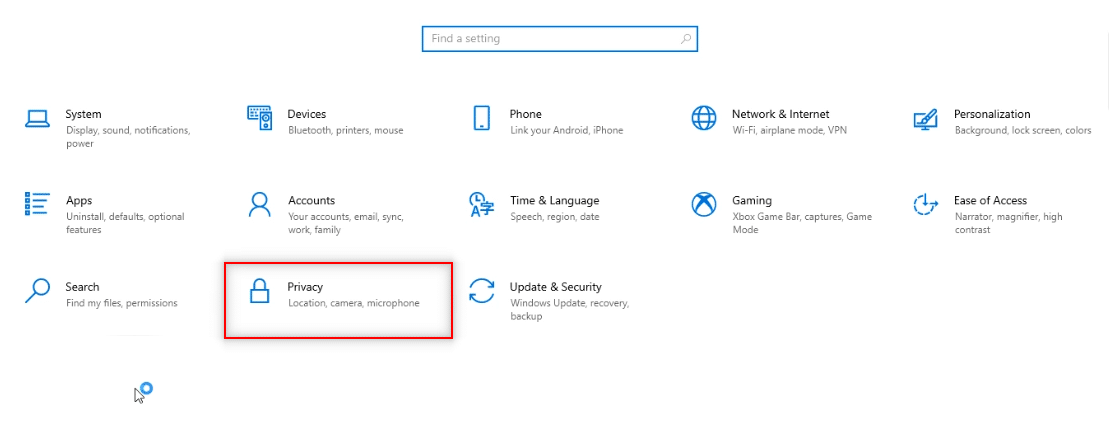
ກົດປຸ່ມ ປຸ່ມ Windows + I together to open ການຕັ້ງຄ່າ.
2. ຄລິກ ຄວາມເປັນສ່ວນຕົວ.
3. ເລື່ອນລົງເພື່ອຊອກຫາ ກ້ອງຖ່າຍຮູບ ແຖບພາຍໃຕ້ ການອະນຸຍາດແອັບ App.
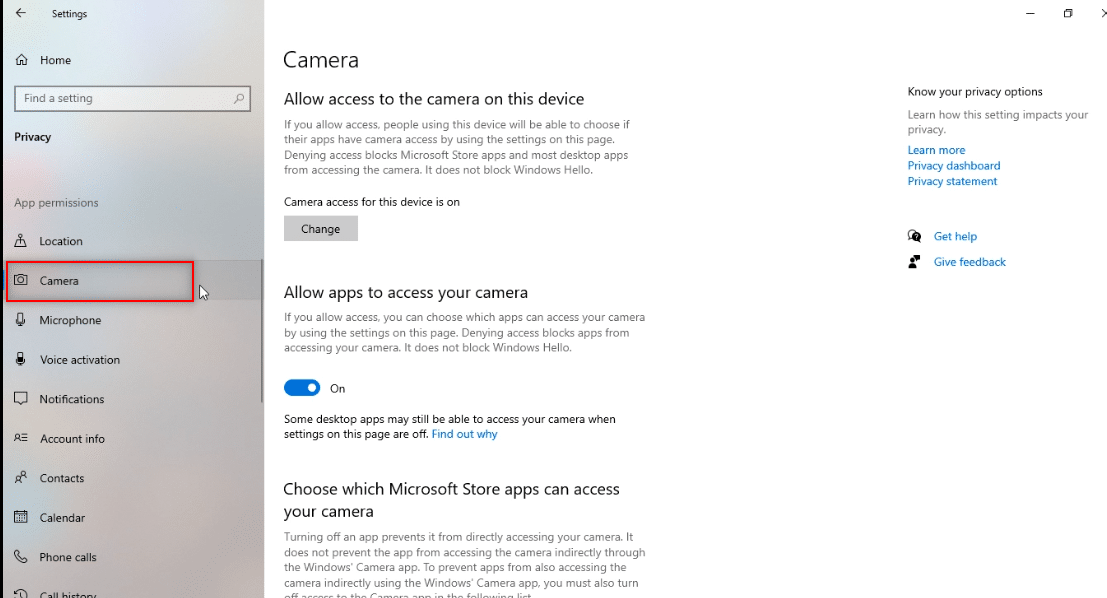
4. Toggle on the option ອະນຸຍາດໃຫ້ແອັບຯເຂົ້າເຖິງກ້ອງຖ່າຍຮູບຂອງທ່ານ.
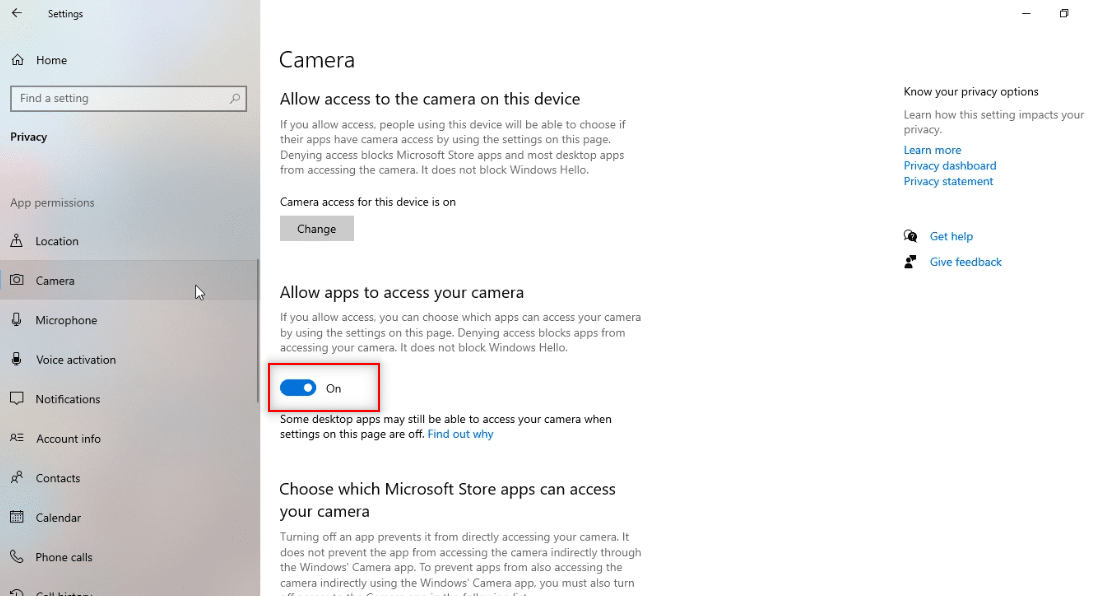
5. ເລື່ອນລົງເພື່ອຊອກຫາ ກ້ອງຖ່າຍຮູບ Snap app ພາຍໃຕ້ Allow desktop apps to access your camera ຫມວດຫມູ່
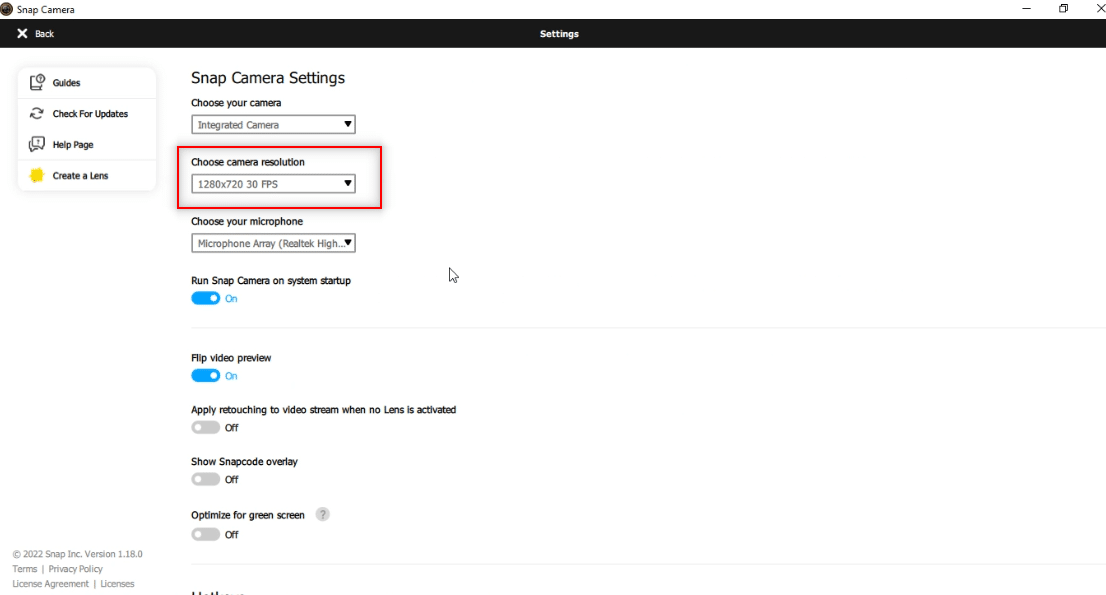
Method 5: Change Camera Resolution and Frame Rate
If you are unable to use your Snap Camera well on your Video call software, you can alter the camera resolution and frame rate on your Snap Camera app. Follow these steps to change Camera resolution and frame rate and fix Snap Camera not working issue.
1 ເປີດຕົວ ກ້ອງຖ່າຍຮູບ Snap ດັ່ງທີ່ໄດ້ເຮັດກ່ອນຫນ້ານີ້.
2 ໃຫ້ຄລິກໃສ່ ການຕັ້ງຄ່າ ໄອຄອນຢູ່ມຸມຂວາເທິງຂອງໜ້າຈໍ.

3. ໃນປັດຈຸບັນ, ມີການປ່ຽນແປງ Resolution and Frame rate in the drop-down menu under the Choose camera resolution ທາງເລືອກ.
ຫມາຍເຫດ: Ensure you choose the resolution recommended for your system.
ຍັງອ່ານ: ວິທີການແກ້ໄຂກ້ອງຖ່າຍຮູບ Omegle ບໍ່ເຮັດວຽກ
Method 6: Enable Keyboard Hotkeys
Keyboard hotkeys to trigger lens ON/OFF is the setting that allows you to change your lens when triggered by a command on Snap Camera. You need to enable this setting on your Snap Camera app to check if you can change the lens on the app. Follow the below steps to resolve the Snap Camera no available camera input error.
1 ເປີດຕົວ ກ້ອງຖ່າຍຮູບ Snap ດັ່ງທີ່ໄດ້ເຮັດກ່ອນຫນ້ານີ້.
2 ໃຫ້ຄລິກໃສ່ ການຕັ້ງຄ່າ ໄອຄອນຢູ່ມຸມຂວາເທິງຂອງໜ້າຈໍ.

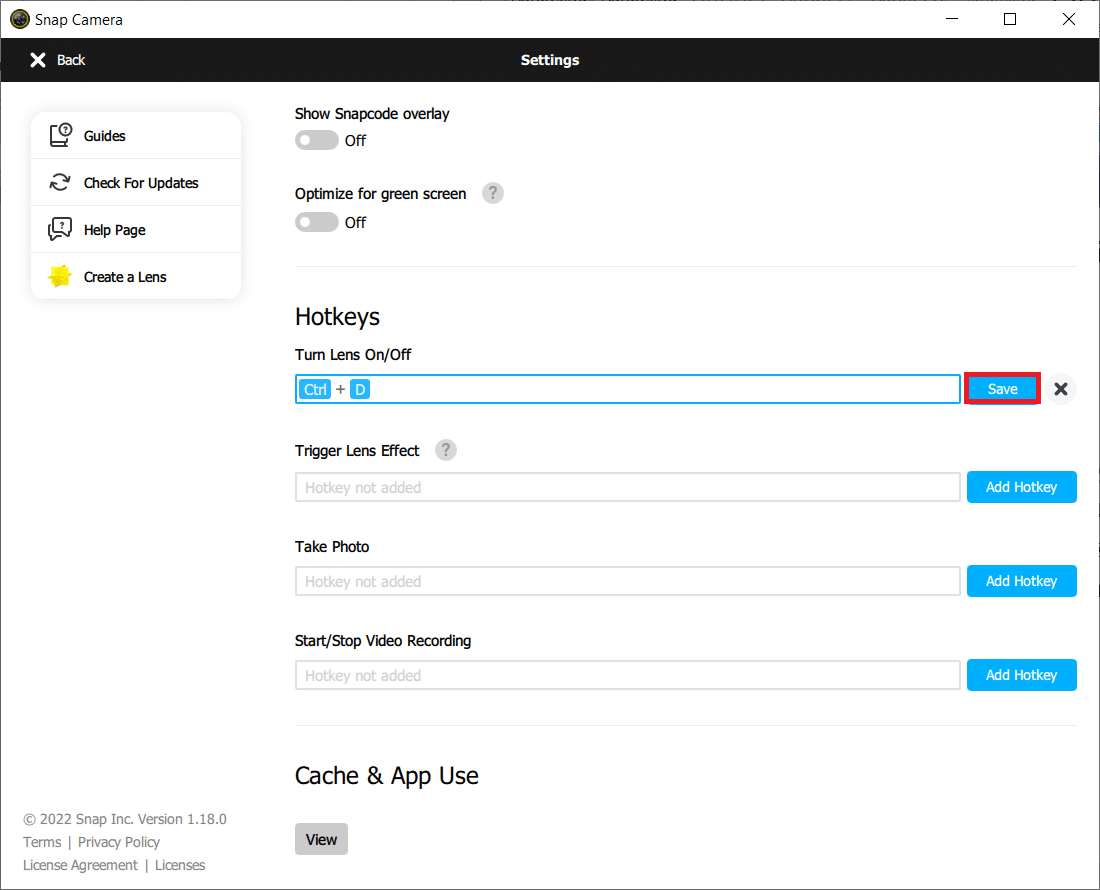
3 ໃນ ການຕັ້ງຄ່າ page, scroll down and save a hotkey under Turn Lens On/Off.
ຫມາຍເຫດ: ທີ່ນີ້, ໄດ້ Ctrl + D keys combination is chosen as the hotkey for this setting.
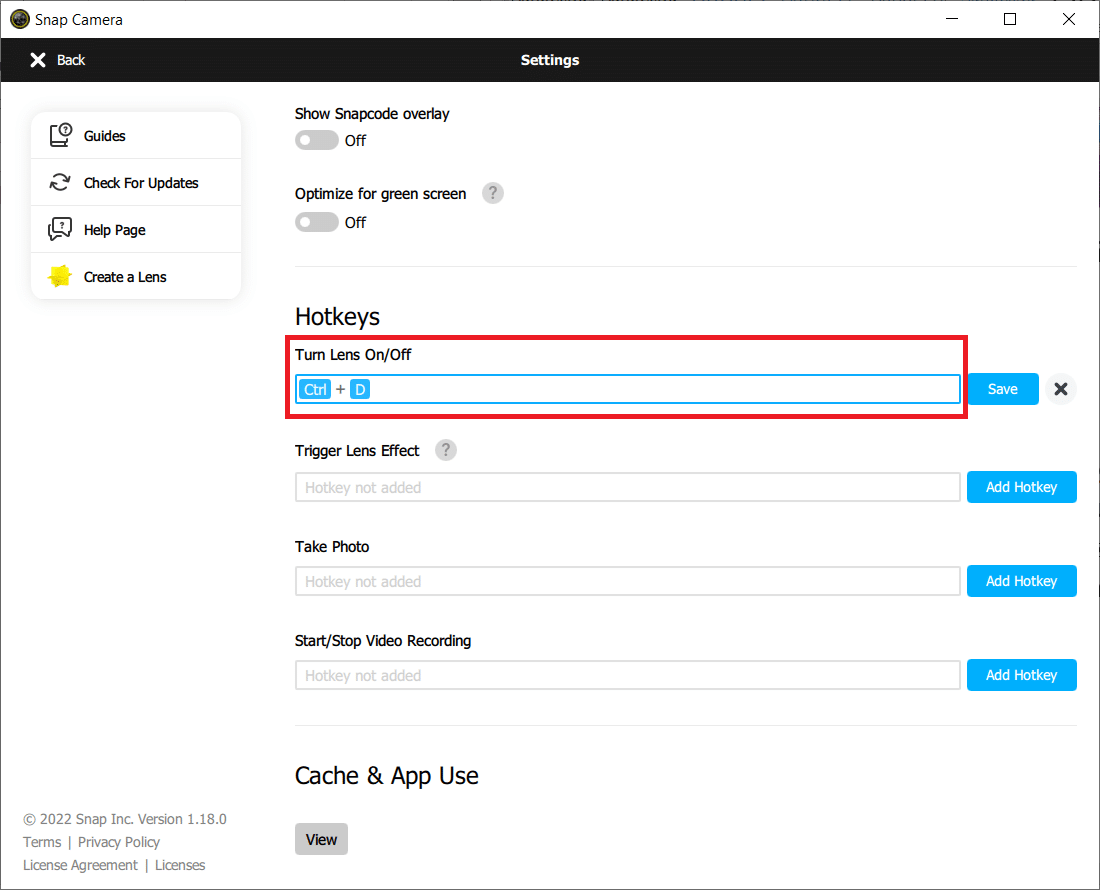
4 ໃຫ້ຄລິກໃສ່ ບັນທຶກ.
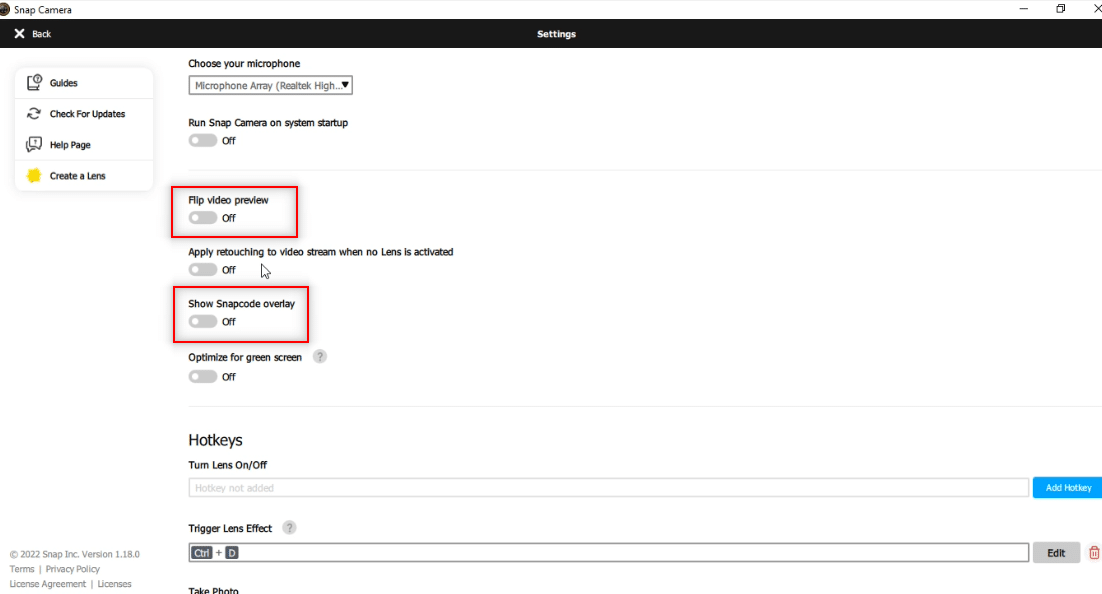
Method 7: Disable Flip Video Preview and Snapcode Overlay Options
The flip video preview is an option to mirror your video screen, and Snapcode overlay is an option to share the Snapcode of your lens with your friends. The options can be turned off if the app doesn’t perform well on your PC. To disable these settings, follow the below steps.
1 ເປີດຕົວ ກ້ອງຖ່າຍຮູບ Snap ດັ່ງທີ່ໄດ້ເຮັດກ່ອນຫນ້ານີ້.
2 ໃຫ້ຄລິກໃສ່ ການຕັ້ງຄ່າ icon
3. Toggle off against the settings, Flip video preview ແລະ Show Snapcode overlay.
4. ສຸດທ້າຍ, reboot the app and check if Snap Camera not working issue persists or not.
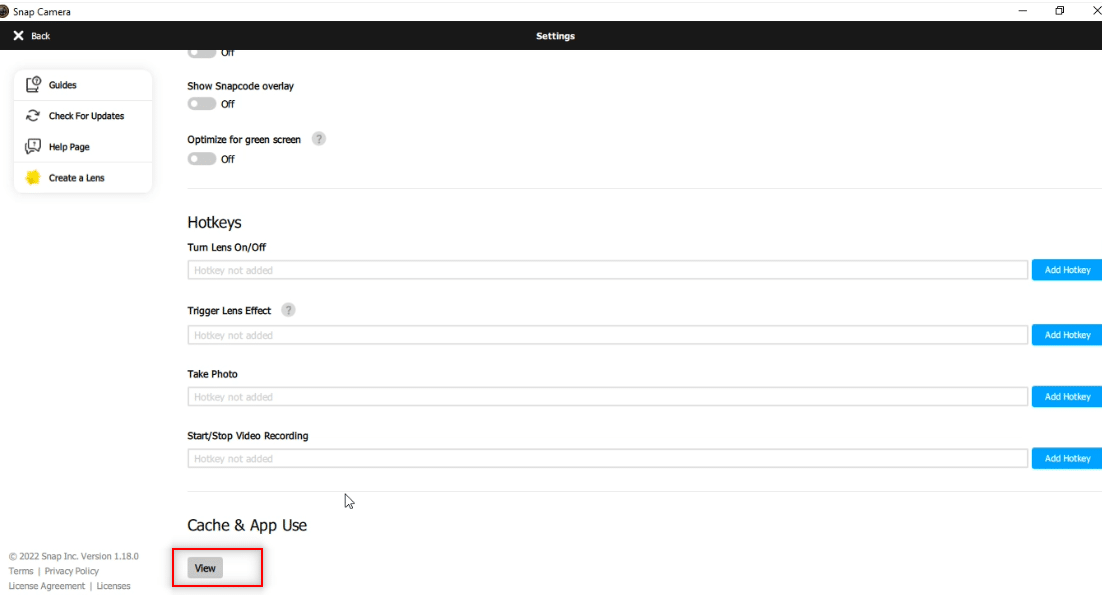
Method 8: Clear Snap Camera Cache Files
To speed up your PC, you can clear the cache files on your Snap Camera app. The cache saved on your app can be cleared by following the steps below.
1 ເປີດຕົວ ກ້ອງຖ່າຍຮູບ Snap ດັ່ງທີ່ໄດ້ເຮັດກ່ອນຫນ້ານີ້.
2. ຄລິກ ການຕັ້ງຄ່າ as done in the previous method.

3. ເລື່ອນລົງເພື່ອຊອກຫາ Cache & App Use ຢູ່ໃນປ່ອງຢ້ຽມ.
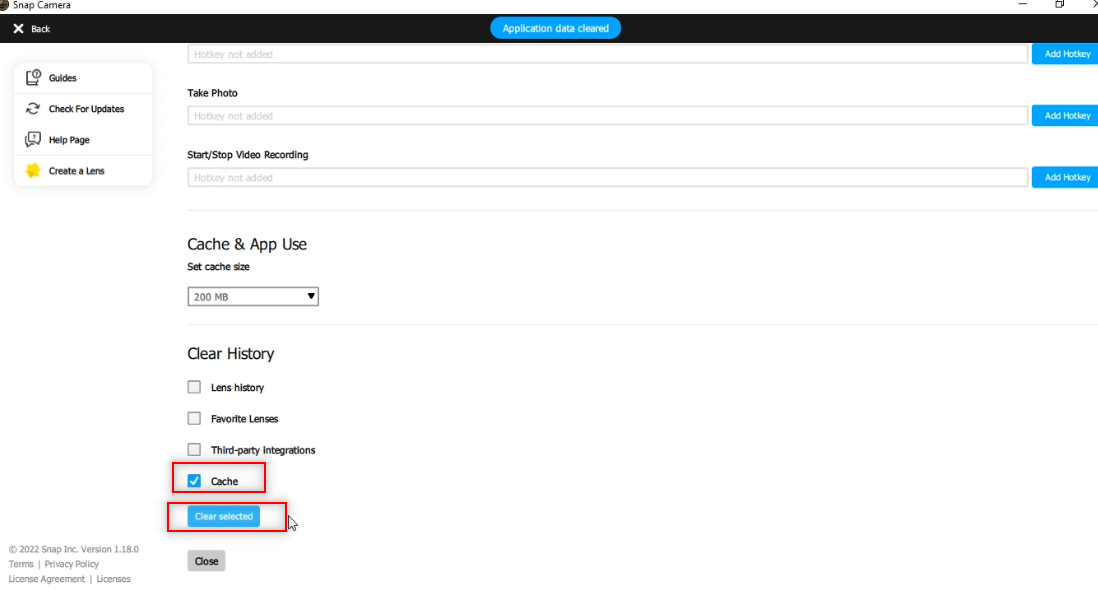
4 ໃຫ້ຄລິກໃສ່ ເບິ່ງ ປຸ່ມ.
5. ກວດເບິ່ງກ່ອງທີ່ຢູ່ຂ້າງຫນ້າ ການປົກຫຸ້ມຂອງ ທາງເລືອກແລະກົດທີ່ Clear selected ປຸ່ມ.
ຍັງອ່ານ: ໄດເວີອຸປະກອນແມ່ນຫຍັງ? ມັນເຮັດວຽກແນວໃດ?
Method 9: Download Older App Version
If the incompatibility issues keep arising, you can download an older version of the app on your PC using third-party websites. You can use websites like Firehorse to download your app and resolve the Snap Camera isn’t working issue.

Method 10: Update Webcam Driver
If the problem lies on your Webcam or Integrated Camera, you can try to update the camera driver.
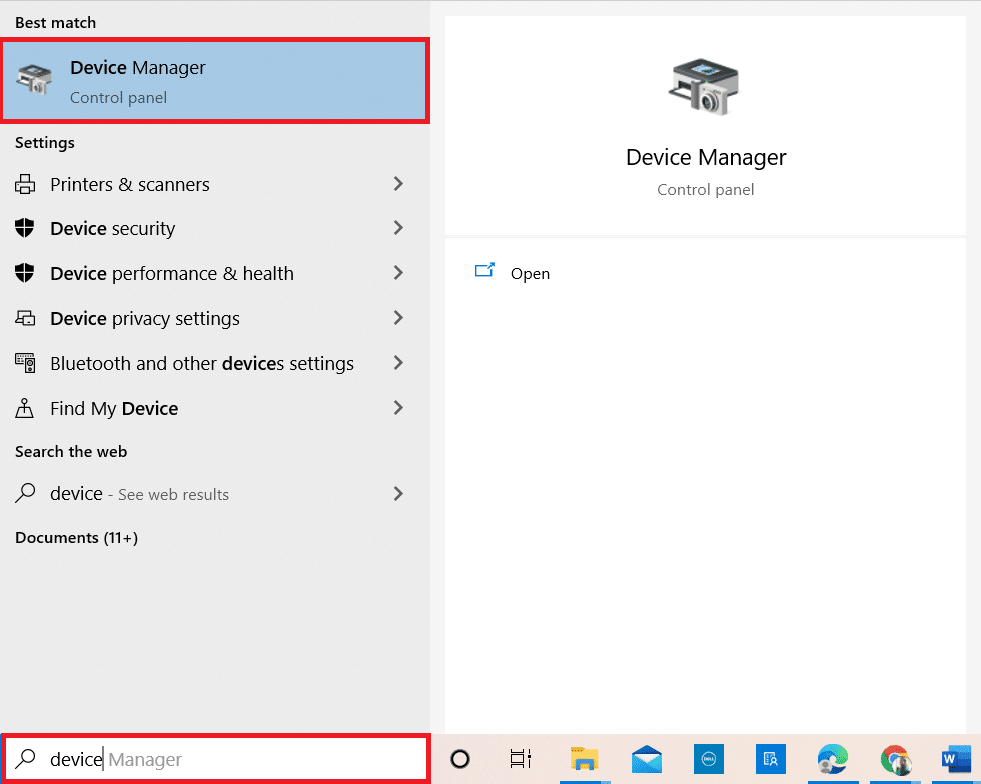
1 ປະເພດ ຕົວຈັດການອຸປະກອນ ໃນ ເມນູຄົ້ນຫາ Windows 10 ແລະເປີດມັນ.
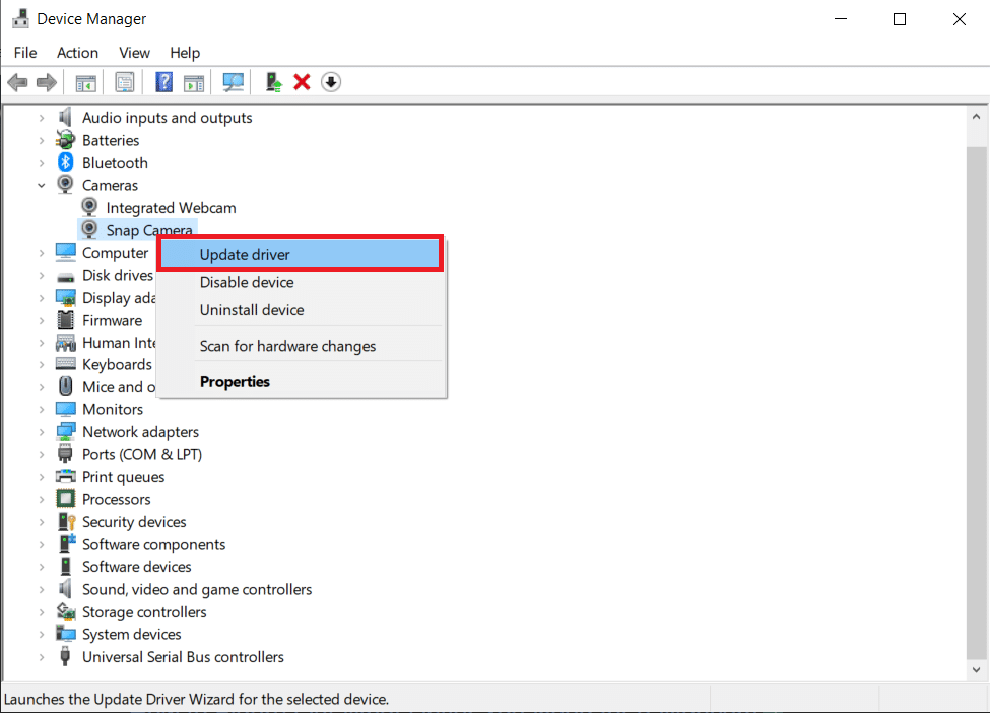
2. ຂະຫຍາຍ ກ້ອງຖ່າຍຮູບ ໂດຍການຄລິກສອງຄັ້ງໃສ່ມັນ.

3. ກົດຂວາໃສ່ ກ້ອງຖ່າຍຮູບ Snap on the list available and select ອັບເດດໄດເວີ.
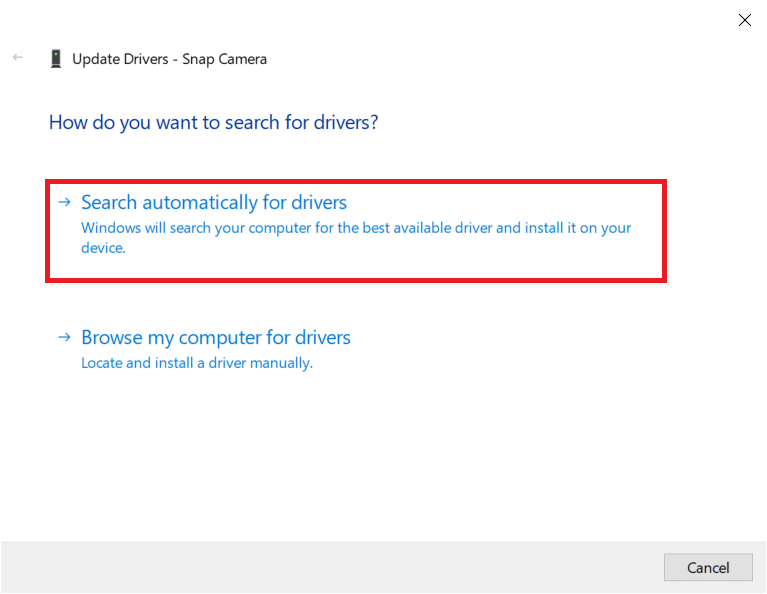
4 ໃຫ້ຄລິກໃສ່ ຄົ້ນຫາໂດຍອັດຕະໂນມັດ ສຳ ລັບຄົນຂັບລົດ ທາງເລືອກໃນເມນູ.
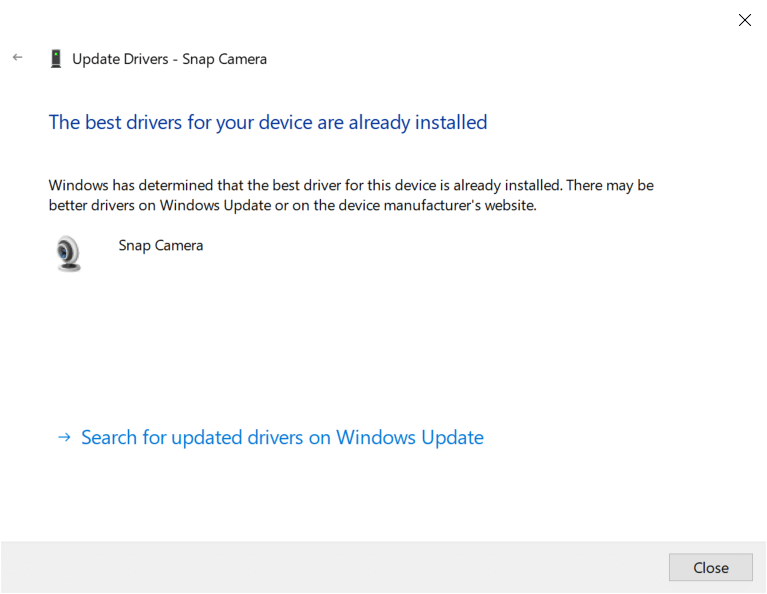
5A. If the driver is up-to-date, it will display ໄດເວີທີ່ດີທີ່ສຸດສໍາລັບອຸປະກອນຂອງທ່ານໄດ້ຖືກຕິດຕັ້ງແລ້ວ.
5B. If there is an update available, it will prompt you to update the webcam driver. Follow the on-screen instructions to update the driver and fix Snap Camera not working issue.
ຍັງອ່ານ: ແກ້ໄຂຂໍ້ຜິດພາດຂອງອຸປະກອນ I/O ໃນ Windows 10
ວິທີ 11: ປິດໃຊ້ງານ VPN
You can turn off the VPN set on your PC to allow you to use Snap Camera on your video call software.
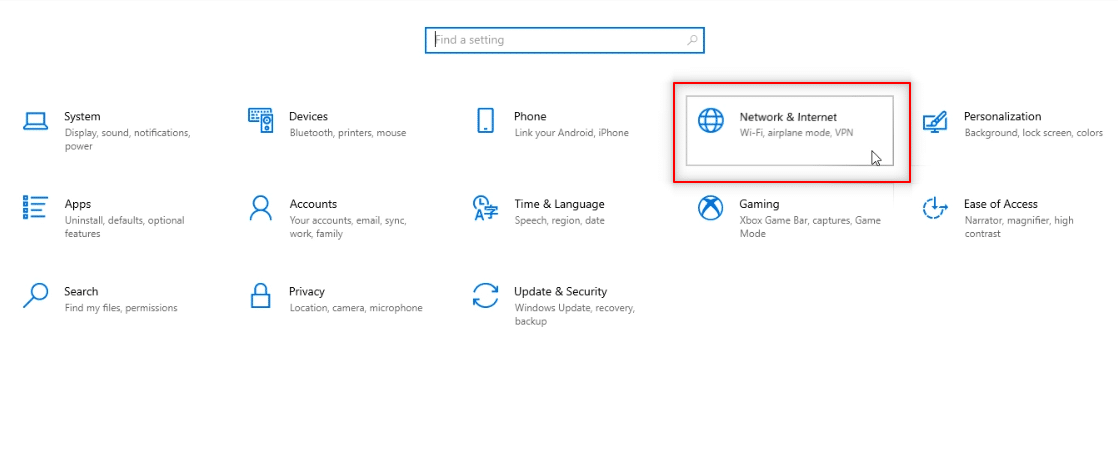
ກົດປຸ່ມ ປຸ່ມ Windows + I ຮ່ວມກັນເພື່ອເປີດ ການຕັ້ງຄ່າ.
2 ໃຫ້ຄລິກໃສ່ ເຄືອຂ່າຍແລະອິນເຕີເນັດ ທາງເລືອກໃນເມນູທີ່ສະແດງ.
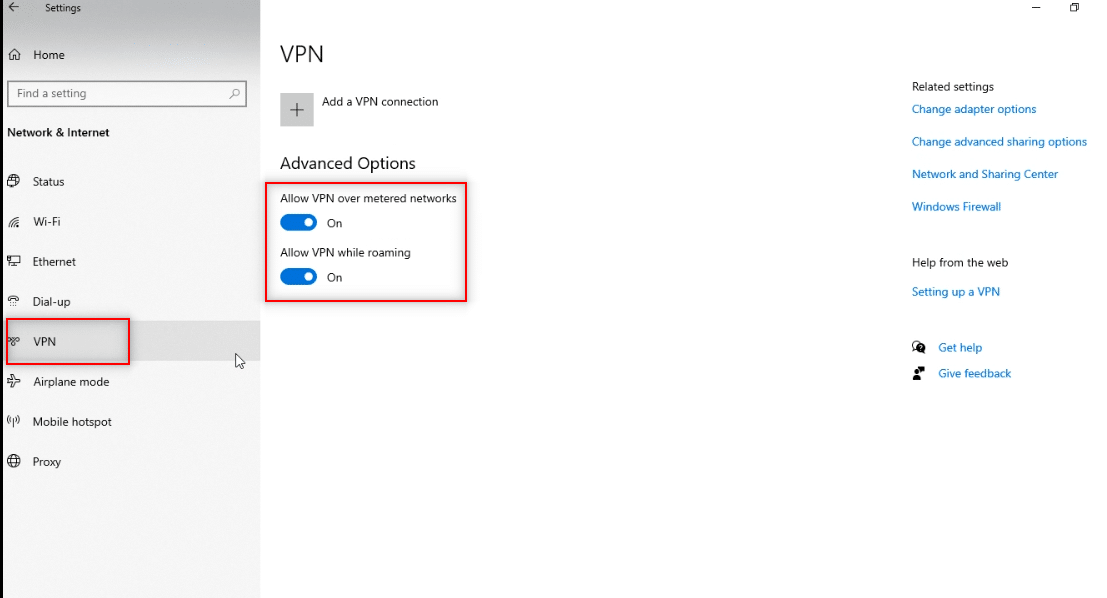
3 ເລືອກເອົາ VPN in the left pane, and disable all the VPNs.

4. Then, turn off all the ຕົວເລືອກ VPN ພາຍໃຕ້ການ ຕົວເລືອກພິເສດ.
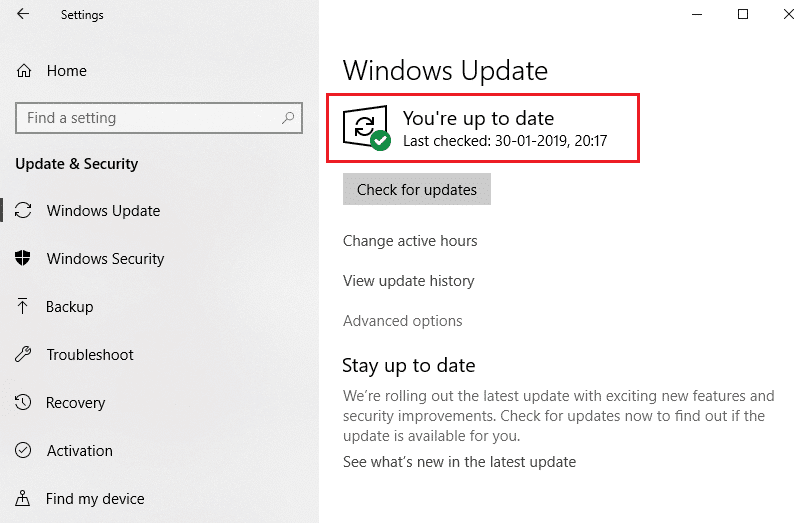
ວິທີ 12: ອັບເດດ Windows
If the Windows OS on your PC is not compatible, it may not support the functioning of the Snap Camera app. You have to update Windows on your PC to use Snap Camera on video call software. To update manually, follow the steps below and fix Snap Camera no available camera input issue.
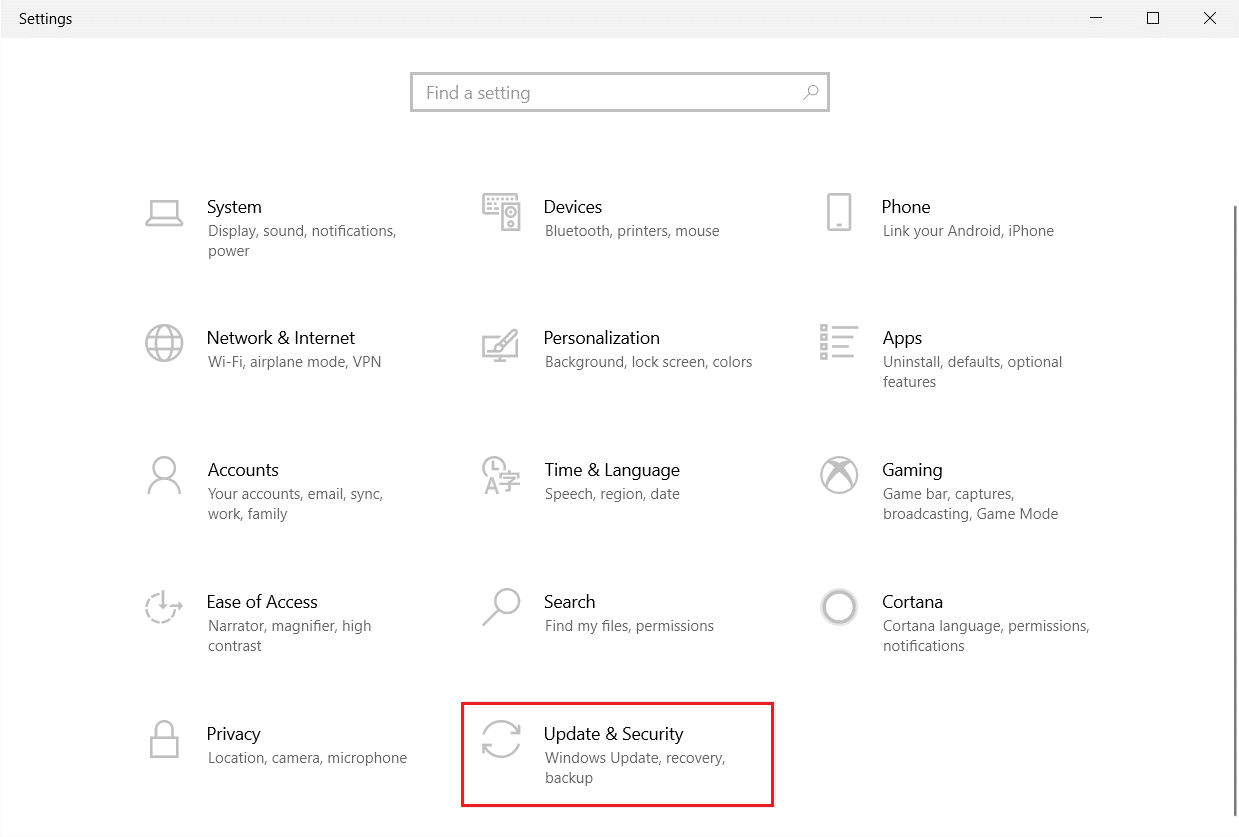
1 ກົດປຸ່ມ ປຸ່ມ Windows + I ພ້ອມກັນເພື່ອເປີດຕົວ ການຕັ້ງຄ່າ.
2 ໃຫ້ຄລິກໃສ່ ປັບປຸງແລະຄວາມປອດໄພ ກະເບື້ອງ, ດັ່ງທີ່ສະແດງ.
3 ໃນ Windows Update ແຖບ, ໃຫ້ຄລິກໃສ່ ກວດສອບການປັບປຸງ ປຸ່ມ.
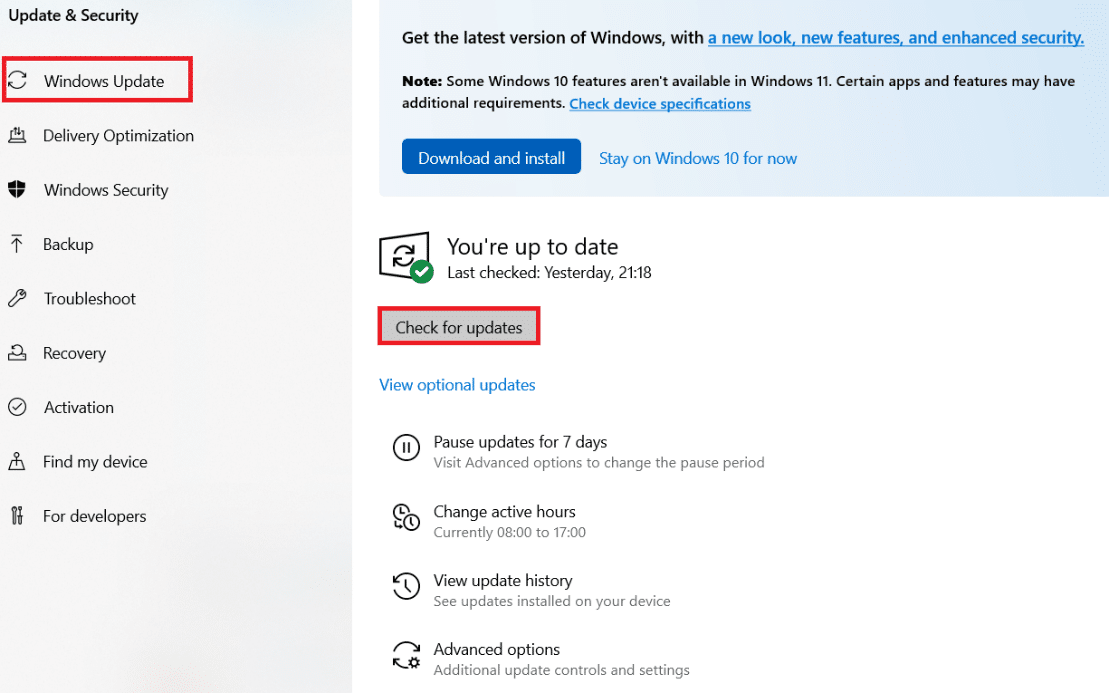
4A. ຖ້າມີການປັບປຸງໃຫມ່, ຫຼັງຈາກນັ້ນໃຫ້ຄລິກໃສ່ ຕິດຕັ້ງຕອນນີ້ ແລະປະຕິບັດຕາມຄໍາແນະນໍາເພື່ອປັບປຸງ.
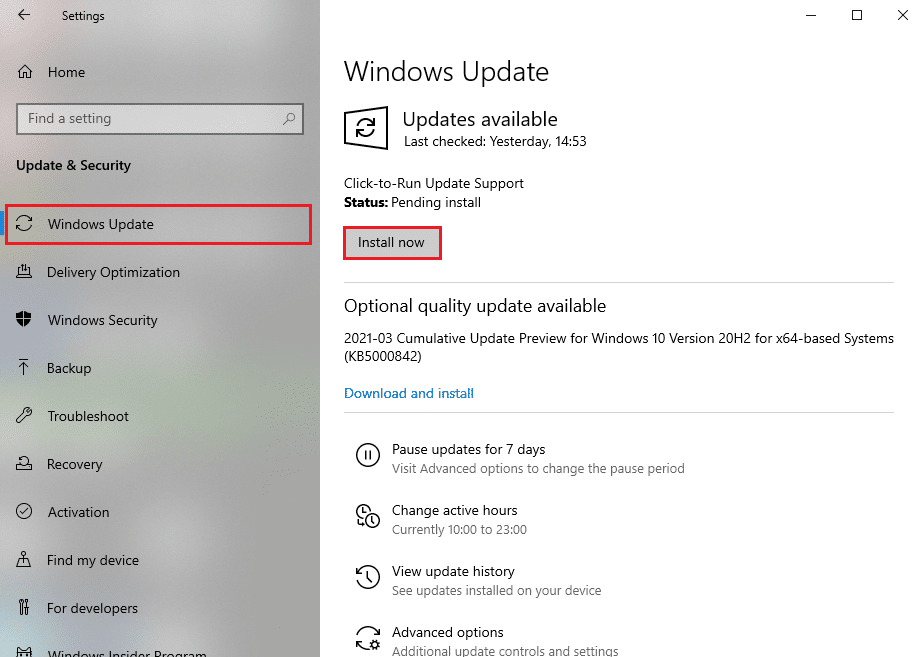
4 ບ. ຖ້າບໍ່ດັ່ງນັ້ນ, ຖ້າຫາກວ່າ Windows ແມ່ນທັນສະໄຫມ, ຫຼັງຈາກນັ້ນມັນຈະສະແດງໃຫ້ເຫັນ ທ່ານອັບເດດແລ້ວ ຂໍ້ຄວາມ.
ຍັງອ່ານ: ວິທີການແກ້ໄຂບໍ່ພົບກ້ອງຖ່າຍຮູບໃນ Google Meet
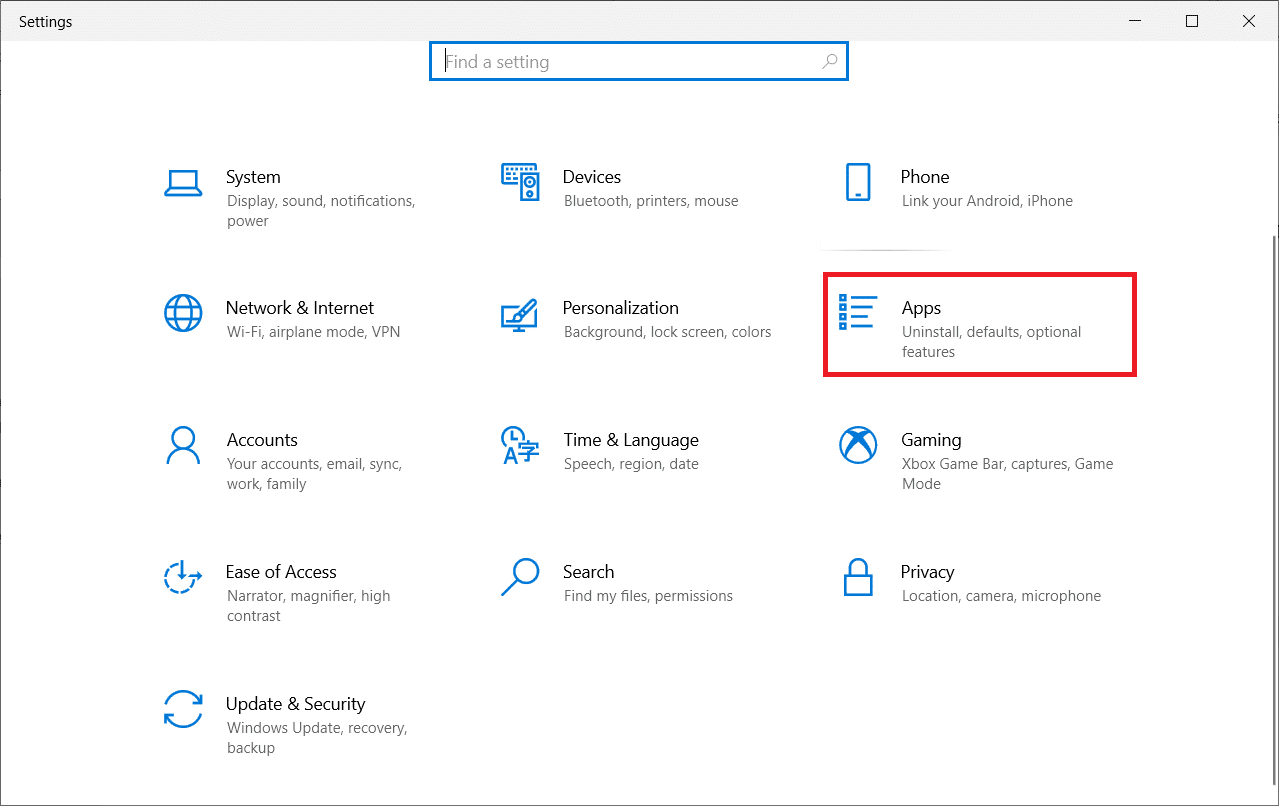
Method 13: Reinstall Snap Camera
If your Snap Camera app isn’t working after trying all the methods, you can reinstall the app on your PC. You need to uninstall the app first and then install it again to fix Snap Camera no available camera input issue.
1 ກົດປຸ່ມ ປຸ່ມ Windows + I ພ້ອມໆກັນທີ່ຈະເປີດ ການຕັ້ງຄ່າ.
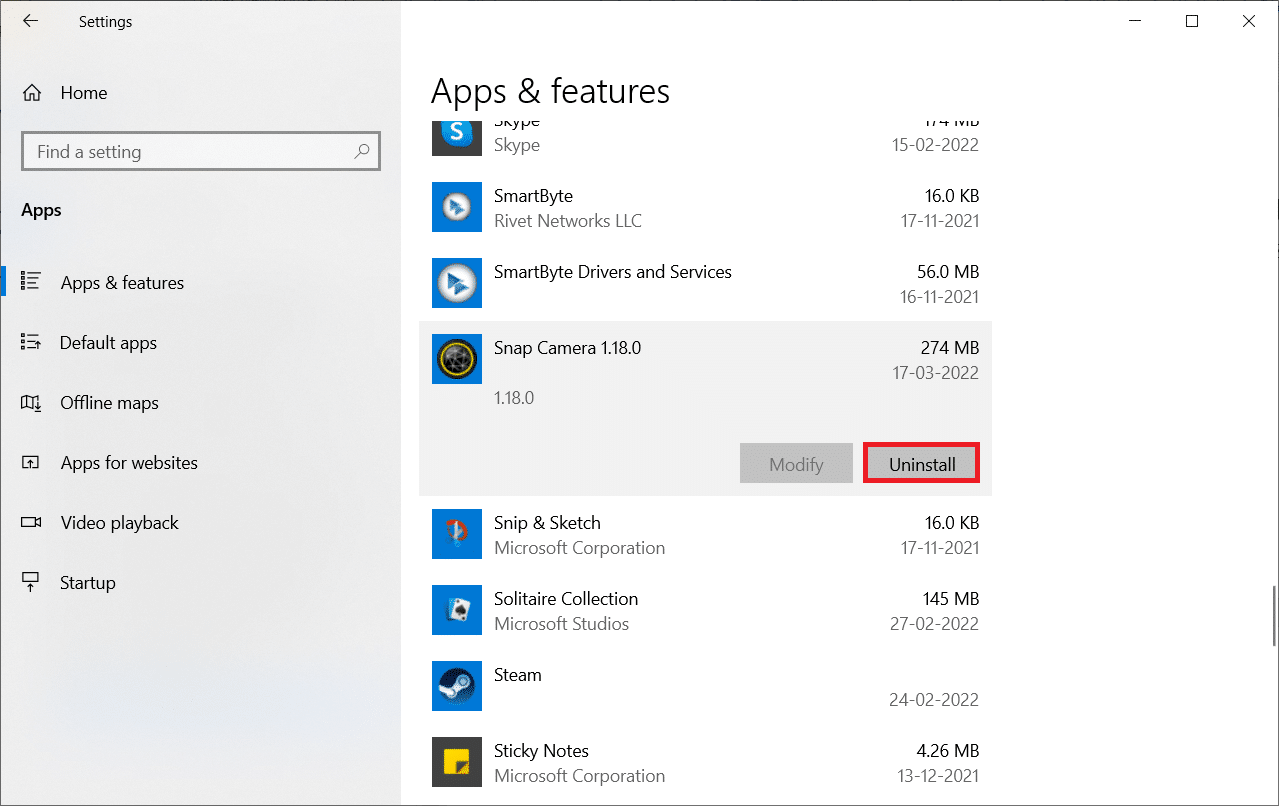
2. ຄລິກ ກິດ.
3. ເລື່ອນລົງແລະເລືອກເອົາ ກ້ອງຖ່າຍຮູບ Snap.
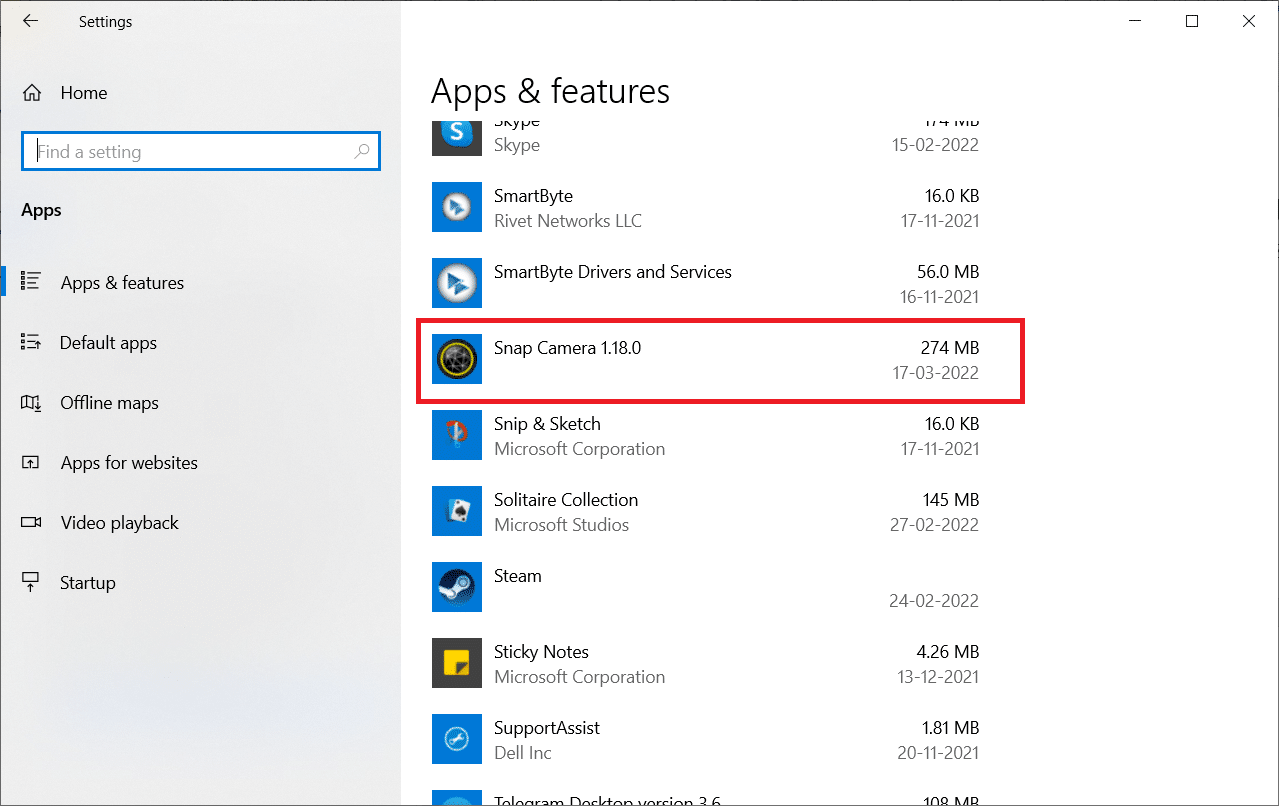
4. ຄລິກ ຖອນການຕິດຕັ້ງ.
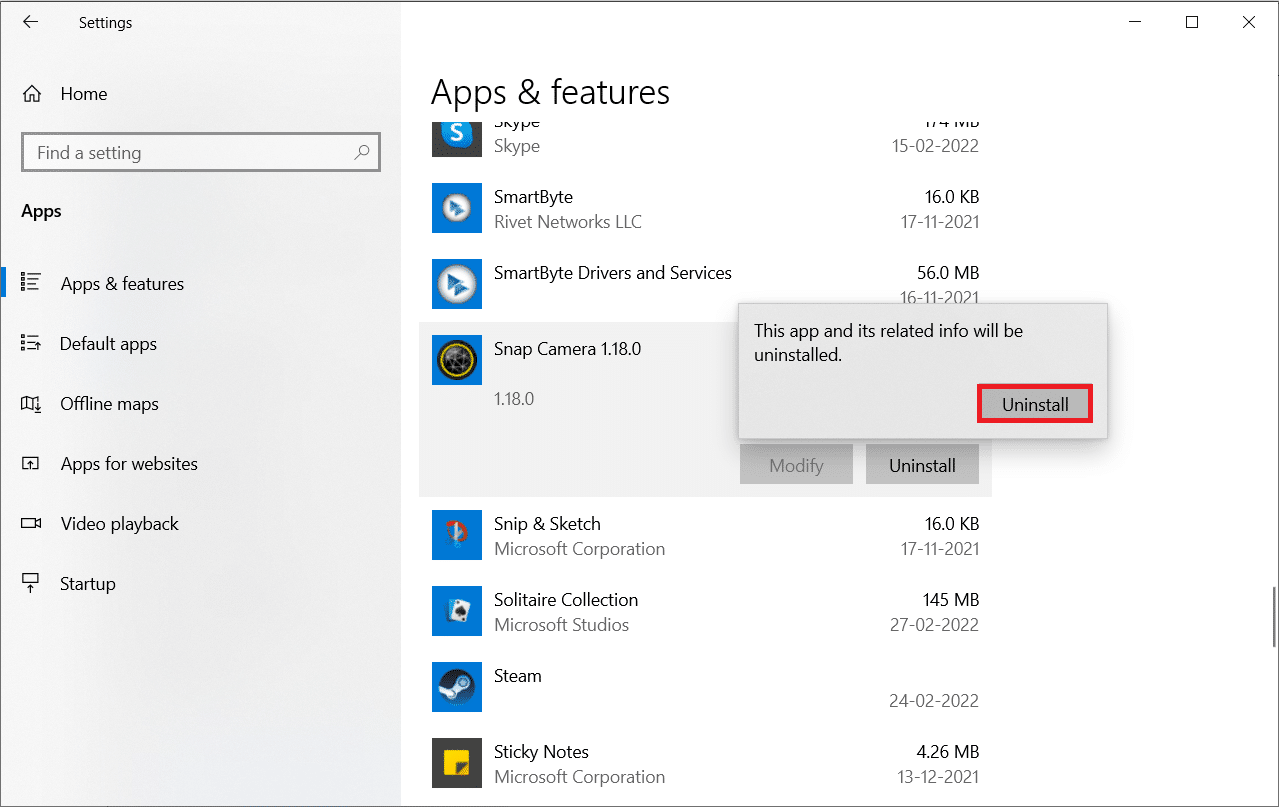
5. ຄລິກ ຖອນການຕິດຕັ້ງ ໃນບໍ່ເຖິງ.
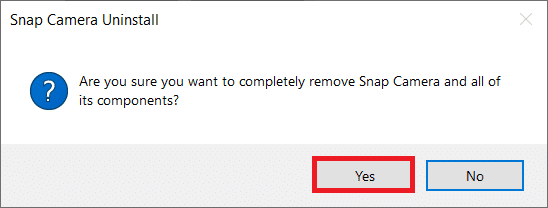
6. ຄລິກ ແມ່ນແລ້ວ ໃນການກະຕຸ້ນເຕືອນ.
ຫມາຍເຫດ: If you see a pop-up stating that Snap Camera is still running, quit the application by right-clicking on the Snap Camera icon in the system tray.
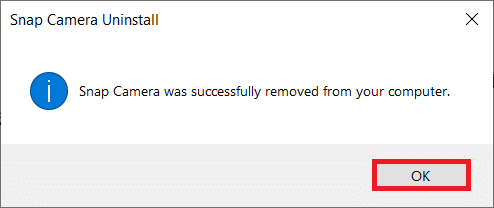
7. ອີກເທື່ອຫນຶ່ງ, ຄລິກ ແມ່ນແລ້ວ ໃນການກະຕຸ້ນເຕືອນ.
8. ສຸດທ້າຍ, ຄລິກ OK.
9 ປະເພດ % ທ້ອງຖິ່ນ ໃນ ແຖບຄົ້ນຫາ Windows ແລະຄິກ ເປີດ.
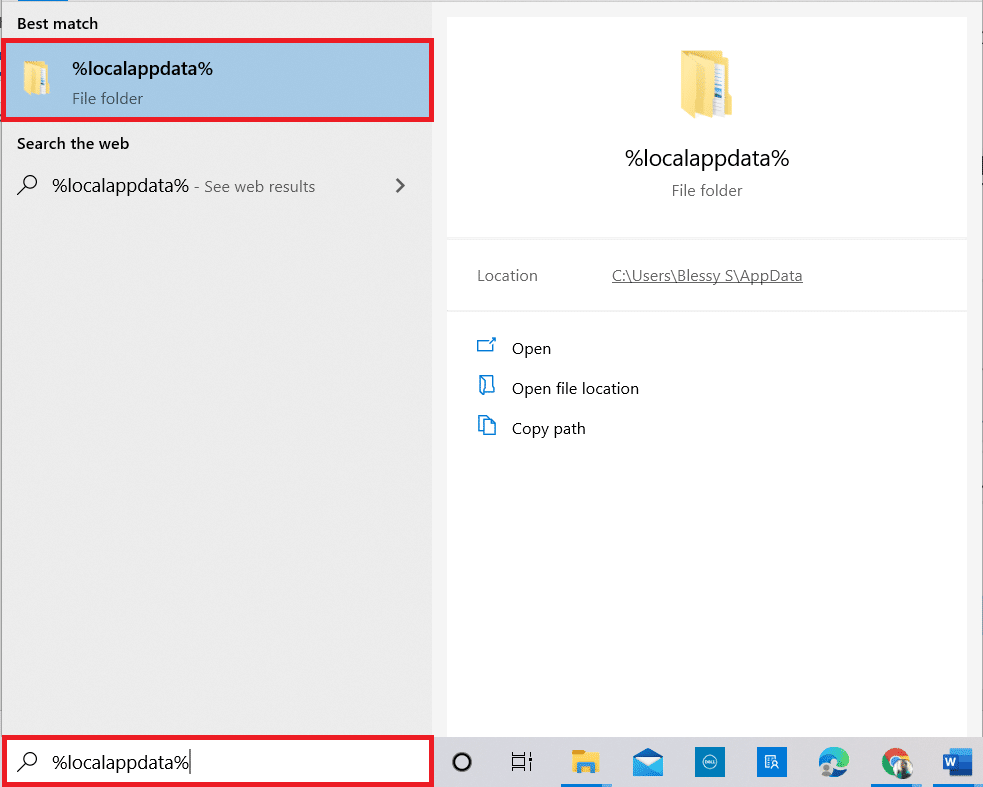
10. ກົດທີ່ Double snap ໂຟນເດີທີ່ຈະເປີດມັນ.
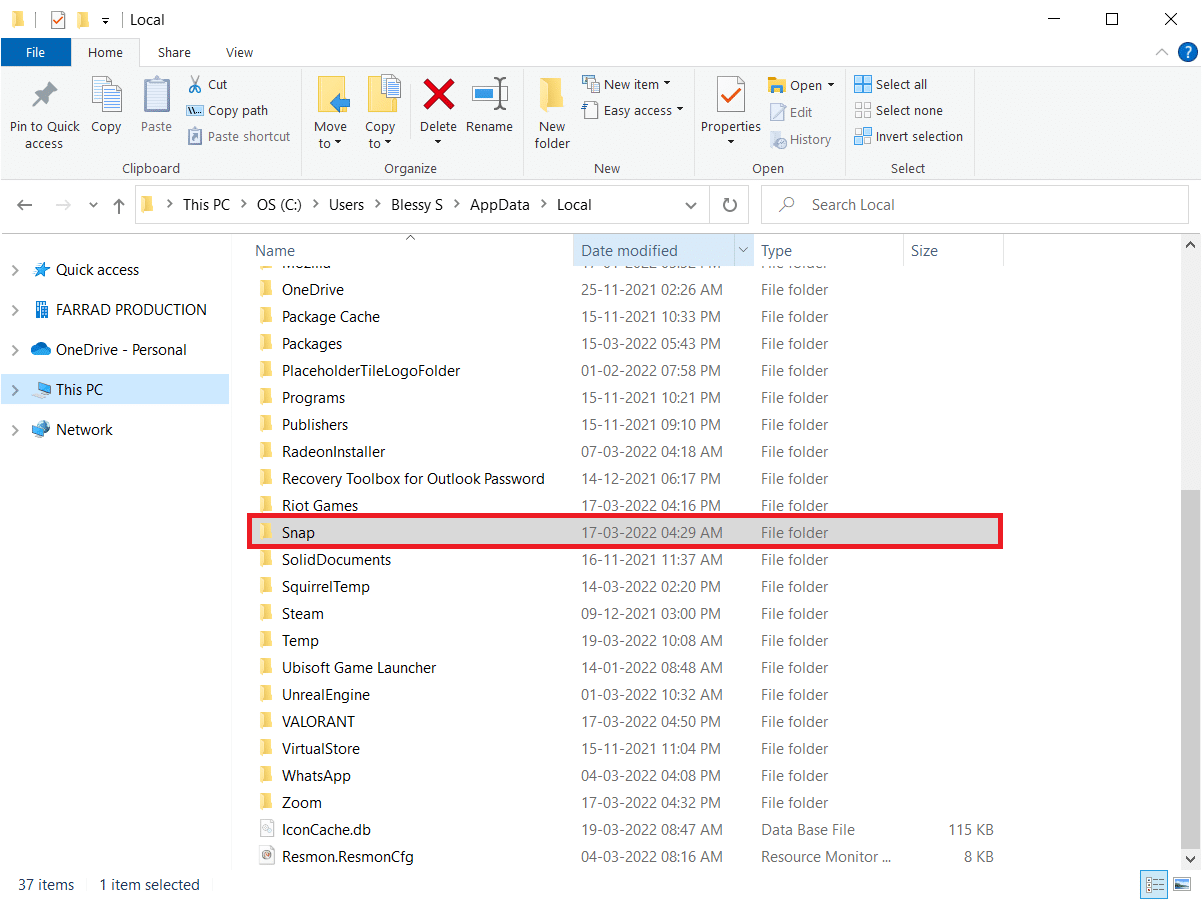
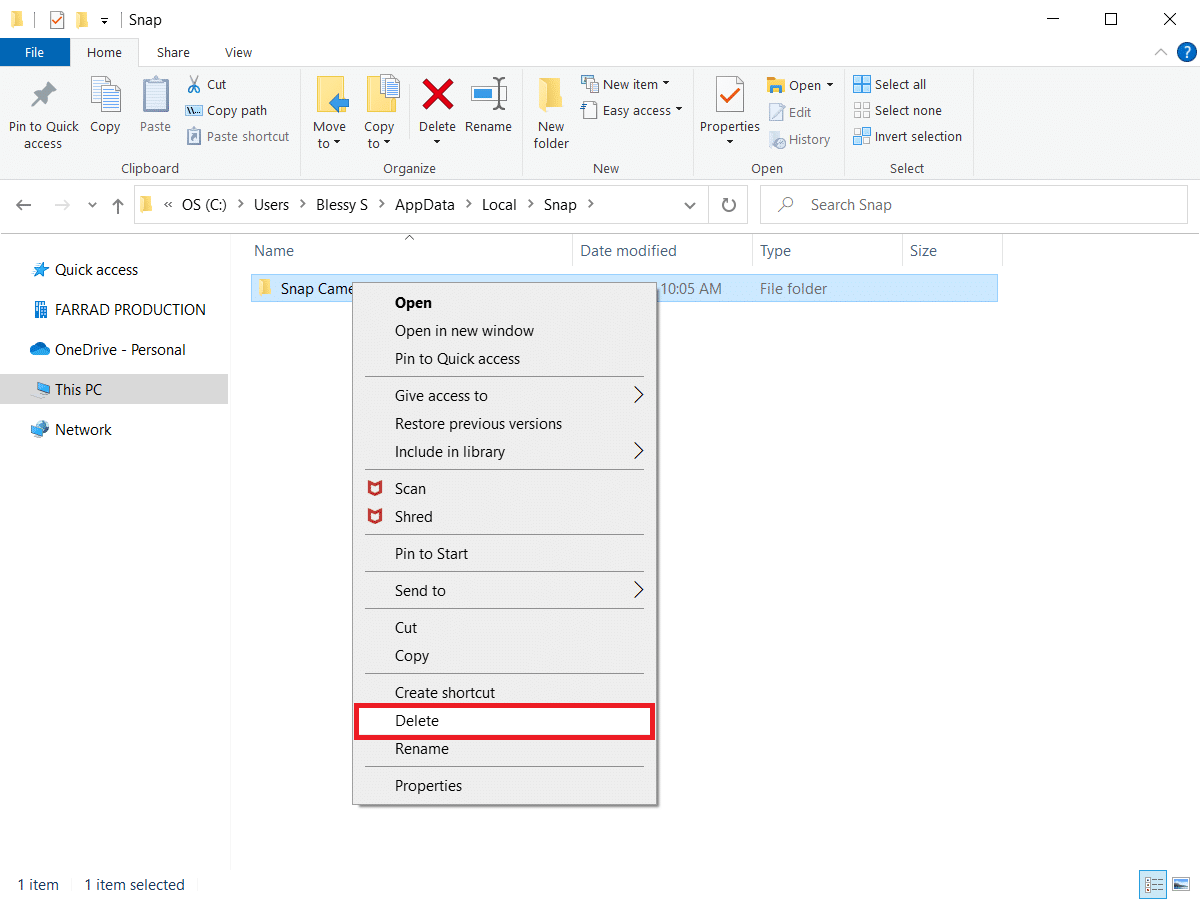
ກົດຂວາໃສ່ປຸ່ມ ກ້ອງຖ່າຍຮູບ Snap ໂຟເດີແລະເລືອກເອົາ ລົບ.
12. ອີກເທື່ອຫນຶ່ງ, ພິມ % appdata% ໃນ ແຖບຄົ້ນຫາ Windows ແລະເປີດມັນ.
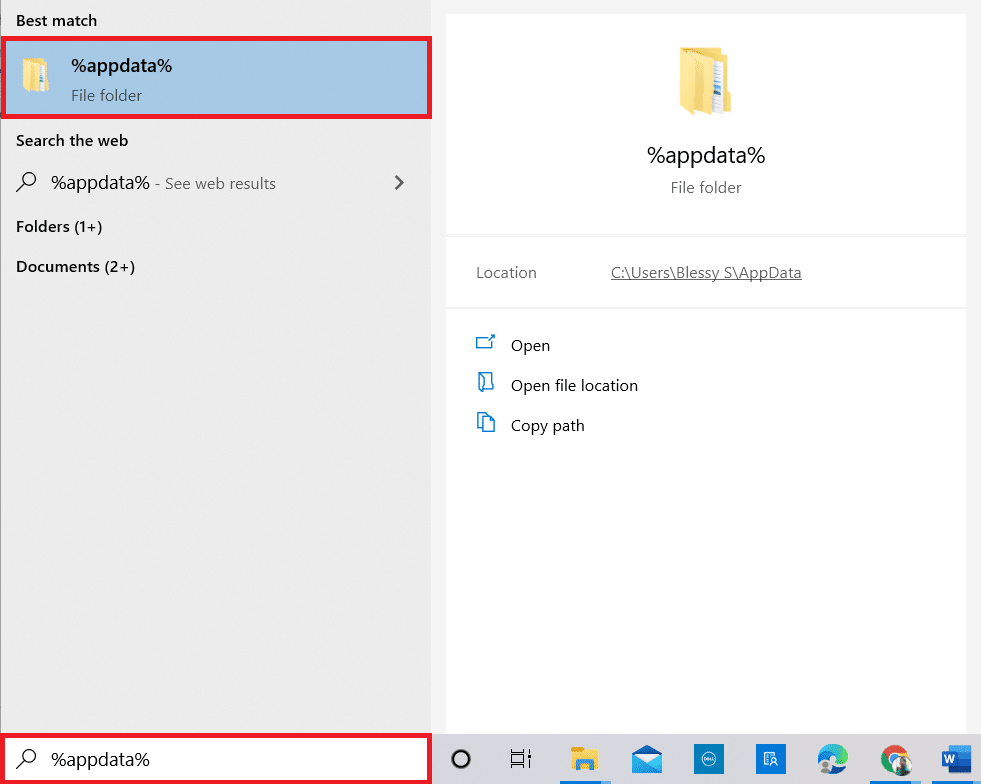
13. ລຶບ ກ້ອງຖ່າຍຮູບ Snap folder as done before.
14. ຈາກນັ້ນ, reboot PC ຂອງທ່ານ.
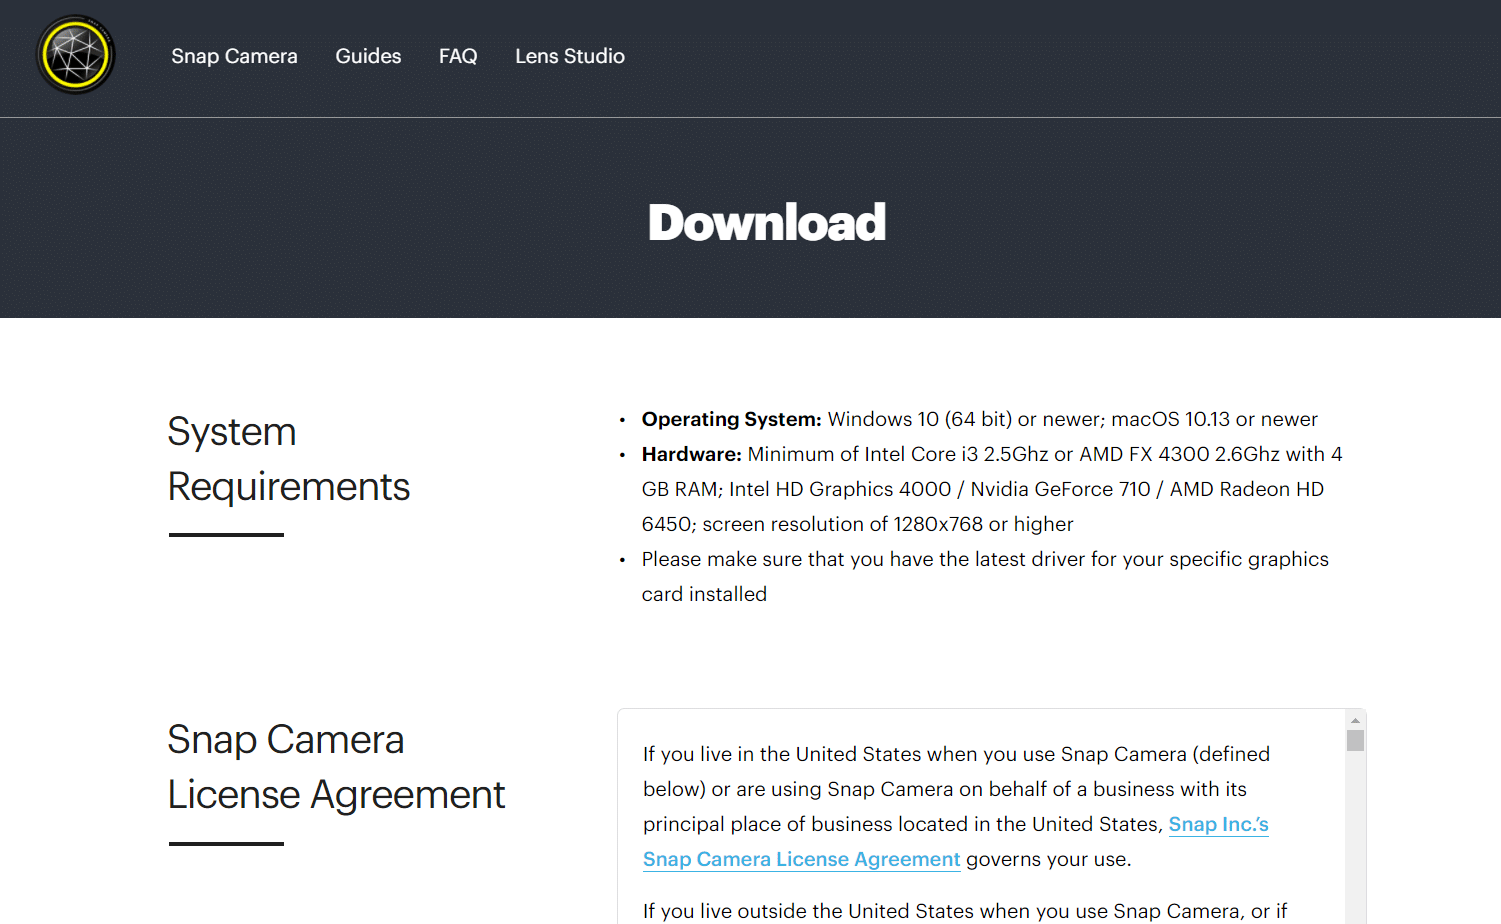
15. ດາວນ໌ໂຫລດໄດ້ ກ້ອງຖ່າຍຮູບ Snap ຈາກ ເວັບໄຊທ໌ຢ່າງເປັນທາງການ.
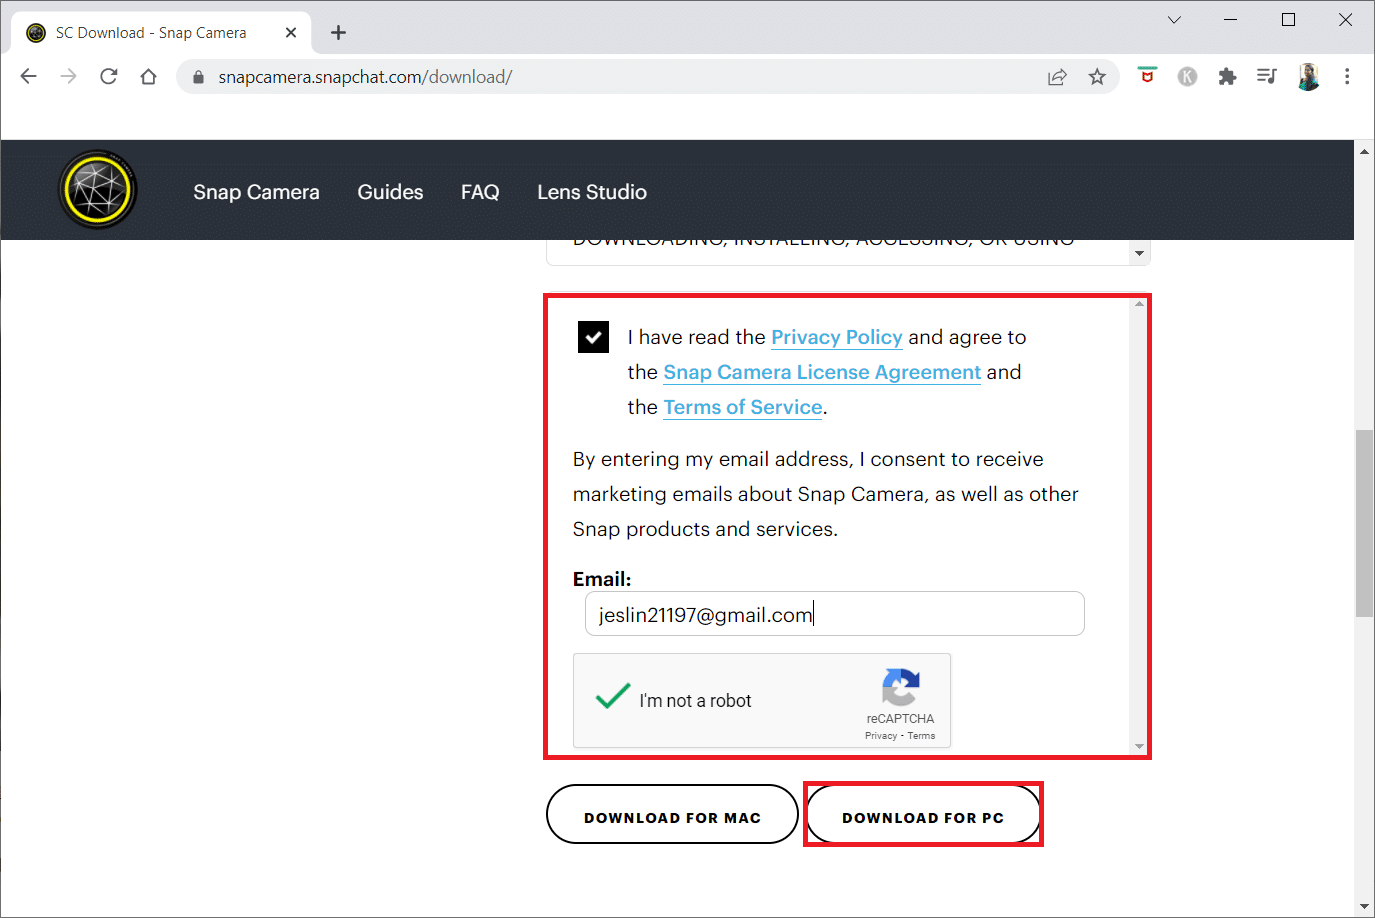
16. On the download page, check the box to accept the Terms & Conditions, ໃສ່ຂອງທ່ານ ທີ່ຢູ່ອີເມວ and verify the ຕອບກັບ.
17. ຫຼັງຈາກນັ້ນ, ໃຫ້ຄລິກໃສ່ ດາວໂຫລດສໍາລັບ PC.
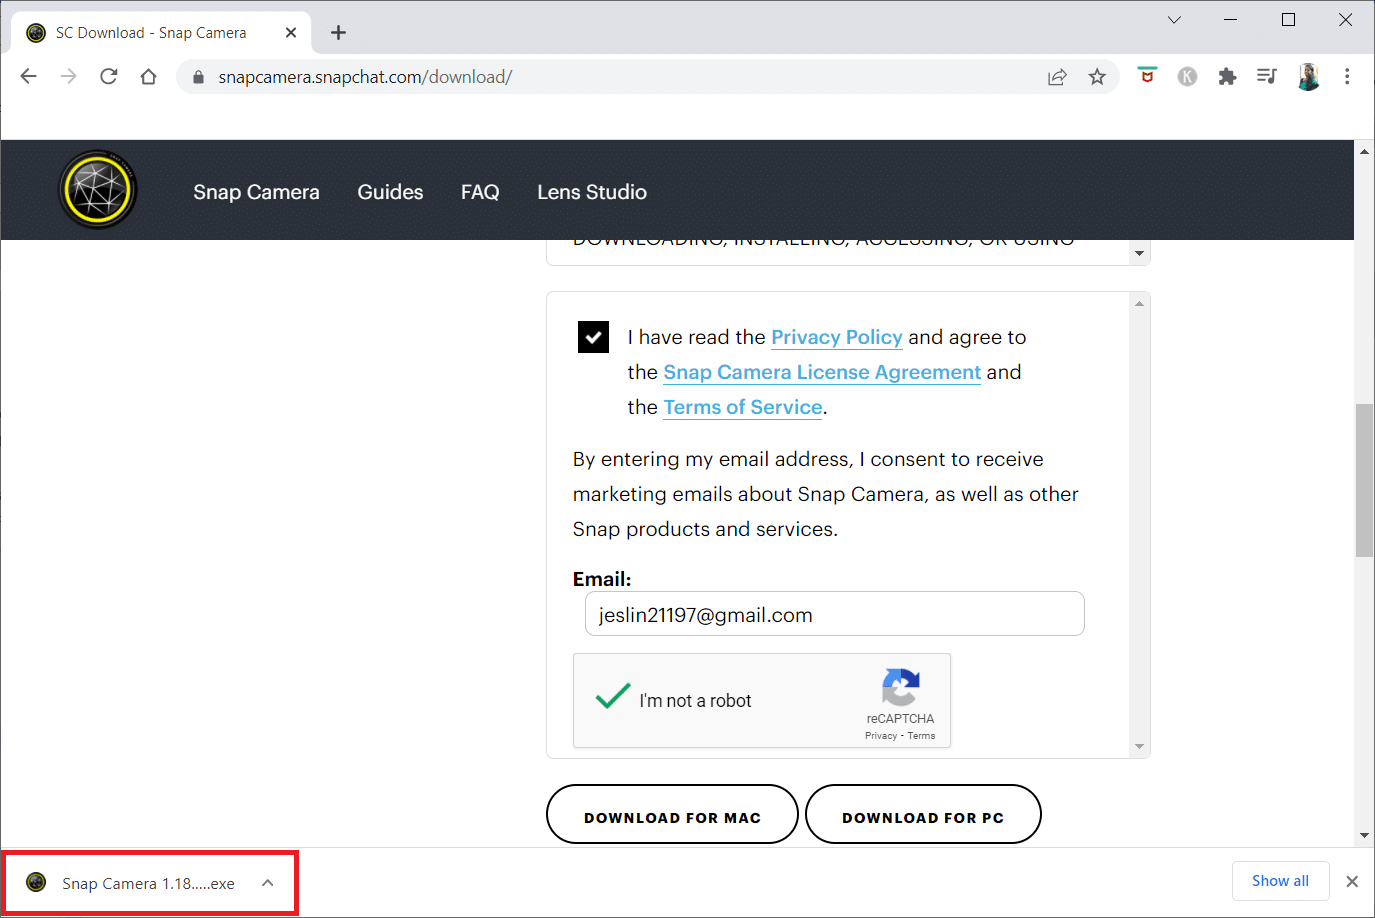
18 ໃຫ້ຄລິກໃສ່ ດາວໂຫຼດໄຟລ໌ຕິດຕັ້ງແລ້ວ ການຕິດຕັ້ງຄໍາຮ້ອງສະຫມັກ.
19. ປະຕິບັດຕາມຄໍາແນະນໍາໃນຫນ້າຈໍເພື່ອສໍາເລັດການຕິດຕັ້ງ.
ແນະນໍາໃຫ້:
We hope that this article was helpful, and you must have learned about the methods to solve Snap Camera no available camera input problem. Please drop your suggestions and queries regarding the topic in the comments section. Also, let us know what you want to learn next.