ແກ້ໄຂເມນູເລີ່ມຕົ້ນທີ່ບໍ່ເຮັດວຽກຢູ່ໃນ Windows 10

If you have recently updated or upgraded to Windows 10, then chances are your Start Menu may not work properly, making it impossible for users to navigate around Windows 10. Users are experiencing various issues with Start Menu such as Start Menu does not open, Start Button is not working, or Start Menu freezes etc. If your Start Menu isn’t working then don’t worry as today we will see a way to fix this issue.
This exact cause is different for different users because each user has a different system configuration and environment. But the problem can be related to anything like corrupted user account or drivers, damaged system files, etc. So without wasting any time, let’s see How to Fix Start Menu Not Working in Windows 10 with the help of the below-listed tutorial.
ໃຫ້ແນ່ໃຈວ່າສ້າງຈຸດຟື້ນຟູພຽງແຕ່ໃນກໍລະນີທີ່ມີບາງຢ່າງຜິດພາດ.
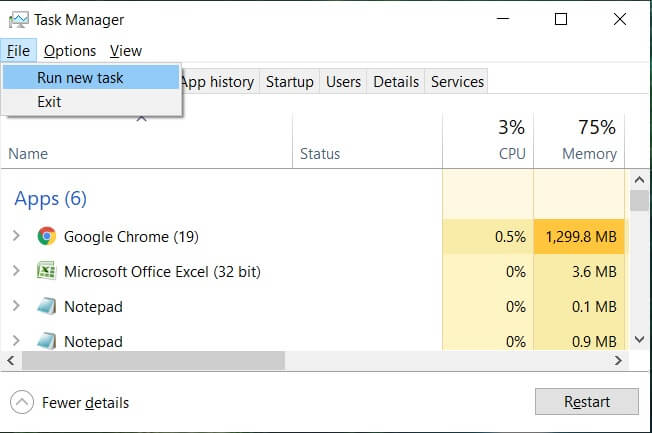
To run Command Prompt as an administrator, press Ctrl + Shift + Esc to open Task Manager. Then click on ເອກະສານ ຫຼັງຈາກນັ້ນເລືອກເອົາ ດຳ ເນີນວຽກງານ ໃໝ່ທີ່ຢູ່ ປະເພດ cmd.exe ແລະເຄື່ອງໝາຍຖືກ "ສ້າງວຽກງານນີ້ດ້ວຍສິດທິພິເສດດ້ານການບໍລິຫານ” then click OK. Similarly, to open PowerShell, type powershell.exe and again checkmark the above field then hit Enter.

ວິທີທີ່ 1: Restart Windows Explorer
1 ກົດປຸ່ມ Ctrl + Shift + Esc ຄີຮ່ວມກັນເພື່ອເປີດຕົວ ຜູ້ຈັດການວຽກງານ.
2. ຊອກຫາ explorer.exe ໃນບັນຊີລາຍຊື່ຫຼັງຈາກນັ້ນຄລິກຂວາໃສ່ມັນແລະ ເລືອກ End Task.

3. ໃນປັດຈຸບັນ, ນີ້ຈະປິດ Explorer ແລະເພື່ອດໍາເນີນການມັນຄືນ, ກົດ File > ແລ່ນໜ້າວຽກໃໝ່.
4 ປະເພດ explorer.exe ແລະກົດ OK ເພື່ອເລີ່ມຕົ້ນ Explorer.

5. Exit Task Manager and see if you’re able to Fix Start Menu Not Working in Windows 10.
6. If you’re still facing the issue, then log out from your account and re-login.
7 ກົດປຸ່ມ Ctrl+Shift+Del key at the same time and click on Signout.
8. Type in your password to login to Windows and see if you’re able to fix the issue.
Method 2: Create a new local administrator account
ຖ້າຫາກວ່າທ່ານໄດ້ລົງນາມກັບບັນຊີ Microsoft ຂອງທ່ານ, ຫຼັງຈາກນັ້ນທໍາອິດເອົາການເຊື່ອມຕໍ່ກັບບັນຊີນັ້ນໂດຍ:
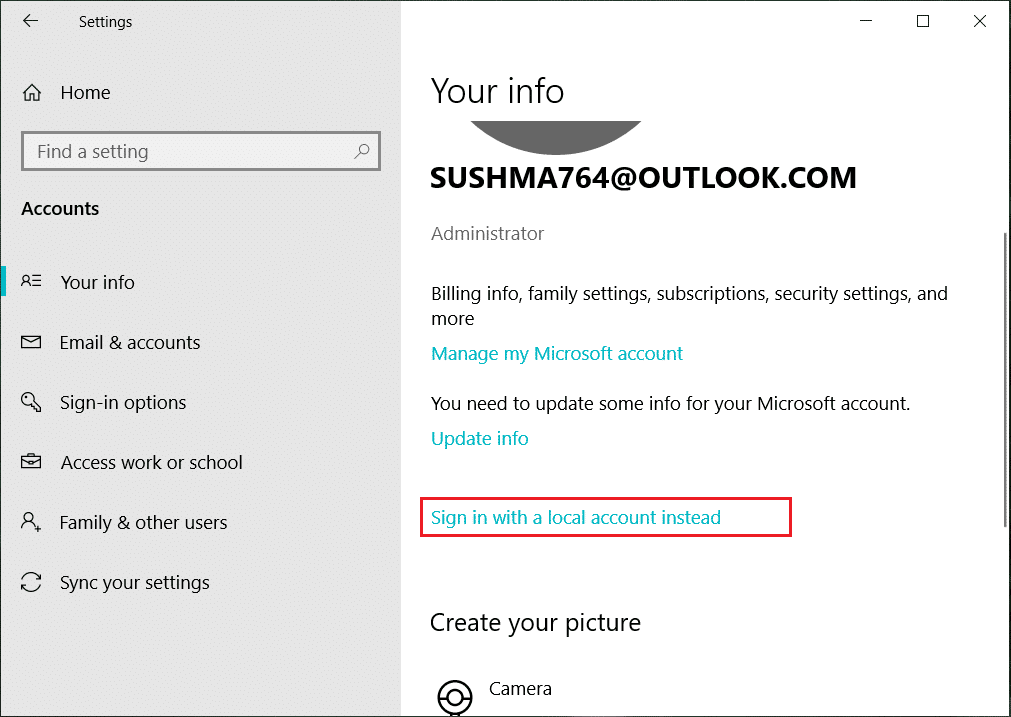
1. ກົດ Windows Key + R ຈາກນັ້ນພິມ “ການຕັ້ງຄ່າ ms:” (ບໍ່ມີວົງຢືມ) ແລະກົດ Enter.
2 ເລືອກເອົາ ບັນຊີ > ເຂົ້າສູ່ລະບົບດ້ວຍບັນຊີທ້ອງຖິ່ນແທນ.
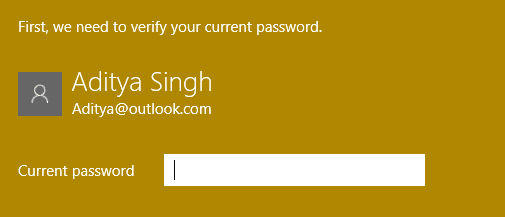
3. ພິມໃນຂອງທ່ານ ລະຫັດບັນຊີ Microsoft ແລະຄິກ ຕໍ່ໄປ.
4. ເລືອກກ ຊື່ບັນຊີໃໝ່ ແລະລະຫັດຜ່ານແລະຫຼັງຈາກນັ້ນເລືອກ Finish ແລະອອກຈາກລະບົບ.
#1. Create the new administrator account:
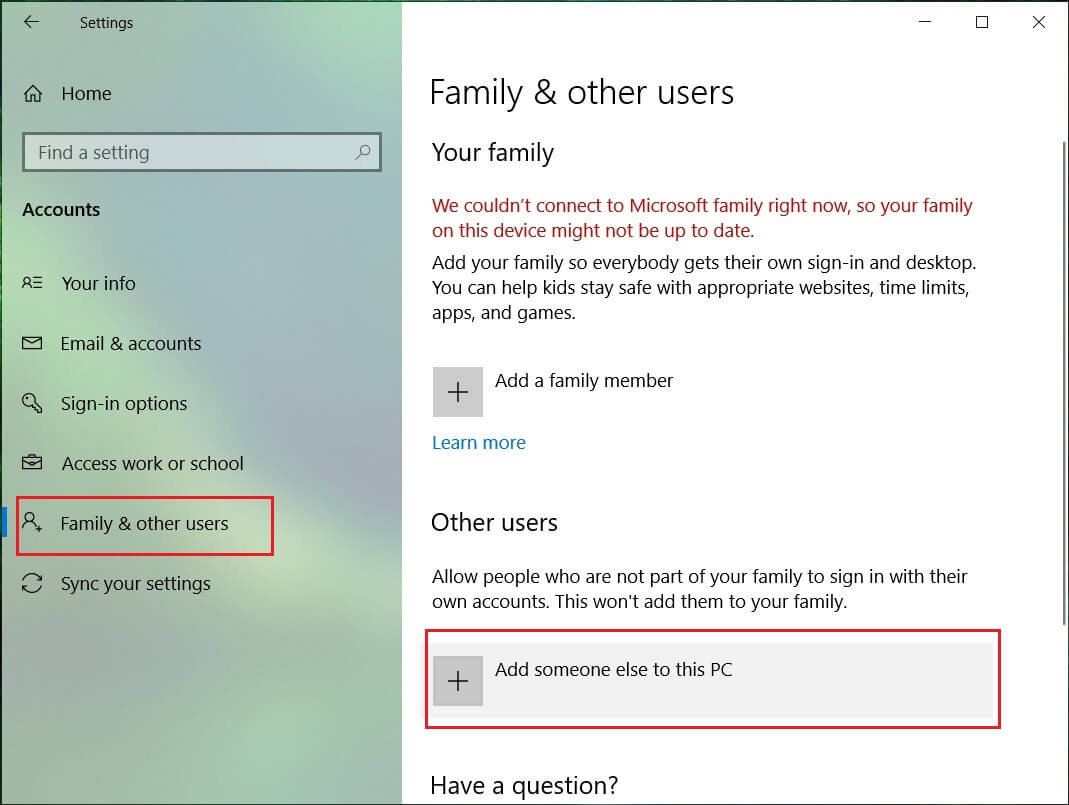
1. ກົດ Windows Key + I ເພື່ອເປີດ Settings ແລະຈາກນັ້ນຄລິກ ບັນຊີ.
2. ຫຼັງຈາກນັ້ນນໍາທາງໄປຫາ ຄອບຄົວ ແລະຄົນອື່ນໆ.
3. ພາຍໃຕ້ຄົນອື່ນຄລິກໃສ່ “ເພີ່ມຄົນອື່ນໃສ່ PC ນີ້."
4. ຕໍ່ໄປ, ໃຫ້ຊື່ສໍາລັບການ user and a password then select Next.
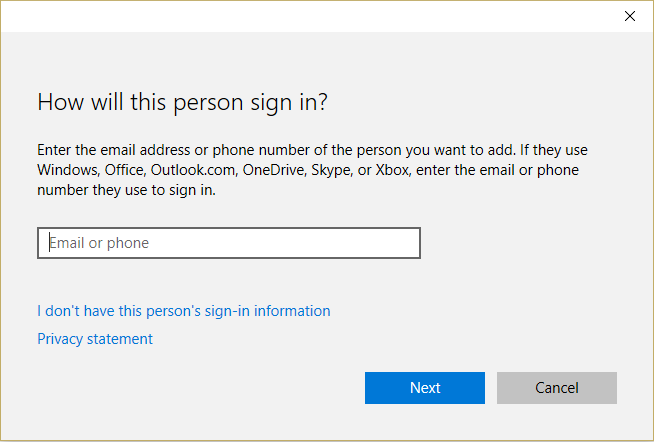
5 Set a ຊື່ຜູ້ໃຊ້ແລະລະຫັດຜ່ານ, ຫຼັງຈາກນັ້ນເລືອກເອົາ ຕໍ່ໄປ> ຈົບແລ້ວ.
#2. Next, make the new account an administrator account:
1. ເປີດອີກຄັ້ງ Windows Settings ແລະຄລິກໃສ່ ບັນຊີ.

2 ໄປຫາ ແຖບຄອບຄົວ ແລະຄົນອື່ນໆ.
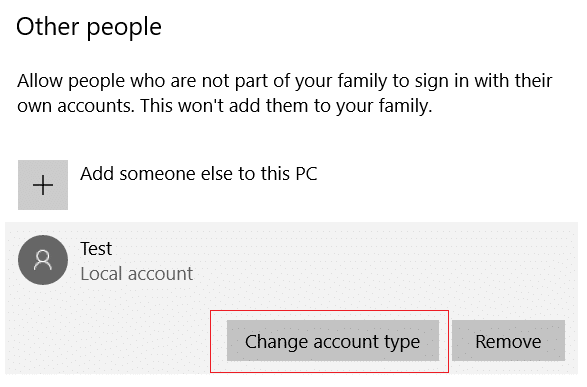
3. ຄົນອື່ນເລືອກບັນຊີທີ່ເຈົ້າຫາກໍ່ສ້າງແລ້ວເລືອກ a ປ່ຽນປະເພດບັນຊີ.
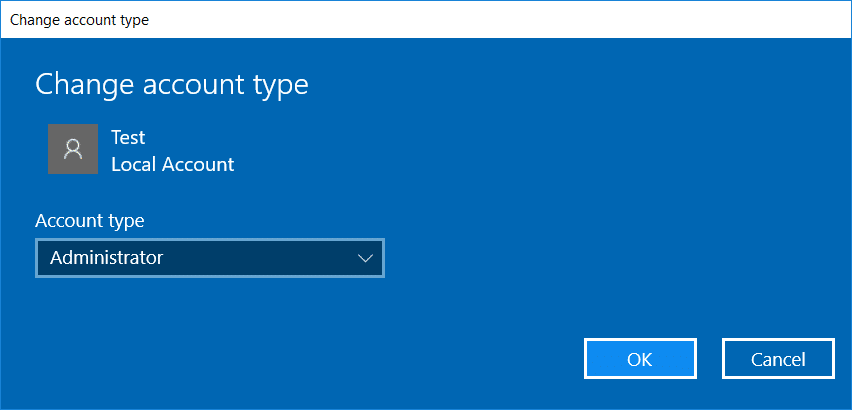
4. ພາຍໃຕ້ປະເພດບັນຊີ, ເລືອກ ຜູ້ບໍລິຫານ ຫຼັງຈາກນັ້ນໃຫ້ຄລິກໃສ່ ຕົກລົງ.
#3. If the issue persists try deleting the old administrator account:
1. ອີກເທື່ອຫນຶ່ງໄປທີ່ການຕັ້ງຄ່າ Windows ຫຼັງຈາກນັ້ນ ບັນຊີ > ຄອບຄົວ ແລະຄົນອື່ນໆ.
2. ພາຍໃຕ້ຜູ້ໃຊ້ອື່ນໆ, ເລືອກບັນຊີຜູ້ເບິ່ງແຍງລະບົບເກົ່າ, ຄລິກ ເອົາອອກ, ແລະເລືອກເອົາ ລຶບບັນຊີ ແລະຂໍ້ມູນ.

3. If you were using a Microsoft account to sign in before, you can associate it with the new administrator by following the next step.
4 ໃນ ການຕັ້ງຄ່າ Windows > ບັນຊີ, ເລືອກເຂົ້າສູ່ລະບົບດ້ວຍບັນຊີ Microsoft ແທນ ແລະໃສ່ຂໍ້ມູນບັນຊີຂອງທ່ານ.
ສຸດທ້າຍ, ທ່ານຄວນຈະສາມາດ ແກ້ໄຂເມນູເລີ່ມຕົ້ນທີ່ບໍ່ເຮັດວຽກຢູ່ໃນ Windows 10 as this step seems to fix the issue in most cases.
If you continue to experience Start Menu’s issue, it’s recommended to download and run ເລີ່ມຕົ້ນການແກ້ໄຂບັນຫາເມນູ.
1. ດາວນ໌ໂຫລດແລະດໍາເນີນການ ເລີ່ມຕົ້ນການແກ້ໄຂບັນຫາເມນູ.
2. Double ໃຫ້ຄລິກໃສ່ ດາວໂຫຼດໄຟລ໌ ແລະຫຼັງຈາກນັ້ນໃຫ້ຄລິກໃສ່ ຕໍ່ໄປ.
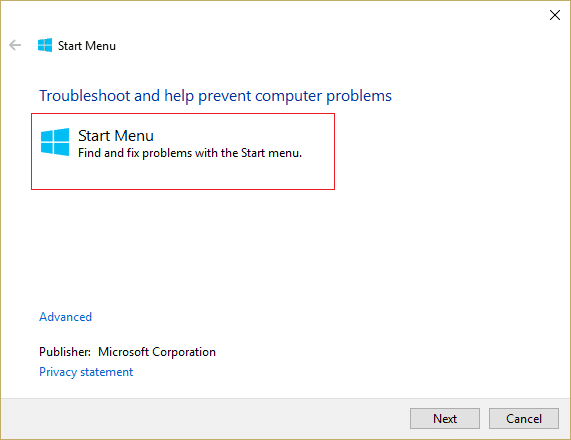
3. ໃຫ້ມັນຊອກຫາແລະອັດຕະໂນມັດ Fixes Start Menu Not Working in Windows 10.
Method 4: Run System File Checker (SFC) and Check Disk
1. ເປີດ Command Prompt. ຜູ້ໃຊ້ສາມາດປະຕິບັດຂັ້ນຕອນນີ້ໂດຍການຊອກຫາ 'cmd' ແລະຫຼັງຈາກນັ້ນກົດກະລຸນາໃສ່.

2. ຕອນນີ້ພິມສິ່ງຕໍ່ໄປນີ້ໃສ່ cmd ແລະກົດ enter:
Sfc /scannow sfc /scannow /offbootdir=c: /offwindir=c:windows

3. ລໍຖ້າສໍາລັບຂະບວນການຂ້າງເທິງນີ້ເພື່ອສໍາເລັດຮູບແລະເມື່ອເຮັດໄດ້, restart PC ຂອງທ່ານ.
4. ຕໍ່ໄປ, ດໍາເນີນການ CHKDSK ຈາກ ແກ້ໄຂຂໍ້ຜິດພາດຂອງລະບົບໄຟລ໌ດ້ວຍ Check Disk Utility(CHKDSK).
5. ໃຫ້ຂະບວນການຂ້າງເທິງນີ້ສໍາເລັດແລະອີກເທື່ອຫນຶ່ງ reboot PC ຂອງທ່ານເພື່ອບັນທຶກການປ່ຽນແປງ.
Method 5: Force Cortana to Rebuild Settings
Open Command Prompt with administrative rights then type the following one by one and hit Enter after each command:
CD /d "%LOCALAPPDATA%PackagesMicrosoft.Windows.Cortana_cw5n1h2txyewy"
Taskkill /F /IM SearchUI.exe
RD /S /Q Settings
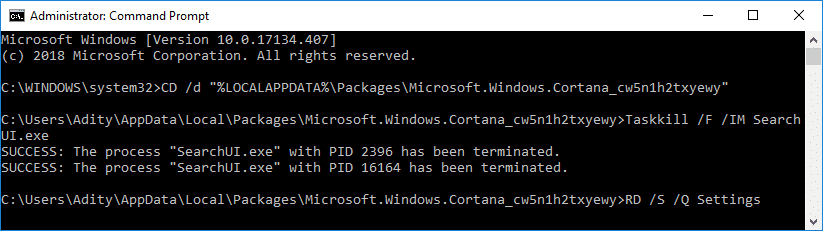
This will force Cortana to rebuild the settings and will Fix Start Menu and Cortana Not Working in Windows 10.
If the issue is still not resolved, follow this guide to fix any issues related to Cortana.
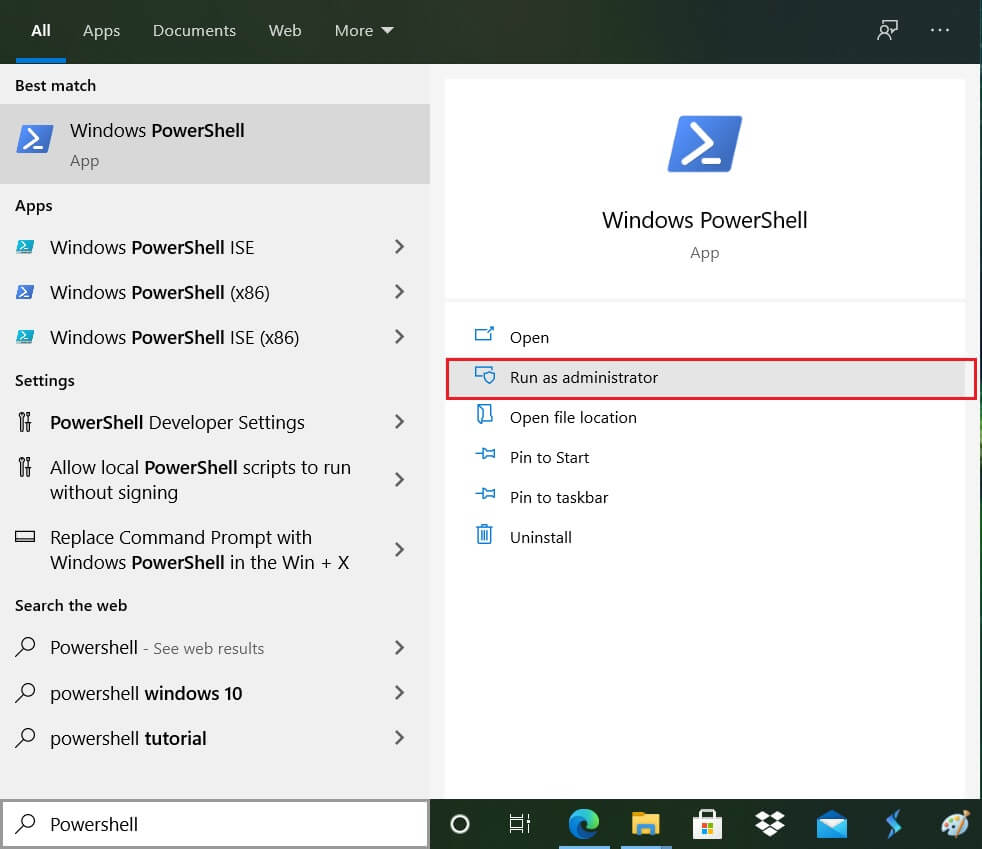
Method 6: Re-Register Windows App
1 ປະເພດ PowerShell ໃນ Windows Search ຈາກນັ້ນຄລິກຂວາໃສ່ PowerShell ແລະເລືອກ Run as Administrator
2. ຕອນນີ້ພິມຄຳສັ່ງຕໍ່ໄປນີ້ໃສ່ໜ້າຈໍ PowerShell:
Get-AppXPackage -AllUsers | ອະທິບາຍ {Add-AppxPackage -DisableDevelopmentMode -Register "$ ($ _. InstallLocation) AppXManifest.xml"}

3. ລໍຖ້າໃຫ້ Powershell ປະຕິບັດຄໍາສັ່ງຂ້າງເທິງນີ້ ແລະບໍ່ສົນໃຈກັບຄວາມຜິດພາດຈໍານວນຫນ້ອຍທີ່ອາດຈະມາພ້ອມ.
4. Reboot PC ຂອງທ່ານເພື່ອບັນທຶກການປ່ຽນແປງ.
ວິທີທີ່ 7: Registry Fix
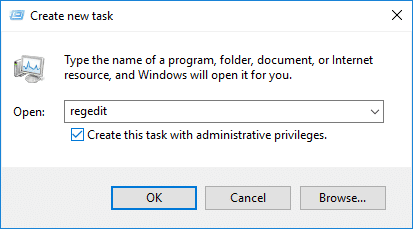
1. Press Ctrl + Shift + Esc to open Task Manager then click on ເອກະສານ ແລະເລືອກເອົາ Run new task.
2 ປະເພດ regedit ແລະເຄື່ອງໝາຍຖືກ "ສ້າງວຽກງານນີ້ດ້ວຍສິດທິພິເສດດ້ານການບໍລິຫານ” then click OK.
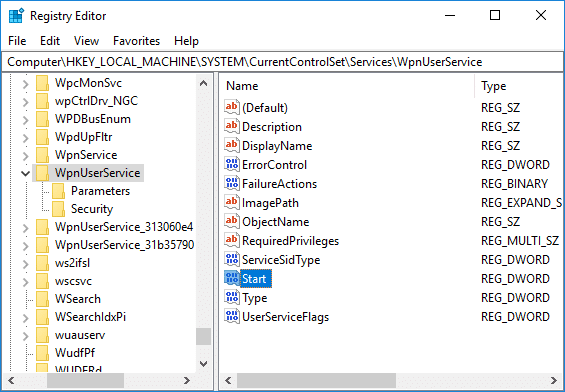
3. Now navigate to the following registry key in the Registry Editor:
ComputerHKEY_LOCAL_MACHINESYSTEMCurrentControlSetServicesWpnUserService
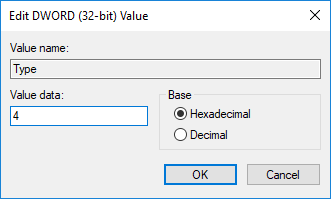
4. ໃຫ້ແນ່ໃຈວ່າເລືອກ WpnUserService then in the right window double-click on the ເລີ່ມ DWORD.
5. Change its value to 4 then click ຕົກລົງ.
6. Reboot PC ຂອງທ່ານເພື່ອບັນທຶກການປ່ຽນແປງ.
ວິທີ 8: ໂຫຼດຂໍ້ມູນຄືນໃໝ່ ຫຼື ຣີເຊັດ Windows 10
ຫມາຍເຫດ: If you can’t access your PC, restart your PC a few times until you start ການສ້ອມແປງອັດຕະໂນມັດ. ຫຼັງຈາກນັ້ນນໍາທາງໄປຫາ ແກ້ໄຂບັນຫາ> ປັບ PC ນີ້> ເອົາທັງຫມົດ.
1. ກົດ Windows Key + I ເພື່ອເປີດ Settings ຫຼັງຈາກນັ້ນໃຫ້ຄລິກໃສ່ ໄອຄອນອັບເດດ ແລະຄວາມປອດໄພ.
![]()
2. ຈາກເມນູຊ້າຍມືເລືອກ ການຟື້ນຕົວ.
3 ພາຍໃຕ້ Reset PC ນີ້, ໃຫ້ຄລິກໃສ່ "ໄດ້ຮັບການເລີ່ມຕົ້ນປຸ່ມ”.

4. ເລືອກທາງເລືອກທີ່ຈະ ຮັກສາໄຟລ໌ຂອງຂ້ອຍ.

5. For the next step, you might be asked to insert Windows 10 installation media, so ensure you have it ready.
6. Now, select your Windows version and click ຢູ່ເທິງໄດທີ່ຕິດຕັ້ງ Windows ເທົ່ານັ້ນ > remove my files.

5 ໃຫ້ຄລິກໃສ່ ປຸ່ມຣີເຊັດ.
6. ປະຕິບັດຕາມຄໍາແນະນໍາໃນຫນ້າຈໍເພື່ອເຮັດສໍາເລັດການປັບ.
ແນະນໍາໃຫ້:
ນັ້ນແມ່ນທ່ານໄດ້ສໍາເລັດຜົນ ແກ້ໄຂເມນູເລີ່ມຕົ້ນທີ່ບໍ່ເຮັດວຽກຢູ່ໃນ Windows 10 ແຕ່ຖ້າທ່ານຍັງມີຄໍາຖາມໃດໆກ່ຽວກັບການສອນນີ້, ກະລຸນາຖາມພວກເຂົາຢູ່ໃນສ່ວນຄໍາເຫັນ.