Bypass ADB Device
Android Debug Bridge (ADB) is a handy tool that lets a user control their android device from a computer or laptop. It provides features such as installing apps through the computer and also lets us debug apps. By default, ADB functionality is disabled on Android phones.
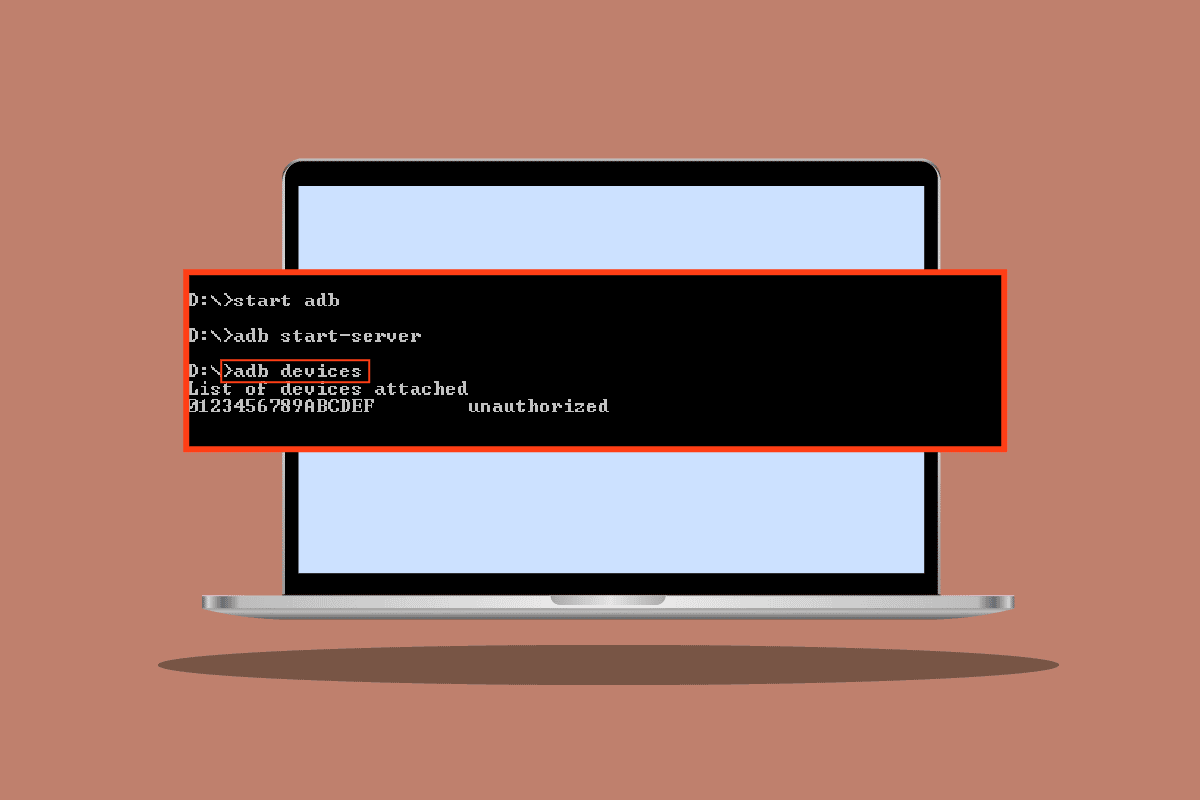
They need to be turned on manually from the Android phone by the User. Android Users report errors in ADB and face issues like ADB device unauthorized messages. If you are searching the internet for an article to explain how to solve this particular problem and/or if you are wondering if is there a way for ADB device unauthorized bypass, then keep reading, Here I will show you the methods and fixes to bypass ADB unauthorized errors and ADBlink device unauthorized. Let’s get started!
Let us see some of the causes of this issue before we move on to the methods to fix the issue
- Faulty USB connection
- RSA fingerprint prompt not appearing
- Incorrect ADB Connection
- USB drivers issue
- ADB drivers issue
ຫມາຍເຫດ: Since smartphones do not have the same settings and may vary from device to device hence, ensure the correct settings before changing any. The following methods were tried on Moto g(8) Power lite Android 10 (ຫຸ້ນ)
See also:
ວິທີການປິດການໃຊ້ງານ Samsung Pass
12 ວິທີແກ້ໄຂໃນປັດຈຸບັນບໍ່ສາມາດດາວໂຫຼດກ່ຽວກັບອຸປະກອນ Android
8 ວິທີການແກ້ໄຂຂໍ້ຄວາມ Android ຕິດຜິດພາດການດາວໂຫຼດ
ວິທີການຕິດຕັ້ງສະຫນັບສະຫນູນອຸປະກອນ Apple ໂທລະສັບມືຖືໃນ Windows 10
ວິທີການຕິດຕັ້ງ APK ໂດຍໃຊ້ຄໍາສັ່ງ ADB
Method 1: Change USB Connection
Android Users reported they could not receive proper prompts when performing ADB activities, if the USB is interrupted in middle then there is a chance for an ADB device unauthorized message to occur, this could be due to a possible fault in the USB connection (in USB hub or USB cable). Try changing the USB cable and the USB hub to see if that solves your issue.
Method 2: Update USB drivers
When you have connected your mobile with the PC, chances are that it wasn’t recognized by the PC due to faulty USB drivers. Thus, updating USB drivers might be helpful in this scenario.
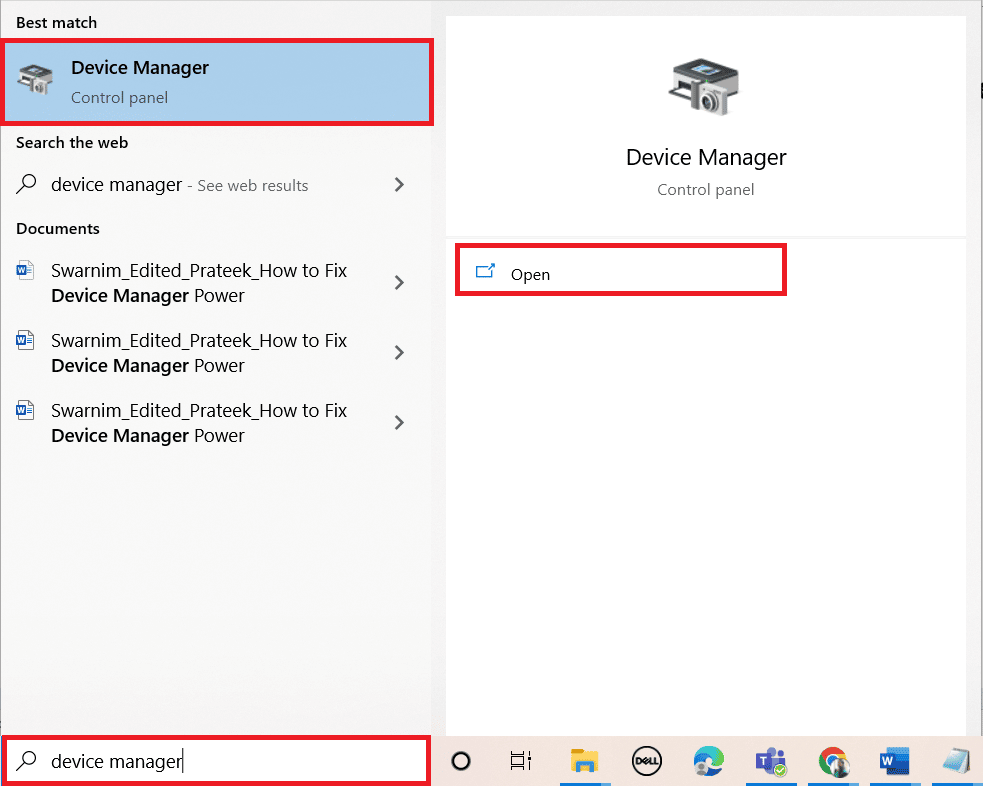
1. ຕີໄດ້ ປຸ່ມ Windows, ປະເພດ ຕົວຈັດການອຸປະກອນ, ຫຼັງຈາກນັ້ນໃຫ້ຄລິກໃສ່ ເປີດ.
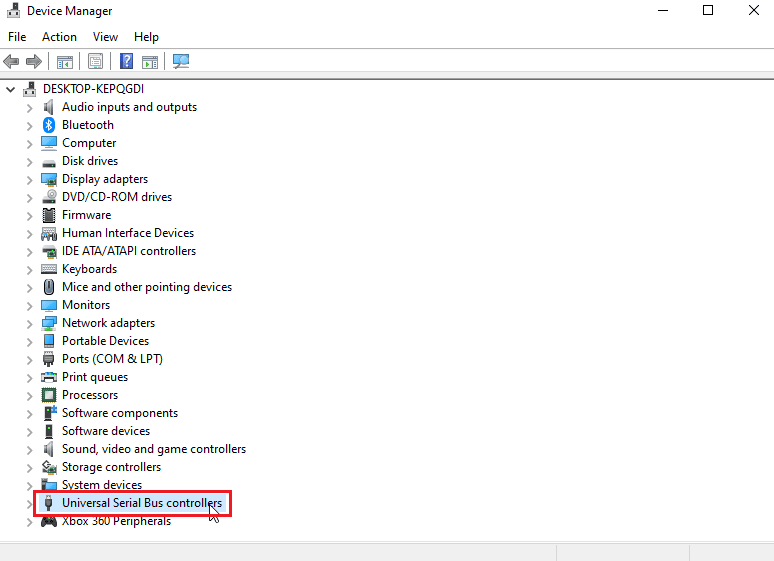
2. ຄລິກສອງຄັ້ງໃສ່ Universal Serial Bus controllers.
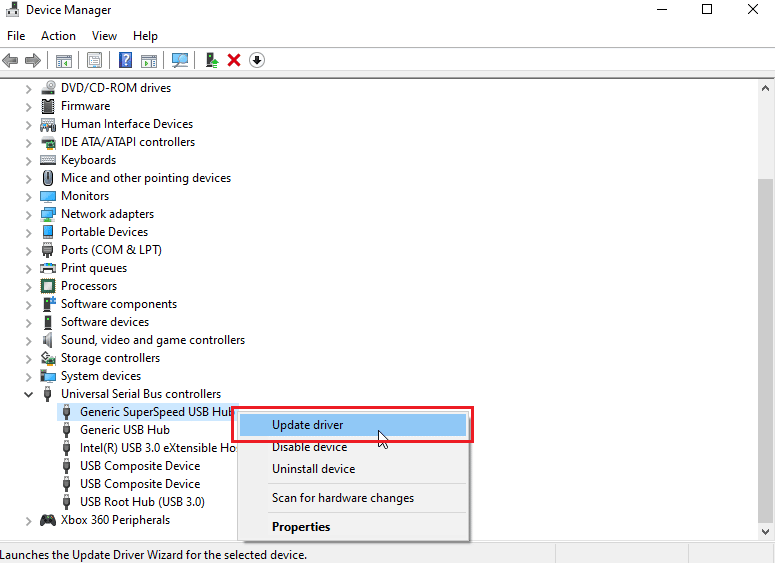
3. Right-click on your USB driver and select the ອັບເດດໄດເວີ ທາງເລືອກ.
4. ດຽວນີ້ກົດເຂົ້າໄປ Search automatically for Updated driver software to let Windows install the drivers automatically.
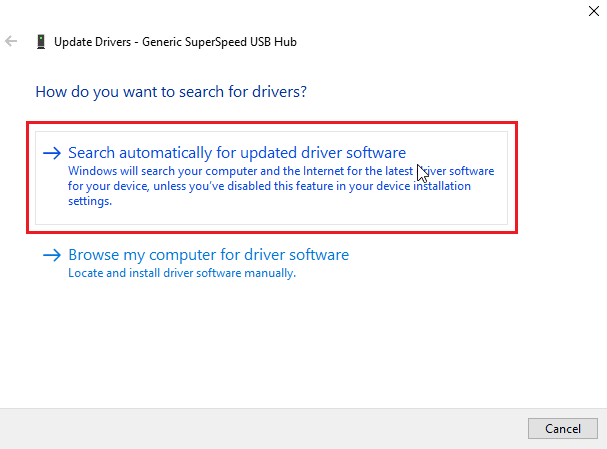
5. Repeat the above steps for all ຂັບ USB ພາຍໃຕ້ການ ເຄື່ອງຄວບຄຸມລົດເມ serial ທົ່ວໄປ ສ່ວນ
ຍັງອ່ານ: How to Install ADB (Android Debug Bridge) on Windows 10
Method 3: Android SDK
Make sure you have downloaded and extracted the Android SDK to avoid an ADB device unauthorized message. Following are the steps to download Android SDK to bypass ADB device unauthorized message.
1. ໄປຫາ Android SDK ຫນ້າດາວໂຫລດ.
2. ເລື່ອນລົງແລະຄລິກ SDK platform tools for Windows

3. ອ່ານ ຂໍ້ກໍານົດແລະເງື່ອນໄຂ, scroll down and check ຂ້າພະເຈົ້າໄດ້ອ່ານແລະຕົກລົງເຫັນດີກັບຂໍ້ກໍານົດແລະເງື່ອນໄຂຂ້າງເທິງ ທາງເລືອກ.
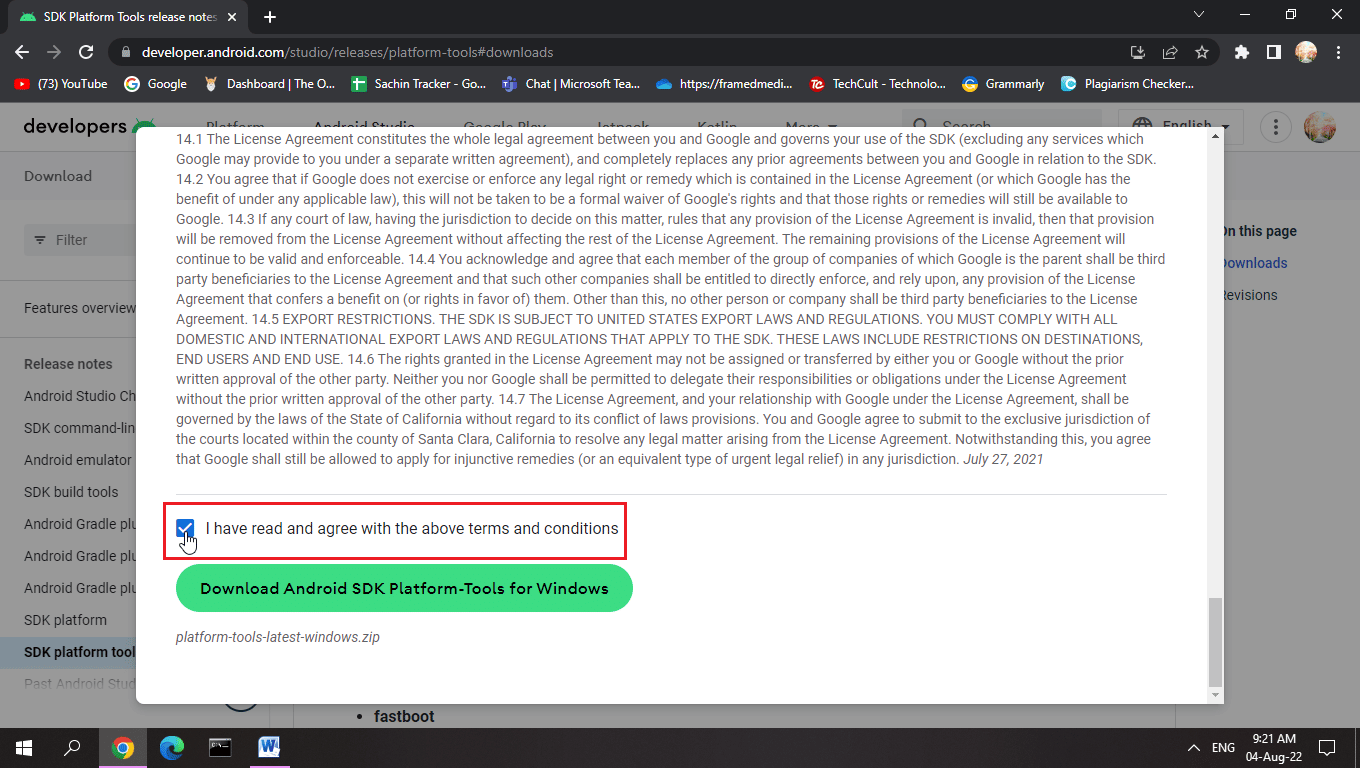
4 ໃຫ້ຄລິກໃສ່ ດາວໂຫລດ Android SDK Platform-Tools ສໍາລັບ Windows. The Android SDK will be downloaded.
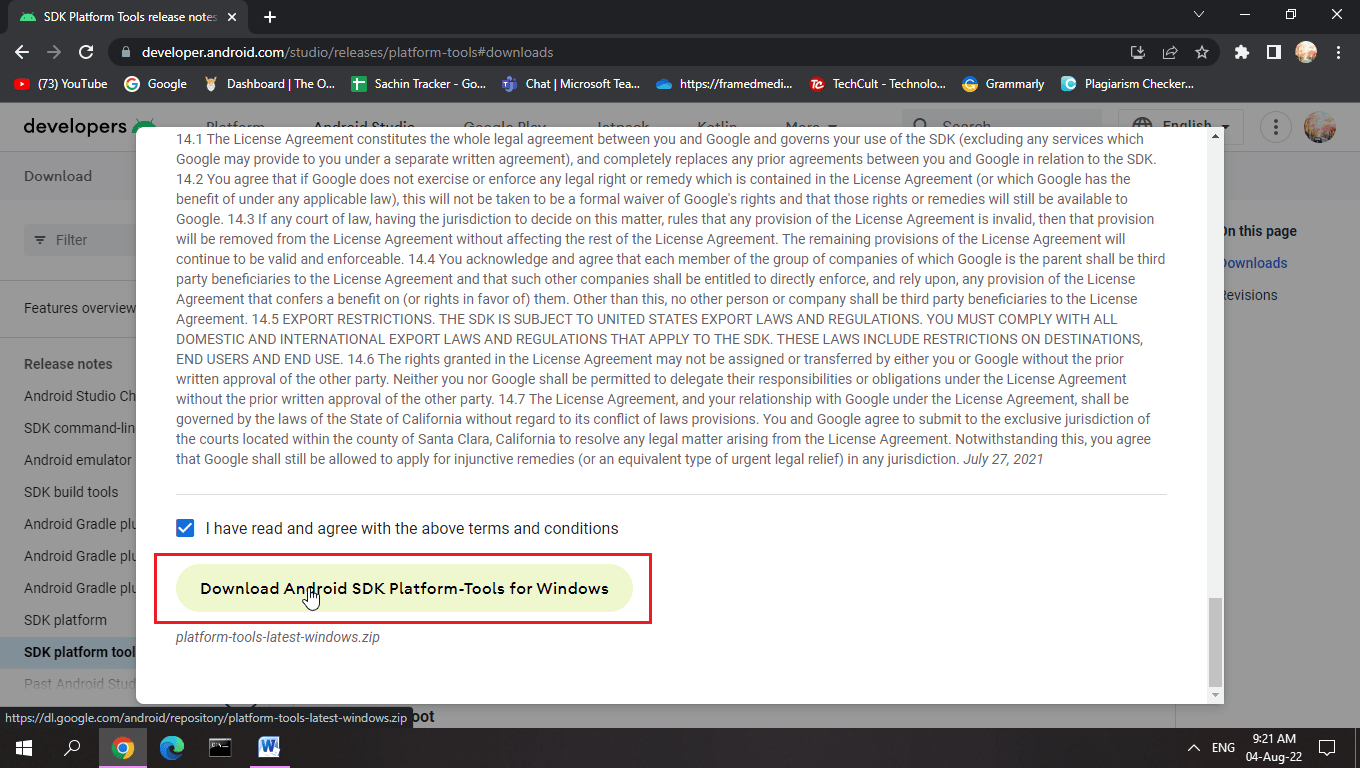
5. Navigate to the download folder and extract the Android SDK files.
With this SDK, you will have all the required ADB files.
Method 4: Enable USB Debugging
USB Debugging allows an Android device to be controlled by a computer through a USB connection, this function allows applications to be installed from a computer and a couple of other functions too. To make sure if you have enabled USB debugging. Here are the steps to enable USB debugging to bypass ADB device unauthorized message.
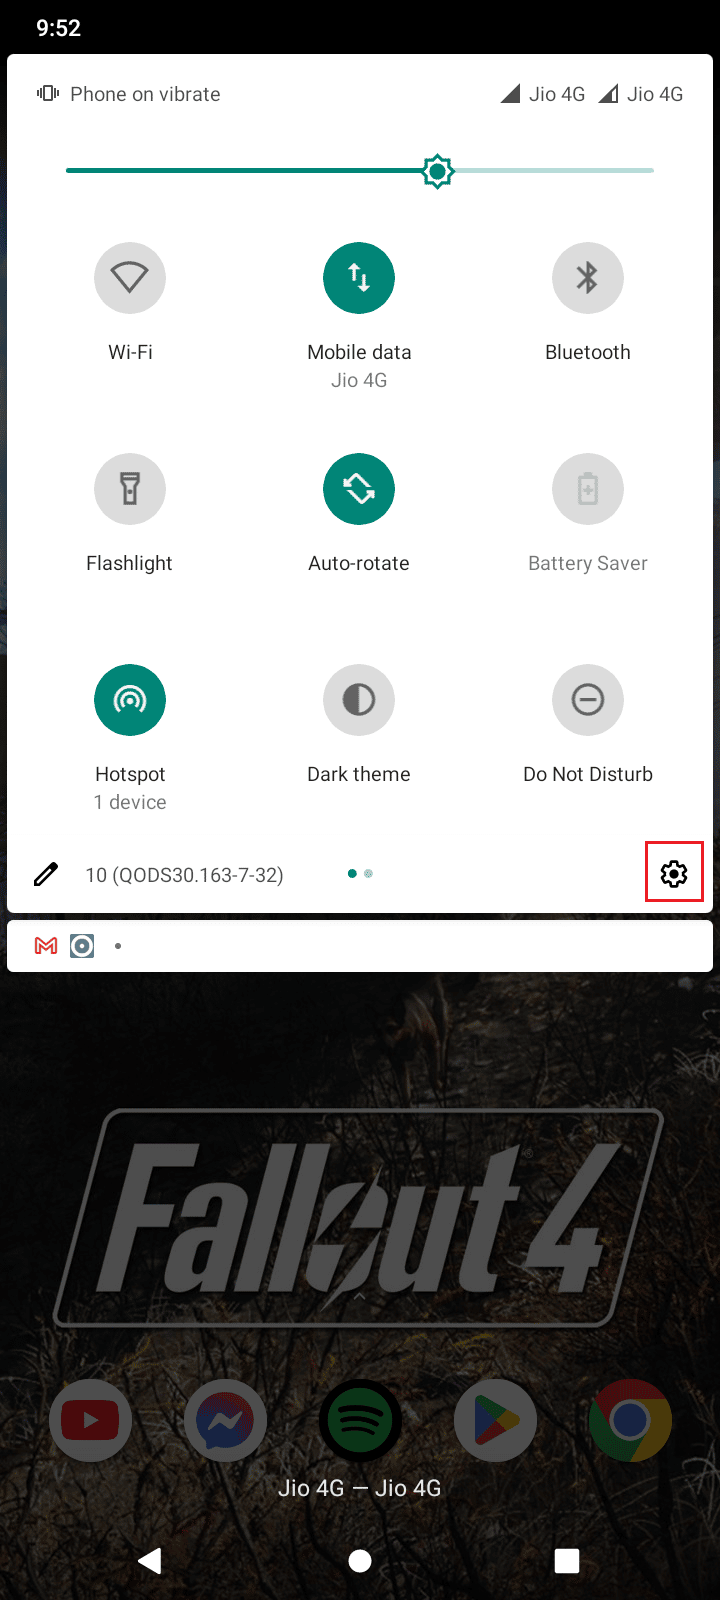
1. Swipe down the ແຖບແຈ້ງເຕືອນ ໃນຂອງທ່ານ Home Screen.
2. ແຕະ ຮູບສັນຍາລັກ cog ເພື່ອເປີດ ການຕັ້ງຄ່າ.
3. ຫຼັງຈາກນັ້ນ, ປາດກ່ຽວກັບ ລະບົບ ຕັ້ງ.

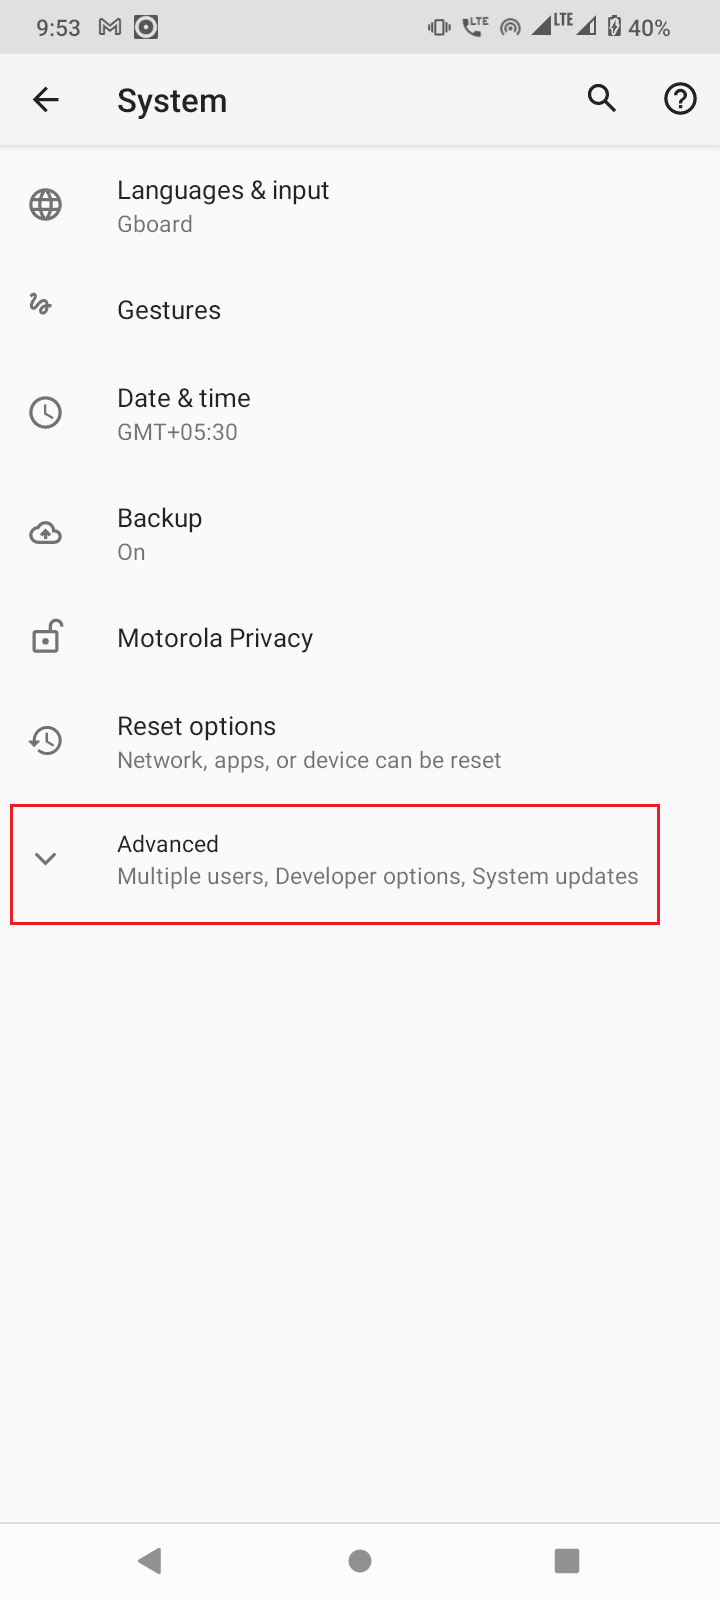
4 ເລືອກເອົາ ແບບພິເສດ ທາງເລືອກ.

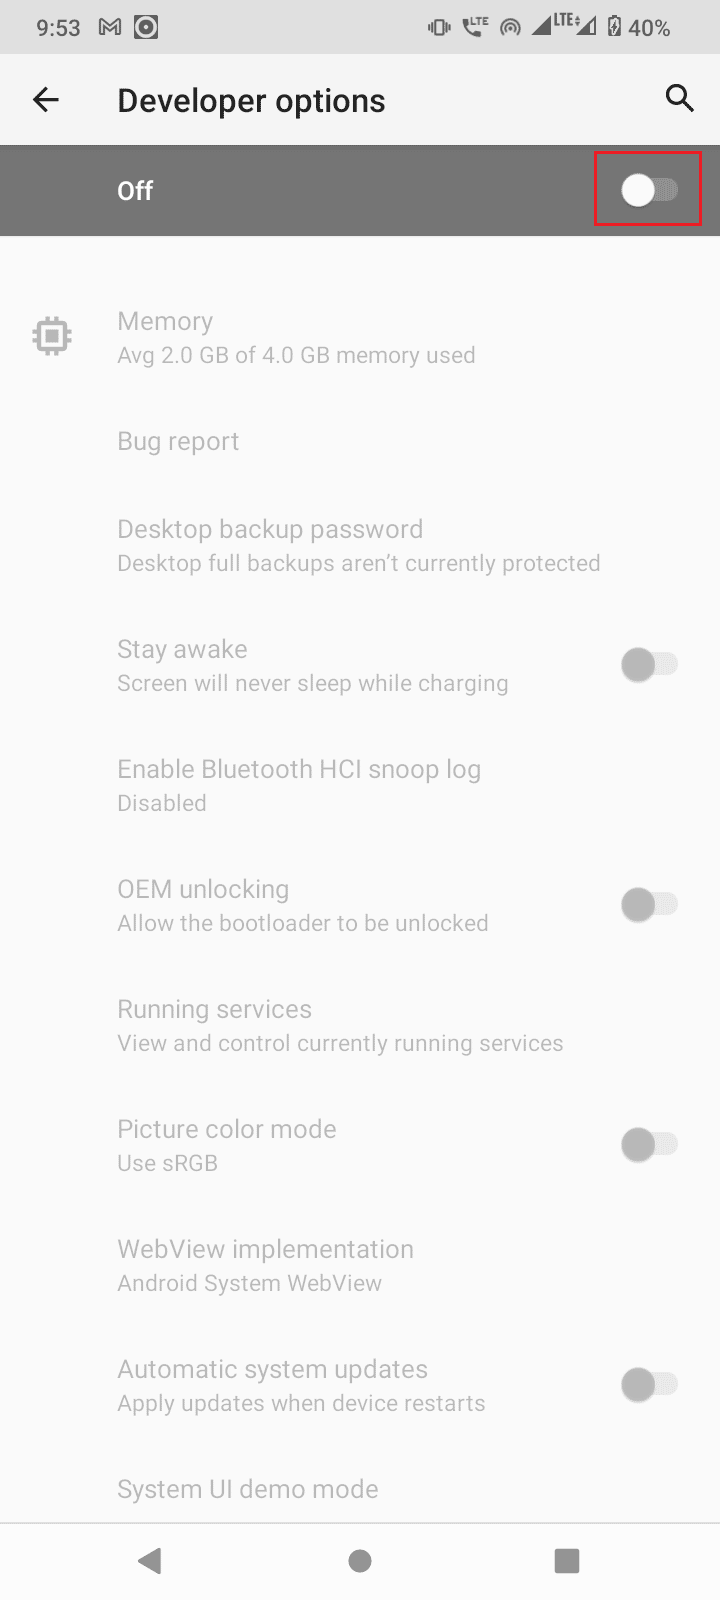
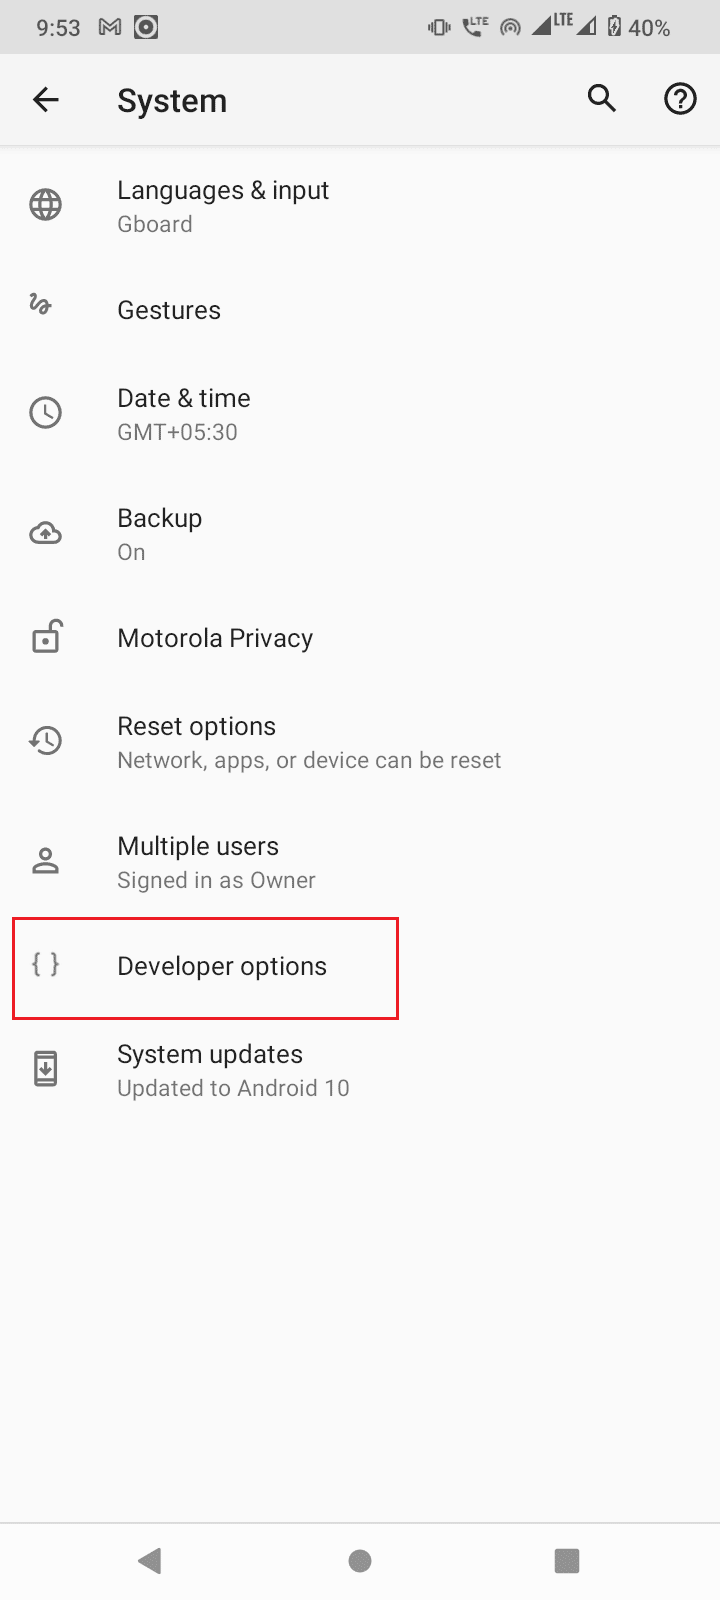
5. ດຽວນີ້, ແຕະໃສ່ ທາງເລືອກນັກພັດທະນາ.

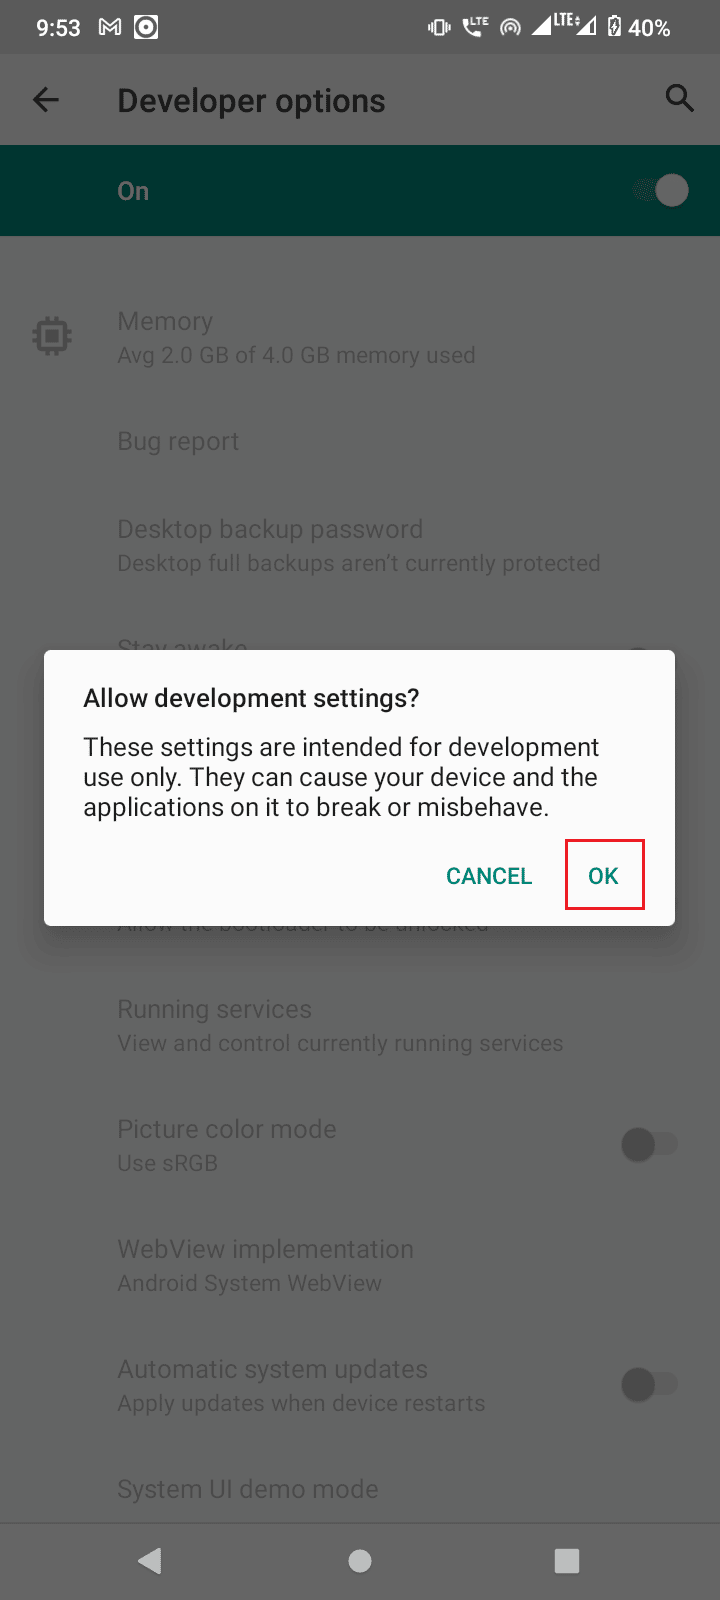
6. ສັບປ່ຽນ On ສະຫຼັບສໍາລັບ ທາງເລືອກນັກພັດທະນາ.
7 ແຕະເທິງ OK to Allow development settings?
ຍັງອ່ານ: ວິທີການປ່ຽນການຕັ້ງຄ່າ USB ໃນ Android 6.0
In case you cannot see the ທາງເລືອກນັກພັດທະນາ then you might not have enabled it, to enable developer options,
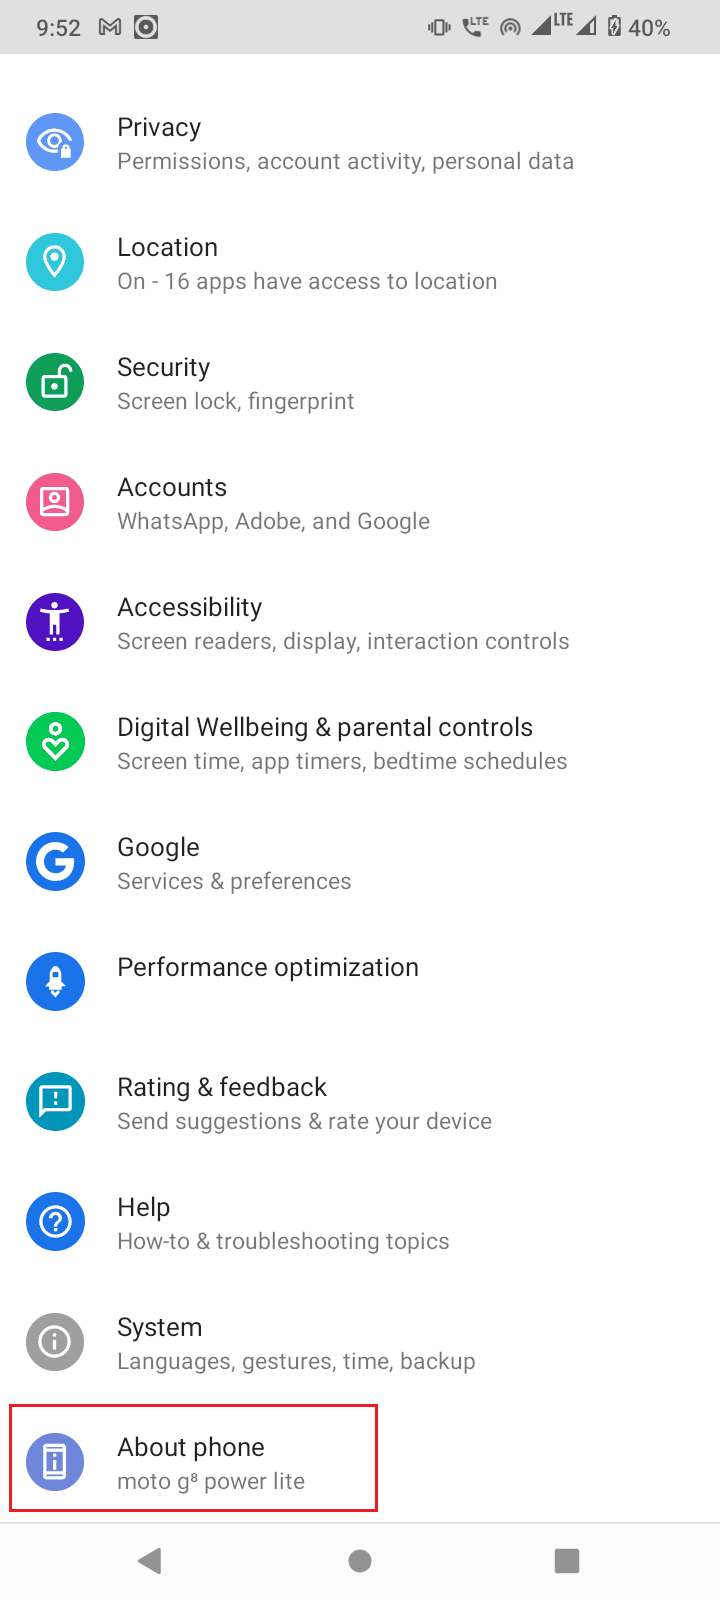
1. Launch your device ການຕັ້ງຄ່າ.

2. ຫຼັງຈາກນັ້ນ, ປາດກ່ຽວກັບ ກ່ຽວກັບໂທລະສັບ ທາງເລືອກ.
3 ແຕະໄດ້ ສ້າງຈໍານວນ 5-7 times to activate ຮູບແບບຂອງນັກພັດທະນາ.
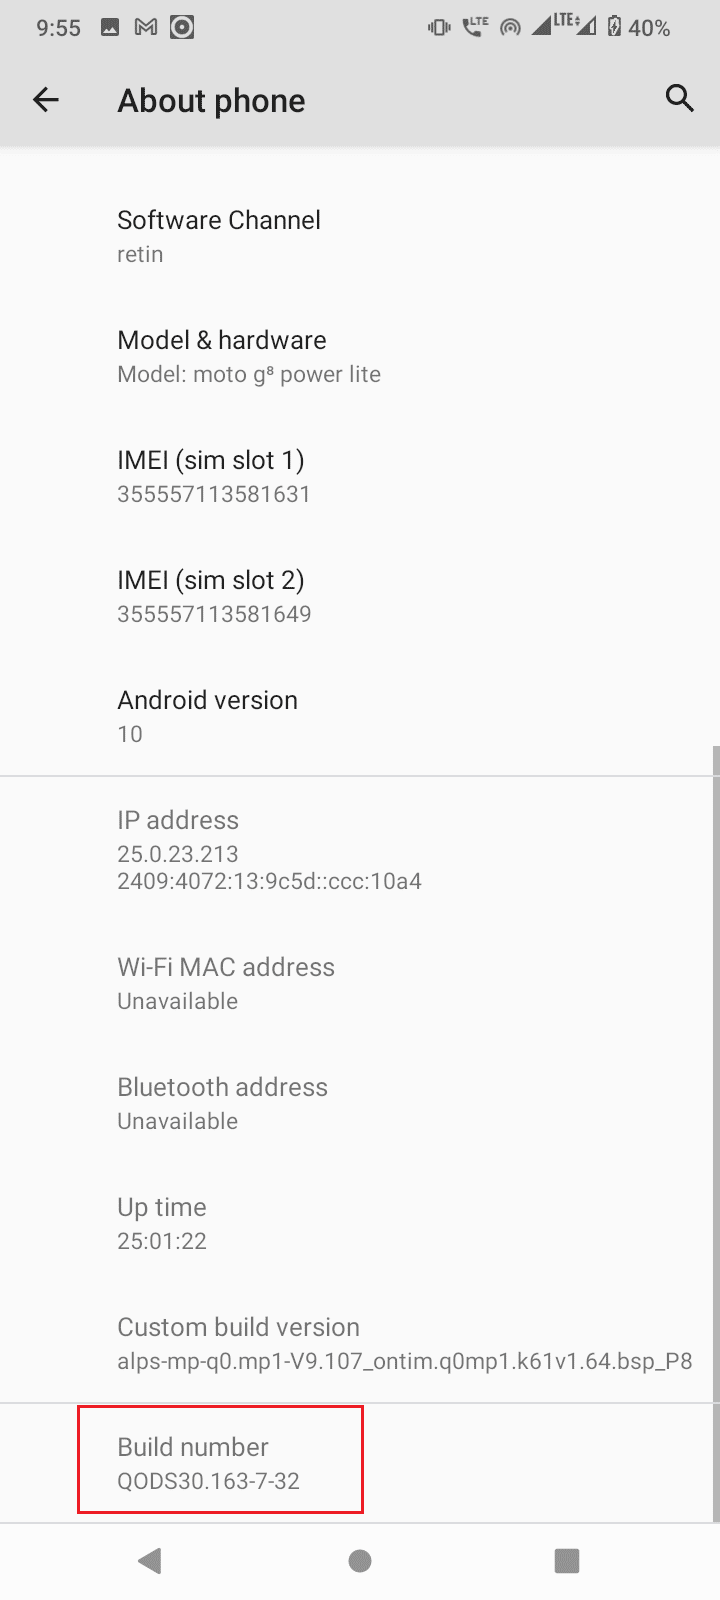
4. A prompt mentioning you are now a developer ຂໍ້ຄວາມຈະຖືກສະແດງ.
If your developer mode is visible then no need to follow the above step.
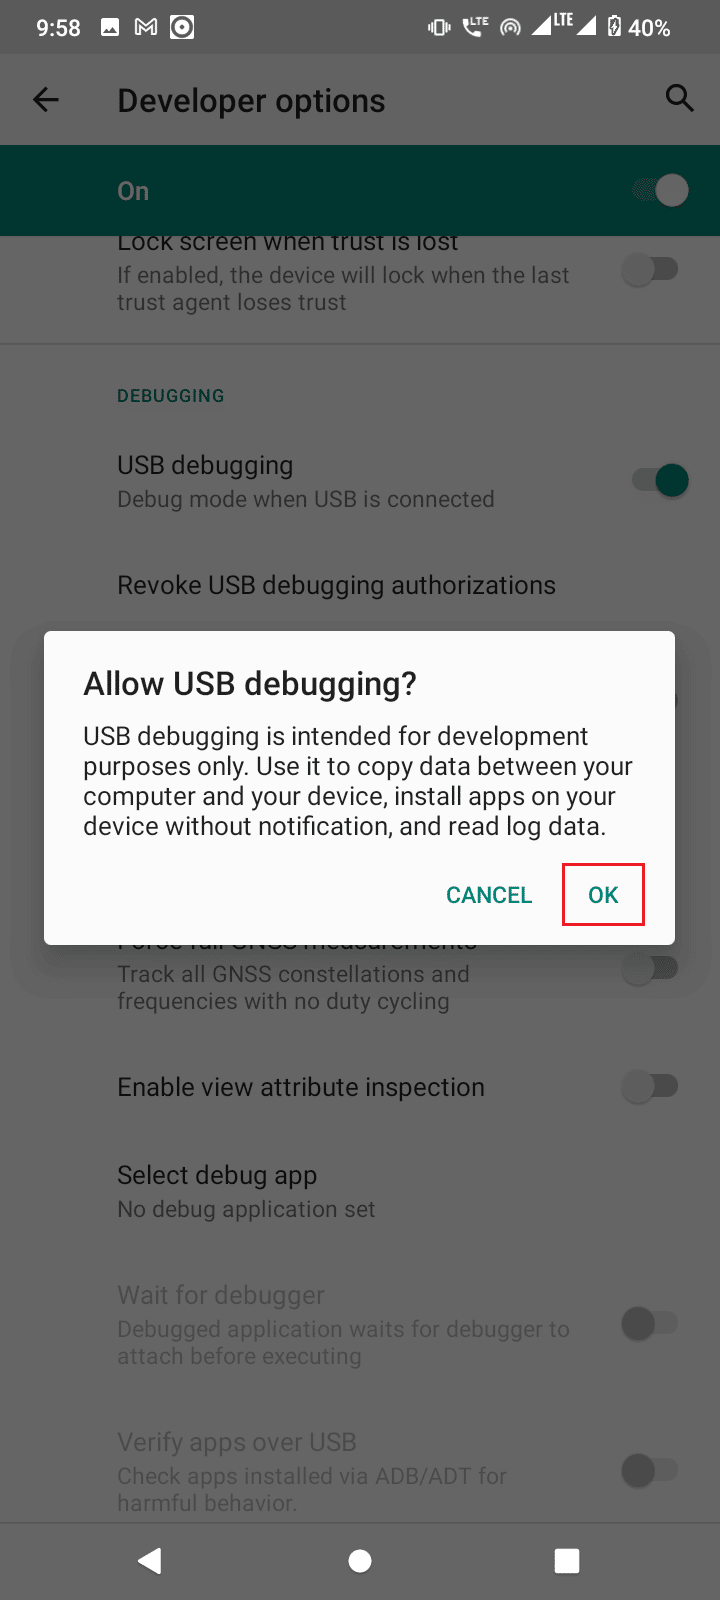
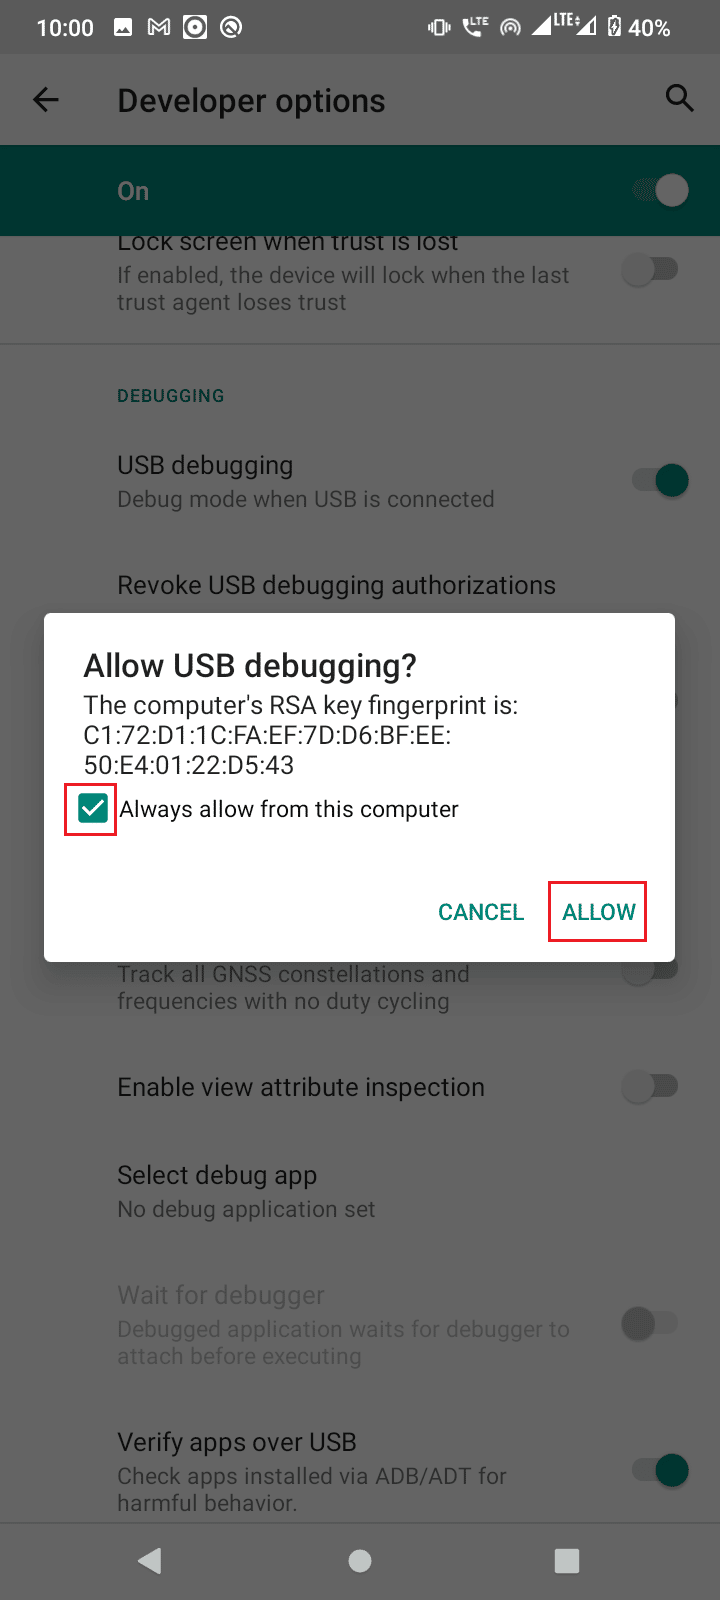
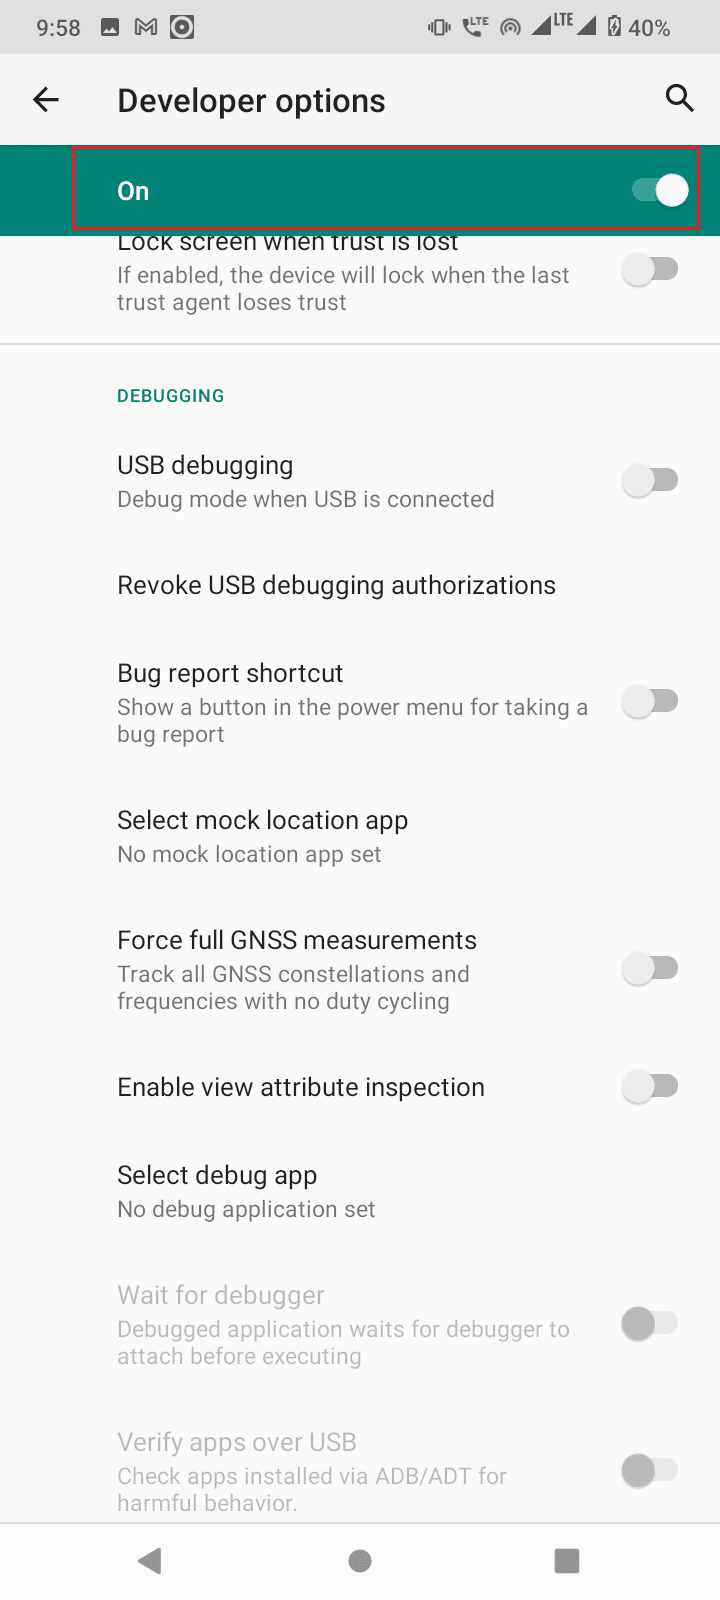
1 ໃນ ທາງເລືອກນັກພັດທະນາ, scroll down and switch On the toggle for debugging USB.
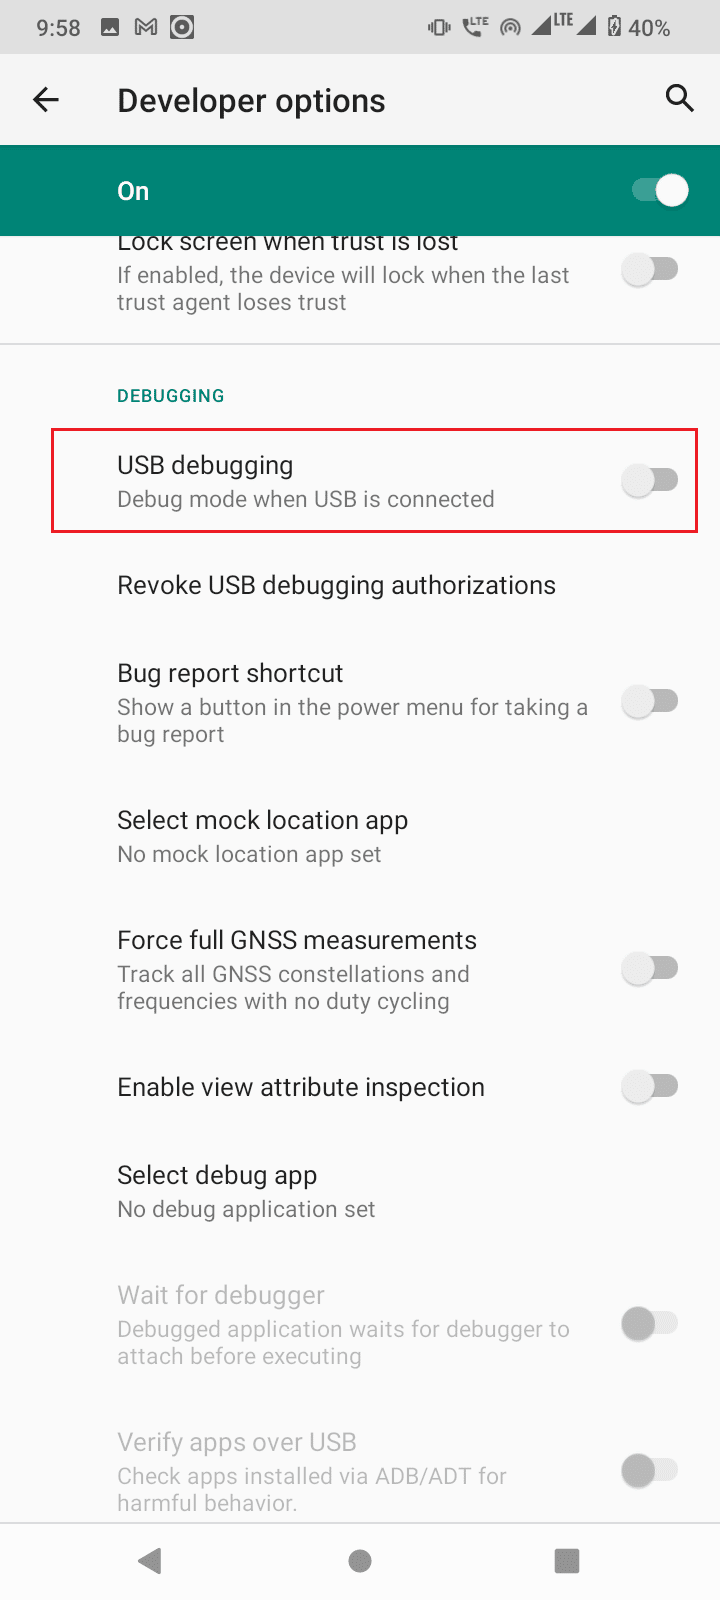
2 ແຕະເທິງ OK in the prompt asking to ອະນຸຍາດໃຫ້ USB debugging?
ຍັງອ່ານ: ແກ້ໄຂ USB OTG ບໍ່ເຮັດວຽກຢູ່ໃນອຸປະກອນ Android
Method 5: Request Access from CMD
If you connected your device and enabled USB debugging but did not receive the request from the PC, then follow the below steps.
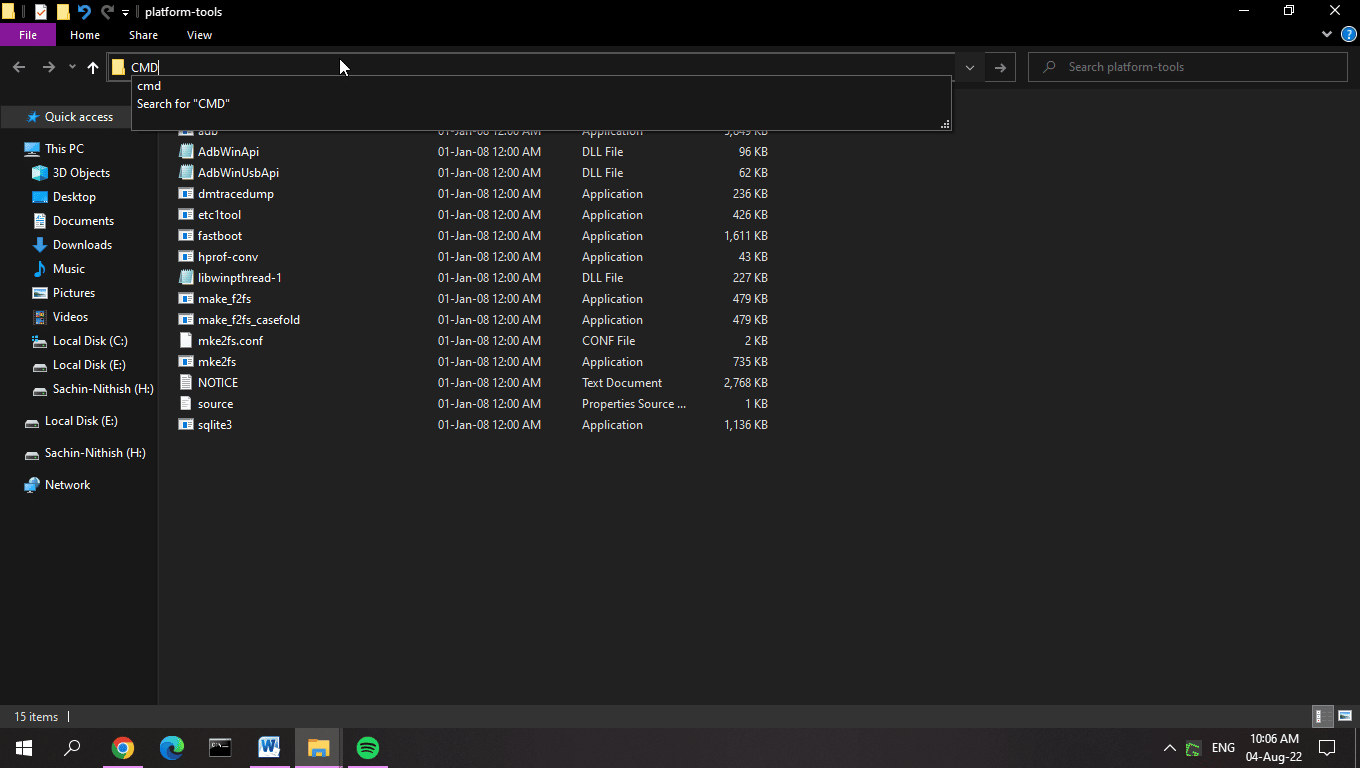
1. ທ່ອງໄປຫາ platform-tools folder ບ່ອນທີ່Android SDK ຖືກສະກັດ.
2 ປະເພດ CMD on the address bar and hit ໃສ່ລະຫັດ.
3 ປະເພດ ອຸປະກອນ adb ຄໍາສັ່ງແລະມົນຕີໄດ້ ໃສ່ລະຫັດ.
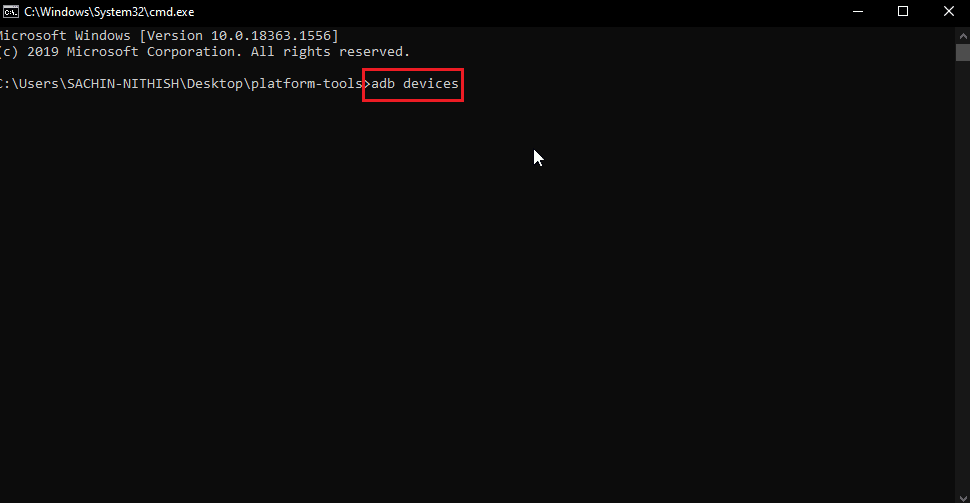
4. If you didn’t get the request now after entering the command you will receive the prompt on your ໂທລະສັບ Android.
5. ກວດເບິ່ງ ອະນຸຍາດຈາກຄອມພິວເຕີເຄື່ອງນີ້ສະເໝີ ທາງເລືອກ.
6 ແຕະເທິງ ທັງ ໝົດ ໃນການກະຕຸ້ນເຕືອນ.
Method 6: Restart ADB Connection
Sometimes ADB device unauthorized message occurs due to a faulty connection with the Android device. This can be fixed by re-connecting the ADB connection by revoking the USB connection.
In the previous solution if you still did not get the prompt or still getting ADB device unauthorized message, follow these steps to ADB device unauthorized bypass.
1 ໄປຫາ ການແຈ້ງເຕືອນ ຄະນະກໍາມະ.
2 ແຕະເທິງ ຮູບສັນຍາລັກ cog ເພື່ອເປີດ ການຕັ້ງຄ່າ

3. ຫຼັງຈາກນັ້ນ, ປາດກ່ຽວກັບ ລະບົບ ຕັ້ງ.
4. ຕໍ່ໄປ, ແຕະໃສ່ ແບບພິເສດ ຕັ້ງ.

5. ໃນປັດຈຸບັນ, ເປີດ ທາງເລືອກນັກພັດທະນາ.

6 ໃນ ທາງເລືອກນັກພັດທະນາ toggle ໄປ ໄດ້ debugging USB ທາງເລືອກ.
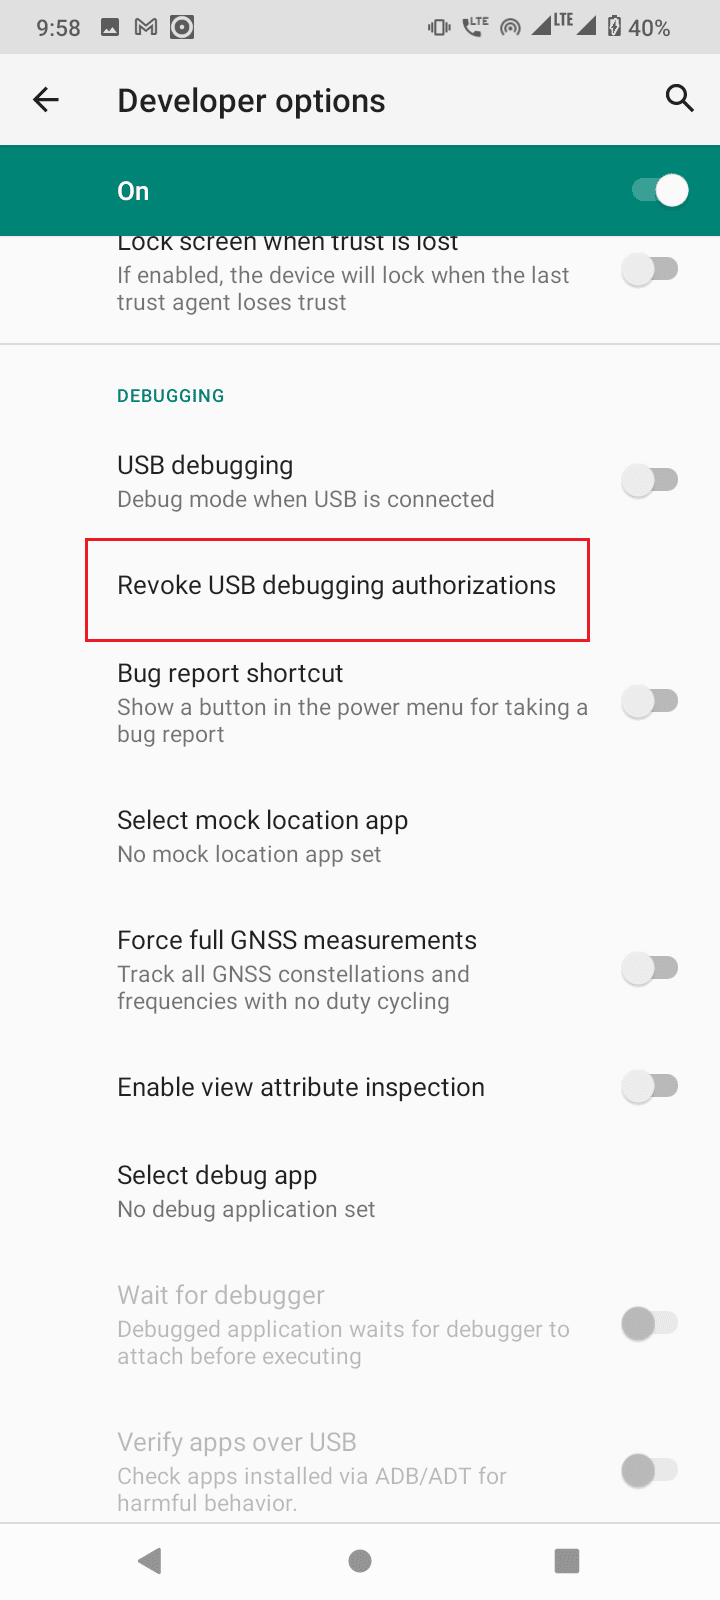
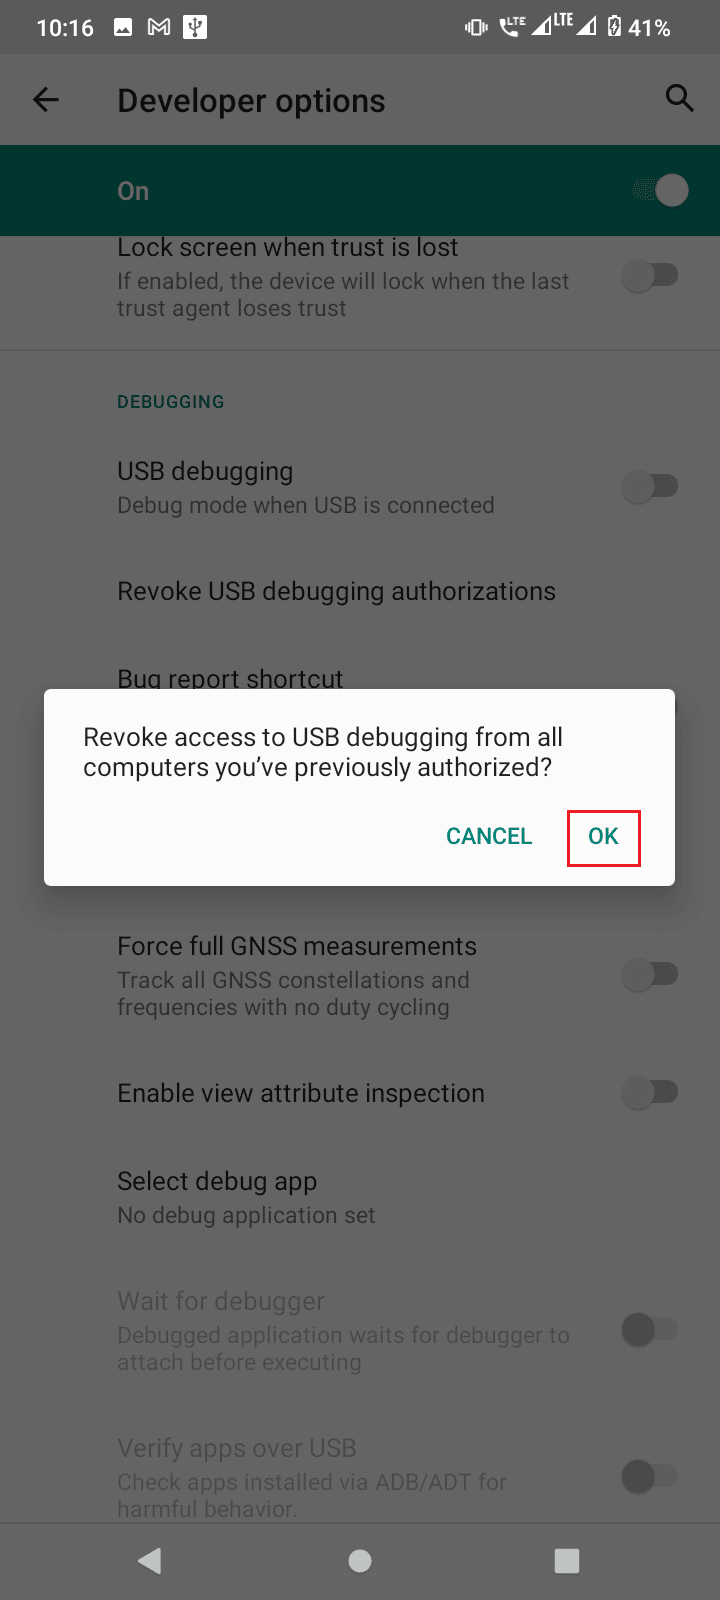
7 ພາຍໃຕ້ debugging USB, ແຕະໃສ່ Revoke USB debugging authorizations.
8 ແຕະເທິງ OK ເພື່ອຍືນຍັນ
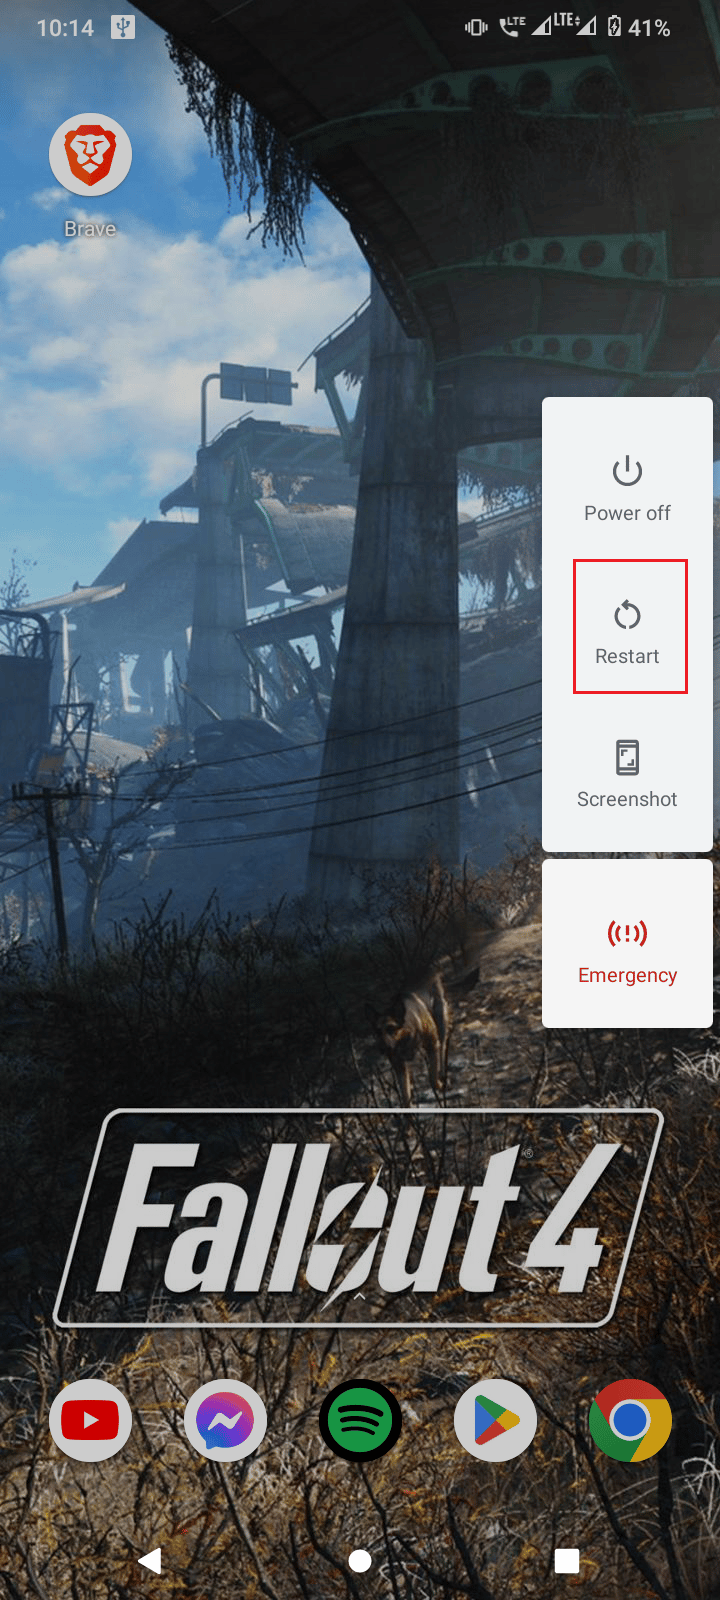
9. Restart your phone by holding the ພະລັງງານ ປຸ່ມແລະປາດກ່ຽວກັບ ເລີ່ມຕົ້ນໃຫມ່.
10. Finally, remove your phone from the ການເຊື່ອມຕໍ່ USB.
ຍັງອ່ານ: ວິທີການປົດລັອກ Bootloader ຜ່ານ Fastboot ໃນ Android
After the above procedure, follow these steps.
1. Now connect your Android mobile to your computer again.
2. Launch your Android device ການຕັ້ງຄ່າ.

3. ຫຼັງຈາກນັ້ນ, ປາດກ່ຽວກັບ ລະບົບ ຕັ້ງ.

4. ຕໍ່ໄປ, ແຕະໃສ່ ແບບພິເສດ ຕັ້ງ.
5. ດຽວນີ້, ແຕະ ທາງເລືອກນັກພັດທະນາ.
6. Then, turn on debugging USB.

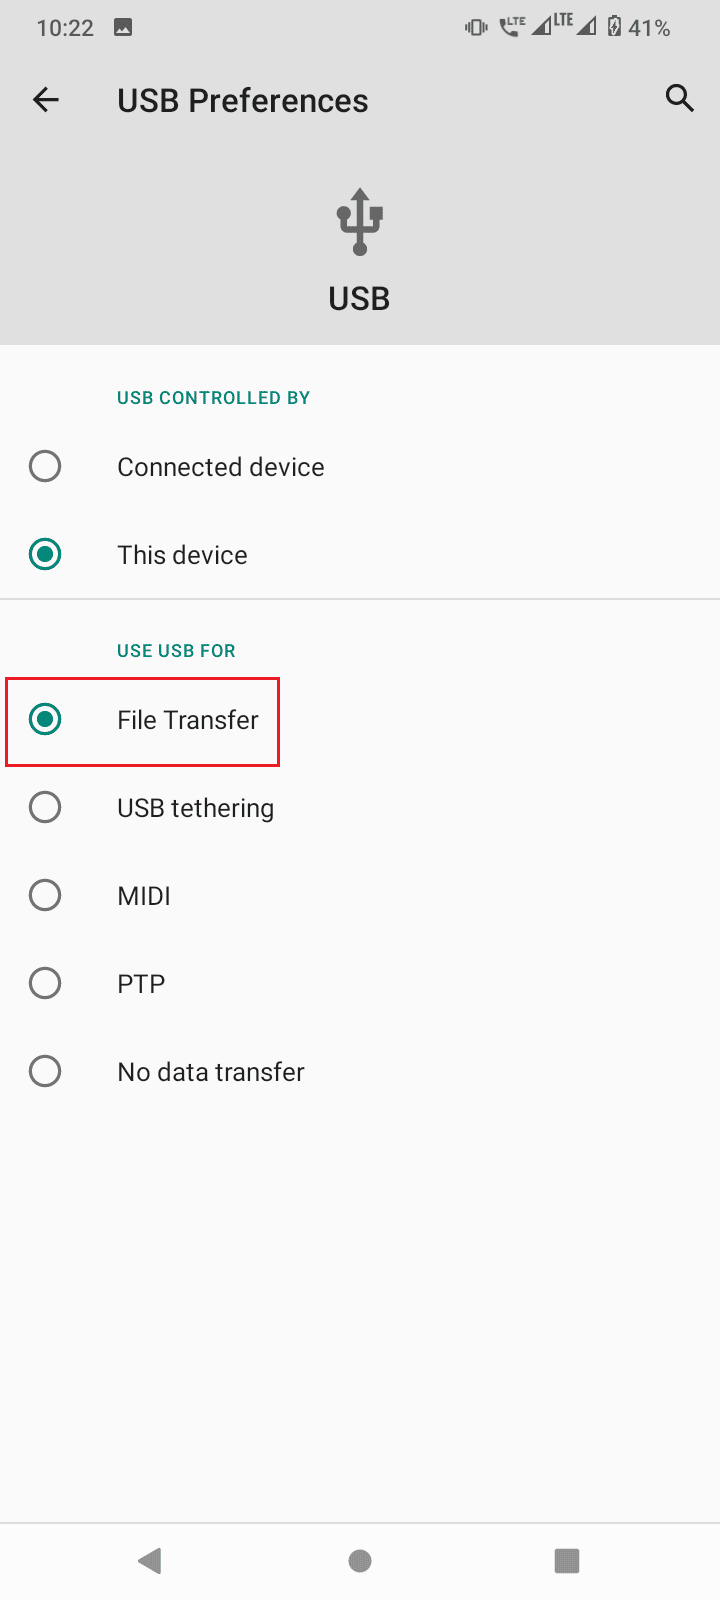
7. Swipe down the notifications bar where it shows charging mode, tap on it.
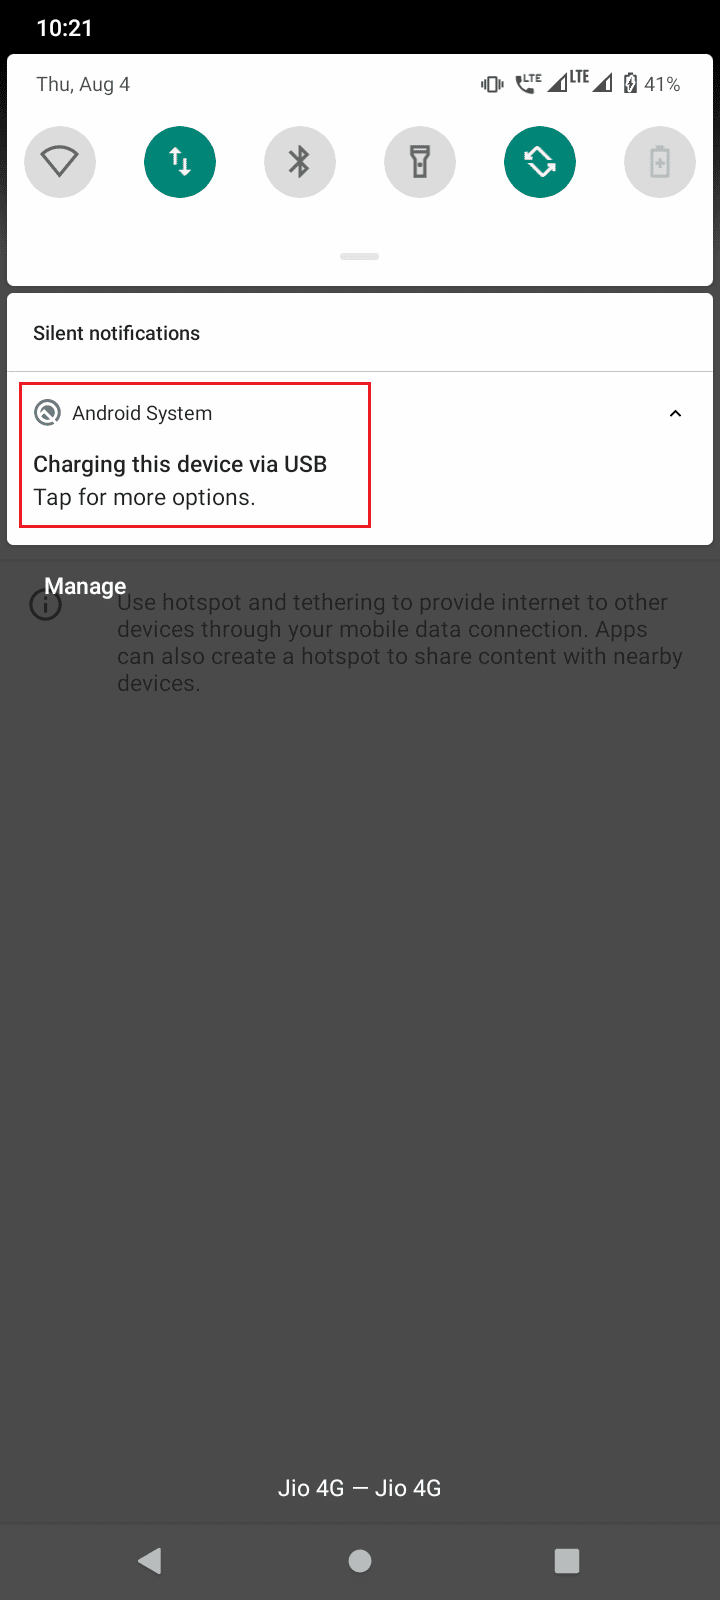
8 ເລືອກເອົາ ການໂອນໄຟລ໌ ທາງເລືອກ.
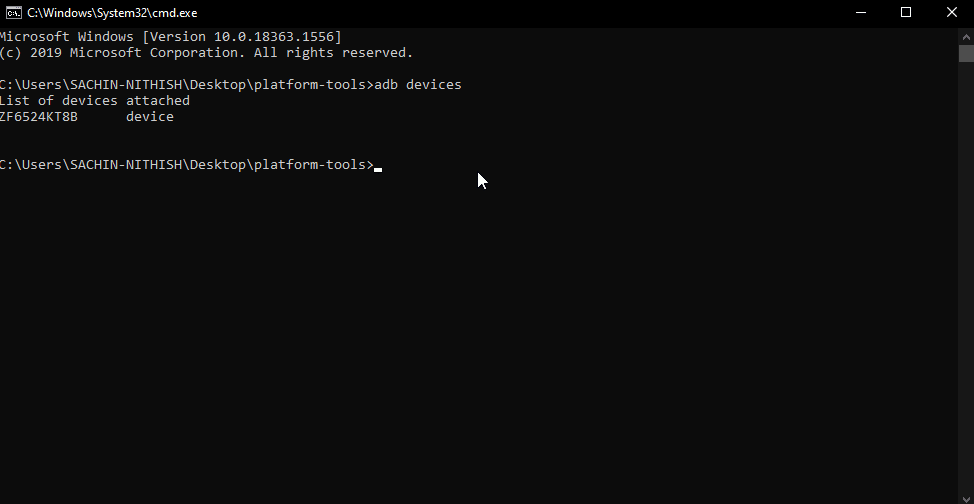
9. Then, run ອຸປະກອນ adb command in CMD at the platform-tools folder.

10. This will fix the ADB device unauthorized message
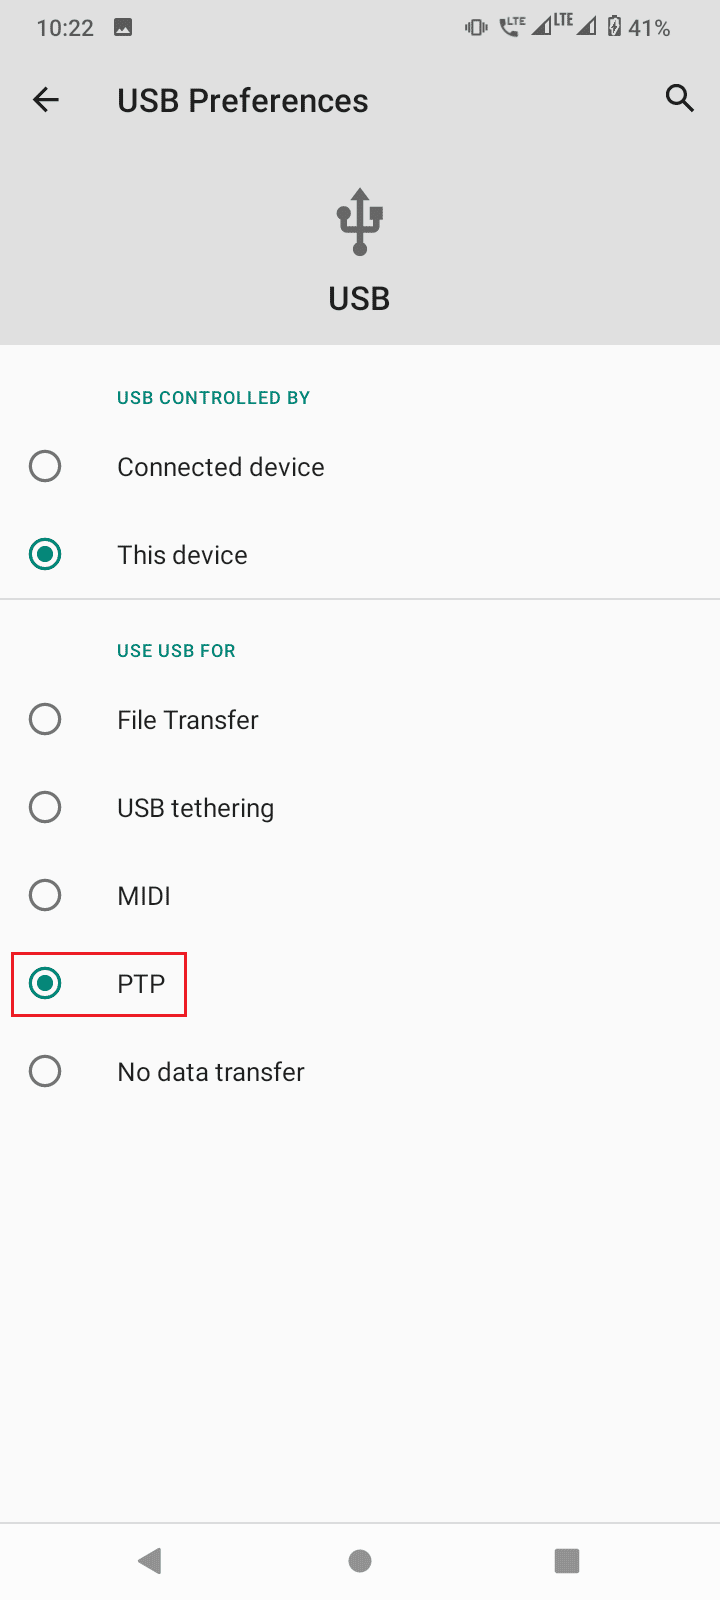
11. Alternatively, choose PTP ແທນທີ່ ການໂອນໄຟລ໌ in 7 ຂັ້ນຕອນ and continue the above steps.
ຍັງອ່ານ: 13 ລູກຄ້າໂປຣໂຕຄໍການໂອນໄຟລ໌ທີ່ດີທີ່ສຸດສໍາລັບ Android
ຄໍາຖາມທີ່ຖາມເລື້ອຍ (FAQs)
Q1. Why do I get an Unauthorized device error?
Ans It simply means that the user did not give a permit to access the Android device through ADB for use with a computer, follow the guide to fix this issue.
Q2. Can ADB run without enabling USB debugging?
ອັນ. ບໍ່, ADB requires USB debugging to be turned on by the user to get authorization from and an Android device and further communicate with it. Also with this USB debugging and RSA fingerprint of the computer only will the connection between the computer and android will be successfully be established.
Q3. Can I remove ADB devices without disconnecting my devices?
ອັນ. ແມ່ນແລ້ວ, you can do so by just turning off USB debugging.
Q4. I don’t have developer options, Why?
Ans Android developer options are disabled by default, to enable it you need to tap build number 6-7 times. Refer to your manufacturer’s website to know your particular model setting.
ແນະນໍາໃຫ້:
We hope that the above article on how to bypass ADB device unauthorized message was helpful to you and you were able successfully to fix your issue, don’t forget to mention which one of the methods worked for you. If you have queries and/or suggestions about the article feel free to drop them down in the comment section below.

