- in langai by Administratorius
Enable Enhanced Anti-Spoofing for Windows Hello Face Authentication

Enable Enhanced Anti-Spoofing for Windows Hello Face Authentication: Windows 10 PC allows you to sign-in using fingerprint, face recognition, or iris scan using Windows Hello. Now Windows hello is a biometrics-based technology which enables users to authenticate their identity in order to access their devices, apps, networks etc using any one of the above methods. Now face detection in Windows 10 works well, but it can’t differentiate between a photo of your face inside your mobile or the actual user face.
The potential threat because of this issue is that someone with your photo could unlock your device by using their mobile. To overcome this difficulty, the anti-spoofing technology comes into actions and once you have enabled the anti-spoofing for Windows Hello Face Authentication, a photo of the authentic user cannot be used to login into the PC.
Once the enhanced anti-spoofing is enabled, Windows will require all users on the device to use anti-spoofing for facial features. This policy is not enabled by default and users have to manually enable anti-spoofing feature. Anyway, without wasting any time let’s see How to Enable Enhanced Anti-Spoofing for Windows Hello Face Authentication with the help of the below-listed tutorial.
Enable Enhanced Anti-Spoofing for Windows Hello Face Authentication
Būtinai sukurkite atkūrimo tašką, jei kas nors nutiktų.
Method 1: Disable or Enable Enhanced Anti-Spoofing for Windows Hello Face Authentication in Group Policy Editor
1. Paspauskite „Windows“ klavišą + R, tada įveskite gpedit.msc ir paspauskite Enter, kad atidarytumėte Grupės strategijos redaktorius.

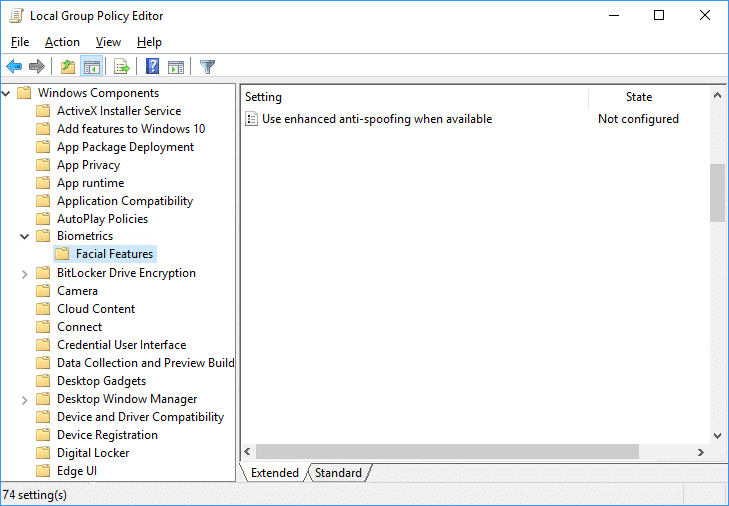
2. Eikite į šią vietą:
Computer ConfigurationAdministrative TemplatesWindows ComponentsBiometricsFacial Features
3. Pasirinkite Veido bruožai then in right window pane double-click on the “Sukonfigūruokite patobulintą apsaugą nuo sukčiavimo“ politika.
4.Now change the settings of the Configure enhanced anti-spoofing policy according to:
To Enable Enhanced Anti-Spoofing for Windows Hello Face Authentication: Select Not Configured or Disabled
To Disable Enhanced Anti-Spoofing for Windows Hello Face Authentication: Select Enabled

5.Click Apply followed by OK then close Group Policy Editor.
6. Iš naujo paleiskite kompiuterį, kad išsaugotumėte pakeitimus.
Method 2: Disable or Enable Enhanced Anti-Spoofing for Windows Hello Face Authentication in Registry Editor
1. Paspauskite „Windows“ klavišą + R, tada įveskite regedit ir paspauskite Enter, kad atidarytumėte Registro redaktorius.

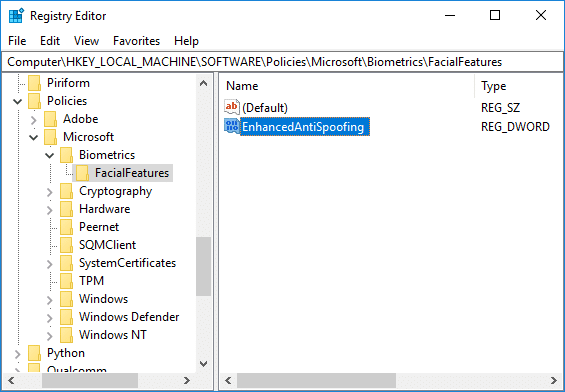
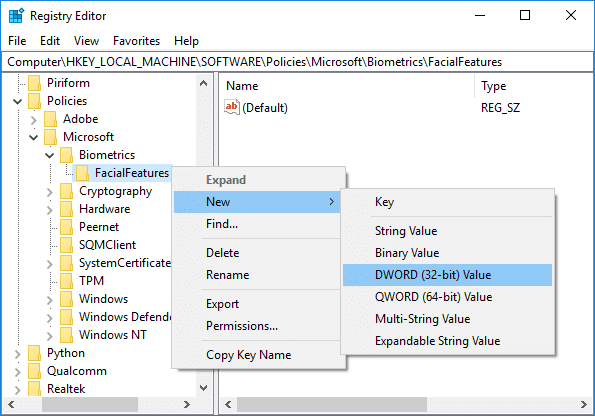
2. Eikite į šį registro raktą:
HKEY_LOCAL_MACHINESOFTWAREPoliciesMicrosoftBiometricsFacialFeatures
3. Dešiniuoju pelės mygtuku spustelėkite FacialFeatures tada pasirinkite Nauja > DWORD (32 bitų) reikšmė.
4. Pavadinkite šį naujai sukurtą DWORD kaip EnhancedAntiSpoofing ir paspauskite "Enter".

5.Double-click on EnhancedAntiSpoofing DWORD and change it’s value to:
Enable Enhanced Anti-Spoofing: 1
Disable Enhanced Anti-Spoofing: 0
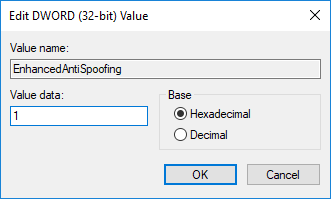
6.Once you have typed the correct value simply click OK.
7.Close registry editor and reboot your PC to save changes.
Rekomenduojama:
Tai jūs sėkmingai išmokote How to Enable Enhanced Anti-Spoofing for Windows Hello Face Authentication in Windows 10 bet jei vis dar turite klausimų dėl šio įrašo, nedvejodami paklauskite jų komentarų skiltyje.