- in langai by Administratorius
Fix Windows 10 install Fails With Error C1900101-4000D

Fix Windows 10 install Fails With Error C1900101-4000D: If you’re trying to upgrade to Windows 10 but the install fails with error code C1900101-4000D then don’t worry as it occurs because the Windows installer cannot access important files required for installation. Sometimes this error is also caused because of a conflict during installation but you can’t be sure as there is no error message accompanying this error.
0xC1900101-0x4000D
The installation failed in the SECOND_BOOT phase with an error during MIGRATE_DATA operation
While there is no definite fix for this issue but users seem to be recommending a clean installation of Windows 10 which should only be used as a last resort. So without wasting any time let’s see How to Fix Windows 10 install Fails With Error C1900101-4000D with the help of below-listed troubleshooting guide.
Fix Windows 10 install Fails With Error C1900101-4000D
Būtinos sąlygos
a)Make sure to Update all drivers, including graphic, sound, BIOS, USB devices, printers, etc before the installing Windows 10.
b)Remove all external USB devices such as pen drive, external hard disk, USB keyboard & mouse, USB printer and all peripherals.
c)Use an ethernet cable instead of WiFi and disable WiFi until the update is complete.
Method 1: Temporarily Disable Antivirus and Firewall before attempting Upgrade
1. Dešiniuoju pelės mygtuku spustelėkite Antivirusinės programos piktograma iš sistemos dėklo ir pasirinkite Išjungti.

2. Tada pasirinkite laikotarpį, kuriam Antivirusinė programa liks išjungta.

Pastaba: Pasirinkite mažiausią įmanomą laiką, pavyzdžiui, 15 minučių arba 30 minučių.
3.Once done, again try to upgrade your PC and check if the error resolves or not.
4.Type control in the Windows Search then click on valdymo pultas iš paieškos rezultatų.

5. Toliau spustelėkite Sistema ir apsauga.
6. Tada spustelėkite Windows ugniasienė.

7. Dabar kairiajame lango lange spustelėkite Įjunkite arba išjunkite Windows ugniasienę.

8.Pasirinkite Išjungti Windows ugniasienę ir iš naujo paleiskite kompiuterį. Again try to upgrade your PC and see if you’re able to Fix Windows 10 install Fails With Error C1900101-4000D.
Jei aukščiau pateiktas metodas neveikia, būtinai atlikite tuos pačius veiksmus, kad vėl įjungtumėte ugniasienę.
Method 2: Remove any hyphens from your computer or machine name
1. Paspauskite „Windows“ klavišą + R, tada įveskite sysdm.cpl ir paspauskite Enter, kad atidarytumėte Sistemos ypatybės.

2.Make sure you’re under Kompiuterio pavadinimo skirtukas tada spustelėkite pokytis mygtukas apačioje.
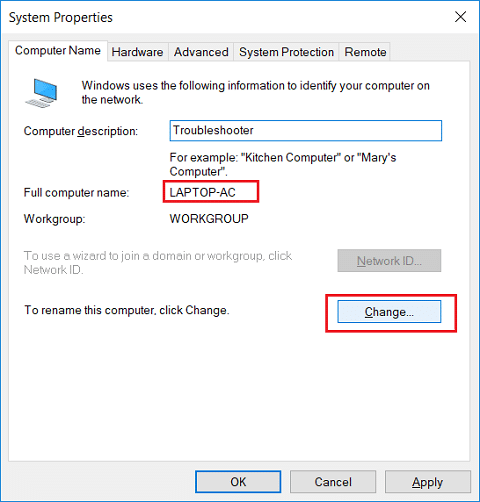
3.Make sure your machine name is simple no periods or hyphens or dashes.
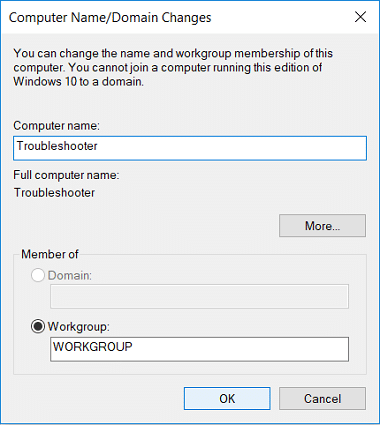
4.Click OK then Apply followed by OK.
5. Iš naujo paleiskite kompiuterį, kad išsaugotumėte pakeitimus.
3 būdas: įsitikinkite, kad „Windows“ yra atnaujinta
1.Paspauskite Windows Key + I, tada pasirinkite Atnaujinimas ir sauga.

2. Kitas, dar kartą spustelėkite Patikrinti atnaujinimus ir įsitikinkite, kad įdiegėte visus laukiančius naujinimus.

3. Įdiegę naujinimus iš naujo paleiskite kompiuterį ir patikrinkite, ar galite tai padaryti Fix Windows 10 install Fails With Error C1900101-4000D.
4 būdas: atlikite švarų paleidimą
This would make sure that if any 3rd party application is conflicting with Windows update then you will be able to successfully install Windows Updates inside Clean Boot. Sometimes 3rd party software can conflict with Windows Update and therefore cause Windows Update to be Stuck. In order, Fix Windows 10 install Fails With Error C1900101-4000D, turite atlikti švarų kompiuterio paleidimą ir žingsnis po žingsnio diagnozuoti problemą.

Method 5: Upgrade using Windows 10 Media Creation Tool
1.Download Media Creation Tool here.
2.Backup your data from system partition and save your license key.
3.Start the tool and choose to Atnaujinkite šį kompiuterį dabar.
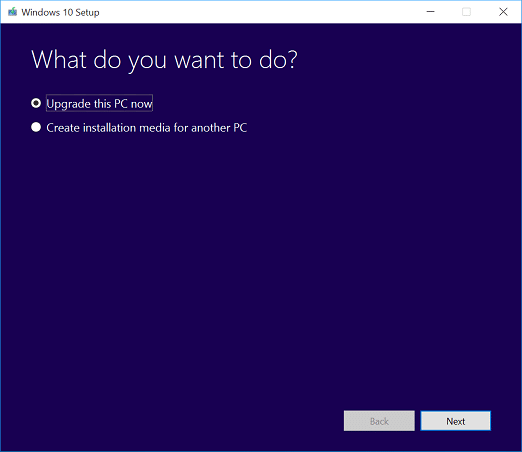
4.Accept the license terms.
5.After the installer is ready, choose to Keep personal files and apps.
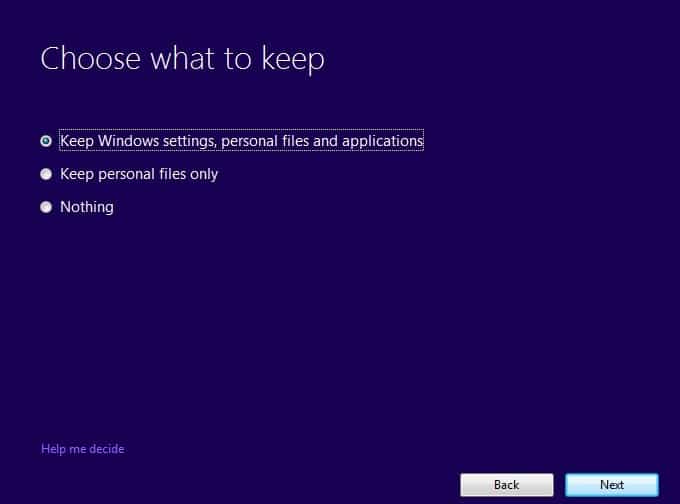
6.The PC will restart few times and your PC would be successfully upgraded.
6 būdas: paleiskite SFC ir DISM
1. Paspauskite Windows Key + X, tada spustelėkite Komandinė eilutė (administratorius).

2. Dabar į cmd įveskite šią informaciją ir paspauskite Enter:
Sfc /scannow sfc /scannow /offbootdir=c: /offwindir=c:windows (jei aukščiau aprašyta nepavyksta, pabandykite šį)

3. Palaukite, kol baigsis aukščiau nurodytas procesas, ir atlikę iš naujo paleiskite kompiuterį.
4. Dar kartą atidarykite cmd ir įveskite šią komandą ir po kiekvienos paspauskite Enter:
a) Dism /Prisijungus /Išvalymo vaizdas /Patikrinkite sveikatą b) Dism /Prisijungęs /Išvalymo vaizdas /ScanHealth c) Dism /Prisijungęs /Išvalymo vaizdas /RestoreHealth

5. Paleiskite komandą DISM ir palaukite, kol ji baigsis.
6. Jei aukščiau pateikta komanda neveikia, išbandykite toliau pateiktą:
Dism /Image:C:offline /Cleanup-Image /RestoreHealth /Šaltinis:c:testmountwindows Dism /Online /Cleanup-Image /RestoreHealth /Šaltinis:c:testmountwindows /LimitAccess
Pastaba: Pakeiskite C:RepairSourceWindows į savo taisymo šaltinio vietą (Windows diegimo arba atkūrimo diską).
7. Iš naujo paleiskite kompiuterį, kad išsaugotumėte pakeitimus ir patikrintumėte, ar galite tai padaryti Fix Windows 10 install Fails With Error C1900101-4000D.
Method 7: Reset Windows Updates Components
1. Paspauskite „Windows“ klavišą + X, tada pasirinkite Komandų eilutė (administratorius).
2. Dabar įveskite šias komandas, kad sustabdytumėte „Windows Update Services“, tada po kiekvienos iš jų paspauskite Enter:
neto stop wuauserv
net stop cryptSvc
neto sustojimo bitai
neto sustabdyti msiserver

3. Tada įveskite šią komandą, kad pervardytumėte SoftwareDistribution aplanką, tada paspauskite Enter:
C: WindowsSoftwareDistribution SoftwareDistribution.old
ren C: „WindowsSystem32catroot2 catroot2.old“

4. Galiausiai įveskite šią komandą, kad paleistumėte „Windows Update Services“, ir po kiekvienos iš jų paspauskite Enter:
net pradėkite wuauserv
neto pradėti cryptSvc
neto pradžios bitai
neto paleisk msiserver

5. Iš naujo paleiskite kompiuterį, kad išsaugotumėte pakeitimus ir patikrintumėte, ar galite tai padaryti Fix Windows 10 install Fails With Error C1900101-4000D.
Method 8: Delete Registry for Mounted Images
1. Paspauskite „Windows“ klavišą + R, tada įveskite regedit ir paspauskite Enter, kad atidarytumėte registro rengyklę.

2. Eikite į šį registro raktą:
HKEY_LOCAL_MACHINESOFTWAREMicrosoftWIMMountMounted Images
3. Pasirinkite Mounted Images then in the right window pane right-click on (Default) and select Delete.
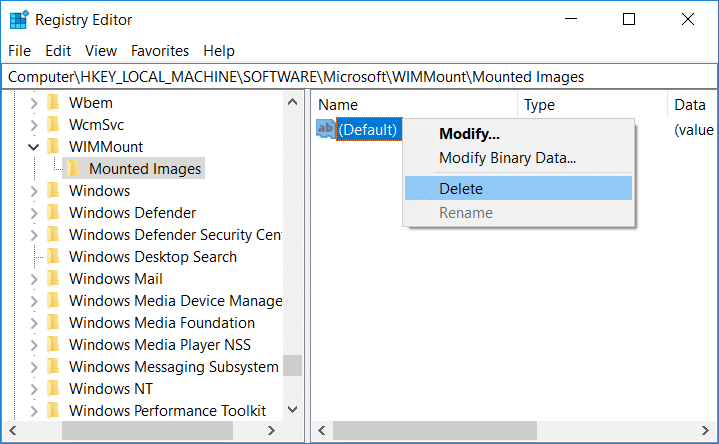
4.Exit Registry Editor and reboot your PC to save changes.
Method 9: Disable Wi-Fi Adapter and CD/DVD Drive
1. Paspauskite „Windows“ klavišą + R, tada įveskite devmgmt.msc ir paspauskite Enter, kad atidarytumėte įrenginių tvarkytuvę.

2.Expand DVD/CD-ROM drives, tada dešiniuoju pelės mygtuku spustelėkite savo CD/DVD diskas ir pasirinkite Išjungti įrenginį.

3.Similarly, expand Network adapters then right-click on your WiFi adapteris ir pasirinkite Išjungti įrenginį.
4.Again try to run Windows 10 setup and see if you’re able to Fix Windows 10 install Fails With Error C1900101-4000D.
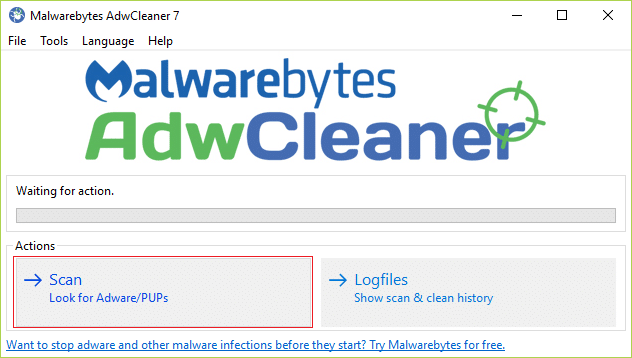
Method 10: Run Malwarebytes and AdwCleaner
Malwarebytes is a powerful on-demand scanner which should remove browser hijackers, adware and other types of malware from your PC. It is important to note that Malwarebytes will run alongside antivirus software without conflicts. To install and run Malwarebytes Anti-Malware, go to this article and follow each and every step.
1.Download AdwCleaner from this link.
2.Once the download is complete, double-click on the adwcleaner.exe file to run the program.
3. Spustelėkite „SutinkuMygtuką accept the license agreement.
4.On the next screen, click the Nuskaitymo mygtukas under Actions.
5.Now, wait for the AdwCleaner to search for PUPs and other malicious programs.
6.Once the scan is complete, click Švarus in order to clean your system of such files.
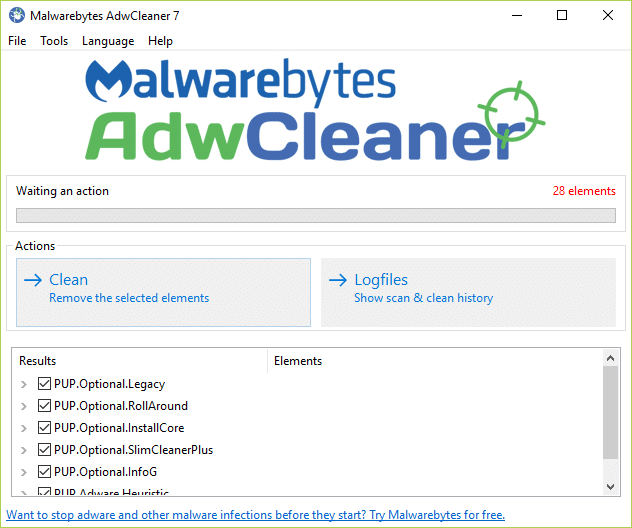
7.Save any work you might be doing as your PC will need to reboot, click OK to reboot your PC.
8.Once the computer reboots, a log file will open which will list all of the files, folders, registry keys, etc that were removed in the previous step.
Rekomenduojama:
Tai tau pavyko Fix Windows 10 install Fails With Error C1900101-4000D bet jei vis dar turite klausimų dėl šio vadovo, nedvejodami paklauskite jų komentarų skiltyje.