Whakahohehia te Whakarei Whakapaipai mo te Motuhēhēnga Mata Kia Ora Windows

Enable Enhanced Anti-Spoofing for Windows Hello Face Authentication: Windows 10 PC allows you to sign-in using fingerprint, face recognition, or iris scan using Windows Hello. Now Windows hello is a biometrics-based technology which enables users to authenticate their identity in order to access their devices, apps, networks etc using any one of the above methods. Now face detection in Windows 10 works well, but it can’t differentiate between a photo of your face inside your mobile or the actual user face.
The potential threat because of this issue is that someone with your photo could unlock your device by using their mobile. To overcome this difficulty, the anti-spoofing technology comes into actions and once you have enabled the anti-spoofing for Windows Hello Face Authentication, a photo of the authentic user cannot be used to login into the PC.
Once the enhanced anti-spoofing is enabled, Windows will require all users on the device to use anti-spoofing for facial features. This policy is not enabled by default and users have to manually enable anti-spoofing feature. Anyway, without wasting any time let’s see How to Enable Enhanced Anti-Spoofing for Windows Hello Face Authentication with the help of the below-listed tutorial.
Whakahohehia te Whakarei Whakapaipai mo te Motuhēhēnga Mata Kia Ora Windows
Me whakarite ki te hanga i tetahi waahi whakaora mena ka raru tetahi mea.
Method 1: Disable or Enable Enhanced Anti-Spoofing for Windows Hello Face Authentication in Group Policy Editor
1.Press Windows Key + R ka pato gpedit.msc ka pa ki te Enter kia tuwhera Kaiwhakatika Kaupapahere Rōpū.

2.Whakatere ki te waahi e whai ake nei:
Computer ConfigurationAdministrative TemplatesWindows ComponentsBiometricsFacial Features
3.Select Whakaaturanga Kanohi then in right window pane double-click on the “Configure enhanced anti-spoofing” kaupapa here.
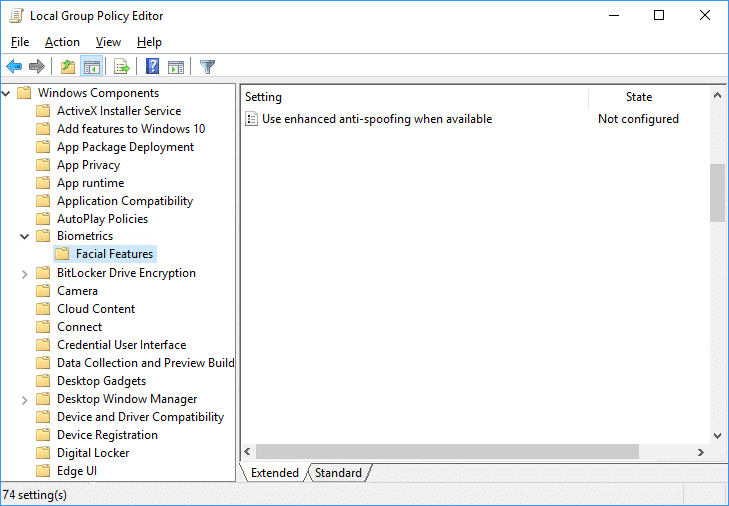
4.Now change the settings of the Configure enhanced anti-spoofing policy according to:
To Enable Enhanced Anti-Spoofing for Windows Hello Face Authentication: Select Not Configured or Disabled
To Disable Enhanced Anti-Spoofing for Windows Hello Face Authentication: Select Enabled

5.Click Apply followed by OK then close Group Policy Editor.
6.Whakahouhia to PC ki te tiaki i nga huringa.
Method 2: Disable or Enable Enhanced Anti-Spoofing for Windows Hello Face Authentication in Registry Editor
1.Press Windows Key + R ka pato regedit ka pa ki te Enter kia tuwhera Kai-Rehita Rehita.

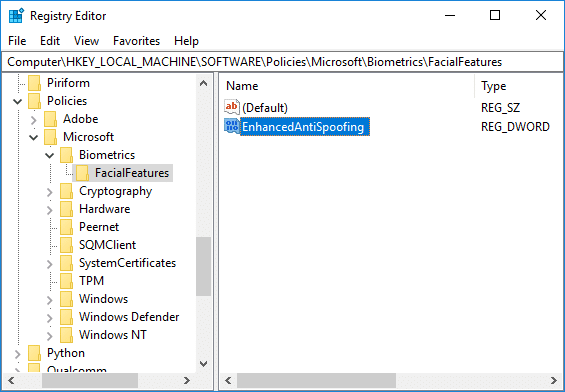
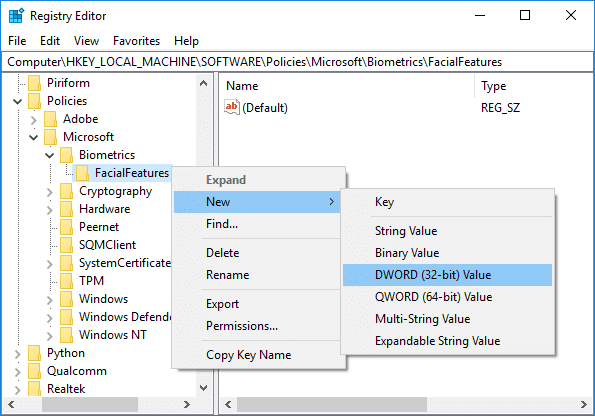
2.Whakatere ki te taviri rehita e whai ake nei:
HKEY_LOCAL_MACHINESOFTWAREPoliciesMicrosoftBiometricsFacialFeatures
3.Pāwhiri-matau ki runga FacialFeatures ka tīpako Hou > DWORD (32-bit) Uara.
4. Whakaingoatia tenei DWORD katahi ano ka hangaia hei EnhancedAntiSpoofing a ka tomo tomo.

5.Double-click on EnhancedAntiSpoofing DWORD and change it’s value to:
Enable Enhanced Anti-Spoofing: 1
Disable Enhanced Anti-Spoofing: 0
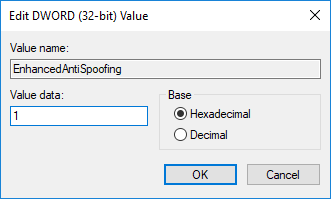
6.Once you have typed the correct value simply click OK.
7.Close registry editor and reboot your PC to save changes.
Manakohia:
Koira kua angitu koe i ako How to Enable Enhanced Anti-Spoofing for Windows Hello Face Authentication in Windows 10 engari mena kei a koe etahi patai mo tenei panui ka pai ki te patai ki a raatau i te waahanga korero.