Windows 10 дээр Credential Guard-г идэвхжүүлэх эсвэл идэвхгүй болгох

Enable or Disable Credential Guard in Windows 10: Windows Credential Guard uses virtualization-based security to isolate secrets so that only privileged system software can access them. Unauthorized access to these secrets can lead to credential theft attacks, such as Pass-the-Hash or Pass-The-Ticket. Windows Credential Guard prevents these attacks by protecting NTLM password hashes, Kerberos Ticket Granting Tickets, and credentials stored by applications as domain credentials.
By enabling Windows Credential Guard the following features and solutions are provided:
Тоног төхөөрөмжийн аюулгүй байдал
Виртуалчлалд суурилсан аюулгүй байдал
Better protection against advanced persistent threats
Now you know the importance of the Credential Guard, you should definitely enable this for your system. So without wasting any time let’s see How to Enable or Disable Credential Guard in Windows 10 with the help of the below-listed tutorial.
Windows 10 дээр Credential Guard-г идэвхжүүлэх эсвэл идэвхгүй болгох
Ямар нэг зүйл буруу болсон тохиолдолд сэргээх цэг үүсгэхээ мартуузай.
Method 1: Enable or Disable Credential Guard in Windows 10 using Group Policy Editor
Тайлбар: This method only works if you have Windows Pro, Education, or Enterprise Edtion. For Windows Home version users skip this method and follow the next one.
1. Windows Key + R товчийг дараад бичнэ үү regedit нээхийн тулд Enter дарна уу Бүлгийн бодлогын редактор.

2. Дараах зам руу шилжинэ.
Computer Configuration > Administrative Templates > System > Device Guard
3. Сонголт хийхээ мартуузай Төхөөрөмжийн хамгаалагч than in right window pane double-click on “Turn On Virtualization Based Security” бодлого.
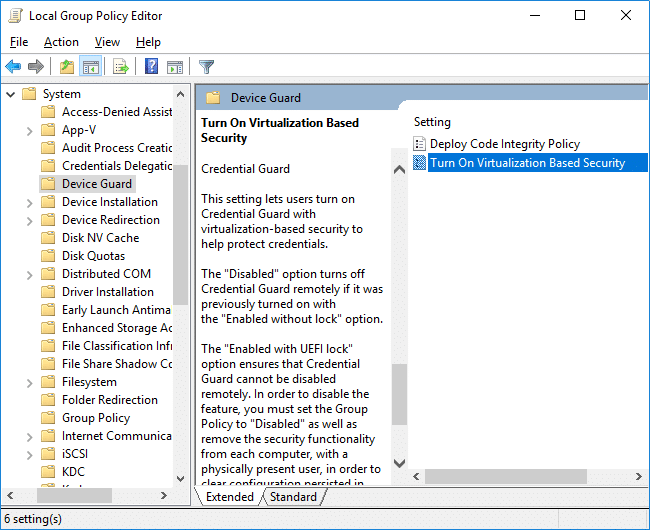
4.In the Properties window of the above policy make sure to select Идэвхжүүлсэн байна.
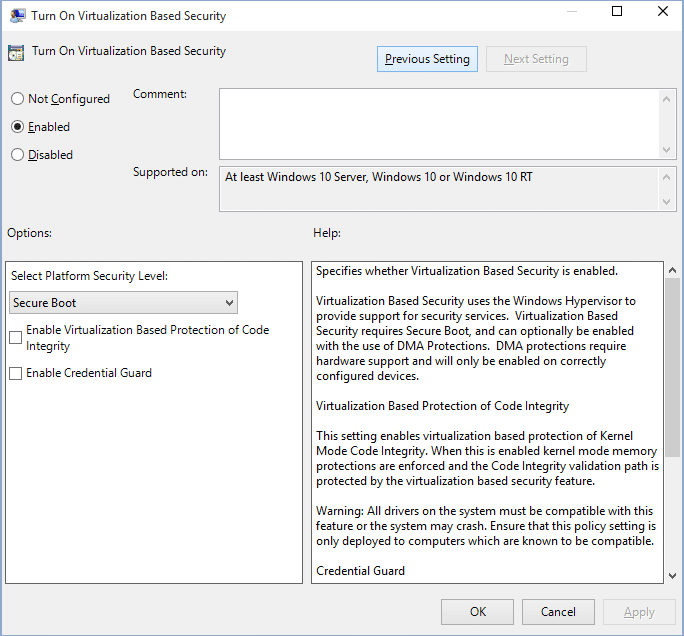
5.Now from the “Платформын аюулгүй байдлын түвшинг сонгоно уу” drop-down select Secure Boot or Secure Boot and DMA Хамгаалалт.
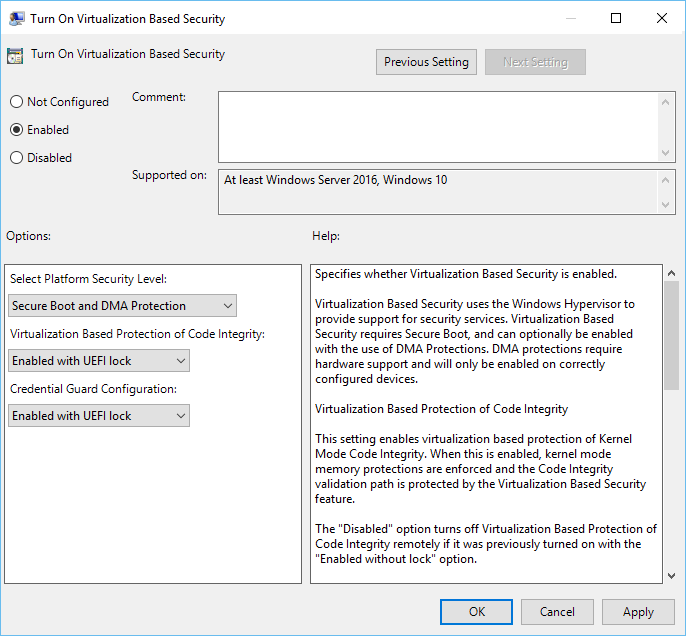
6.Next, from “Credential Guard Configuration” drop-down select Enabled with UEFI lock. If you want to turn off Credential Guard remotely, choose Enabled without lock instead of Enabled with UEFI lock.
7.Once finished, click Apply followed by OK.
8. Өөрчлөлтүүдийг хадгалахын тулд компьютерээ дахин ачаална уу.
Method 2: Enable or Disable Credential Guard in Windows 10 using Registry Editor
Credential Guard uses virtualization-based security features which have to be enabled first from Windows feature before you can enable or disable Credential Guard in Registry Editor. Make sure to only use one of the below-listed methods to enable virtualization-based security features.
Програм болон онцлогуудыг ашиглан виртуалчлалд суурилсан аюулгүй байдлын функцуудыг нэмнэ үү
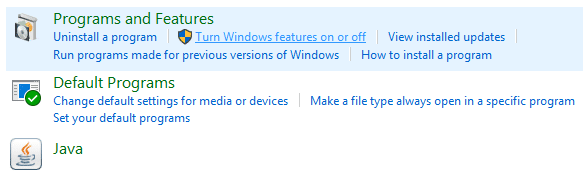
1. Windows Key + R товчийг дараад бичнэ үү appwiz.cpl нээхийн тулд Enter дарна уу Program and Features.
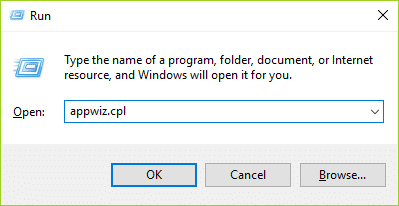
2.From the left-hand window click on “Windows онцлогуудыг асаах эсвэл унтраах".
3.Find and expand Hyper-V then similarly expand Hyper-V Platform.
4.Under Hyper-V Platform шалгах тэмдэг "Hyper-V Hypervisor".
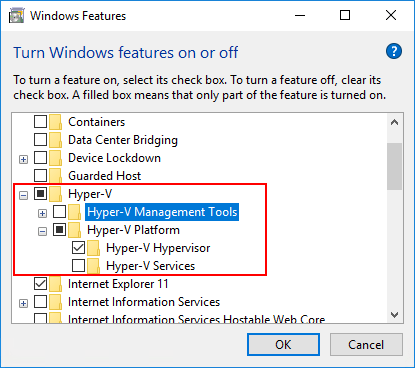
5.Now scroll down and checkmark “Isolated User Mode” OK дарна уу.
Виртуалчлалд суурилсан аюулгүй байдлын функцуудыг DISM ашиглан офлайн зураг дээр нэмнэ үү
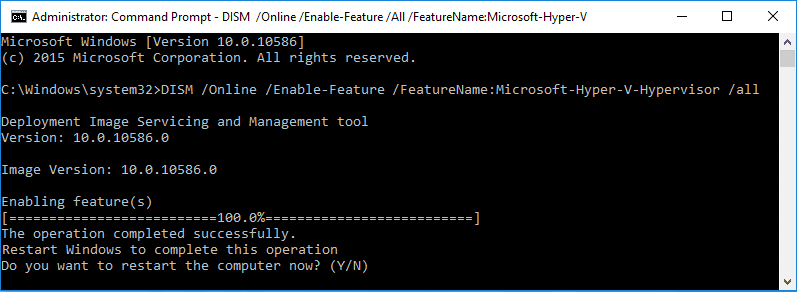
1. Windows Key + X товчийг дараад сонгоно уу Тушаал хүлээх мөр (Admin).

2.Type the following command into cmd to add the Hyper-V Hypervisor and hit Enter:
dism /image:<WIM file name> /Enable-Feature /FeatureName:Microsoft-Hyper-V-Hypervisor /all
OR
dism /Online /Enable-Feature:Microsoft-Hyper-V /All
3.Add the Isolated User Mode feature by running the following command:
dism /image:<WIM file name> /Enable-Feature /FeatureName:IsolatedUserMode
OR
dism /Online /Enable-Feature /FeatureName:IsolatedUserMode
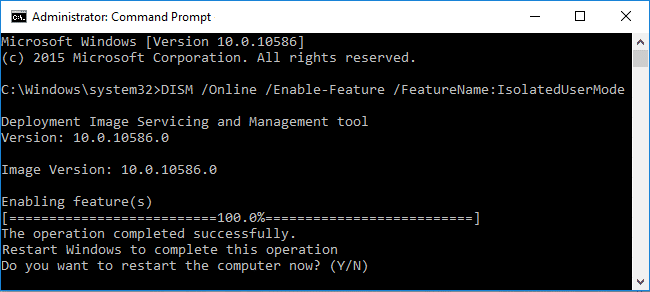
4.Once finished, you can close the command prompt.
Windows 10 дээр Credential Guard-г идэвхжүүлэх эсвэл идэвхгүй болгох
1. Windows Key + R товчийг дараад бичнэ үү regedit нээхийн тулд Enter дарна уу Бүртгэлийн редактор.
2. Дараах бүртгэлийн түлхүүр рүү очно уу:
HKEY_LOCAL_MACHINESystemCurrentControlSetControlDeviceGuard
3. Хулганы баруун товчийг дарна уу DeviceGuard Дараа нь сонгоно уу Шинэ > DWORD (32 бит) утга.
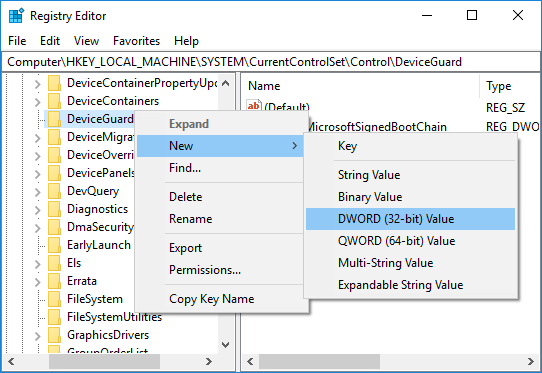
4. Энэ шинээр үүсгэсэн DWORD гэж нэрлэнэ үү Виртуалчлалд суурилсан аюулгүй байдлыг идэвхжүүл болон Enter дараарай.
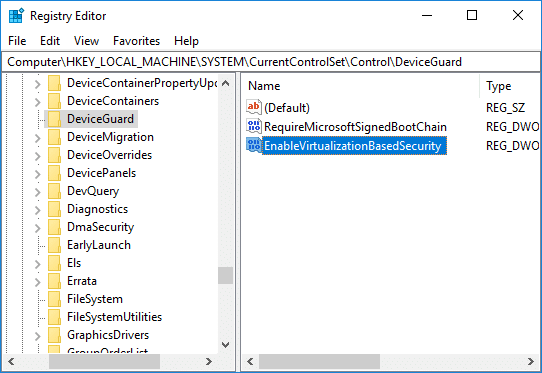
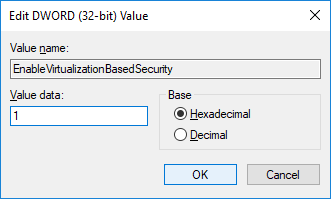
5.Double-click on EnableVirtualizationBasedSecurity DWORD then change its value to:
To Enable Virtualization-based Security: 1
To Disable Virtualization-based Security: 0
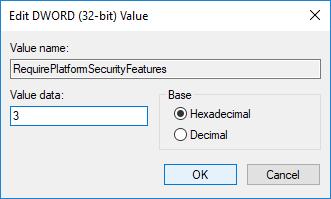
6.Now again right-click on DeviceGuard then select Шинэ> DWORD (32-бит) утга мөн энэ DWORD гэж нэрлэнэ үү PlatformSecurityFeatures шаардлагатай Дараа нь Enter дараарай.
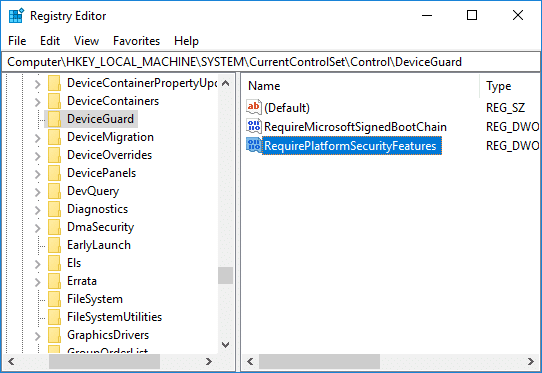
7.Double-click on RequirePlatformSecurityFeatures DWORD and change it’s value to 1 to use Secure Boot only or set it to 3 to use Secure Boot and DMA protection.
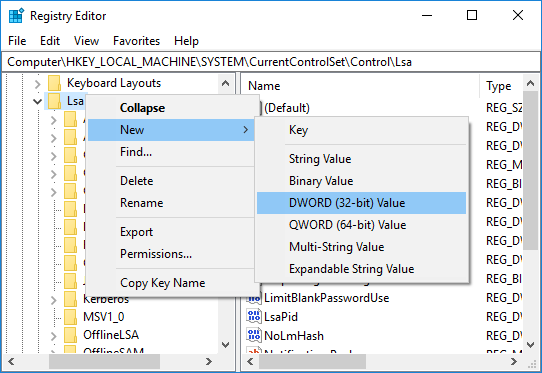
8. Одоо дараах бүртгэлийн түлхүүр рүү очно уу:
HKEY_LOCAL_MACHINESystemCurrentControlSetControlLSA
9.Right-click on LSA then select Шинэ> DWORD (32-бит) утга then name this DWORD as LsaCfgFlags болон Enter дараарай.
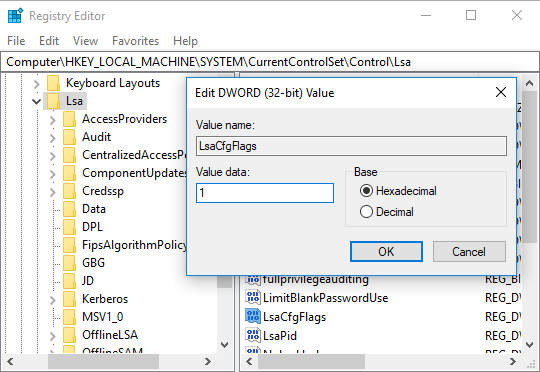
10.Double-click on LsaCfgFlags DWORD and change its value according to:
Disable Credential Guard: 0
Enable Credential Guard with UEFI lock: 1
Enable Credential Guard without lock: 2
11.Once finished, close Registry Editor.
Disable Credential Guard in Windows 10
If Credential Guard was enabled without UEFI Lock then you can Disable Windows Credential Guard ашиглаж байна Device Guard and Credential Guard hardware readiness tool or the following method:
1. Windows Key + R товчийг дараад бичнэ үү regedit нээхийн тулд Enter дарна уу Бүртгэлийн редактор.
2.Navigate and delete the following registry keys:
HKEY_LOCAL_MACHINESystemCurrentControlSetControlLSALsaCfgFlags
HKEY_LOCAL_MACHINESoftwarePoliciesMicrosoftWindowsDeviceGuardEnableVirtualizationBasedSecurity
HKEY_LOCAL_MACHINESoftwarePoliciesMicrosoftWindowsDeviceGuardRequirePlatformSecurityFeatures

3.Delete the Windows Credential Guard EFI variables by using bcdedit. Press Windows Key + X then select Тушаал хүлээх мөр (Admin).
4. cmd дээр дараах тушаалыг бичээд Enter дарна уу.
mountvol X: /s
copy %WINDIR%System32SecConfig.efi X:EFIMicrosoftBootSecConfig.efi /Y
bcdedit /create {0cb3b571-2f2e-4343-a879-d86a476d7215} /d "DebugTool" /application osloader
bcdedit /set {0cb3b571-2f2e-4343-a879-d86a476d7215} path "EFIMicrosoftBootSecConfig.efi"
bcdedit /set {bootmgr} bootsequence {0cb3b571-2f2e-4343-a879-d86a476d7215}
bcdedit /set {0cb3b571-2f2e-4343-a879-d86a476d7215} loadoptions DISABLE-LSA-ISO
bcdedit /set {0cb3b571-2f2e-4343-a879-d86a476d7215} device partition=X:
mountvol X: /d
5.Once finished, close command prompt and reboot your PC.
6.Accept the prompt to disable Windows Credential Guard.
Зөвлөмж:
Үүнийг л та амжилттай сурсан How to Enable or Disable Credential Guard in Windows 10 Гэхдээ танд энэ заавартай холбоотой асуулт байгаа бол коммент хэсэгт асуугаарай.