Facebook дээрх кэшийг хэрхэн цэвэрлэх вэ

The Facebook app saves files for later reference as you use it. It has its own browser with a cache, much like any other browser. The information is saved in the app cache, saving you time when doing certain tasks. Because Facebook doesn’t set a limit on the size of its browser cache, it may get fairly large, making the app slow. If you’re concerned about storage or having issues with the Facebook app, you may wish to erase the cache. Today we’ll show you how to clear cache on Facebook in various devices like Android and iOS.

Facebook дээрх кэшийг хэрхэн цэвэрлэх вэ
Facebook-ийн is a ubiquitous social network that follows you throughout the Internet. Its share widgets have become such an integral part of the Internet that it’s difficult to locate a page without them. Facebook widgets aren’t merely seen on websites. Both iOS and macOS support it natively, so there is no difference between your smartphones and PCs. Continue reading to clear Facebook cache Android, iPhone, and web browsers.
Арга 1: Android дээр
Here are the steps to clear Facebook cache on Android devices.
Тайлбар: Since smartphones don’t have the same Settings options, and they vary from manufacturer to manufacturer hence, ensure the correct settings before changing any. The said steps were performed on OnePlus Nord.
Үзнэ үү:
How to Get Rid of Picasa on Samsung Galaxy S5
Android дээрх Gmail автоматаар бөглөхөөс имэйл хаягийг хэрхэн устгах вэ
Android дээр HEIC-г JPG болгон хөрвүүлэх арга
Android дээр Gear VR үйлчилгээг хэрхэн идэвхгүй болгох вэ
Шифрлэгдсэн VeraCrypt-ийг Android дээр хэрхэн суулгах вэ
Option 1: Through App
Your personal account data, photographs, or posts will not be deleted if you clear your Facebook cache. Here’s how to clear Facebook cache Android:
1. Нээх Facebook-ийн Таны утсан дээрх апп.
2. Дээр дарна уу гамбургер дүрс.
![]()
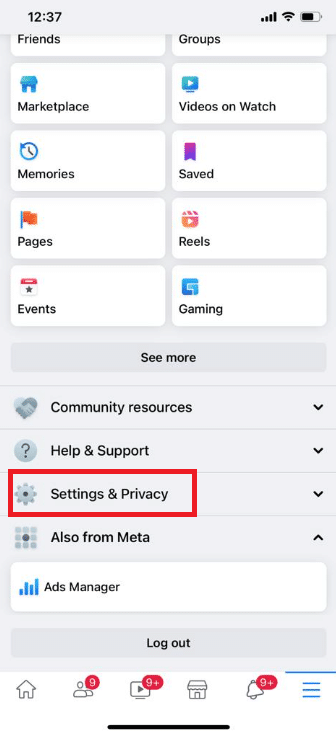
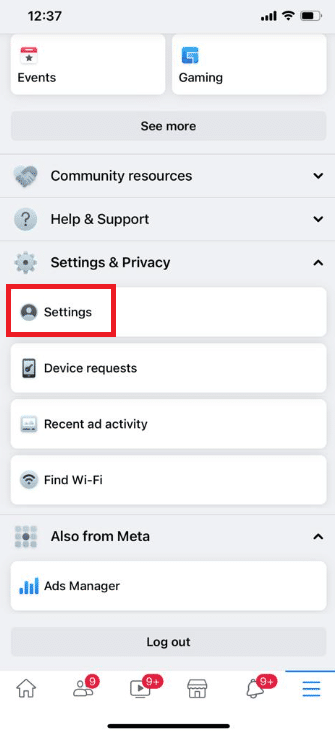
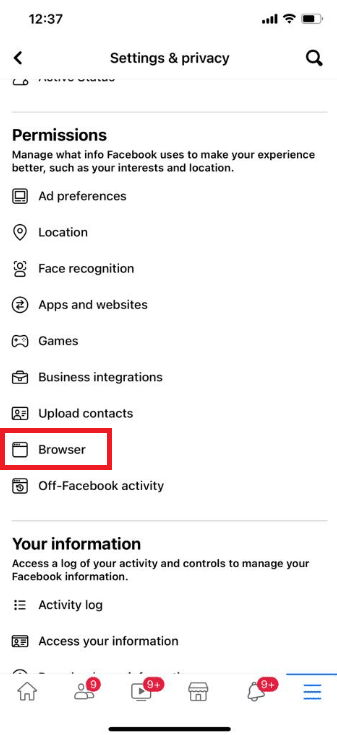
3. Swipe to the bottom of the page and tap on Тохиргоо ба нууцлал.
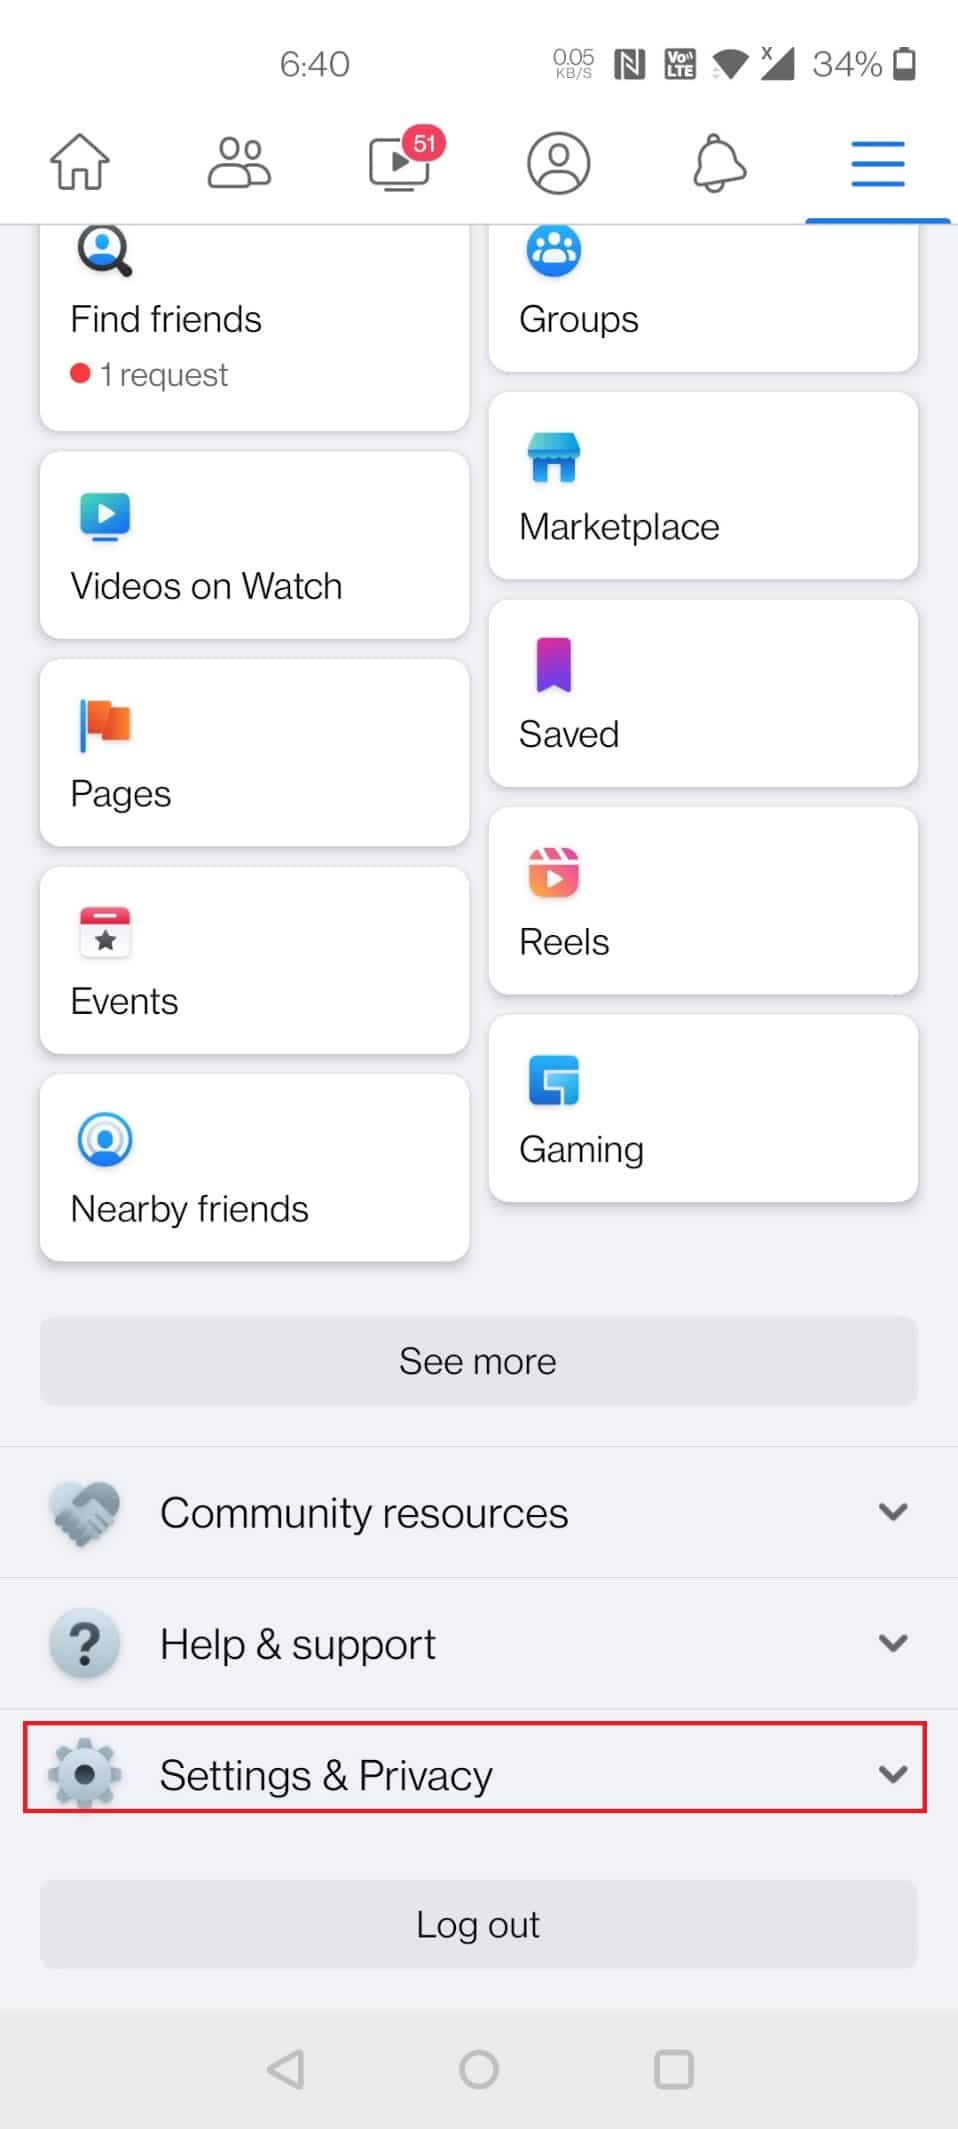
4 дугаартай. Дарна уу Тохиргоо.

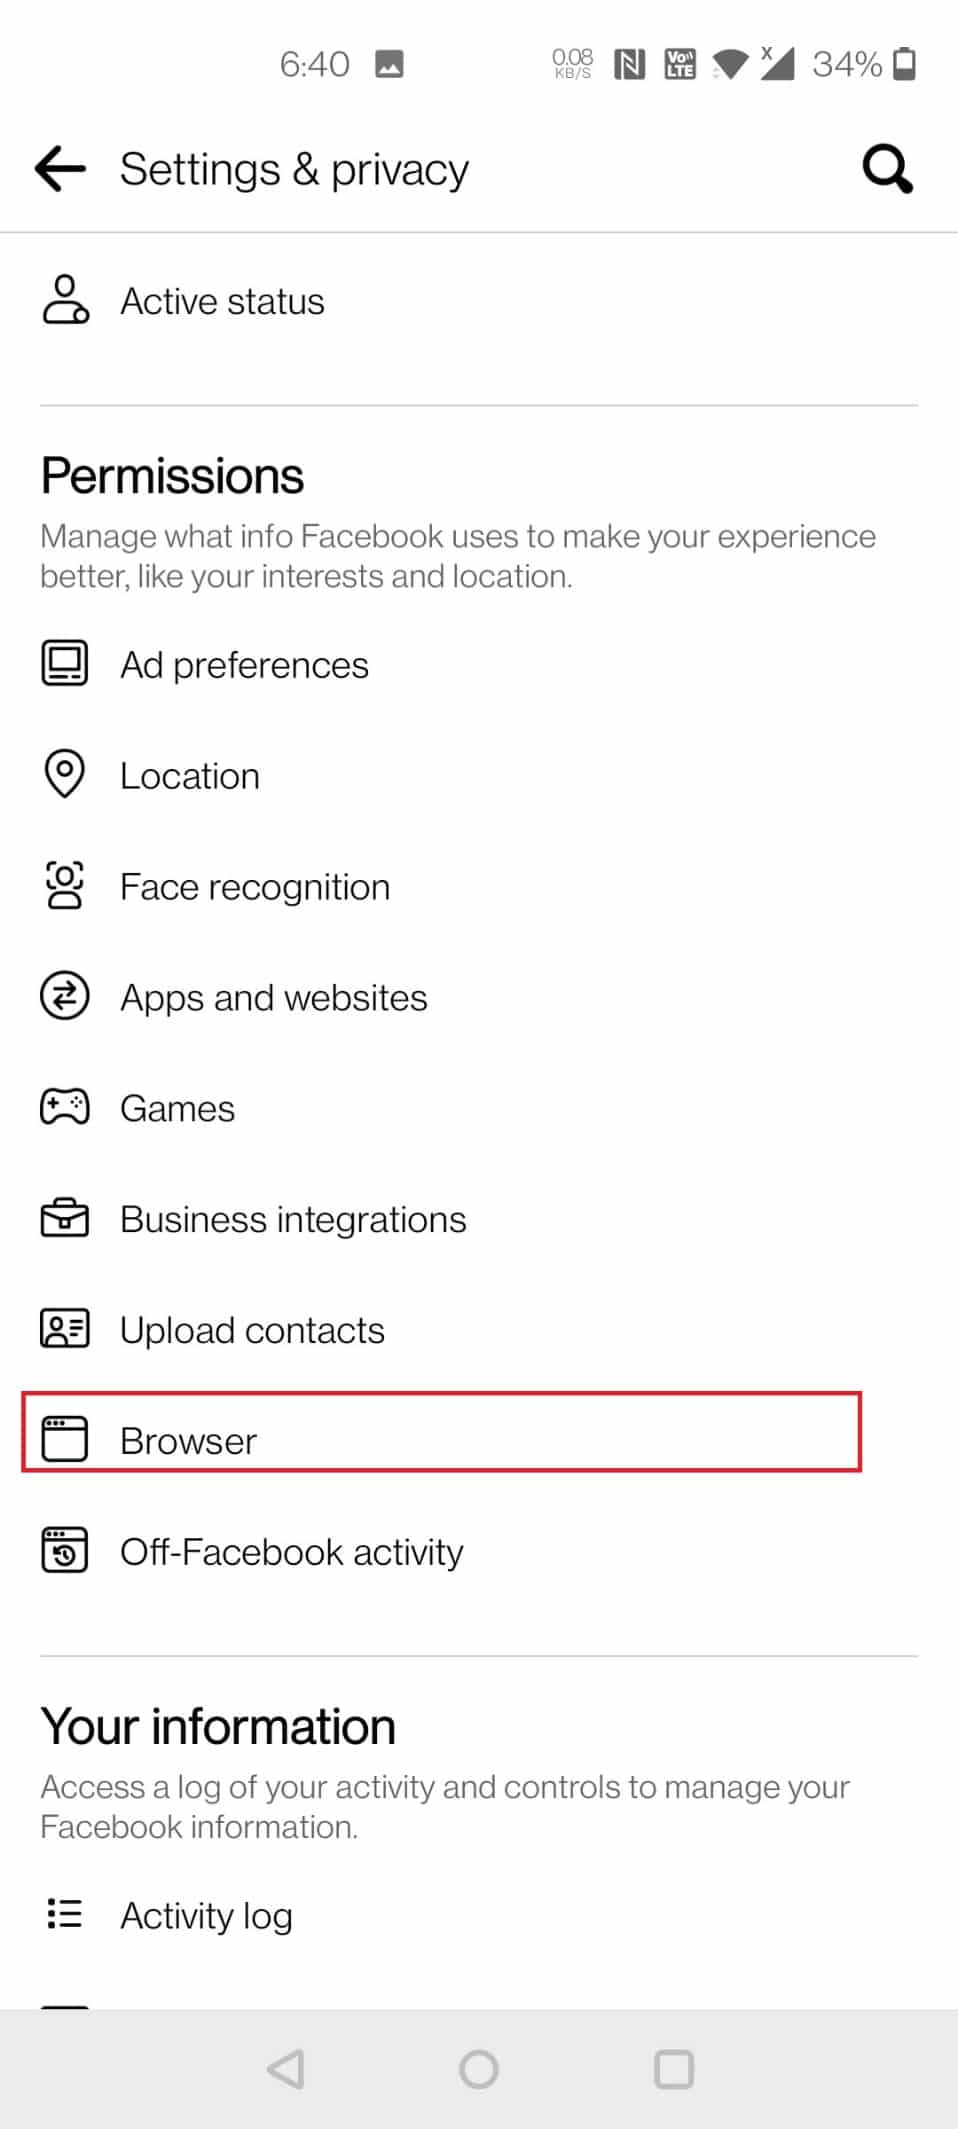
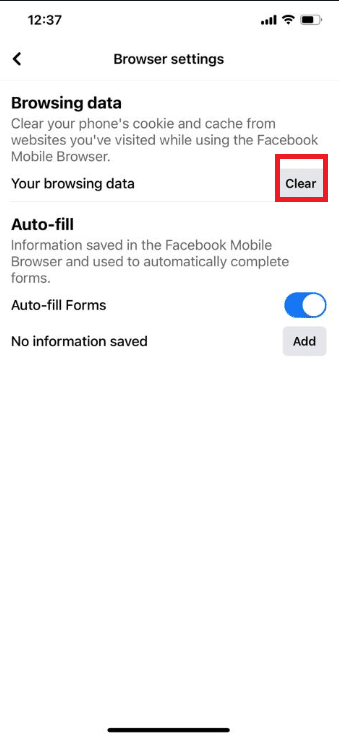
5. Доош шударч, дээр товш Хөтөч тохируулга Зөвшөөрөл.
6. Дээр дарна уу Цэвэр товчийг дарж Мэдээлэл үзэх.

Option 2: Through Settings
To clear cache on Facebook through Android device settings, follow the given steps below:
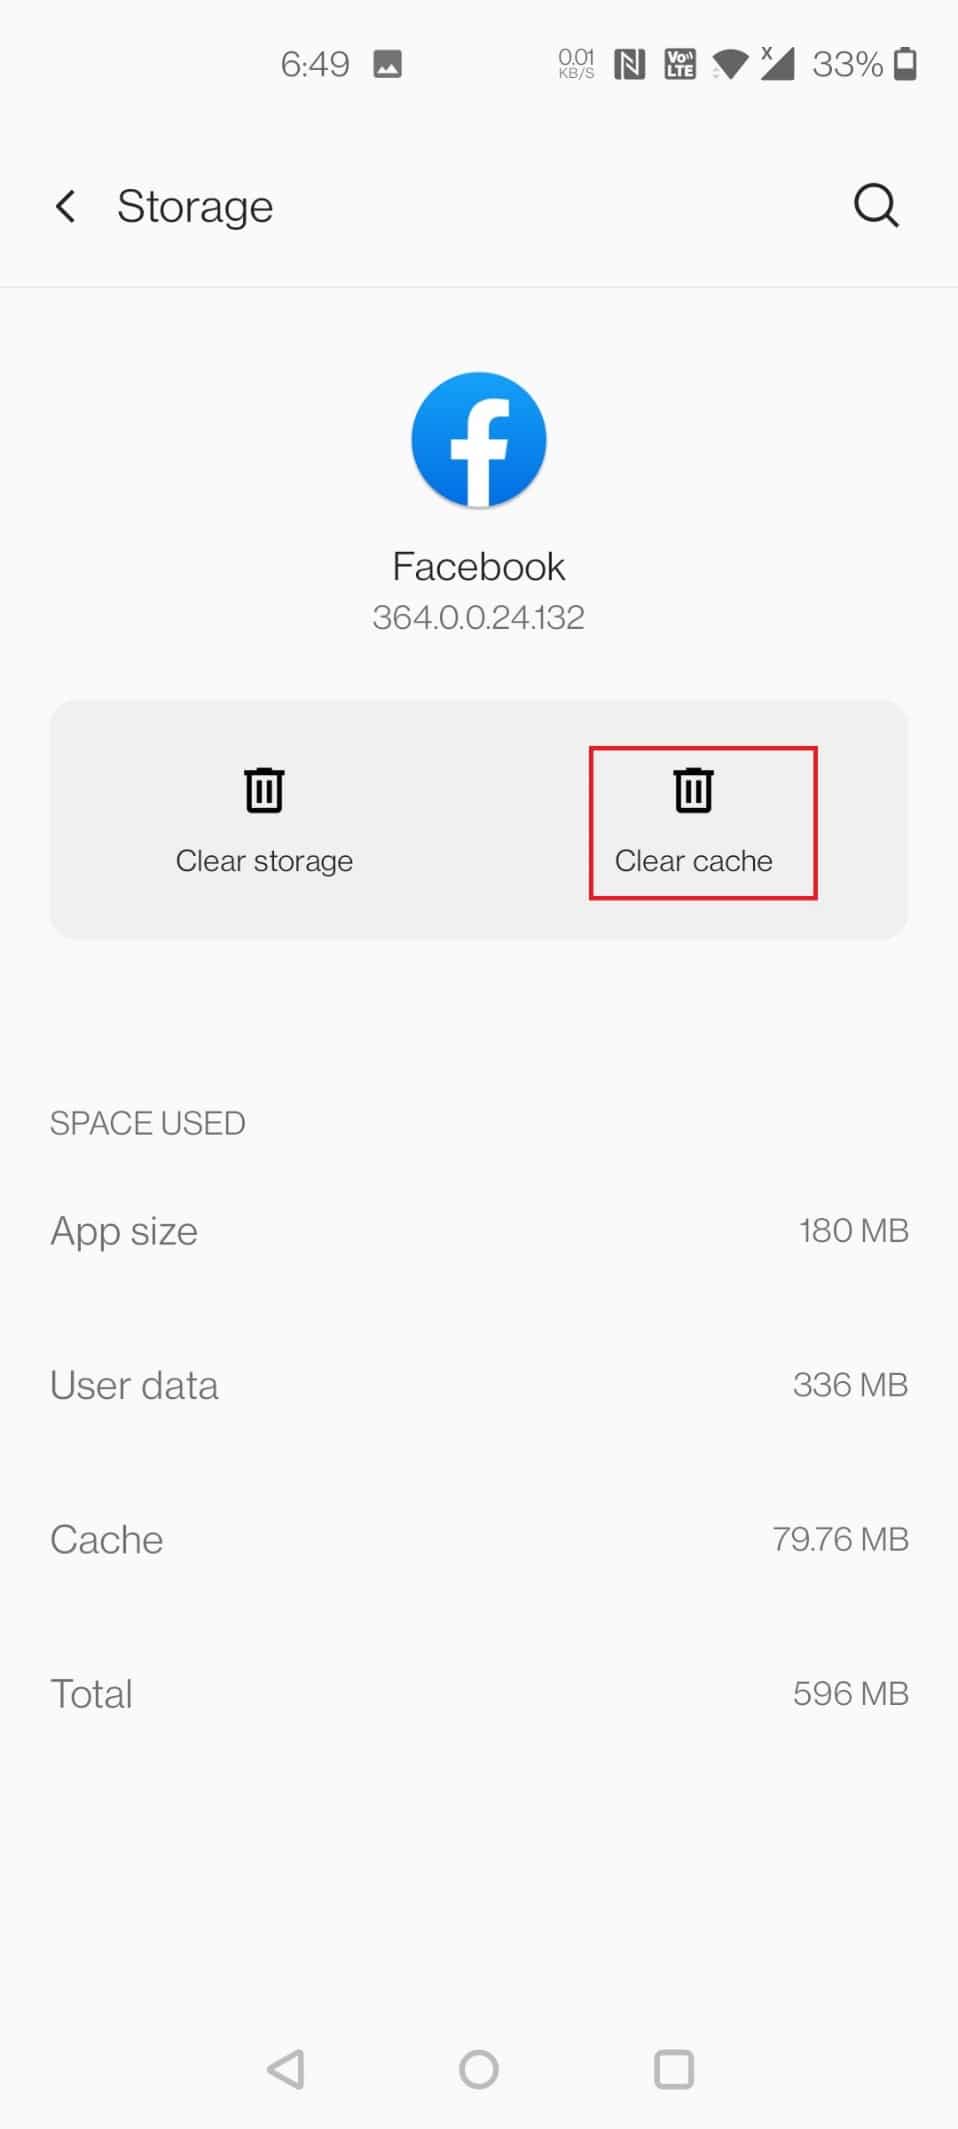
1. Руу явах Тохиргоо Таны утас дээр.
2 дугаартай. Дарна уу Апп, мэдэгдэл.
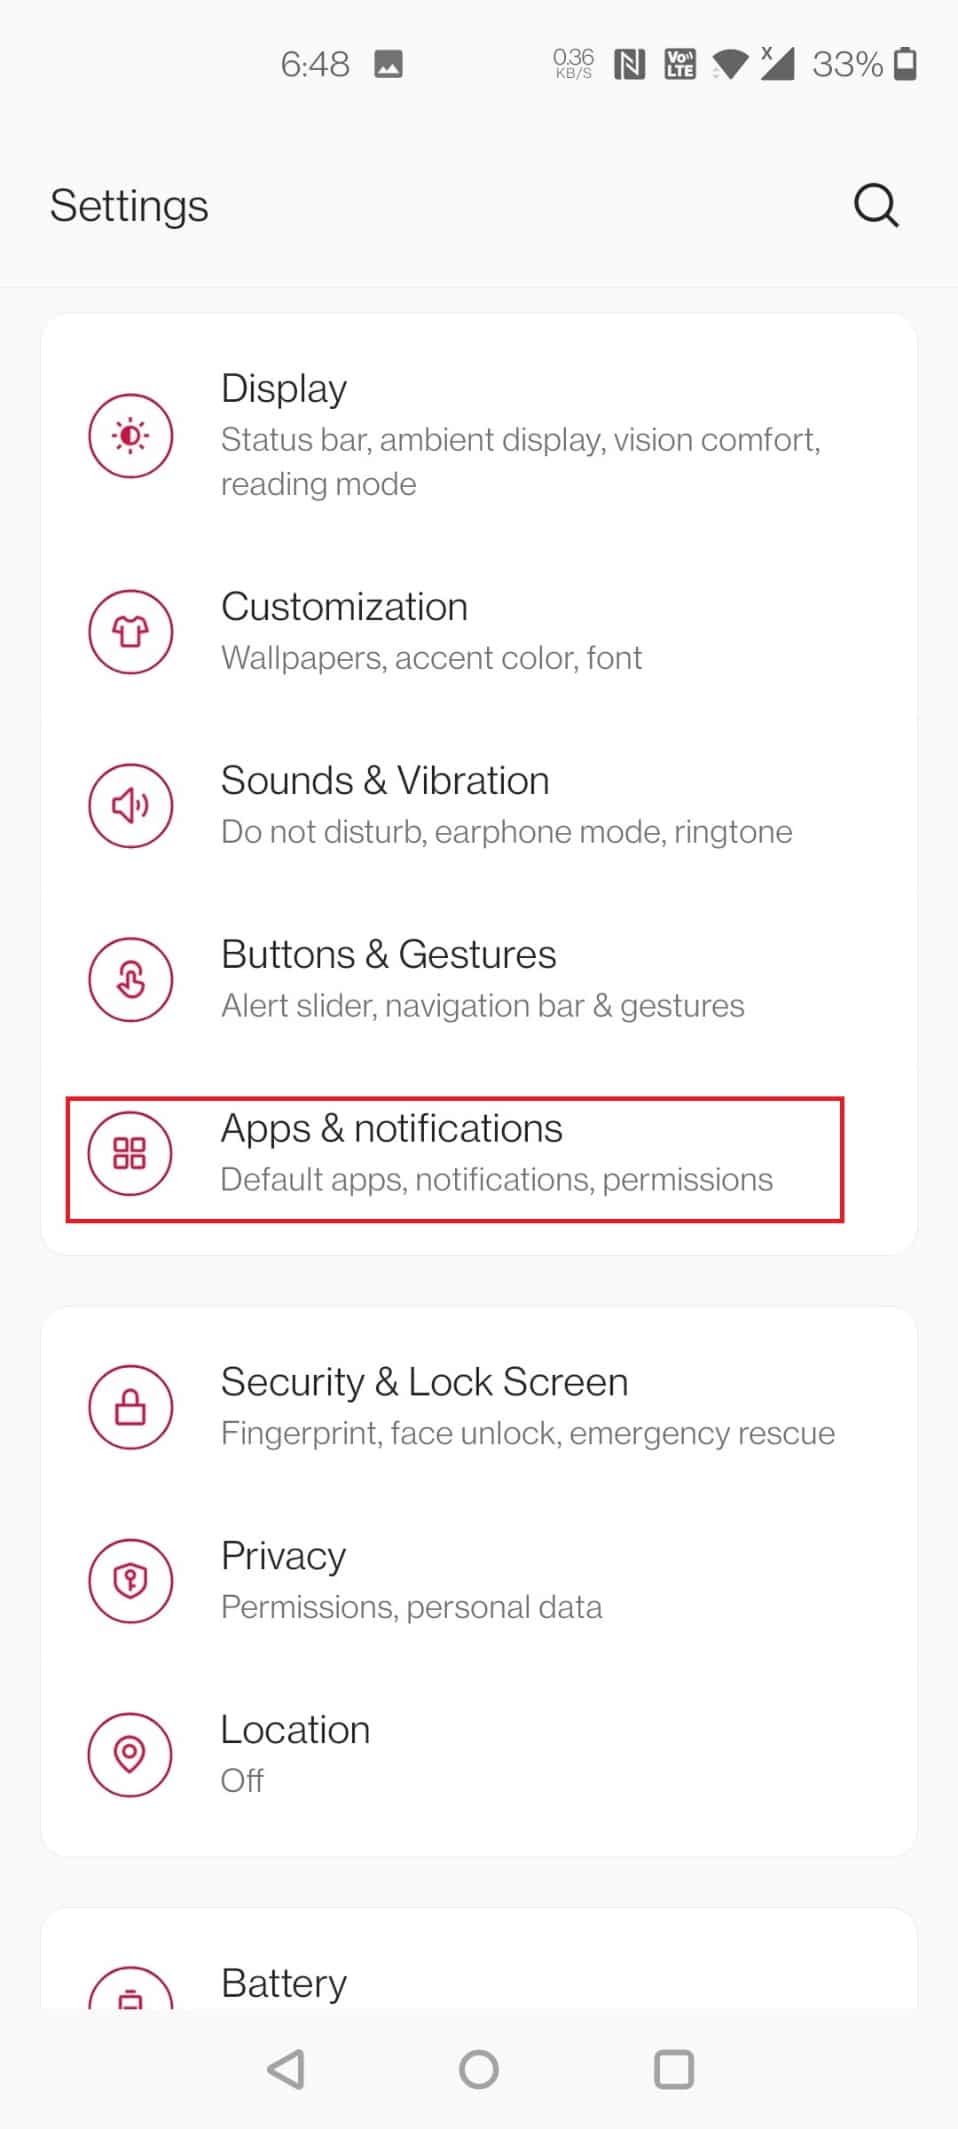
3. Доош шударч, товшино уу Facebook-ийн.

4 дугаартай. Дарна уу Хадгалах ба хадгалах сан.
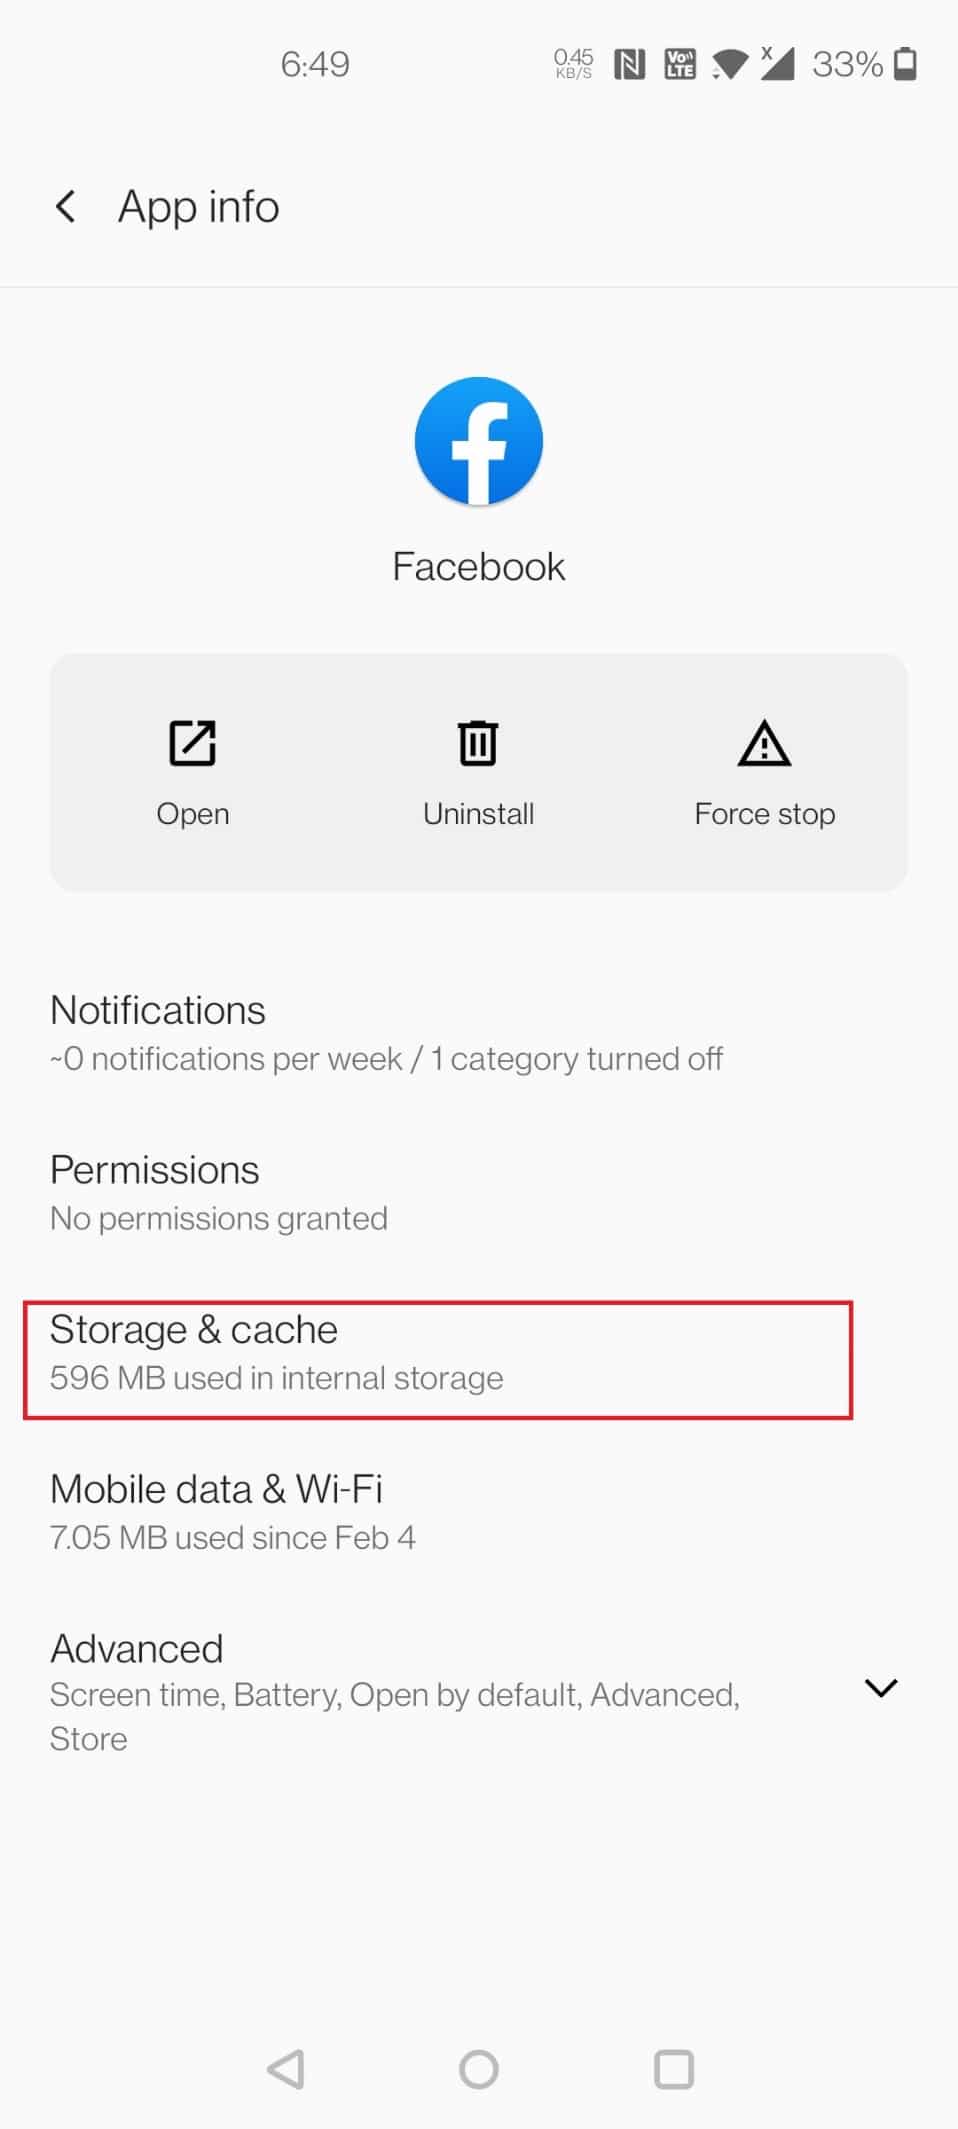
5 дугаартай. Дарна уу Кэшийг цэвэрлэх.
Мөн уншина уу: Chrome дээрх Facebook мэдэгдлийг хэрхэн унтраах вэ
Арга 2: iOS дээр
Follow these steps to clear Facebook cache in iOS.
Option 1: Through App
To begin, delete the cache in your Facebook browser. Only the data Facebook has stored from websites you visited using the in-app web browser will be cleared. Here’s how to clear cache on Facebook
1. Нээх Facebook-ийн Програм.
2. In the bottom-right corner, tap on the гамбургер дүрс.
![]()
3. At the bottom, tap on Тохиргоо ба нууцлал.
4 дугаартай. Дарна уу Тохиргоо.
5. Swipe down and tap on the option Хөтөч хуудасны доод хэсэгт.
6 дугаартай. Дарна уу Цэвэр хажуугийн Мэдээлэл үзэх.
Option 2: Through Settings
Clearing app cache on iPhone can be done only by offloading the app from the device. If you use to clear the cache on your iPhone through settings, follow the below steps to clear cache on Facebook through iOS settings.
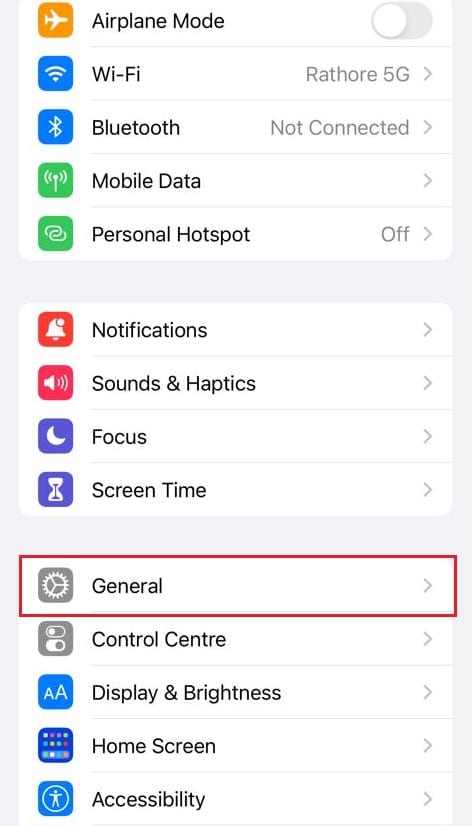
1. Нээлттэй Тохиргоо Таны iPhone дээр.

2 дугаартай. Дарна уу Ерөнхий.
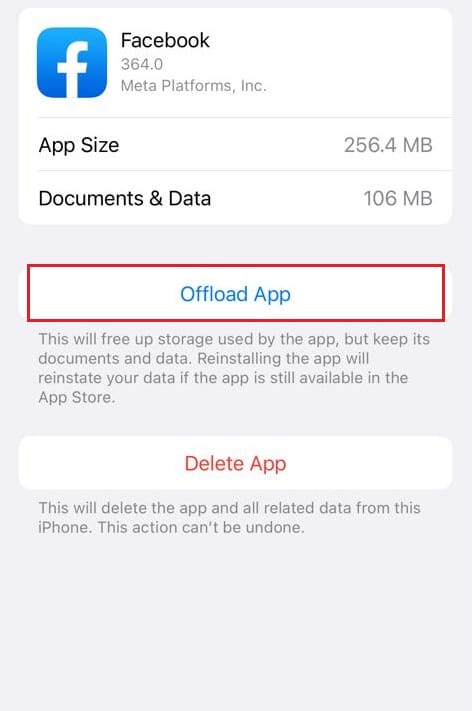
3. Одоо товшино уу iPhone хадгалах.
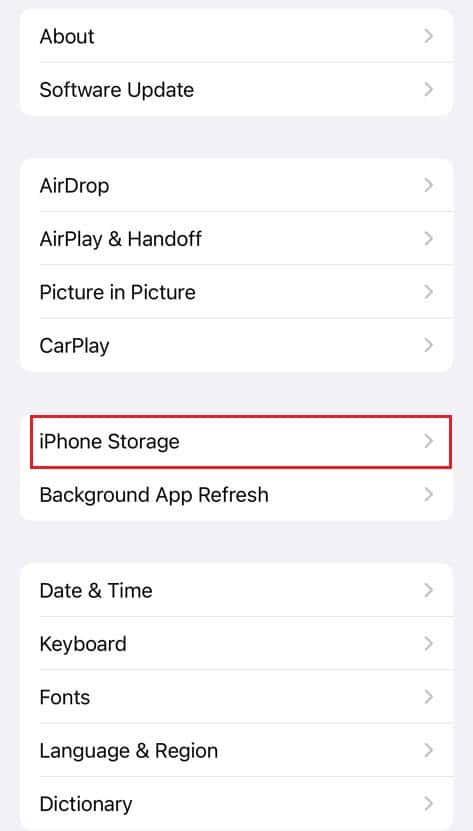
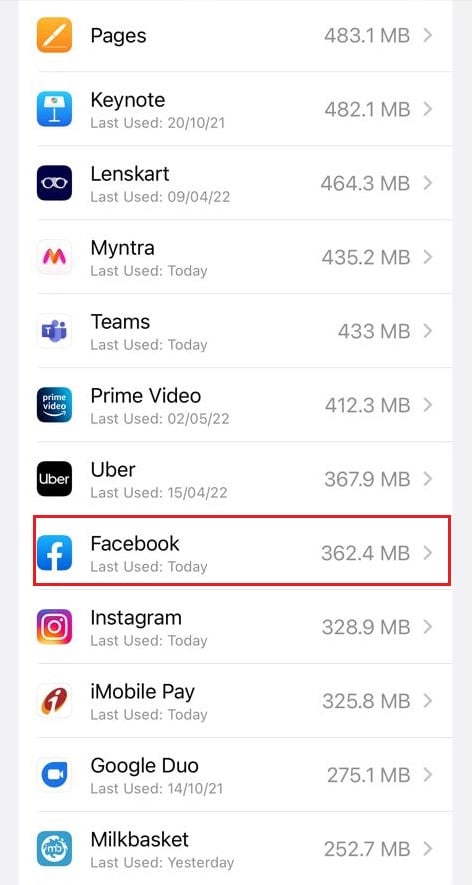
4. Доош шударч, товшино уу Facebook-ийн.
5 дугаартай. Дарна уу Offload програм.
Тайлбар: Offloading will retain the documents and settings on your device. You can also choose Аппыг устгах.
6. Одоо товшино уу App Store.
7. Search and install the Facebook-ийн апп.
Мөн уншина уу: Facebook хавсралт боломжгүй алдааг засна уу
Method 3: On Web Browser
You cannot specifically clear the Facebook cache on web browsers. Instead, you can clear the cache of the browser. The steps to clear cache vary on different web browsers. Below are the steps on how to clear cache on Facebook on Google Chrome, Firefox, and Microsoft Edge.
Option 1: On Google Chrome
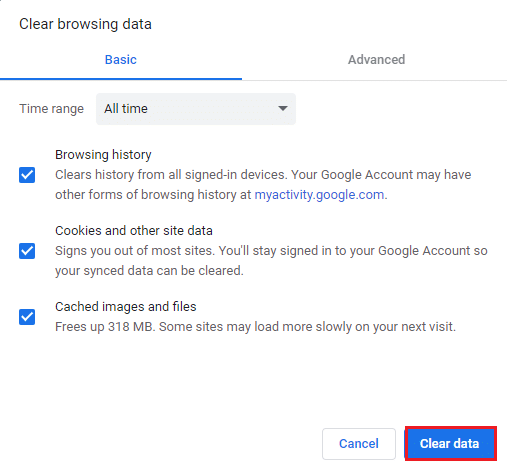
Read our guide on How to Clear Cache & Cookies in Google Chrome and clear the browsing data.
Option 2: Mozilla Firefox
The steps to clear browsing data of Mozilla Firefox is given below:
1 дугаартай. Дар Windows түлхүүр, төрөл Firefox болон Түлхүүрийг оруулна уу.
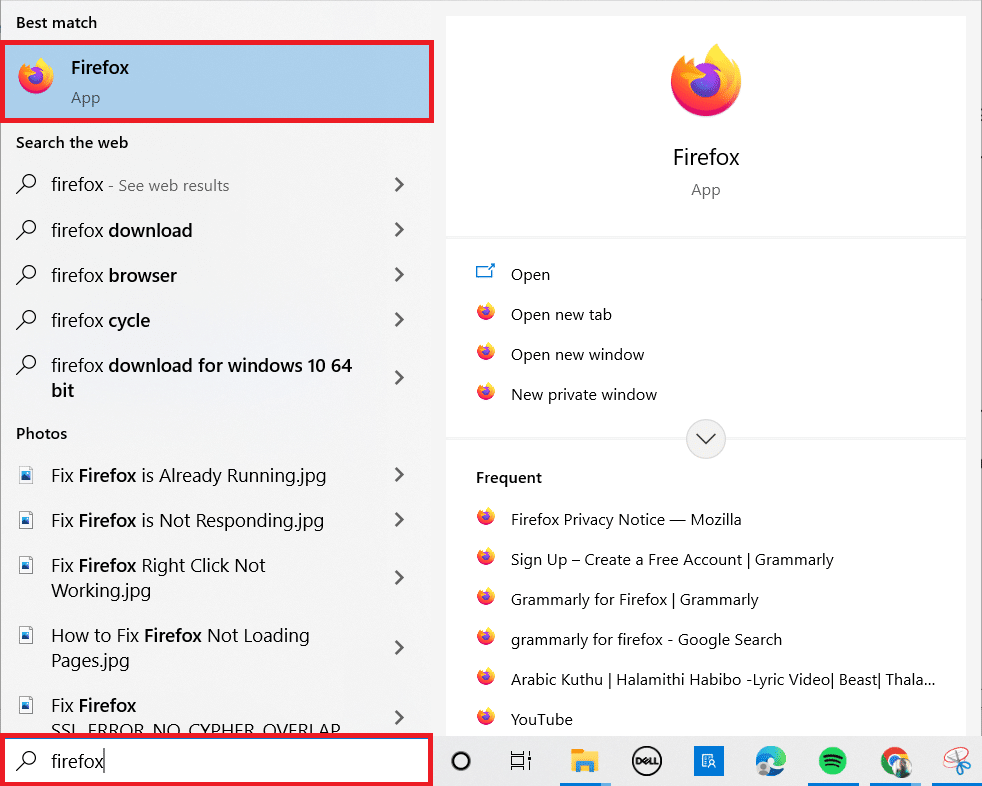
2. Одоо дээр дарна уу цэс дэлгэцийн баруун дээд буланд байгаа дүрс.
![]()
3. Эндээс сонгоно уу Тохиргоо унадаг жагсаалтаас сонголт.
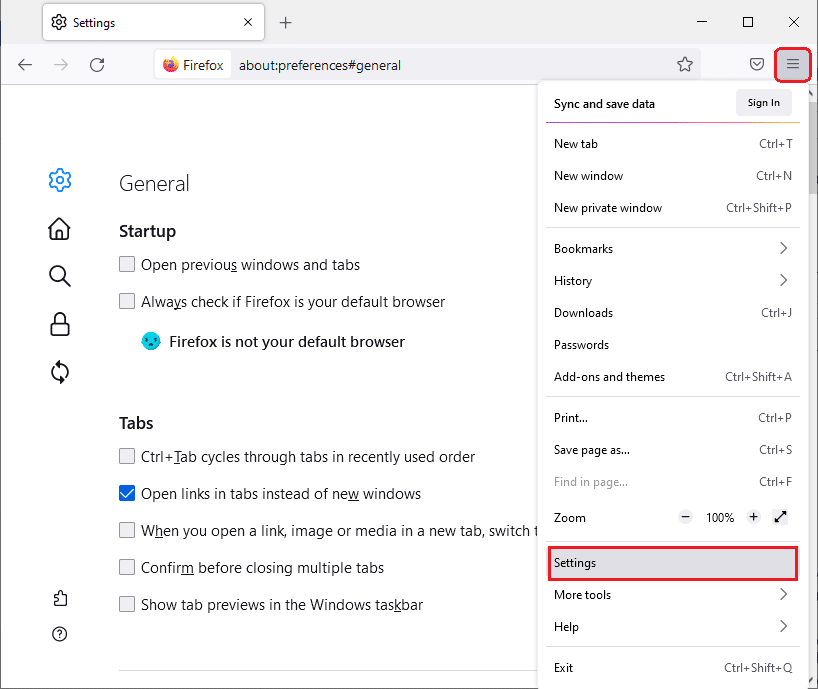
4. Одоо гэсэн рүү оч Нууцлал ба Аюулгүй байдал section in the left pane and scroll down the right screen to the Cookies ба сайтын мэдээлэл цэс.
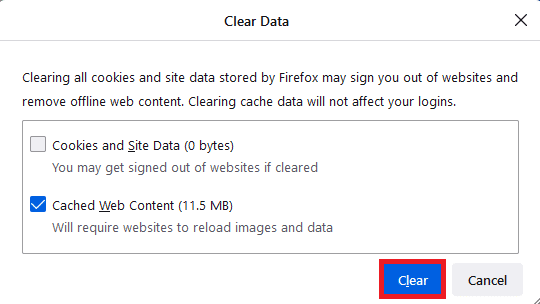
5. Дээр дарна уу Өгөгдлийг арилгах... сонголт.
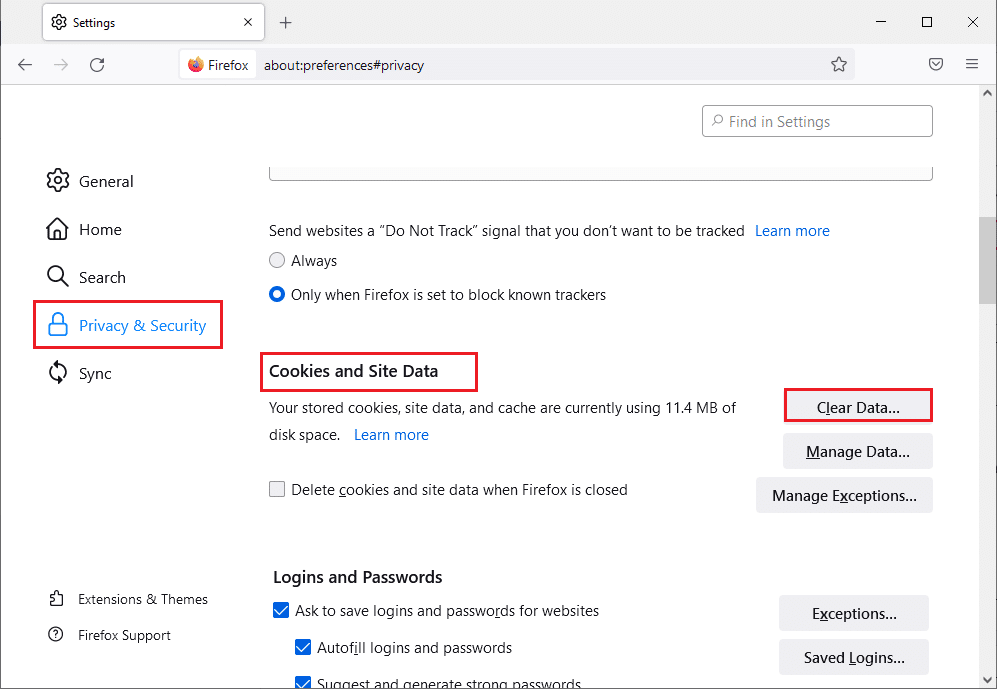
6. Энд тэмдэглэгээг арилгана уу Cookies ба сайтын мэдээлэл box and check the Кэш хийсэн вэб контент хайрцаг.
Тайлбар: Clearing Cookies and Site Data will clear all cookies and site data stored by Firefox. This will sign you out of websites and remove offline web content. On the other hand, clearing Cached Web Content will not affect your logins.
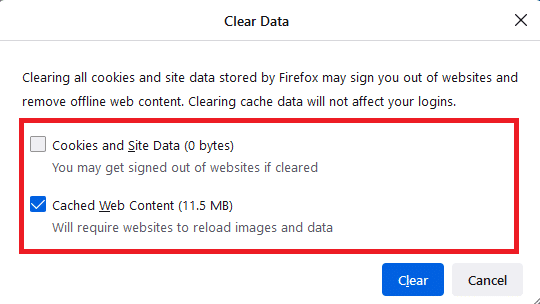
7. Эцэст нь дээр дарна уу Цэвэр Firefox-д хадгалагдсан күүкиг цэвэрлэх товчийг дарна уу.
Мөн уншина уу: Windows 10 дээрх Firefox SSL_ERROR_NO_CYPHER_OVERLAP-ийг засна уу
Option 3: On Microsoft Edge
Here are the steps to clear Microsoft Edge browser data.
1 дугаартай. Дар Windows гол, төрөл Ирмэг болон Түлхүүрийг оруулна уу.
2. Дээр дарна уу гурван цэгтэй дүрс near your profile image.
![]()
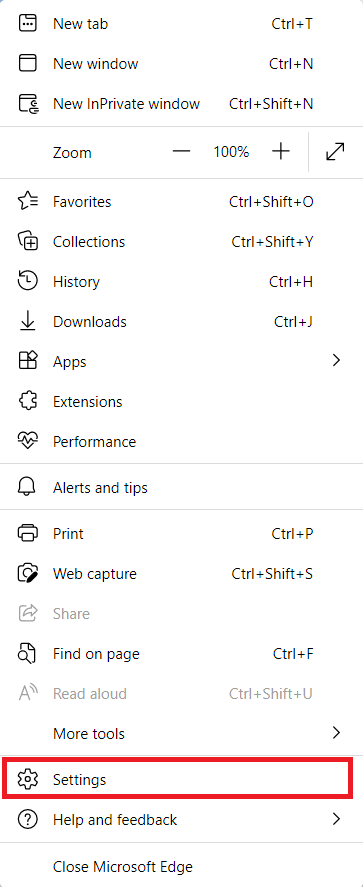
3. Дараа нь, дээр дарна уу Тохиргоо.
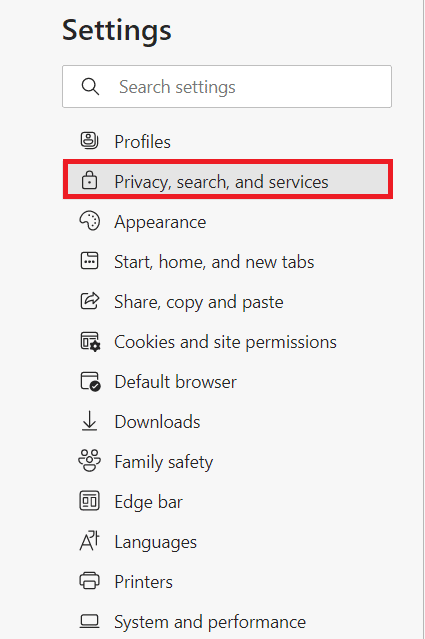
4. Одоо гэсэн рүү оч Нууцлал, хайлт, үйлчилгээ зүүн самбар дахь сонголт.
5. Дараа нь доош гүйлгээд дээр дарна уу Юуг арилгахаа сонгоно уу тохируулга Хайлтын өгөгдлийг арилгах.
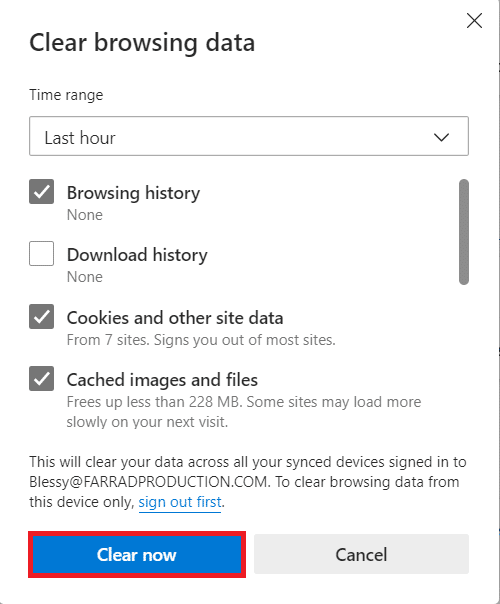
Тайлбар: Та бичээд Edge дээр хайлтын түүхийг устгахын тулд хуудас руу шууд шилжих боломжтой зах: // тохиргоо / clearBrowserData хайлтын талбарт.
6. Дараагийн цонхонд өөрийн сонголтын дагуу нүднүүдийг сонго Browsing history, Cookies and other site dataБолон Кэшлсэн зураг ба файлууд, дээр дарна уу Одоо цэвэрлэ доор тодруулсны дагуу.
Зөвлөмж:
We hope you found this information useful and that you have learned яаж clear cache on Facebook. Please let us know which technique was the most beneficial for you. Please use the form below if you have any queries or comments. Also, let us know what you want to learn next.