Fix Restore Point Not Working in Windows 10

System Restore not working in Windows 10 is a very common issue that users encounter every now and then. Well, system restores not working can be classified into the following two categories: system restore cannot create a restore point, and system restore fails & unable to restore your computer.
There is no specific reason why system restores stopped working unexpectedly, but we do have quite a few troubleshooting steps that would definitely Fix Restore Point Not Working in Windows 10 issue.
The following error message may also pop up, which are all fixable by the below-listed troubleshooting steps:
- System Restore failed.
- Windows या संगणकावर सिस्टम प्रतिमा शोधू शकत नाही.
- सिस्टम रिस्टोर दरम्यान एक अनिर्दिष्ट त्रुटी आली. (0x80070005)
- System Restore did not complete successfully. Your computer’s system files and settings were not changed.
- System Restore failed to extract the original copy of the directory from the restore point.
- System Restore doesn’t appear to be functioning correctly on this system. (0x80042302)
- There was an unexpected error on the property page. (0x8100202)
- System Restore encountered an error. Please try to run System Restore again. (0x81000203)
- System Restore did not complete successfully. An unexpected error occurs during System Restore. (0x8000ffff)
- Error 0x800423F3: The writer experienced a transient error. If the backup process is retried, the error may not reoccur.
- Can’t system restore, file or directory is corrupted and unreadable (0x80070570)
टीप: This also fixes System Restore is disabled by your system administrator message.
If System Restore is grayed out, or System Restore tab is missing, or if you receive a System Restore is disabled by your system administrator message, this post will help you fix the problem on your Windows 10/8/7 computer.
Before continuing with this post, make sure you try to run a system restore from safe mode. If you want to start your PC into Safe Mode, then this post will help you: 5 Ways to Start your PC in Safe Mode
Fix Restore Point Not Working in Windows 10
पद्धत 1: CHKDSK आणि सिस्टम फाइल तपासक चालवा
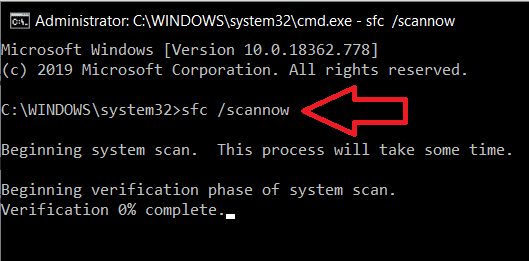
1. Press Windows Key + X, then select कमांड प्रॉमप्ट (प्रशासन)

2. खालील आदेश cmd मध्ये टाइप करा आणि Enter दाबा:
chkdsk C: / f / r / x
एसएफसी / स्कॅनो
टीप: Replace C: with the drive letter on which you want to run Check Disk. Also, in the above command C: is the drive on which we want to run check disk, /f stands for a flag which chkdsk the permission to fix any errors associated with the drive, /r let chkdsk search for bad sectors and perform recovery and /x instructs the check disk to dismount the drive before beginning the process.
3. Wait for the command to finish checking the disk for errors, then restart your PC.
Method 2: Enable System Restore
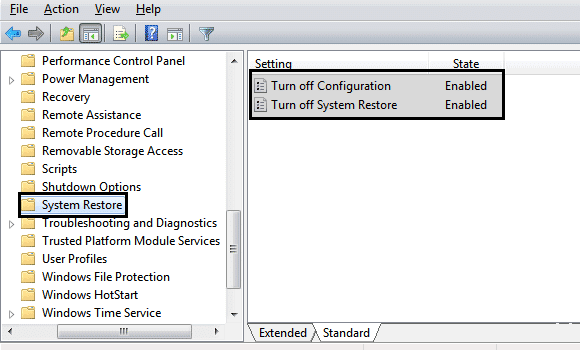
1. Press Windows Key + R and then type “gpedit.msc” and hit enter to open group policy editor.

2. Now navigate to the following:
Computer Configuration>Administrative Templates>System>System Restore
टीप: Install gpedit.msc from here
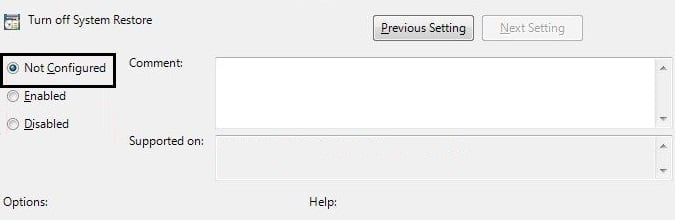
3. सेट करा Turn off Configuration आणि Turn off System Restore settings to Not configured.
4. पुढे, उजवे-क्लिक करा हे पीसी or माझा संगणक आणि निवडा गुणधर्म
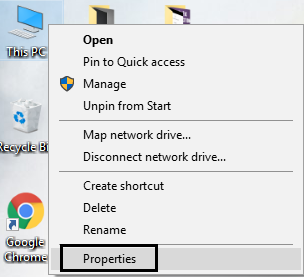
२. आता निवडा सिस्टम संरक्षण डाव्या उपखंडापासून.
6. याची खात्री करा Local Disk (C:) (System) is selected and click on कॉन्फिगर करा.
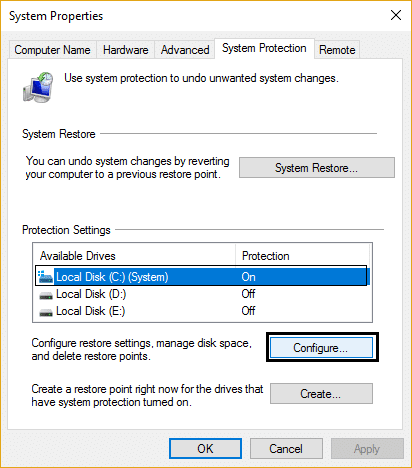
7. तपासा "सिस्टम संरक्षण चालू करा" आणि set at least 5 to 10 GB under Disk Space Usage.

8. क्लिक करा लागू करा आणि नंतर तुमचा पीसी रीस्टार्ट करा बदल लागू करण्यासाठी.
Method 3: Enable System Restore from Registry Editor
1. दाबा Windows Key+R, नंतर टाइप करा regedit and hit enter to open the Registry editor.

2. Next, navigate to the following keys:
HKEY_LOCAL_MACHINESYSTEMControlSet001ServicesVssDiagSystemRestore.
HKEY_LOCAL_MACHINESOFTWAREMicrosoftWindows NTCurrentVersionSystemRestore.
3. Delete the value कॉन्फिग अक्षम करा आणि DisableSR.
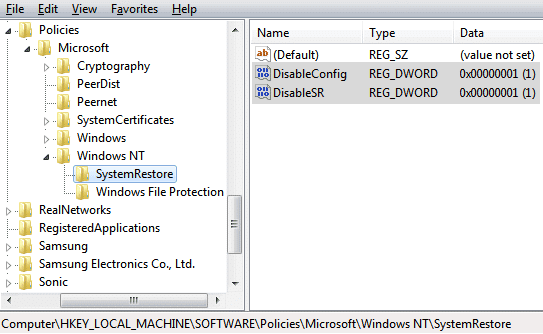
4. तुमचा पीसी रीबूट करा आणि तुम्ही सक्षम आहात का ते पहा Fix Restore Point Not Working in Windows 10 issue.
पद्धत 4: Temporarily Disable Antivirus
1. वर राइट-क्लिक करा अँटीव्हायरस प्रोग्राम चिन्ह सिस्टम ट्रेमधून आणि निवडा अक्षम करा

2. पुढे, निवडा वेळ सीमा ज्यासाठी अँटीव्हायरस अक्षम राहील.

टीप: शक्य तितका कमी वेळ निवडा, उदाहरणार्थ, 15 मिनिटे किंवा 30 मिनिटे.
3. Once done, again try to run System Restore and check if you’re able to Fix Restore Point Not Working in Windows 10 issue.
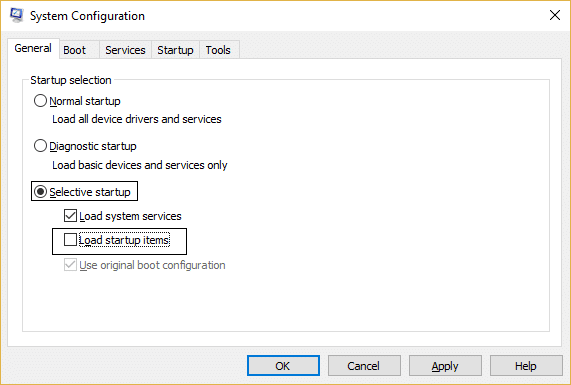
पद्धत 5: क्लीन बूट करा
1. Windows Key + R दाबा, नंतर "टाईप कराmsconfig” and hit enter to open system configuration.

2. Under general settings, check निवडक स्टार्टअप but uncheck Load startup items in it.
3. पुढे, निवडा सेवा टॅब आणि चेकमार्क सर्व मायक्रोसॉफ्ट लपवा आणि नंतर क्लिक करा सर्व अक्षम करा.
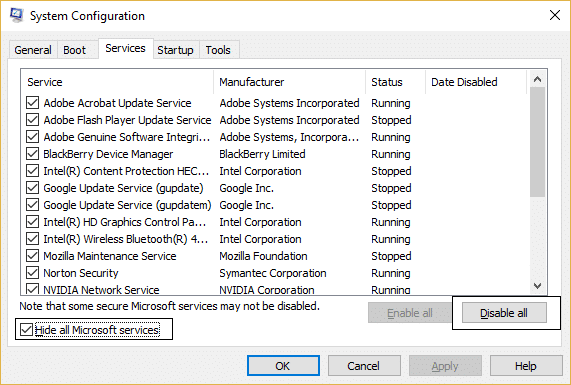
4. क्लिक करा Ok आणि आपला पीसी रीस्टार्ट करा.
पद्धत 6: DISM चालवा (उपयोजन प्रतिमा सेवा आणि व्यवस्थापन)
1. Windows Key + X दाबा आणि निवडा कमांड प्रॉम्प्ट (प्रशासक).

2. cmd मध्ये खालील कमांड टाईप करा आणि प्रत्येकानंतर एंटर दाबा:
Dism/ऑनलाइन/क्लीनअप-इमेज/चेकहेल्थ डिसम/ऑनलाइन/क्लीनअप-इमेज/स्कॅनहेल्थ डिसम/ऑनलाइन/क्लीनअप-इमेज/रिस्टोरहेल्थ

3. DISM कमांड चालू द्या आणि ती पूर्ण होण्याची प्रतीक्षा करा.
4. जर वरील आदेश कार्य करत नसेल तर, खालील वापरून पहा:
Dism/Image:C:ऑफलाइन/Cleanup-Image/RestoreHealth/Source:c:testmountwindows Dism/Online/Cleanup-Image/RestoreHealth/Source:c:testmountwindows/LimitAccess
टीप: C:RepairSourceWindows ला तुमच्या रिपेअर सोर्सने (विंडोज इंस्टॉलेशन किंवा रिकव्हरी डिस्क) बदला.
5. बदल जतन करण्यासाठी तुमचा PC रीबूट करा आणि तुम्ही सक्षम आहात का ते पहा Fix Restore Point Not Working in Windows 10.
Method 7: Check if System Restore services are running
1. Windows Key + R दाबा, नंतर "टाईप कराservices.msc” and hit Enter to open Services.

2. खालील सेवा शोधा: Volume Shadow Copy, Task Scheduler, Microsoft Software Shadow Copy Provider Service, and System Restore Service.
3. Double-click each of the above services and set the startup type to स्वयंचलित
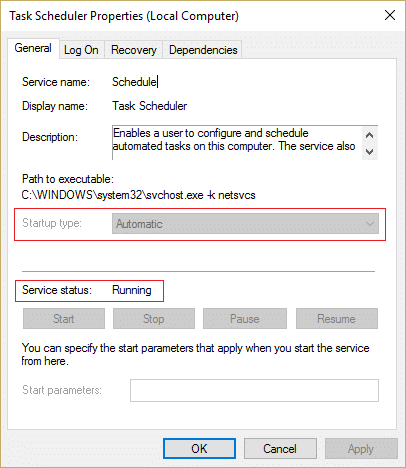
4. Make sure that the status of the above service is set to चालू आहे.
5. क्लिक करा Okत्यानंतर लागू करा, and then restart your PC.
पद्धत 8: विंडोज 10 स्थापित करा दुरुस्त करा
This method is the last resort because if nothing works out, then this method will surely repair all problems with your PC. Repair Install just uses an in-place upgrade to repair issues with the system without deleting user data present on the system. So follow this article to see How to Repair Install Windows 10 Easily.

बस एवढेच; आपण यशस्वीरित्या केले आहे Fix Restore Point Not Working in Windows 10, पण तरीही तुम्हाला या पोस्टबद्दल काही शंका असल्यास, टिप्पणी विभागात त्यांना मोकळ्या मनाने विचारा.