Enable or Disable Disk Write Caching in Windows 10

Disk Write Caching is a feature where data write-requests are not immediately sent to the hard disk, and they are cached into fast volatile memory (RAM) and later sent to hard disk from the queue. The benefit of using Disk Write Caching is that it allows the application to run faster by temporarily storing the data write-requests to RAM rather than the disk. Thus, increasing the system performance but using Disk Write Caching can also lead to data loss or corruption due to power outage or another hardware failure.
The risk of data corruption or loss is real, as the data which is temporarily stored on the RAM might get lost in case of power or system failure before the data is flushed by writing it to the disk. To better understand how Disk Write Caching works consider this example, suppose you want to save a text file on the desktop when you click Save, Windows will temporarily save the information that you want to save the file on the disk into RAM and later Windows will write this file to hard disk. Once the file is written to the disk, the cache will send an acknowledgement to Windows and after which the information from the RAM will be flushed.
Disk Write Caching doesn’t actually write the data to the disk it sometimes occurs after but Disk Write Caching is only the messenger. So now you are aware of the advantages and risk associated with using Disk Write Caching. So without wasting any time let’s see How to Enable or Disable Disk Write Caching in Windows 10 with the help of the below-listed tutorial.
Enable or Disable Disk Write Caching in Windows 10
Pastikan anda membuat titik pemulihan sekiranya berlaku masalah.
Method 1: Enable Disk Write Caching in Windows 10
1. Tekan Windows Key + R kemudian taip devmgmt.msc dan tekan Enter.

2. Kembangkan Pemacu cakera, Maka double-click on the disk drive you want to enable the Disk Write Caching.
Catatan: Or you can right-click on the same drive and select Properties.
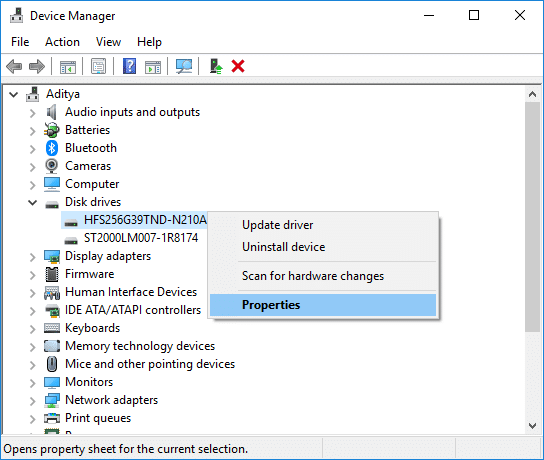
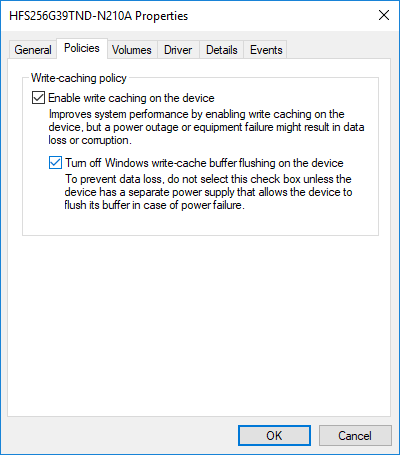
3. Make sure to switch to Policies tab kemudian tanda semak "Dayakan penulisan cache pada peranti”Dan klik OK.

Catatan: Check or uncheck “Turn off Windows write-cache buffer flushing on the device” under Write-caching policy according to your choice. But to prevent data loss, do not checkmark this policy unless you have a separate power supply (ex: UPS) connected to your device.
4. Klik pada Ya to reboot your PC to save changes.
Method 2: Disable Disk Write Caching in Windows 10
1. Tekan Windows Key + R kemudian taip devmgmt.msc dan tekan Enter.
2. Expand Disk drives, then double-click on the disk drive you want to enable the Disk Write Caching.
3. Make sure to switch to Policies tab kemudian centang "Dayakan penulisan cache pada peranti”Dan klik OK.
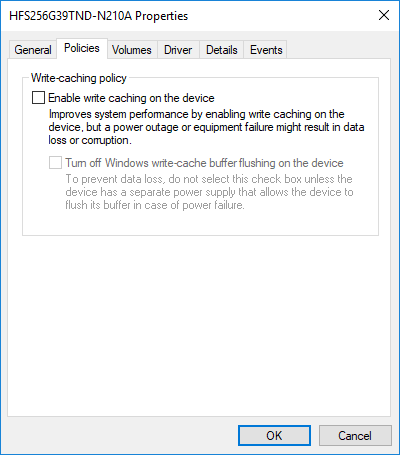
4. Click Yes to confirm to restart your PC.
Lawatan:
Itu sahaja anda telah berjaya belajar How to Enable or Disable Disk Write Caching in Windows 10 but if you still have
any questions regarding this tutorial then feel free to ask them in the comment’s section.