Fix Windows Modules Installer Worker High CPU Usage
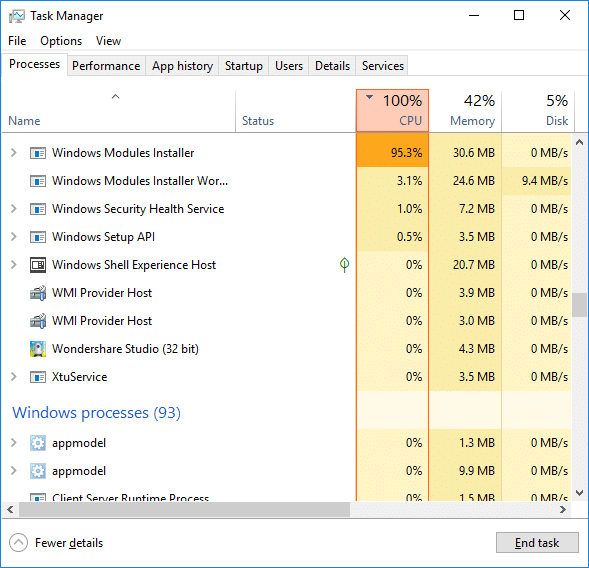
If you are facing the High CPU Usage by Windows Modules Installer Worker, then don’t worry as thousands of other users are also facing the similar problem and therefore, there are many working fixes which we will be discussing today in this article. To verify if you are facing this issue open Task Manager (Ctrl + Shift + Esc) and you will find that the Windows Modules Installer Worker is consuming High CPU or Disk Usage.

Petua Pro: You may leave your PC overnight or for a few hours to see the issue rectify itself once the Windows is finished downloading and installing updates.
What is Windows Modules Installer worker (WMIW)?
Windows Modules Installer worker (WMIW) is a service which takes cares of automatically installing Windows Update. According to its service description, WMIW is a system process that enables automatic installation, modification, and removal of Windows updates and optional components.
This process is responsible for finding new Windows Update automatically and installing them. As you might be aware that Windows 10 automatically install newer builds (i.e. 1803 etc.) via Windows Updates, so this process is responsible for installing these updates in the background.
Although this process is called Windows Modules Installer worker (WMIW) and you will see the same name in the Processes tab in the Task Manager, but if you switch to Details tab, then you will find the name of the file as TiWorker.exe.
Why Is Windows Modules Installer worker Using So Much CPU?
As Windows Modules Installer worker (TiWorker.exe) runs continuously in the background, sometimes it might utilize high CPU or disk usage when installing or uninstalling Windows Updates. But if its constantly using high CPU then the Windows Modules Installer worker may have become unresponsive while checking new updates. As a result, you may be experiencing lags, or your system might hang or freeze completely.
The first thing users do when they experience freezing, or lagging issues on their system is to restart their PC, but I assure you that this strategy won’t work in this case. This is because the issue will not resolve by itself until and unless you fix the underlying cause.
Fix Windows Modules Installer Worker High CPU Usage
Pastikan anda membuat titik pemulihan sekiranya berlaku masalah.
Windows Modules Installer Worker (WMIW) is an important service, and it should not be disabled. WMIW or TiWorker.exe is not a virus or malware, and you cannot just delete this service from your PC. So without wasting any time let’s see How to Fix Windows Modules Installer Worker High CPU Usage dengan bantuan panduan penyelesaian masalah yang disenaraikan di bawah.
Kaedah 1: Jalankan Penyelesai Masalah Kemas Kini Windows
1. Tekan Windows Key + I untuk membuka Tetapan kemudian klik pada Ikon Kemas Kini & Keselamatan.
![]()
2. Dari menu sebelah kiri, pilih Selesaikan masalah di bawah "Bangun dan berlari" Klik pada Kemas kini Windows.
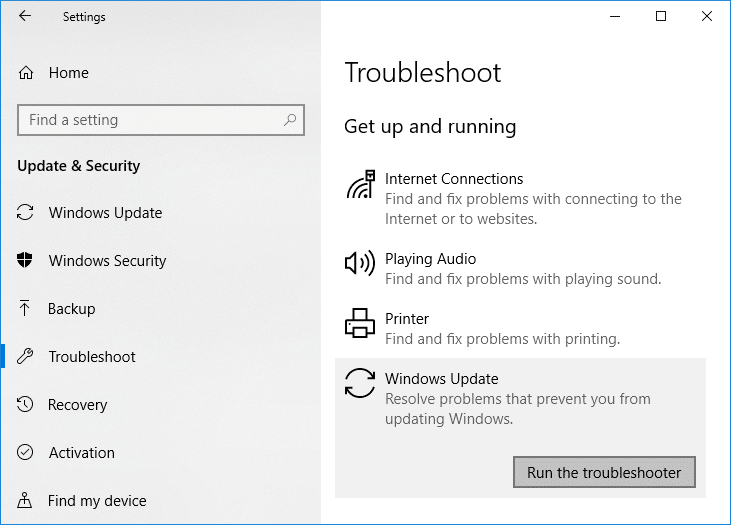
3. Sekarang klik “Jalankan penyelesai masalah” di bawah Kemas Kini Windows.
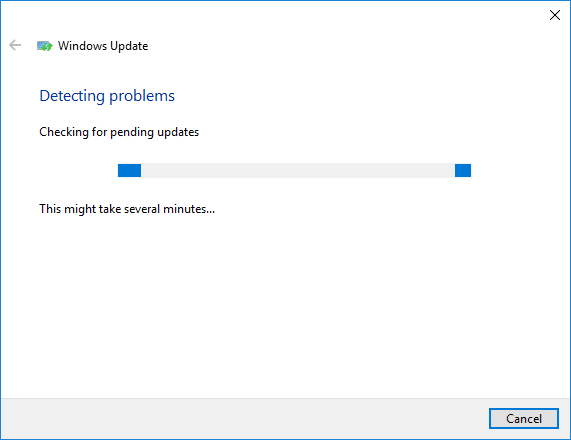
4. Let the troubleshooter run, and it will automatically fix any issues found with Windows Update taking forever.
Method 2: Manually Check for Windows Updates
1. Tekan Windows Key + I kemudian pilih Kemas kini & Keselamatan.
2. Dari sebelah kiri, menu klik pada Kemas kini Windows.
3. Sekarang klik pada “Semak kemas kinibutang ” untuk menyemak sebarang kemas kini yang tersedia.

4. Jika sebarang kemas kini belum selesai, kemudian klik pada Muat turun & Pasang kemas kini.

5. Setelah kemas kini dimuat turun, pasangkannya dan Windows anda akan menjadi terkini.
Method 3: Configure Windows Update to Manual
Amaran: This method will switch Windows Update from automatically installing the new updates to the manual. This means you have to manually check for Windows Update (weekly or monthly) to keep your PC secure. But follow this method, and you can again set the Updates to Automatic once the issue is resolved.
1.Tekan Windows Key + R kemudian taip services.msc dan tekan Enter.

2. Tatal ke bawah dan cari Pemasang Modul Windows service in the list.
3. Klik kanan pada Perkhidmatan Pemasang Modul Windows dan pilih Sifat.
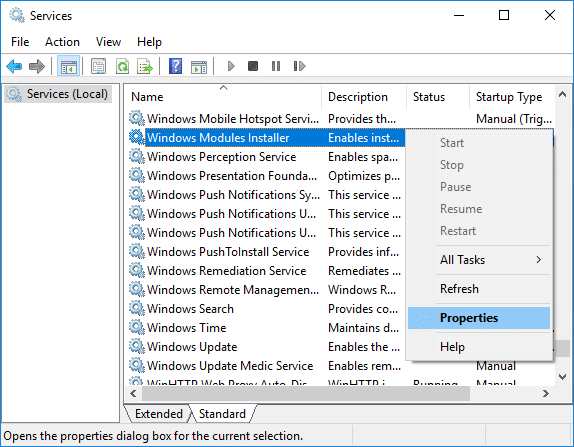
4. Sekarang klik Berhenti then from the Jenis permulaan drop-down select Manual.
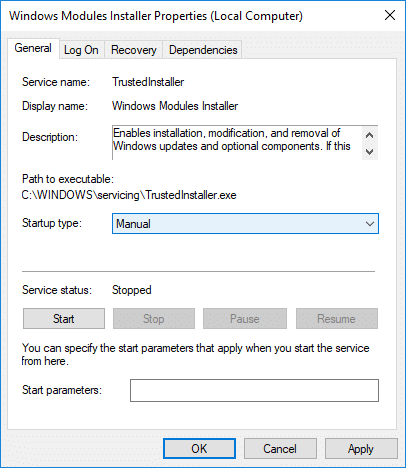
5. Klik Guna, diikuti dengan OK.
6. Similarly, follow the same step for the Windows Update service.
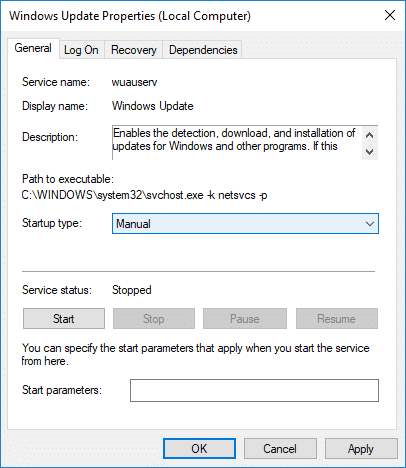
7. But semula PC anda untuk menyimpan perubahan.
8. Sekali lagi periksa Windows Updates Manually dan pasang sebarang kemas kini yang belum selesai.
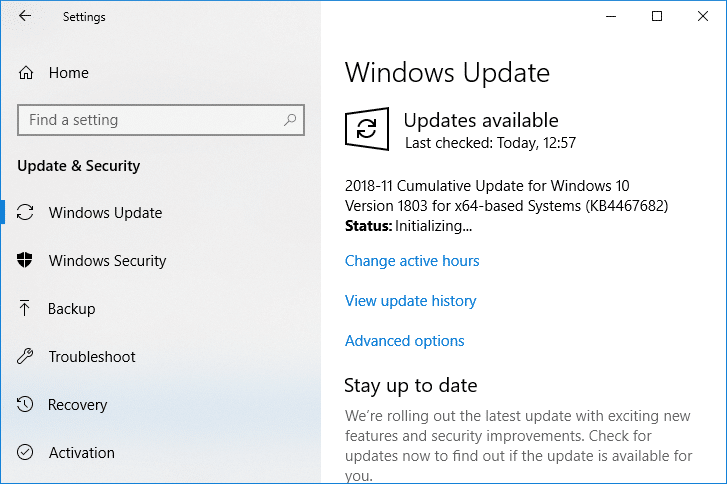
9. Once is done, again go back to services.msc window and open the Windows Modules Installer & Windows Update Properties tingkap.
10. Menetapkan Jenis permulaan kepada automatik dan klik Start. Then click Apply followed by OK.
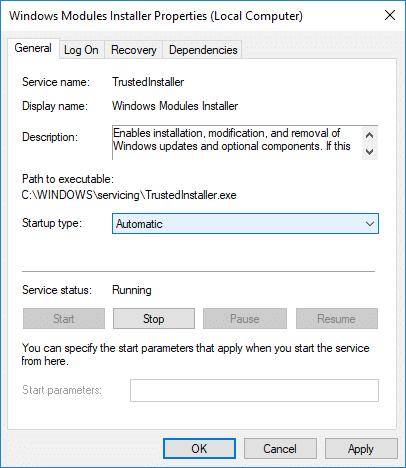
11. But semula PC anda untuk menyimpan perubahan.
Kaedah 4: Jalankan Penyelesai Masalah Penyelenggaraan Sistem
1. Tekan Windows Key + R kemudian taip kawalan dan tekan Enter untuk membuka Panel Kawalan.
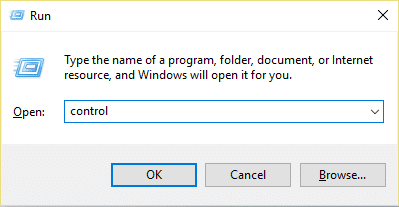
2. Cari Selesaikan Masalah dan klik pada Penyelesaian masalah.

3. Seterusnya, klik pada Lihat semua dalam anak panah kiri.
4. Klik pada “System Maintenance” untuk menjalankan System Maintenance Troubleshooter.

5. Penyelesai Masalah mungkin boleh Fix Windows Modules Installer Worker High CPU Usage, but if it didn’t, then you need to run System Performance Troubleshooter.
6. Buka Prompt Perintah. Pengguna boleh melakukan langkah ini dengan mencari 'cmd' Dan kemudian tekan Enter.

7. Taip arahan berikut ke dalam cmd dan tekan Enter:
msdt.exe / id PerformanceDiagnostic
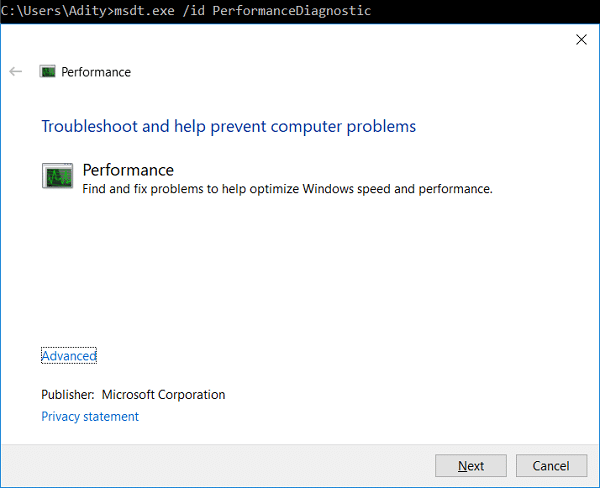
8. Follow the on-screen instruction to run the troubleshooter and fix any issues find the System.
9. Finally, exit the cmd and reboot your PC.
Method 5: Disable Automatic Maintenance
Sometimes Automatic Maintenance can conflict with the Windows Modules Installer Worker service, so try to disable Automatic Maintenance using this guide and see if this fixes your issue.
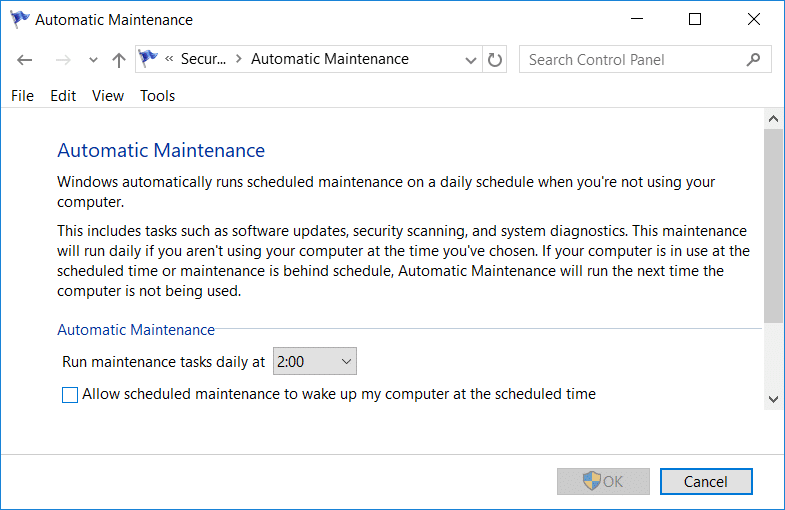
Although disabling Automatic Maintenance is not a good idea, but there might be some case where you need to actually disable it, for example, if your PC freezes during automatic maintenance or Windows Modules Installer Worker High CPU Usage issue then you should disable maintenance to troubleshoot the issue.
Method 6: Run System File Checker and DISM
1. Buka Prompt Perintah. Pengguna boleh melakukan langkah ini dengan mencari 'cmd' Dan kemudian tekan Enter.
2. Sekarang taip yang berikut dalam cmd dan tekan enter:
Sfc /scannow sfc /scannow /offbootdir=c: /offwindir=c:windows (Jika di atas gagal, cuba yang ini)

3. Tunggu proses di atas selesai dan setelah selesai, mulakan semula PC anda.
4. Sekali lagi buka cmd dan taip arahan berikut dan tekan enter selepas setiap satu:
Dism /Dalam Talian /Imej Pembersihan /SemakKesihatan Dism /Dalam Talian /Imej Pembersihan /ScanHealth Dism /Dalam Talian /Imej Pembersihan /RestoreHealth

5. Biarkan arahan DISM berjalan dan tunggu sehingga ia selesai.
6. Jika arahan di atas tidak berfungsi, maka cuba di bawah:
Dism /Imej:C:luar talian /Cleanup-Image /RestoreHealth /Sumber:c:testmountwindows Dism /Online /Cleanup-Image /RestoreHealth /Sumber:c:testmountwindows /LimitAccess
Catatan: Gantikan C:RepairSourceWindows dengan sumber pembaikan anda (Pemasangan Windows atau Cakera Pemulihan).
7. But semula PC anda untuk menyimpan perubahan dan lihat jika anda mampu Fix Windows Modules Installer Worker High CPU Usage.
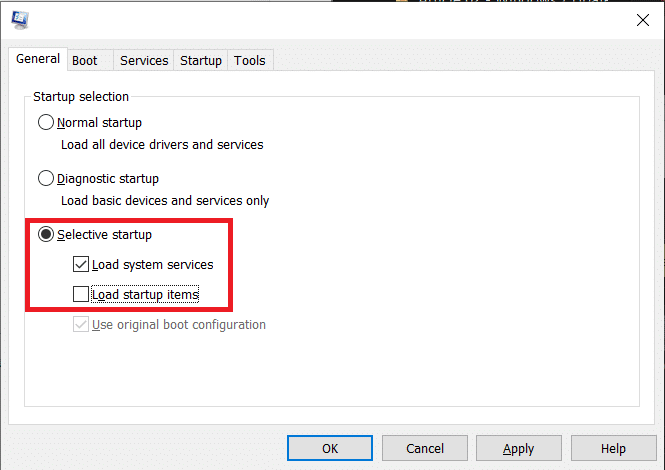
Kaedah 7: Lakukan But Bersih
Sometimes 3rd party software can conflict with Windows and can cause the issue. To Fix Windows Modules Installer Worker High CPU Usage issue, anda perlu melakukan but bersih pada PC anda dan mendiagnosis isu langkah demi langkah.
Method 8: Set your WiFi as Metered Connection
Catatan: This will stop Windows Automatic Update, and you will need to manually check for Updates.
1. Tekan Windows Key + I untuk membuka Tetapan kemudian klik pada Rangkaian & Internet.

2. Dari menu sebelah kiri, pilih Wi-Fi.
3. Under Wi-Fi, klik on your currently connected network (WiFi).
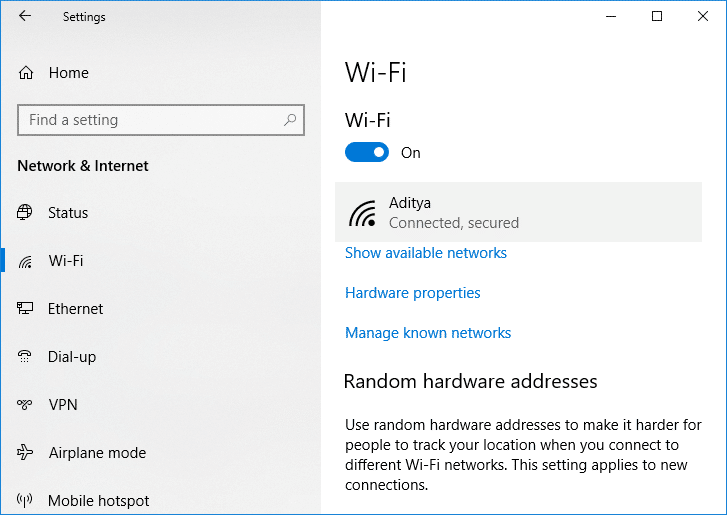
4. Scroll down to Metered connection and dayakan togol di bawah "Tetapkan sebagai sambungan berukuran".
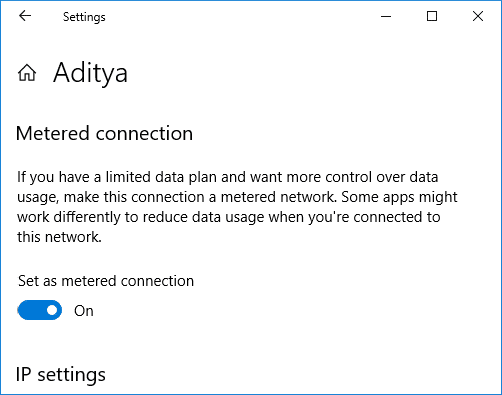
5. Close Settings and reboot your PC to save changes.
Lawatan:
Itu sahaja, anda telah berjaya Fix Windows Modules Installer Worker High CPU Usage tetapi jika anda masih mempunyai sebarang pertanyaan mengenai tutorial ini, sila tanya mereka di bahagian komen.
