- in ပြတင်းပေါက် by admin
Windows Updates Error 0x8024401c Fix

If you are facing error code 0x8024401c while trying to update Windows 10, then you are at the right place as today we are going to discuss how to resolve this issue. Basically, you won’t be able to download or install any updates because of this error 0x8024401c. Windows updates are an essential part of your system to easily prevent your PC from vulnerabilities, leading to malware or virus, spyware, or adware installed on your system. Depending upon user’s system configuration, you could face the following error:
အပ်ဒိတ်များကို ထည့်သွင်းရာတွင် ပြဿနာအချို့ရှိခဲ့သော်လည်း နောက်မှ ထပ်ကြိုးစားပါမည်။ ၎င်းကို ဆက်လက်မြင်နေရပြီး ဝဘ်တွင် ရှာဖွေလိုပါက သို့မဟုတ် အချက်အလက်အတွက် ပံ့ပိုးကူညီမှုအား ဆက်သွယ်လိုပါက၊ ၎င်းသည် အကူအညီဖြစ်နိုင်သည်- (0x8024401c)
Now you could face this error message because of a number of reasons such as corrupt registry entries, corrupted system files, outdated or incompatible drivers, incomplete installation or uninstallation of a program etc. So without wasting any time let’s see how to actually Fix Windows Updates Error 0x8024401c with the help of below-listed steps.
Windows Updates Error 0x8024401c Fix
တစ်စုံတစ်ခု မှားယွင်းသွားပါက ပြန်လည်ရယူသည့်အမှတ်ကို ဖန်တီးရန် သေချာပါစေ။
နည်းလမ်း 1- Windows Update Troubleshooter ကိုဖွင့်ပါ။
1. Open control panel and search Troubleshooting in the Search Bar on the top right side and click on Troubleshooting.

2. ထို့နောက် ဘယ်ဘက်ဝင်းဒိုးမှ အကန့်ကို ရွေးပါ။ အားလုံးကိုကြည့်ရှုပါ။
3. ထို့နောက် Troubleshoot computer problems list မှ ရွေးချယ်ပါ။ Windows Update ကို။
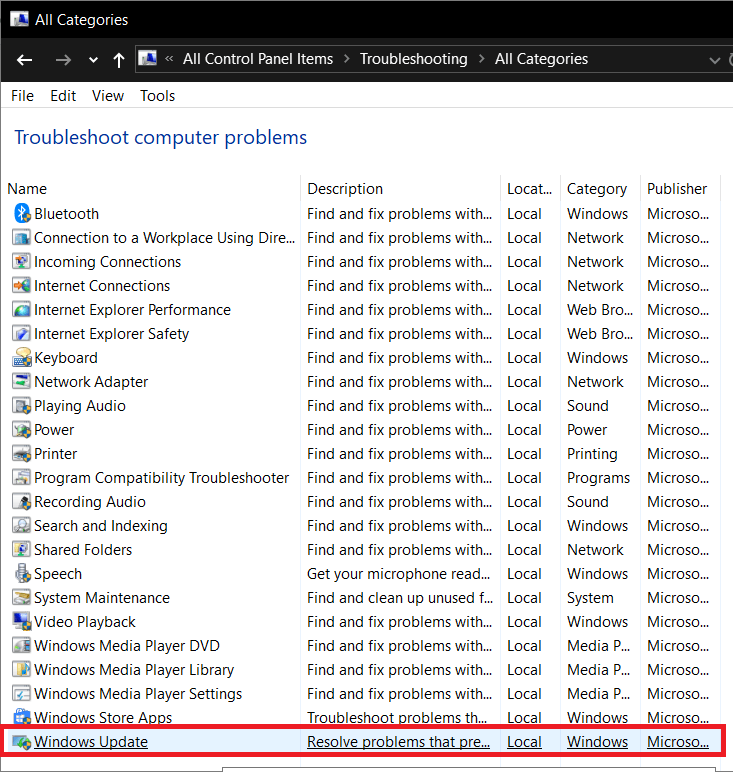
4. မျက်နှာပြင်ပေါ်ရှိ ညွှန်ကြားချက်ကို လိုက်နာပြီး Windows Update ပြဿနာဖြေရှင်းခြင်းကို လုပ်ဆောင်ပါစေ။
5. သင့် PC ကို ပြန်လည်စတင်ပါ၊ သင်လုပ်နိုင်ပေမည်။ Fix Windows Updates Error 0x8024401c.
နည်းလမ်း 2- SFC နှင့် CHKDSK ကိုဖွင့်ပါ။
1 ။ ဖွင့်လှစ် command Prompt ကို. အသုံးပြုသူသည် ရှာဖွေခြင်းဖြင့် ဤအဆင့်ကို လုပ်ဆောင်နိုင်သည်။ 'cmd' ပြီးနောက် Enter ကိုနှိပ်ပါ။

2. ယခု cmd တွင် အောက်ပါတို့ကို ရိုက်ထည့်ပြီး enter နှိပ်ပါ။
Sfc /scannow sfc /scannow /offbootdir=c: /offwindir=c:windows

3. အထက်ဖော်ပြပါ လုပ်ငန်းစဉ်ပြီးဆုံးရန် စောင့်ပြီး ပြီးသည်နှင့် သင့် PC ကို ပြန်လည်စတင်ပါ။
4. ထို့နောက်၊ ဖိုင်စနစ်အမှားများကိုပြင်ရန် CHKDSK ကိုဖွင့်ပါ။
5. အထက်ပါ လုပ်ငန်းစဉ်ကို အပြီးသတ်ပြီး အပြောင်းအလဲများကို သိမ်းဆည်းရန် သင့် PC ကို ပြန်လည်စတင်ပါ။
နည်းလမ်း 3- DISM ကိုဖွင့်ပါ။
1 ။ ဖွင့်လှစ် command Prompt ကို. အသုံးပြုသူသည် ရှာဖွေခြင်းဖြင့် ဤအဆင့်ကို လုပ်ဆောင်နိုင်သည်။ 'cmd' ပြီးနောက် Enter ကိုနှိပ်ပါ။
2. Now type the following in the cmd and hit enter after each one:
Dism /Online /Cleanup-Image/CheckHealth Dism/Online/Cleanup-Image/ScanHealth Dism/Online/Cleanup-Image/RestoreHealth

3. DISM အမိန့်ကို လည်ပတ်စေပြီး ၎င်းကို အပြီးသတ်ရန် စောင့်ပါ။
4. အထက်ဖော်ပြပါ command သည် အလုပ်မလုပ်ပါက၊ အောက်ပါတို့ကို စမ်းကြည့်ပါ။
Dism /Image:C:offline/Cleanup-Image/RestoreHealth/Source:c:testmountwindows Dism/Online/Cleanup-Image/RestoreHealth/Source:c:testmountwindows/LimitAccess
မှတ်စု: C:RepairSourceWindows ကို သင်၏ပြုပြင်မှုရင်းမြစ် (Windows Installation သို့မဟုတ် Recovery Disc) ဖြင့် အစားထိုးပါ။
5. အပြောင်းအလဲများကို သိမ်းဆည်းရန်နှင့် သင်လုပ်ဆောင်နိုင်သည်ကို ကြည့်ရှုရန် သင့် PC ကို ပြန်လည်စတင်ပါ။ Fix Windows Updates Error 0x8024401c.
နည်းလမ်း 4- IPv6 ကို ပိတ်ပါ။
1. စနစ်ဗန်းရှိ WiFi အိုင်ကွန်ပေါ်တွင် ညာဖက်ကလစ်နှိပ်ပြီး “ကိုနှိပ်ပါ။Open Network နှင့် Sharing စင်တာ။"
![]()
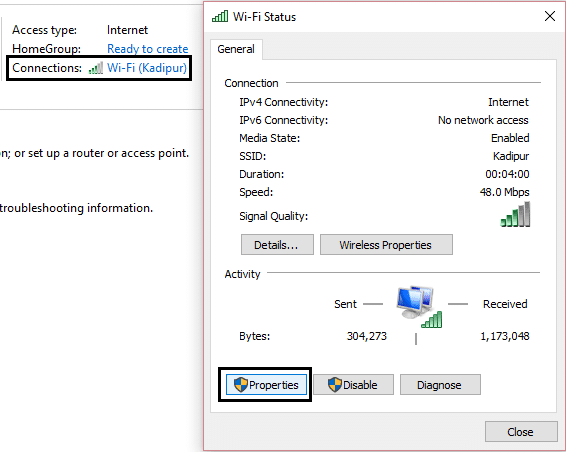
၁၂ သင်၏လက်ရှိချိတ်ဆက်မှုကိုနှိပ်ပါ။ ဖွင့်လှစ်ရန် Settings များ။
မှတ်စု: သင့်ကွန်ရက်သို့ မချိတ်ဆက်နိုင်ပါက၊ ချိတ်ဆက်ရန် Ethernet ကြိုးကို အသုံးပြုပြီး ဤအဆင့်ကို လိုက်နာပါ။
3 ။ ယင်းကိုကလစ်နှိပ်ပါ Properties ကိုနှိပ်ပါ။ ဖွင့်ထားတဲ့ window ထဲမှာ။
4 ။ သေချာအောင်လုပ်ပါ Internet Protocol ဗားရှင်း 6 (TCP/IP) ကို အမှန်ခြစ်ဖြုတ်ပါ။
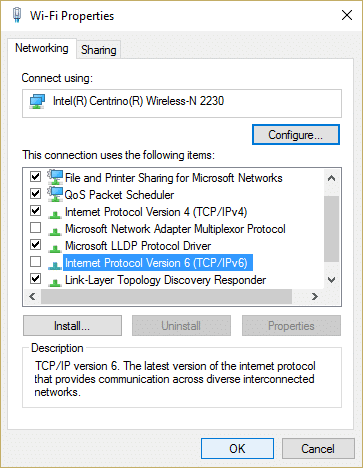
5. OK ကိုနှိပ်ပြီး Close ကိုနှိပ်ပါ။ ပြောင်းလဲမှုများကို သိမ်းဆည်းရန် သင့် PC ကို ပြန်လည်စတင်ပါ။
နည်းလမ်း 5- System Restore ကိုဖွင့်ပါ။
1. Windows Key + R ကို နှိပ်ပြီး ရိုက်ပါ။ system.cpl ပြီးရင် enter နှိပ်လိုက်ပါ။

2 ။ ယင်းကို Select လုပ်ပါ System ကိုကာကွယ်စောင့်ရှောက်ရေး tab ကိုရွေးချယ်ပါ System Restore
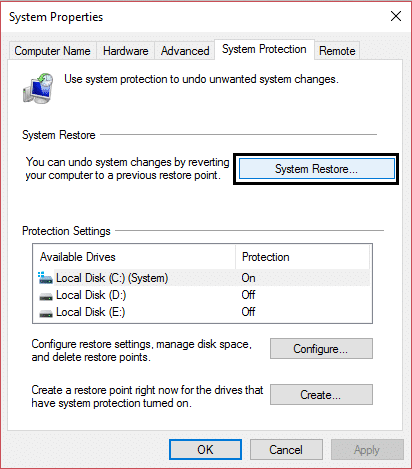
3. Next ကိုနှိပ်ပြီး နှစ်သက်ရာကို ရွေးချယ်ပါ။ System Restore အမှတ်.
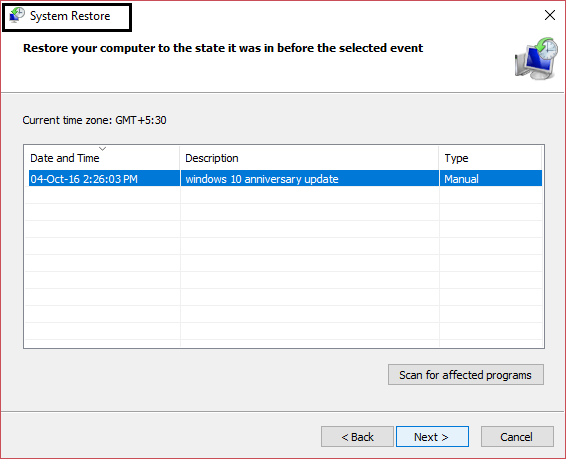
4. စနစ်ပြန်လည်ရယူခြင်းကို အပြီးသတ်ရန် မျက်နှာပြင်ပေါ်ရှိ ညွှန်ကြားချက်ကို လိုက်နာပါ။
5. ပြန်လည်စတင်ပြီးနောက်၊ သင်လုပ်နိုင်ပေမည်။ Fix Windows Updates Error 0x8024401c.
နည်းလမ်း 6- Registry Fix
1. Windows Key + R ကို နှိပ်ပြီး ရိုက်ထည့်ပါ။ regedit လို့ Registry Editor ကိုဖွင့်ရန် Enter ကိုနှိပ်ပါ။

2. အောက်ပါ registry key သို့ သွားပါ-
ComputerHKEY_LOCAL_MACHINESOFTWAREPoliciesMicrosoftWindowsWindowsUpdateAU
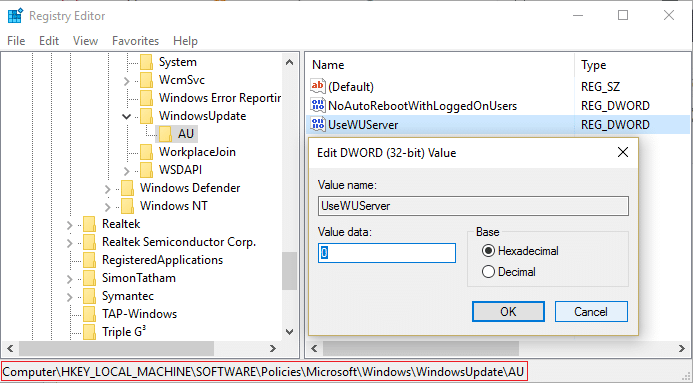
3. Make sure to select AU than in the right window pane double click on UseWUServer DWORD.
မှတ်စု: If you can’t find the above DWORD then you need to create it manually. Right-click on AU then select အသစ် > DWORD (32-bit) တန်ဖိုး. Name this key as WUServer ကိုသုံးပါ။ နှင့် Enter နှိပ်ပါ။
4. Now, in the Value data field, enter 0 OK ကိုနှိပ်ပါ။
5. ပြောင်းလဲမှုများကို သိမ်းဆည်းရန် သင့် PC ကို ပြန်လည်စတင်ပါ။
နည်းလမ်း 7- Google DNS ကိုသုံးပါ။
You can use Google’s DNS instead of the default DNS set by your Internet Service Provider or the network adapter manufacturer. This will ensure that the DNS your browser is using has nothing to do with the YouTube video not loading. To do so,
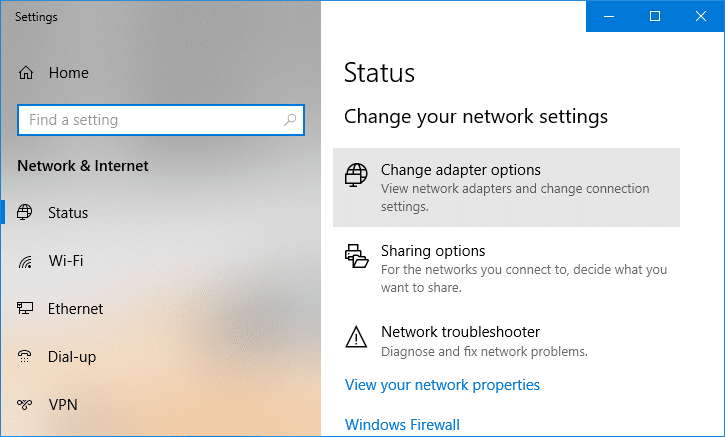
1. right-click နှိပ်ပြီး ထိုအပေါ် ကွန်ရက် (LAN) သင်္ကေတ ၏ညာဘက်အဆုံး၌တည်၏ taskbarနှင့်အပေါ်ကိုကလစ်နှိပ်ပါ ကွန်ရက်နှင့် အင်တာနက် ဆက်တင်များကို ဖွင့်ပါ။
![]()
2 ။ ထဲမှာ setting များကို ပေါ်လာသော app ကိုနှိပ်ပါ။ ပြောင်းလဲမှု adapter options များ ညာဘက် pane ၌တည်၏။
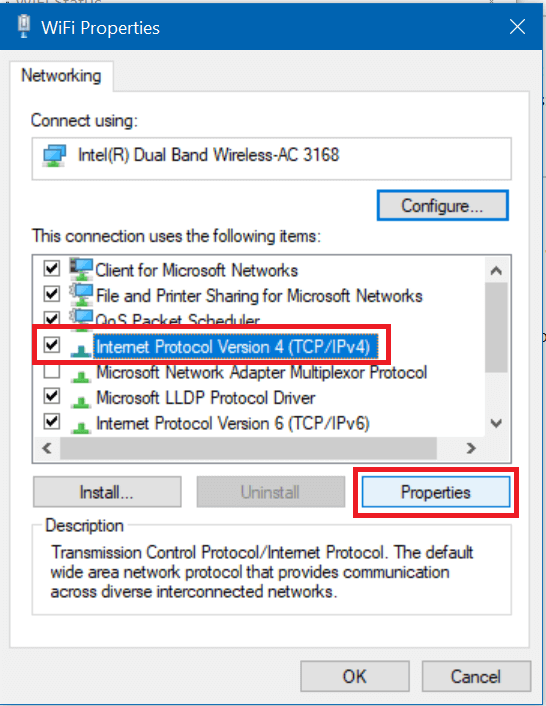
3. right-click နှိပ်ပြီး သင် configure လုပ်လိုသော ကွန်ရက်ပေါ်တွင် နှိပ်ပါ။ Properties ကို။

4 ။ အပေါ်ကိုကလစ်နှိပ်ပါ အင်တာနက် ပရိုတိုကော ဗားရှင်း 4 (IPv4) list ထဲမှာ ပြီးရင် on ကိုနှိပ်ပါ။ Properties ကို။
ဒါ့အပြင်ဖတ်ရန်: သင်၏ DNS ဆာဗာသည် မရရှိနိုင်သော အမှားဖြစ်နိုင်သည်ကို ပြင်ဆင်ပါ။
5. General tab အောက်တွင်၊ 'ကိုရွေးချယ်ပါ။အောက်ပါ DNS Server ကိုလိပ်စာများကိုသုံးပါ' နှင့် အောက်ပါ DNS လိပ်စာများကို ထည့်ပါ။
နှစ်သက်သော DNS ဆာဗာ- 8.8.8.8
အစားထိုး DNS ဆာဗာ- 8.8.4.4
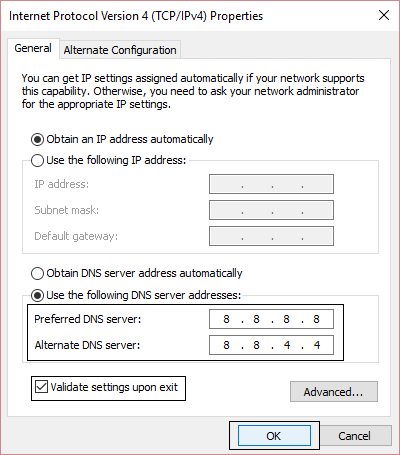
6. နောက်ဆုံးတွင် နှိပ်ပါ။ OK ပြောင်းလဲမှုများကို သိမ်းဆည်းရန် ဝင်းဒိုးအောက်ခြေတွင်
7. သင့် PC ကို reboot လုပ်ပြီး system restart လုပ်ပြီးတာနဲ့ သင်လုပ်နိုင်လားဆိုတာ ကြည့်ပါ။ Fix Windows Updates Error 0x8024401c.
နည်းလမ်း 8: Clean Boot ကိုလုပ်ဆောင်ပါ။
Sometimes 3rd party software can conflict with Windows and can cause Windows Update error. To Fix Windows Updates Error 0x8024401c, you need to perform a clean boot on your PC and diagnose the issue step by step.

အကြံပြုထားသည်:
ဒါပဲ မင်းအောင်မြင်သွားပြီ Fix Windows Updates Error 0x8024401c ဒါပေမယ့် ဒီလမ်းညွှန်ချက်နဲ့ပတ်သတ်ပြီး မေးစရာတွေရှိသေးရင် comment ရဲ့ကဏ္ဍမှာ သူတို့ကို လွတ်လပ်စွာမေးမြန်းနိုင်ပါတယ်။