Fix Desktop Icons keep getting rearranged after Windows 10 Creators Update: After installing the latest Windows 10 Creators Update users are complaining about a new strange issue where the desktop icons keep getting rearranged automatically. Every time the user hits refresh the desktop icons arrangement is changed or messed up. In short whatever you do from saving a new file on the desktop, to rearranging icons on the desktop, to renaming files or shortcuts on the desktop affects the icon arrangement in some way or other.
![]()
In some cases, in addition to above issues, users are also complaining about the icon spacing issue as before the update the space between icons was different and after the Creators Update, the icon spacing is also messed up. Below is the official Windows announcement of a new feature being introduced in Creators Update called Desktop Icon Placement Improvements:
Windows now more intelligently rearranges and scales desktop icons when you switch between different monitors and scaling settings, seeking to preserve your custom icon layout rather than scrambling them.
Now the main issue about this feature is you can’t disable it and this time Microsoft has really messed up by introducing this feature which is causing more harm than good. Anyway without wasting any more time let’s see how to actually Fix Desktop Icons keep getting rearranged after Windows 10 Creators Update with the below-listed troubleshooting guide.
फिक्स डेस्कटप आइकनहरू Windows 10 क्रिएटरहरू अद्यावधिक पछि पुन: व्यवस्थित भइरहन्छन्
सुनिश्चित गर्नुहोस् पुनर्स्थापना विन्दु सिर्जना गर्नुहोस् केवल यदि केहि गलत हुन्छ।
विधि 1: प्रतिमा दृश्य परिवर्तन गर्नुहोस्
1. डेस्कटपमा दायाँ क्लिक गर्नुहोस् त्यसपछि चयन गर्नुहोस् हेर्नुहोस् र तपाईंको हाल चयन गरिएको दृश्यबाट कुनै अन्य दृश्यमा परिवर्तन गर्नुहोस्। उदाहरण को लागी यदि "मध्यम" हाल चयन गरिएको छ भने "सानो" मा क्लिक गर्नुहोस्।

2. अब फेरि उही दृश्य चयन गर्नुहोस् जुन पहिले चयन गरिएको थियो उदाहरणको लागि हामीले चयन गर्नेछौं फेरि मध्यम।
६.अर्को, चयन गर्नुहोस् "लघु"दृश्य विकल्पमा र तपाइँ तुरुन्तै डेस्कटपमा आइकनमा परिवर्तनहरू देख्नुहुनेछ।
![]()
4. यस पछि, आइकनले आफैलाई पुन: व्यवस्थित गर्दैन।
Method 2: Enable Align icons to grid
1.Right-click on an empty space on the desktop then select View र अनचेक गर्नुहोस् Align icons to grid.
![]()
2.Now again from the view option enable Align icons to grid and see if you are able to fix the issue.
3. यदि छैन भने दृश्य विकल्पबाट स्वत: व्यवस्थित आइकनहरू अनचेक गर्नुहोस् र सबै काम हुनेछ।
विधि 3: डेस्कटप आइकनहरू परिवर्तन गर्न थिमहरूलाई अनुमति दिनुहोस् अनचेक गर्नुहोस्
1.Press Windows Key + I to open Settings then click निजीकरण।
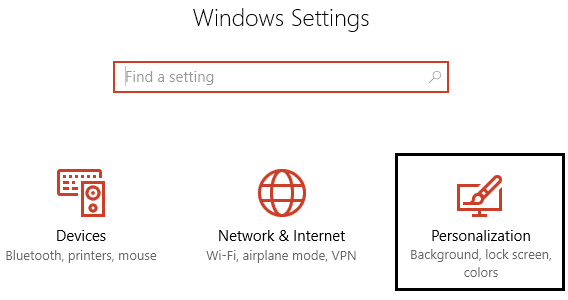
2. बायाँ-हात मेनुबाट चयन गर्नुहोस् वस्तु र त्यसपछि क्लिक गर्नुहोस् डेस्कटप आइकन सेटिङहरू।
![]()
3. अब डेस्कटप आइकन सेटिंग्स विन्डोमा विकल्प अनचेक गर्नुहोस् "विषयवस्तुहरूलाई डेस्कटप आइकनहरू परिवर्तन गर्न अनुमति दिनुहोस्"तलमा।
![]()
4. ठीक पछि लागू गर्नुहोस् क्लिक गर्नुहोस्।
5. परिवर्तनहरू बचत गर्न आफ्नो पीसी रिबुट गर्नुहोस् र हेर्नुहोस् यदि तपाईं सक्षम हुनुहुन्छ Fix Desktop Icons keep getting rearranged automatically issue.
विधि 4: आइकन क्यास मेटाउनुहोस्
1.Make sure to save all the work which you are currently doing on your PC and close all the present applications or folder windows.
2. खोल्नको लागि Ctrl + Shift + Esc सँगै थिच्नुहोस् कार्य प्रबन्धक।
3. दायाँ क्लिक गर्नुहोस् Windows Explorer र चयन गर्नुहोस् कार्य समाप्त

4.Cick फाइल त्यसपछि क्लिक गर्नुहोस् नयाँ कार्य चलाउनुहोस्।

5. प्रकार cmd.exe मान फिल्डमा र ठीक क्लिक गर्नुहोस्।

6. अब cmd मा निम्न आदेश टाइप गर्नुहोस् र प्रत्येक पछि इन्टर थिच्नुहोस्:
CD /d % userprofile% AppDataLocal
DEL IconCache.db /a
बाहिर निस्कनुहोस्
![]()
7. एकपटक सबै आदेशहरू सफलतापूर्वक कार्यान्वयन भइसकेपछि क्लोज कमांड प्रम्प्ट।
8. अब फेरि टास्क म्यानेजर खोल्नुहोस् यदि तपाईंले बन्द गर्नुभयो भने क्लिक गर्नुहोस् फाइल > नयाँ कार्य चलाउनुहोस्।
9. explorer.exe टाइप गर्नुहोस् र ठीक क्लिक गर्नुहोस्। यसले तपाइँको विन्डोज एक्सप्लोरर पुन: सुरु गर्नेछ र Fix Desktop Icons keep getting rearranged issue.

Method 5: Roll back to the previous Windows 10 build
1.First, go to the Login screen then click on पावर बटन त्यसपछि शिफ्ट होल्ड गर्नुहोस् र त्यसपछि क्लिक गर्नुहोस् फेरि शुरु गर्नु।
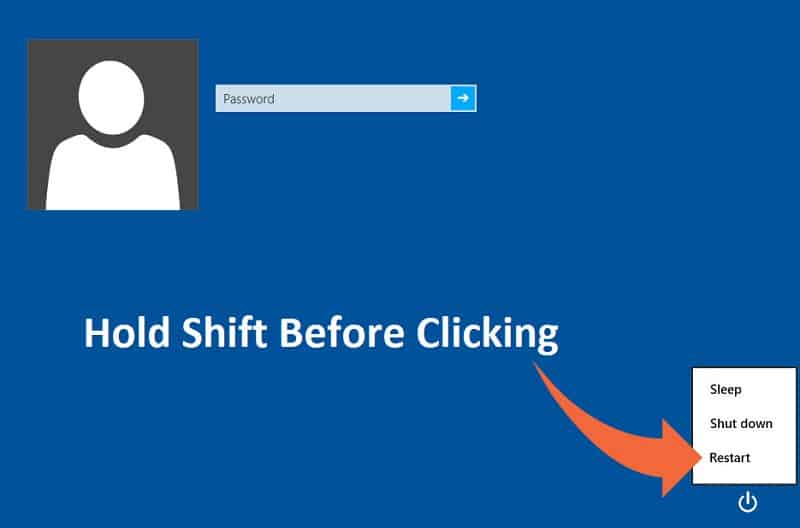
2. सुनिश्चित गर्नुहोस् कि तपाईंले शिफ्ट बटन नदेखेसम्म छोड्नु हुन्न उन्नत रिकभरी विकल्प मेनु।

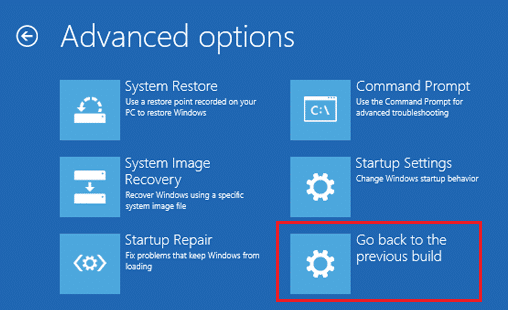
3. अब उन्नत रिकभरी विकल्प मेनुमा निम्नमा नेभिगेट गर्नुहोस्:
समस्या निवारण > उन्नत विकल्पहरू > अघिल्लो निर्माणमा फर्कनुहोस्।
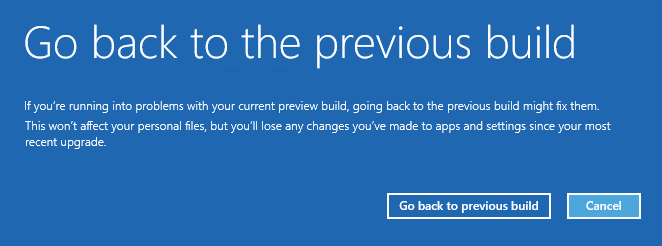
3.After a few seconds, you will be asked to choose your User Account. Click on the User Account, type in your password and click Continue. Once done, choose the option Go Back to the Previous Build again.
तपाईंको लागि सिफारिस गरिएको:
त्यो तपाईले सफलतापूर्वक गर्नुभएको छ फिक्स डेस्कटप आइकनहरू Windows 10 क्रिएटरहरू अद्यावधिक पछि पुन: व्यवस्थित भइरहन्छन् तर यदि तपाईंसँग अझै पनि यस गाइडको बारेमा कुनै प्रश्नहरू छन् भने टिप्पणीको खण्डमा तिनीहरूलाई सोध्न नहिचकिचाउनुहोस्।
![Fix WMI Provider Host High CPU Usage [Windows 10]](https://lbsite.org/wp-content/uploads/2023/02/Fix-WMI-Provider-Host-High-CPU-Usage-on-Windows-10.png "Fix WMI Provider Host High CPU Usage [Windows 10]")
