All the corrupt files in your system can be analyzed and repaired by several built-in tools in Windows 10 system. One such command-line tool is Implementatiebeeldservice en -beheer or DISM, which assists in servicing and preparing Windows images on Windows Recovery Environment, Windows Setup, and Windows PE. This tool could also help you in repairing the corrupt files even if System File Checker is not working correctly. Yet, sometimes you may receive Windows 10 DISM Error 87 due to varied reasons. This guide will help you fix DISM Error 87 in Windows 10 PC.
Hoe DISM-fout 87 in Windows 10 te repareren
What causes DISM Error 87 in Windows 10?
Several reasons contribute to Windows 10 DISM Error 87. A few of them are discussed below.
- Command Line has an Error – Wrongly typed command line can cause the said error. For example, when you have typed an incorrect code or any incorrect spaces exist before the /snijden.
- Bug in Windows 10 System – When there is an update pending in your system or if your system has a hidden bug, then you might face DISM Error 87. Installing all the new updates available can fix the issue in your system.
- Running Commands in Regular Command Prompt Window – Few commands are validated only if you have administrative privileges.
- Outdated Version of DISM – If you try to apply or use a Windows 10 image using an old version of DISM in your system, you will face DISM Error 87. In this case, use the correct wofadk.sys filter driver and try applying the Windows 10 image using an apt DISM version.
Now that you have a basic idea about what causes DISM Error 87 in Windows 10, continue reading the article to learn how to fix the said problem. A list of methods is compiled and arranged according to user convenience. So, one by one, implement these until you find a solution for your Windows 10 desktop/laptop.
Method 1: Type Commands with Correct Spelling & Spacing
The most common mistake users make is of either typing an incorrect spelling or leaving an incorrect spacing before or after the / character. To fix this error, type the command correctly.
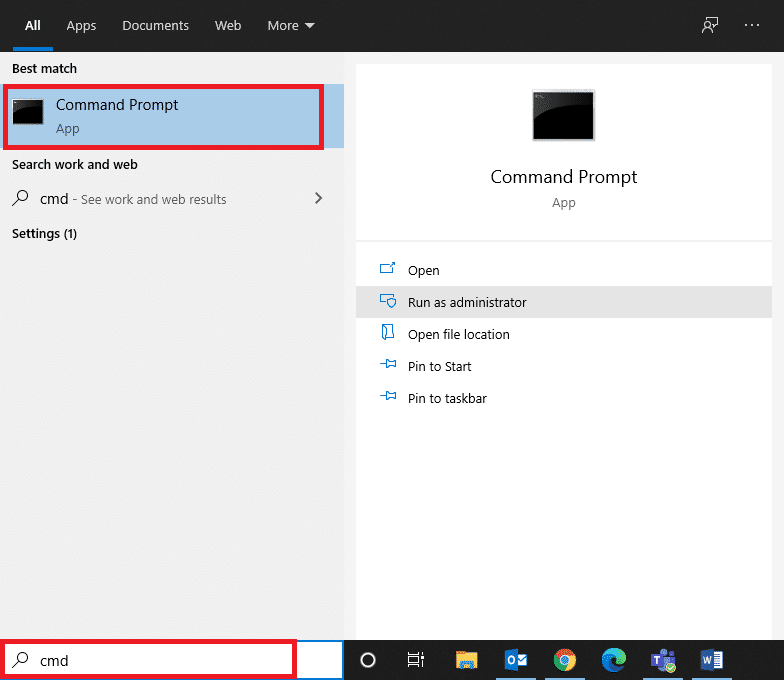
1. Lancering Opdrachtprompt door de Windows-zoekbalk, zoals getoond.
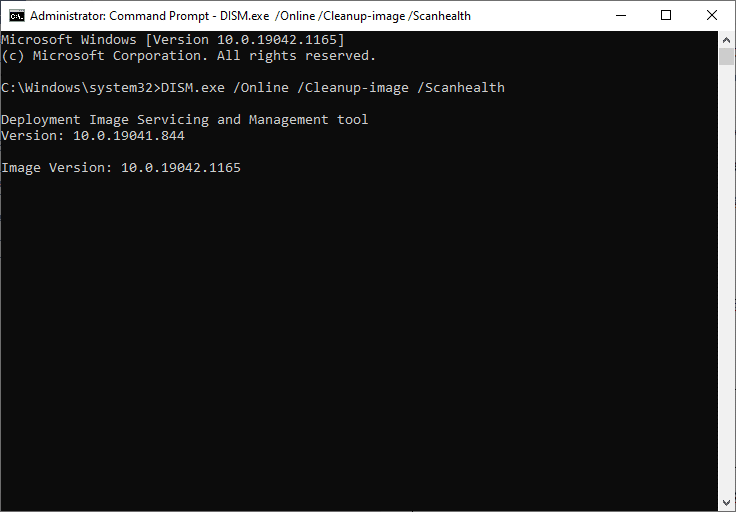
2. Type the following command with spelling and spacing as mentioned:
DISM.exe / Online / Opschonen-afbeelding / Scanhealth
OR
DISM.exe / Online / Cleanup-image / Restorehealth
3. Once you hit Enter, you will see some data pertaining to the DISM tool displayed on the screen, as depicted.
4. The said command should get executed and fetch results.
Method 2: Run Command Prompt with Administrative Privileges
Even if you type the command with correct spelling and spacing, you may encounter Windows 10 DISM Error 87 due to lack of administrative privileges. Hence, do as follows:
1. druk de Dakramen en raamkozijnen sleutel en type cmd in de zoekbalk.
2. Klik op Als administrator uitvoeren in the right pane to launch Command Prompt with administrative privileges.

3. Typ de commando as earlier and hit Enter.
Now, your command will be executed and Windows 10 DISM Error 87 will be fixed. If not, try the next solution.
Lees ook: Fix DISM Error 14098 Component Store has been corrupted
Method 3: Run System File Checker and CHKDSK
Windows 10 users can automatically, scan and repair their system files by running System File Checker (SFC) and Check Disk (CHKDSK) commands. These are built-in tools that let the user delete files and fix Windows 10 DISM Error 87. Steps to run SFC and CHKDSK are given below:
1. Lancering Opdrachtprompt als beheerder using the steps explained in Methode 2.
2. Typ de volgende opdracht: sfc / scannow en druk op Enter toets.
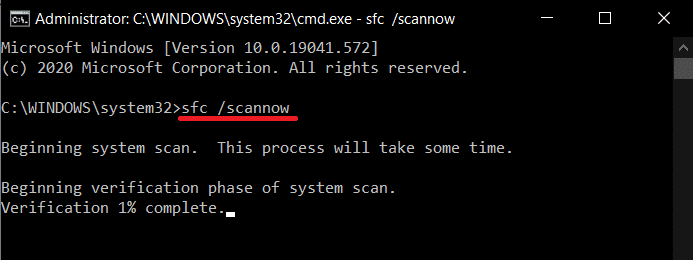
Now, System File Checker will begin its process. All the programs in your system will be scanned and will be repaired automatically.
3. Wacht op de Verificatie 100% voltooid statement to appear, and once done, herstart je pc.
Check if Windows 10 DISM Error 87 is fixed. If not, follow the steps further.
Opmerking: Before executing the CHKDSK tool, make sure you do not need to recover any deleted files in your system since this tool cannot restore the recoverable data.
4. Nogmaals, start Command Prompt as an administrator.
5. Type CHKDSK C:/r and hit Enter, zoals getoond.
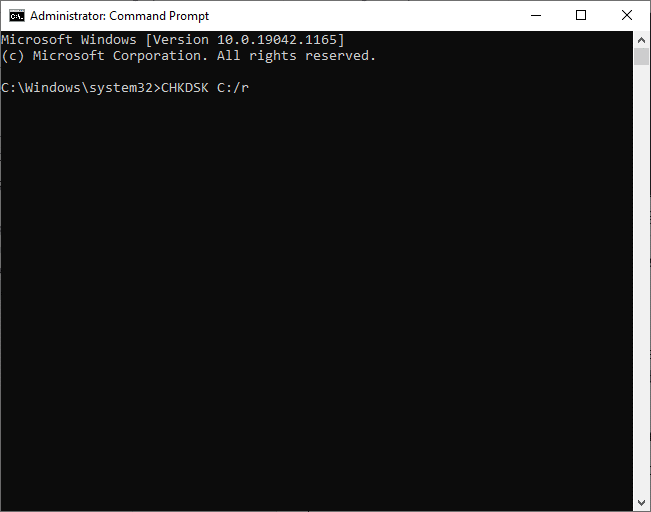
6. Wacht ten slotte tot het proces succesvol is uitgevoerd en dichtbij het raam.
Lees ook: Fix DISM Source Files Could not be Found Error
Methode 4: Windows-besturingssysteem bijwerken
If you did not obtain any results by the above-mentioned methods, then there might be bugs in your system. Microsoft releases updates periodically, to fix the bugs in your system. Therefore, always ensure that you use your system in its updated version. Otherwise, the files in the system will not be compatible with the DISM files leading to DISM Error 87 in Windows 10 computers.
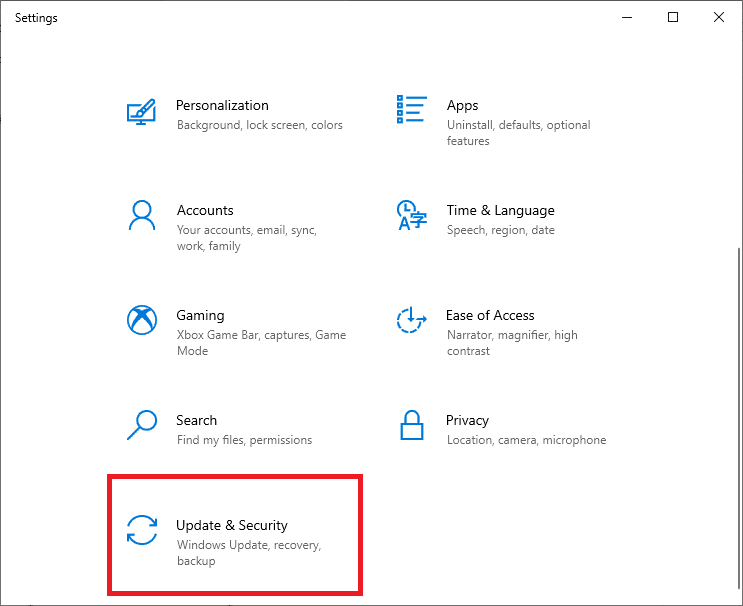
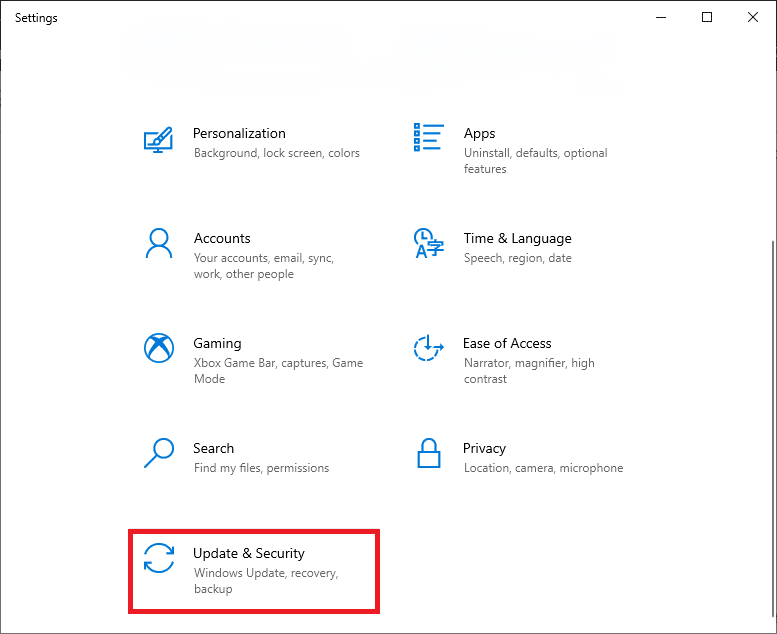
1. druk de Windows + I sleutels samen te openen Instellingen in uw systeem.
2. Selecteer nu Update en beveiliging, zoals getoond.
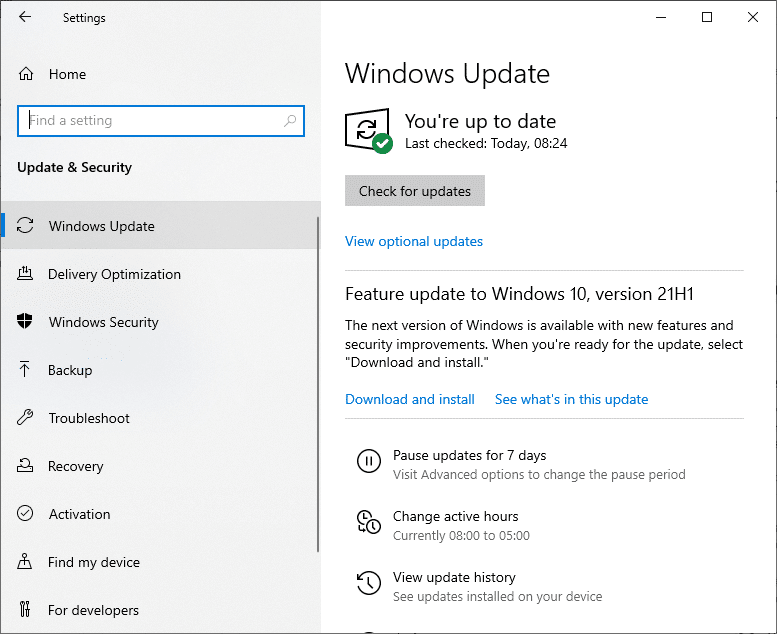
3. Klik vervolgens op Controleren op updates knop.
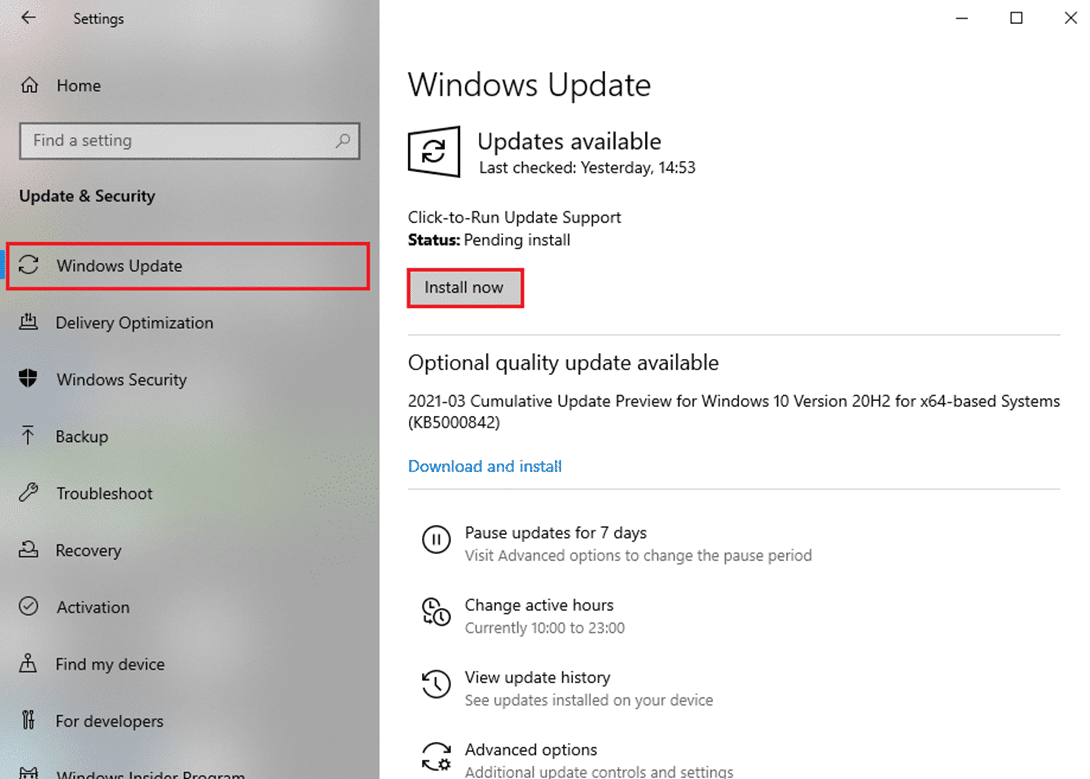
3A. Klik op Nu installeren om de . te downloaden en te installeren Updates beschikbaar.
3B. Als uw systeem al up-to-date is, wordt dit weergegeven Je bent op de hoogte message, as depicted.
4. Start je systeem opnieuw op en controleer of het probleem nu is opgelost.
Lees ook: Fix DISM-fout 0x800f081f in Windows 10
Method 5: Use the Correct Version of DISM
When you execute command lines on older versions of DISM on Windows 8.1 or earlier, you are bound to face Windows 10 DISM Error 87. But this problem can be fixed when you use the correct version of DISM in Windows 10 with the correct Wofadk.sys filter driver. The Operating System used by DISM is the Host deployment environment. The DISM supports the following platforms in several Windows versions, as listed below:
| Host-implementatieomgeving | Doelafbeelding: Windows 11 of WinPE voor Windows 11 | Doelafbeelding: Windows 10 of WinPE voor Windows 10 | Doelafbeelding: Windows 8.1, Windows Server 2016, Windows Server 2012 R2 of WinPE 5.0 (x86 of x64) |
| Ramen 11 | ondersteunde | ondersteunde | ondersteunde |
| Windows 10 (x86 of x64) | Ondersteund, met behulp van de Windows 11-versie van DISM | ondersteunde | ondersteunde |
| Windows Server 2016 (x86 of x64) | Ondersteund, met behulp van de Windows 11-versie van DISM | ondersteunde | ondersteunde |
| Windows 8.1 (x86 of x64) | Ondersteund, met behulp van de Windows 11-versie van DISM | Ondersteund, met behulp van de Windows 10-versie van DISM | ondersteunde |
| Windows Server 2012 R2 (x86 of x64) | Ondersteund, met behulp van de Windows 11-versie van DISM | Ondersteund, met behulp van de Windows 10-versie van DISM | ondersteunde |
| Windows 8 (x86 of x64) | Niet ondersteund | Ondersteund, met behulp van de Windows 10-versie van DISM | Ondersteund, met de Windows 8.1-versie van DISM of hoger |
| Windows Server 2012 (x86 of x64) | Ondersteund, met behulp van de Windows 11-versie van DISM | Ondersteund, met behulp van de Windows 10-versie van DISM | Ondersteund, met de Windows 8.1-versie van DISM of hoger |
| Windows 7 (x86 of x64) | Niet ondersteund | Ondersteund, met behulp van de Windows 10-versie van DISM | Ondersteund, met de Windows 8.1-versie van DISM of hoger |
| Windows Server 2008 R2 (x86 of x64) | Ondersteund, met behulp van de Windows 11-versie van DISM | Ondersteund, met behulp van de Windows 10-versie van DISM | Ondersteund, met de Windows 8.1-versie van DISM of hoger |
| Windows Server 2008 SP2 (x86 of x64) | Niet ondersteund | Niet ondersteund | Ondersteund, met de Windows 8.1-versie van DISM of hoger |
| WinPE voor Windows 11 x64 | ondersteunde | Ondersteund: alleen X64-doelafbeelding | Ondersteund: alleen X64-doelafbeelding |
| WinPE voor Windows 10 x86 | ondersteunde | ondersteunde | ondersteunde |
| WinPE voor Windows 10 x64 | Ondersteund, met behulp van de Windows 11-versie van DISM | Ondersteund: alleen X64-doelafbeelding | Ondersteund: alleen X64-doelafbeelding |
| WinPE 5.0 x86 | Ondersteund, met behulp van de Windows 11-versie van DISM | Ondersteund, met behulp van de Windows 10-versie van DISM | ondersteunde |
| WinPE 5.0 x64 | Ondersteund, met behulp van de Windows 11-versie van DISM | Ondersteund, met gebruik van de Windows 10-versie van DISM: alleen X64-doelafbeelding | Ondersteund: alleen X64-doelafbeelding |
| WinPE 4.0 x86 | Niet ondersteund | Ondersteund, met behulp van de Windows 10-versie van DISM | Ondersteund, met de Windows 8.1-versie van DISM of hoger |
| WinPE 4.0 x64 | Niet ondersteund | Ondersteund, met gebruik van de Windows 10-versie van DISM: alleen X64-doelafbeelding | Ondersteund, met gebruik van de Windows 8.1-versie van DISM of hoger: alleen X64-doelimage |
| WinPE 3.0 x86 | Niet ondersteund | Ondersteund, met behulp van de Windows 10-versie van DISM | Ondersteund, met de Windows 8.1-versie van DISM of hoger |
| WinPE 3.0 x64 | Niet ondersteund | Ondersteund, met gebruik van de Windows 10-versie van DISM: alleen X64-doelafbeelding | Ondersteund, met gebruik van de Windows 8.1-versie van DISM of hoger: alleen X64-doelimage |
Thus, when you use DISM for an image service, always ensure what version you are using and whether it is compatible with the device or not. Run DISM commands only if you are sure that you are using the correct DISM version.
Method 6: Perform Clean Installation
If none of the methods have helped you solve the issue, you can try to reinstall Windows. Here’s how to fix DISM Error 87 in Windows 10 by performing a clean installation of Windows:
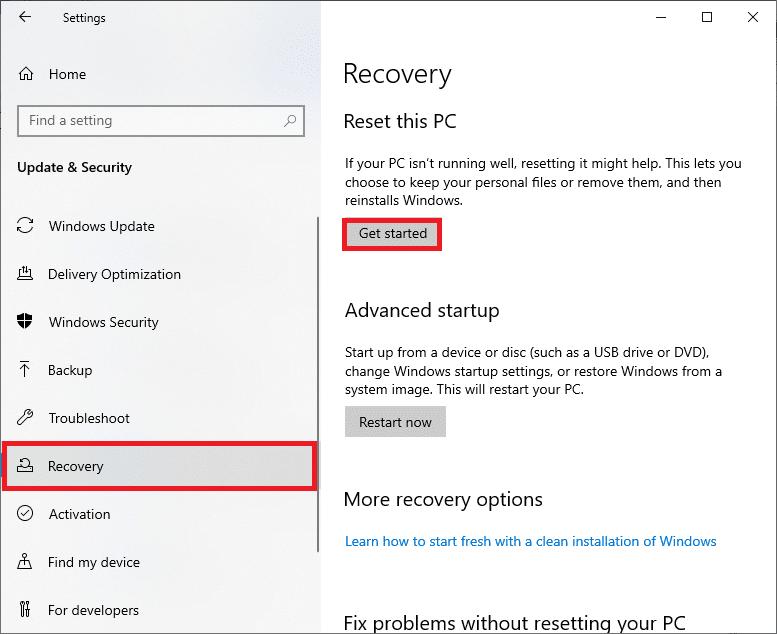
1. Navigeren naar Instellingen> Update en beveiliging zoals geïnstrueerd in Methode 3.
2. Selecteer nu de Herstel optie in het linkerdeelvenster en klik op Start in het rechterdeelvenster.
3. Here, choose an option from the Reset deze pc venster:
- Bewaar mijn bestanden option will remove apps and settings but keeps your personal files.
- De Verwijder alles option will remove all your personal files, apps, and settings.
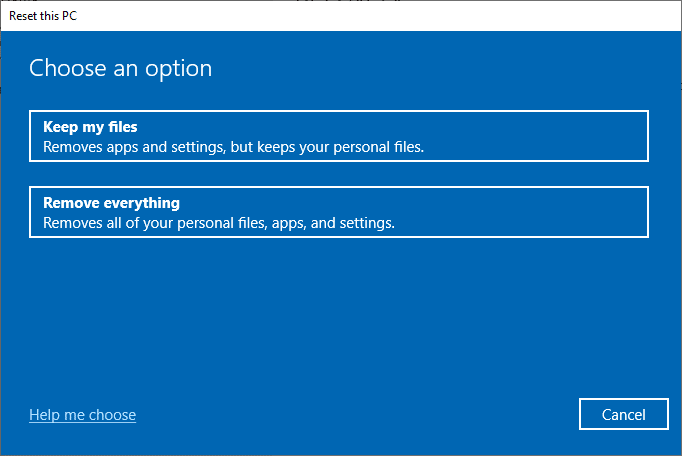
4. Volg ten slotte de instructies op het scherm om het resetproces te voltooien.
Aanbevolen
We hopen dat deze gids nuttig was en dat u in staat was om fix DISM Error 87 in Windows 10. Laat ons weten welke methode voor u het beste werkte. Als u vragen/suggesties heeft over dit artikel, kunt u deze ook in het opmerkingengedeelte achterlaten.

