Reparer startmenyen som ikke fungerer i Windows 10

If you have recently updated or upgraded to Windows 10, then chances are your Start Menu may not work properly, making it impossible for users to navigate around Windows 10. Users are experiencing various issues with Start Menu such as Start Menu does not open, Start Button is not working, or Start Menu freezes etc. If your Start Menu isn’t working then don’t worry as today we will see a way to fix this issue.
This exact cause is different for different users because each user has a different system configuration and environment. But the problem can be related to anything like corrupted user account or drivers, damaged system files, etc. So without wasting any time, let’s see How to Fix Start Menu Not Working in Windows 10 with the help of the below-listed tutorial.
Sørg for å opprette et gjenopprettingspunkt i tilfelle noe går galt.
To run Command Prompt as an administrator, press Ctrl + Shift + Esc to open Task Manager. Then click on filet Velg deretter Kjør ny oppgave. Type cmd.exe og hake "Opprett denne oppgaven med administrative rettigheter” then click OK. Similarly, to open PowerShell, type powershell.exe and again checkmark the above field then hit Enter.

Metode 1: Start Windows Utforsker på nytt
1. Pressen Ctrl + Shift + Esc tastene sammen for å starte Task Manager.
2. Finne explorer.exe i listen, høyreklikk på den og velg Avslutt oppgave.

3. Nå vil dette lukke Utforskeren og kjøre den på nytt, klikk på Fil > Kjør ny oppgave.
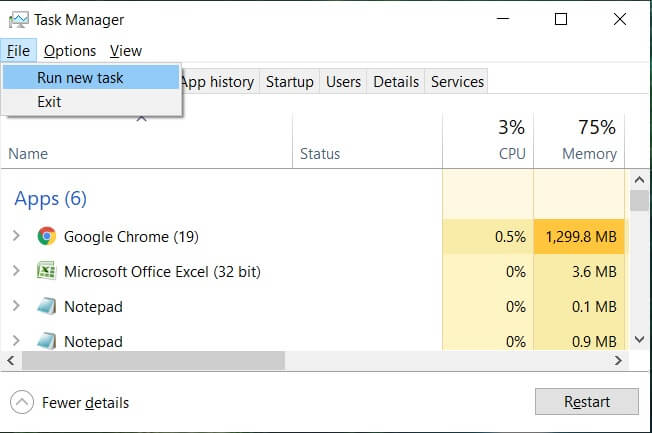
4. Type explorer.exe og trykk OK for å starte Explorer på nytt.

5. Exit Task Manager and see if you’re able to Fix Start Menu Not Working in Windows 10.
6. If you’re still facing the issue, then log out from your account and re-login.
7. Pressen Ctrl + Shift + Del key at the same time and click on Signout.
8. Type in your password to login to Windows and see if you’re able to fix the issue.
Method 2: Create a new local administrator account
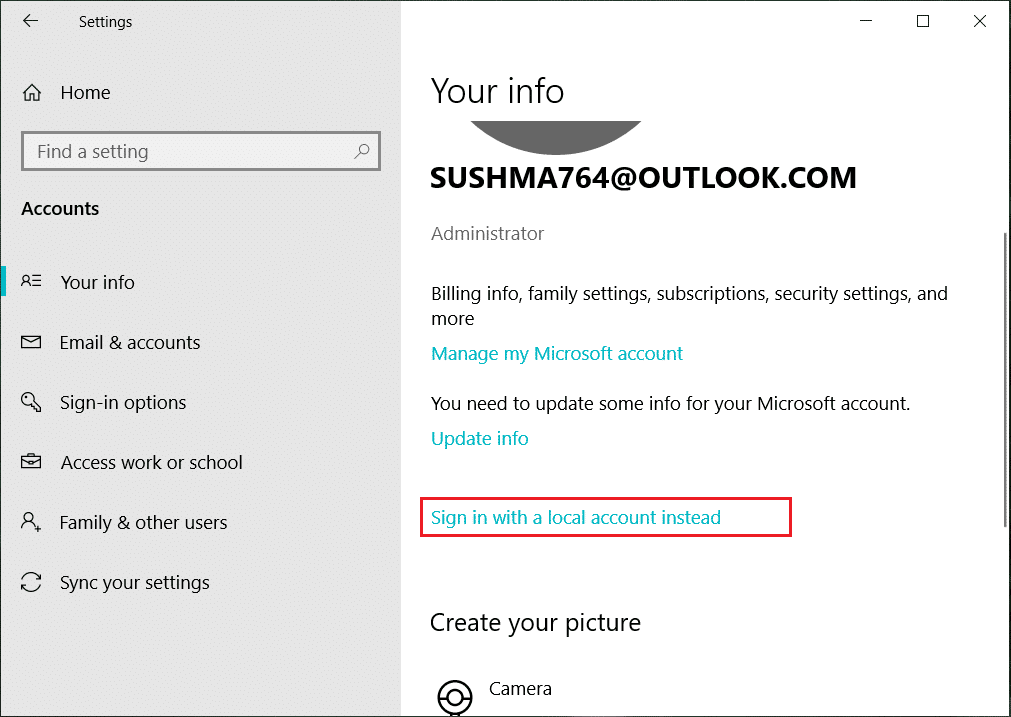
If you’re signed with your Microsoft account, then first remove the link to that account by:
1. Trykk Windows-tast + R og skriv deretter "ms-innstillinger:” (uten anførselstegn) og trykk Enter.
2. velg Account > Sign in with a local account instead.
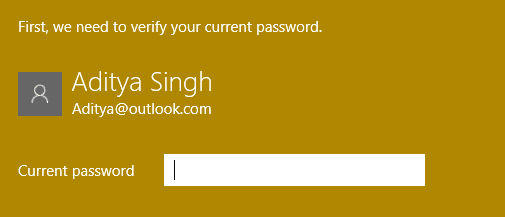
3. Skriv inn din Microsoft-konto passord og klikk Neste.
4. Velg en new account name and password, and then select Finish and sign out.
#1. Create the new administrator account:
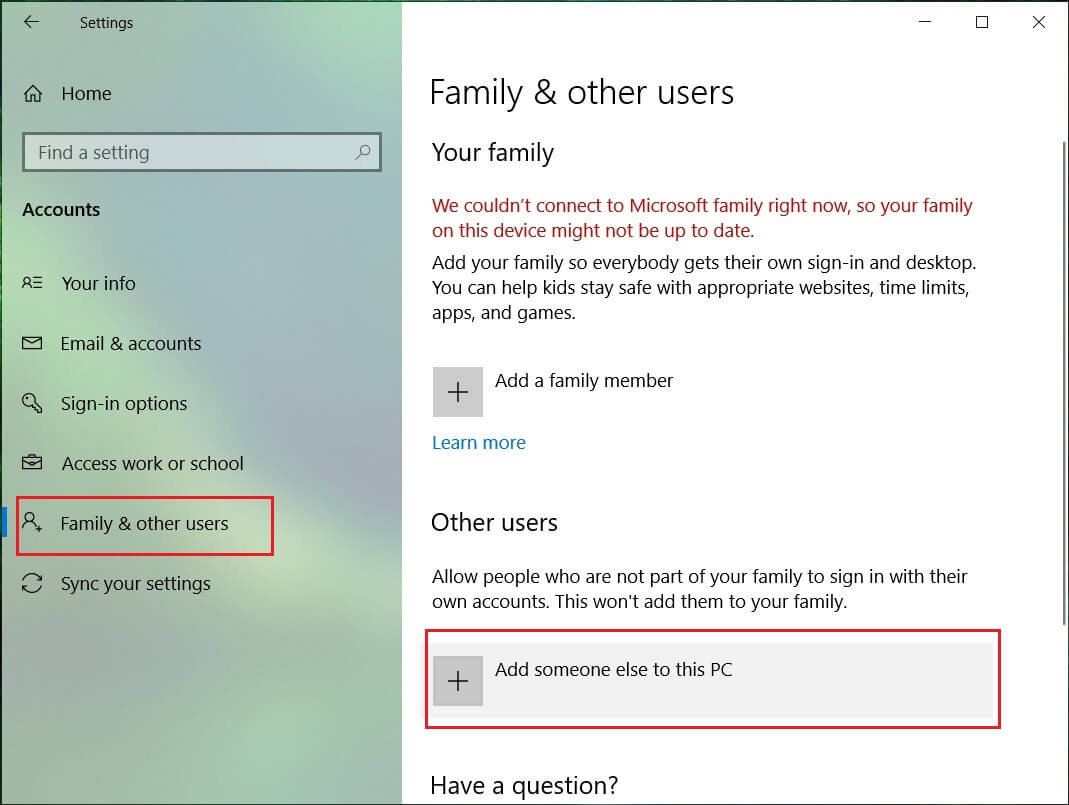
1. Press Windows Key + I to open Settings and then click Kontoer.
2. Naviger deretter til Familie og andre mennesker.
3. Under Other people click on “Legg til noen andre på denne PC-en."
4. Next, provide a name for the user and a password then select Next.
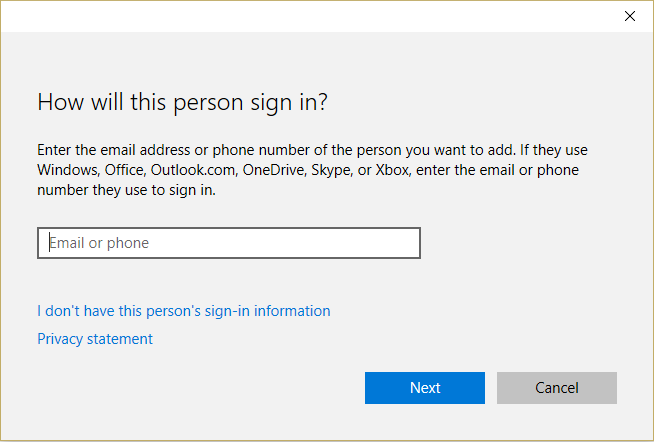
5. Sett a brukernavn og passord, velg deretter Neste> Fullfør.
#2. Next, make the new account an administrator account:
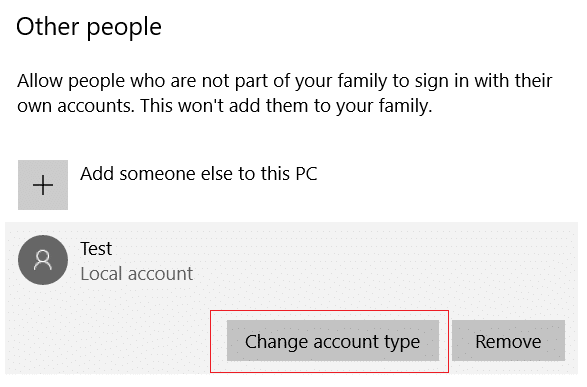
1. Again open Windows-innstillinger og klikk på Konto.

2. Gå til Fanen Familie og andre mennesker.
3. Other people choose the account you just created and then selected a Endre kontotype.
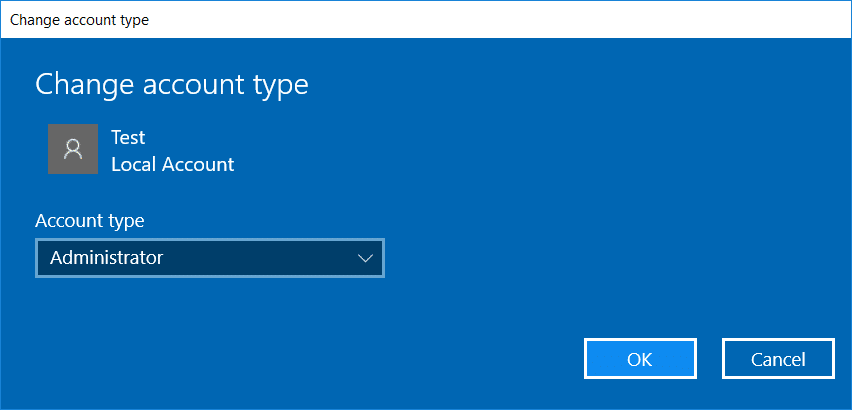
4. Under Account type, select administrator Klikk deretter OK.
#3. If the issue persists try deleting the old administrator account:
1. Again go to Windows Settings then Account > Family & other people.
2. Under Other users, select the old administrator account, click Fjerne, og velg Delete account and data.

3. If you were using a Microsoft account to sign in before, you can associate it with the new administrator by following the next step.
4. i Windows Settings > Accounts, select Sign in with a Microsoft account instead and enter your account info.
Finally, you should be able to Reparer startmenyen som ikke fungerer i Windows 10 as this step seems to fix the issue in most cases.
If you continue to experience Start Menu’s issue, it’s recommended to download and run Start Menu Troubleshooter.
1. Download and run Start Menu Troubleshooter.
2. Dobbeltklikk på nedlastet fil og klikk deretter Neste.
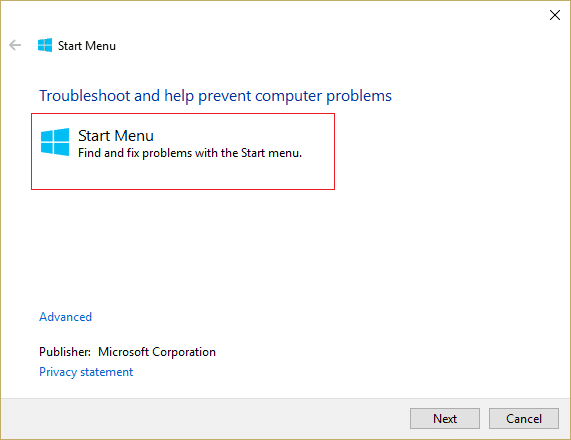
3. Let it finds and automatically Fixes Start Menu Not Working in Windows 10.
Method 4: Run System File Checker (SFC) and Check Disk
1. Åpne ledetekst. Brukeren kan utføre dette trinnet ved å søke etter 'cmd' Og trykk deretter på Enter.

2. Skriv nå følgende i cmd og trykk enter:
Sfc /scannow sfc /scannow /offbootdir=c: /offwindir=c:windows

3. Vent til prosessen ovenfor er ferdig, og start PC-en på nytt når du er ferdig.
4. Kjør deretter CHKDSK fra Fiks filsystemfeil med Check Disk Utility (CHKDSK).
5. La prosessen ovenfor fullføre og start PC-en på nytt for å lagre endringene.
Method 5: Force Cortana to Rebuild Settings
Open Command Prompt with administrative rights then type the following one by one and hit Enter after each command:
CD /d "%LOCALAPPDATA%PackagesMicrosoft.Windows.Cortana_cw5n1h2txyewy"
Taskkill /F /IM SearchUI.exe
RD /S /Q Settings
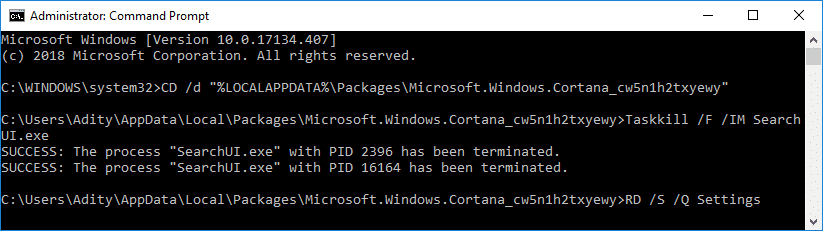
This will force Cortana to rebuild the settings and will Fix Start Menu and Cortana Not Working in Windows 10.
If the issue is still not resolved, follow this guide to fix any issues related to Cortana.
Method 6: Re-Register Windows App
1. Type PowerShell i Windows Search, høyreklikk deretter på PowerShell og velg Kjør som Administrator.
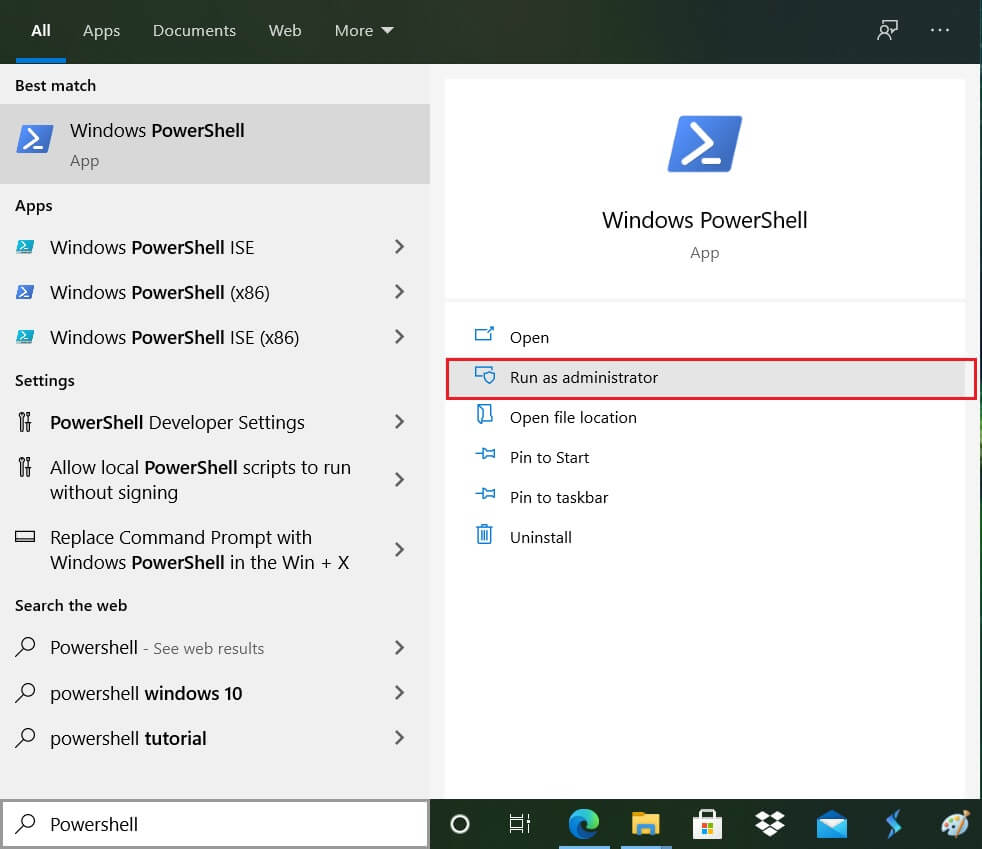
2. Skriv nå inn følgende kommando i PowerShell-vinduet:
Get-AppXPackage -AllUsers | Foreach {Add-AppxPackage -DisableDevelopmentMode -Register "$ ($ _. InstallLocation) AppXManifest.xml"}

3. Vent til Powershell utfører kommandoen ovenfor og ignorer de få feilene som kan komme.
4. Start PC-en på nytt for å lagre endringene.
Metode 7: Registerfiks
1. Press Ctrl + Shift + Esc to open Task Manager then click on filet og velg Kjør ny oppgave.
2. Type regedit og hake "Opprett denne oppgaven med administrative rettigheter" klikk deretter OK.
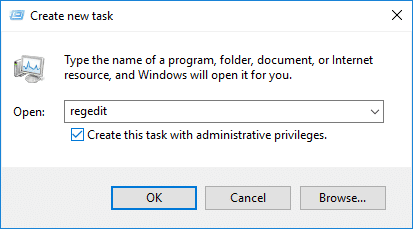
3. Now navigate to the following registry key in the Registry Editor:
ComputerHKEY_LOCAL_MACHINESYSTEMCurrentControlSetServicesWpnUserService
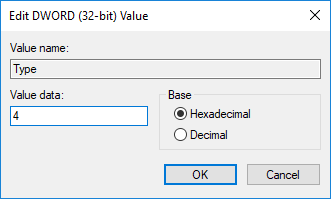
4. Sørg for å velge WpnUserService then in the right window double-click on the Start DWORD.
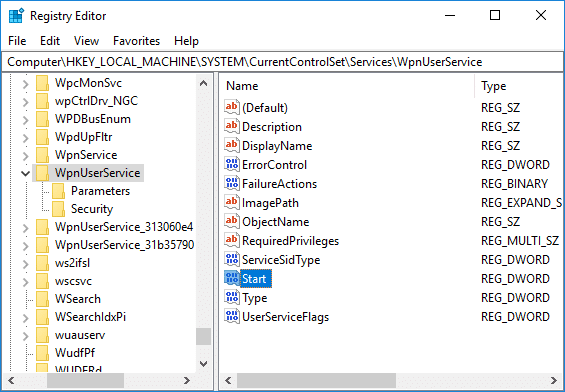
5. Change its value to 4 then click OK.
6. Start PC-en på nytt for å lagre endringene.
Metode 8: Oppdater eller tilbakestill Windows 10
OBS: If you can’t access your PC, restart your PC a few times until you start Automatisk reparasjon. Naviger deretter til Feilsøking > Tilbakestill denne PCen > Fjern alt.
1. Trykk Windows-tast + I for å åpne Innstillinger og klikk deretter på Oppdatering og sikkerhet-ikon.
![]()
2. Velg fra menyen til venstre Recovery.
3. Under Tilbakestill denne PCen, Klikk på "Kom i gang"-Knappen.

4. Velg alternativet til Hold filene mine.

5. For the next step, you might be asked to insert Windows 10 installation media, so ensure you have it ready.
6. Now, select your Windows version and click kun på stasjonen der Windows er installert > remove my files.

5. Klikk på Nullstillknapp.
6. Følg instruksjonene på skjermen for å fullføre tilbakestillingen.
Anbefalt:
Det er det du har lykkes med Reparer startmenyen som ikke fungerer i Windows 10 men hvis du fortsatt har spørsmål angående denne opplæringen, kan du gjerne spørre dem i kommentarfeltet.