15 sposobów na przyspieszenie wolnego komputera z systemem Windows 10

If your PC running Windows 10 is becoming slow or constantly lags, you’re at the right place as today we will fix the issue altogether. Although Windows 10 is one of the best-operating systems out there, with time it has become slow and now your PC lags a lot, worse of all it freezes suddenly. You will notice that when you installed a new copy of Windows, the system was a lot faster as compared to the current state.
Now the lagging or slow PC issue is generally caused by performance issues under Windows 10, but sometimes it can also be caused by bad memory (RAM), damaged hard disk, virus or malware etc. So without wasting any time let’s see how to actually Seed Up a Slow Windows 10 PC with the help of below-listed methods.
15 sposobów na przyspieszenie wolnego komputera z systemem Windows 10
Pamiętaj, aby utworzyć punkt przywracania na wypadek, gdyby coś poszło nie tak.
Method 1: Disable Animation and adjust for best performance
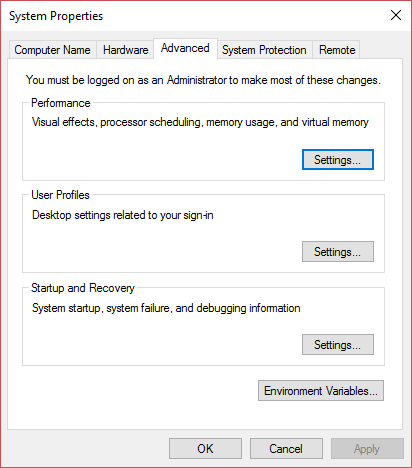
1. Naciśnij klawisz Windows + R, a następnie wpisz sysdm.cpl i naciśnij Enter, aby otworzyć Właściwości systemu.

2. Przełącz na Zakładka Zaawansowane następnie kliknij Ustawienia dla Wydajność.
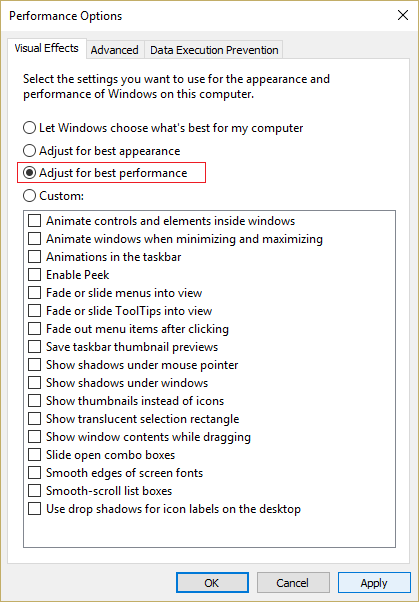
3. Under Visual Effects checkmark “Dopasuj dla uzyskania najlepszej wydajności” would automatically wyłącz wszystkie animacje.
4. Kliknij Zastosuj, a następnie OK.
5. Uruchom ponownie komputer, aby zapisać zmiany i sprawdź, czy możesz Przyspiesz powolny komputer z systemem Windows 10.
Method 2: Disable Unnecessary Startup Programs
1. Press Ctrl + Shift + Esc keys together to open Task Manager and then switch to Startup.
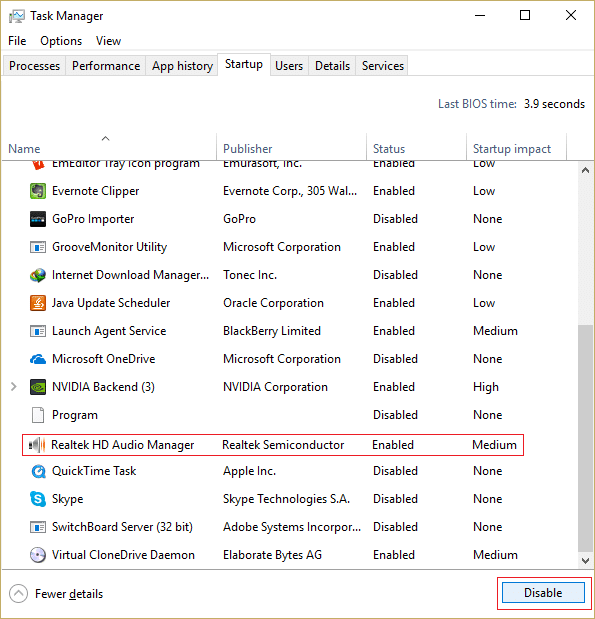
2. From the list, select the programs you don’t use and then click on the Wyłącz przycisk.
3. Do this for every unnecessary program, as you will only be able to disable one program at a time.

4. Close Task Manager and reboot your PC to save changes.
Metoda 3: Uruchom CCleaner i Malwarebytes
1. Ściągnij i zainstaluj CCleaner & Malwarebytes.
2. Uruchom Malwarebytes i pozwól mu przeskanować Twój system w poszukiwaniu szkodliwych plików. Jeśli zostanie znalezione złośliwe oprogramowanie, automatycznie je usunie.

3. Teraz uruchom CCleaner i wybierz Niestandardowe czyszczenie.
4. W obszarze Czyszczenie niestandardowe wybierz Karta Okna i zaznacz wartości domyślne i kliknij Analizować.

5. Po zakończeniu analizy upewnij się, że na pewno usuniesz pliki do usunięcia.

6. Na koniec kliknij Uruchom Cleaner i pozwól CCleanerowi działać.
7. Aby jeszcze bardziej wyczyścić system, wybierz zakładkę Rejestri upewnij się, że zostały sprawdzone następujące elementy:

8. Kliknij na Skanuj w poszukiwaniu problemów i zezwól CCleaner na skanowanie, a następnie kliknij Napraw zaznaczone problemy przycisk.

9. Gdy CCleaner pyta „Czy chcesz wykonać kopię zapasową zmian w rejestrze?" wybierz Tak.
10. Po zakończeniu tworzenia kopii zapasowej kliknij Napraw wszystkie wybrane problemy przycisk.
11. Uruchom ponownie komputer, aby zapisać zmiany.
Method 4: Run Disk Cleanup and Error Checking
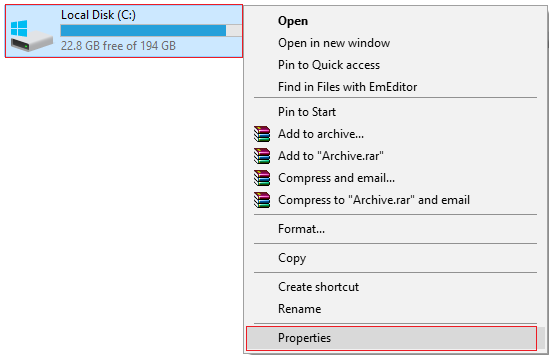
1. Go to This PC or My PC and right-click on the C: drive to select Nieruchomości.
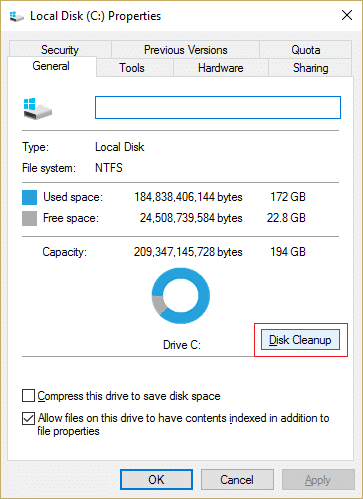
2. Teraz z Właściwości okno, kliknij Oczyszczanie dysku under capacity.
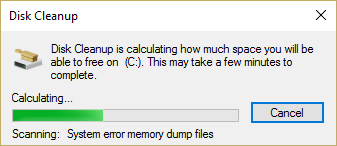
3. It will take some time to calculate how much space Disk Cleanup will free.
4. Teraz kliknij Oczyść pliki systemowe in the bottom under Description.
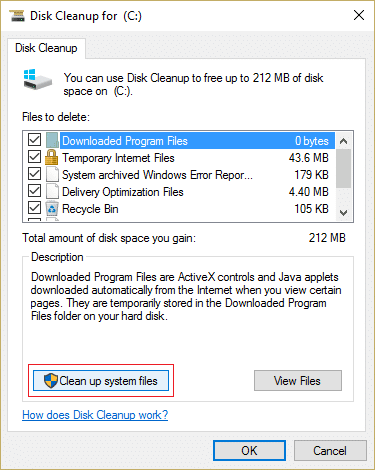
5. In the next window, make sure to select everything under Pliki do usunięcia and then click OK to run Disk Cleanup. Uwaga: We are looking for “Previous Windows Installation(s)"I"Tymczasowe pliki instalacyjne systemu Windows” if available, make sure they are checked.
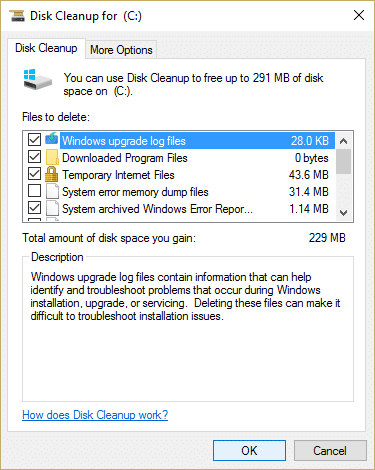
6. Wait for Disk Cleanup to complete and see if you can Speed Up a Slow Windows 10 PC, jeśli nie, kontynuuj.
7. otwarte Wiersz polecenia. Użytkownik może wykonać ten krok, wyszukując „cmd” A następnie naciśnij klawisz Enter.

8. In the cmd window type the following command and hit Enter:
chkdsk C: / f / r / x

Uwaga: In the above command C: is the drive on which we want to check disk, /f stands for a flag which chkdsk the permission to fix any errors associated with the drive, /r let chkdsk search for bad sectors and perform recovery and /x instructs the check disk to dismount the drive before beginning the process.
9. It will ask to schedule the scan in the next system reboot, wpisz Y i naciśnij enter.
Please keep in mind that CHKDSK process can take up a lot of time as it has to perform many system-level functions, so be patient while it fixes system errors and once the process is finished it will show you the results.
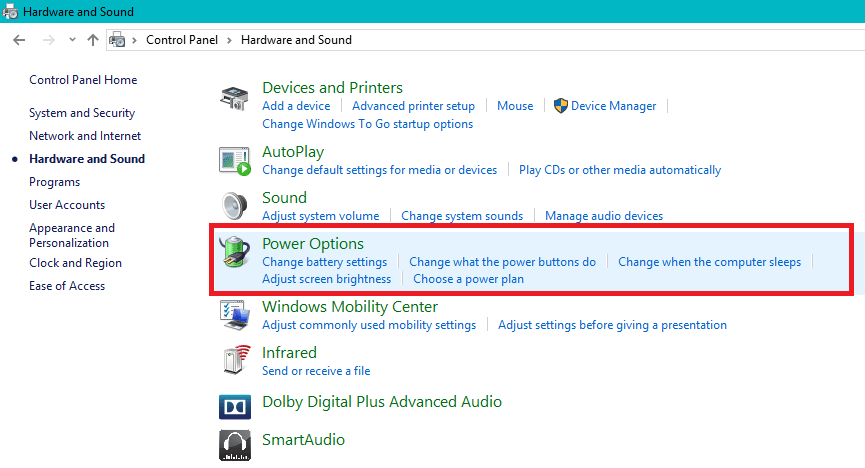
Metoda 5: Wyłącz szybkie uruchamianie
1. Naciśnij Klawisz Windows + R, następnie wpisz control i naciśnij Enter, aby otworzyć Panel sterowania.

2. Kliknij na Sprzęt i dźwięk następnie kliknij Opcje zasilania.
3. Then from the left window pane select "Wybierz funkcje przycisków zasilania."

4. Teraz kliknij "Zmień ustawienia, które są obecnie niedostępne."

5. Odznacz „Włącz szybkie uruchamianie” i kliknij Zapisz zmiany.
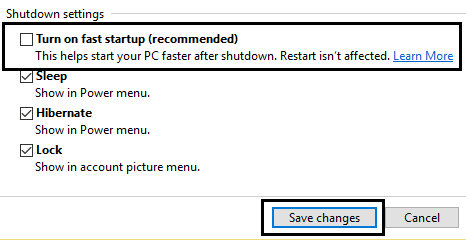
6. Uruchom ponownie komputer, aby zapisać zmiany i sprawdź, czy możesz Przyspiesz powolny komputer z systemem Windows 10.
Metoda 6: Zaktualizuj sterowniki
1. Naciśnij klawisz Windows + R, a następnie wpisz devmgmt.msc i naciśnij Enter, aby otworzyć Menedżera urządzeń.

2. Next, make sure to kliknij prawym przyciskiem myszy on any device with a yellow exclamation mark next to it.
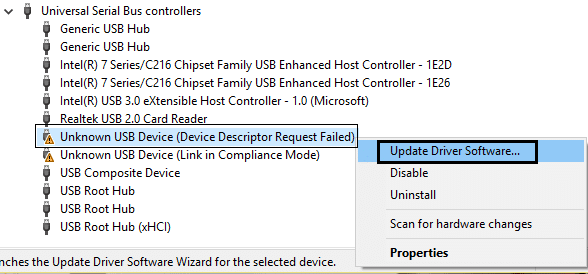
3. wybierać Aktualizuj sterownik a następnie kliknij Wyszukaj automatycznie zaktualizowane oprogramowanie sterownika.

4. After the update, restart your PC and see if you’re able to fix the issue.
5. If not, then again right-click and select Aktualizuj sterownik.
6. This time, select “Przeglądaj mój komputer w poszukiwaniu oprogramowania sterownika."

7. Następnie kliknij „Pozwól mi wybrać z listy dostępnych sterowników na moim komputerze."

8. Wybierz odpowiedni sterownik z listy i kliknij Dalej.
Uwaga: It’s recommended you try the above process with each listed device driver.
9. Uruchom ponownie komputer i sprawdź, czy możesz Przyspiesz powolny komputer z systemem Windows 10.
Method 7: Run System Maintenance
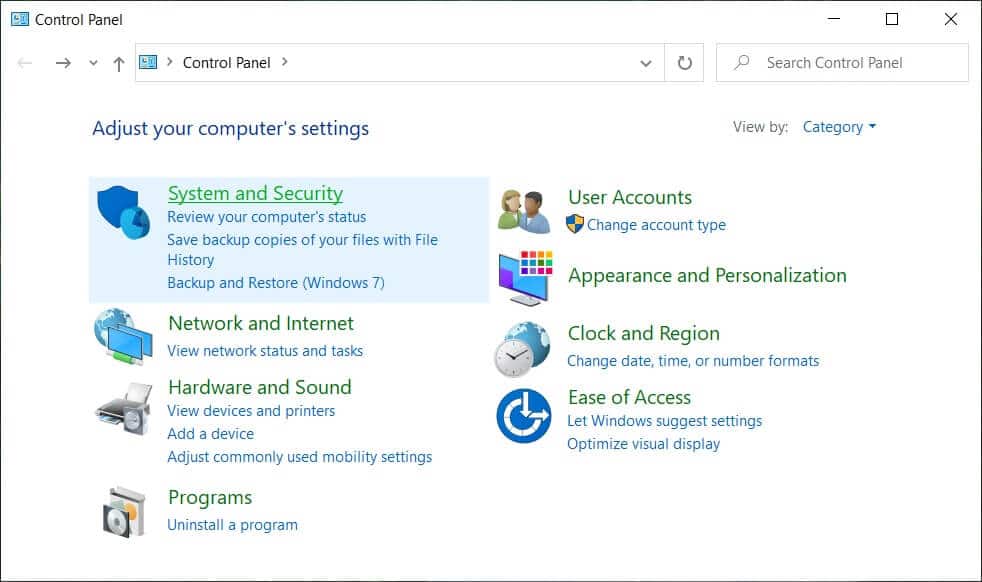
1. Wyszukaj panel sterowania from the Start Menu search bar and click on it to open the Control Panel.

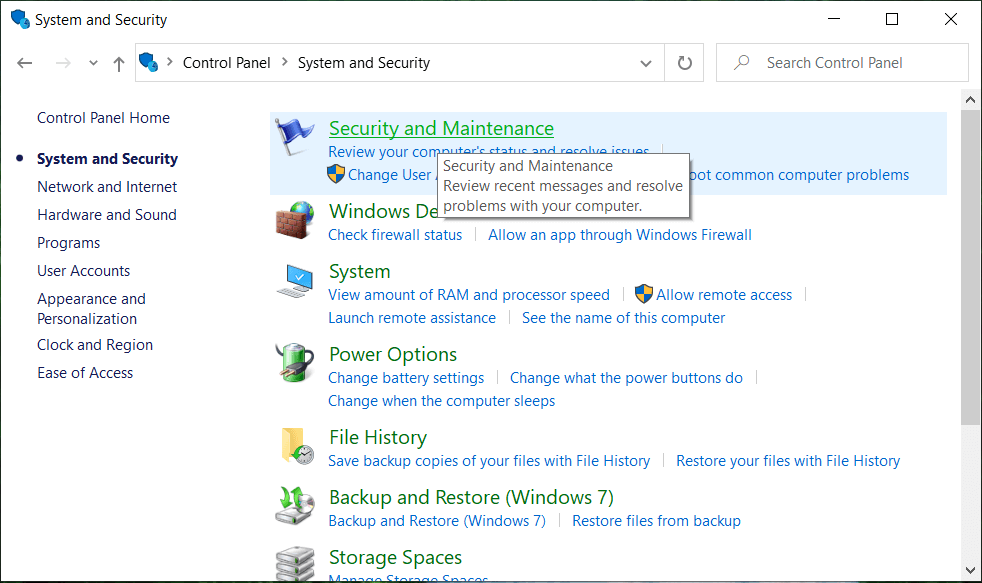
2. Teraz kliknij System i bezpieczeństwo.
3. Następnie kliknij Bezpieczeństwo i konserwacja.
4. Expand Maintenance and under Automatic Maintenance click on “Rozpocznij konserwację".
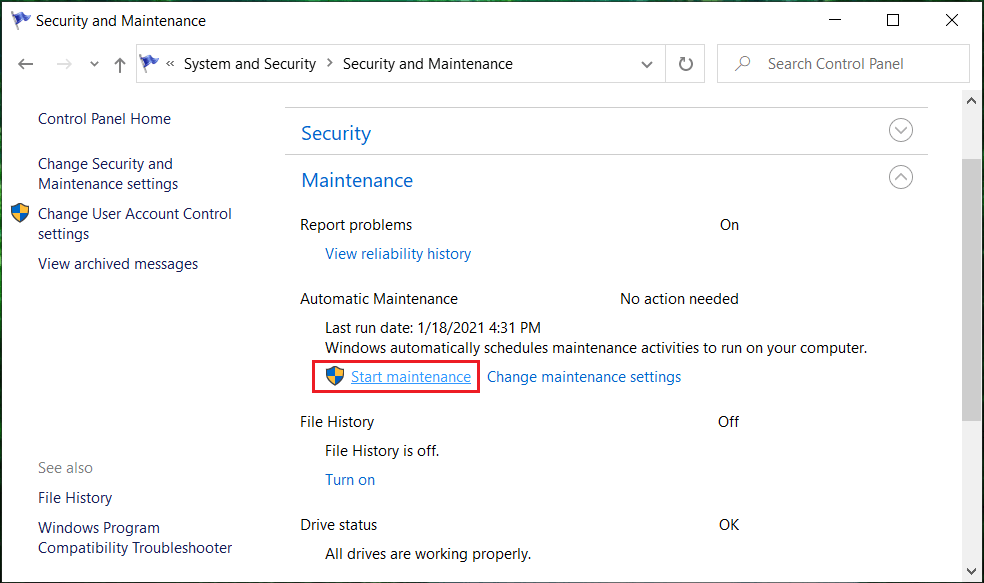
5. Let System Maintenace runs and sees if you’re able to Przyspiesz powolny komputer z systemem Windows 10, jeśli nie, kontynuuj.
Method 8: Defragment Your Hard Disk
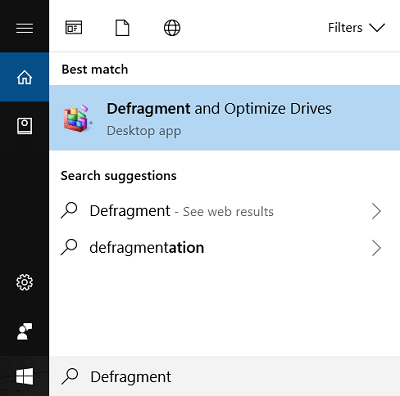
1. Rodzaj Defragmentacja w polu wyszukiwania systemu Windows, a następnie kliknij Defragmentuj i optymalizuj dyski.
2. Wybierz dyski one by one and click Analizować.
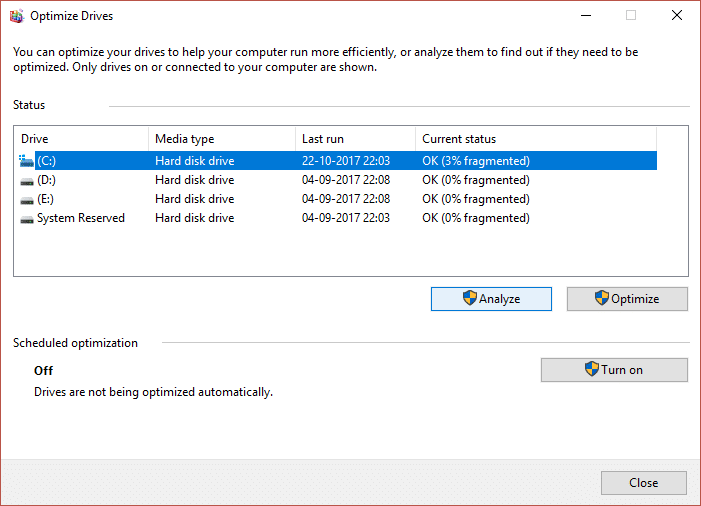
3. Similarly, for all the listed drives click Optymalizować.
Uwaga: Nie defragmentuj dysku SSD, ponieważ może to skrócić jego żywotność.
4. Uruchom ponownie komputer, aby zapisać zmiany i sprawdź, czy możesz Przyspiesz powolny komputer z systemem Windows 10, jeśli nie, kontynuuj.
Metoda 9: Uruchom narzędzie do rozwiązywania problemów z konserwacją systemu
1. Wyszukaj panel sterowania from the Start Menu search bar and click on it to open the Control Panel.
2. Wyszukaj opcję Rozwiązywanie problemów i kliknij Rozwiązywanie problemów.

3. Następnie kliknij opcję Wyświetl wszystko w lewym okienku.
4. Kliknij i uruchom Narzędzie do rozwiązywania problemów z konserwacją systemu.

5. The Troubleshooter may be able to Speed Up a Slow Windows 10 PC.
Method 10: Disable Unwanted Extensions (Web Browser)
Extensions are a handy feature in chrome to extend its functionality, but you should know that these extensions take up system resources while they run in the background. In short, even though the particular extension is not in use, it will still use your system resources. So it’s a good idea to remove all the unwanted/junk extensions you might have installed earlier.
1. Otwórz przeglądarkę Google Chrome i wpisz chrome: // extensions w adresie i naciśnij Enter.
2. Teraz najpierw wyłącz wszystkie niechciane rozszerzenia, a następnie usuń je, klikając ikonę usuwania.
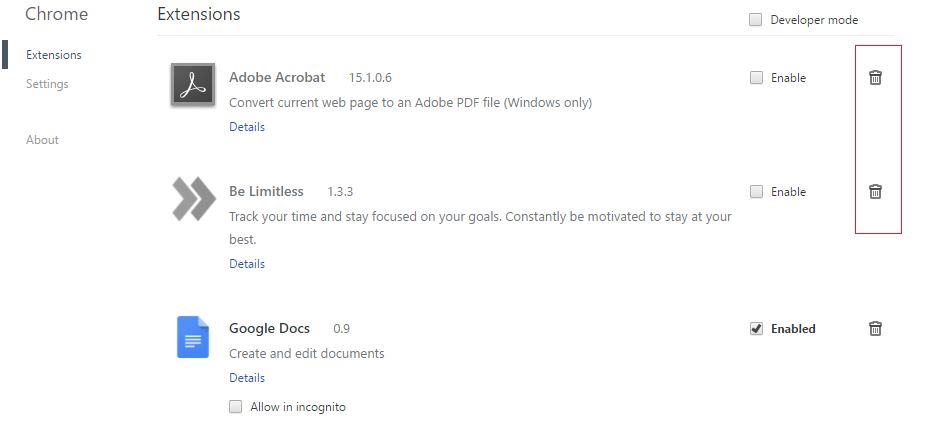
3. Restart Chrome and see if this help in making your PC faster.
Method 11: Change PageFile Size
1. Rodzaj jest gwarancją najlepszej jakości, które mogą dostarczyć Ci Twoje monitory, in the Windows Search box and then click on “Dostosuj wygląd i wydajność systemu Windows."
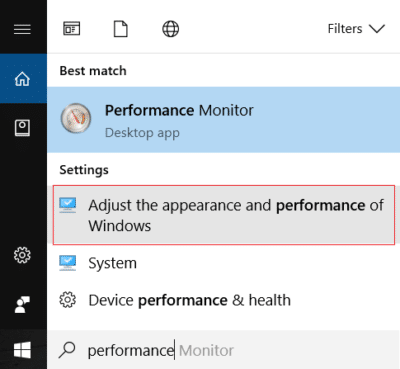
2. Switch to the Advanced tab and then click the zmiana przycisk pod Pamięć wirtualna.

3. Odznacz "Automatycznie zarządzaj rozmiarem pliku stronicowania dla wszystkich sterowników".
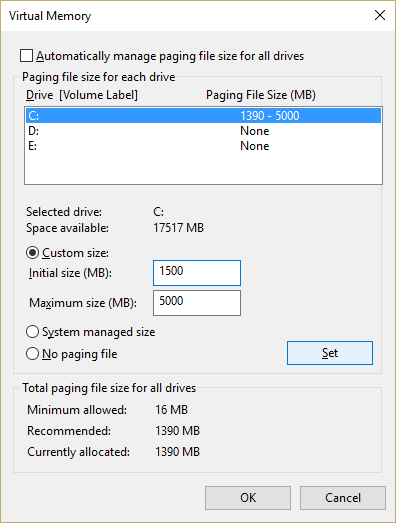
4. Highlight the drive on which Windows 10 is installed and then select the Niestandardowy rozmiar.
5. Ustaw Recommended values for fields: Initial size (MB) and Maximum size (MB).
6. Click OK, then click Apply followed by OK
7.Restart your PC and see if you’re able to Przyspiesz powolny komputer z systemem Windows 10.
Method 12: Disable Windows 10 Tips
1. Naciśnij Klawisz Windows + I, aby otworzyć Ustawienia, a następnie kliknij System.

2. Z menu po lewej stronie wybierz Powiadomienia i działania.
3. Wyłącz przełącznik dla „Get tips, tricks, and suggestions as you use Windows. "
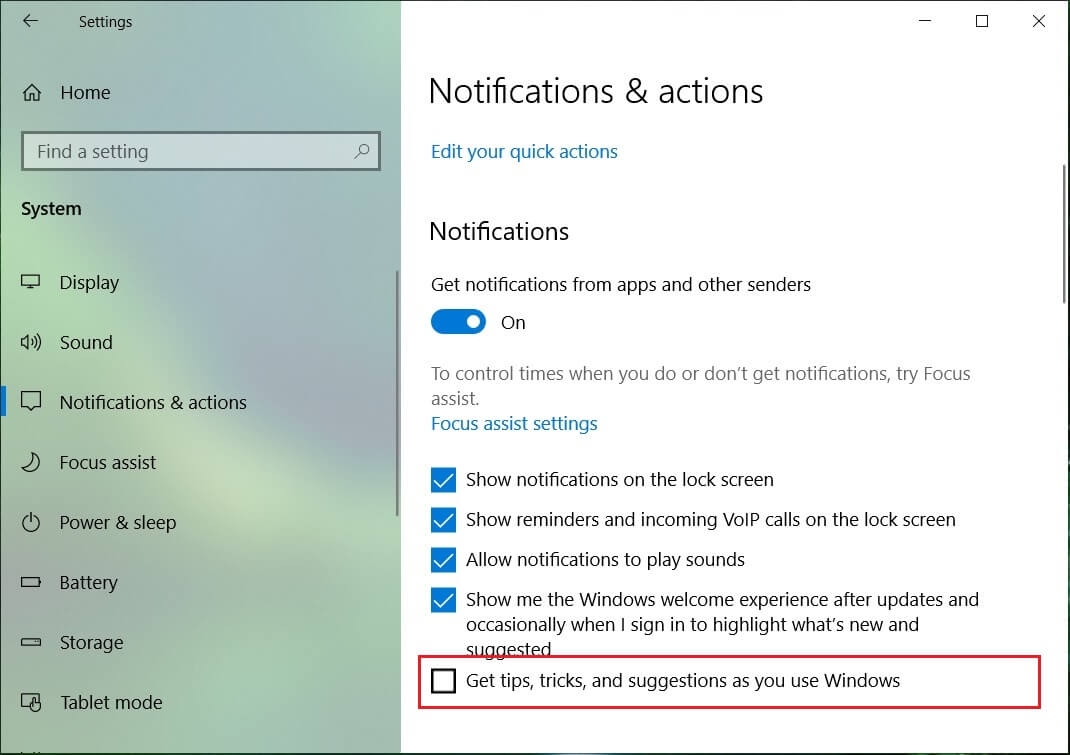
4. Uruchom ponownie komputer.
Method 13: Set your Power Plan to High Performance
1. Kliknij prawym przyciskiem myszy Ikona zasilania następnie wybiera Opcje mocy.

2. Kliknij na Show additionals plans nastepnie: Wysoka wydajność.
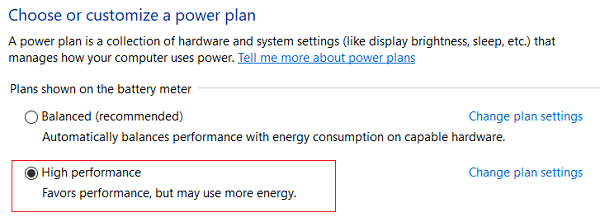
3. Close Settings and restart your PC.
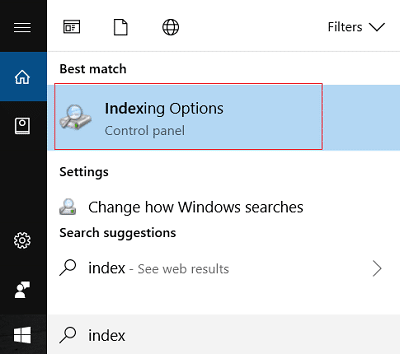
Metoda 14: Wyłącz indeksowanie wyszukiwania
1. Rodzaj wskaźnik in Windows Search then clicks on Opcje indeksowania.
2. Kliknij na modyfikować i kliknij Show all locations.
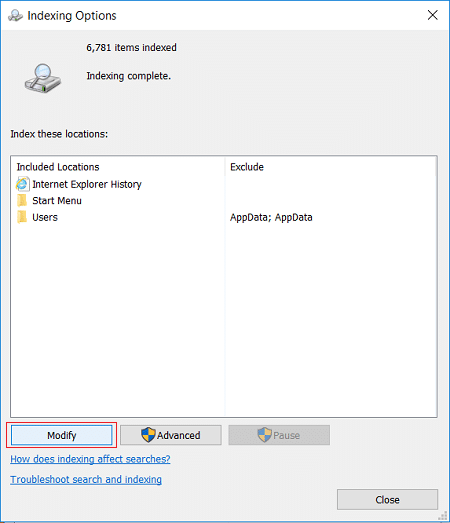
3. Upewnij się uncheck all of your disk drives and click OK.

4. Then click Close and reboot your PC. Also, see if you’re able to Przyspiesz powolny komputer z systemem Windows 10, jeśli nie, kontynuuj.
Method 15: Add more RAM and SSD
If your PC is still running slow and have tried all other options, you may need to consider adding more RAM. Please remove the old RAM and then install the new RAM’s to increase your system performance.
But if you are still facing the occasional lags or system freezes, then you may also consider adding an external SSD to speed up your PC.
Polecamy:
To wszystko, co udało Ci się pomyślnie Seed Up a Slow Windows 10 PC ale jeśli nadal masz jakieś pytania dotyczące tego posta, możesz je zadać w sekcji komentarzy.