- in Android by Administrador
Como limpar o cache no Facebook

The Facebook app saves files for later reference as you use it. It has its own browser with a cache, much like any other browser. The information is saved in the app cache, saving you time when doing certain tasks. Because Facebook doesn’t set a limit on the size of its browser cache, it may get fairly large, making the app slow. If you’re concerned about storage or having issues with the Facebook app, you may wish to erase the cache. Today we’ll show you how to clear cache on Facebook in various devices like Android and iOS.

Como limpar o cache no Facebook
Facebook is a ubiquitous social network that follows you throughout the Internet. Its share widgets have become such an integral part of the Internet that it’s difficult to locate a page without them. Facebook widgets aren’t merely seen on websites. Both iOS and macOS support it natively, so there is no difference between your smartphones and PCs. Continue reading to clear Facebook cache Android, iPhone, and web browsers.
Método 1: no Android
Here are the steps to clear Facebook cache on Android devices.
Observação: Since smartphones don’t have the same Settings options, and they vary from manufacturer to manufacturer hence, ensure the correct settings before changing any. The said steps were performed on OnePlus Nord.
Veja também:
How to Get Rid of Picasa on Samsung Galaxy S5
Como excluir endereços de e-mail do preenchimento automático do Gmail no Android
Como converter HEIC para JPG no Android
Como desativar o serviço Gear VR no Android
How to Mount Encrypted VeraCrypt on Android
Option 1: Through App
Your personal account data, photographs, or posts will not be deleted if you clear your Facebook cache. Here’s how to clear Facebook cache Android:
1. Abra a Facebook Aplicativo no seu telefone.
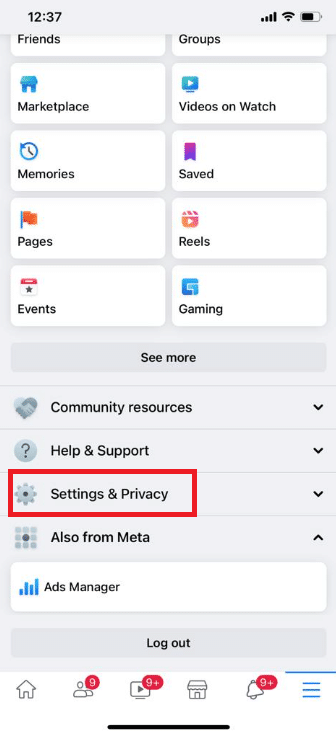
2. Toque no hamburger ícone.
![]()
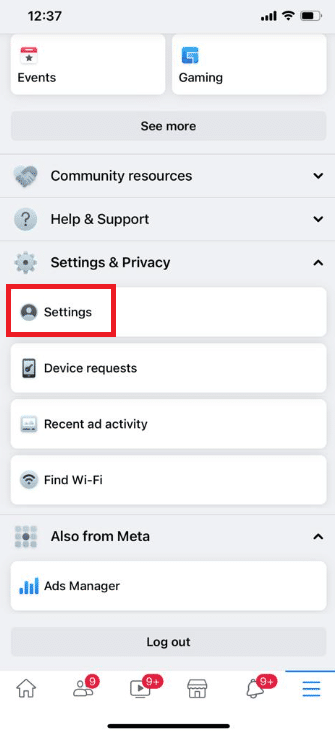
3. Swipe to the bottom of the page and tap on Configurações e privacidade.
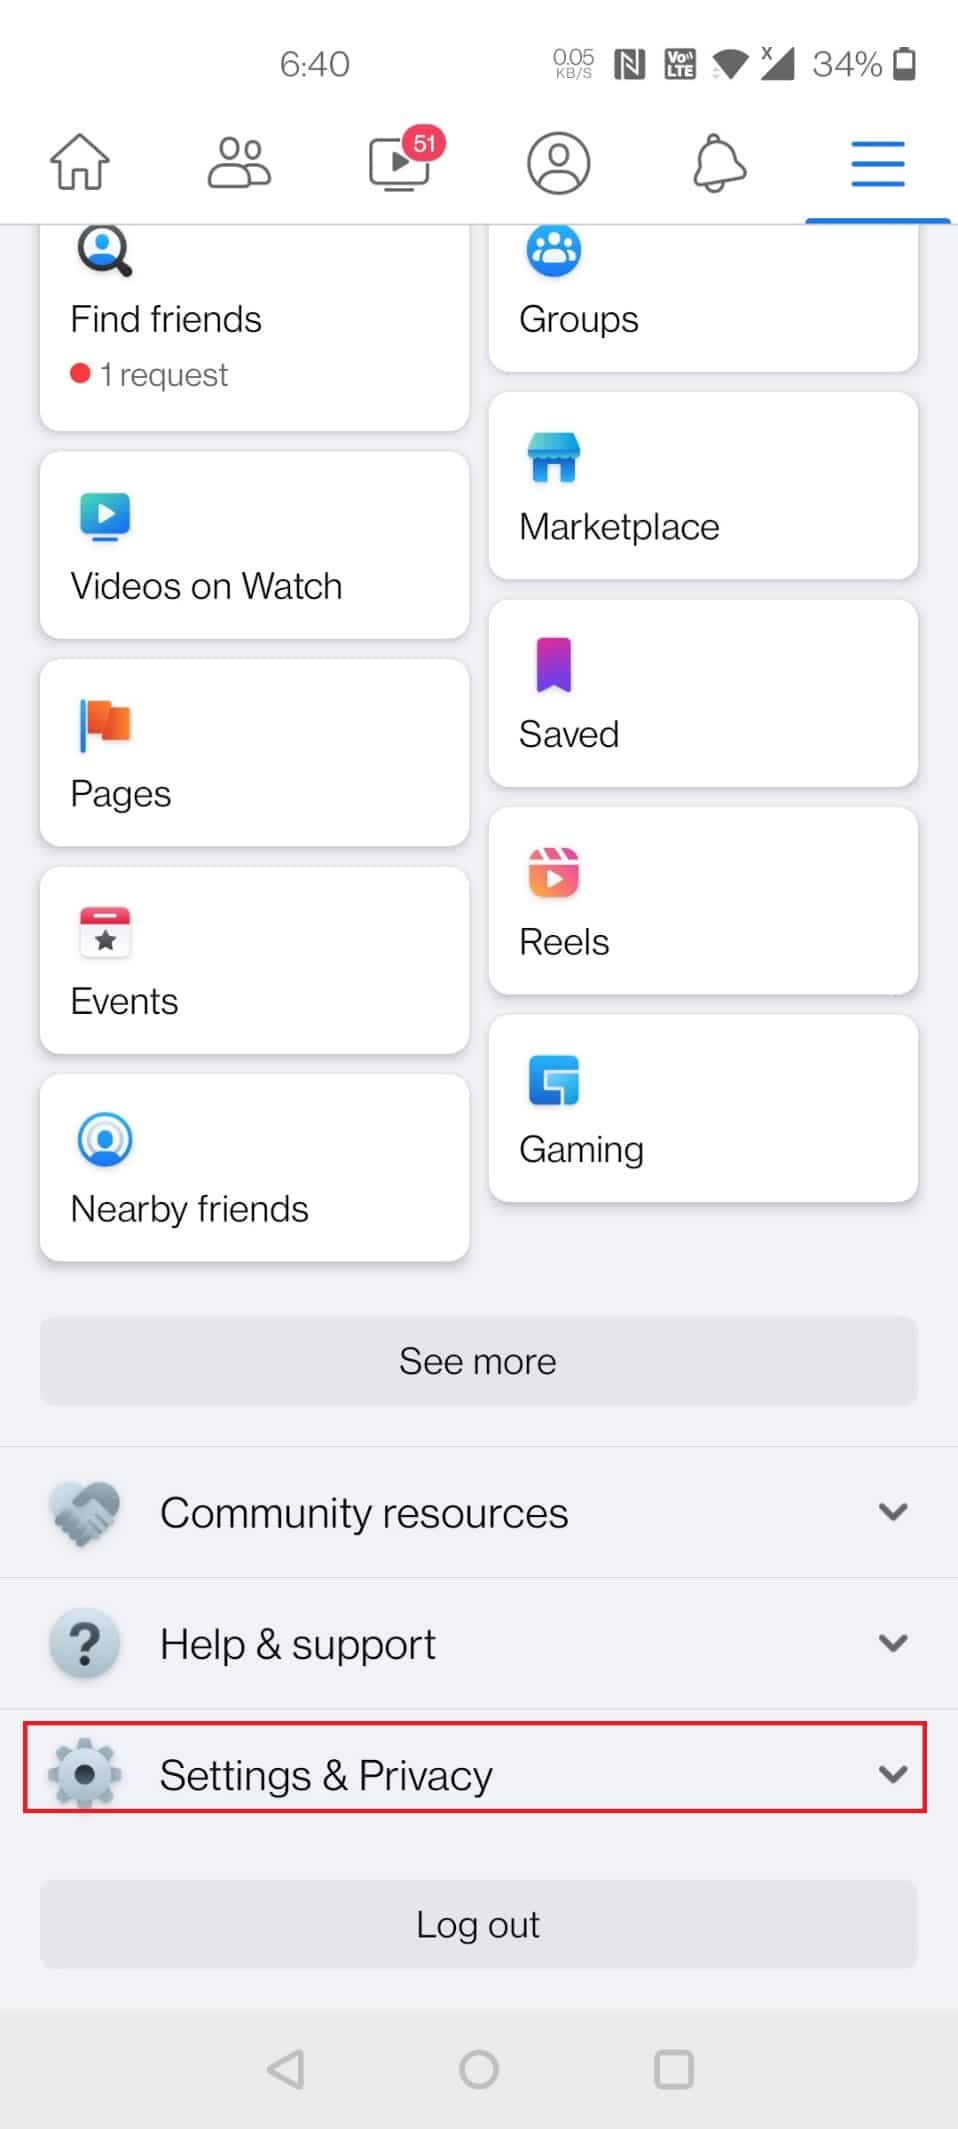
4. Toque em Configurações.

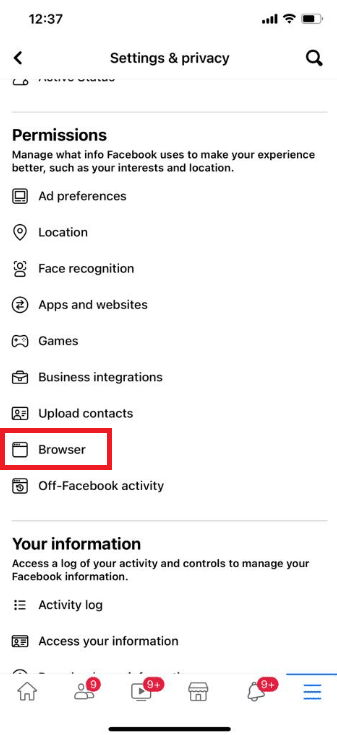
5. Deslize para baixo e toque no Navegador opção abaixo Permissões.
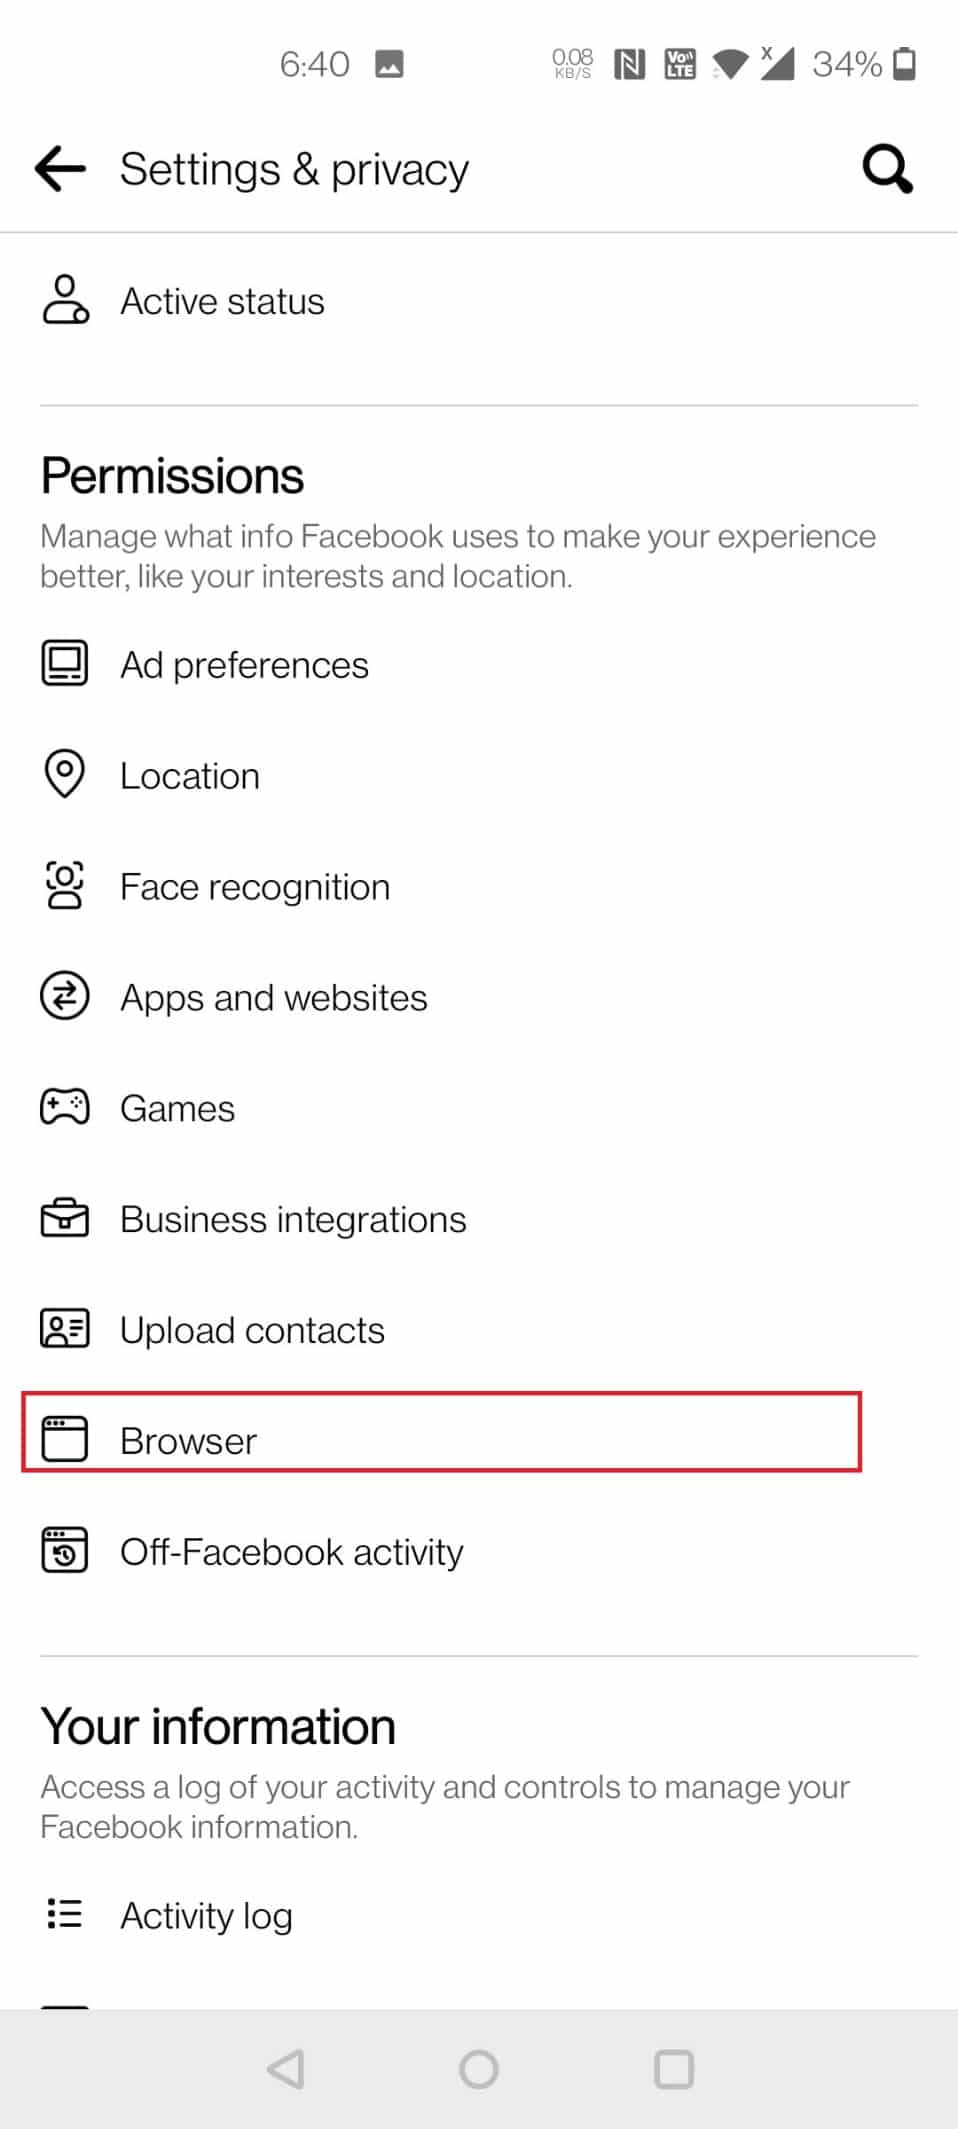
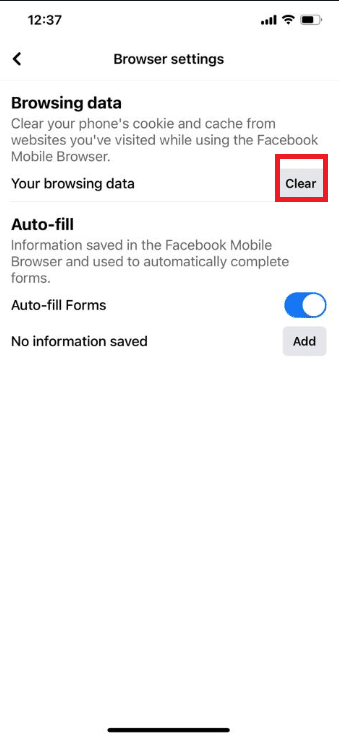
6. Toque no Limpar botão ao lado de Dados de navegação.

Option 2: Through Settings
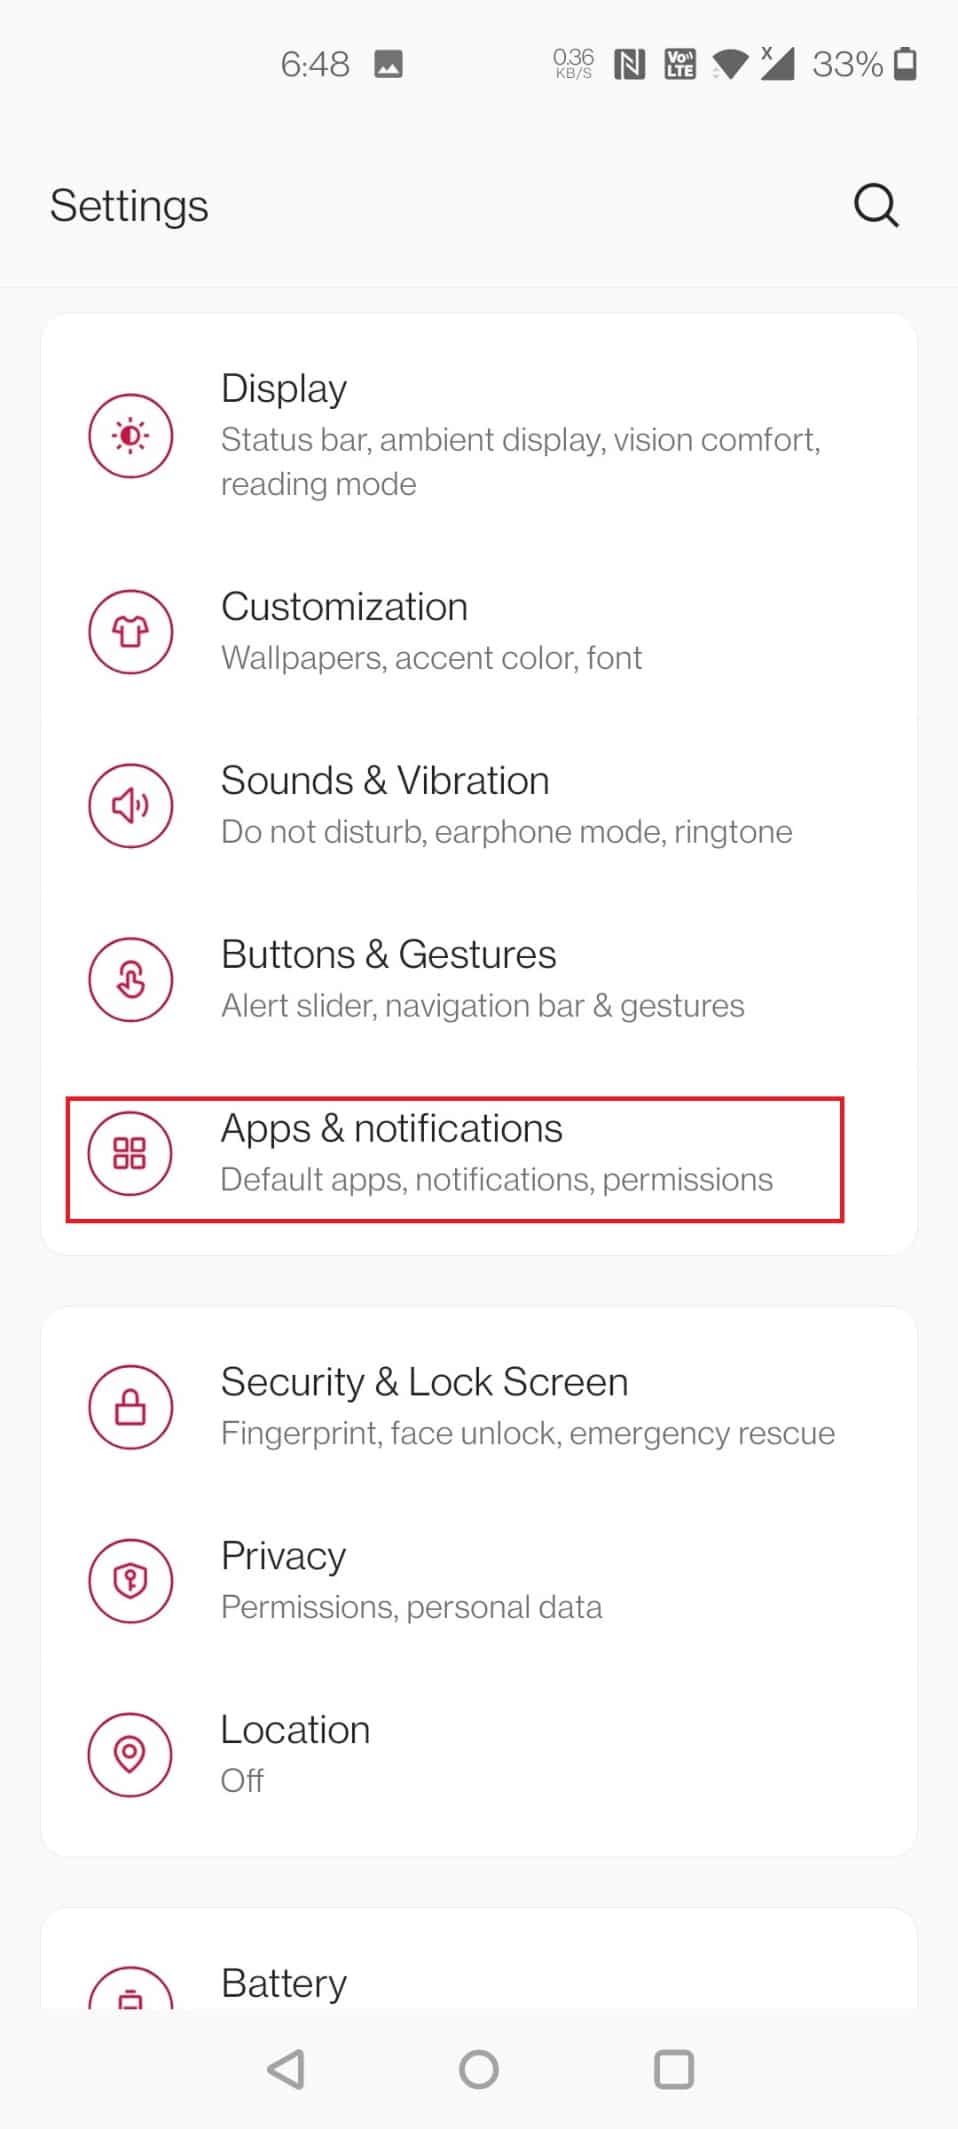
To clear cache on Facebook through Android device settings, follow the given steps below:
1. Vamos para Configurações no seu celular.
2. Toque em Apps e notificações.
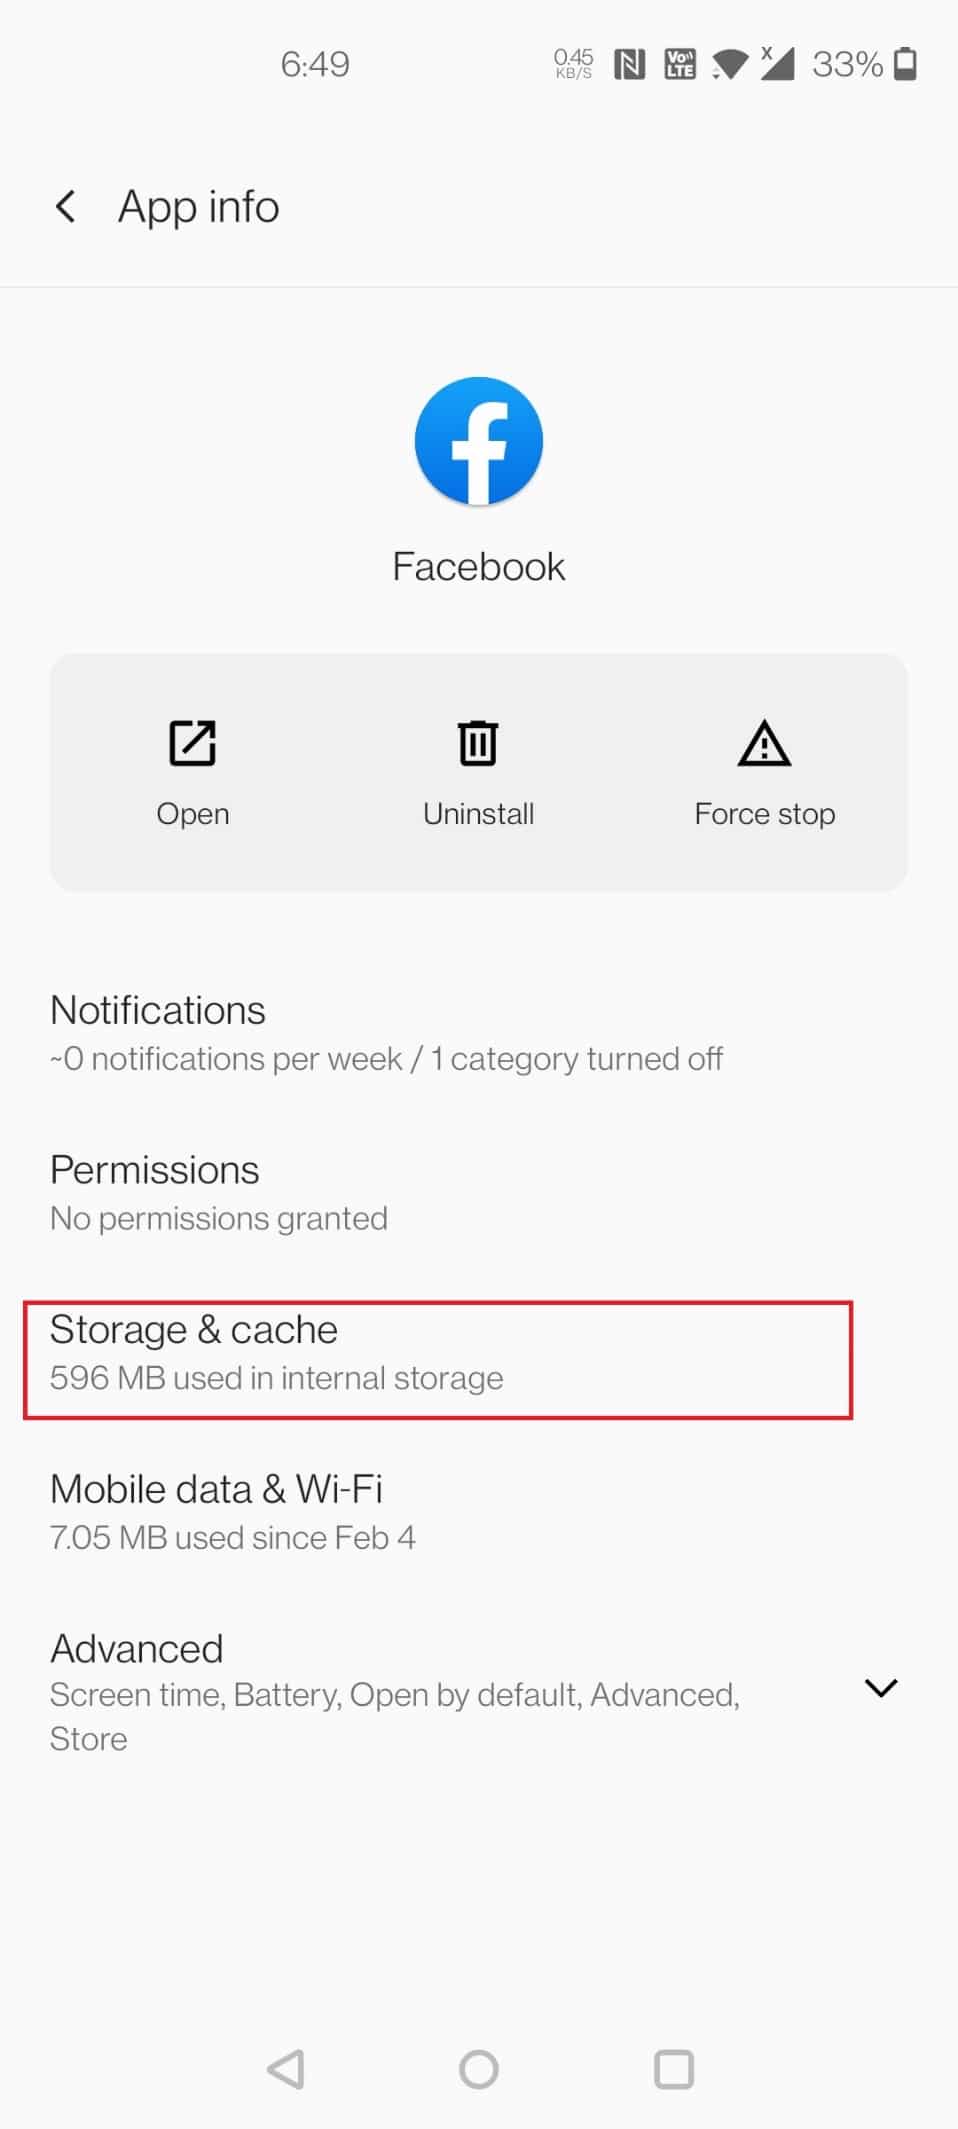
3. Deslize para baixo e toque em Facebook.

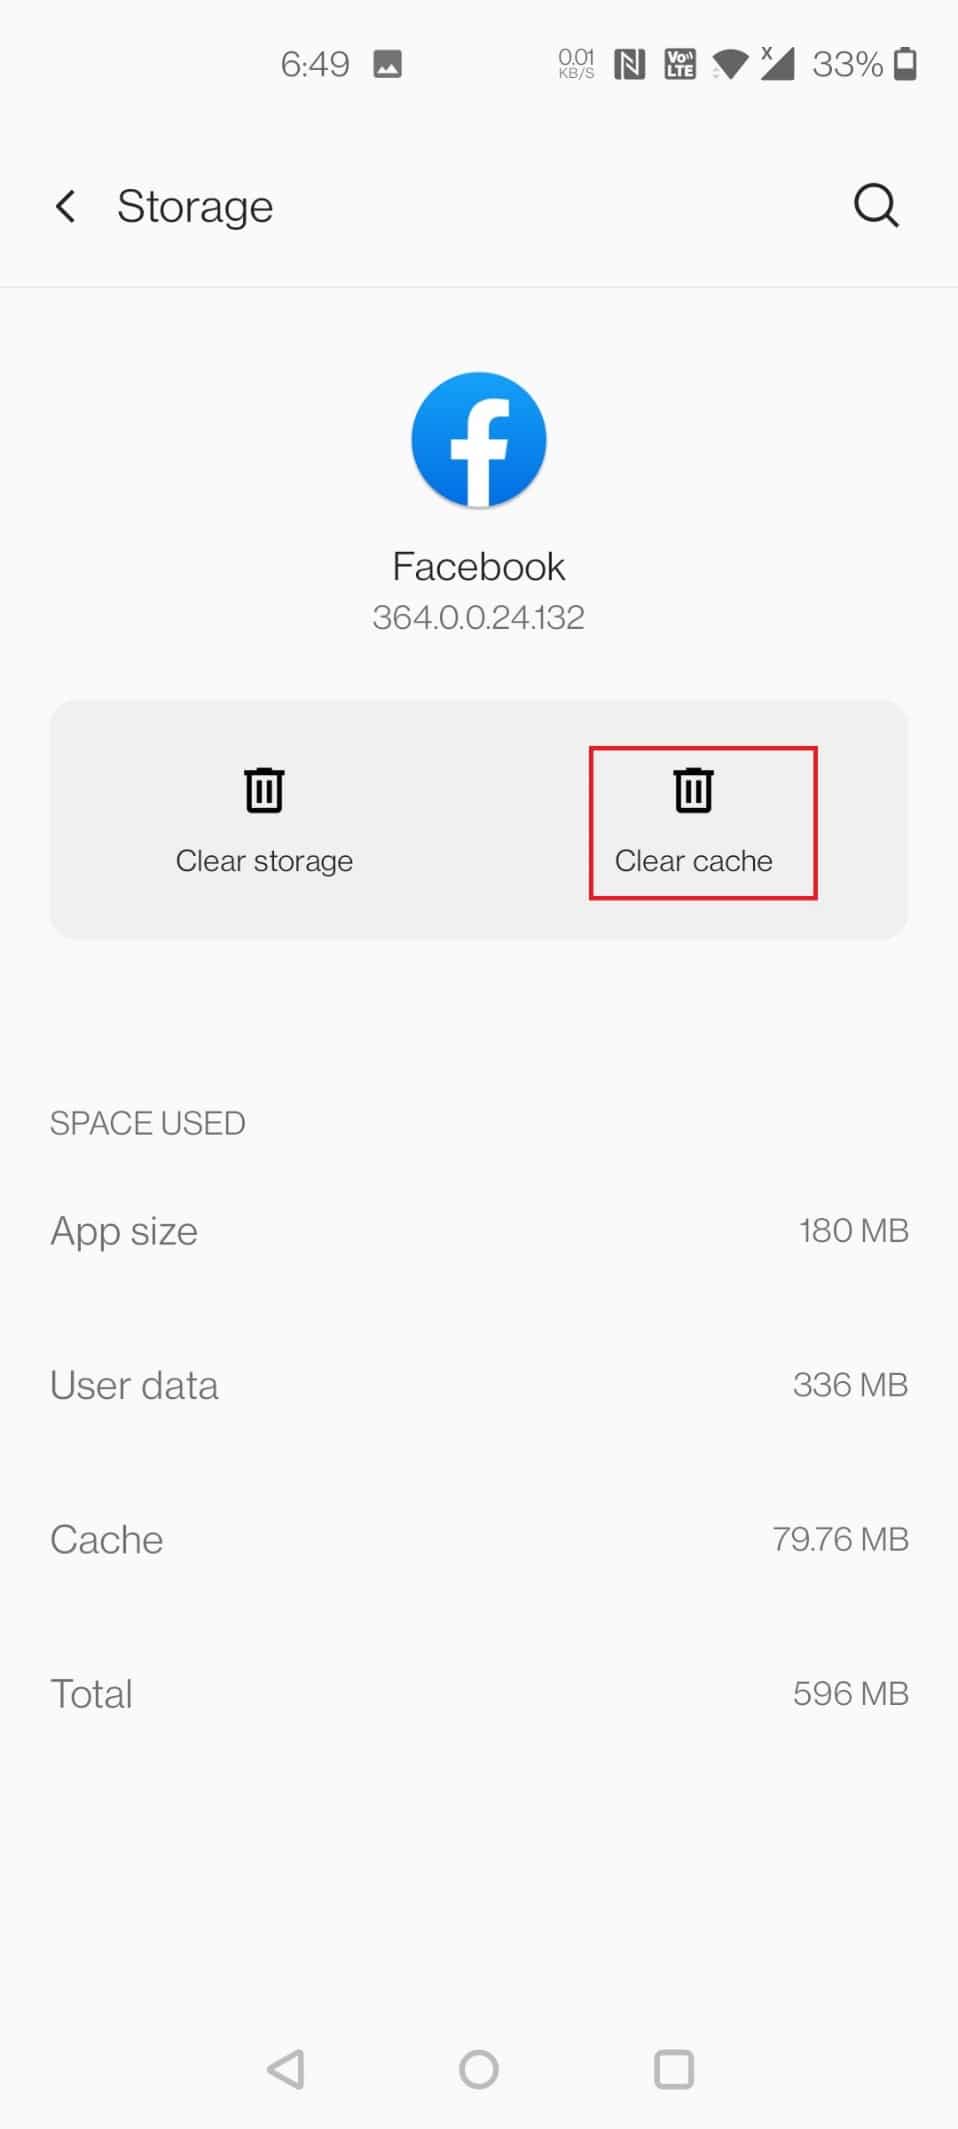
4. Toque em Armazenamento e cache.
5. Toque em Limpar cache.
Leia também: Como desativar as notificações do Facebook no Chrome
Método 2: no iOS
Follow these steps to clear Facebook cache in iOS.
Option 1: Through App
To begin, delete the cache in your Facebook browser. Only the data Facebook has stored from websites you visited using the in-app web browser will be cleared. Here’s how to clear cache on Facebook
1. Abra a Facebook aplicação.
2. In the bottom-right corner, tap on the hamburger ícone.
![]()
3. Na parte inferior, toque em Configurações e privacidade.
4. Toque em Configurações.
5. Swipe down and tap on the option Navegador Na parte inferior da página.
6. Toque em Limpar próximo de Dados de navegação.
Option 2: Through Settings
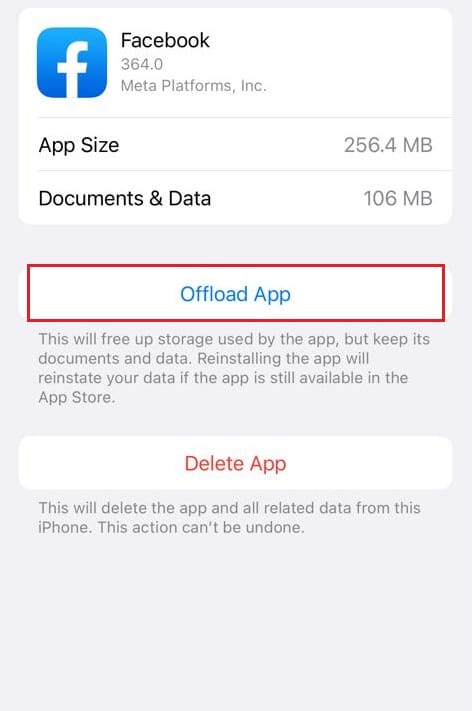
Clearing app cache on iPhone can be done only by offloading the app from the device. If you use to clear the cache on your iPhone through settings, follow the below steps to clear cache on Facebook through iOS settings.
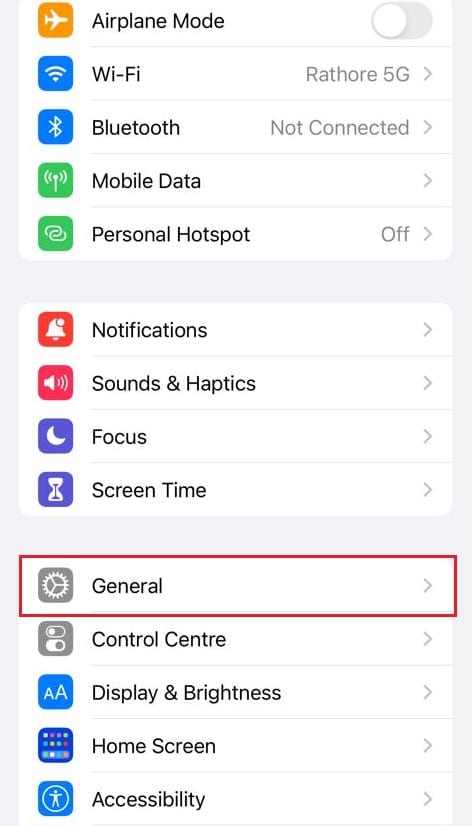
1. Abrir Configurações no seu iPhone.

2. Toque em Geral.
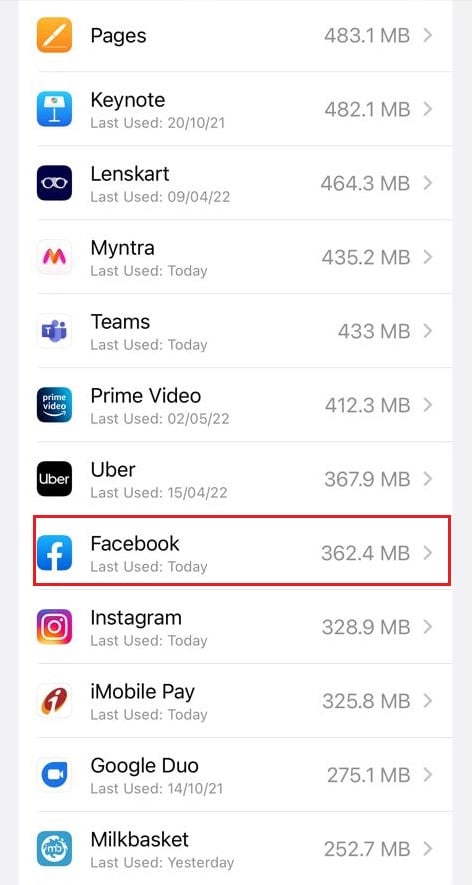
3. Agora, toque em Armazenamento do iPhone.
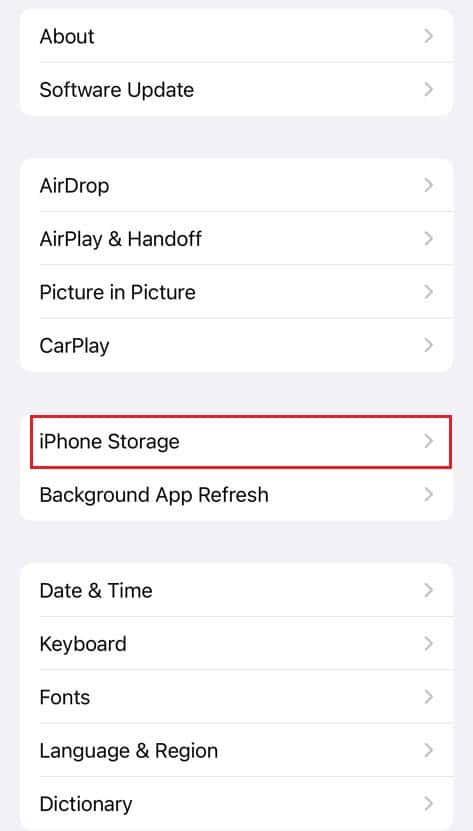
4. Deslize para baixo e toque em Facebook.
5. Toque em App Offload.
Observação: Offloading will retain the documents and settings on your device. You can also choose Excluir aplicativo.
6. Agora, toque em app Store.
7. Search and install the Facebook app.
Leia também: Corrigir erro de anexo indisponível do Facebook
Method 3: On Web Browser
You cannot specifically clear the Facebook cache on web browsers. Instead, you can clear the cache of the browser. The steps to clear cache vary on different web browsers. Below are the steps on how to clear cache on Facebook on Google Chrome, Firefox, and Microsoft Edge.
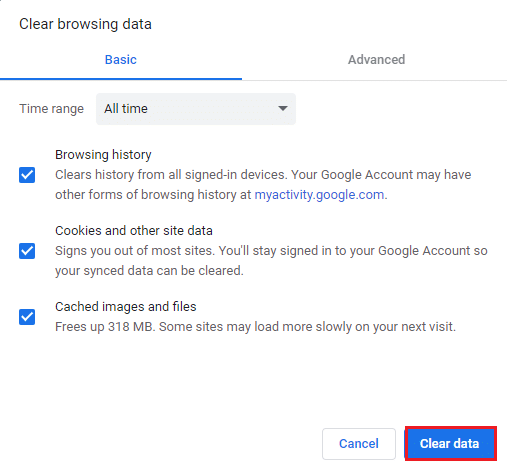
Option 1: On Google Chrome
Read our guide on How to Clear Cache & Cookies in Google Chrome and clear the browsing data.
Option 2: Mozilla Firefox
The steps to clear browsing data of Mozilla Firefox is given below:
1. aperte o Tecla do Windows, Tipo Firefox e acertar o Tecla Enter.
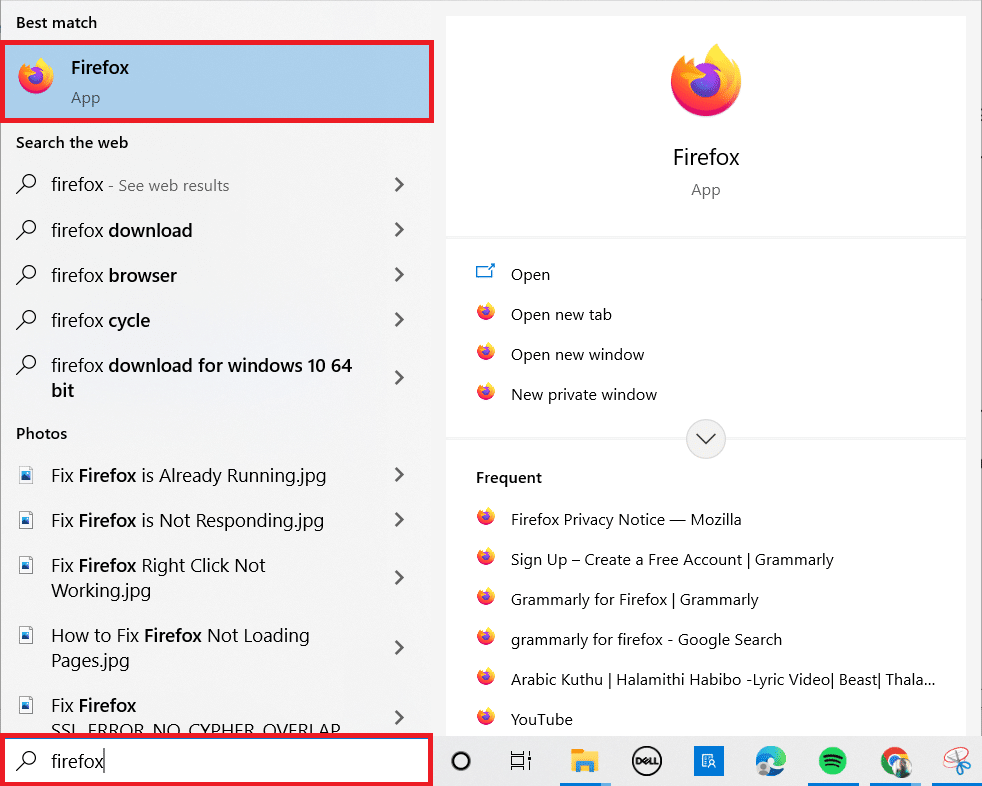
2. Agora, clique no Menu ícone no canto superior direito da tela.
![]()
3. Aqui, selecione o Configurações opção na lista suspensa.
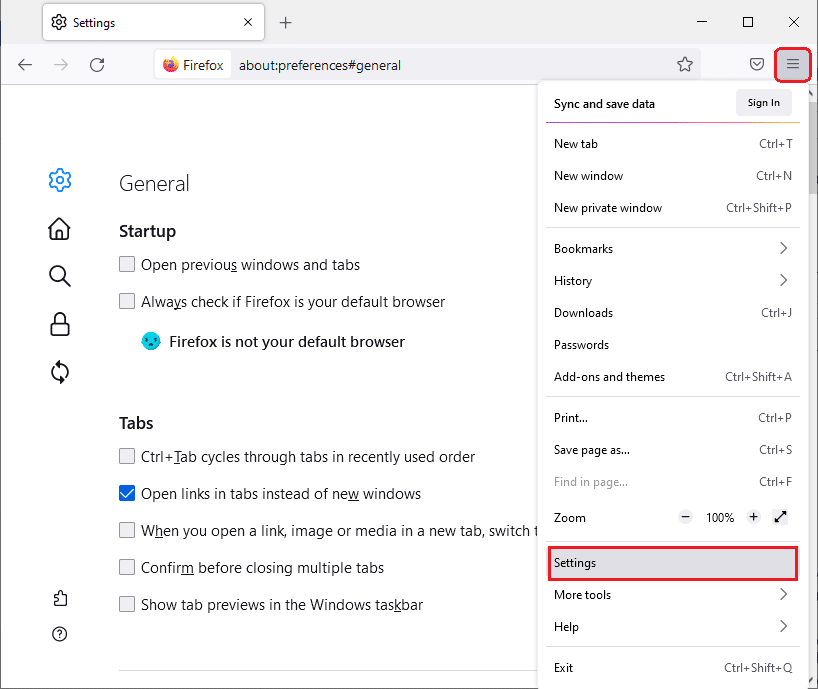
4. Agora, navegue até o Privacidade e Segurança section in the left pane and scroll down the right screen to the Cookies e dados do site menu.
5. Clique no ícone Apagar os dados… opção.
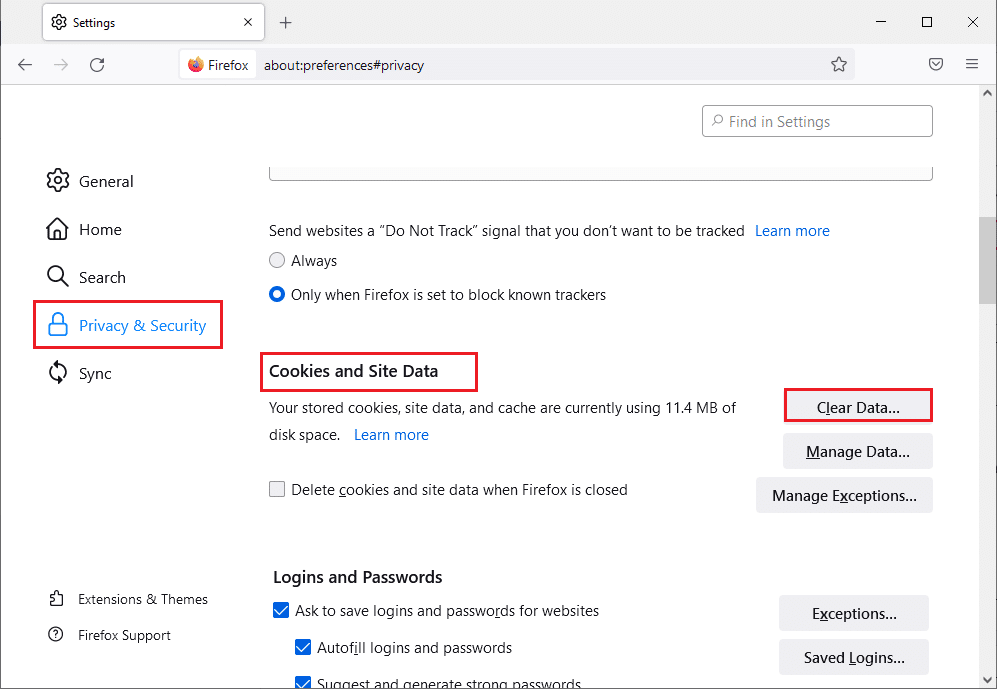
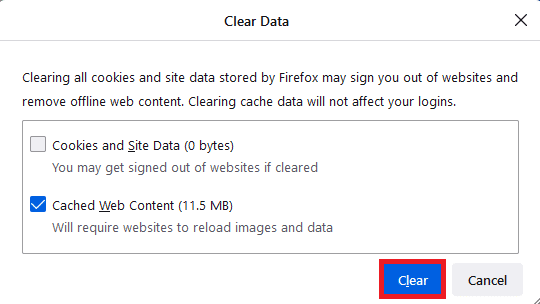
6. Aqui, desmarque o Cookies e dados do site box and check the Conteúdo da Web em cache caixa.
Observação: Clearing Cookies and Site Data will clear all cookies and site data stored by Firefox. This will sign you out of websites and remove offline web content. On the other hand, clearing Cached Web Content will not affect your logins.
7. Por fim, clique no Limpar botão para limpar os cookies em cache do Firefox.
Leia também: Corrigir SSL_ERROR_NO_CYPHER_OVERLAP do Firefox no Windows 10
Option 3: On Microsoft Edge
Here are the steps to clear Microsoft Edge browser data.
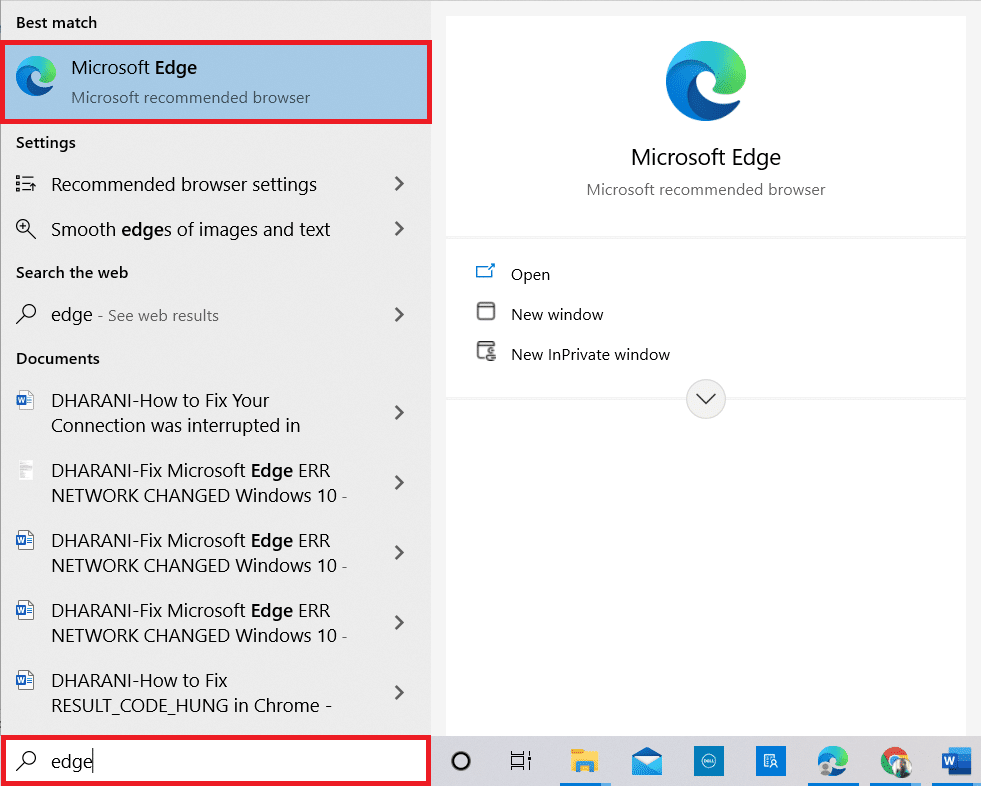
1. aperte o Windows chave, Tipo borda e acertar o Tecla Enter.
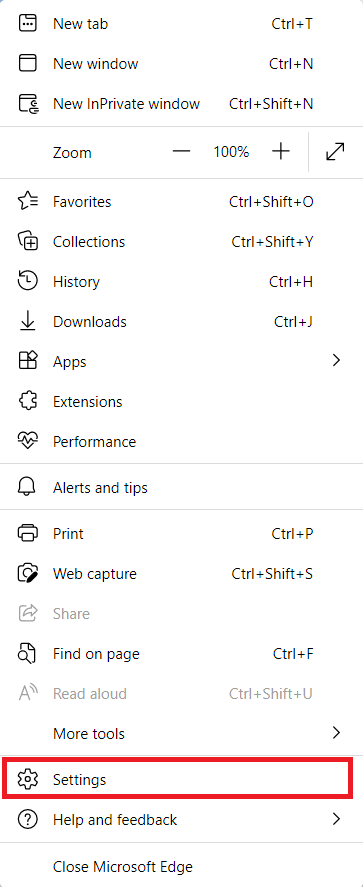
2. Clique no ícone ícone de três pontos near your profile image.
![]()
3. Em seguida, clique em Configurações.
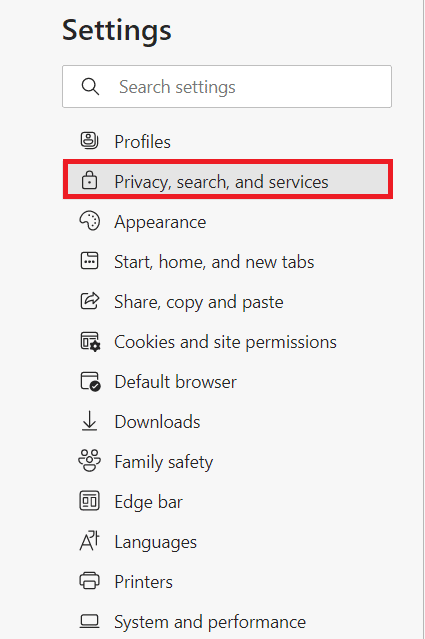
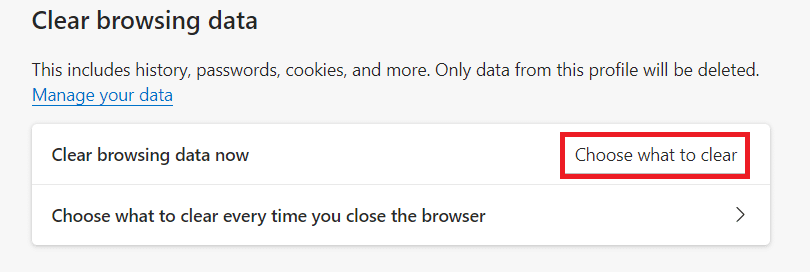
4. Agora, navegue até o Privacidade, pesquisa e serviços opção no painel esquerdo.
5. Em seguida, role para baixo e clique no botão Escolha o que limpar opção abaixo Limpar dados de navegação.
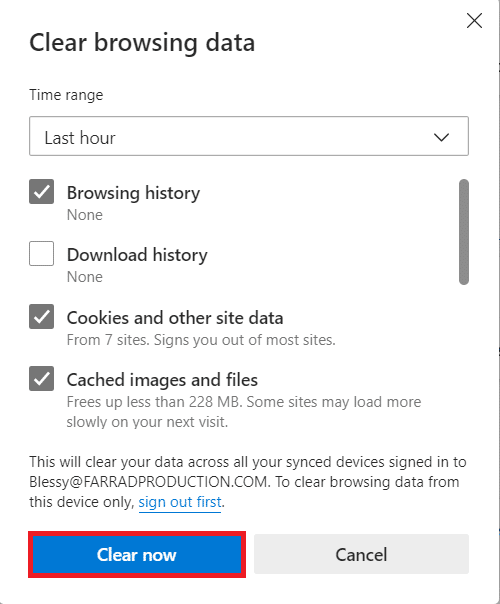
Observação: Você pode navegar diretamente na página para excluir o histórico de navegação no Edge digitando edge: // settings / clearBrowserData na barra de pesquisa.
6. Na próxima janela, selecione as caixas de acordo com suas preferências, como Browsing history, Cookies and other site data e Imagens e arquivos em cache, e clique em Limpe Agora conforme destacado abaixo.
Recomendado:
We hope you found this information useful and that you have learned como limpar cache no Facebook. Please let us know which technique was the most beneficial for you. Please use the form below if you have any queries or comments. Also, let us know what you want to learn next.