If you are a person who loves to play around with the programs on your phone, you might be aware of the TWRP mount internal storage. This is an official app from the Google Play Store and can help in installing third-party apps and software.
One of the issues with the mode is TWRP internal storage 0MB. Though you might have enough space to flash new files on your phone, you may see this error message pop up on your phone. In this case, you might be unable to mount storage TWRP on your Android phone. There are various reasons for this issue and you might be denied access to the unofficial software files and other custom ROMs. You can use the method in the article to fix TWRP unable to mount storage issue.
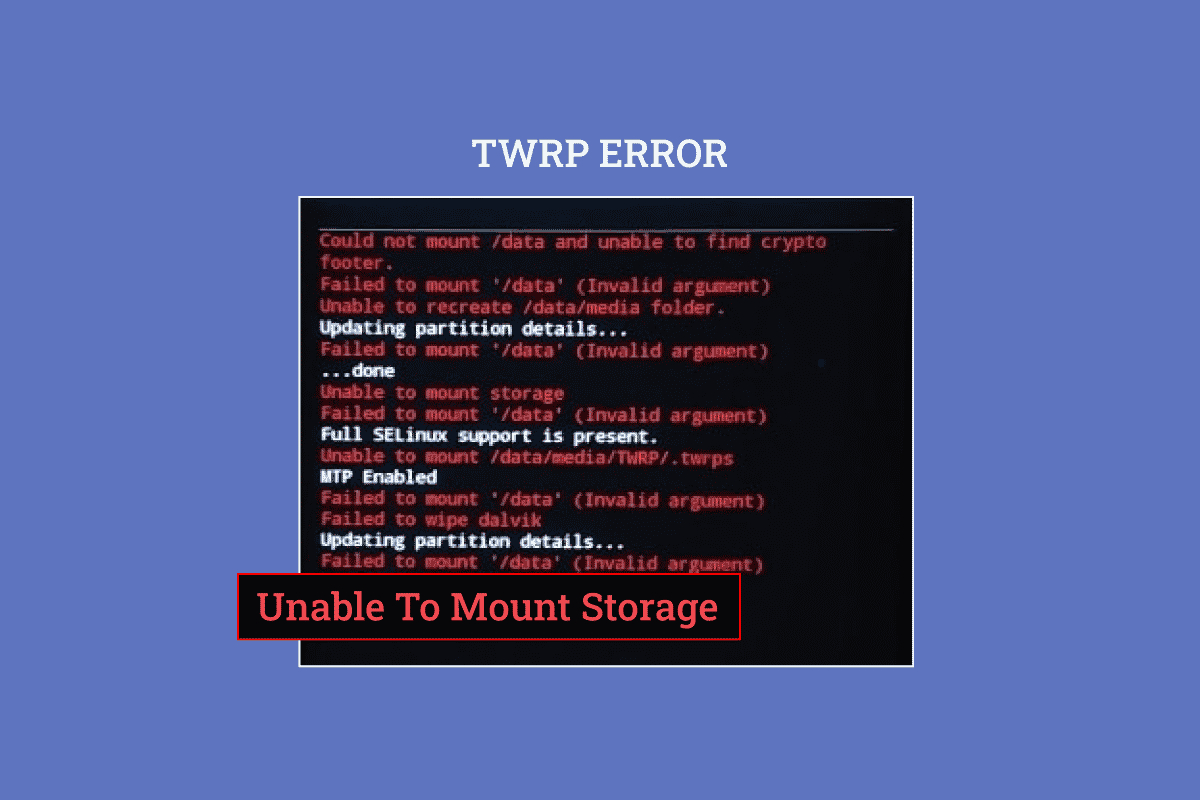
How to Fix Unable to Mount Storage TWRP on Android
TWRP Recovery mode is used to install and back up the files on your phone instantly. It is available as an app in the Google Play Store and is a trusted app.
Notă: The steps mentioned correspond to the Samsung Galaxy A21 s model and the settings are bound to differ according to the phone model and manufacturer.
How to Install TWRP Recovery Mode App
Here are the steps to install TWRP recovery mode application.
Vezi de asemenea:
Fix Google Photos not uploading photos on Android
Fix Tinder Matches Disappeared on Android
10 moduri de a remedia eroarea Spotify Imposibil de autentificare
Remediați eroarea Netflix 5.7 pe Android
Cum să știți dacă AirPod-urile se încarcă pe Android
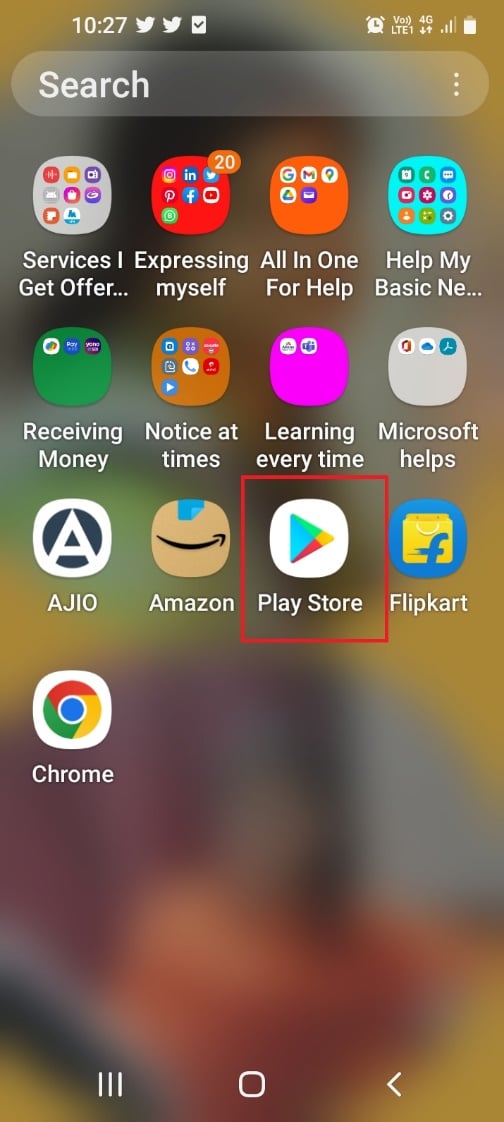
1. From the menu, open the Joaca Store app.
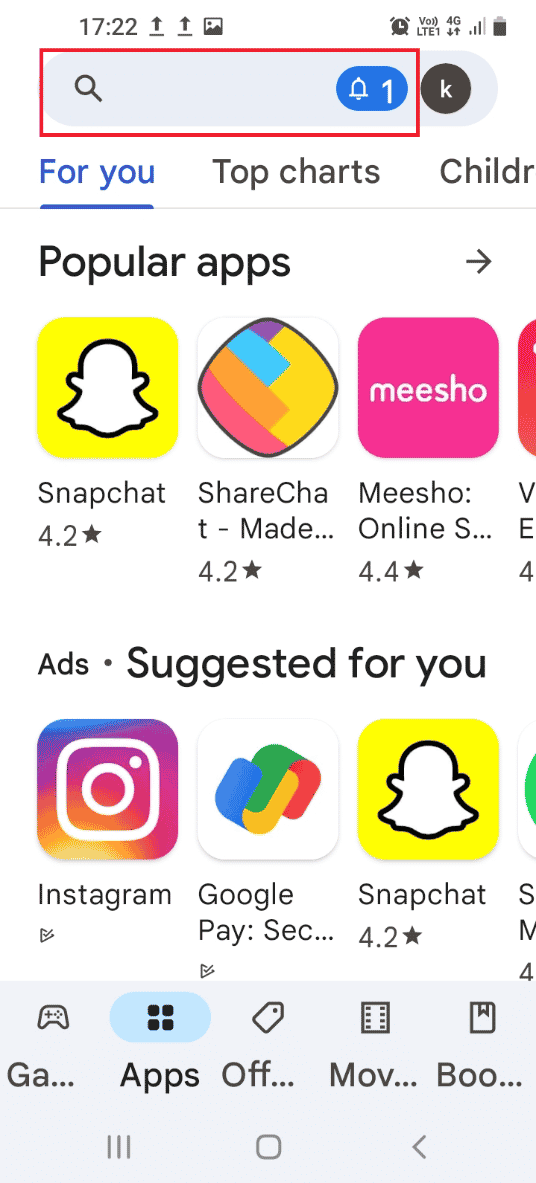
2. Apăsați pe bara de căutare în partea de sus a paginii de start.
3. Căutați TWRP recovery mode și atingeți tasta căutare icon.
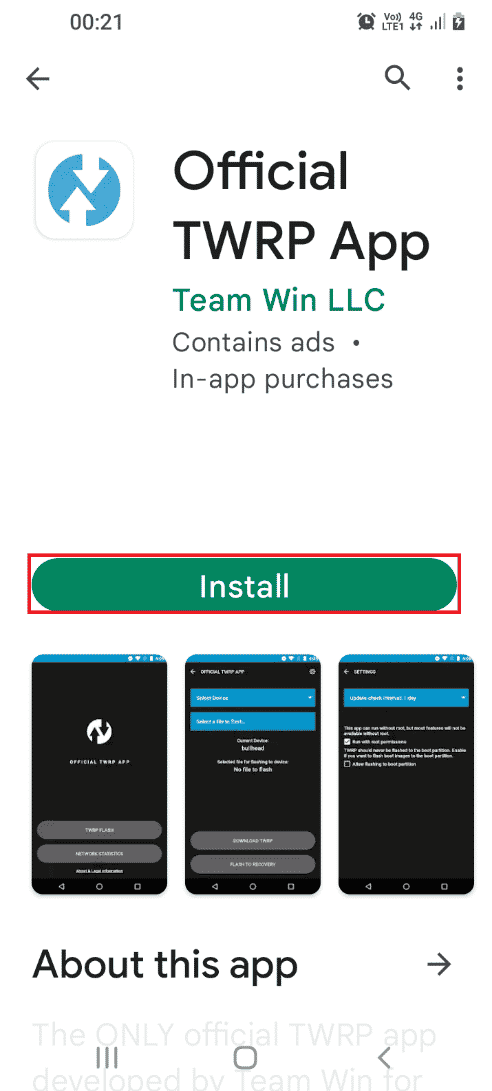
4. Apăsați pe Instala butonul de Aplicația oficială TWRP.
What Causes TWRP Unable to Mount Storage Issue?
The issue of being unable to mount internal storage may be due to the following reasons as below.
- Security Password- The security password or the lock password on your phone may not allow you to mount the storage files.
- Unsupported File is installed- A zip file that is unsupported with your phone model installed on your phone may be a reason for this issue.
- Unable to decrypt files in partition- Your phone may not able to decrypt the files in the Partition drives on your phone.
- Flashing a wrong file in Partition drive- An incorrect or wrong file may be flashed to the Partition drives on your phone.
- Corrupt Files in Partition drive- The files in the partition drives on your Phone may be corrupt or have some malware.
- Factory reset option is corrupt- The issue may occur if the Factory reset option on your phone is corrupt.
Citeste si: Fix Android începe optimizarea aplicației 1 din 1
Following are the troubleshooting methods to fix unable to mound storage TWRP on your Android device.
Method 1: Change Screen Security Password
The simplest approach to fix the unable to mount storage TWRP issue is to change the security password of your phone.
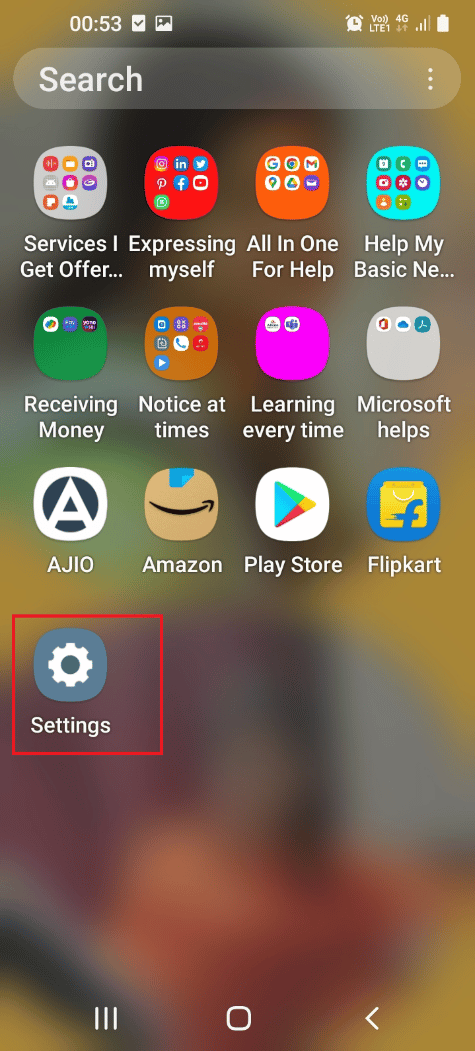
1. From the menu, open the setări cont app.
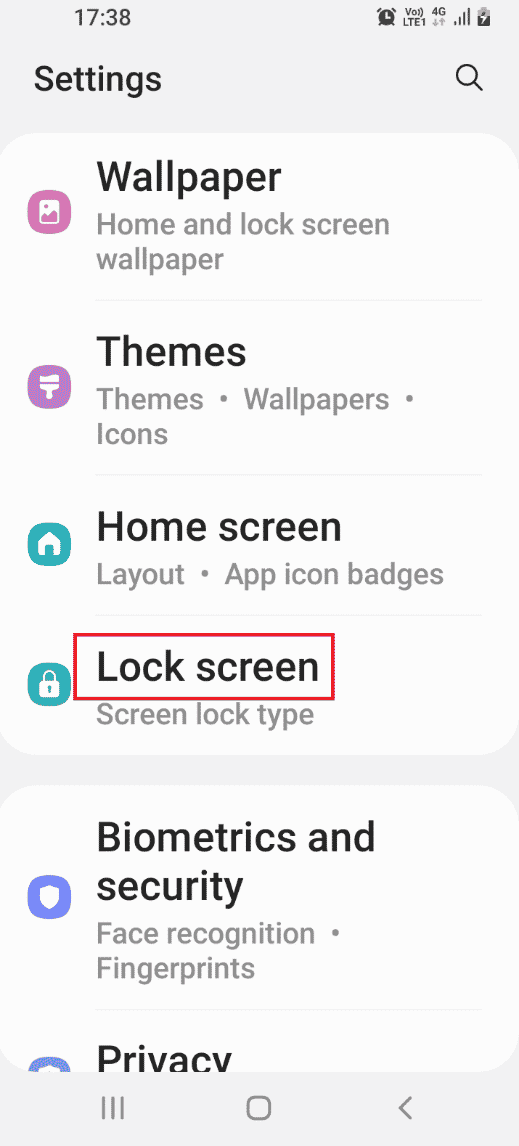
2. Apăsați pe Ecran de blocare tab.
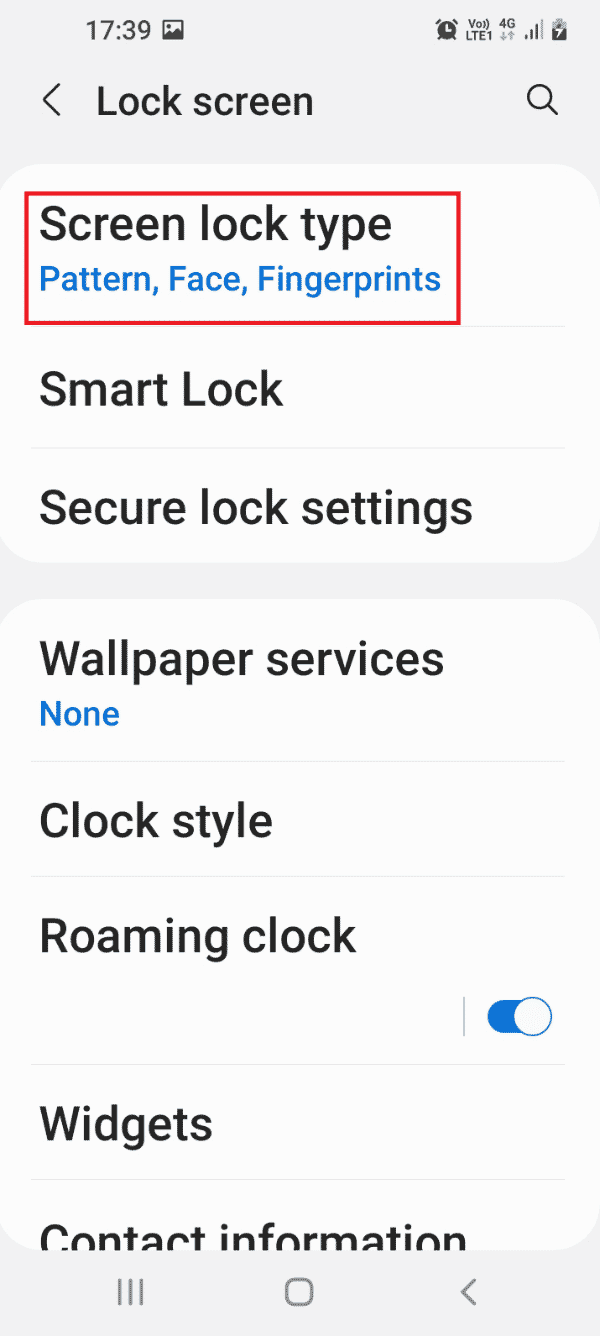
3. Apăsați pe Screen lock type tab.
4. Enter your current password or draw your current pattern on the confirmation screen.
5. Apăsați pe Parolă tab.
Notă: Alternativ, puteți apăsa pe PIN tab.

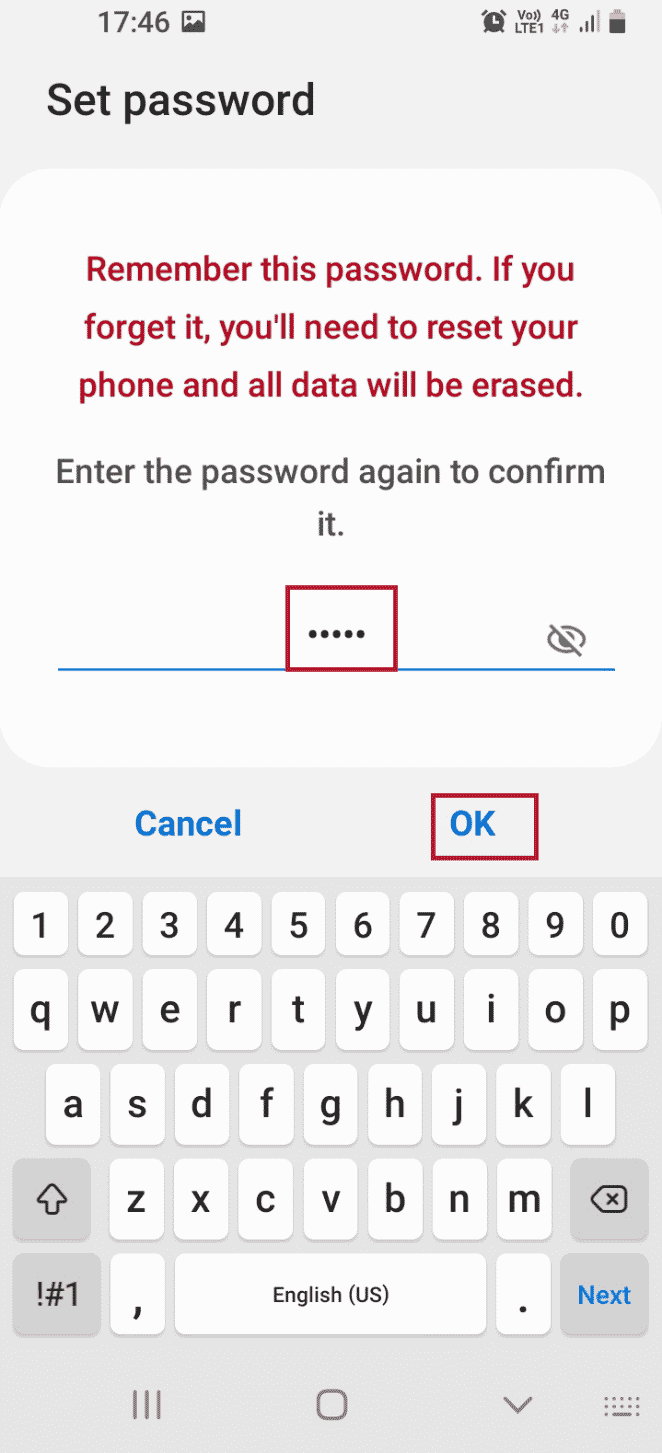
6. Type any alpha-numeric password and tap on the A continua opțiune.

7. Type the same alpha-numeric password and tap on the OK opțiune.
Now, check if TWRP internal storage 0mb is resolved.
Method 2: Use Micro SD Card
This method is a little workaround but can be used to fix the issue of TWRP mount internal storage. Using this method, you can move the files of the partition drives to a Micro SD Card on your phone.
1. Apăsați lung butonul Alimentare button and tap on the Oprire opțiune.
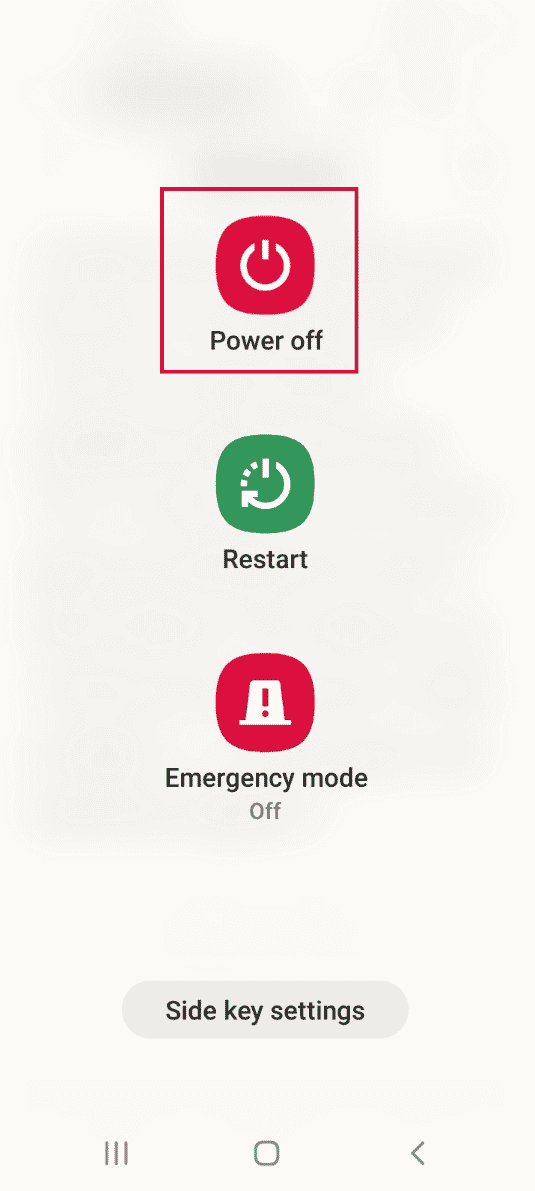
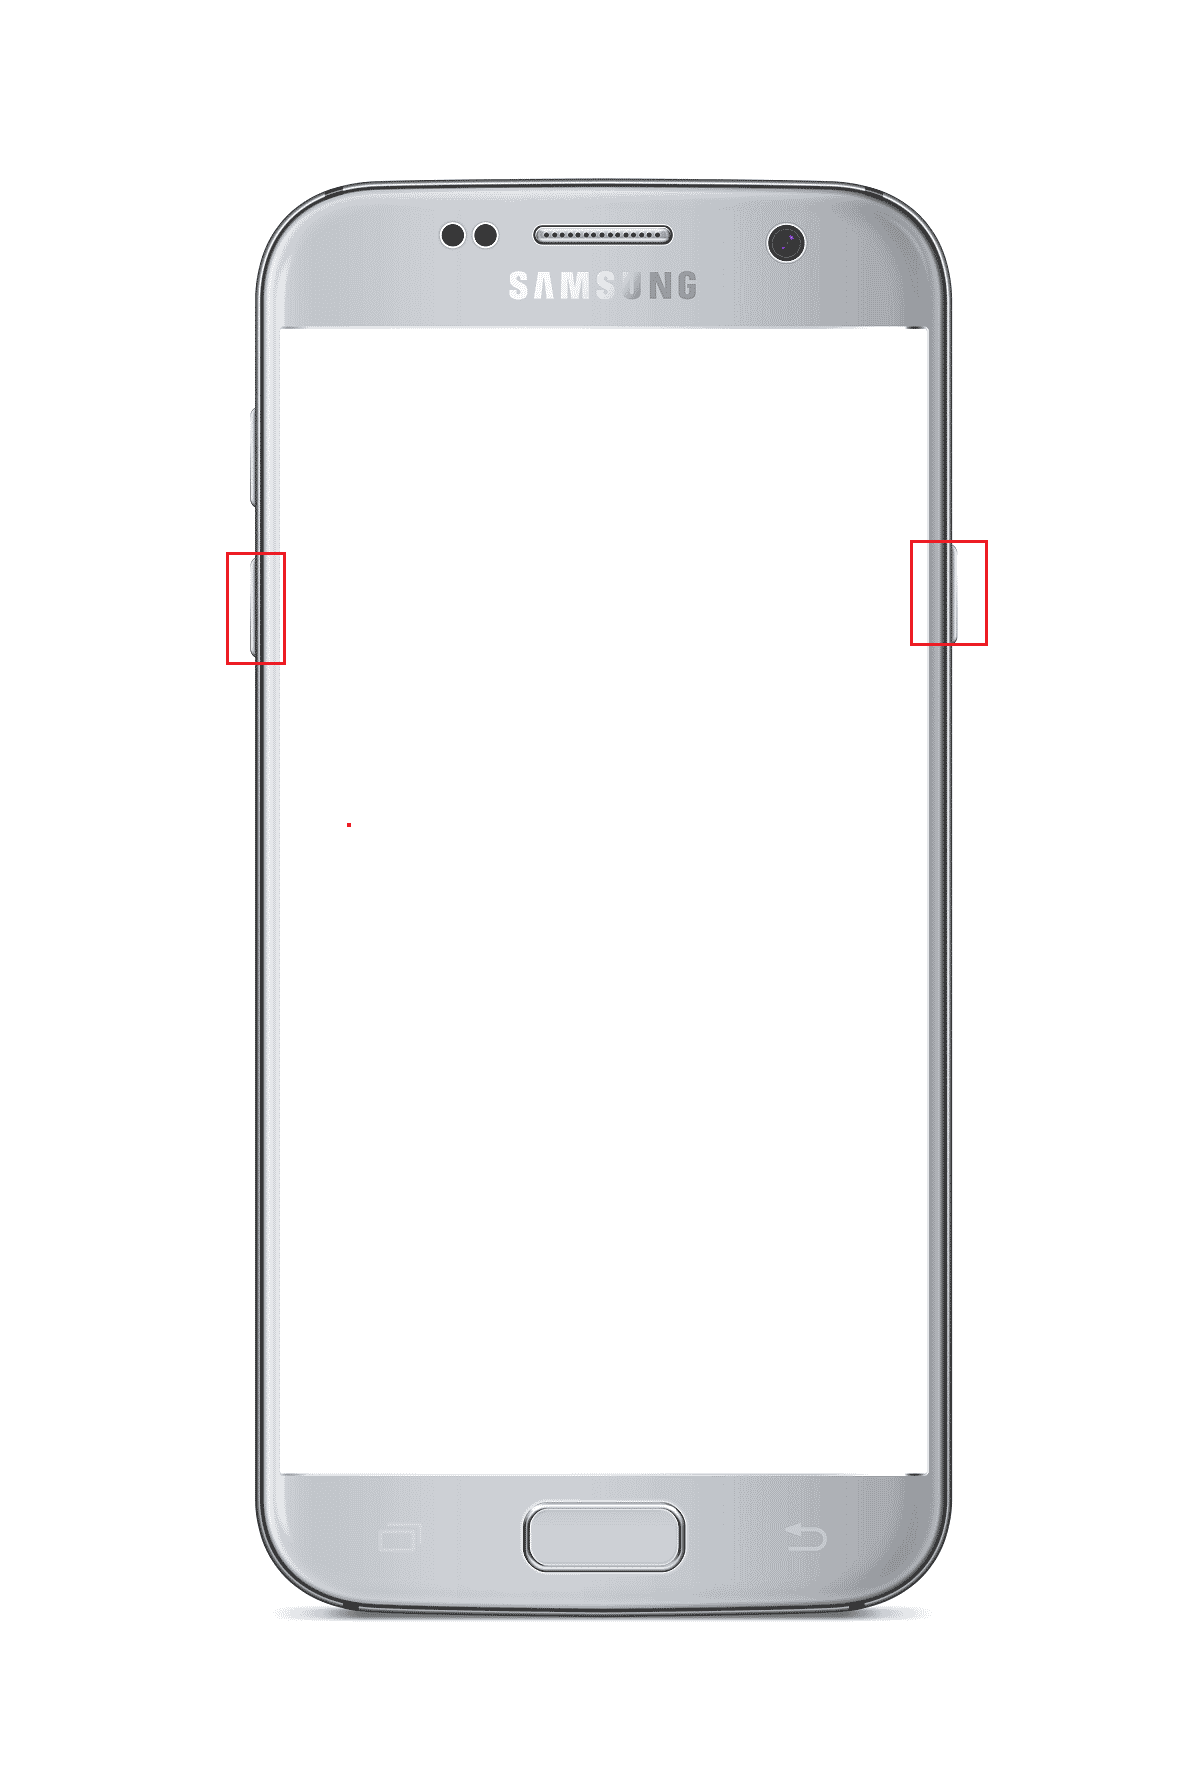
2. apasă pe Putere + reducere volum buttons to boot into the TWRP Recovery mode.
3. Apăsați pe Keep Read Only button and swipe the triple arrow icon or the Swipe to Allow Modifications opțiunea din dreapta.
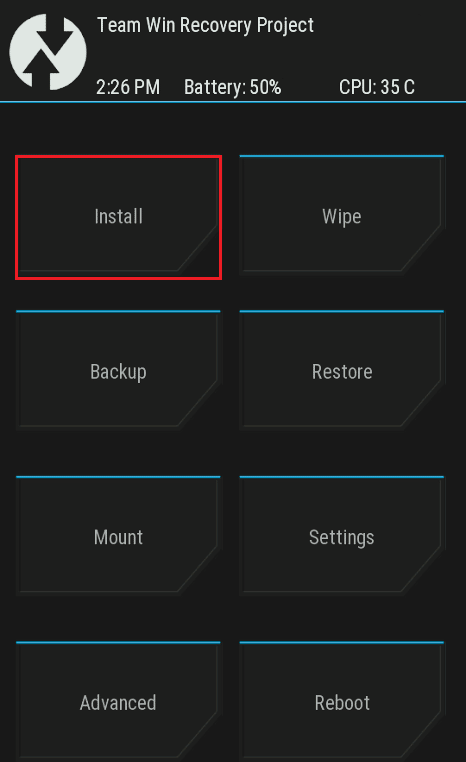
4. Apoi, apăsați pe Instala opțiune în Team Win Recovery Project ecran.
5. Apoi, apăsați pe Selectați Stocare tab.
6. Selectați Micro SD card option in the menu. Then, check if TWRP unable to mount storage is resolved.
Citeste si: Cum se schimbă numărul IMEI pe Android fără root
Method 3: Format Data
If you are not able to fix unable to mount storage TWRP issue, you can format the data on your phone in the Team Win Recovery Project mode.
Notă: You can back up the files on your Phone to Google Drive before proceeding with this method to avoid loss of data.
1. Tine Alimentare button and tap on the Oprire opțiune.

2. apasă pe Putere + Reducere volum buttons to boot into the TWRP Recovery mode.
3. Apăsați pe Keep Read Only button and swipe the triple arrow icon or the Swipe to Allow Modifications opțiunea din dreapta.
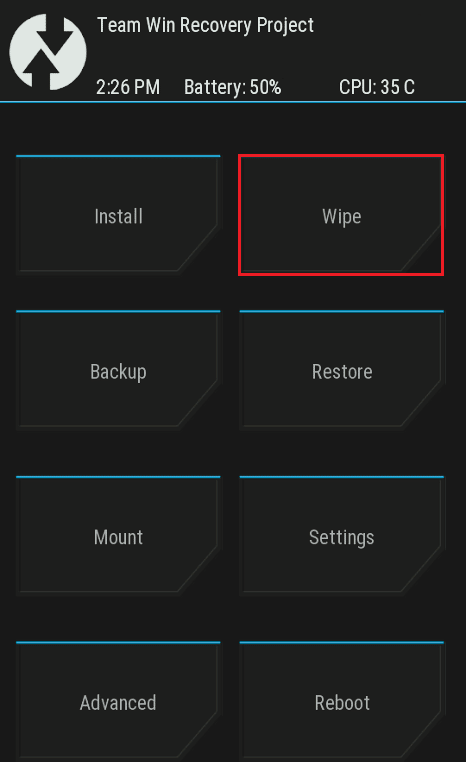
4. Apăsați pe șterge opțiune în Team Win Recovery Project ecran.
5. Apăsați pe Formatare date butonul.
6. Tip da în Wipe Format Data screen and tap on the Intrați opțiune.
7. Reveniți la Team Win Recovery Project screen and tap on the reboot opțiune.
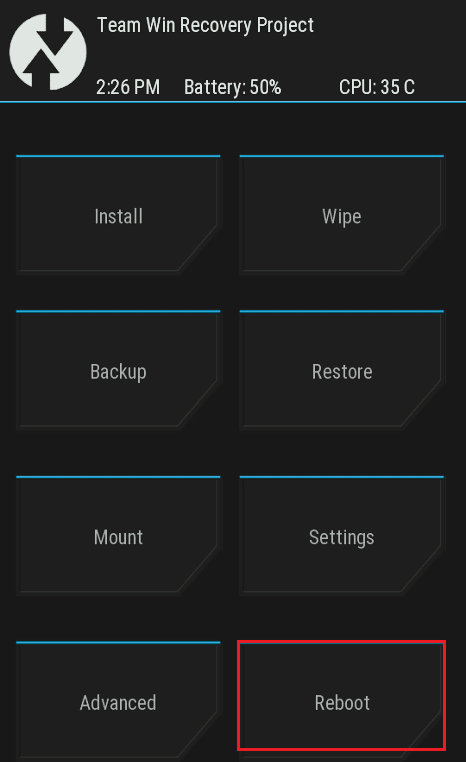
8. Apăsați pe Sistem option to turn on your phone.
Finally, check if TWRP internal storage 0mb issue is resolved.
Method 4: Format Internal Storage
Another option to fix unable to mount storage TWRP issue is to format the internal storage on your phone.
Step I: Backup Files on Internal Storage
The first step is to back up the files on your Internal Storage partition drive in the twrp recovery mode.
1. apasă pe Alimentare button and tap on the Oprire opțiune.

2. apasă pe Putere + reducere volum buttons to boot into the TWRP Recovery mode.
3. Apăsați pe Keep Read Only button and swipe the triple arrow icon or the Swipe to Allow Modifications opțiunea din dreapta.
4. Apoi, apăsați pe Backup opțiune în Team Win Recovery Project ecran.
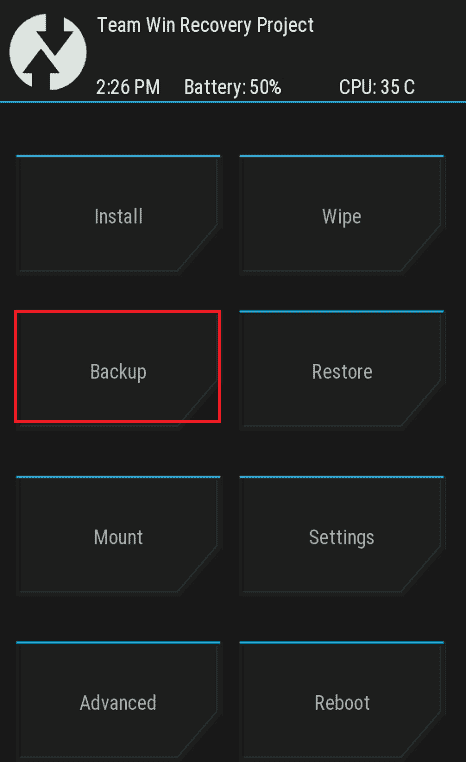
5. Selectați Stocare internă opțiune în Selectați Stocare screen and tap on the OK butonul.
6. Select all the partitions and swipe the triple arrow icon or the Glisați pentru a șterge option to the right to confirm the selection.
Step II: Format Internal Storage
The next step is to format the files on the Internal Storage partition drive in the TWRP recovery mode.
1. Deschide Team Win Recovery Project aplicația și atingeți șterge opțiune.
2. Apăsați pe Ștergere avansată opțiune.
3. Selectați Stocare internă opțiune în Select Partition to Wipe section and swipe the triple arrow icon or the Glisați pentru a șterge option to the right to confirm the selection.
Citeste si: What is HTC S-OFF?
Metoda 5: Reparați fișierele de sistem
To fix the unable to mount storage TWRP issue, you can repair the system files on your phone in the TWRP recovery mode.
1. Tine Alimentare button and tap on the Oprire opțiune.

2. Then, press the Putere + reducere volum buttons to boot into the TWRP Recovery mode.
3. Apăsați pe Keep Read Only button and swipe the triple arrow icon or the Swipe to Allow Modifications opțiunea din dreapta.
4. Apăsați pe șterge opțiune în Team Win Recovery Project ecran.
5. Apăsați pe Ștergere avansată opțiune.
6. Selectați Date opțiune în Select Partition to Wipe secțiunea și atingeți Repair or Change File System opțiune.
7. Apăsați pe Change File System butonul.
8. Apăsați pe exFAT option and swipe the triple arrow icon or the Swipe to Change option to the right on the screen.
If TWRP mount internal storage issue is still not resolved, you can follow the steps below to repair further files (Optional).
9. Reveniți la Repair or Change File System screen and tap on the Change File System opțiune.
10. Selectați EXT 2 option in the menu and swipe the triple arrow icon or the Swipe to Change option to the right to confirm the selection.
11. Return to the menu, select the EXT 4 option, and swipe the triple arrow icon or the Swipe to Change option to the right to confirm the selection.
12. Reveniți la Team Win Recovery Project screen and tap on the Mount opțiune.
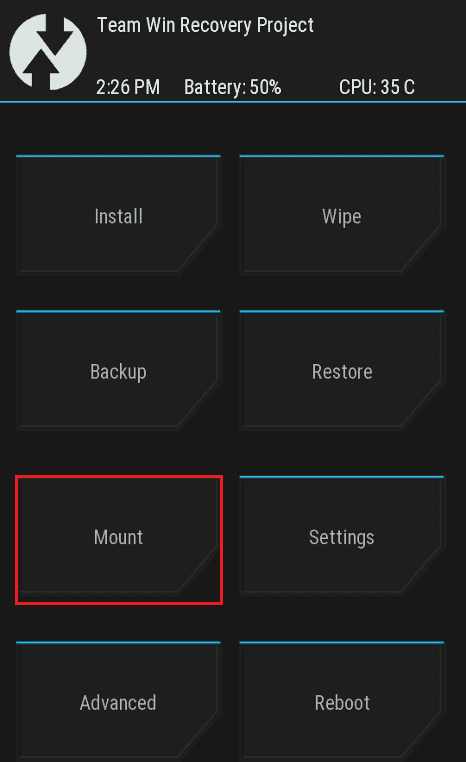
13. Selectați Date și Micro SD card opțiuni în Select Partition to Mount section and flash the files.
Method 6: Use ADB Command
The final resort to fix unable to mount storage TWRP issue is to use the ADB or Android Debug Bridge commands on your Windows PC.
Option I: Use Fastboot Command
The first option to fix TWRP internal storage 0mb issue is to use the fastboot command and format data on your phone.
Step I: Enable ADB devices on your PC
As a first step, you have to enable the ADB devices on your Windows PC using the official ADB tool.
1. Folosind un Cablu USB, connect your phone to your Windows PC.
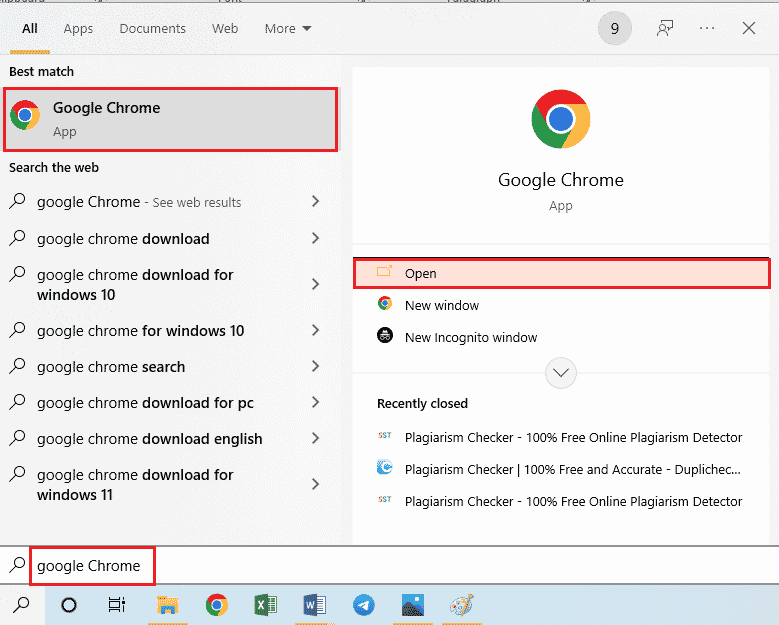
2. Apăsați Tasta Windows, tip Google Chrome, și faceți clic pe Operatii Deschise.
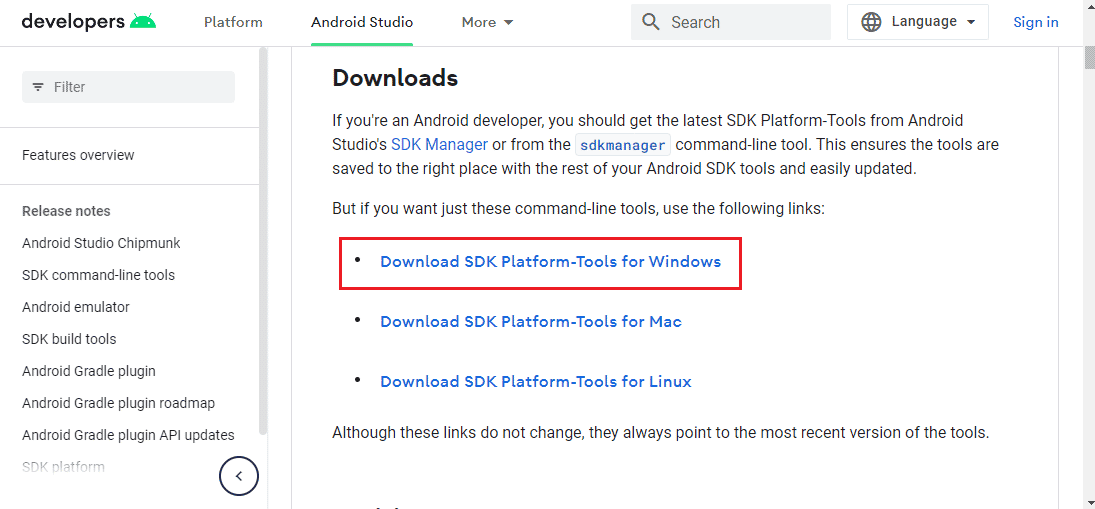
3. Deschide Instrumente platformă Android SDK site-ul web și faceți clic pe Download SDK Platform- Tools for Windows link în Download secţiune.
4. Using a data compression utility like WinZip, extract all the files of the ADB tool to the Discul local (C :) conduce.

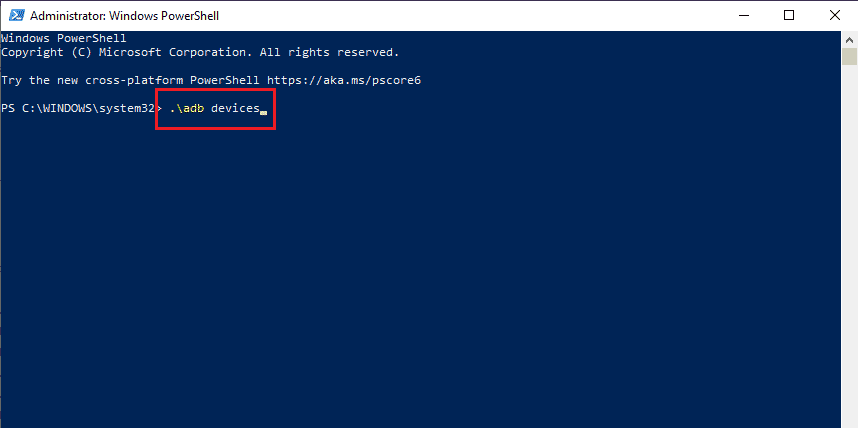
5. apasă pe Tasta Windows, tip Windows PowerShell, apoi faceți clic pe Rulat ca administrator.

6. Introduceți ./adb dispozitive comanda și apăsați tasta Introduce cheia to check the connected devices.
7. Apăsați pe Accept opțiunea de pe telefonul dvs.
Citeste si: Fix System UI a oprit ecranul negru pe Android
Step II: Enable USB Debugging
To enable the USB debugging option, you have to enable the Developer mode on your phone as follows.
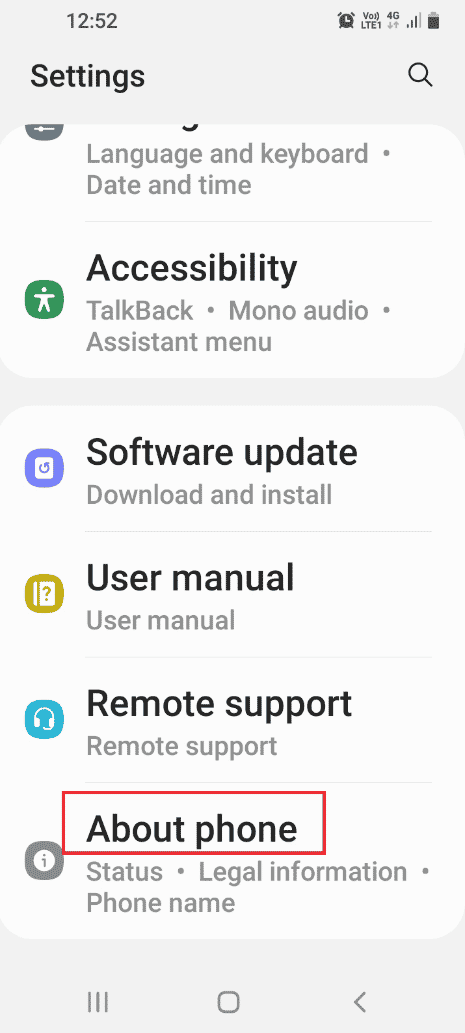
1. Din meniul principal, deschideți setări cont app.

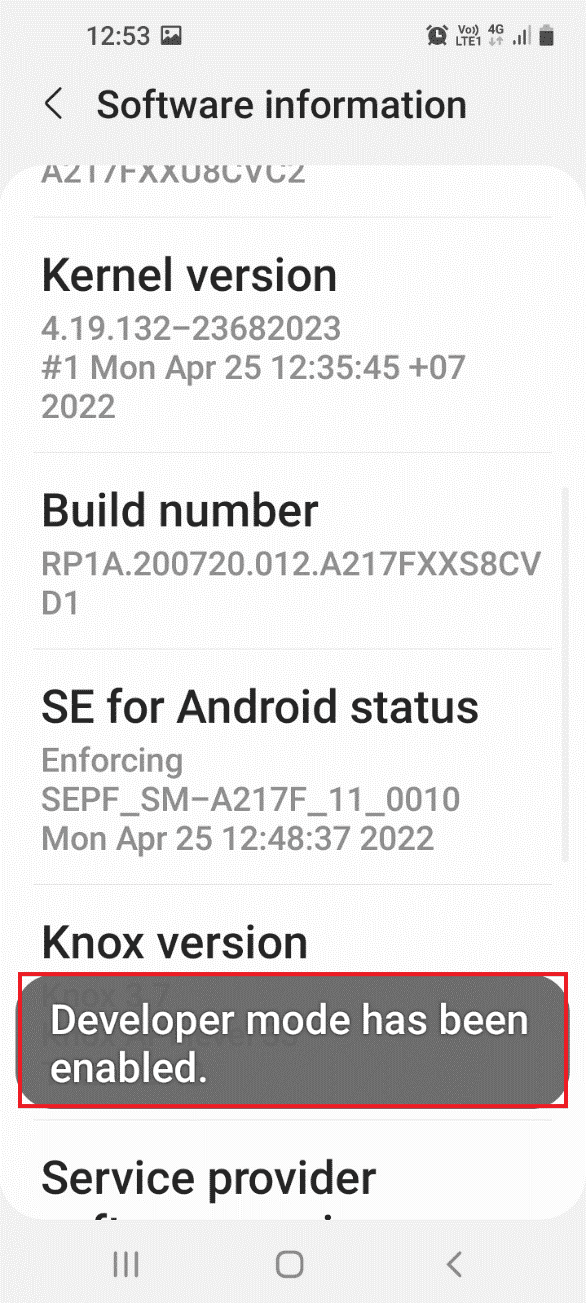
2. Tap on the tab Despre telefon.
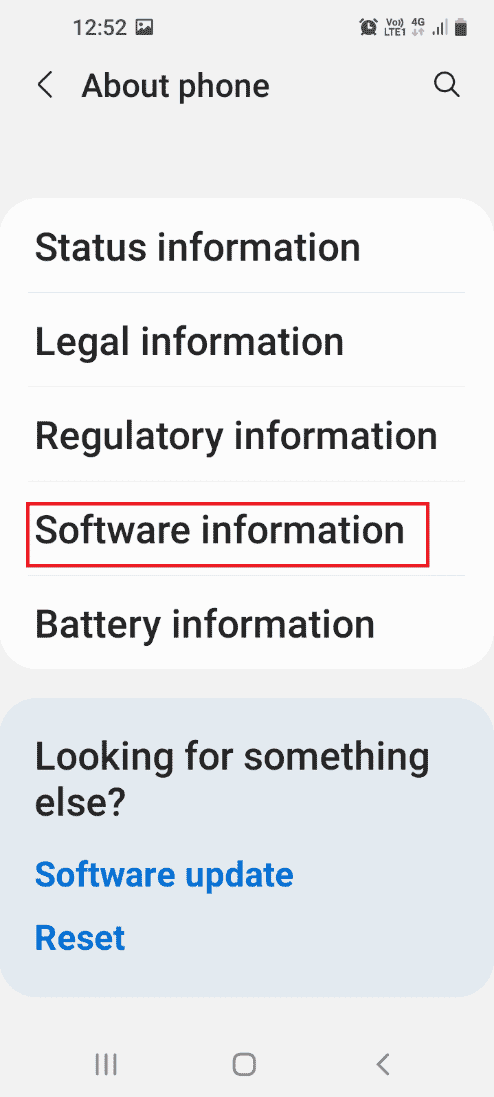
3. Tap on the tab Informații software.
4. Tap on the tab Numărul de construcție 7 ori.
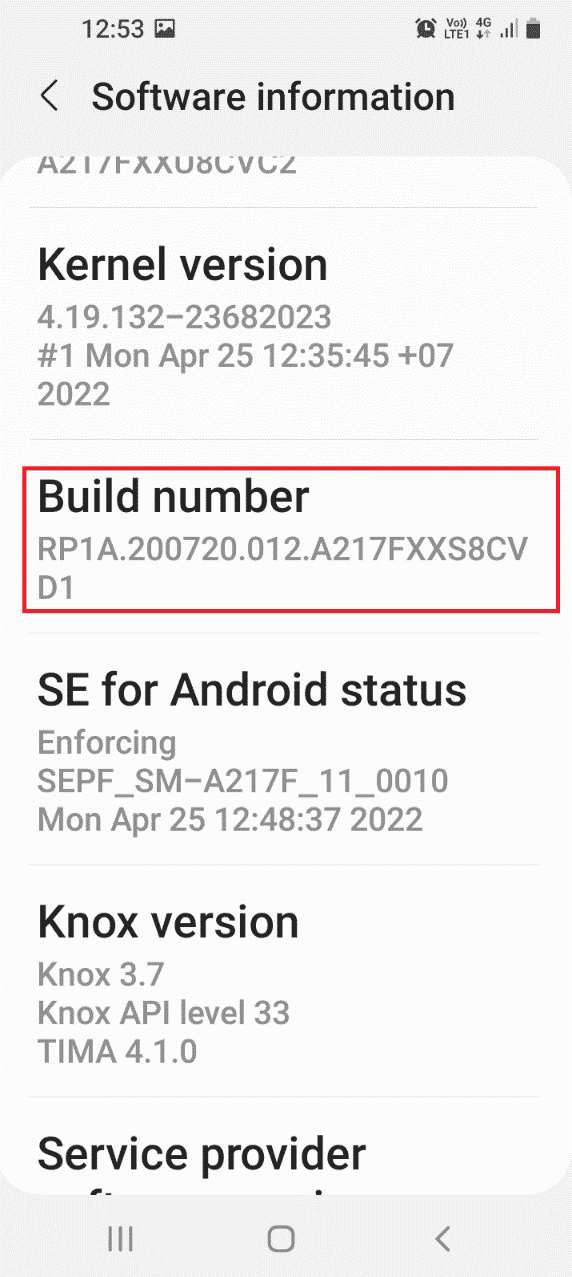
5. The message Developer mode has been enabled would be displayed.
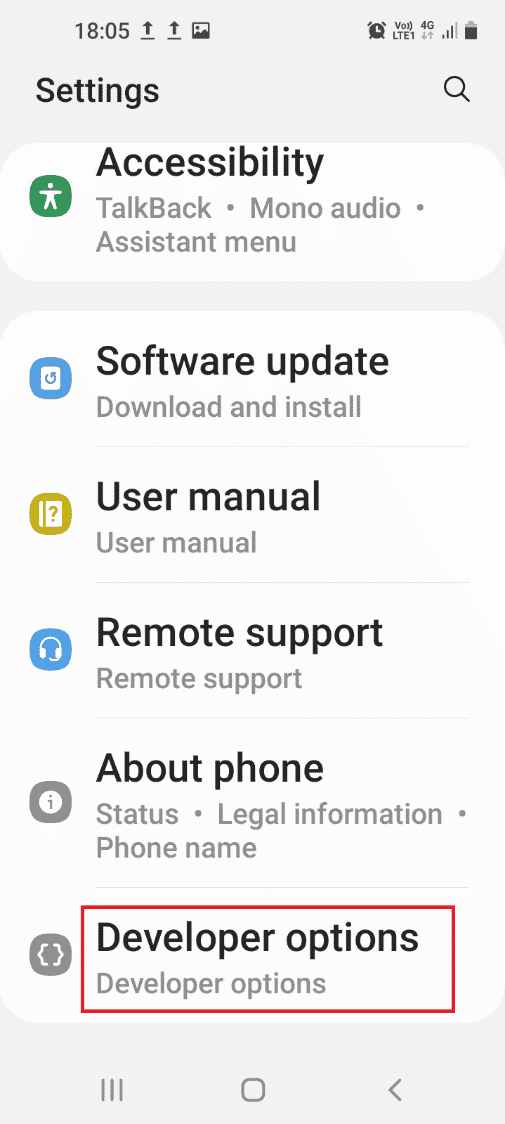
6. Reveniți la setări cont main page and tap on the tab Opțiuni pentru dezvoltatori.
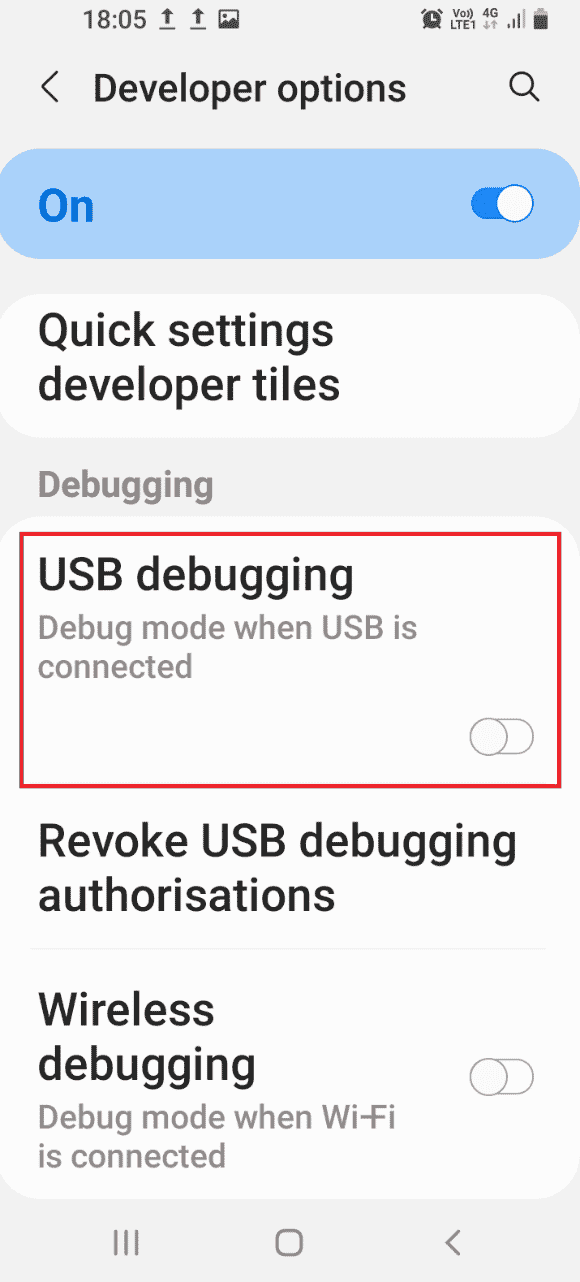
7. În Depanarea section, toggle on the depanare USB opțiune.
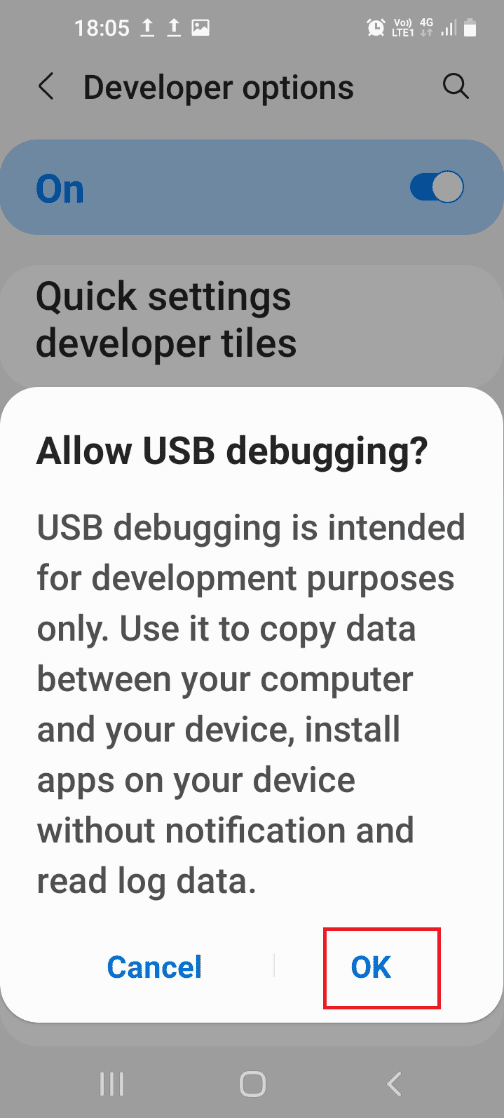
8. În Permiteți depanarea USB? confirmation message, tap on the OK opțiune.
Citeste si: What is Odin Mode on Samsung Phone?
Step III: Enable Node Tree Debugging
To enable the Windows PC to make changes to the Android phone, you have to enable the additional feature called Node Tree Debugging as follows.
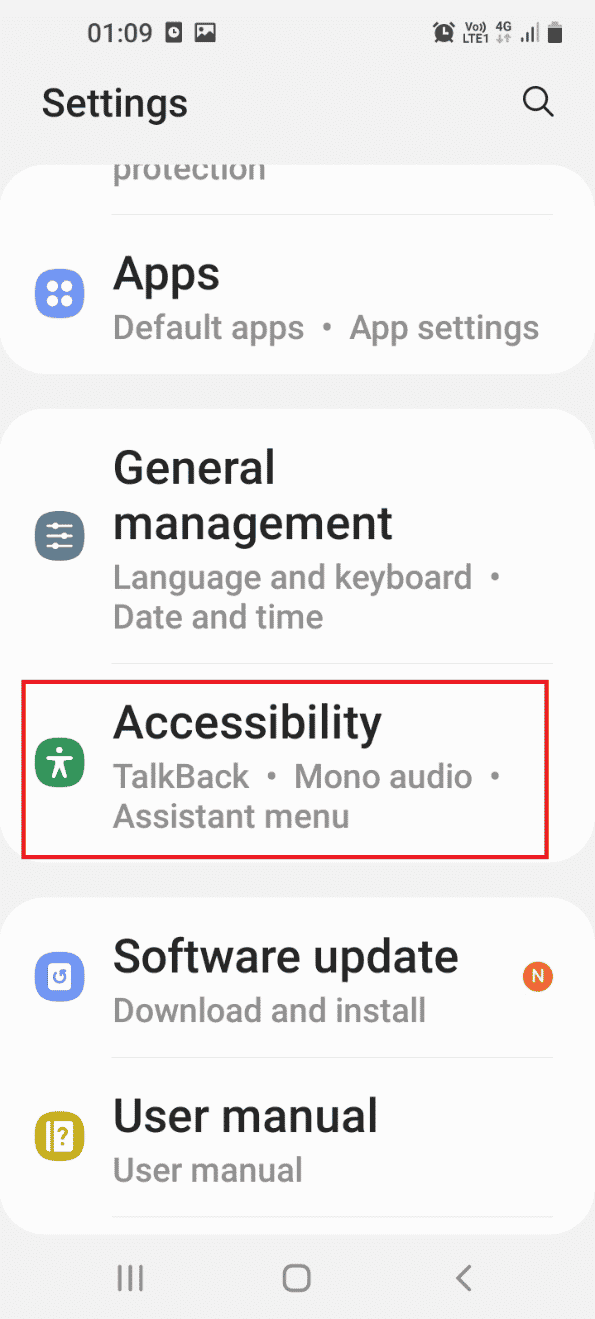
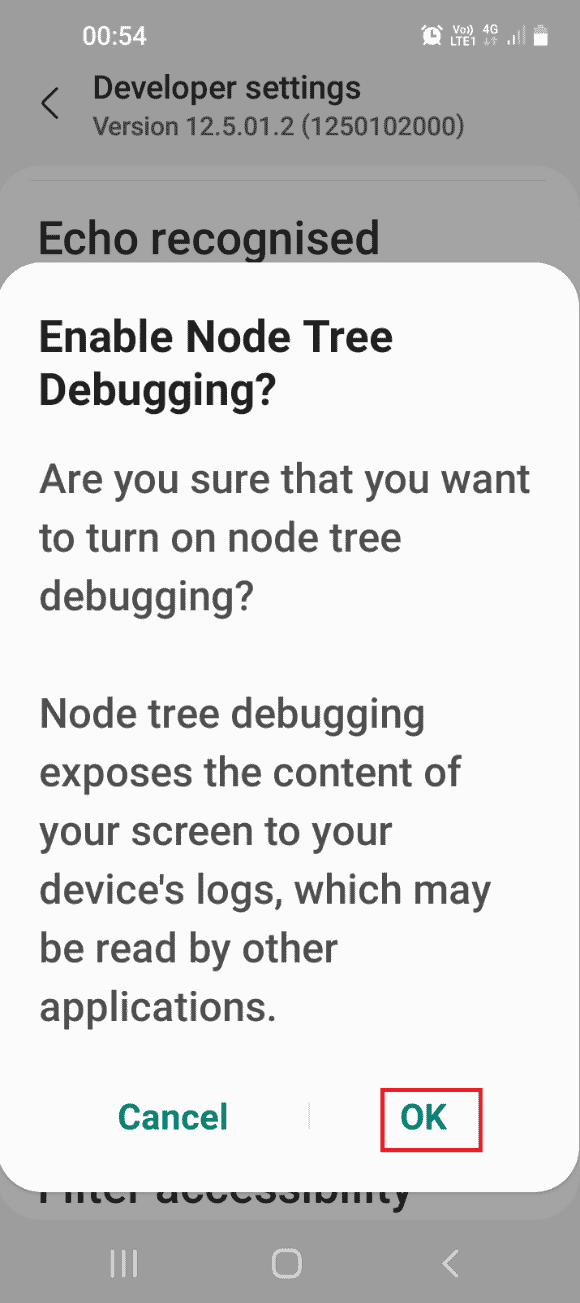
1. Reveniți la setări cont main page and tap on the tab Accesibilitate.
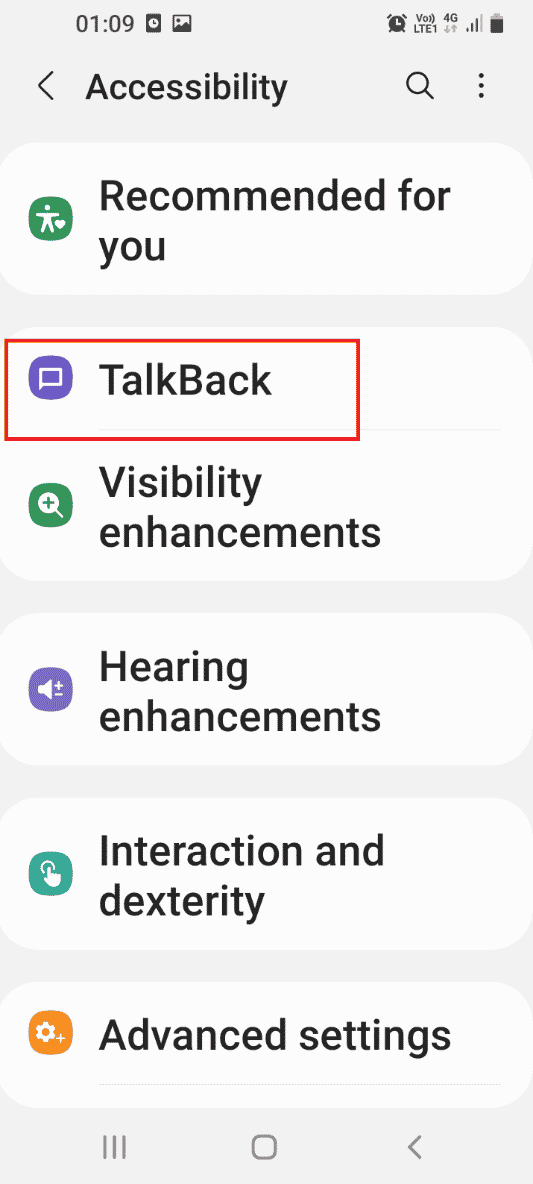
2. Apăsați pe Răspunde opțiune.
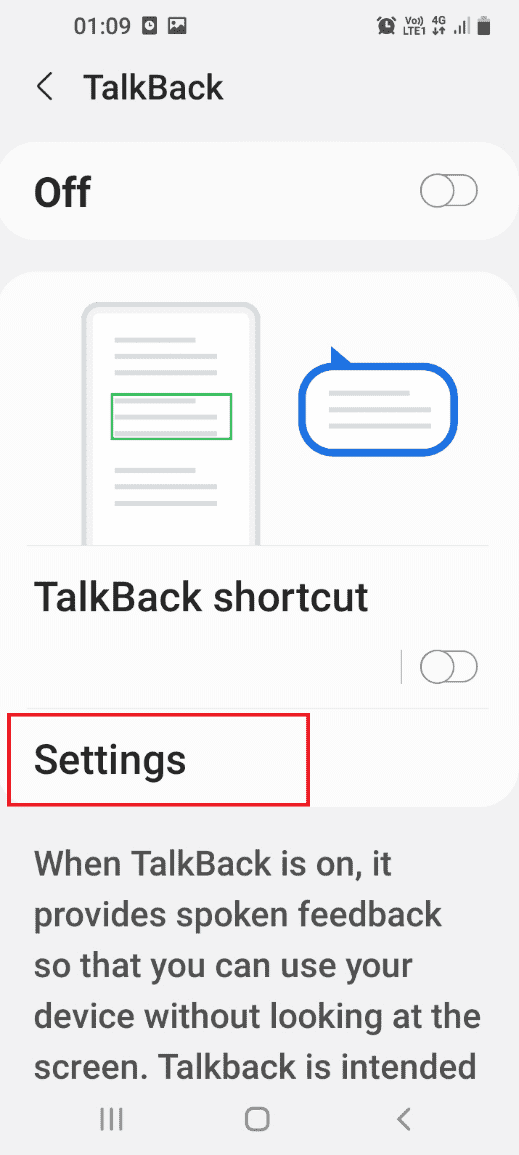
3. Apoi, apăsați pe setări cont opțiune.
4. Apoi, apăsați pe setările avansate opțiune.

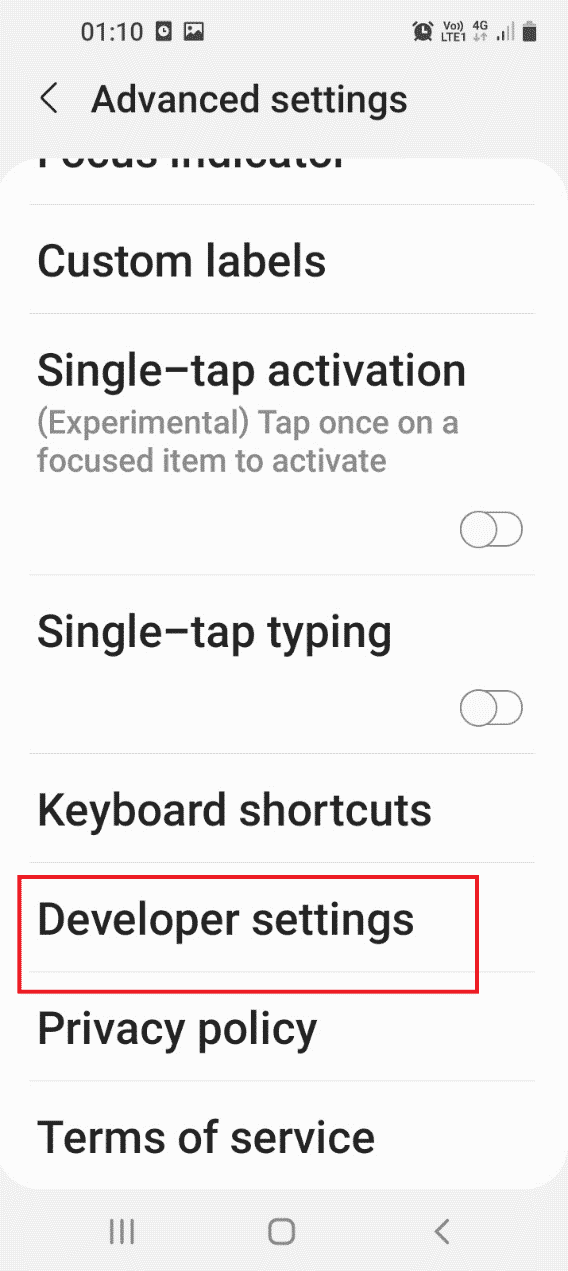
5. Apăsați pe Setări pentru dezvoltatori opțiune.
6. Comutați pe Enable node tree debugging opțiune.
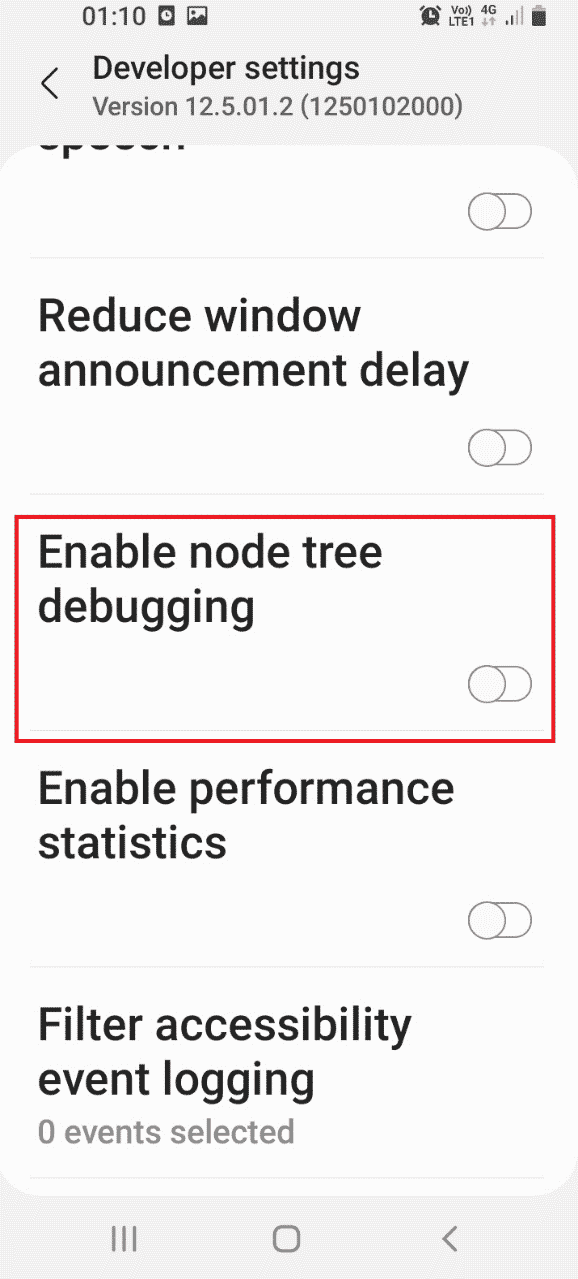
7. În Enable Node Tree Debugging? confirmation window, tap on the OK opțiune.

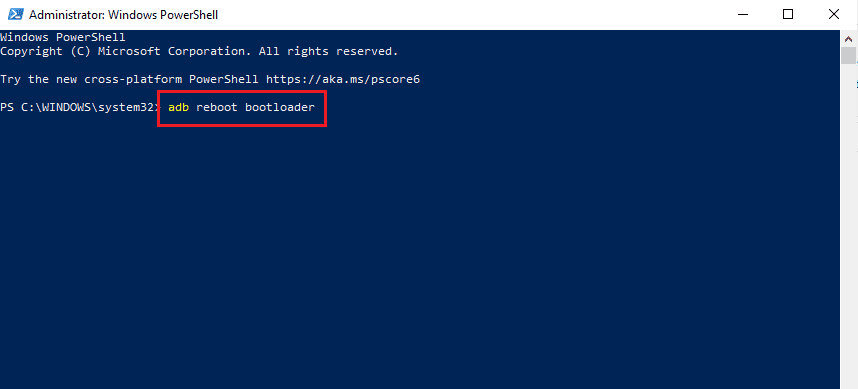
Step IV: Format Data Using Windows PowerShell
The last step to fix the unable to mount storage TWRP issue is to format the data on your phone using the Windows PowerShell app.
1. Apăsați Tasta Windows, tip Windows PowerShell, și faceți clic pe Rulat ca administrator.

2. Type the given comandă și apăsați tasta Introduce cheia to reboot your phone into TWRP Mod.
Adb reboot bootloader
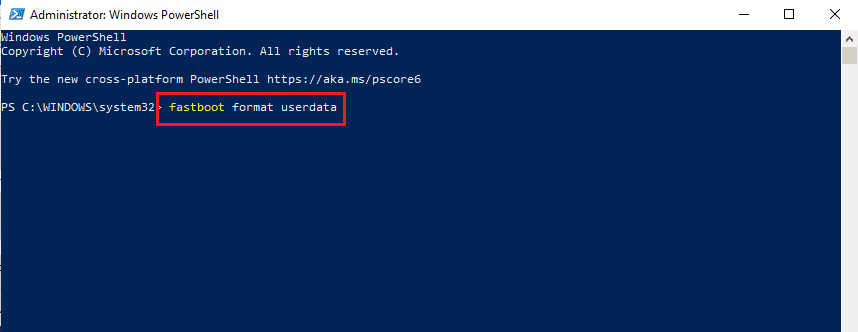
3. Apoi, tastați următoarele comandă și a lovit Introduce cheia to format the user data on your phone.
fastboot format userdata
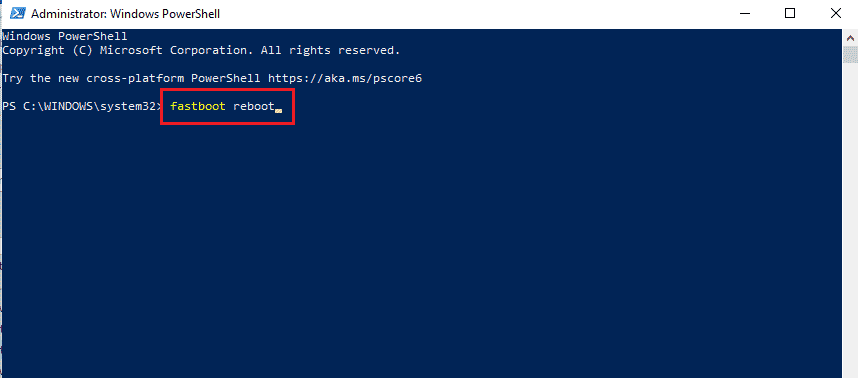
4. Introduceți fastboot repornire comanda și apăsați tasta Introduce cheia to reboot your phone in Fastboot mode.
Citeste si: Cum să afișați aplicațiile pe Android
Option II: Flash Recovery File
The second option to fix the issue is to flash the recovery file to your ADB folder on your Windows PC.
Step I: Rename Recovery File in adb Folder
As a first step, you have to rename the recovery file on the adb folder on your Windows PC to fix compatibility issues.
1. Enable ADB devices using your Windows PC.
2. Activați Depanare USB și Node Tree Debugging options on your phone.
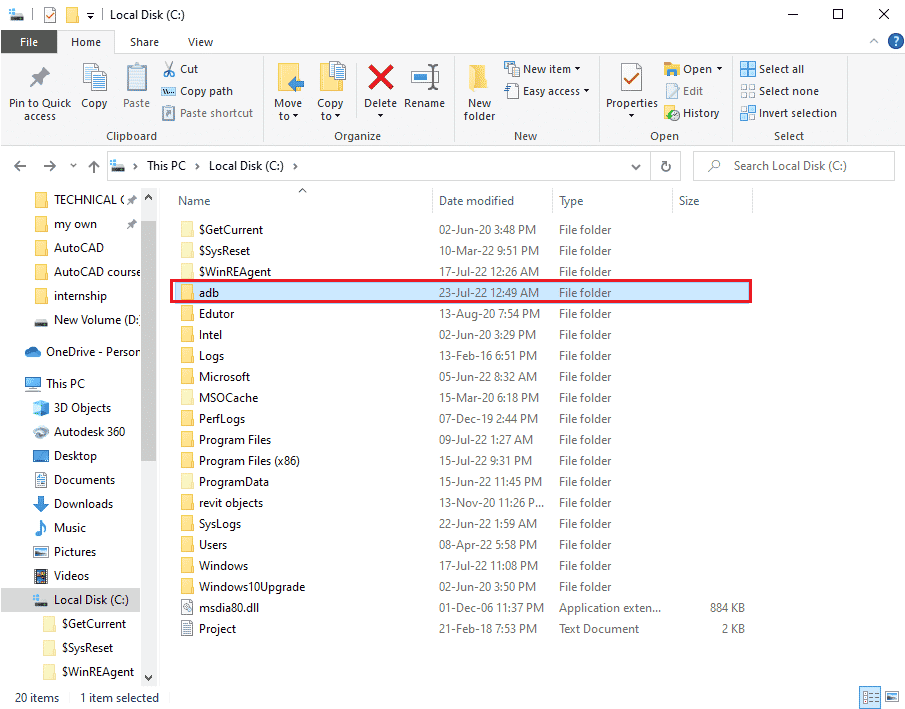
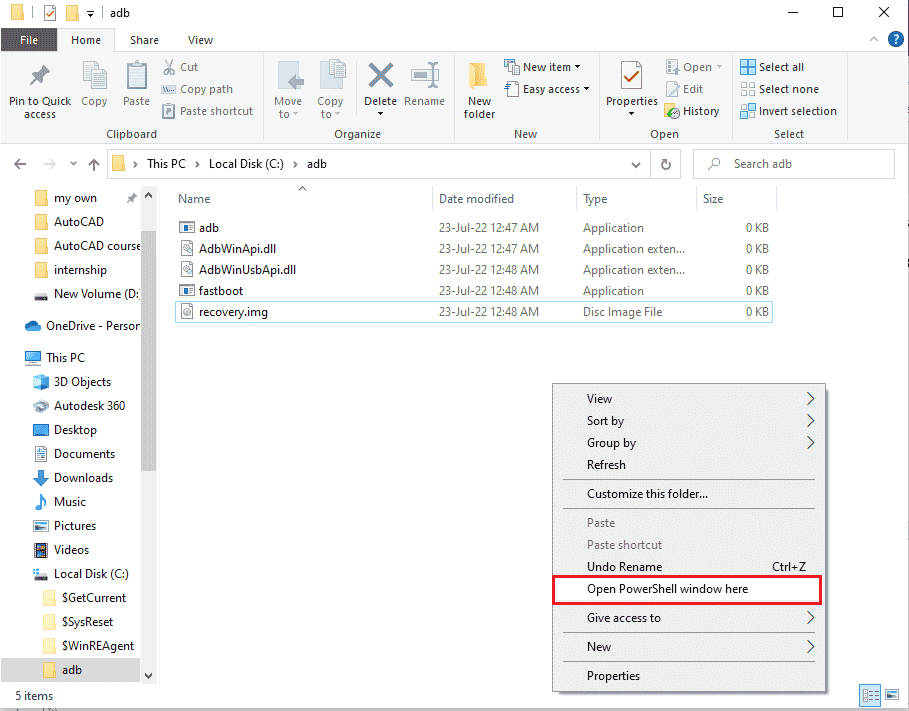
3. Deschide Explorator de fișiere folosind Windows + E chei simultaneously and navigate to the ADB folder using the location path as This PC > Local Disk (C:) > adb.
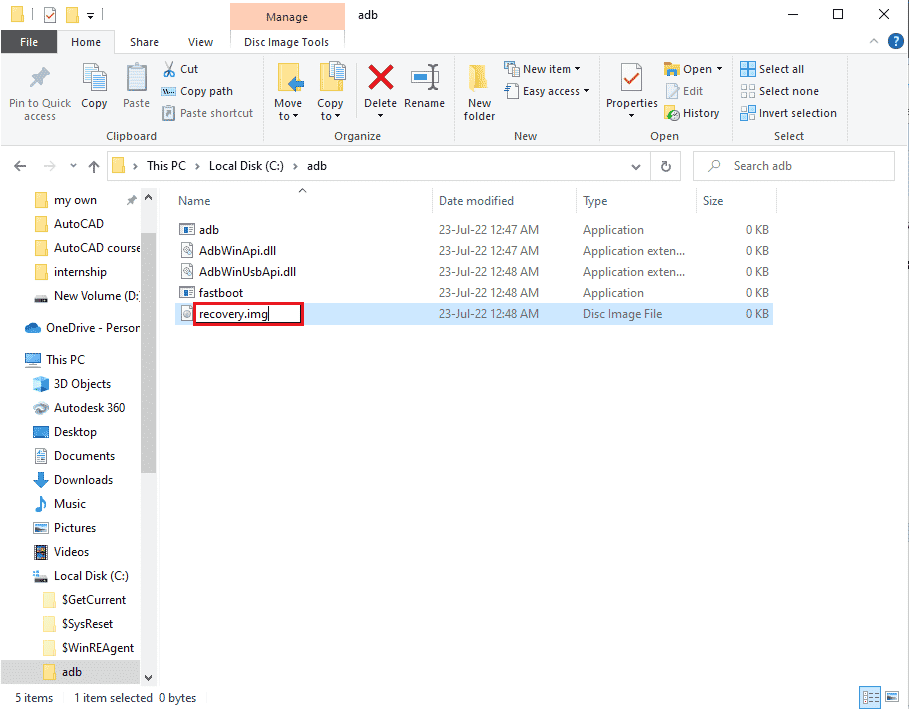
4. Right-click on the TWRP file and click on the Redenumiți opțiune.
5. Tip recovery.img și apăsați tasta Introduce cheia.
Notă: You have to copy the name of the recovery file on your phone and rename the file accordingly.
Step II: Flash Recovery File
The next step is to flash the recovery file on your phone using the Windows PowerShell app.
1. apasă pe Tasta Shift, right-click on a space, and click on the Open Windows PowerShell window here opțiune.
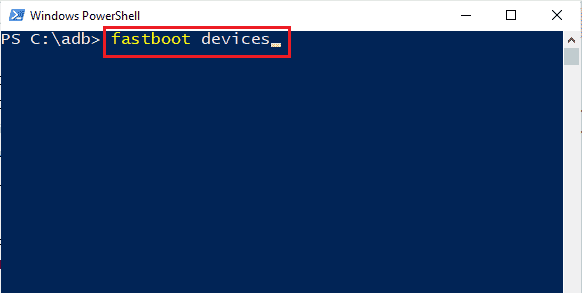
2. Tastați comanda Dispozitive fastboot și a lovit Introduce cheia to check for adb devices in the fastboot mode.
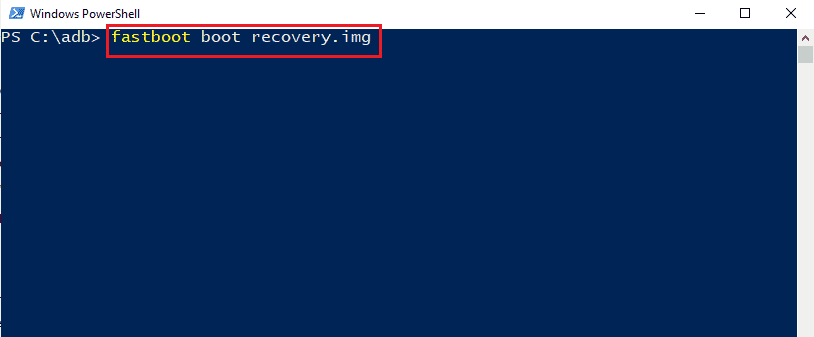
3. Tastați comanda fastboot recovery.img și apăsați tasta Intrați key to flash the recovery file on the fastboot mode on your phone.
Recomandat:
The methods to fix the issue of being unable to mount storage TWRP are discussed in the article. Please let us know your suggestions and queries on the topic in the comments below for us to heed your doubts.

