Fix Background Intelligent Transfer Service won’t start: For Windows Update to function Background Intelligent Transfer Service (BITS) is very important as it basically acts as a download manager for Windows Update. BITS transfers files between client and server in the background and also provide progress information when needed. Now if you are having issues in downloading updates then it will be most probably caused because of BITS. Either the configuration of BITS is corrupted or BITS is not able to start.
If you will go to services window you will find out that Background Intelligent Transfer Service (BITS) won’t start. These are the type of errors which you will face while trying to start BITS:
Background intelligent transfer service did not start properly
Background intelligent transfer service will not start
Background intelligent transfer service has stopped working
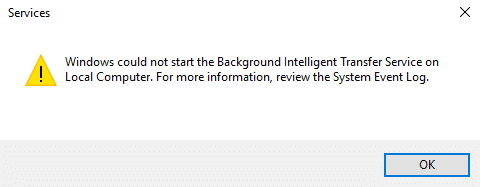
Windows could not start the Background Intelligent Transfer service on the local computer. For more information review the system event log. If this is a non-Microsoft service contact the service vendor and refer to service-specific error code -2147024894. (0x80070002)
Now if you are facing a similar issue with BITS or with Windows update then this post is for you. Without wasting any time let’s see how to actually Fix Background Intelligent Transfer Service won’t start issue with the below-listed troubleshooting guide.
Fix Background Intelligent Transfer Service won’t start
پڪ ڪريو ته ھڪڙي بحالي پوائنٽ ٺاھيو صرف صورت ۾ ڪجھ غلط ٿي وڃي.
Method 1: Start BITS from Services
1.Press Windows Keys + R then type خدمتون .msc ۽ داخل ٿيو.

2.Now find BITS and then double click on it.
3.Make sure the Startup type is set to خودڪار and the service is running, if not then click on شروعاتي بٽڻ.

4. ڪلڪ ڪريو لاڳو ڪريو پوءِ ٺيڪ.
5.Reboot your PC and again try to update Windows.
Method 2: Enable dependent Services
1.Press Windows Keys + R then type خدمتون .msc ۽ داخل ٿيو.
2.Now find the below-listed services and double click on each of them to change their properties:
ٽرمينل سروسز
ريموٹ پروسيسنگ ڪال (RPC)
System Event Notification
Windows Management Instrumentation Driver Extensions
COM+ Event System
DCOM سرور پروسيسنگ لانچر
![]()
3.Make sure their Startup type is set to خودڪار and the above services are running, if not then click on شروعاتي بٽڻ.
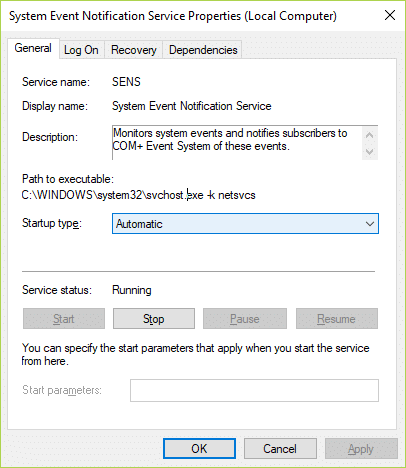
4. ڪلڪ ڪريو لاڳو ڪريو پوءِ ٺيڪ.
5. تبديلين کي بچائڻ لاءِ پنھنجي پي سي کي ريبوٽ ڪريو ۽ ڏسو ته توھان ڪري سگھوٿا Fix Background Intelligent Transfer Service won’t start.
طريقو 3: رن فائيل فائل چيڪر
1. پريس ڪريو Windows Key + X پوءِ ڪلڪ ڪريو ڪمانڊ پرامپٽ (ايڊمنٽ).

2. ھاڻي ھيٺ ڏنل cmd ۾ ٽائپ ڪريو ۽ انٽر کي دٻايو.
Sfc/scannow sfc/scannow/offbootdir=c: /offwindir=c:windows (جيڪڏهن مٿيان ناڪام ٿئي ته پوءِ هي ڪوشش ڪريو)

3. مٿي ڏنل عمل کي ختم ڪرڻ لاء انتظار ڪريو ۽ هڪ دفعو ٿي چڪو آهي توهان جي PC کي ٻيهر شروع ڪريو.
طريقو 4: هلايو ونڊوز اپڊيٽ ٽربلشوٽر
1. ٽائپ ڪريو "مسئلو حل ڪرڻ" ونڊوز سرچ بار ۾ ۽ ڪلڪ ڪريو تڪليف ٺٽوي.

2. اڳتي، کاٻي ونڊو پين مان چونڊيو سڀ ڏسو.
3. پوءِ ڪمپيوٽر جي مسئلن کي حل ڪرڻ جي فهرست مان چونڊيو ونڊوز تازه ڪاري.

4.Follow on-screen instructions and let the Windows Update Troubleshoot run.

5.Restart your PC and see if you are able to Fix Background Intelligent Transfer Service won’t start.
Method 5: Run DISM Tool
1. پريس ڪريو Windows Key + X ۽ منتخب ڪريو Command Prompt(Admin).
2. cmd ۾ ھيٺ ڏنل ڪمانڊ ٽائپ ڪريو ۽ ھر ھڪ کان پوءِ انٽر کي دٻايو.
a) Dism/Online/Cleanup-Image/CheckHealth ب) Dism/Online/Cleanup-Image/ScanHealth ج) Dism/Online/Cleanup-Image/RestoreHealth

3. اچو ته DISM حڪم هلائي ۽ ان جي ختم ٿيڻ جو انتظار ڪريو.
4. جيڪڏهن مٿي ڏنل حڪم ڪم نٿو ڪري ته هيٺ ڏنل حڪم تي ڪوشش ڪريو.
Dism/Image:C:offline/Cleanup-Image/RestoreHealth/Source:c:testmountwindows Dism/آن لائن/Cleanup-Image/RestoreHealth/ذريعو:c:testmountwindows/LimitAccess
نوٽ: C:RepairSourceWindows کي تبديل ڪريو پنھنجي مرمت جي ماخذ جي جڳھ سان (ونڊوز تنصيب يا بحالي ڊسڪ).
5. تبديلين کي بچائڻ لاءِ پنھنجي پي سي کي ريبوٽ ڪريو ۽ ڏسو ته توھان ڪري سگھوٿا Fix Background Intelligent Transfer Service won’t start, جيڪڏهن نه ته پوءِ ايندڙ طريقي سان جاري رکو.
Method 6: Reset the Download Queue
1. دٻايو Windows Key + R then type the following and hit Enter:
%ALLUSERSPROFILE%Application DataMicrosoftNetworkDownloader
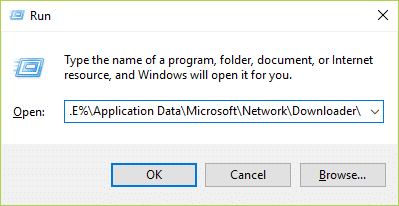
2.Now look for qmgr0.dat and qmgr1.dat, if found make sure to delete these files.
3. پريس ڪريو Windows Key + X پوءِ چونڊيو حڪم پرومو (ايڊمنسٽريٽ)
4. هيٺ ڏنل حڪم کي cmd ۾ ٽائپ ڪريو ۽ Enter کي دٻايو.
نيٽ شروع بٽ
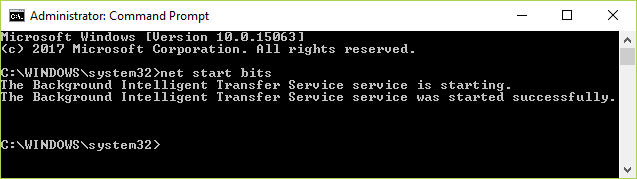
5.Again try to update window and see if it works.
طريقو 7: رجسٽري درست ڪريو
1. پريس ڪريو Windows Key + R پوءِ ٽائپ ڪريو ريڊيڪل ۽ داخل ٿيڻ کي کوليو رجسٽري جو ايڊيٽر.

2. ھيٺ ڏنل رجسٽري چيڪ ڏانھن وڃو:
HKEY_LOCAL_MACHINESYSTEMCurrentControlSetControlBackupRestoreFilesNotToBackup
3.If the above key exists then continues, if not then right-click on بيڪ اپ ريسٽور ۽ چونڊيو نئون > ڪي.
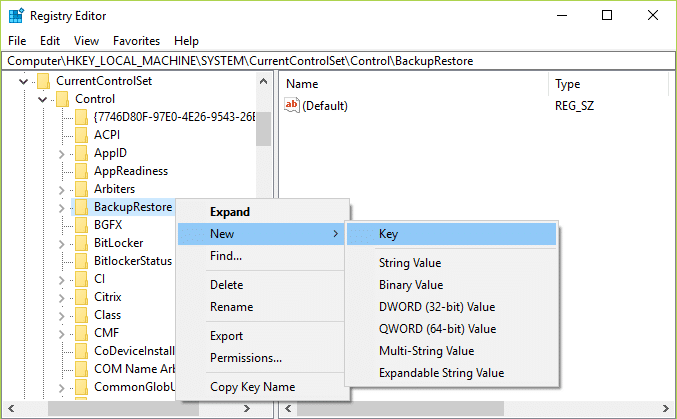
4.Type FilesNotToBackup and then hit Enter.
5.Exit Registry Editor and press Windows Key + R then type خدمتون .msc ۽ داخل ٿيو.
6.Find BITS and double-click on it. Then in the عام ٽئب، تي ڪلڪ ڪريو شروع ڪيو
توھان جي لاء سفارش ڪئي وئي آھي:
اهو توهان کي ڪاميابي سان آهي Fix Background Intelligent Transfer Service won’t start پر جيڪڏھن توھان اڃا تائين ھن ھدايت جي حوالي سان ڪي سوال آھن، انھن کان پڇڻ لاء آزاد محسوس ڪريو تبصري جي سيڪشن ۾.

