Windows 10 හි වෙනත් යෙදුමකින් භාවිතයේ ඇති කැමරාව නිවැරදි කරන්න

Several users have faced camera used by another app issue when they are trying to access camera in Skype or other similar applications. This issue occurs both in inbuilt and external camera devices and it is reported on versions of Windows 7, 8.1, 10, and 11. To be more precise, this issue is faced after the 20H2 update of the Windows Operating System. The camera in use issue is not specific to any particular application on your device but it occurs on your PC for many reasons. In this guide, you will learn effective troubleshooting methods that will help you fix camera is being used by another application issue.
How to Fix Camera In Use by Another App in Windows 10
Here are some valid reasons that contribute to the camera used by another app problem. You are advised to analyze the reasons deeply so that you could follow appropriate troubleshooting methods to resolve the problem so easily.
- අතුරුදහන්, යල් පැන ගිය හෝ නොගැලපෙන කැමරා ධාවක.
- The files and cache in-camera application are corrupt or incompatible with your Operating System.
- Camera access is not granted in your Windows 10 PC.
- Antivirus programs may restrict camera access.
- දූෂිත කැමරා යෙදුම.
- Some other programs on PC are using your camera.
- කැමරා සැකසුම් සුදුසු නොවේ.
- Windows Defender Firewall is blocking Camera access.
- Webcam security features are contributing to the error.
We have investigated several technical forums regarding the camera used by another app issue and thereby analyzed the troubleshooting hacks to fix the problem.
Method 1: Close Programs that Use Camera
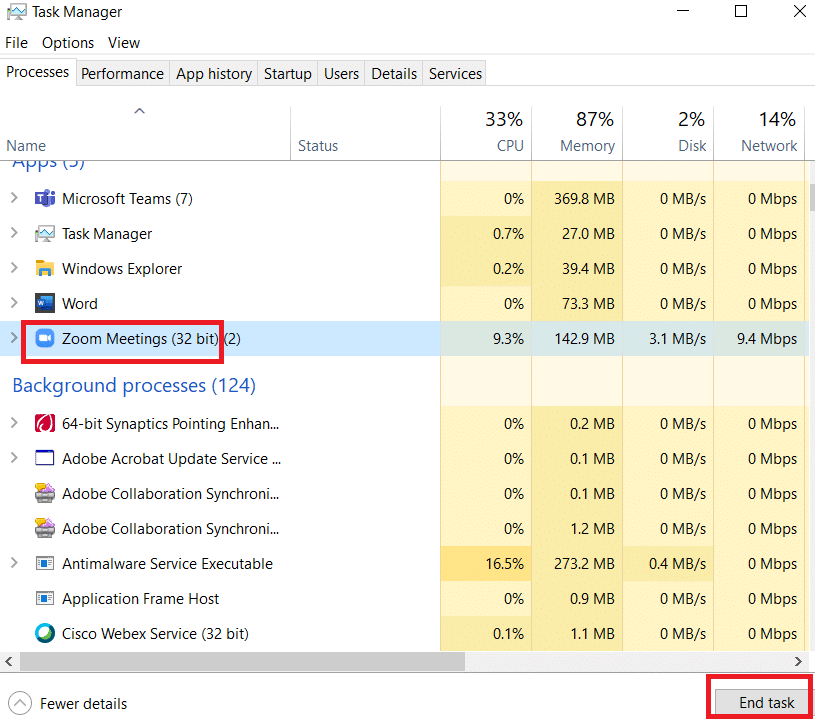
The camera in your device can only be used by one application at a time. If you guess that other applications are using the camera, you are advised to close all background applications that are active on your device. You can either exit from all programs by closing all of them one by one or by Task Manager. To do so, follow our guide on How to End Task in Windows 10.
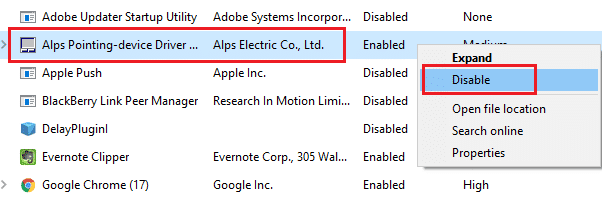
In addition, you are advised to disable start-up programs on your Windows 10 PC. To implement the task, follow our guide on 4 Ways to Disable Startup Programs in Windows 10
ක්රමය 2: කැමරා ප්රවේශයට ඉඩ දෙන්න
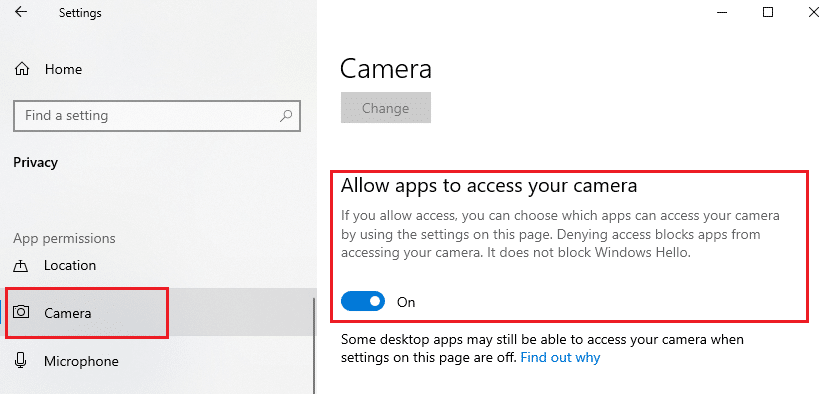
If you are experiencing a camera used by another app issue in your Windows 10 computer, there are some chances that access to the camera is not granted appropriately. Also, you can easily fix this issue by allowing access to the camera in Windows Settings. Here are a few steps to grant permission.
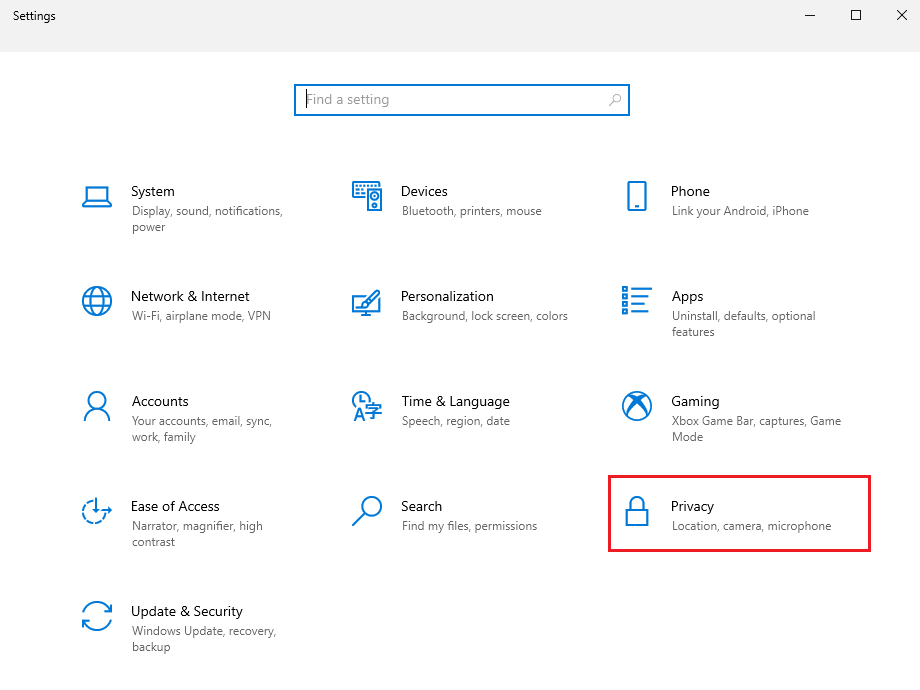
1. You can launch වින්ඩෝස් සැකසුම් එබීමෙන් Windows + I යතුරු සමාන්තරව.
2. ඉන්පසු, තෝරන්න පුද්ගලිකත්වය පෙන්වා ඇති පරිදි විකල්පය.
3. ඉන්පසුව, වම් කවුළුවෙහි, සොයන්න සහ තෝරන්න කැමරාව විකල්පය.
සටහන: සහතික කරගන්න ඔබගේ කැමරාවට ප්රවේශ වීමට යෙදුම් වලට ඉඩ දෙන්න විකල්පය නිරූපණය කර ඇති පරිදි සක්රිය කර ඇත.
කියවන්න: Omegle කැමරාව ක්රියා නොකිරීම නිවැරදි කරන්නේ කෙසේද?
ක්රමය 3: දෘඪාංග සහ උපාංග දෝශ නිරාකරණ ධාවනය කරන්න
If you find your Windows 10 computer is facing any hardware-related issues, it can be easily sorted by running දෘඪාංග සහ උපාංග දෝශ නිරාකරණ. All the issues identified by the troubleshooter will be automatically resolved by the troubleshooter itself. For instance, if there are any corrupt settings in your PC and if there are any specific changes intended to be done, the troubleshooter helps you a lot. Follow our guide to Run Hardware and Devices Troubleshooter to fix issues and implement the steps as instructed.
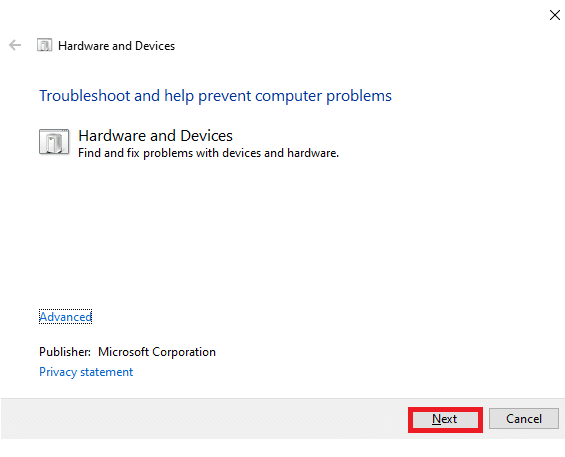
Once you have fixed all the suggestions mentioned at the end of the troubleshooting process, check if you have fixed camera used by another app issue.
ක්රමය 4: කැමරා උපාංග ධාවකය සක්රිය කරන්න
If you have accidentally disabled the webcam or camera in your device settings, you will face camera in use issue. So, if you have disabled the webcam in your device, enable it on your computer as instructed below.
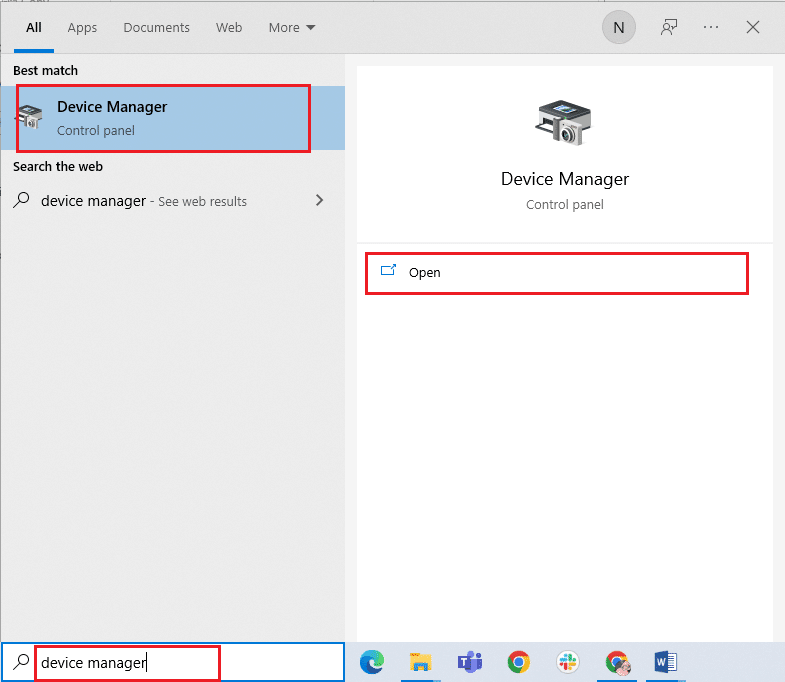
1. පහර දෙන්න වින්ඩෝස් යතුර සහ වර්ගය උපාංග කළමනාකරු. ඉන්පසු, ක්ලික් කරන්න විවෘත.
2. ඉක්මනින් උපාංග කළමනාකරු කවුළුව විවෘත වේ, දෙවරක් ක්ලික් කරන්න කැමරා එය පුළුල් කිරීමට කොටස.
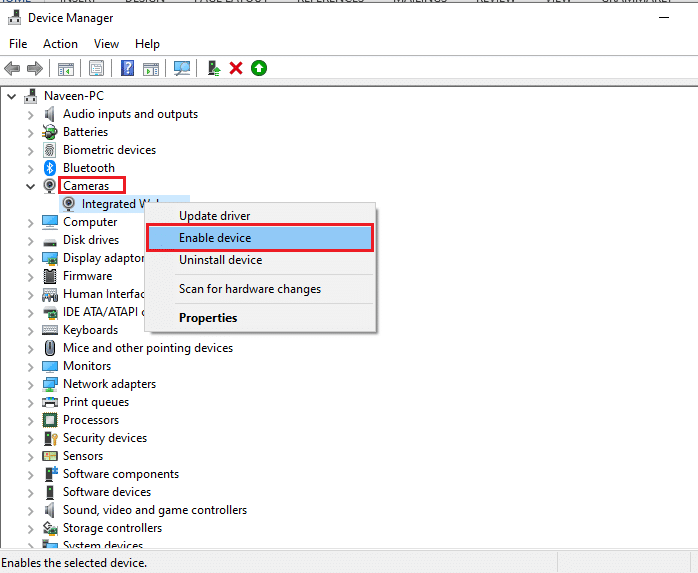
3. දැන්, ඔබගේ කැමරා උපාංගය මත දකුණු-ක්ලික් කර තෝරන්න උපාංගය සබල කරන්න විකල්පය.
කියවන්න: 8 Best Webcam for Streaming in India (2022)
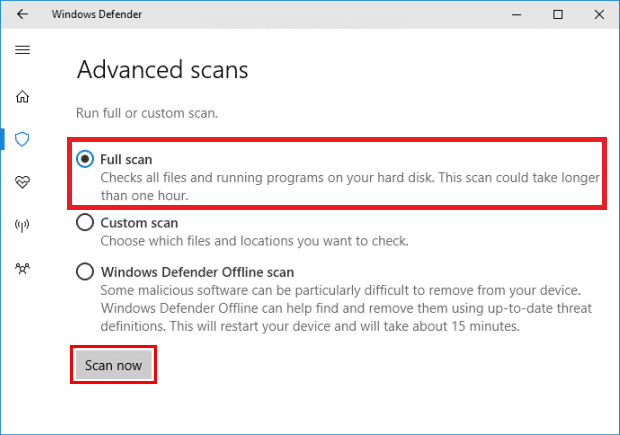
ක්රමය 5: අනිෂ්ට මෘදුකාංග ස්කෑන් ධාවනය කරන්න
Several Microsoft experts suggest that, scanning PC will help you maintain your computer threat free. If there are any virus or malware intrusions in your PC, you cannot use external and internal hardware devices. Hence, you are advised to scan your computer as instructed in our guide on How do I Run a Virus Scan on my Computer?
එසේම, ඔබට ඔබේ පරිගණකයෙන් අනිෂ්ට මෘදුකාංග ඉවත් කිරීමට අවශ්ය නම්, Windows 10 හි ඔබේ පරිගණකයෙන් අනිෂ්ට මෘදුකාංග ඉවත් කරන්නේ කෙසේද යන්න අපගේ මාර්ගෝපදේශය පරීක්ෂා කරන්න.
ක්රමය 6: වින්ඩෝස් යාවත්කාලීන කරන්න
Also, if there are any bugs in your PC, they can only be fixed after a Windows update. Microsoft releases regular updates to fix all these bugs thereby sorting camera is being used by another application issue. Hence, ensure if you have updated your Windows Operating System and if there are any updates pending in action, use our guide to Download and Install Windows 10 Latest Update.
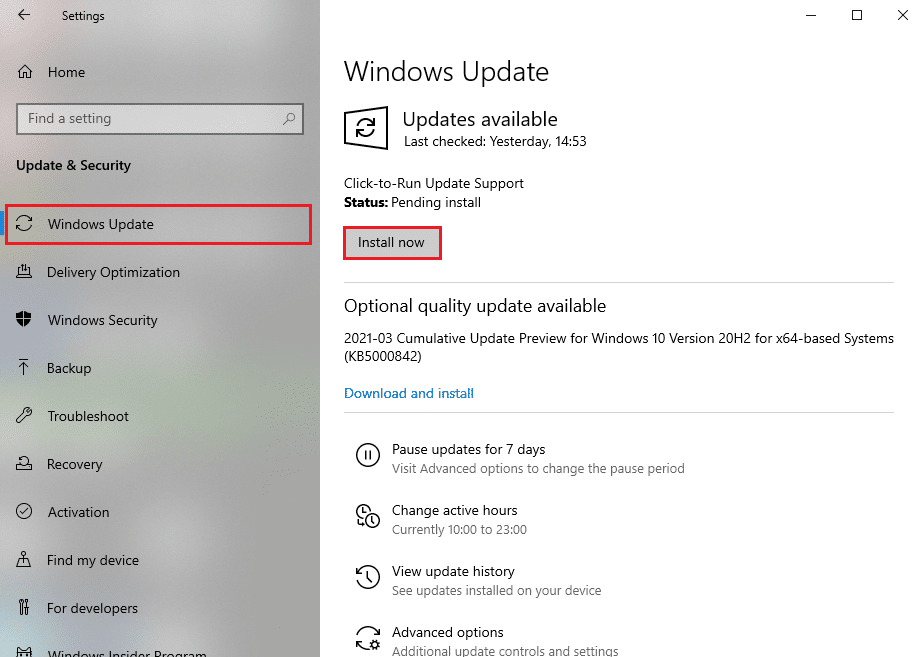
ඔබගේ Windows මෙහෙයුම් පද්ධතිය යාවත්කාලීන කිරීමෙන් පසු, ඔබට ඔබගේ කැමරාවට ප්රවේශ විය හැකිද යන්න පරීක්ෂා කරන්න.
කියවන්න: Google Meet හි කිසිදු කැමරාවක් හමු නොවීම නිවැරදි කරන්නේ කෙසේද
Method 7: Disable Windows Firewall
Sometimes, Windows Defender Firewall in your computer might prevent camera access, for some security reasons. If in case, camera has been blocked by Windows Defender Firewall, you have to enable it or disable the Firewall securities temporarily from your computer. If you do not know how to disable Windows Defender Firewall, our guide to Disable Windows 10 Firewall will help you do so.
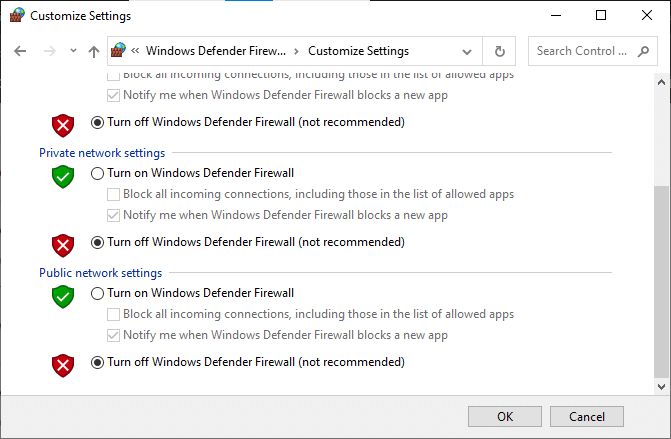
ඔබගේ කැමරාවට ප්රවේශ වීමෙන් පසු, ආරක්ෂක වැඩසටහනක් නොමැති පරිගණකයක් සැමවිටම තර්ජනයක් වන බැවින්, ඔබ නැවත Firewall කට්ටලය සක්රීය කිරීමට වග බලා ගන්න.
Method 8: Update or Rollback Camera Drivers
If there are any incompatible or outdated camera drivers in your computer, you will face camera in use issue. To fix the problem, either update the camera drivers or roll back them if necessary.
විකල්ප I: ධාවක යාවත්කාලීන කරන්න
1. වර්ගය උපාංග කළමනාකරු in the Windows 10 search menu and click on විවෘත.
2. ඉන්පසුව, දෙවරක් ක්ලික් කරන්න කැමරා එය පුළුල් කිරීමට.
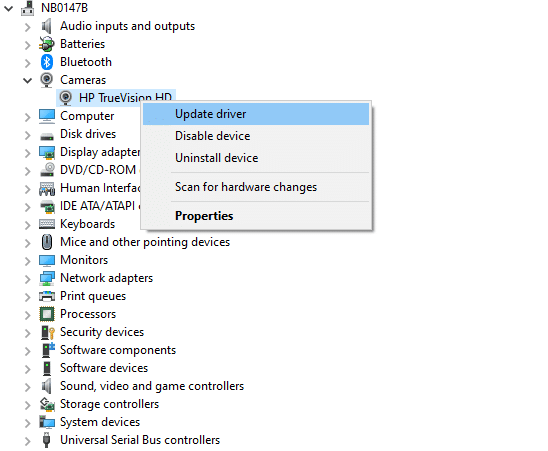
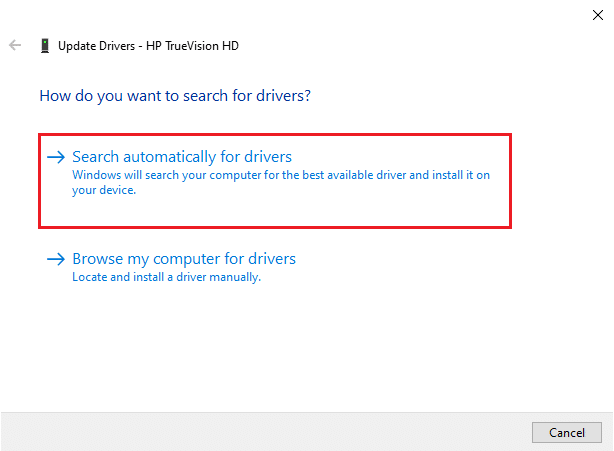
3. දැන්, දකුණු-ක්ලික් කරන්න ඔබේ රියදුරු (say HP TrueVision HD) and then select ධාවක යාවත්කාලීන කරන්න.
4. දැන්, ක්ලික් කරන්න ධාවක සඳහා ස්වයංක්රීයව සොයන්න. This will identify and install the apt drivers automatically.
5A. If there are updates pending to be installed, the update will be successful.
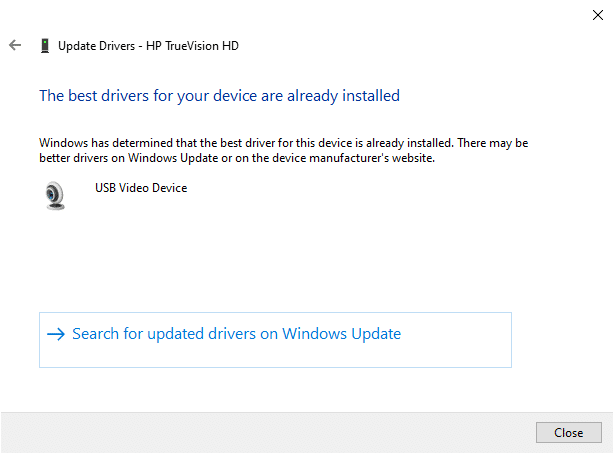
5B. You will get ඔබගේ උපාංගය සඳහා හොඳම ධාවක දැනටමත් ස්ථාපනය කර ඇත message if the drivers are already updated.
6. Exit the window and පද්ධතිය නැවත ආරම්භ ඔබේ පරිගණකය.
කියවන්න: මෙම උපාංගය වෙනත් යෙදුම් ශබ්ද දෝෂයක් මගින් භාවිතා කරන බව නිවැරදි කරන්න
Option II: Rollback Drivers
1. As you did earlier, open උපාංග කළමනාකරු සහ පුළුල් කරන්න කැමරා කොටස.
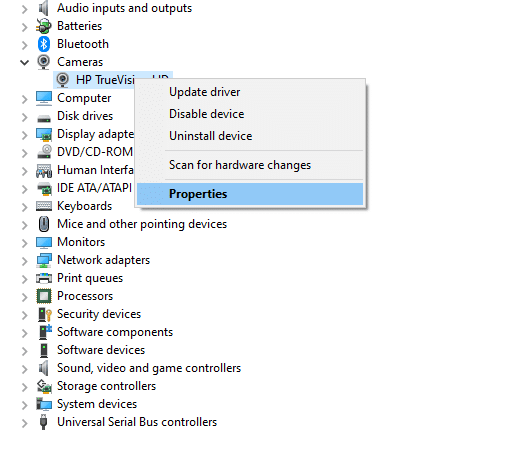
2. දකුණු-ක්ලික් කරන්න රියදුරු තෝරන්න දේපළ විකල්පය.
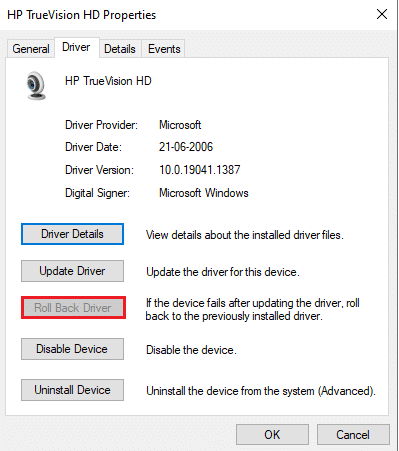
3. වෙත මාරු වන්න ධාවක පටිත්ත ක්ලික් කරන්න නැවත ධාවනය කරන්න.
4. මත ක්ලික් කරන්න OK වෙනස්කම් සුරැකීමට.
5. අවසාන වශයෙන්, ක්ලික් කරන්න ඔව් in the prompt and නැවත ආරම්භ your computer. Now, you can access your camera.
කියවන්න: උපාංග ධාවකයක් යනු කුමක්ද? එය වැඩ කරන්නේ කෙසේද?
ක්රමය 9: යෙදුම් යාවත්කාලීන කරන්න
You must make sure whether all the applications associated with the Microsoft Store are updated to its latest version. This will ensure if all the inter related apps are up to its latest version thereby fixing camera used by another app problem. Follow the steps as instructed.
1. වර්ගය මයික්රොසොෆ්ට් වෙළඳසැල සෙවුම් මෙනුවේ සහ ක්ලික් කරන්න විවෘත.
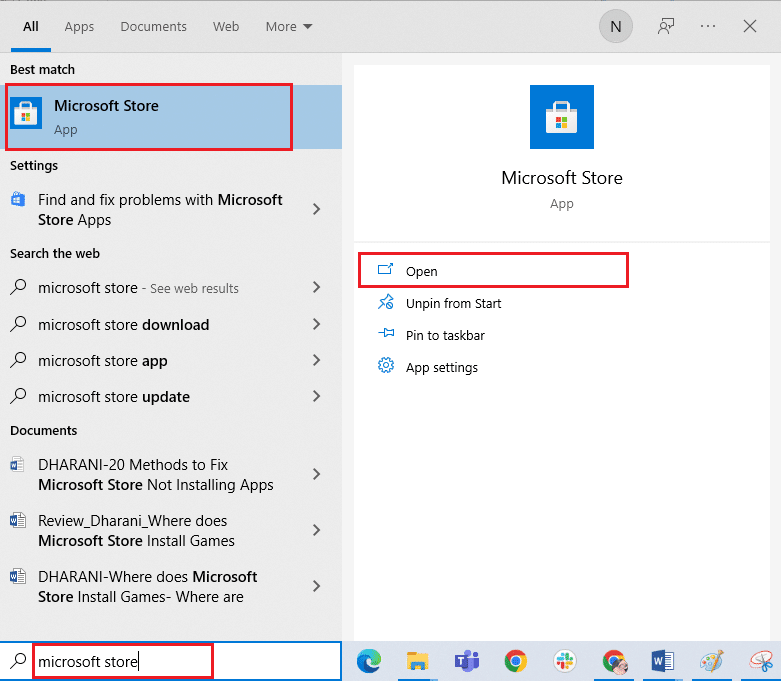
2. ඊළඟට මයික්රොසොෆ්ට් වෙළඳසැල කවුළුව, මත ක්ලික් කරන්න පුස්තකාලය පෙන්වා ඇති පරිදි නිරූපකය.
![]()
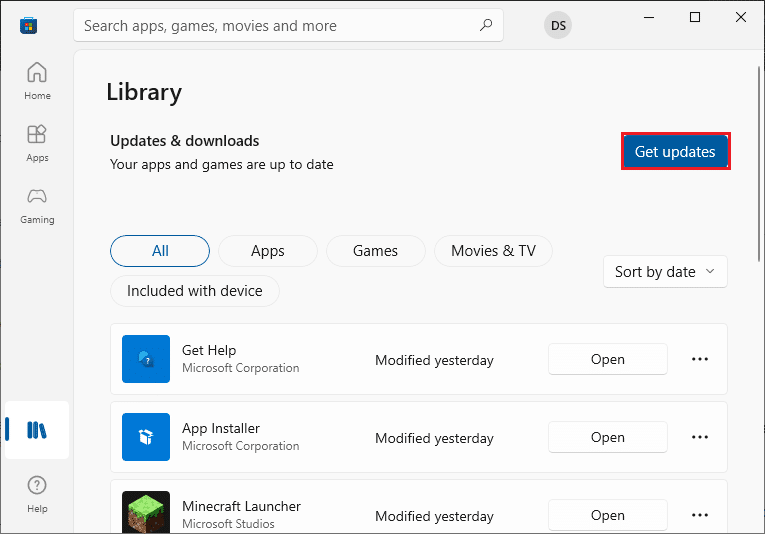
3. දැන්, ක්ලික් කරන්න යාවත්කාලීන ලබා ගන්න පෙන්වා ඇති පරිදි බොත්තම.
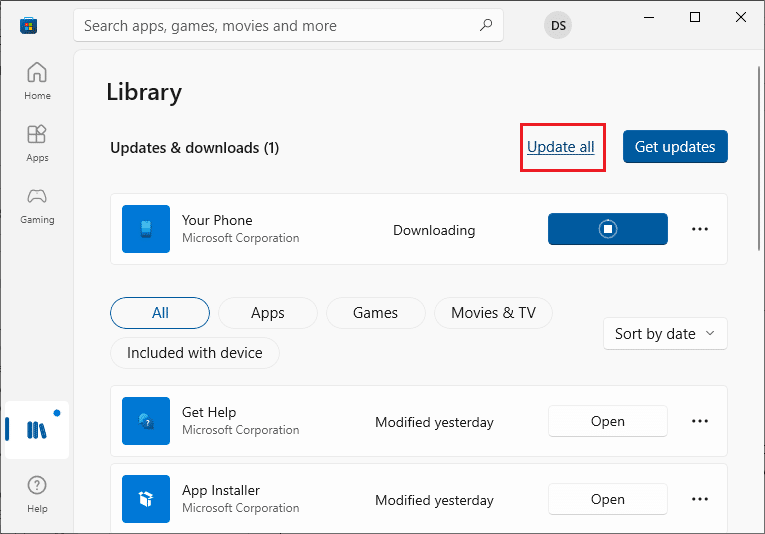
4. ඊළඟට, ක්ලික් කරන්න සියල්ල යාවත්කාලීන කරන්න බොත්තම.
5. ලැබෙන තුරු ඉන්න ඔබගේ යෙදුම් සහ ක්රීඩා යාවත්කාලීන වේ විමසුම.
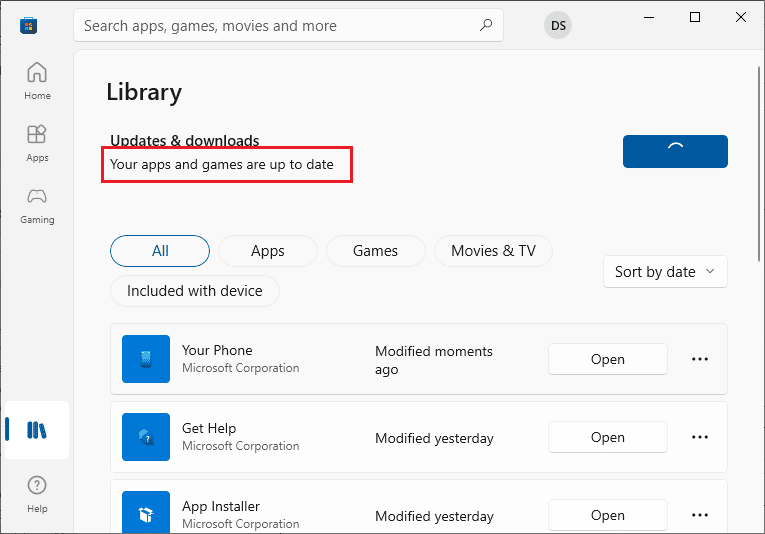
After updating the apps, check if you have fixed the problem.
ක්රමය 10: ගැටළු සහිත යෙදුම් නැවත ස්ථාපනය කරන්න
For app related problems that are causing you camera is being used by another application issue, you have no other options than to reinstall them. Here are few instructions to reinstall problematic applications in Microsoft Store.
සටහන: මෙම මාර්ගෝපදේශය තුළ, Zoom උදාහරණයක් ලෙස ගෙන ඇත.
1. වර්ගය පාලන පුවරුව සෙවුම් මෙනුවේ සහ ක්ලික් කරන්න විවෘත.
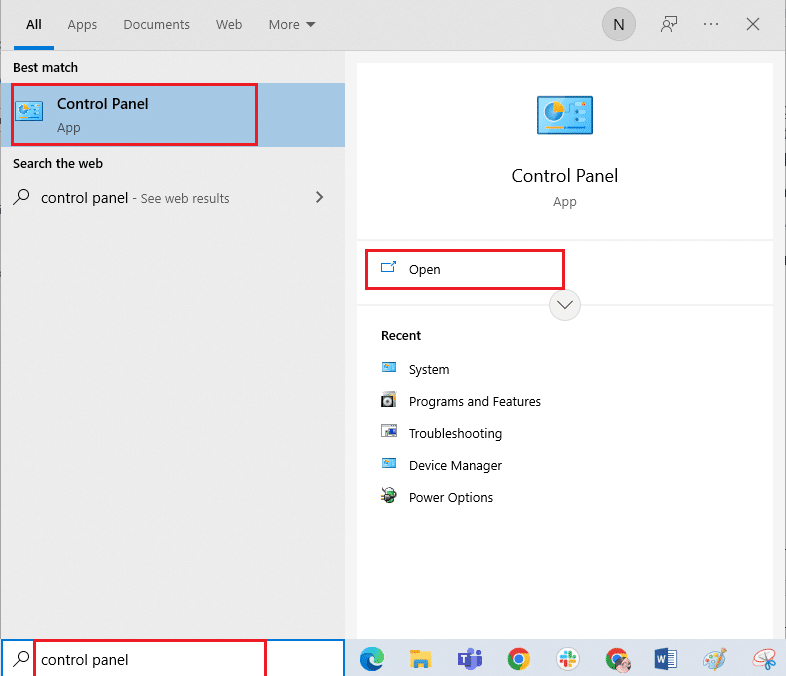
2. සකසන්න > විශාල අයිකන මගින් බලන්න, ඉන්පසු ක්ලික් කරන්න වැඩසටහන් හා විශේෂාංග විකල්පය.
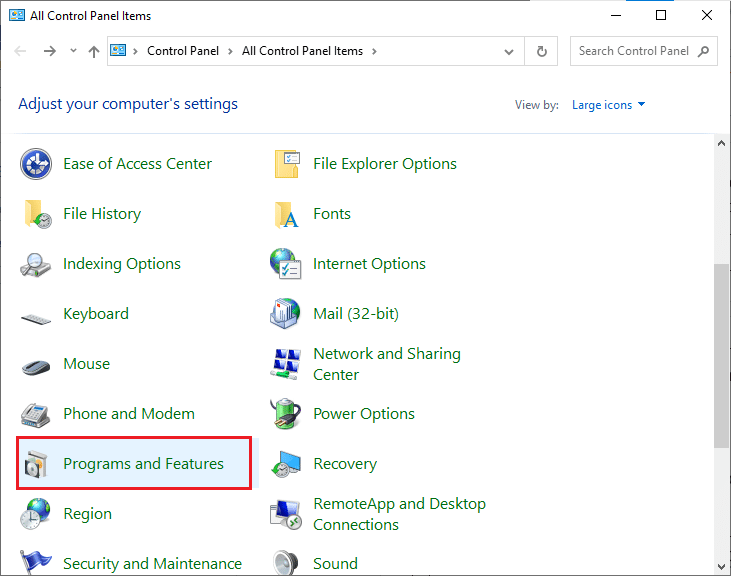
3. දැන්, ක්ලික් කරන්න Zoom තෝරන්න අස්ථාපනය කරන්න විකල්පය.
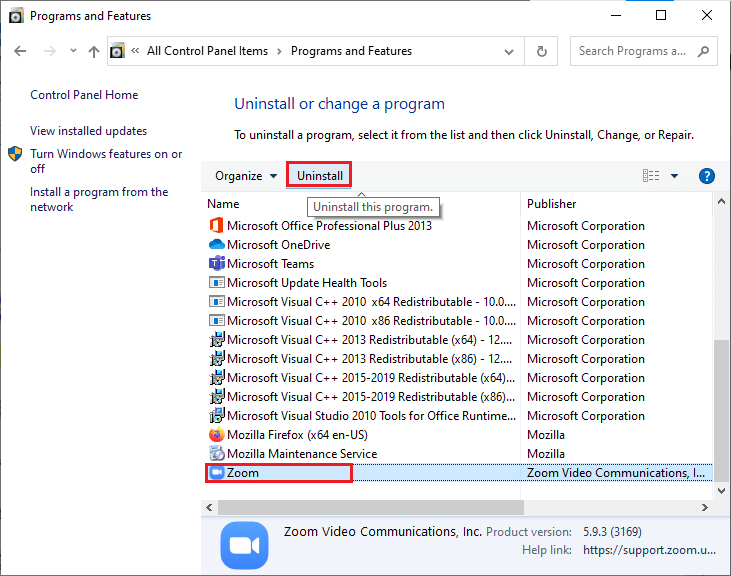
4. විමසුම ඇත්නම් තහවුරු කරන්න සහ පද්ධතිය නැවත ආරම්භ යෙදුම සම්පූර්ණයෙන්ම අස්ථාපනය කිරීමෙන් පසු ඔබේ පරිගණකය.
5. Download Zoom from the නිල වෙබ් අඩවිය.

6. දැන්, සංචාලනය කරන්න මගේ බාගැනීම් දුවන්න ZoomInstaller setup file. Wait until the app gets installed on your PC. Now, you can access the camera in the newly installed app.
කියවන්න: කණ්ඩායම්වල ක්රියා නොකරන කැමරාව නිවැරදි කරන්න
ක්රමය 11: කැමරාව නැවත ලියාපදිංචි කරන්න
If none of the above-discussed methods have helped you, then have a try to re-register your camera as instructed below. There are two methods to implement the task.
විකල්ප I: Windows PowerShell හරහා
1. වර්ගය PowerShell සෙවුම් තීරුවේ සහ ක්ලික් කරන්න පරිපාලක ලෙස ක්රියාත්මක වන්න පෙන්වා ඇති පරිදි.
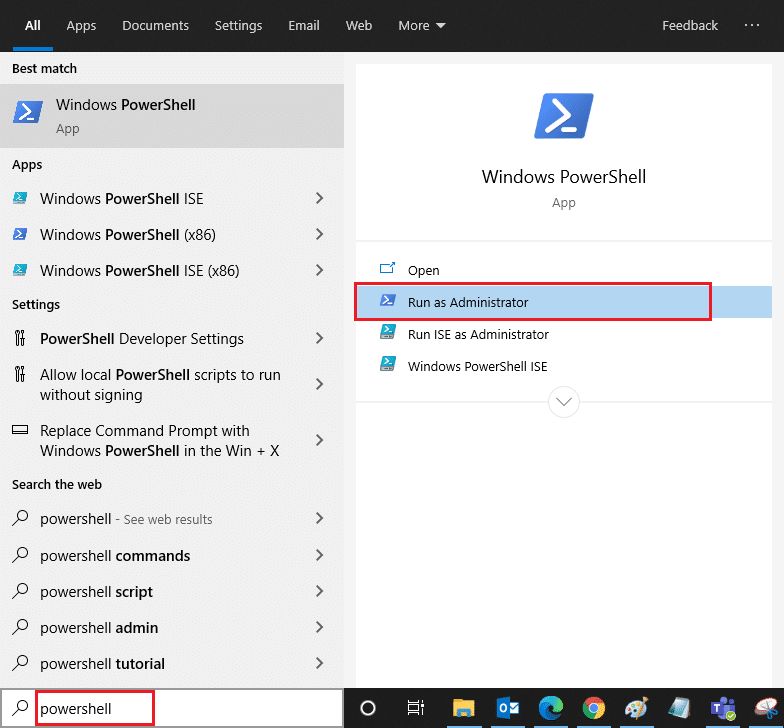
2. Then, type the following command and hit යතුර ඇතුළත් කරන්න.
Get-AppxPackage -allusers Microsoft.WindowsCamera | {Add-AppxPackage -DisableDevelopmentMode -Register "$($_.InstallLocation)AppXManifest.xml"} වෙත පිවිසෙන්න
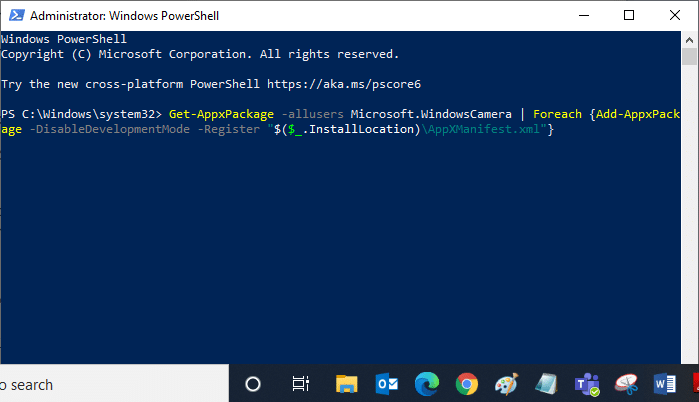
3. Wait until the common execution is successful and check if you have fixed camera in use issue .
විකල්ප II: උපාංග කළමනාකරු හරහා
1. විවෘත උපාංග කළමනාකරු වින්ඩෝස් සෙවුම් තීරුවෙන්.
2. දැන්, පුළුල් කරන්න කැමරා එය මත දෙවරක් ක්ලික් කිරීමෙන් කොටස.
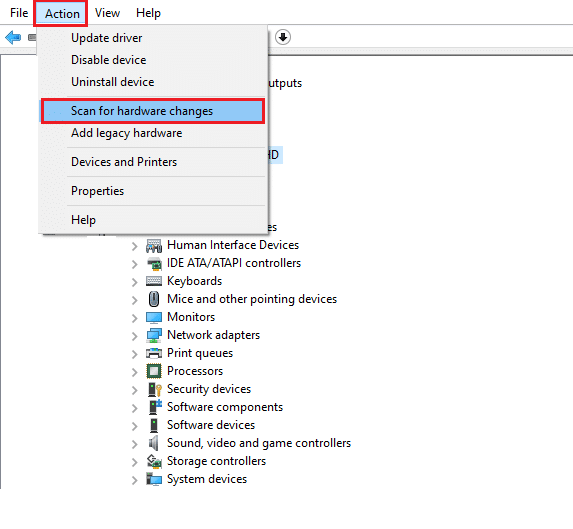
3. Then, right-click on the camera driver (e.g. HP TrueVision HD) සහ තෝරන්න උපාංගය අස්ථාපනය කරන්න විකල්පය.

4. දැන්, වෙත මාරු වන්න කටයුතු පටිත්ත සහ තෝරන්න දෘඩාංග වෙනස්කම් සඳහා ස්කෑන් විකල්පය.
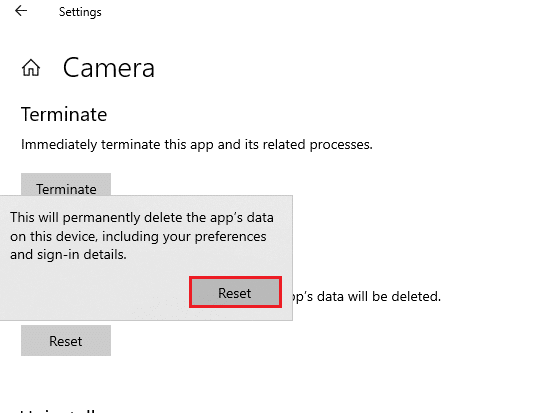
ක්රමය 12: කැමරා යෙදුම යළි පිහිටුවන්න
You can also try resetting your camera application to fix camera used by another app issue. Follow as instructed below
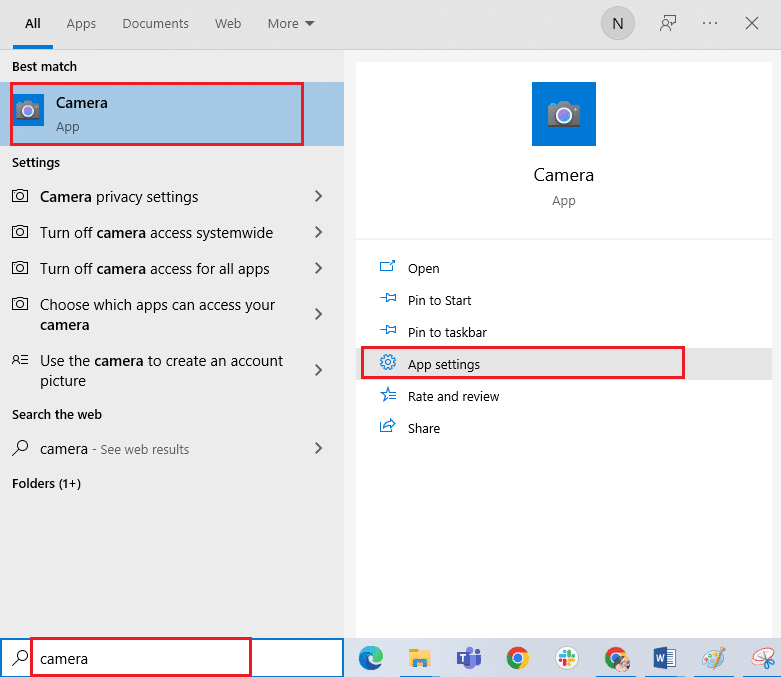
1. පහර දෙන්න වින්ඩෝස් යතුරවර්ගය කැමරාව, සහ ක්ලික් කරන්න යෙදුම් සැකසුම්.
2. ඉන්පසු, ක්ලික් කරන්න නැවත සකසන්න උද්දීපනය කර ඇති පරිදි විකල්පය.
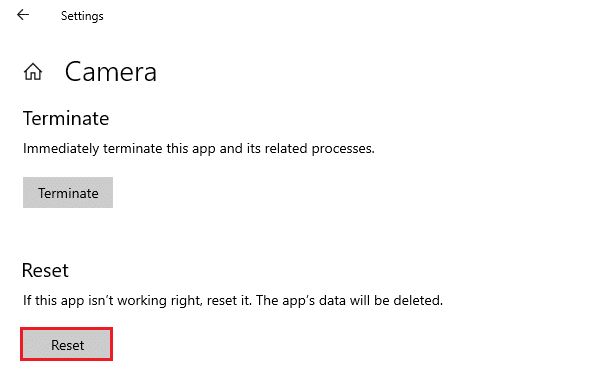
3. ඊළඟට, ක්ලික් කිරීමෙන් ඕනෑම විමසුමක් තහවුරු කරන්න නැවත සකසන්න.
කියවන්න: Windows 10 හි හඳුනා නොගත් ලැප්ටොප් කැමරාව නිවැරදි කරන්න
ක්රමය 13: පද්ධති ප්රතිෂ් .ාපනය සිදු කරන්න
If there are any incompatible Windows updates on your computer, your PC will not work as usual it does. So, restore your computer to a state whether everything was working fine. Here are some instructions to restore your PC. To do so, follow our guide on How to use System Restore on Windows 10 and implement the instructions as demonstrated.
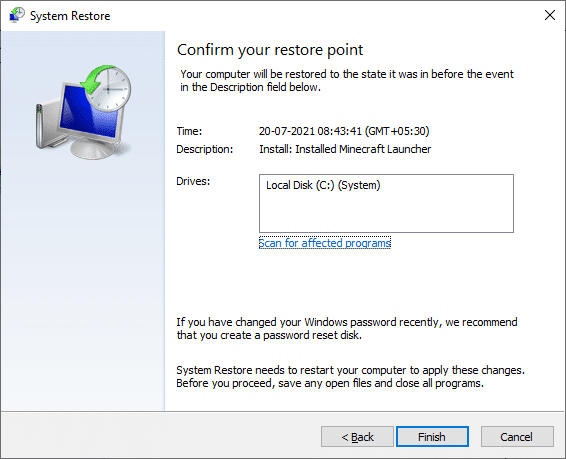
ඔබගේ Windows 10 පරිගණකය ප්රතිසාධනය කිරීමෙන් පසු, ඔබගේ කැමරාව භාවිතා කළ හැකිදැයි පරීක්ෂා කරන්න.
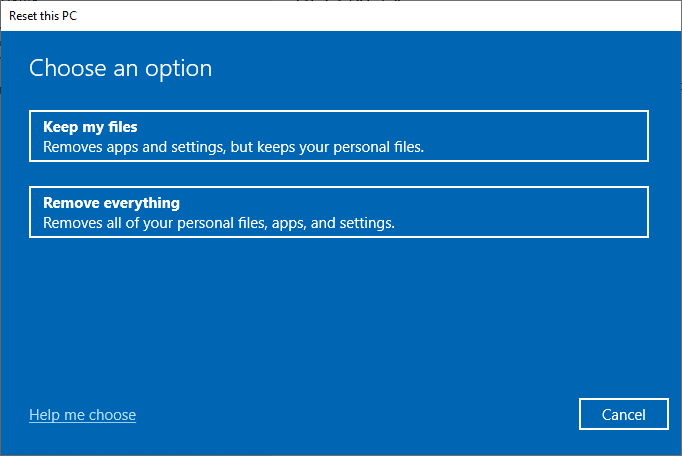
Method 14: Clean Install Windows 10
If none of the methods have helped you fix the said issue, then you have to clean install your Windows Operating System. To clean boot your computer, implement the steps as instructed in our guide to do a Clean Install of Windows 10
නිර්දේශ:
It would be really frustrating not being able to access your camera in the middle of the meetings, but now you would have fixed භාවිතයේ ඇති කැමරාව by another app issue in Windows 10. Keep visiting our page for more cool tips & tricks and leave your comments below. Also, if you have any queries/suggestions regarding this article, then feel free to drop them in the comments section.