වින්ඩෝස් පරිගණකය රූපවාහිනියට සම්බන්ධ නොවන බව නිවැරදි කරන්න

The computer is connected to a Smart TV using an HDMI cable. Using HDMI, you can have a home theatre setup by connecting an HDTV or video projector to a computer. This cable will help in connecting to components for both audio and video. However, users have reported that sometimes computers do not recognize TV. If you are facing your PC won’t connect to TV issue, then you are in the right place. This article on how to fix computer won’t connect to TV issue will resolve the issue.
How to Fix Windows 10 PC Won’t Connect to TV HDMI
Whenever an external device is connected to the computer, Windows 10 sets the device ready to work with that device. For instance, when you connect a pen drive, you will see a prompt for File Explorer to run it. The process is similar when you connect a TV. If your computer fails to recognize the TV, then follow any of the methods below to resolve the issue.
Why Computer won’t Connect to TV?
Below are some of the reasons why your PC won’t connect to TV:
- යල් පැන ගිය රියදුරු
- Issues with the HDMI cable
- Issues with HDMI port
මූලික දෝශ නිරාකරණ ඉඟි
Before trying advanced troubleshooting methods, let us try some of the basic troubleshooting methods:
- Loosen up the HDMI coil if it is coiled tightly.
- Since HDMI is sensitive, check whether the pins on the HDMI are damaged.
- Use another HDMI cable.
- වෙනත් සම්බන්ධතා ඉවත් කරන්න of the TV using the HDMI hub or switch.
- උත්සාහ කරන්න connect HDMI cable directly to the TV.
- උත්සාහ කරන්න connect to another HDMI port if your TV has multiple ports.
- Discharge the computer by removing AC adapters, power cables, and peripheral devices.
- Disconnect all ports and restart your computer and TV. Then, reconnect them.
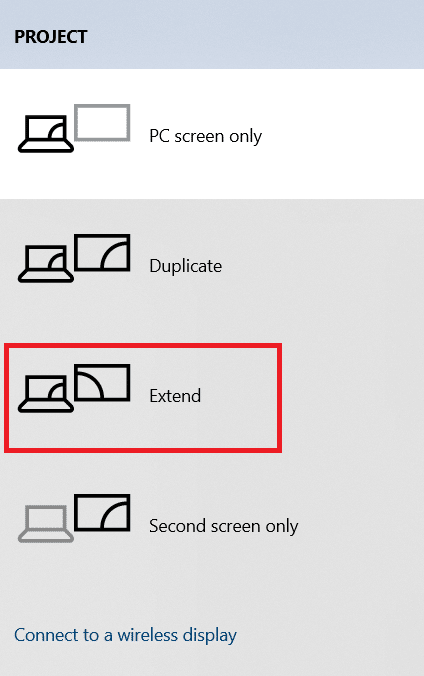
Method 1: Enable Projection Mode
If Windows 10 has failed to automatically detect the connection to the TV, then you can enable the projection mode:
1. මුද්රණය කරන්න වින්ඩෝස් + පී යතුරු simultaneously on the keyboard.
2. තෝරන්න දිගු කරන්න to display your computer screen on the TV.
සටහන: ඔබට තෝරා ගත හැකිය අනුපිටපත්.
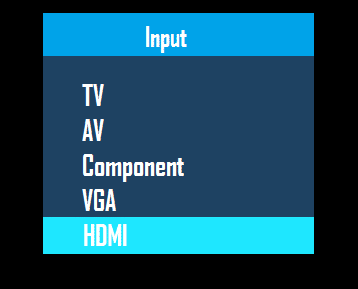
Method 2: Select Input Source on TV
If a TV has more than one display port, it might not detect the incoming video signal automatically and cause Windows 10 DisplayPort Not Working issue and cause Windows 10 DisplayPort Not Working issue. In this case, you can select input on the TV. Follow the steps below:
1. ඔබන්න Input Source menu බොත්තම රූපවාහිනී දුරස්ථ.
2. තෝරන්න HDMI. This will display the screen of the computer.
කියවන්න: How to Convert Coaxial Cable to HDMI
Method 3: Run Hardware and Devices Troubleshooter
If there is any issue with the PC hardware, running the troubleshooter will automatically diagnose the problems and fix them. Follow the steps written below to run the Hardware and Devices Troubleshooter to fix Computer won’t Connect to TV issue.
1. ඔබන්න හි Windows සඳහා ප්රධානවර්ගය කමාන්ඩ් ප්රොම්ප් ක්ලික් කරන්න පරිපාලක ලෙස ධාවනය කරන්න.
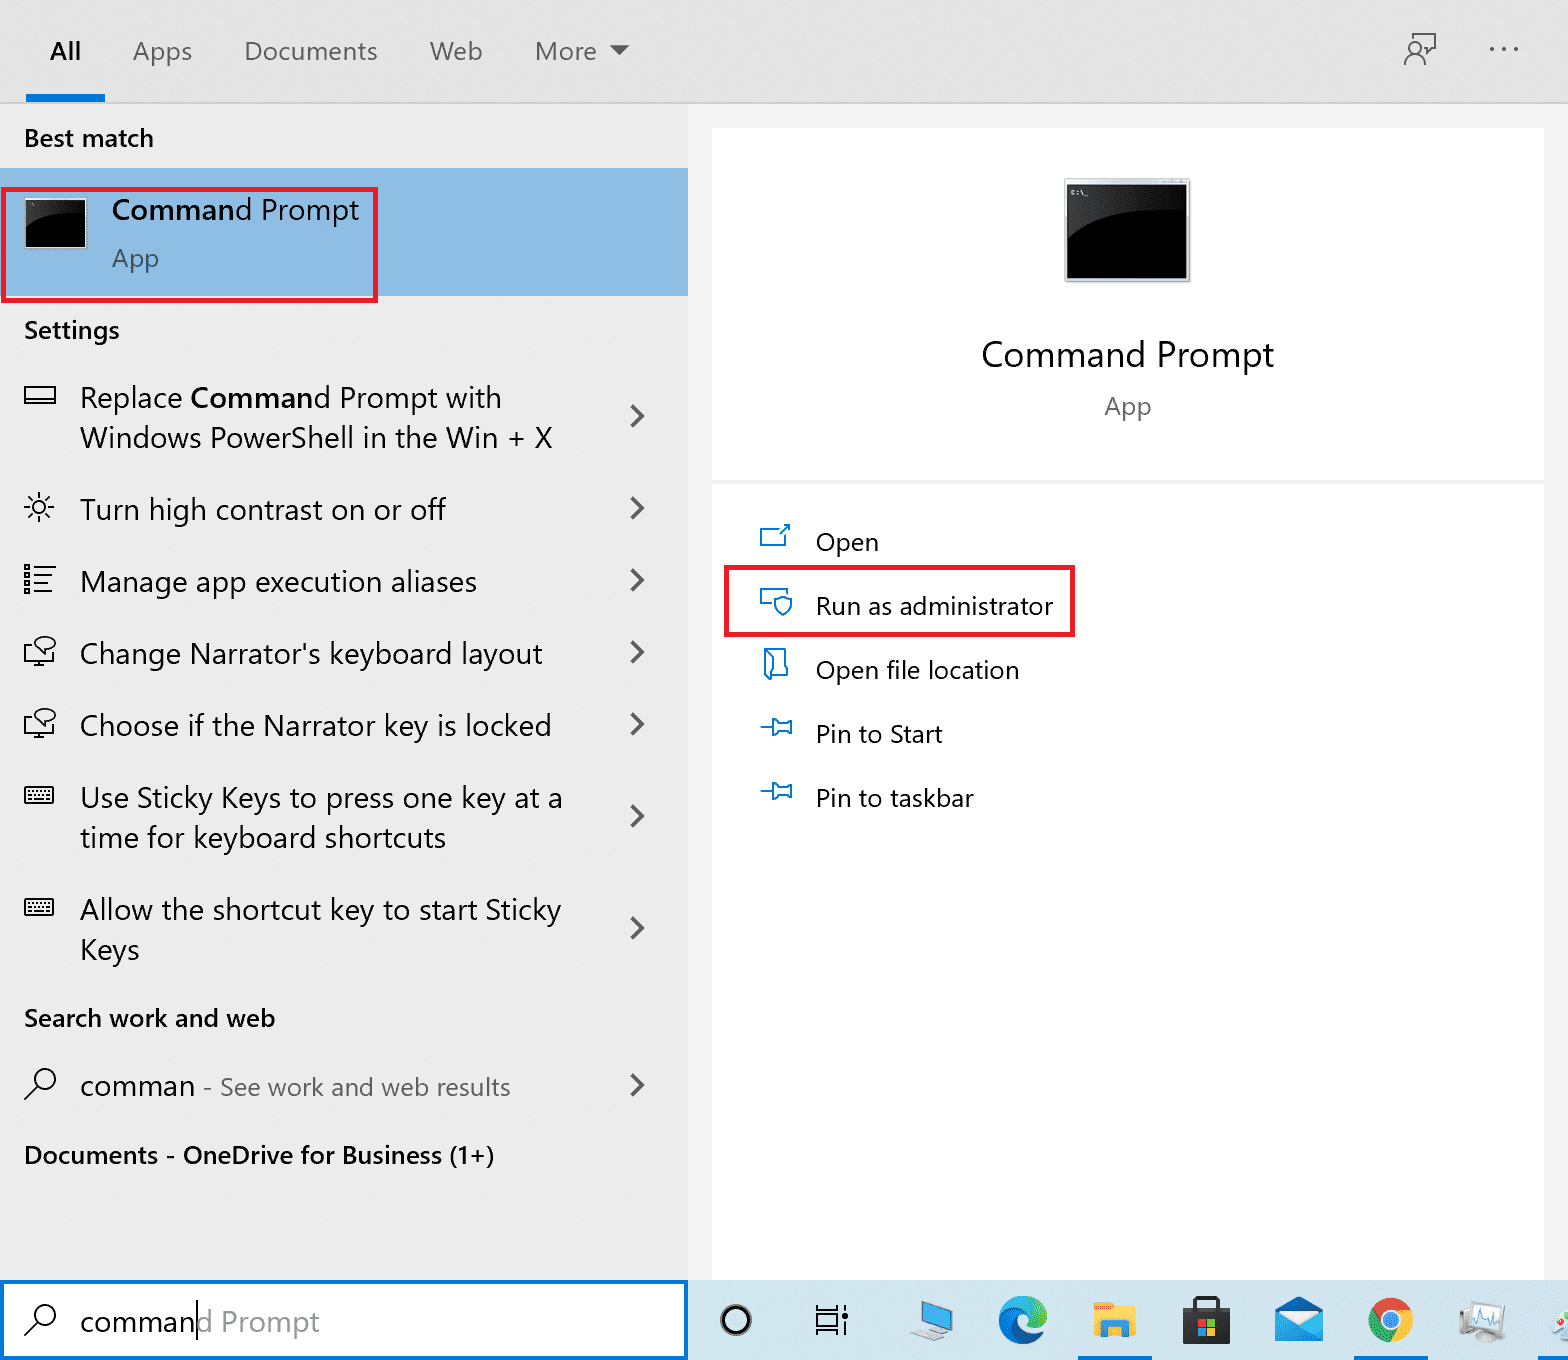
2. ක්ලික් කරන්න ඔව් තුළ පරිශීලක ගිණුම් පාලනය විමසුම.
3. විධානය ටයිප් කරන්න msdt.exe -id DeviceDiagnostic සහ මාධ්ය ඇතුලත් කරන්න.
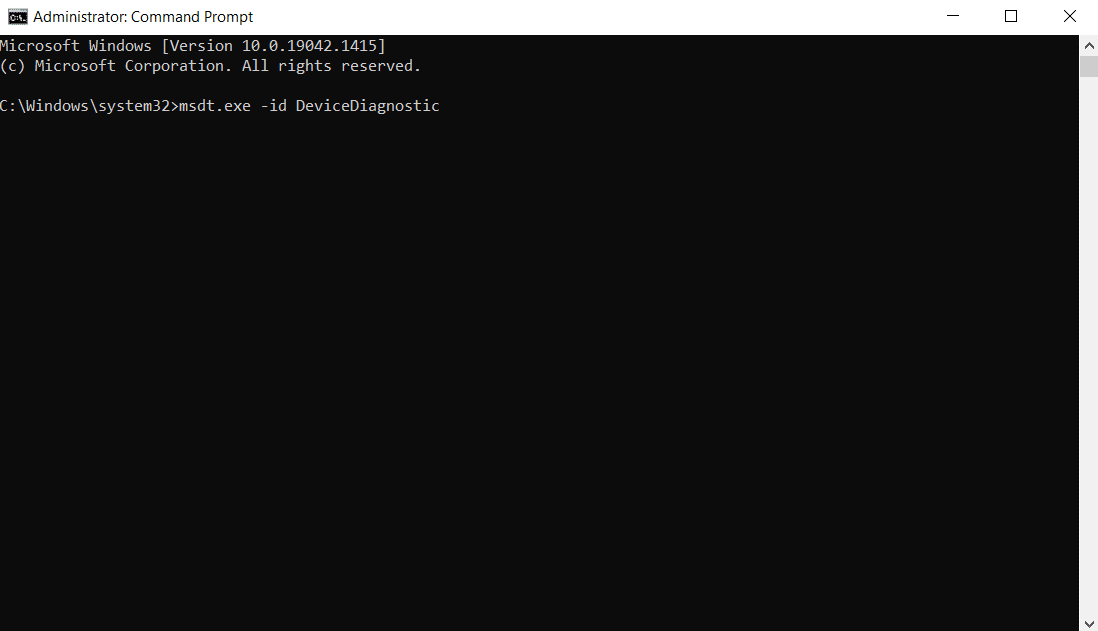
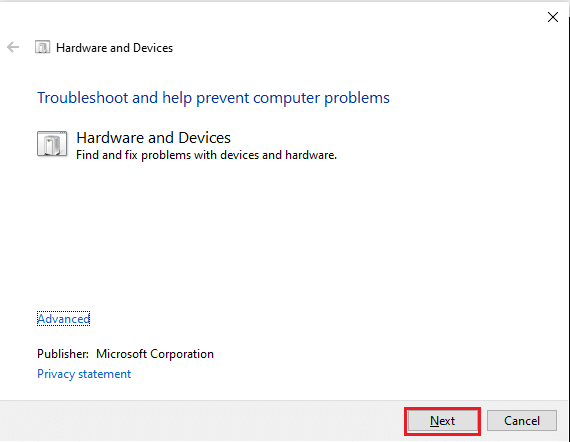
4. මත ක්ලික් කරන්න උසස් විකල්පය, පෙන්වා ඇති පරිදි.

5. පරීක්ෂා කරන්න අළුත්වැඩියා ස්වයංක්රීයව යොදන්න විකල්පය මත ක්ලික් කරන්න ඊලඟ.
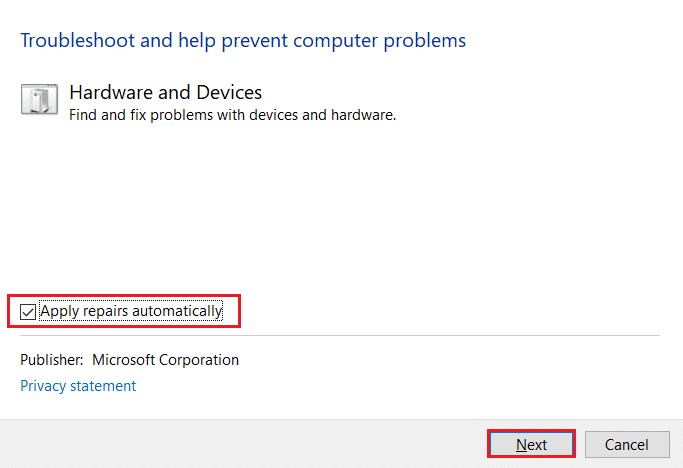
6. මත ක්ලික් කරන්න ඊලඟ ඉදිරියට යන්න.
7. The troubleshooter will now run. If problems are detected, it will display two options:
- මෙම දෝෂය භාවිතා කරන්න
- Skip this fix
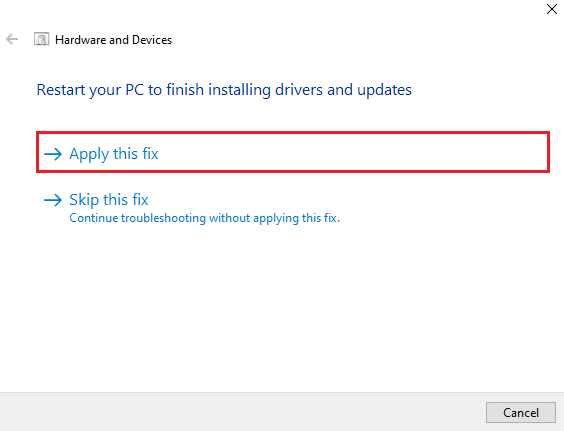
8. මෙන්න, ක්ලික් කරන්න මෙම දෝෂය භාවිතා කරන්න, සහ නැවත ආරම්භ ඔබේ පරිගණකය.
If the issue occurs on your PC even after running the troubleshooter, then you can try updating the video driver.
ක්රමය 4: සංදර්ශක ධාවකය යාවත්කාලීන කරන්න
Outdated or damaged video drivers can also be one of the reasons behind PC won’t connect to TV issues. Follow the steps below:
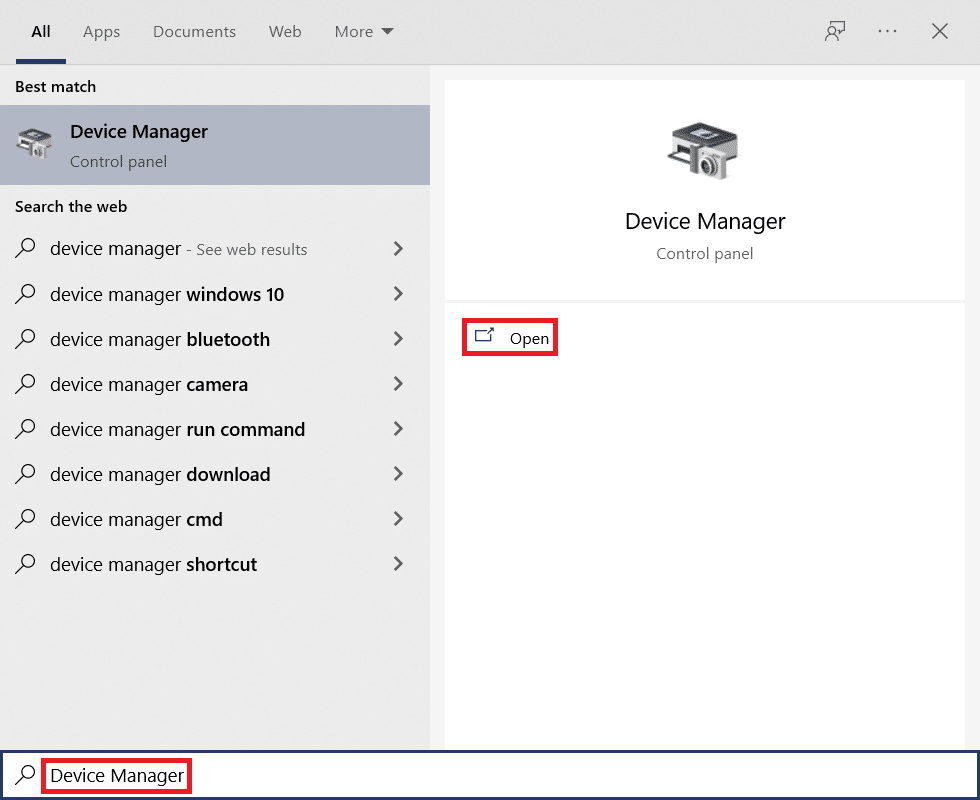
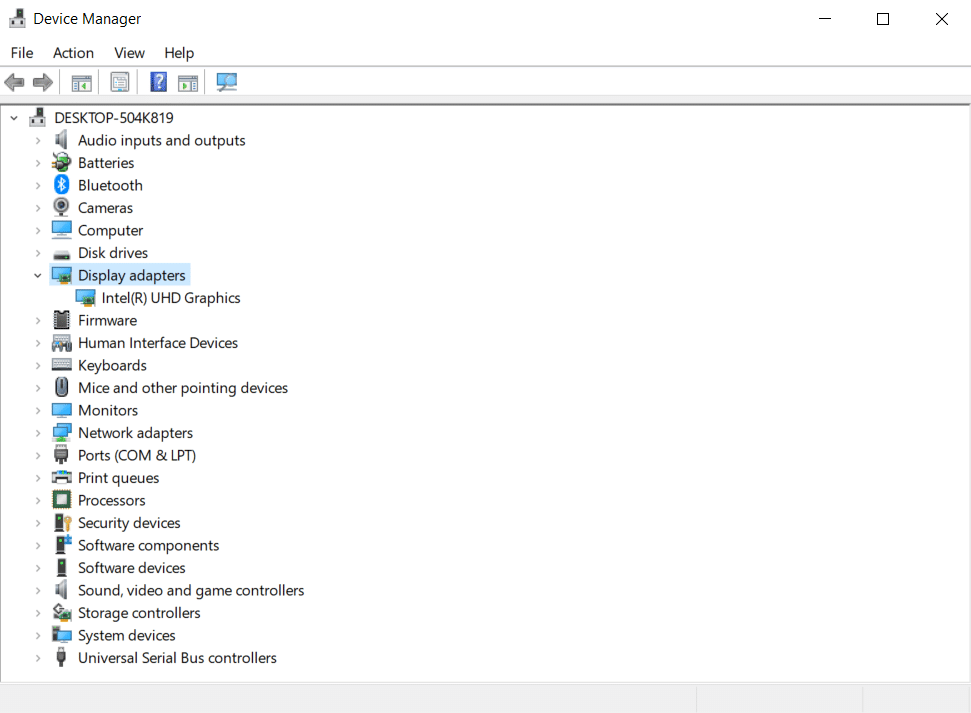
1. මත ක්ලික් කරන්න ආරම්භයක් සහ වර්ගය උපාංග කළමනාකරු. මත ක්ලික් කරන්න විවෘත.
2. දෙවරක් ක්ලික් කරන්න ඇඩප්ටර පෙන්වන්න එය පුළුල් කිරීමට.
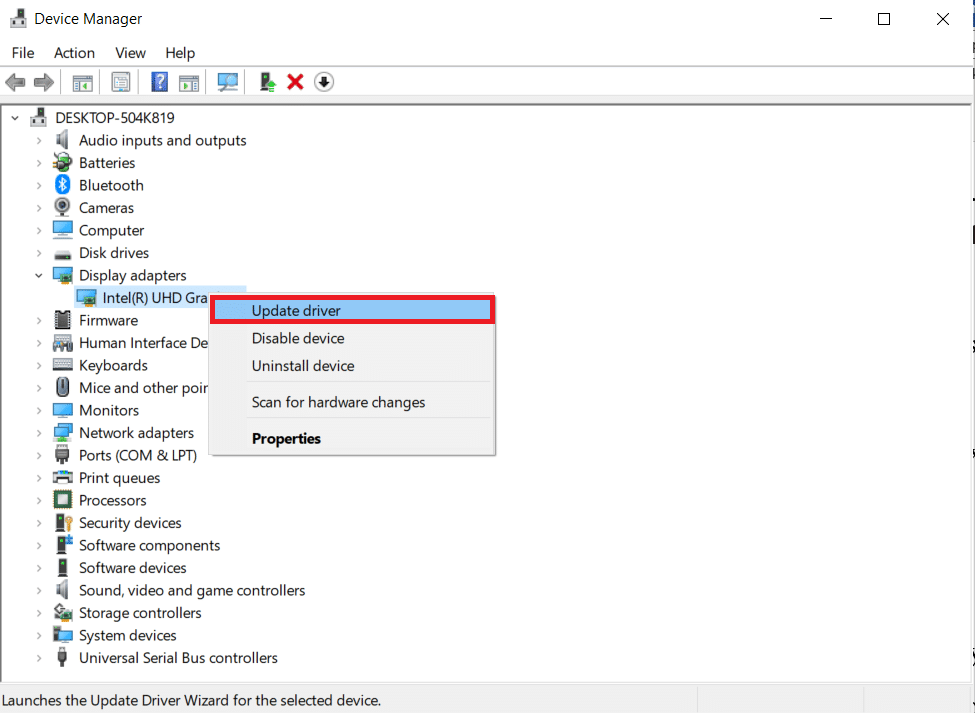
3. ඔබගේ මත දකුණු-ක්ලික් කරන්න සංදර්ශක ඇඩප්ටර තෝරන්න ධාවක යාවත්කාලීන කරන්න.
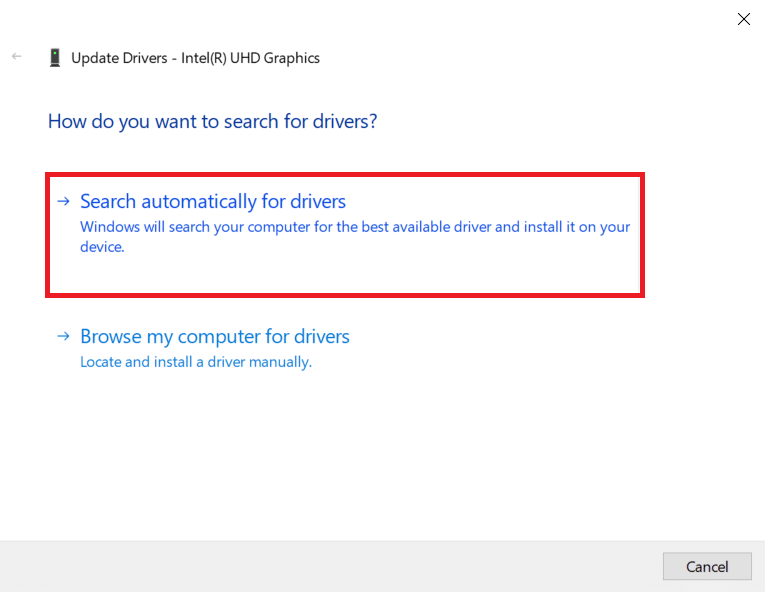
4. ඊළඟට, තෝරන්න ධාවක සඳහා ස්වයංක්රීයව සොයන්න.
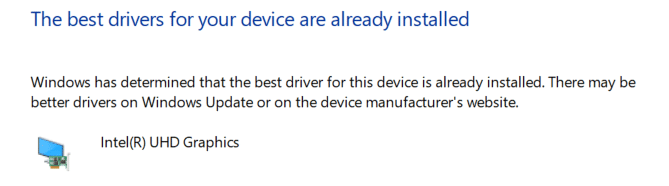
5A. ධාවක දැනටමත් යාවත්කාලීන කර ඇත්නම්, එය පෙන්වයි ඔබගේ උපාංගය සඳහා හොඳම ධාවක දැනටමත් ස්ථාපනය කර ඇත.
5B. If any updates are available then, Windows will install them automatically.
6. After this process, නැවත ආරම්භ ඔබේ පරිගණකය.
කියවන්න: Smart TV හි Kodi ස්ථාපනය කරන්නේ කෙසේද?
Method 5: Reinstall Driver in Compatibility Mode
If you face PC won’t connect to TV issue, then you have to use the driver in compatibility mode for a previous Windows version. Follow the steps below.
1. විවෘත උපාංග කළමනාකරු සහ යන්න ඇඩප්ටර පෙන්වන්න හි පෙන්වා ඇති පරිදි 4 ක්රමය.
2. දකුණු-ක්ලික් කරන්න video device තෝරන්න උපාංගය අස්ථාපනය කරන්න.

3. පරීක්ෂා කරන්න මෙම උපාංගය සඳහා ධාවක මෘදුකාංගය මකන්න option. Then, click on අස්ථාපනය කරන්න button in the confirmation prompt.
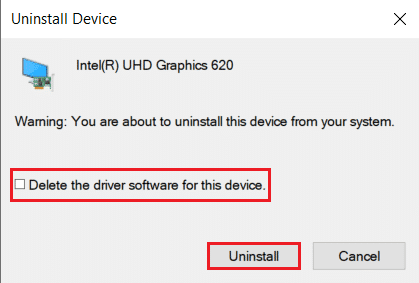
4. ඔබේ පරිගණකය නැවත ආරම්භ කරන්න after uninstalling the driver.
5. Next, download the appropriate driver from the නිෂ්පාදකයාගේ වෙබ් අඩවිය.
සටහන: For example, visit ඉන්ටෙල් නිල වෙබ් අඩවිය to download the latest USB driver for ඉන්ටෙල් ග්රැෆික්ස්.
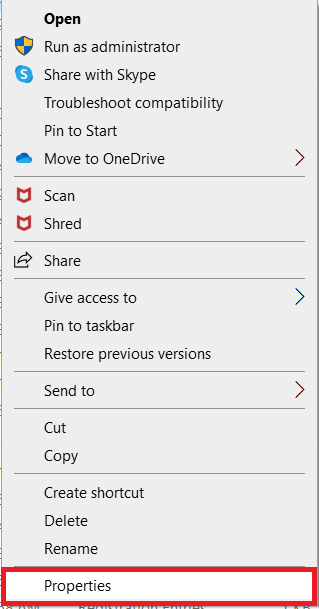
6. Once the file is downloaded, go to the download location and select the සැකසුම් ගොනුව.
7. දකුණු-ක්ලික් කරන්න .exe setup file and then select දේපළ මෙනුවෙන්.
8. දැන්, යන්න ගැළපුම ටැබය.
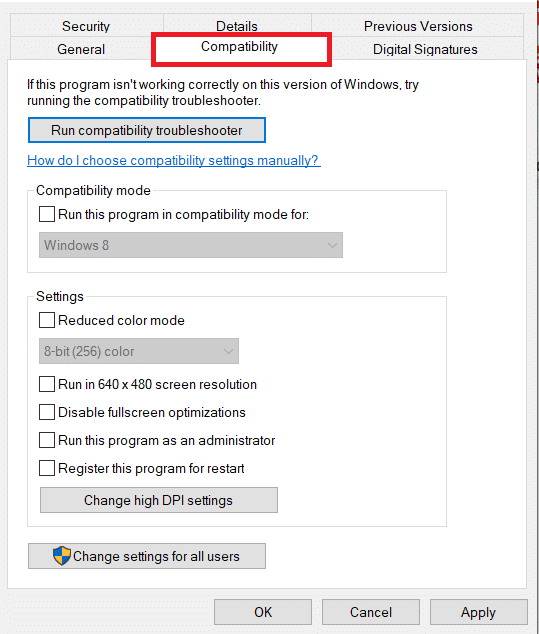
9. Next, check the box next to සඳහා මෙම වැඩසටහන අනුකූලතා ප්රකාරයේදී ක්රියාත්මක කරන්න.
10. From the drop-down menu, select a previous Windows OS version.
11. ක්ලික් කරන්න අදාළ ඊළගට OK වෙනස්කම් සුරැකීමට.

12. අවසාන වශයෙන්, ඔබේ පරිගණකය නැවත ආරම්භ කරන්න නැවතත්.
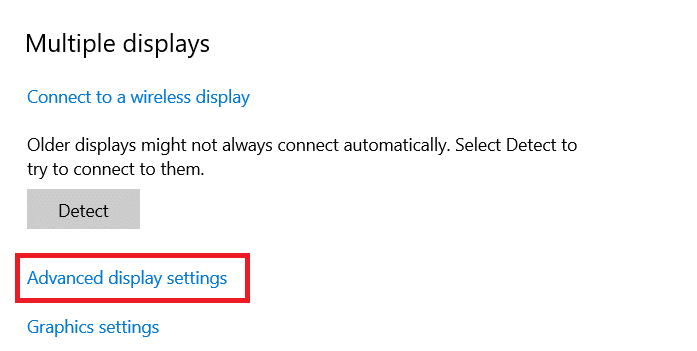
Method 6: Change Display Settings
Changing the display settings to the recommended settings will help resolve computer won’t connect to TV issue. Follow the steps below:
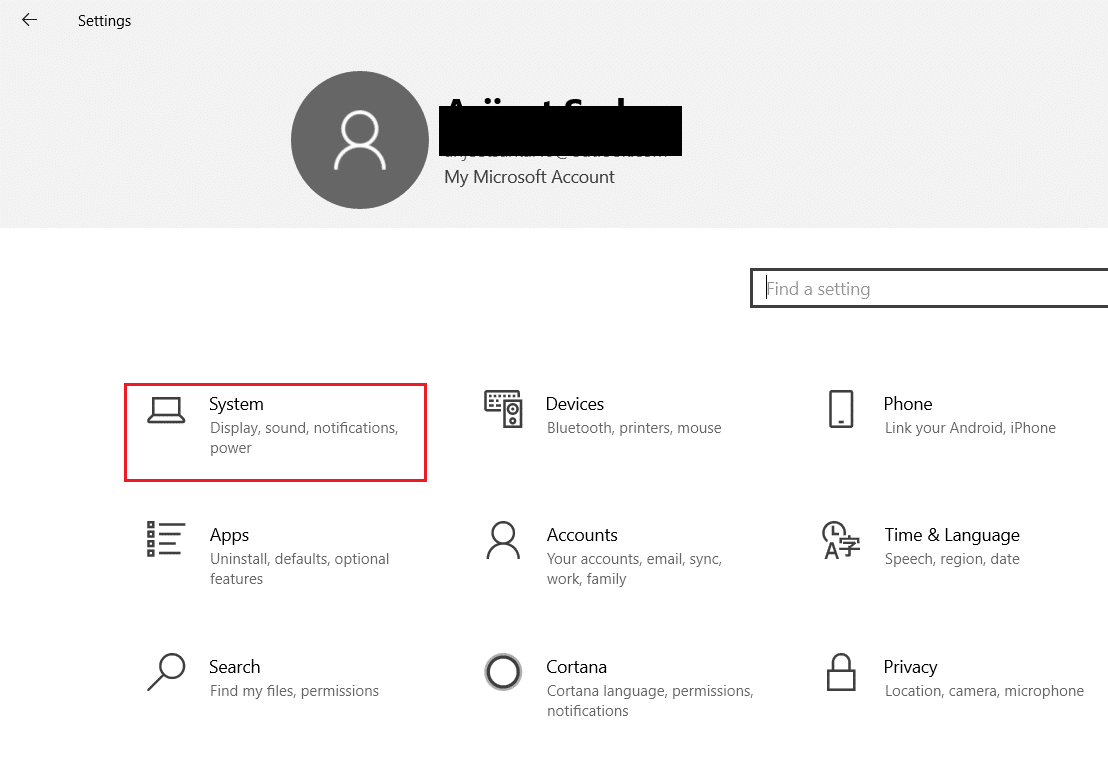
1. විවෘත සැකසුම් එබීමෙන් Windows + I යතුරු සමාන්තරව.
2. තෝරන්න පද්ධතිය සැකසුම්.
3. In the left-hand menu select ප්රදර්ශනය.
4. මෙන්න, සකසන්න නිර්දේශිත සඳහා විකල්ප පරිමාණය සහ පිරිසැලසුම, සහ විභේදනය පෙන්වන්න.

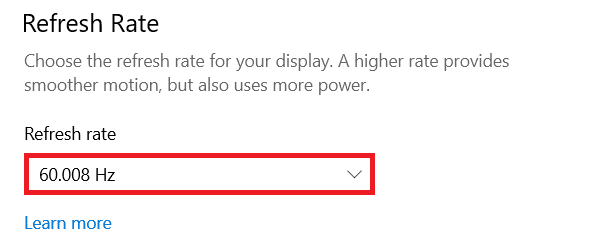
5. දැන්, ක්ලික් කරන්න උසස් දර්ශන සැකසුම්.
6. තෝරන්න recommended and required rate (උදා 60.008 Hz) යටතේ අනුපාතය refresh කරන්න.
කියවන්න: යූ ටියුබ් රූපවාහිනිය ක්රියා නොකිරීම පවුල් බෙදාගැනීම නිවැරදි කරන්න
Method 7: Perform Factory Reset on TV
If none of the methods above worked, then factory reset your TV to resolve your PC won’t connect to TV problem. Follow the given steps to perform factory reset on TV.
සටහන: The settings may vary depending on the manufacturer of the TV. Below settings and methods are based on the Samsung R series.
1. Press the Home button on the TV remote.
2. තෝරන්න සැකසුම්, එවිට සහාය වම් කවුළුව තුළ.
3. මෙන්න, තෝරන්න ස්වයං රෝග විනිශ්චය විකල්පය.
4. දැන්, තෝරන්න නැවත සකසන්න විකල්පය සහ ඇතුල් කරන්න PIN අංකය.
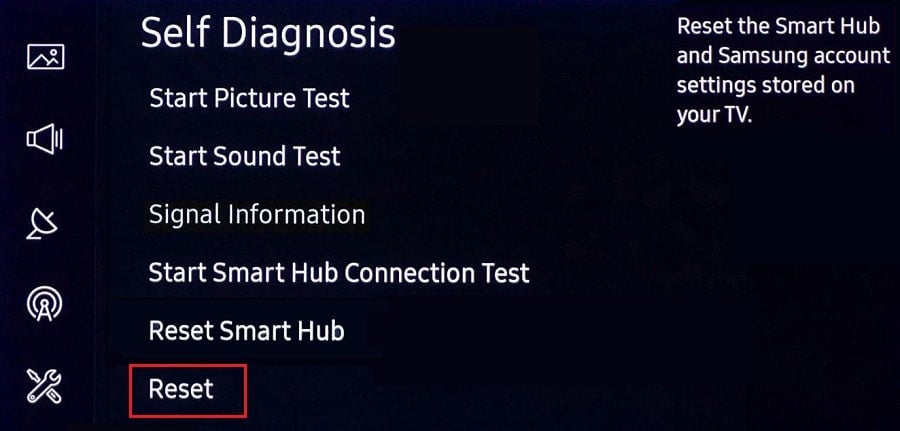
5. අවසාන වශයෙන්, තෝරන්න ඔව් තහවුරු කරන්න.
නිතර අසන ප්රශ්න (නිතර අසන ප්රශ්න)
Q1. How can I check whether my display output is working well?
Ans. සම්බන්ධ කිරීමෙන් පසු HDMI කේබලය, දකුණු-ක්ලික් කරන්න ඩෙස්ක්ටොප් තෝරන්න පුද්ගලීකරණය කරන්න. Here, you can see your ස්මාර්ට් TV as a second monitor.
Q2. Do I have to reset my PC to resolve the computer that did not recognize the TV issue?
පිළිතුර: නැත, there is no need to factory reset your PC. If none of the troubleshooting methods worked, then you can reset your Smart TV as a last resort.
Q3. What are the different ways to connect a PC to a TV?
Ans. You can connect your computer to the TV using HDMI cable, DVI or VGA, or Wi-Fi. Using Wi-Fi to connect your computer to TV depends on the manufacturer & TV model.
නිර්දේශ:
We hope our article was helpful and you were able to fix Windows PC won’t connect to TV issue was helpful to you. In case, you have any suggestions or queries regarding this article, feel free to reach out to us in the comment section below.