Omogočite ali onemogočite Credential Guard v sistemu Windows 10

Enable or Disable Credential Guard in Windows 10: Windows Credential Guard uses virtualization-based security to isolate secrets so that only privileged system software can access them. Unauthorized access to these secrets can lead to credential theft attacks, such as Pass-the-Hash or Pass-The-Ticket. Windows Credential Guard prevents these attacks by protecting NTLM password hashes, Kerberos Ticket Granting Tickets, and credentials stored by applications as domain credentials.
By enabling Windows Credential Guard the following features and solutions are provided:
Varnost strojne opreme
Varnost, ki temelji na virtualizaciji
Better protection against advanced persistent threats
Now you know the importance of the Credential Guard, you should definitely enable this for your system. So without wasting any time let’s see How to Enable or Disable Credential Guard in Windows 10 with the help of the below-listed tutorial.
Omogočite ali onemogočite Credential Guard v sistemu Windows 10
Ne pozabite ustvariti obnovitvene točke za vsak primer, če gre kaj narobe.
Method 1: Enable or Disable Credential Guard in Windows 10 using Group Policy Editor
Opomba: This method only works if you have Windows Pro, Education, or Enterprise Edtion. For Windows Home version users skip this method and follow the next one.
1. Pritisnite tipko Windows + R in nato vnesite regedit in pritisnite Enter, da se odpre Urejevalnik pravilnika skupine.

2. Pomaknite se na naslednjo pot:
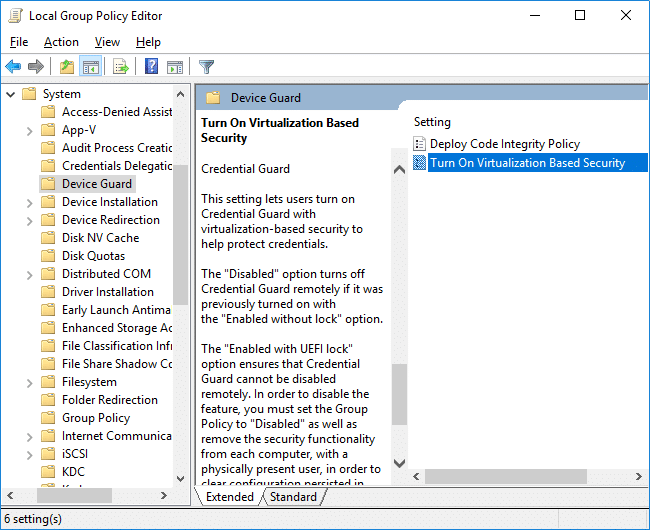
Computer Configuration > Administrative Templates > System > Device Guard
3. Prepričajte se, da ste izbrali Device Guard than in right window pane double-click on “Turn On Virtualization Based Security” politika.
4.In the Properties window of the above policy make sure to select Omogočeno.
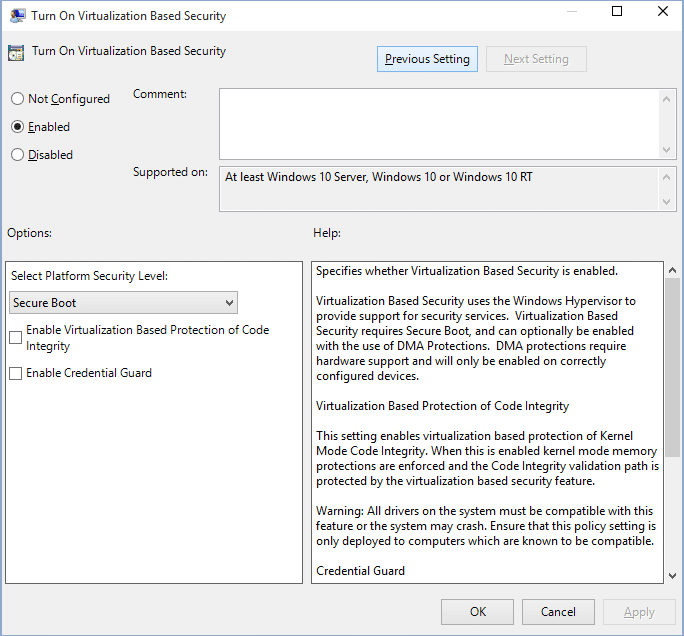
5.Now from the “Izberite Raven varnosti platforme” drop-down select Secure Boot or Secure Boot and DMA Zaščita.
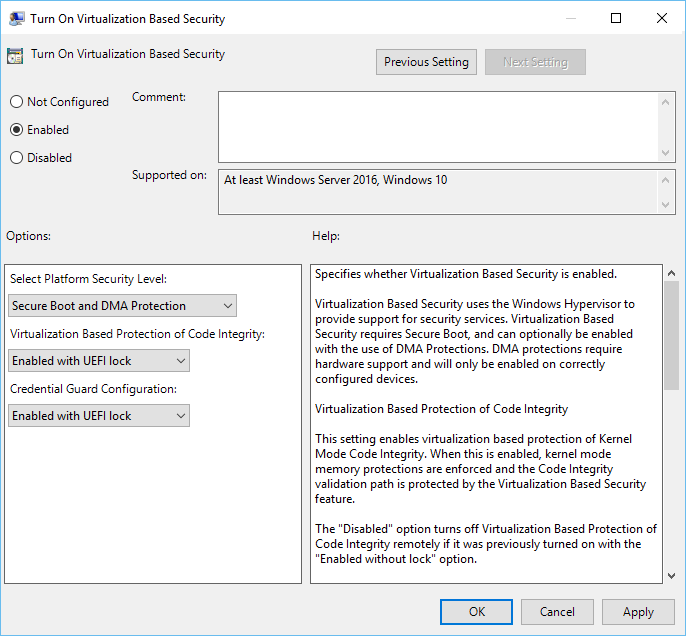
6.Next, from “Credential Guard Configuration” drop-down select Enabled with UEFI lock. If you want to turn off Credential Guard remotely, choose Enabled without lock instead of Enabled with UEFI lock.
7.Once finished, click Apply followed by OK.
8. Znova zaženite računalnik, da shranite spremembe.
Method 2: Enable or Disable Credential Guard in Windows 10 using Registry Editor
Credential Guard uses virtualization-based security features which have to be enabled first from Windows feature before you can enable or disable Credential Guard in Registry Editor. Make sure to only use one of the below-listed methods to enable virtualization-based security features.
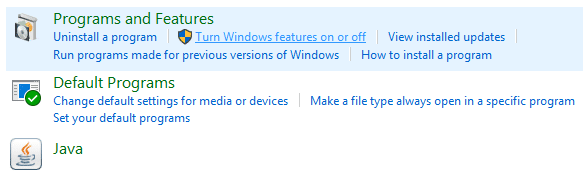
Dodajte varnostne funkcije, ki temeljijo na virtualizaciji, z uporabo programov in funkcij
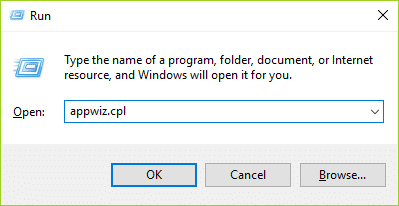
1. Pritisnite tipko Windows + R in nato vnesite appwiz.cpl in pritisnite Enter, da se odpre Program and Features.
2.From the left-hand window click on “Vklopite ali izklopite funkcije sistema Windows".
3.Find and expand Hyper-V then similarly expand Hyper-V Platform.
4.Under Hyper-V Platform kljukica "Hipervizor Hyper-V".
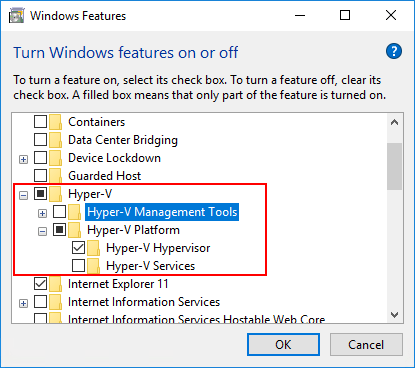
5.Now scroll down and checkmark “Isolated User Mode” in kliknite V redu.
Dodajte varnostne funkcije, ki temeljijo na virtualizaciji, v sliko brez povezave z uporabo DISM
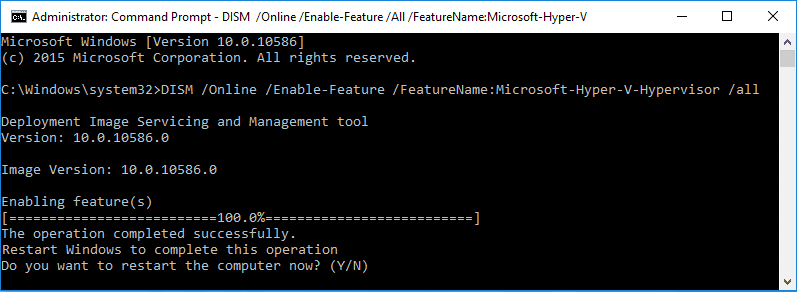
1.Pritisnite tipko Windows + X in nato izberite Ukazni poziv (Admin).

2.Type the following command into cmd to add the Hyper-V Hypervisor and hit Enter:
dism /image:<WIM file name> /Enable-Feature /FeatureName:Microsoft-Hyper-V-Hypervisor /all
OR
dism /Online /Enable-Feature:Microsoft-Hyper-V /All
3.Add the Isolated User Mode feature by running the following command:
dism /image:<WIM file name> /Enable-Feature /FeatureName:IsolatedUserMode
OR
dism /Online /Enable-Feature /FeatureName:IsolatedUserMode
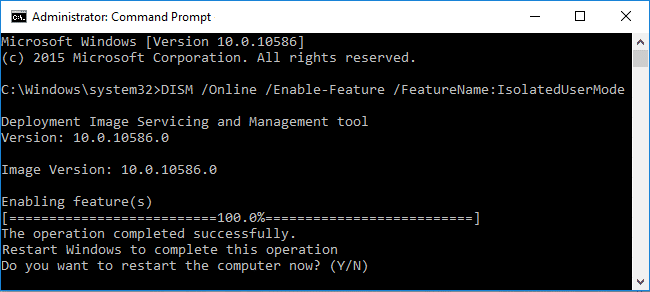
4.Once finished, you can close the command prompt.
Omogočite ali onemogočite Credential Guard v sistemu Windows 10
1. Pritisnite tipko Windows + R in nato vnesite regedit in pritisnite Enter, da se odpre Urejevalnik registra.
2. Pomaknite se do naslednjega registrskega ključa:
HKEY_LOCAL_MACHINESystemCurrentControlSetControlDeviceGuard
3. Desni klik na DeviceGuard nato izberite Novo > DWORD (32-bitna) vrednost.
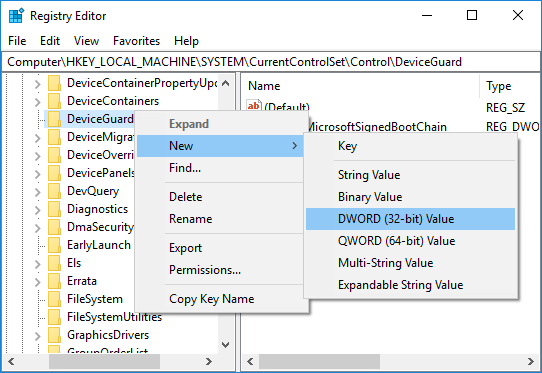
4. Poimenujte ta na novo ustvarjen DWORD kot Omogoči varnost, ki temelji na virtualizaciji in pritisnite Enter.
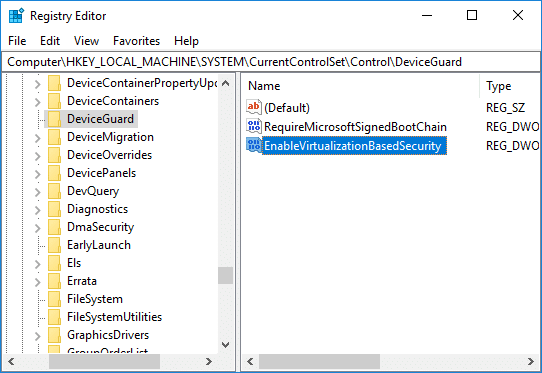
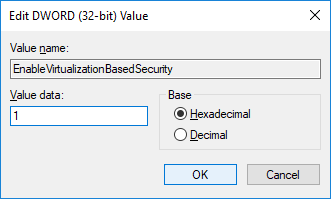
5.Double-click on EnableVirtualizationBasedSecurity DWORD then change its value to:
To Enable Virtualization-based Security: 1
To Disable Virtualization-based Security: 0
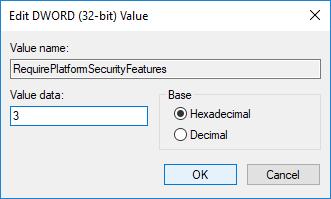
6.Now again right-click on DeviceGuard then select Novo> DWORD (32-bitna) vrednost in poimenujte ta DWORD kot RequirePlatformSecurityFeatures nato pritisnite Enter.
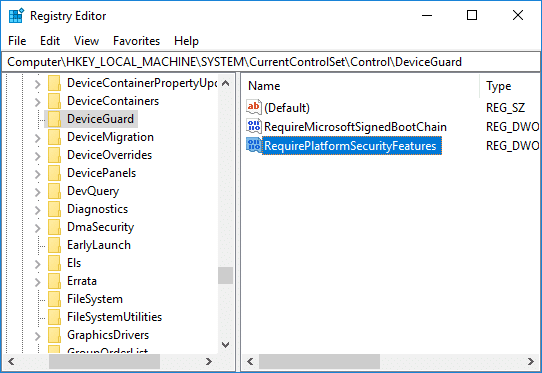
7.Double-click on RequirePlatformSecurityFeatures DWORD and change it’s value to 1 to use Secure Boot only or set it to 3 to use Secure Boot and DMA protection.
8. Zdaj se pomaknite do naslednjega registrskega ključa:
HKEY_LOCAL_MACHINESystemCurrentControlSetControlLSA
9.Right-click on LSA then select Novo> DWORD (32-bitna) vrednost then name this DWORD as LsaCfgFlags in pritisnite Enter.
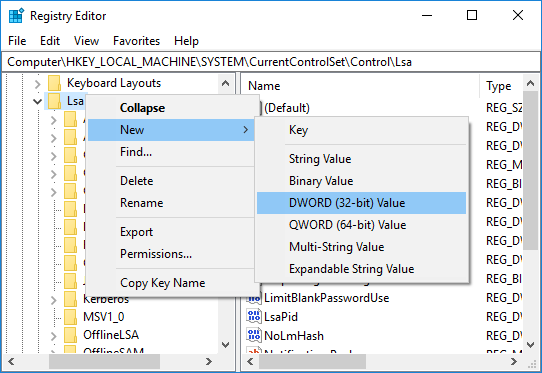
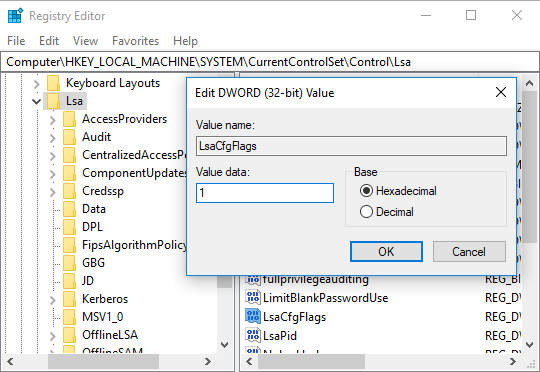
10.Double-click on LsaCfgFlags DWORD and change its value according to:
Disable Credential Guard: 0
Enable Credential Guard with UEFI lock: 1
Enable Credential Guard without lock: 2
11.Once finished, close Registry Editor.
Disable Credential Guard in Windows 10
If Credential Guard was enabled without UEFI Lock then you can Disable Windows Credential Guard uporabi Device Guard and Credential Guard hardware readiness tool or the following method:
1. Pritisnite tipko Windows + R in nato vnesite regedit in pritisnite Enter, da se odpre Urejevalnik registra.
2.Navigate and delete the following registry keys:
HKEY_LOCAL_MACHINESystemCurrentControlSetControlLSALsaCfgFlags
HKEY_LOCAL_MACHINESoftwarePoliciesMicrosoftWindowsDeviceGuardEnableVirtualizationBasedSecurity
HKEY_LOCAL_MACHINESoftwarePoliciesMicrosoftWindowsDeviceGuardRequirePlatformSecurityFeatures

3.Delete the Windows Credential Guard EFI variables by using bcdedit. Press Windows Key + X then select Ukazni poziv (Admin).
4. Vnesite naslednji ukaz v cmd in pritisnite Enter:
mountvol X: /s
copy %WINDIR%System32SecConfig.efi X:EFIMicrosoftBootSecConfig.efi /Y
bcdedit /create {0cb3b571-2f2e-4343-a879-d86a476d7215} /d "DebugTool" /application osloader
bcdedit /set {0cb3b571-2f2e-4343-a879-d86a476d7215} path "EFIMicrosoftBootSecConfig.efi"
bcdedit /set {bootmgr} bootsequence {0cb3b571-2f2e-4343-a879-d86a476d7215}
bcdedit /set {0cb3b571-2f2e-4343-a879-d86a476d7215} loadoptions DISABLE-LSA-ISO
bcdedit /set {0cb3b571-2f2e-4343-a879-d86a476d7215} device partition=X:
mountvol X: /d
5.Once finished, close command prompt and reboot your PC.
6.Accept the prompt to disable Windows Credential Guard.
Priporočamo:
To je to, kar ste se uspešno naučili How to Enable or Disable Credential Guard in Windows 10 če pa imate še vedno kakršna koli vprašanja v zvezi s to vadnico, jih lahko vprašate v razdelku za komentarje.