Fix Windows Modules Installer Worker High CPU Usage
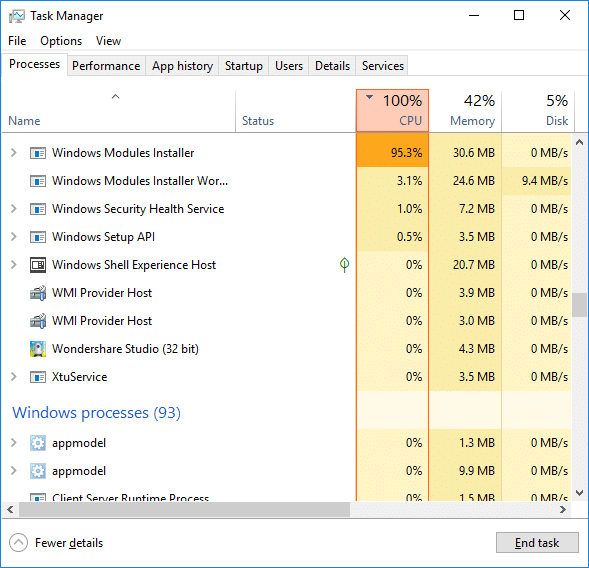
If you are facing the High CPU Usage by Windows Modules Installer Worker, then don’t worry as thousands of other users are also facing the similar problem and therefore, there are many working fixes which we will be discussing today in this article. To verify if you are facing this issue open Task Manager (Ctrl + Shift + Esc) and you will find that the Windows Modules Installer Worker is consuming High CPU or Disk Usage.

Pro Nasvet: You may leave your PC overnight or for a few hours to see the issue rectify itself once the Windows is finished downloading and installing updates.
What is Windows Modules Installer worker (WMIW)?
Windows Modules Installer worker (WMIW) is a service which takes cares of automatically installing Windows Update. According to its service description, WMIW is a system process that enables automatic installation, modification, and removal of Windows updates and optional components.
This process is responsible for finding new Windows Update automatically and installing them. As you might be aware that Windows 10 automatically install newer builds (i.e. 1803 etc.) via Windows Updates, so this process is responsible for installing these updates in the background.
Although this process is called Windows Modules Installer worker (WMIW) and you will see the same name in the Processes tab in the Task Manager, but if you switch to Details tab, then you will find the name of the file as TiWorker.exe.
Why Is Windows Modules Installer worker Using So Much CPU?
As Windows Modules Installer worker (TiWorker.exe) runs continuously in the background, sometimes it might utilize high CPU or disk usage when installing or uninstalling Windows Updates. But if its constantly using high CPU then the Windows Modules Installer worker may have become unresponsive while checking new updates. As a result, you may be experiencing lags, or your system might hang or freeze completely.
The first thing users do when they experience freezing, or lagging issues on their system is to restart their PC, but I assure you that this strategy won’t work in this case. This is because the issue will not resolve by itself until and unless you fix the underlying cause.
Fix Windows Modules Installer Worker High CPU Usage
Ne pozabite ustvariti obnovitvene točke za vsak primer, če gre kaj narobe.
Windows Modules Installer Worker (WMIW) is an important service, and it should not be disabled. WMIW or TiWorker.exe is not a virus or malware, and you cannot just delete this service from your PC. So without wasting any time let’s see How to Fix Windows Modules Installer Worker High CPU Usage s pomočjo spodaj navedenega vodnika za odpravljanje težav.
1. način: Zaženite orodje za odpravljanje težav Windows Update
1. Pritisnite tipko Windows + I, da odprete Nastavitve nato kliknite na Ikona za posodobitev in varnost.
![]()
2. V levem meniju izberite Odpravljanje težav Spodaj "Vstani in pognaj" kliknite na Windows Update.
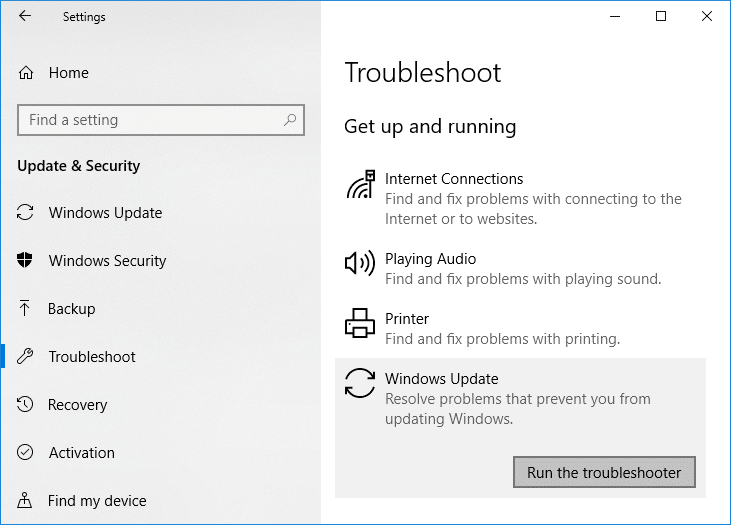
3. Zdaj kliknite na “Zaženite orodje za odpravljanje težav« pod Windows Update.
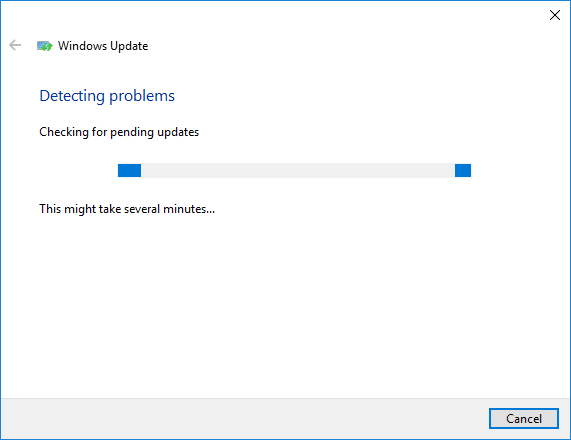
4. Let the troubleshooter run, and it will automatically fix any issues found with Windows Update taking forever.
Method 2: Manually Check for Windows Updates
1. Pritisnite tipko Windows + I in nato izberite Posodobitve in varnost.
2. Na levi strani klikne meni Windows Update.
3. Zdaj kliknite »Preveri za posodobitve«, da preverite, ali so na voljo posodobitve.

4. Če so na čakanju kakršne koli posodobitve, kliknite na Prenesite in namestite posodobitve.

5. Ko so posodobitve prenesene, jih namestite in vaš Windows bo postal posodobljen.
Method 3: Configure Windows Update to Manual
Pozor: This method will switch Windows Update from automatically installing the new updates to the manual. This means you have to manually check for Windows Update (weekly or monthly) to keep your PC secure. But follow this method, and you can again set the Updates to Automatic once the issue is resolved.
1. Pritisnite tipko Windows + R in nato vnesite services.msc in pritisnite Enter.

2. Scroll down and find Windows Installer Moduli service in the list.
3. Z desno miškino tipko kliknite Storitev namestitvenega programa Windows Modules in izberite Lastnosti.
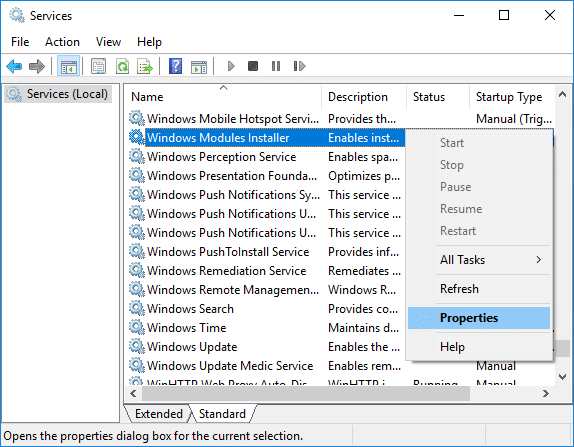
4. Sedaj kliknite na stop then from the Vrsta zagona drop-down select Manual.
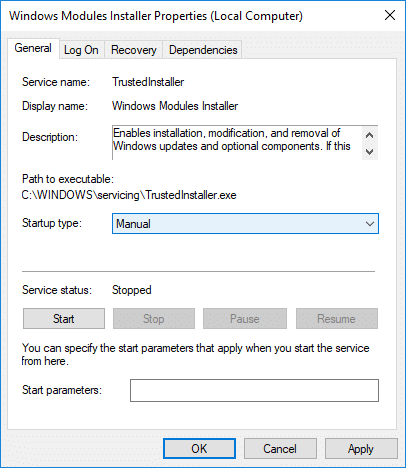
5. Kliknite Uporabi in nato OK.
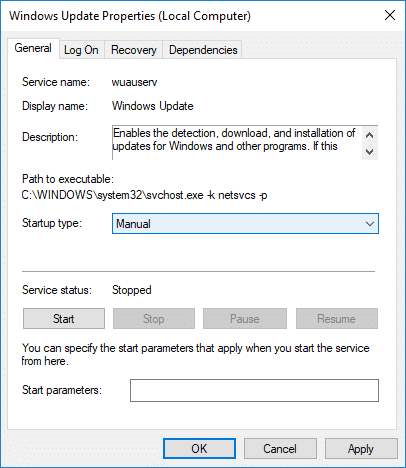
6. Similarly, follow the same step for the Storitev Windows Update.
7. Znova zaženite računalnik, da shranite spremembe.
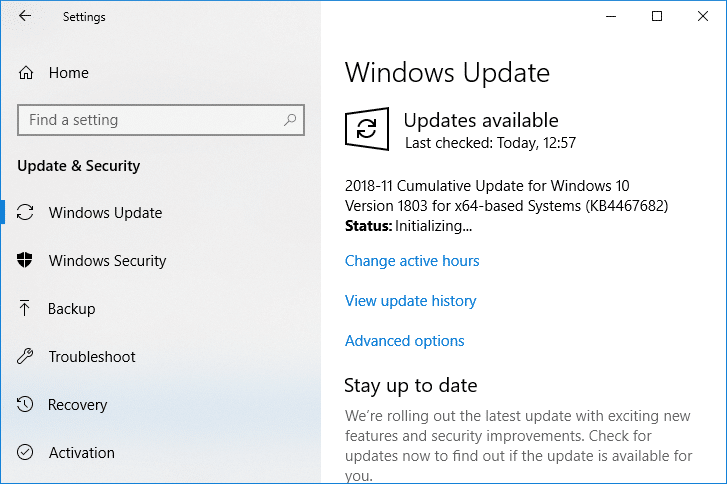
8. Spet preveri za Windows Updates Manually in namestite vse čakajoče posodobitve.
9. Once is done, again go back to services.msc window and open the Windows Modules Installer & Windows Update Properties okno.
10. Nastavite Vrsta zagona do Samodejno in kliknite Začetek. Then click Apply followed by OK.
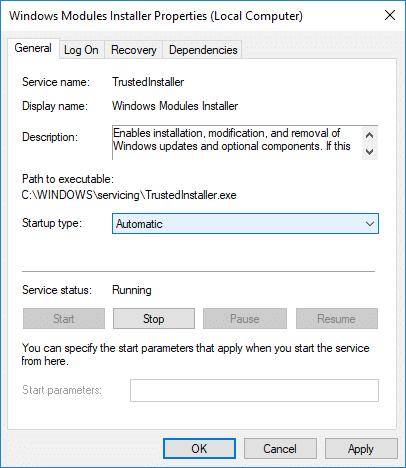
11. Znova zaženite računalnik, da shranite spremembe.
4. način: Zaženite orodje za odpravljanje težav pri vzdrževanju sistema
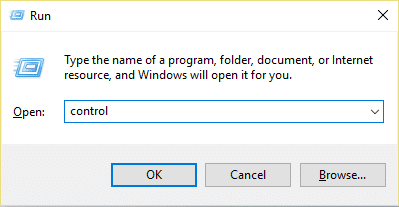
1. Pritisnite tipko Windows + R, nato vnesite control in pritisnite Enter, da odprete Nadzorna plošča.
2. Poiščite Odpravljanje težav in kliknite Odpravljanje težav.

3. Nato kliknite na Vpogled v izbrane izdelke v levem podoknu.
4. Kliknite na “System Maintenance” za zagon System Maintenance Troubleshooter.

5. Orodje za odpravljanje težav bo morda zmoglo Fix Windows Modules Installer Worker High CPU Usage, but if it didn’t, then you need to run System Performance Troubleshooter.
6. Odprite ukazni poziv. Uporabnik lahko izvede ta korak z iskanjem 'cmd' In pritisnite Enter.

7. Vnesite naslednji ukaz v cmd in pritisnite Enter:
msdt.exe / id PerformanceDiagnostic
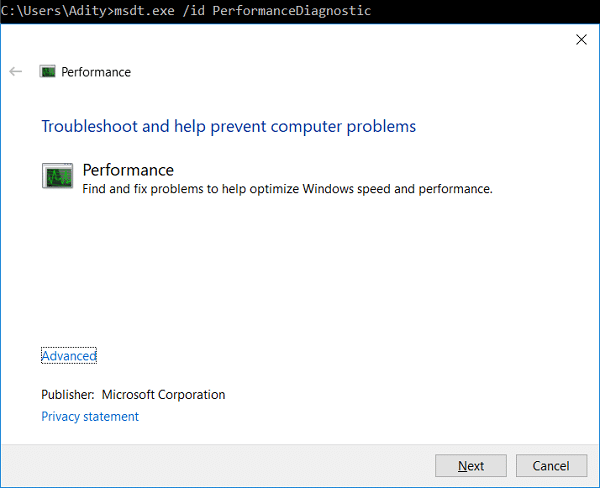
8. Follow the on-screen instruction to run the troubleshooter and fix any issues find the System.
9. Finally, exit the cmd and reboot your PC.
Method 5: Disable Automatic Maintenance
Sometimes Automatic Maintenance can conflict with the Windows Modules Installer Worker service, so try to disable Automatic Maintenance using this guide and see if this fixes your issue.
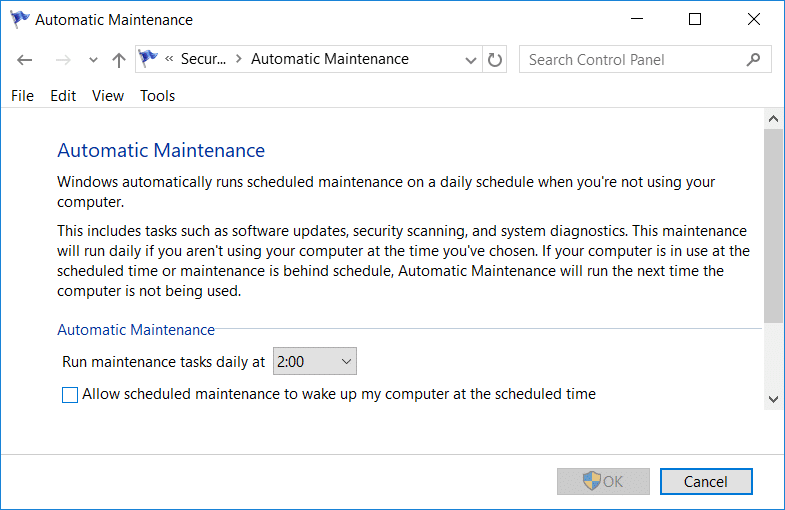
Although disabling Automatic Maintenance is not a good idea, but there might be some case where you need to actually disable it, for example, if your PC freezes during automatic maintenance or Windows Modules Installer Worker High CPU Usage issue then you should disable maintenance to troubleshoot the issue.
Method 6: Run System File Checker and DISM
1. Odprite ukazni poziv. Uporabnik lahko izvede ta korak z iskanjem 'cmd' In pritisnite Enter.
2. Zdaj vnesite naslednje v cmd in pritisnite enter:
Sfc /scannow sfc /scannow /offbootdir=c: /offwindir=c:windows (Če zgoraj ne uspe, poskusite s tem)

3. Počakajte, da se zgornji postopek konča, in ko je končan, znova zaženite računalnik.
4. Znova odprite cmd in vnesite naslednji ukaz ter za vsakim pritisnite enter:
Dism /Online /Cleanup-Image /CheckHealth Dism /Online /Cleanup-Image /ScanHealth Dism /Online /Cleanup-Image /RestoreHealth

5. Pustite, da se zažene ukaz DISM, in počakajte, da se konča.
6. Če zgornji ukaz ne deluje, poskusite s spodnjim:
Dism /Image:C:offline /Cleanup-Image /RestoreHealth /Source:c:testmountwindows Dism /Online /Cleanup-Image /RestoreHealth /Source:c:testmountwindows /LimitAccess
Opomba: Zamenjajte C:RepairSourceWindows s svojim virom popravila (namestitveni ali obnovitveni disk Windows).
7. Znova zaženite računalnik, da shranite spremembe in preverite, ali lahko Fix Windows Modules Installer Worker High CPU Usage.
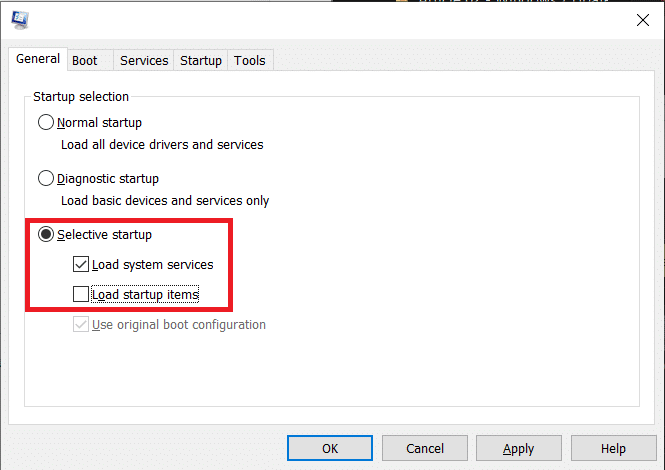
7. način: Izvedite čisti zagon
Sometimes 3rd party software can conflict with Windows and can cause the issue. To Fix Windows Modules Installer Worker High CPU Usage issue, morate izvesti čisti zagon računalnika in korak za korakom diagnosticirati težavo.
Method 8: Set your WiFi as Metered Connection
Opomba: This will stop Windows Automatic Update, and you will need to manually check for Updates.
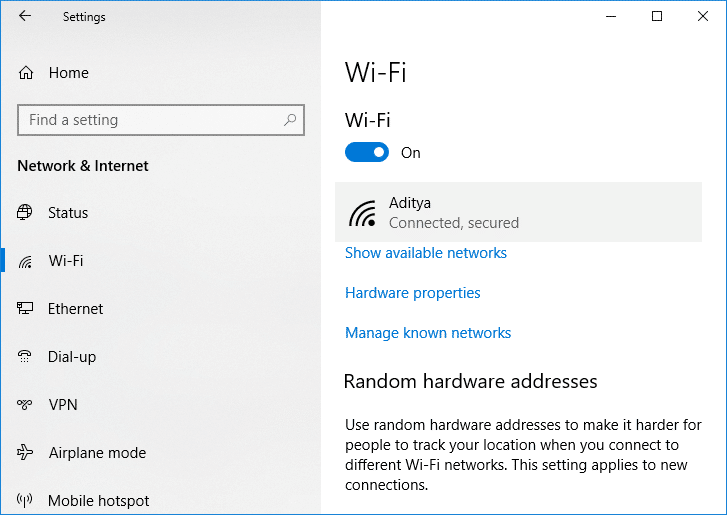
1. Pritisnite tipko Windows + I, da odprete Nastavitve nato kliknite na Omrežje in internet.

2. V levem meniju izberite Wi-Fi.
3. Under Wi-Fi, klik on your currently connected network (WiFi).
4. Scroll down to Metered connection and omogoči preklop Spodaj "Nastavi kot merjeno povezavo".
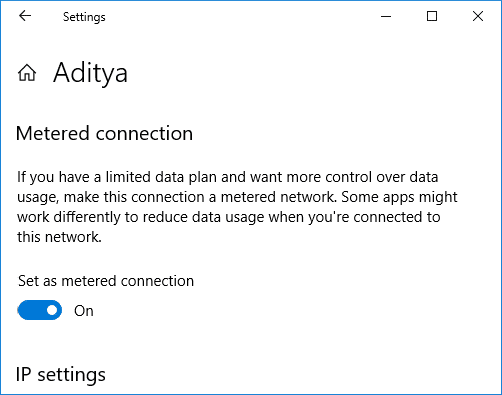
5. Close Settings and reboot your PC to save changes.
Priporočamo:
To je to, uspešno ste Fix Windows Modules Installer Worker High CPU Usage če pa imate še vedno kakršna koli vprašanja v zvezi s to vadnico, jih lahko vprašate v razdelku za komentarje.
