మెమరీ నిర్వహణ లోపాన్ని పరిష్కరించడానికి 11 మార్గాలు (గైడ్)

Fix Memory Management Error: You may have faced various Blue Screen of Death errors with Windows PC and one such error is Memory Management. Memory_Management is a Windows Stop error which indicates that there is something wrong with your system memory. As the name itself suggest, memory management is the function which typically manages your system memory.
Causes of the Memory Management Blue Screen of Death Error in Windows 10?
Memory Management BSOD Error generally means that there is something critical going on with your system memory and here are some well-known causes for the Memory_Management error:
- Faulty or damaged RAM
- Incompatible or outdated drivers
- A virus of Malware infection
- డిస్క్ లోపాలు
- Issues with new Hardware or Software
- Corrupt System files or Operating System
- Error 0x1A may be caused by a damaged hard disk.
There can a number of reasons for Windows Stop Memory Management error because it all depends on users system configuration and environment. Therefore, we are going to list all the possible solutions for this issue. So without wasting any time let’s see How to Fix Memory Management Error in Windows 10 with the help of the below-listed guide.
11 Ways to Fix Memory Management Error in Windows 10
ఏదైనా తప్పు జరిగితే పునరుద్ధరణ పాయింట్ను సృష్టించినట్లు నిర్ధారించుకోండి.
విధానం 1: సిస్టమ్ ఫైల్ చెకర్ని అమలు చేయండి మరియు డిస్క్ని తనిఖీ చేయండి
1.Windows కీ + X నొక్కి ఆపై క్లిక్ చేయండి కమాండ్ ప్రాంప్ట్ (అడ్మిన్).

2.ఇప్పుడు cmdలో కింది వాటిని టైప్ చేసి ఎంటర్ నొక్కండి:
Sfc / scannow sfc / scannow /offbootdir = c: /offwindir = c:windows (పైన విఫలమైతే దీన్ని ప్రయత్నించండి)

3.పై ప్రక్రియ పూర్తయ్యే వరకు వేచి ఉండండి మరియు పూర్తయిన తర్వాత మీ PCని పునఃప్రారంభించండి.
4.తర్వాత, ఇక్కడ నుండి CHKDSKని అమలు చేయండి చెక్ డిస్క్ యుటిలిటీ (CHKDSK)తో ఫైల్ సిస్టమ్ లోపాలను పరిష్కరించండి.
5.పై ప్రక్రియను పూర్తి చేసి, మార్పులను సేవ్ చేయడానికి మీ PCని మళ్లీ రీబూట్ చేయండి.
Method 2: Run Windows Memory Diagnostic Tool
If you have a faulty RAM then the best way to determine this is to run Windows Memory Diagnostic Tool and if the test results indicate that RAM has some issues then you can easily replace it with a new one and can easily fix Memory Management Error in Windows 10.
1.Type memory in the Windows search bar and select “విండోస్ మెమరీ డయాగ్నస్టిక్."
2.In the set of options displayed select “ఇప్పుడే పునఃప్రారంభించండి మరియు సమస్యల కోసం తనిఖీ చేయండి."
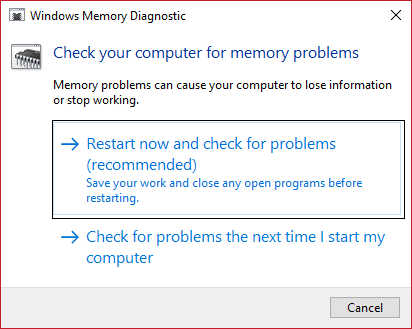
3.After which Windows will restart to check for possible RAM errors and will hopefully Fix Memory Management Error in Windows 10.
4.మార్పులను సేవ్ చేయడానికి మీ PCని రీబూట్ చేయండి.
Method 3: Run MemTest86
1.మీ సిస్టమ్కి USB ఫ్లాష్ డ్రైవ్ను కనెక్ట్ చేయండి.
2.డౌన్లోడ్ చేసి ఇన్స్టాల్ చేయండి విండోస్ Memtest86 USB కీ కోసం ఆటో-ఇన్స్టాలర్.
3.మీరు ఇప్పుడే డౌన్లోడ్ చేసిన ఇమేజ్ ఫైల్పై కుడి-క్లిక్ చేసి, "" ఎంచుకోండిఇక్కడ విస్తృతపరచు" ఎంపిక.
4.ఒకసారి సంగ్రహించిన తర్వాత, ఫోల్డర్ని తెరిచి, దాన్ని అమలు చేయండి Memtest86+ USB ఇన్స్టాలర్.
5. MemTest86 సాఫ్ట్వేర్ను బర్న్ చేయడానికి (ఇది మీ USB డ్రైవ్ను ఫార్మాట్ చేస్తుంది) USB డ్రైవ్లో ప్లగ్ చేయబడిన మీ ఎంపికను ఎంచుకోండి.

6.Once the above process is finished, insert the USB to the PC in which you’re getting the “Memory Management Error".
7.మీ PCని పునఃప్రారంభించండి మరియు USB ఫ్లాష్ డ్రైవ్ నుండి బూట్ ఎంపిక చేయబడిందని నిర్ధారించుకోండి.
8.Memtest86 మీ సిస్టమ్లో మెమరీ అవినీతిని పరీక్షించడం ప్రారంభిస్తుంది.
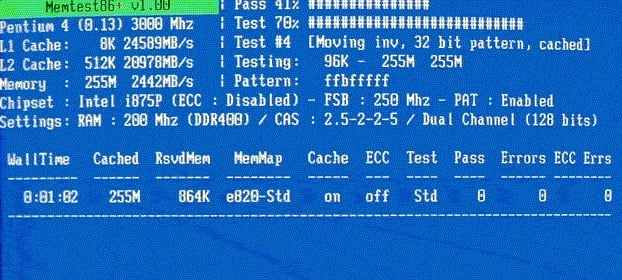
9.మీరు అన్ని పరీక్షలలో ఉత్తీర్ణులైతే, మీ మెమరీ సరిగ్గా పని చేస్తుందని మీరు నిర్ధారించుకోవచ్చు.
10.అప్పుడు కొన్ని దశలు విఫలమైతే Memtest86 will find memory corruption which means “Memory Management Error” is because of bad/corrupt memory.
11. క్రమంలో Fix Memory Management Error in Windows 10, చెడ్డ మెమరీ సెక్టార్లు కనుగొనబడితే మీరు మీ RAMని భర్తీ చేయాలి.
విధానం 4: Windows తాజాగా ఉందని నిర్ధారించుకోండి
1.Windows కీ + I నొక్కండి, ఆపై ఎంచుకోండి నవీకరణ & భద్రత.

2.తదుపరి, మళ్లీ క్లిక్ చేయండి తాజాకరణలకోసం ప్రయత్నించండి మరియు ఏవైనా పెండింగ్లో ఉన్న నవీకరణలను ఇన్స్టాల్ చేసినట్లు నిర్ధారించుకోండి.

3. అప్డేట్లు ఇన్స్టాల్ చేయబడిన తర్వాత మీ PCని రీబూట్ చేయండి.
Method 5: Update your graphics card drivers
1.Windows కీ + R నొక్కండి, ఆపై "" అని టైప్ చేయండిdevmgmt.msc” (కోట్లు లేకుండా) మరియు పరికర నిర్వాహికిని తెరవడానికి ఎంటర్ నొక్కండి.

2.తదుపరి, విస్తరించండి అడాప్టర్లను ప్రదర్శించు మరియు మీ ఎన్విడియా గ్రాఫిక్ కార్డ్పై కుడి-క్లిక్ చేసి, ఎంచుకోండి ప్రారంభించు.

3. మీరు దీన్ని చేసిన తర్వాత మళ్లీ మీ గ్రాఫిక్స్ కార్డ్పై కుడి-క్లిక్ చేసి, "" ఎంచుకోండిడ్రైవర్ సాఫ్ట్వేర్ను నవీకరించండి."

4. ఎంచుకోండి "నవీకరించబడిన డ్రైవర్ సాఫ్ట్వేర్ కోసం స్వయంచాలకంగా శోధించండి” మరియు అది ప్రక్రియను పూర్తి చేయనివ్వండి.

5.పై దశ మీ సమస్యను పరిష్కరించగలిగితే చాలా మంచిది, కాకపోతే కొనసాగించండి.
6. మళ్ళీ ఎంచుకోండి "డ్రైవర్ సాఫ్ట్వేర్ అప్డేట్” అయితే ఈసారి తదుపరి స్క్రీన్లో ఎంచుకోండి “డ్రైవర్ సాఫ్ట్వేర్ కోసం నా కంప్యూటర్ను బ్రౌజ్ చేయండి."

7. ఇప్పుడు ఎంచుకోండి "నా కంప్యూటర్లో పరికర డ్రైవర్ల జాబితా నుండి నన్ను ఎంచుకుందాం. "

8.చివరిగా, మీ కోసం జాబితా నుండి అనుకూల డ్రైవర్ను ఎంచుకోండి ఎన్విడియా గ్రాఫిక్ కార్డ్ మరియు తదుపరి క్లిక్ చేయండి.
9.Let the above process finish and restart your PC to save changes. After updating the Graphics card driver you may be able to Fix Memory Management Error in Windows 10.
విధానం 6: CCleaner మరియు Malwarebytesని అమలు చేయండి
1.డౌన్లోడ్ చేసి ఇన్స్టాల్ చేయండి CCleaner & మాల్వేర్బైట్స్.
2.మాల్వేర్బైట్లను అమలు చేయండి మరియు హానికరమైన ఫైల్ల కోసం మీ సిస్టమ్ని స్కాన్ చేయనివ్వండి.
3.మాల్వేర్ కనుగొనబడితే అది వాటిని స్వయంచాలకంగా తీసివేస్తుంది.
4.ఇప్పుడు రన్ చేయండి CCleaner మరియు "క్లీనర్" విభాగంలో, విండోస్ ట్యాబ్ క్రింద, శుభ్రం చేయడానికి క్రింది ఎంపికలను తనిఖీ చేయమని మేము సూచిస్తున్నాము:

5.ఒకసారి మీరు సరైన పాయింట్లను తనిఖీ చేశారని నిర్ధారించుకున్న తర్వాత, క్లిక్ చేయండి క్లీనర్ ని రన్ చేయండి, మరియు CCleaner దాని కోర్సును అమలు చేయనివ్వండి.
6.మీ సిస్టమ్ను మరింత శుభ్రం చేయడానికి రిజిస్ట్రీ ట్యాబ్ని ఎంచుకుని, కింది వాటిని తనిఖీ చేసినట్లు నిర్ధారించుకోండి:

7. సమస్య కోసం స్కాన్ని ఎంచుకుని, స్కాన్ చేయడానికి CCleanerని అనుమతించి, ఆపై క్లిక్ చేయండి ఎంచుకున్న సమస్యలను పరిష్కరించండి.
8. CCleaner అడిగినప్పుడు "మీరు రిజిస్ట్రీకి బ్యాకప్ మార్పులు చేయాలనుకుంటున్నారా?”అవును ఎంచుకోండి.
9.మీ బ్యాకప్ పూర్తయిన తర్వాత, ఎంచుకున్న అన్ని సమస్యలను పరిష్కరించండి ఎంచుకోండి.
10.మార్పులను సేవ్ చేయడానికి మీ PCని పునఃప్రారంభించండి.
విధానం 7: సిస్టమ్ పునరుద్ధరణ జరుపుము
1.Windows కీ + R నొక్కండి మరియు టైప్ చేయండి”sysdm.cpl” తర్వాత ఎంటర్ నొక్కండి.

2.Select సిస్టమ్ ప్రొటెక్షన్ ట్యాబ్ చేసి ఎంచుకోండి వ్యవస్థ పునరుద్ధరణ.
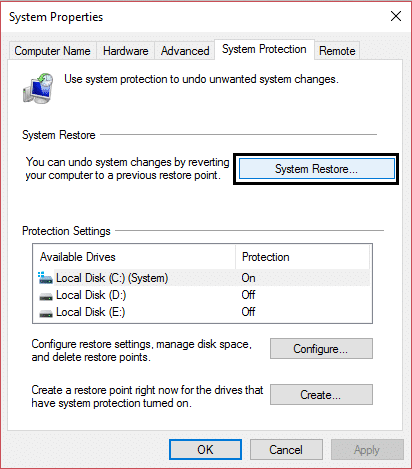
3. తదుపరి క్లిక్ చేసి, కావలసినదాన్ని ఎంచుకోండి సిస్టమ్ పునరుద్ధరణ పాయింట్.
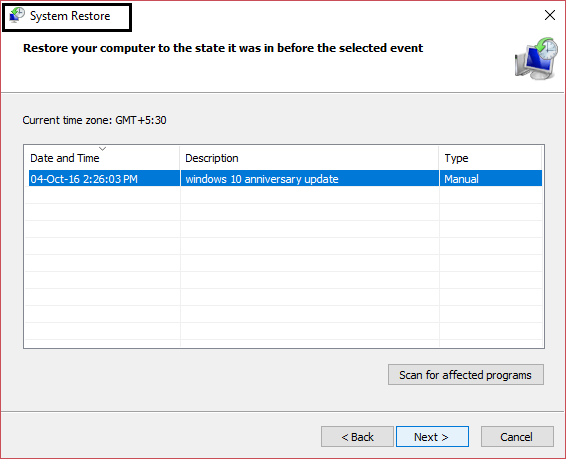
4.సిస్టమ్ పునరుద్ధరణను పూర్తి చేయడానికి ఆన్-స్క్రీన్ సూచనలను అనుసరించండి.
5.రీబూట్ చేసిన తర్వాత, మీరు చేయగలరు Fix Memory Management Error in Windows 10.
Method 8: Manually increase Virtual Memory
1.Press Windows Key + R and type sysdm.cpl in the Run dialog box and click OK to open సిస్టమ్ గుణాలు.
2.ఇది సిస్టమ్ గుణాలు విండో, కి మారండి అధునాతన టాబ్ మరియు కింద ప్రదర్శన, నొక్కండి సెట్టింగులు ఎంపిక.

3.Next, in the పనితీరు ఎంపికలు విండో, కి మారండి అధునాతన టాబ్ మరియు క్లిక్ చేయండి మార్చు వర్చువల్ మెమరీ కింద.

4.Finally, in the వర్చువల్ మెమరీ window shown below, uncheck the “Automatically manage paging file size for all drive” option. Then highlight your system drive under Paging file size for each type heading and for the Custom size option, set the suitable values for fields: Initial size (MB) and Maximum size (MB). It is highly recommended to avoid selecting పేజింగ్ ఫైల్ లేదు option here.
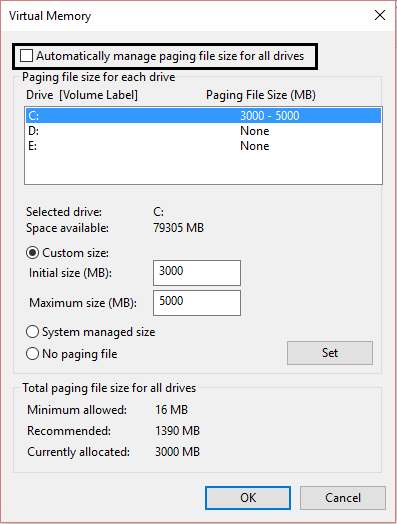
5.Select the radio button which says నచ్చిన పరిమాణం and set the initial size to కు 1500 3000 and maximum to at least 5000 (Both of these depends on the size of your hard disk).
గమనిక: You can always set the Recommended values for fields: Initial size (MB) and Maximum size (MB).
6.Now if you’ve increased the size, a reboot is not mandatory. But if you’ve decreased the size of the paging file, you must have to reboot to make changes effective.
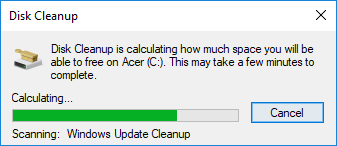
విధానం 9: డిస్క్ క్లీనప్ని అమలు చేయండి
Disk Cleanup generally deletes temporary files, system files, empties Recycle Bin, remove a variety of other items that you might no longer need. Disk Cleanup also comes up with a new System compression which will compress Windows binaries and program files to save disk space on your system. Anyway, without wasting any time let’s see How to Run Disk Cleanup to Fix Memory Management Error in Windows 10.
విధానం 10: క్లీన్ మెమరీ స్లాట్
గమనిక: Don’t open your PC as it may void your warranty, if you don’t know what to do please take your laptop to the service center. If you don’t know what you are doing then expert supervision is recommended.
Try to switch RAM in another memory slot then try using only one memory and see if you can use the PC normally. Also, clean memory slot vents just to be sure and again check if this fixes the issue. If you have two RAM slots then remove both RAM’s, clean the slot and then insert RAM in only one slot and see if the issue is resolved. If it didn’t, then again do the same thing with another slot and see if this helps in fixing the issue.
Now if you are still facing the MEMORY_MANAGEMENT error then you need to replace your RAM with a new one which will definitely fix the issue.
Method 11: Reset Windows 10 (Last Resort)
గమనిక: మీరు మీ PCని యాక్సెస్ చేయలేకపోతే, మీరు ప్రారంభించే వరకు మీ PCని కొన్ని సార్లు పునఃప్రారంభించండి స్వయంచాలక మరమ్మతు. ఆపై నావిగేట్ చేయండి ట్రబుల్షూట్ > ఈ PCని రీసెట్ చేయండి > ప్రతిదీ తీసివేయండి.
1. సెట్టింగ్లను తెరవడానికి విండోస్ కీ + I నొక్కండి, ఆపై క్లిక్ చేయండి నవీకరణ & భద్రత చిహ్నం.
![]()
2.ఎడమవైపు మెను నుండి ఎంచుకోండి రికవరీ.
3. కింద ఈ PC ని రీసెట్ చేయండి "పై క్లిక్ చేయండిప్రారంభించడానికి”బటన్.

4. ఎంపికను ఎంచుకోండి నా ఫైళ్ళను ఉంచండి.

5.తదుపరి దశ కోసం మీరు Windows 10 ఇన్స్టాలేషన్ మీడియాను ఇన్సర్ట్ చేయమని అడగబడవచ్చు, కాబట్టి మీరు దానిని సిద్ధంగా ఉంచుకున్నారని నిర్ధారించుకోండి.
6.ఇప్పుడు, మీ Windows వెర్షన్ని ఎంచుకుని, క్లిక్ చేయండి Windows ఇన్స్టాల్ చేయబడిన డ్రైవ్లో మాత్రమే > నా ఫైల్లను తీసివేయండి.

క్లిక్ చేయండి తి రి గి స వ రిం చు బ ట ను.
6.రీసెట్ని పూర్తి చేయడానికి స్క్రీన్పై ఉన్న సూచనలను అనుసరించండి.
మద్దతిచ్చే:
అంతే, మీరు విజయవంతంగా చేసారు Fix Memory Management Error in Windows 10 అయితే ఈ ట్యుటోరియల్కు సంబంధించి మీకు ఇంకా ఏవైనా ప్రశ్నలు ఉంటే, వాటిని వ్యాఖ్య విభాగంలో అడగడానికి సంకోచించకండి.