- in หน้าต่าง by ผู้ดูแลระบบ
Fix Computer does not start until restarted multiple times

Fix Computer does not start until restarted multiple times: There seems to be a new issue with PC users, which is when they first turn ON their PC the power comes ON, fans start to spin but everything suddenly stops and PC never gets a display, in short, PC automatically turned OFF without any warning. Now if the user, powers off the PC and then turned it back ON, the computer boots normally without any additional issues. Basically, Computer does not start until restarted multiple times which is very annoying for basic Windows users.
Sometimes you need to boot up to 4-5 time before you could see the display or even boot your PC, but there is no guarantee that it will boot. Now living in this uncertainty, that you may or may not be able to use your PC next day is not such a good thing, so you need to address this problem immediately.
Now there are only a few issues which can cause this problem, so you can definitely troubleshoot this issue easily. The problem sometimes can be related to software like the main culprit seems to be Fast Startup in many cases and disabling it seems to fix the issue. But if this doesn’t fix the issue then you can be sure that the issue is related to hardware. In hardware, this can be a memory issue, faulty power supply, BIOS Settings or CMOS battery dried up, etc. So without wasting any time let’s see how to Fix Computer does not start until restarted multiple times with the help of the below-listed guide.
Fix Computer does not start until restarted multiple times
ตรวจสอบให้แน่ใจว่าได้สร้างจุดคืนค่า เผื่อในกรณีที่มีสิ่งผิดปกติเกิดขึ้น
หมายเหตุ Some of the methods require expert supervision as you can seriously damage your PC while performing the steps, so if you don’t know what you’re doing then take your laptop/PC to a service repair center. If your PC is under warranty then opening the case can temper/void the warranty.
วิธีที่ 1: ปิดการเริ่มต้นอย่างรวดเร็ว
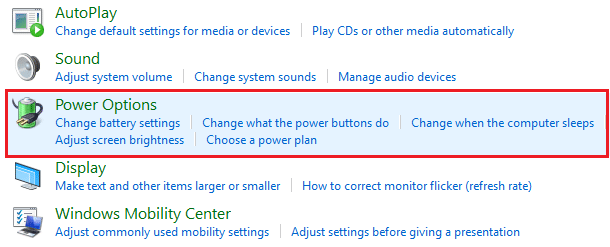
1. กด Windows Key + R จากนั้นพิมพ์ control แล้วกด Enter เพื่อเปิด แผงควบคุม

2 คลิกที่ ฮาร์ดแวร์และเสียง จากนั้นคลิกที่ ตัวเลือก Power.
3.จากนั้นจากบานหน้าต่างด้านซ้ายให้เลือก “เลือกสิ่งที่ปุ่มเพาเวอร์ทำ"
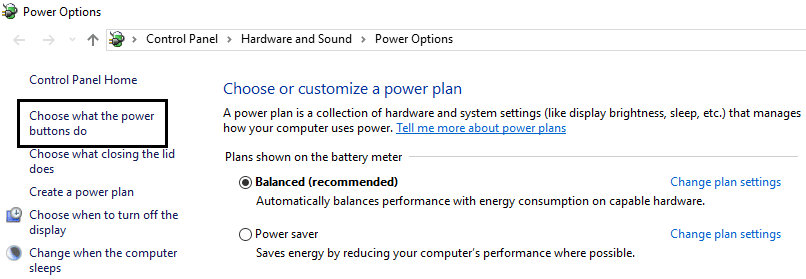
4. ตอนนี้คลิกที่ “เปลี่ยนการตั้งค่าที่ไม่สามารถใช้งานได้ในขณะนี้"

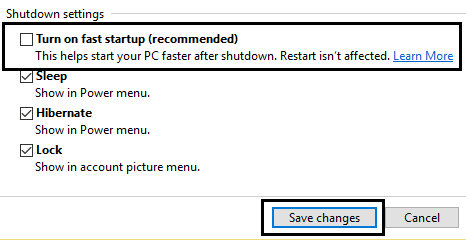
5.ยกเลิกการเลือก “เปิดใช้งานการเริ่มต้นอย่างรวดเร็ว” และคลิกที่บันทึกการเปลี่ยนแปลง
วิธีที่ 2: เรียกใช้การซ่อมแซมอัตโนมัติ
1.ใส่แผ่นดีวีดีการติดตั้งที่สามารถบู๊ตได้ของ Windows 10 และรีสตาร์ทเครื่องคอมพิวเตอร์ของคุณ
2.When prompted to กดปุ่มใดก็ได้ หากต้องการบูตจากซีดีหรือดีวีดี ให้กดปุ่มใดก็ได้เพื่อดำเนินการต่อ

3. เลือกการตั้งค่าภาษาของคุณ แล้วคลิก ถัดไป คลิกซ่อม คอมพิวเตอร์ของคุณที่ด้านล่างซ้าย

4. บนหน้าจอเลือกตัวเลือก ให้คลิก การแก้ไขปัญหาการ.

5.ในหน้าจอแก้ไขปัญหา คลิก ตัวเลือกขั้นสูง.
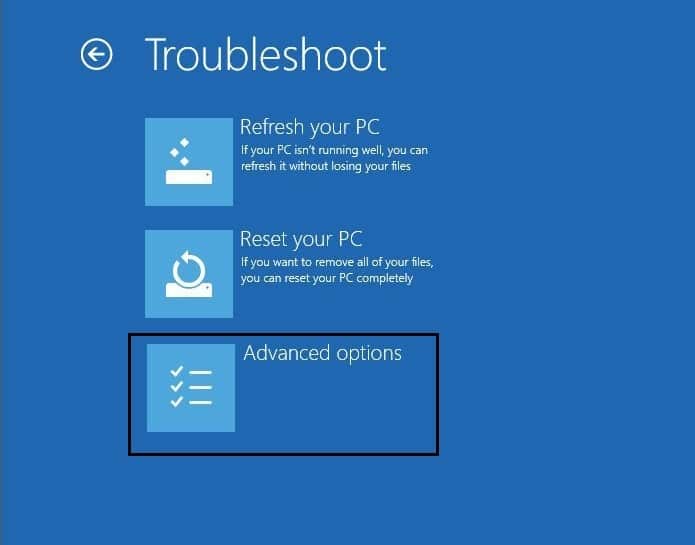
6.บนหน้าจอตัวเลือกขั้นสูง คลิก การซ่อมแซมอัตโนมัติหรือการซ่อมแซมการเริ่มต้นระบบ.
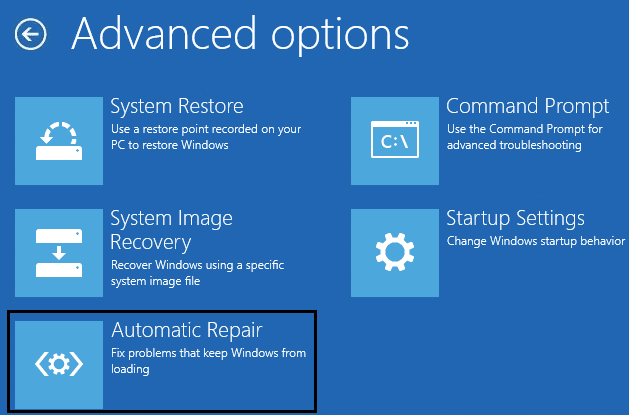
7.รอจนกว่า การซ่อมแซม Windows อัตโนมัติ/การเริ่มต้นระบบ สมบูรณ์
8.Restart และคุณได้สำเร็จ Fix Computer does not start until restarted multiple times issue, ถ้าไม่เช่นนั้นให้ดำเนินการต่อ
นอกจากนี้อ่าน วิธีแก้ไข Automatic Repair ไม่สามารถซ่อมแซมพีซีของคุณได้
วิธีที่ 3: รีเซ็ต BIOS เป็นการตั้งค่าเริ่มต้น
1.ปิดแล็ปท็อปของคุณ จากนั้นเปิดเครื่องพร้อมๆ กัน กด F2, DEL หรือ F12 (ขึ้นอยู่กับผู้ผลิตของคุณ) เพื่อเข้าสู่ การตั้งค่าไบออส

2. ตอนนี้ คุณจะต้องค้นหาตัวเลือกการรีเซ็ตเป็น โหลดการกำหนดค่าเริ่มต้น และอาจมีชื่อเป็นรีเซ็ตเป็นค่าเริ่มต้น โหลดค่าเริ่มต้นจากโรงงาน ล้างการตั้งค่า BIOS โหลดค่าเริ่มต้นการตั้งค่า หรือสิ่งที่คล้ายกัน

3. เลือกด้วยปุ่มลูกศร กด Enter และยืนยันการดำเนินการ ของคุณ ไบออส ตอนนี้จะใช้ของมัน การตั้งค่าเริ่มต้น
4.Once you’re logged into Windows see if you’re able to Fix Computer does not start until restarted multiple times issue.
Method 4: Check if hard disk is failing
In many cases, the issue occurs because of the failing hard disk and to check if this is the problem here you need to disconnect the hard disk from your PC and connect it to another PC and try to boot from it. If you can boot from the hard disk without any issue on the other PC then you can be sure that the issue is not related to it.
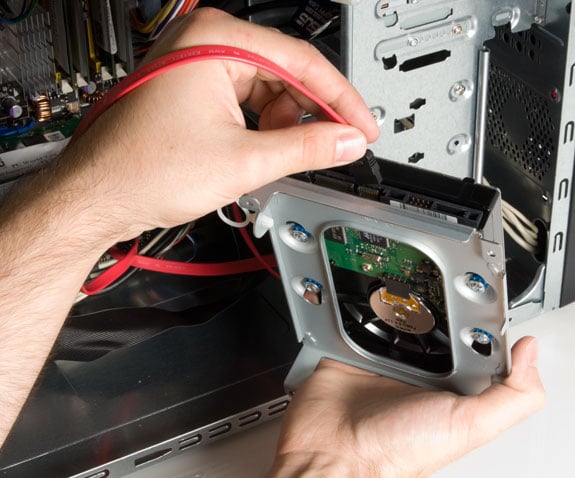
Another way to test your hard disk is download and burn the SeaTools for DOS on a CD then run the test to check if your hard disk is failing or not. You will need to set the first boot to CD/DVD from BIOS in order for this to work.
วิธีที่ 5: ตรวจสอบพาวเวอร์ซัพพลาย
A faulty or failing Power Supply is generally the cause for PC not starting at the first boot. Because if the power consumption of hard disk is not met, it won’t get enough power to run and subsequently you may need to restart the PC several times before it can take the adequate power from PSU. In this case, you may need to replace the power supply with a new one or you could borrow a spare power supply to test if this is the case here.
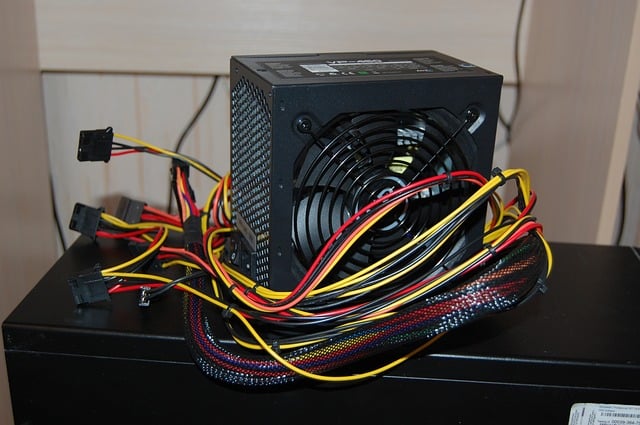
If you have recently installed a new hardware such as video card then chances are the PSU is not able to deliver the necessary power needed by the graphic card. Just temporary remove the hardware and see if this fixes the issue. If the issue is resolved then in order to use the graphic card you may need to purchase a higher voltage Power Supply Unit.
Method 6: Replace CMOS battery
If CMOS battery has dried up or no longer deliver powers then your PC won’t start and after few days it will eventually start hanging up. In order to fix the issue, it’s advised to replace your CMOS battery.
วิธีที่ 7: การรีเซ็ต ATX
หมายเหตุ โดยทั่วไปกระบวนการนี้ใช้กับแล็ปท็อป ดังนั้นหากคุณมีคอมพิวเตอร์ ให้ออกจากวิธีนี้
1.Power off your laptop then remove the power cord, leave it for few minutes.
2.ตอนนี้ ถอดแบตเตอรี่ออก จากด้านหลังแล้วกดปุ่มเปิดปิดค้างไว้ 15-20 วินาที
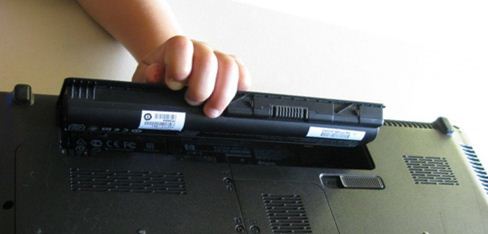
หมายเหตุ อย่าเพิ่งเสียบสายไฟ เราจะแจ้งให้คุณทราบเมื่อต้องดำเนินการดังกล่าว
3.Now plug in สายไฟของคุณ (ไม่ควรใส่แบตเตอรี่) และลองบูทแล็ปท็อปของคุณ
4.If it’s boot properly then again turn off your laptop. Put in the battery and again start your laptop.
If the problem is still there again turn off your laptop, remove power cord & battery. Press & hold the power button for 15-20 seconds and then insert the battery. Power on the laptop and this should fix the issue.
Now if any of the above methods weren’t helpful then it means the problem is with your motherboard and unfortunately, you need to replace it in order to fix the issue.
ที่แนะนำ:
นั่นคือคุณประสบความสำเร็จ Fix Computer does not start until restarted multiple times issue แต่ถ้าคุณยังคงมีข้อสงสัยเกี่ยวกับคู่มือนี้ อย่าลังเลที่จะถามพวกเขาในส่วนความคิดเห็น