- in หน้าต่าง by ผู้ดูแลระบบ
Fix MultiVersus Not Launching in Windows 10

MultiVersus is a famous online multiplayer fighting game that is rocking today’s gaming world. Yet, few users complain about the MultiVersus not launching issue when the game is launched on their Windows 10 PC. If you are in the same boat, the troubleshooting hacks discussed in this article will help you sail the problem.
How to Fix MultiVersus Not Launching in Windows 10
If you are vexed by MultiVersus won’t launch issue in your Windows 10 computer, here are a few possible reasons why you must analyze them carefully to sort out the problem.
- พีซีไม่ตรงตามข้อกำหนดพื้นฐานของเกม
- โปรแกรมพื้นหลังอื่น ๆ กำลังรบกวนเกม
- คุณกำลังใช้ไดรเวอร์เวอร์ชันที่ไม่ได้รับการยืนยัน
- The graphics settings of the game are misconfigured.
- การปรากฏตัวของมัลแวร์และไวรัส
- กรอบงาน .NET และระบบปฏิบัติการไม่ได้รับการอัพเดตเป็นเวอร์ชันล่าสุด
- DirectX version is not up-to-date.
- การโอเวอร์คล็อก
- ไฟล์การติดตั้งเกมที่กำหนดค่าไม่ถูกต้องหรือเสียหายอาจทำให้เกิดปัญหาได้เช่นกัน
- ไฟล์ที่แจกจ่ายต่อได้ของ Microsoft C++ เข้ากันไม่ได้กับเกมและพีซี
Here are a few possible troubleshooting methods that will help you fix the discussed issue.
วิธีที่ 1: วิธีการแก้ไขปัญหาเบื้องต้น
ปฏิบัติตามวิธีการแก้ไขปัญหาเบื้องต้นเหล่านี้เพื่อแก้ไขปัญหาดังกล่าว
1เอ ตรวจสอบความต้องการของระบบ
Multi Versus ความต้องการของระบบขั้นต่ำ
- ซีพียู: Intel Core i5-2300 หรือ AMD FX-8350
- แรม: 4 GB
- วีดีโอการ์ด: Nvidia GeForce GTX 550 Ti or AMD Radeon HD 5850 | Intel UHD 750
- พิกเซลเชดเดอร์: 5.0
- เวอร์เท็กซ์ เชดเดอร์: 5.0
- พื้นที่ว่างในดิสก์: 6 GB
- แรมวิดีโอโดยเฉพาะMB 1024
Multi Versus ข้อกำหนดที่แนะนำ
- ซีพียู: Intel Core i5-3470 หรือ AMD Ryzen 3 1200
- แรม: 8 GB
- วีดีโอการ์ด: Nvidia GeForce GTX 660 or AMD Radeon R9 270
- พิกเซลเชดเดอร์: 5.0
- เวอร์เท็กซ์ เชดเดอร์: 5.0
- พื้นที่ว่างในดิสก์: 6 GB
- แรมวิดีโอโดยเฉพาะMB 2048
1B. Check your internet connection
Unstable internet connection leads to MultiVersus is not working issue, also if there are any obstacles between your router and your computer, they may interfere with the wireless signal and will cause intermittent connection problems.
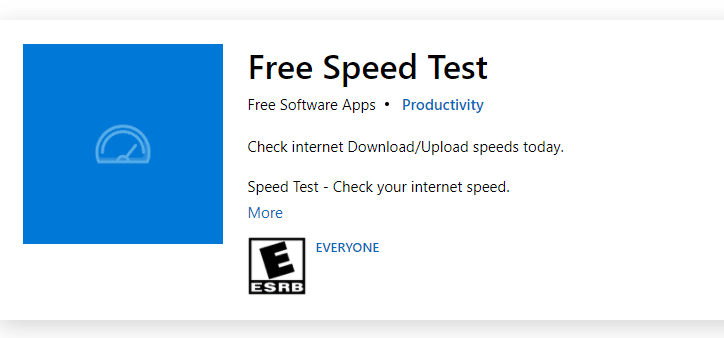
คุณสามารถเรียกใช้ไฟล์ ทดสอบความเร็ว เพื่อทราบระดับความเร็วเครือข่ายที่เหมาะสมที่สุดที่จำเป็นสำหรับการเชื่อมต่อที่เหมาะสม
ตรวจสอบให้แน่ใจว่าอุปกรณ์ของคุณตรงตามเกณฑ์ด้านล่าง
- ค้นหาความแรงของสัญญาณเครือข่ายของคุณและหากสัญญาณต่ำมาก ให้เคลียร์สิ่งกีดขวางทั้งหมดที่อยู่ระหว่างทาง
- หลีกเลี่ยงอุปกรณ์ที่เชื่อมต่อกับเครือข่ายเดียวกันมากเกินไป
- ซื้อโมเด็ม/เราเตอร์ที่ตรวจสอบโดยผู้ให้บริการอินเทอร์เน็ต (ISP) ของคุณเสมอ และไม่มีความขัดแย้งกัน
- ไม่ได้ใช้ สายเคเบิลเก่า หัก หรือชำรุด เปลี่ยนสายเคเบิลหากจำเป็น
- ตรวจสอบให้แน่ใจว่าสายไฟจากโมเด็มไปยังเราเตอร์และโมเด็มไปยังผนังมีความเสถียรและไม่รบกวน
หากมีปัญหาการเชื่อมต่ออินเทอร์เน็ต โปรดตรวจสอบคำแนะนำของเราวิธีแก้ไขปัญหาการเชื่อมต่อเครือข่ายใน Windows 10 เพื่อแก้ไขปัญหาเดียวกัน
1C. Stop Overclocking
- Every high-end computer is built with the option of Overclocking which helps in outputting more juice than your specifications that you already have. Running the graphics card or processor faster than the default speed refers to overclocking.
- เมื่อสิ่งนี้เกิดขึ้น คอมพิวเตอร์ของคุณจะถึงอุณหภูมิสูงสุดหลังจากช่วงเวลาหนึ่ง คอมพิวเตอร์ตรวจพบสิ่งนี้และปรับความเร็วสัญญาณนาฬิกาให้เป็นความเร็วปกติจนกระทั่งเย็นลง ความเร็วสัญญาณนาฬิกาจะเพิ่มขึ้นอีกครั้งหลังจากที่เย็นลง
- ซึ่งจะเพิ่มประสิทธิภาพให้กับคอมพิวเตอร์ของคุณและจะช่วยได้มากหากคุณไม่มีคอมพิวเตอร์ที่มีประสิทธิภาพ
- It must be noted that all the games do not support overclocking. The same applies to MultiVersus. So, you must try disabling all overclocking on your computer and try launching the game. If it launches well, the issue is fixed.
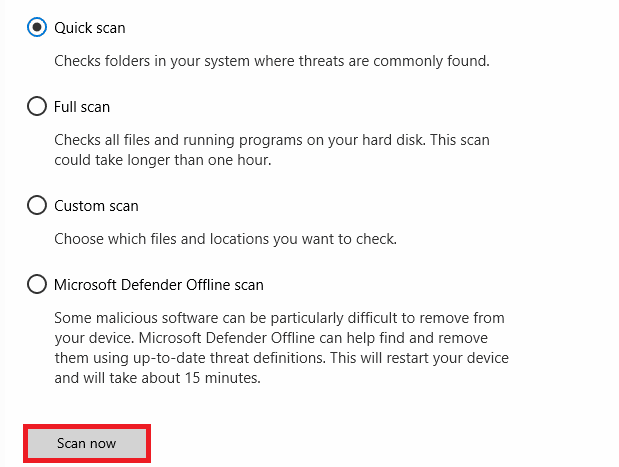
1D. เรียกใช้การสแกนมัลแวร์
The presence of a virus or malware attack will result in gaming problems on your computer. If in case, the virus attack is very severe, you cannot connect to any online game continuously at all. To resolve the problem, you have to remove the virus or malware completely from your Windows 10 computer.
ขอแนะนำให้คุณสแกนคอมพิวเตอร์ของคุณตามคำแนะนำในคู่มือของเรา ฉันจะสแกนไวรัสบนคอมพิวเตอร์ของฉันได้อย่างไร?
นอกจากนี้ หากคุณต้องการลบมัลแวร์ออกจากคอมพิวเตอร์ของคุณ โปรดดูคำแนะนำในการลบมัลแวร์ออกจากพีซีของคุณใน Windows 10
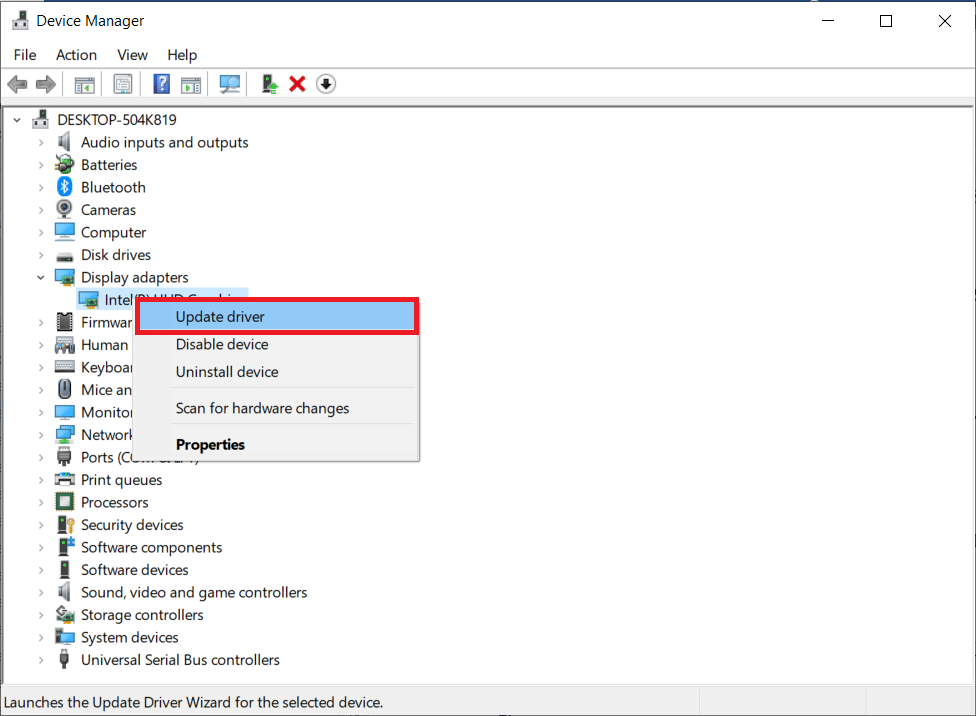
1จ. อัปเดตไดรเวอร์ GPU
Graphical drivers are responsible for heavy graphical images and video processing games. If you face any launching conflicts in the MultiVersus game, make sure you use an updated version of device drivers, as they serve as a link between the hardware and Operating System of your PC. Many users have suggested that updating drivers have fixed MultiVersus not working issue. Read and implement the steps instructed in our guide 4 Ways to Update Graphics Drivers in Windows 10 to do so.
ยังอ่าน: แก้ไข Windows พบไดรเวอร์สำหรับอุปกรณ์ของคุณ แต่พบข้อผิดพลาด
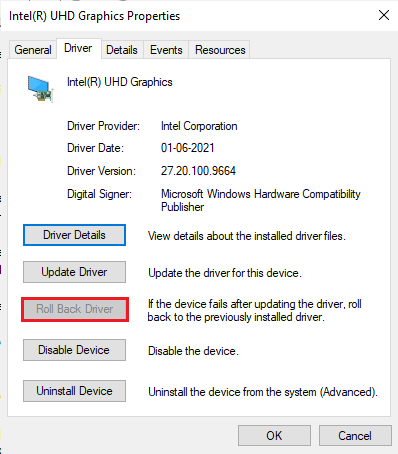
1F. Roll Back GPU Drivers
Sometimes, the current version of GPU drivers may cause the discussed launching issue in MultiVersus, and in this case, you have to restore previous versions of installed drivers. This process is called การย้อนกลับของไดรเวอร์ และคุณสามารถย้อนกลับไดรเวอร์คอมพิวเตอร์ของคุณไปสู่สถานะก่อนหน้าได้อย่างง่ายดายโดยทำตามคำแนะนำของเราวิธีการย้อนกลับไดรเวอร์ใน Windows 10
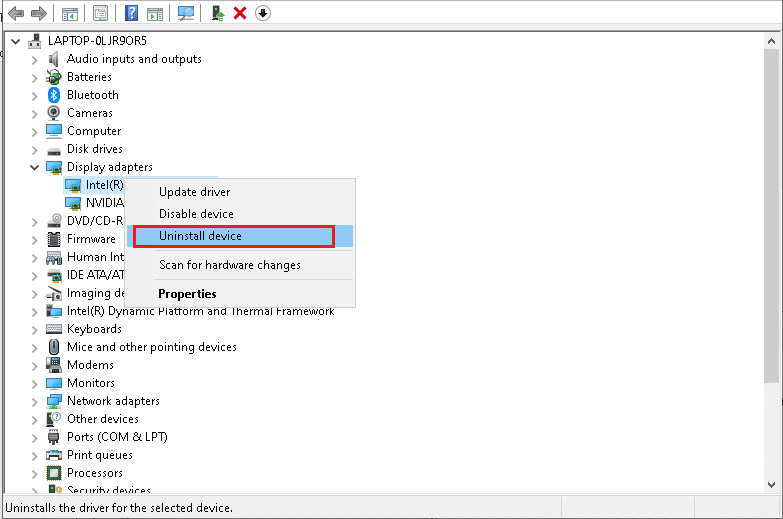
1G. Reinstall GPU Driver
If you still face MultiVersus not starting issue after updating your GPU drivers, then reinstall device drivers to fix any incompatibility issues. There are several ways to reinstall drivers on your computer. Yet, you can easily reinstall Graphical drivers as instructed in our guide How to Uninstall and Reinstall Drivers on Windows 10.
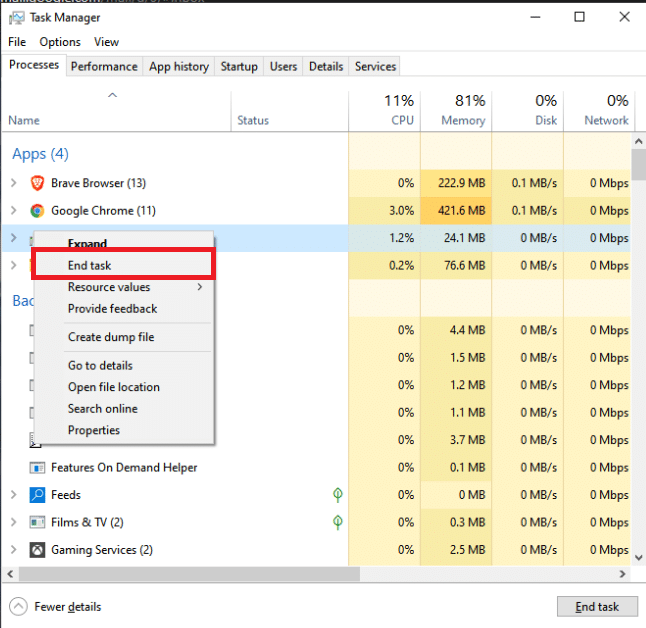
1H. End Background Processes
Several users have confirmed that MultiVersus not starting on PC can be resolved by closing all the background tasks running on your PC. To implement the task, follow our guide How to End Task in Windows 10, and proceed as instructed.
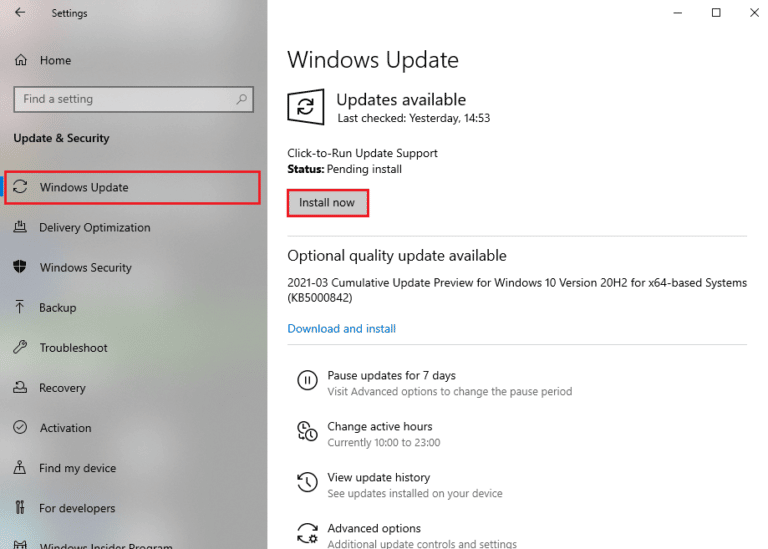
1I. Update Windows
You can also eradicate bugs in your computer and game by updating your Operating System. Always ensure if you have updated your Windows Operating System and if any updates are pending in action, use our guide How to Download and Install Windows 10 Latest Update
1J. Disable Antivirus Temporarily (If Applicable)
Some incompatible antivirus programs installed on your computer will cause MultiVersus launching problem. To avoid conflicts, you must ensure the security settings of your Windows 10 computer and check if they are stable or not. To find whether the antivirus suite is the reason for the discussed issue, disable it once and try connecting to a network.
อ่านคำแนะนำของเราเกี่ยวกับวิธีปิดการใช้งานโปรแกรมป้องกันไวรัสชั่วคราวบน Windows 10 และทำตามคำแนะนำเพื่อปิดการใช้งานโปรแกรมป้องกันไวรัสของคุณชั่วคราวบนพีซีของคุณ
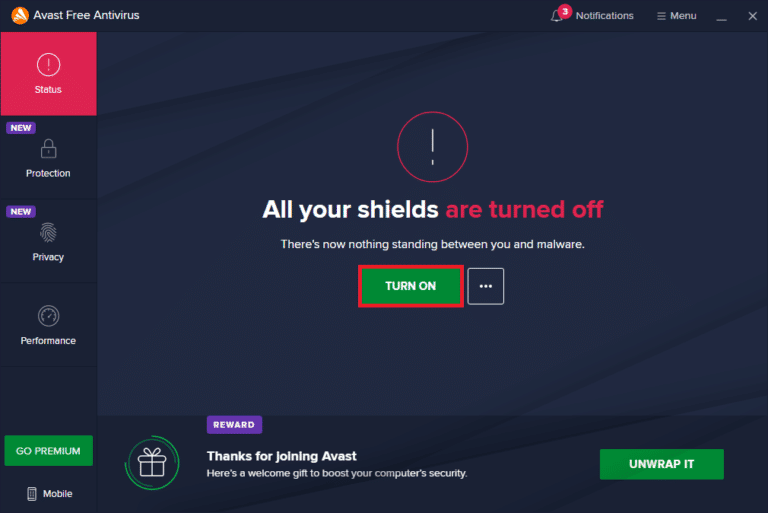
หากคุณสามารถแก้ไขปัญหาได้หลังจากปิดใช้งานโปรแกรมป้องกันไวรัสในคอมพิวเตอร์ของคุณแล้ว ขอแนะนำให้ถอนการติดตั้งโปรแกรมดังกล่าวจากพีซีของคุณโดยสิ้นเชิง
Read our guide Force Uninstall Programs which won’t Uninstall in Windows 10 to uninstall your antivirus program on your computer.
ยังอ่าน: วิธีถอนการติดตั้ง McAfee LiveSafe ใน Windows 10
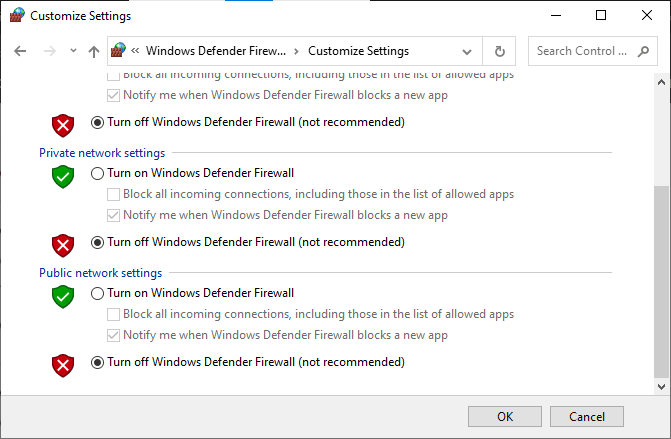
1K. Turn Off Windows Defender Firewall (Not Recommended)
Your computer will face MultiVersus is not working issue, due to an over-protective firewall suite in the Windows 10 PC. To resolve the problem, you can either add a new rule for your game, whitelist the game or as the last fix, disable the firewall temporarily.
Our guide on How to Disable Windows 10 Firewall will help you.
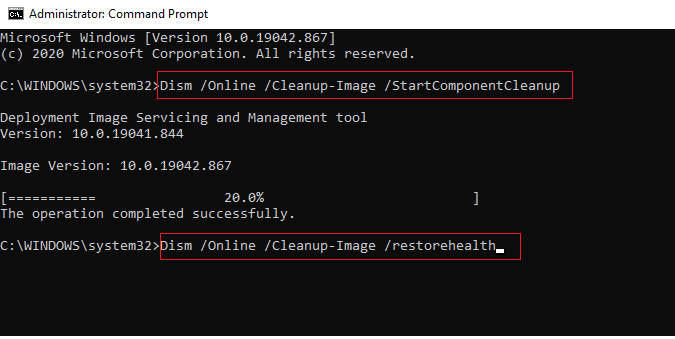
1ลิตร ซ่อมแซมไฟล์ระบบ
If there are any missing or damaged files on your Windows 10 PC, you will face MultiVersus takes forever to launch issue. Yet, you are repairing these corrupt files by using inbuilt utilities namely, ตรวจสอบระบบไฟล์ และ การจัดการและให้บริการ Deployment Image.
อ่านคำแนะนำของเราเกี่ยวกับวิธีการซ่อมแซมไฟล์ระบบใน Windows 10 และทำตามขั้นตอนตามคำแนะนำเพื่อซ่อมแซมไฟล์ที่เสียหายทั้งหมดของคุณ
Method 2: Run MultiVersus Game as Administrator
If MultiVersus does not have required administrative privileges, a few essential features of the game will be limited causing you MultiVersus not launching issue whenever you open the game or install any updates. Follow the below-mentioned instructions to run the game as an administrator.
1. คลิกขวาที่ MultiVersus shortcut บนเดสก์ท็อป
หมายเหตุ คุณยังสามารถไปที่ไฟล์ ไดเรกทอรีการติดตั้ง และคลิกขวาที่มัน
2 จากนั้นเลือก อสังหาริมทรัพย์ ตัวเลือก
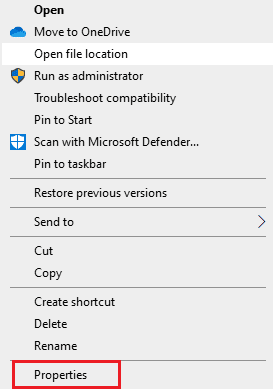
3. ตอนนี้ ย้ายไปที่ ความเข้ากันได้ และคลิกที่ รันโปรแกรมนี้เป็นผู้ดูแลระบบ.
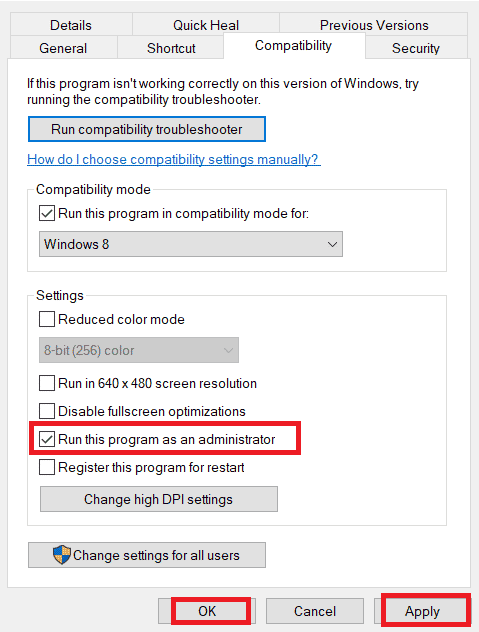
4. สุดท้ายคลิกที่ ใช้> ตกลง เพื่อบันทึกการเปลี่ยนแปลง
Check if you have fixed MultiVersus launching issues.
ยังอ่าน: แก้ไข WoW ใช้เวลาตลอดไปในการเปิดตัวใน Windows 10
วิธีที่ 3: เปลี่ยนลำดับความสำคัญของกระบวนการเกม
The preference of an application or process tells the computer the importance and if it should be given preference over the others while allocating the resources. The priority of every application is normal except the system processes, by default. MultiVersus might crash if it didn’t get enough resources.
1 กด Ctrl + Shift + Esc คีย์ ร่วมกันเปิด ทาสก์บาร์.
2. ตอนนี้ ค้นหา MultiVersus process.
3. จากนั้นเปลี่ยนลำดับความสำคัญเป็น ลำดับความสำคัญสูง และตรวจสอบว่าใช้งานได้หรือไม่
หมายเหตุ เปลี่ยนลำดับความสำคัญด้วยความระมัดระวังเป็นอย่างยิ่ง เนื่องจากการเปลี่ยนลำดับความสำคัญของกระบวนการโดยไม่ระมัดระวังอาจทำให้ระบบของคุณช้ามากหรือไม่เสถียร
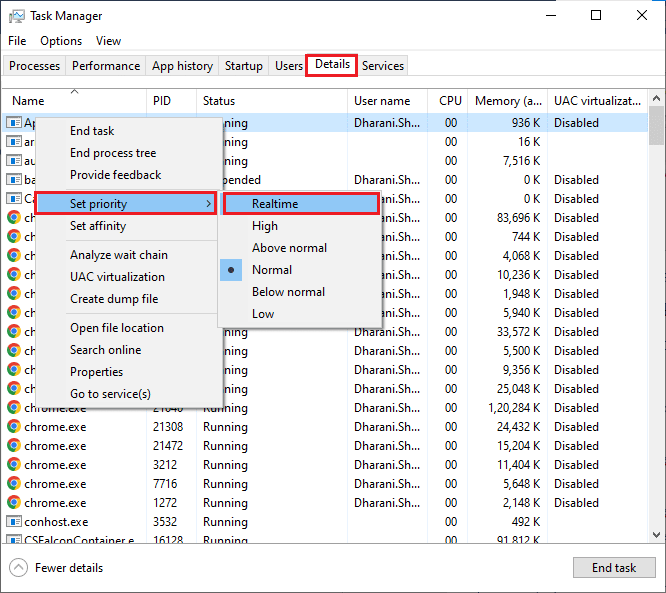
4 ปิด ที่ Task Manager และ รีบูต คอมพิวเตอร์ของคุณ.
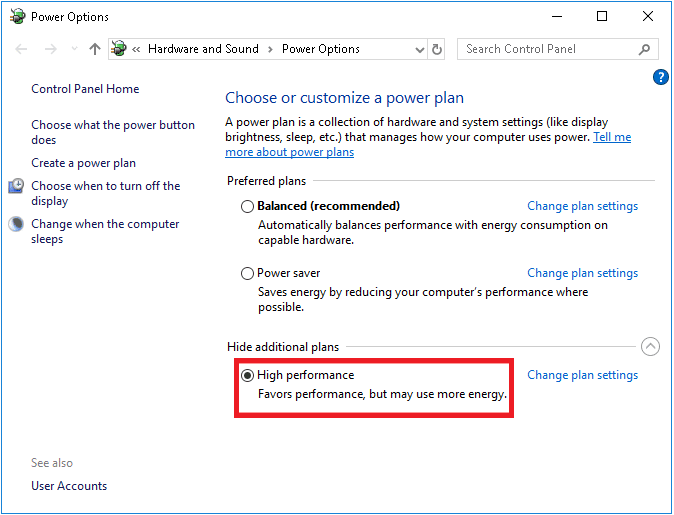
วิธีที่ 4: ตั้งค่าประสิทธิภาพสูง
คุณยังสามารถเพิ่มประสิทธิภาพเกมของคุณได้เมื่อตั้งค่าแผนการใช้พลังงานประสิทธิภาพสูง แผนการใช้พลังงานเหล่านี้ได้รับการพัฒนาเพื่อจัดการการตั้งค่าพลังงานในการตั้งค่าแบบพกพา ปฏิบัติตามคำแนะนำด้านล่างเพื่อใช้การตั้งค่าแผนการใช้พลังงานประสิทธิภาพสูงในระบบของคุณ
1 กด ปุ่ม Windows + I พร้อมกันเพื่อเปิด การตั้งค่า Windows
2 ตอนนี้ให้คลิกที่ System การตั้งค่า
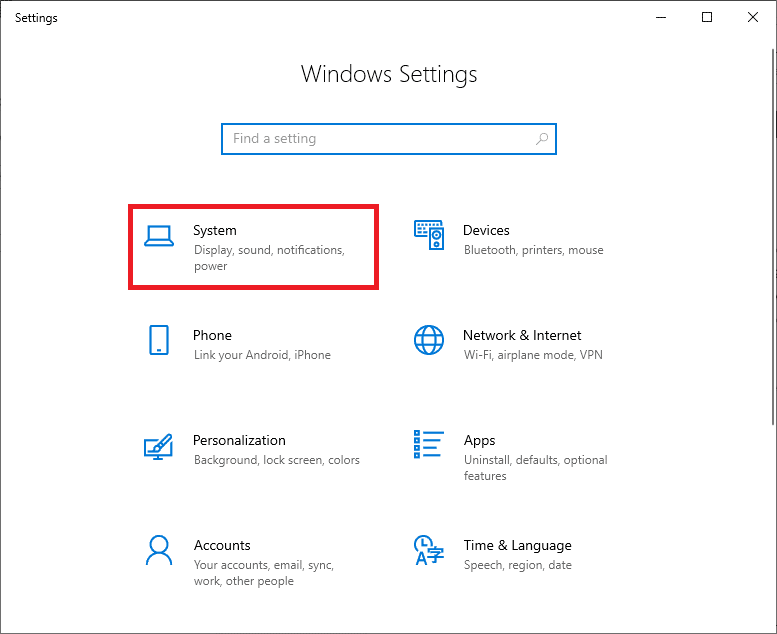
3. ตอนนี้ เลือก พลังและการนอนหลับ ตัวเลือกและคลิกที่ การตั้งค่าพลังงานเพิ่มเติม ภายใต้ การตั้งค่าที่เกี่ยวข้อง.
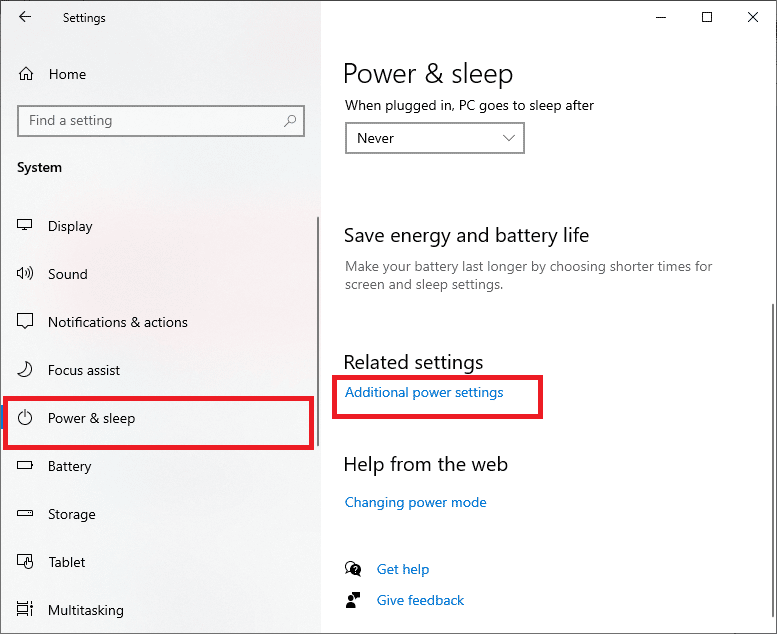
4. ตอนนี้ เลือก ประสิทธิภาพสูง ภายใต้ แผนเพิ่มเติมสูง ดังแสดงในภาพด้านล่าง
Now you have optimized your system, check if you have fixed MultiVersus won’t launch on startup issue.
ยังอ่าน: แก้ไขข้อผิดพลาดไฟล์ที่ดาวน์โหลดหายไปบน Steam
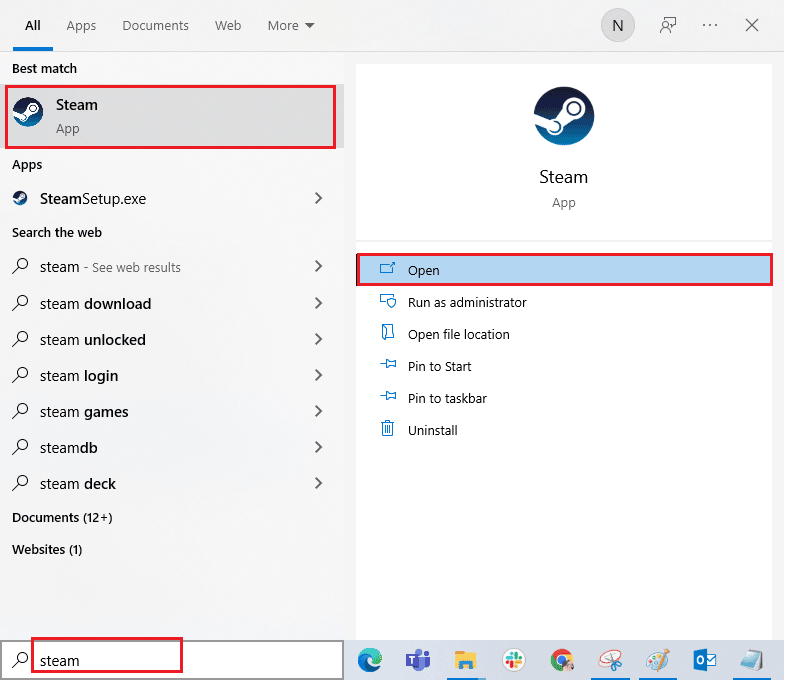
Method 5: Update Steam App & MultiVersus Game
If you use an outdated Steam application, you cannot access any games smoothly. Hence always make sure you use an updated version of Steam and MultiVersus game before launching it.
1 ตี ปุ่ม windows และประเภท อบไอน้ำจากนั้นคลิกที่ เปิด
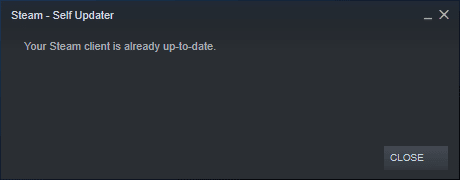
2 ตอนนี้ให้คลิกที่ อบไอน้ำ ที่มุมซ้ายบนของหน้าจอตามด้วย ตรวจสอบการอัปเดตไคลเอ็นต์ Steam... ตามที่ไฮไลต์ด้านล่าง
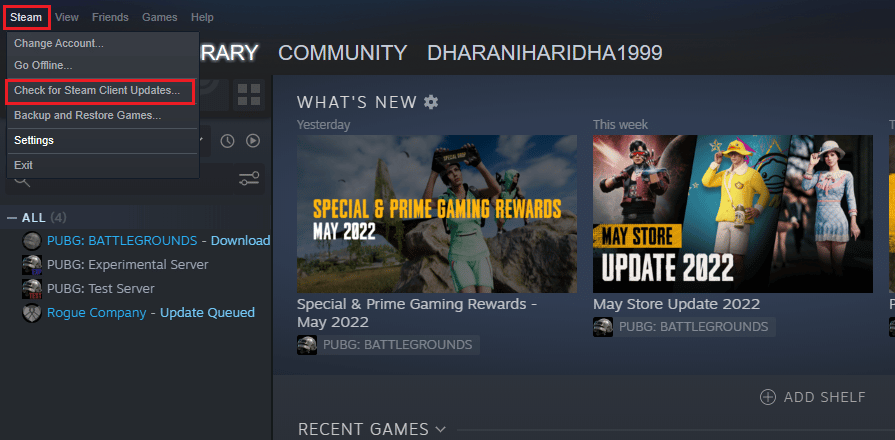
3. หากคุณมีการอัพเดตใหม่ที่จะดาวน์โหลด ให้ติดตั้งและตรวจสอบให้แน่ใจ ไคลเอนต์ Steam ของคุณเป็นเวอร์ชันล่าสุด.
4. ตอนนี้ เปิด Steam อีกครั้ง และตรวจสอบว่าปัญหาได้รับการแก้ไขแล้วหรือไม่
Likewise, it is always essential that your game run at its latest version to avoid any conflicts. Until your game is updated, you cannot log in to MultiVersus servers successfully.
ไปยัง อัปเดตเกมของคุณ, ทำตามขั้นตอนที่กล่าวถึงด้านล่างนี้.
1 เปิด อบไอน้ำ และไปที่ ห้องสมุด.
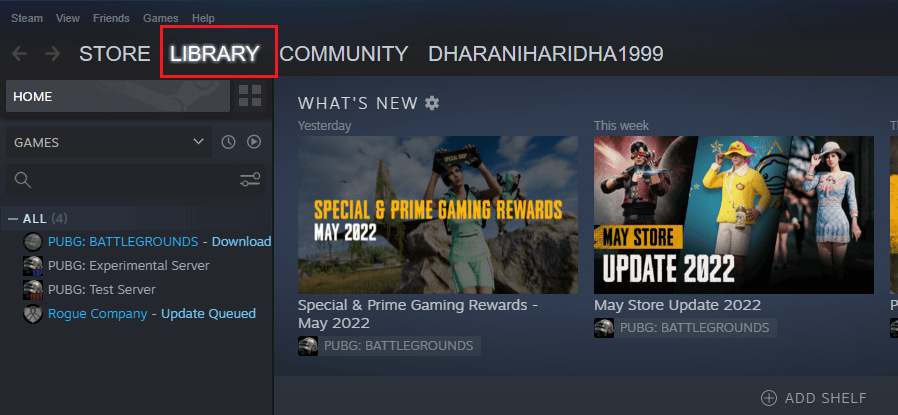
2 ตอนนี้ให้คลิกที่ หน้าหลัก and search for MultiVersus.
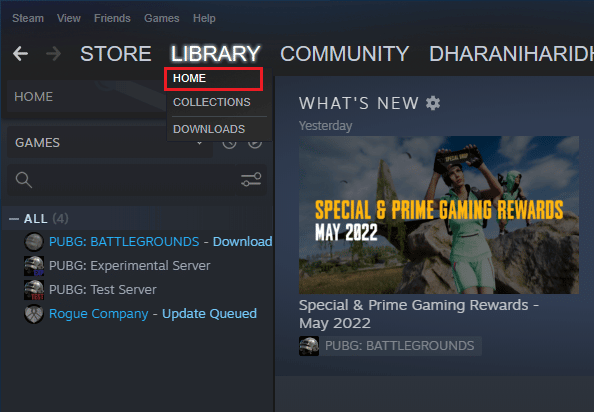
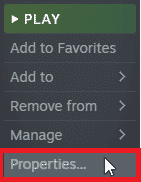
3. จากนั้นคลิกขวาที่เกมแล้วเลือก คุณสมบัติ ตัวเลือก

4. ตอนนี้เปลี่ยนเป็น การปรับปรุง แท็บและตรวจสอบว่าการอัปเดตใด ๆ ที่อยู่ระหว่างดำเนินการอยู่หรือไม่ หากเป็นเช่นนั้น ให้ทำตามคำแนะนำบนหน้าจอเพื่อดาวน์โหลดการอัพเดตล่าสุด
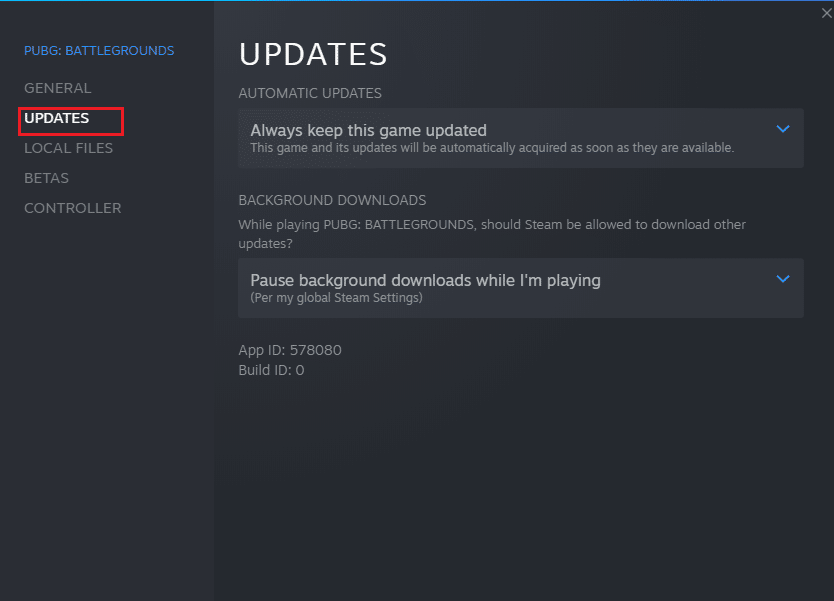
After an update, check if MultiVersus not launching issue is fixed.
วิธีที่ 6: ปิดใช้งานการเพิ่มประสิทธิภาพแบบเต็มหน้าจอ
Few users have suggested that disabling full-screen optimizations on PC has helped them fix MultiVersus is not launching issue. Follow as instructed.
1. Navigate to the Steam ห้องสมุด เมนู
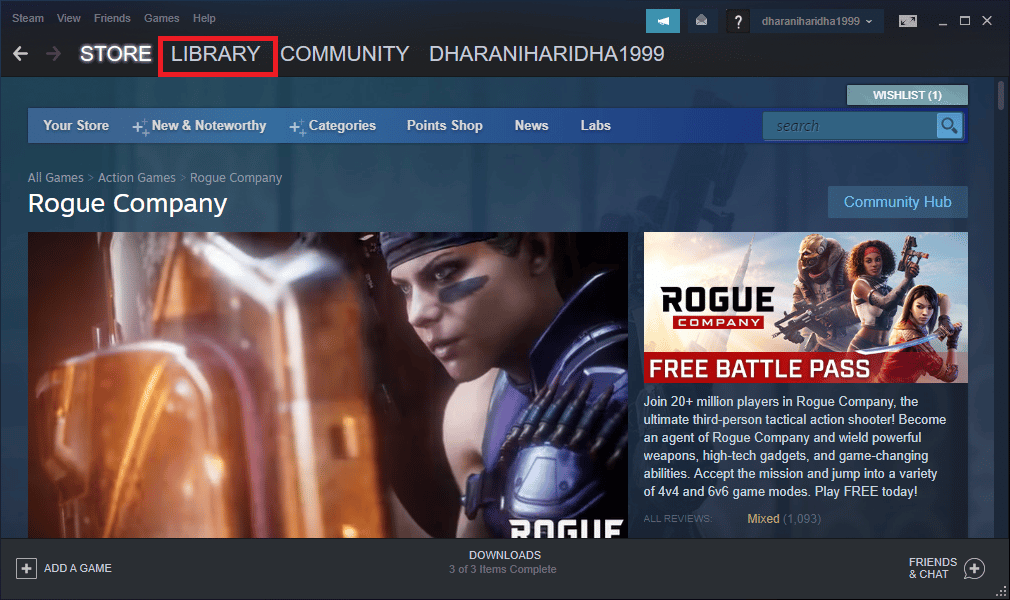
2. Now, right-click on the MultiVersus game and click on คุณสมบัติ
3. ตอนนี้เปลี่ยนเป็น ทั่วไป และคลิกที่ ตั้งค่าตัวเลือกการเปิดตัว… ตามที่ปรากฎ
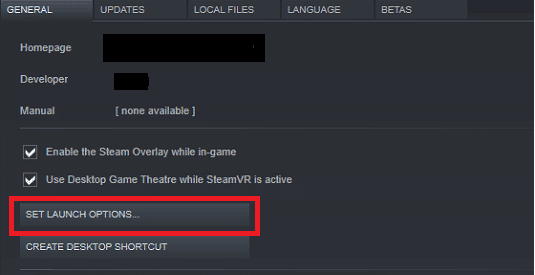
4. ตอนนี้ หน้าต่างใหม่จะเปิดขึ้นพร้อมกับคำเตือนผู้ใช้ขั้นสูง หากต้องการเปิดเกมในโหมดหน้าต่าง ให้พิมพ์ – มีหน้าต่าง พารามิเตอร์.
5. ตอนนี้ บันทึกการเปลี่ยนแปลงโดยคลิก OK และออกจากหน้าต่างคุณสมบัติ
6. ตอนนี้ สังข์ เกม and ensure that it runs in windowed mode.
หมายเหตุ คุณยังสามารถนำทางไปยัง ตั้งค่าตัวเลือกการเปิดตัว… อีกครั้งและพิมพ์พารามิเตอร์ต่อไปนี้แทนพารามิเตอร์สุดท้าย
– มีหน้าต่าง -w 1024
7. Now, save the changes by clicking on OK.
พารามิเตอร์นี้จะตั้งค่าเกมให้เปิดในโหมดหน้าต่าง
ยังอ่าน: แก้ไขการกำหนดค่าแอป Steam ไม่พร้อมใช้งานใน Windows 10
วิธีที่ 7: ปิดการใช้งานโอเวอร์เลย์ในเกม
The Steam Overlay is a piece of Steam that allows the users to access friends list, and web browser and allows in-game purchasing. It is a significant tool, yet it sometimes triggers MultiVersus not launching on startup issue. If you want to solve this problem, then turn off the Steam game overlay.
1 เปิด อบไอน้ำ แอพและคลิกที่ ห้องสมุด.
2. ตอนนี้ให้คลิกขวาที่ Multi Versus และคลิกที่ คุณสมบัติ

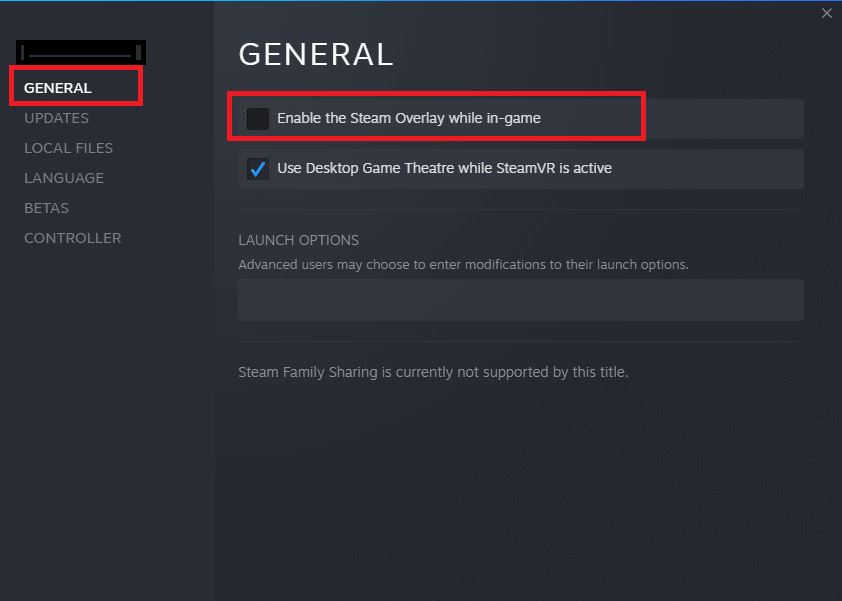
3. ตอนนี้เปลี่ยนเป็น ทั่วไป แท็บและยกเลิกการทำเครื่องหมายในช่องที่มี เปิดใช้งาน Steam Overlay ในขณะที่อยู่ในเกม
4. สุดท้าย เปิดเกมอีกครั้ง and check if the MultiVersus launching issue is solved.
วิธีที่ 8: ตรวจสอบความสมบูรณ์ของไฟล์เกม
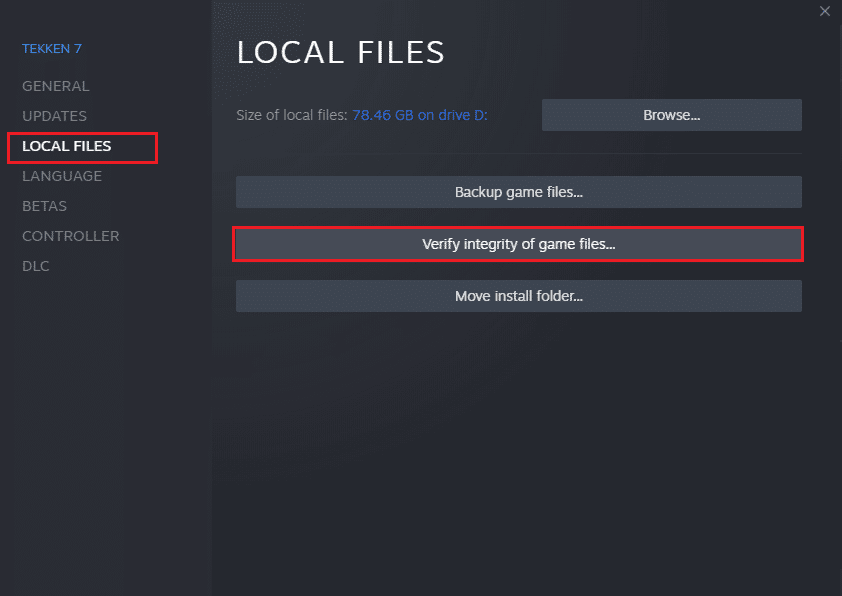
We have seen many cases in which the game files are either missing or corrupt or it had incomplete installations. Users could also experience MultiVersus not starting on PC issue if they are interrupted by the update process or if the game files are being moved. In this method, you will be opening Steam and using the built-in function for verifying the integrity of the game. It will be replaced if the application finds something. Read our guide on how to verify integrity of game files on Steam.
ยังอ่าน: แก้ไข Steam Client Bootstrapper ไม่ตอบสนองใน Windows 10
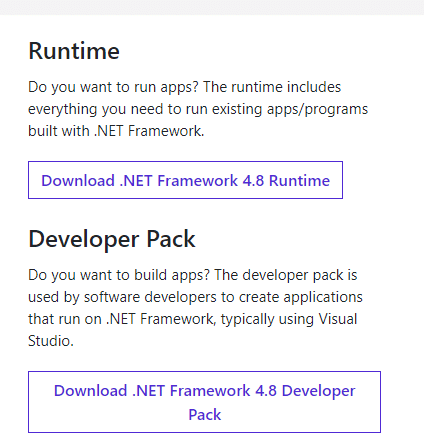
วิธีที่ 9: อัปเดต .NET Framework
.NET framework in Windows 10 computer is essential for uninterrupted service of modern apps and games. Many games have an auto-update feature for the .NET framework, and thus it will be updated automatically whenever an update is available. In another case, if an update prompts in your PC, you can manually install the latest version of the .NET framework, as discussed below, to fix MultiVersus not launching issue.
1. ตรวจสอบ อัปเดตใหม่ สำหรับ . NET Framework จาก เว็บไซต์ของ Microsoft อย่างเป็นทางการ.
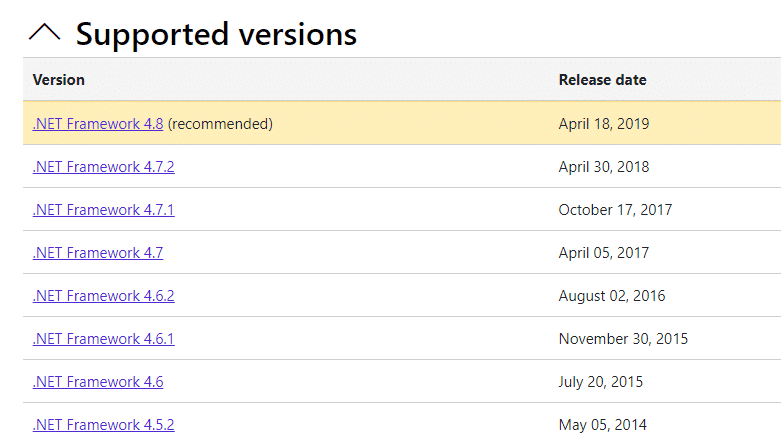
2. หากมีการอัพเดตใดๆ ให้คลิกที่ส่วนที่เกี่ยวข้อง/แนะนำ ลิงค์และคลิก ดาวน์โหลดรันไทม์ .NET Framework 4.8 ตัวเลือก
หมายเหตุ อย่าคลิกบน ดาวน์โหลดชุดนักพัฒนา .NET Framework 4.8 ตามที่นักพัฒนาซอฟต์แวร์ใช้
3 ไปที่ การดาวน์โหลดของฉัน ดับเบิลคลิกที่ไฟล์ติดตั้งเพื่อเรียกใช้ไฟล์ที่ดาวน์โหลดมาและปฏิบัติตาม คำแนะนำบนหน้าจอ to install the .NET framework successfully on your Windows PC. Once done, check if you have fixed the discussed issue or not.
วิธีที่ 10: อัปเดต DirectX
To enjoy a seamless multimedia experience on MultiVersus, you have to make sure whether DirectX is installed, and it is updated to its latest version. DirectX helps you improve the visual media experience for graphical games and applications especially. It is worth updating DirectX needed for this game.
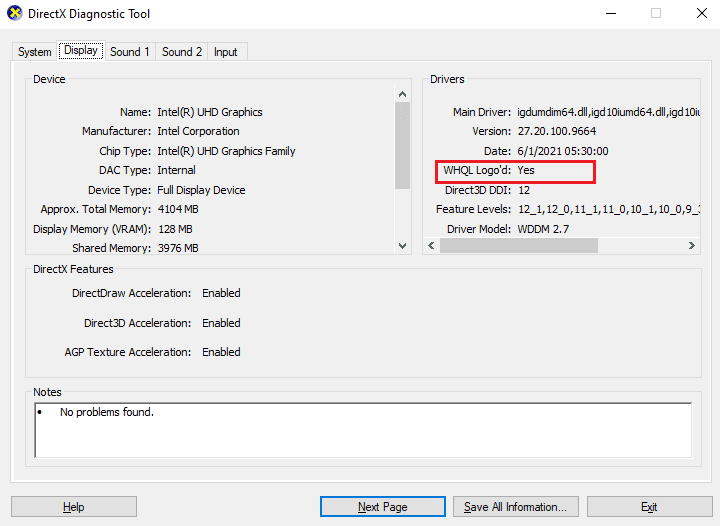
1. กดปุ่ม ปุ่ม Windows + R พร้อมกันเพื่อเปิดตัว วิ่ง กล่องโต้ตอบ
2 ประเภท dxdiag และกดปุ่ม ใส่รหัส เพื่อเปิด DirectX เครื่องมือวิเคราะห์.
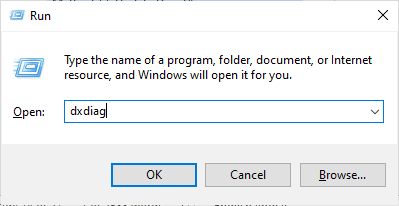
3 ตรวจสอบ เวอร์ชั่นของ DirectX, if it contains 12 DirectX หรือไม่
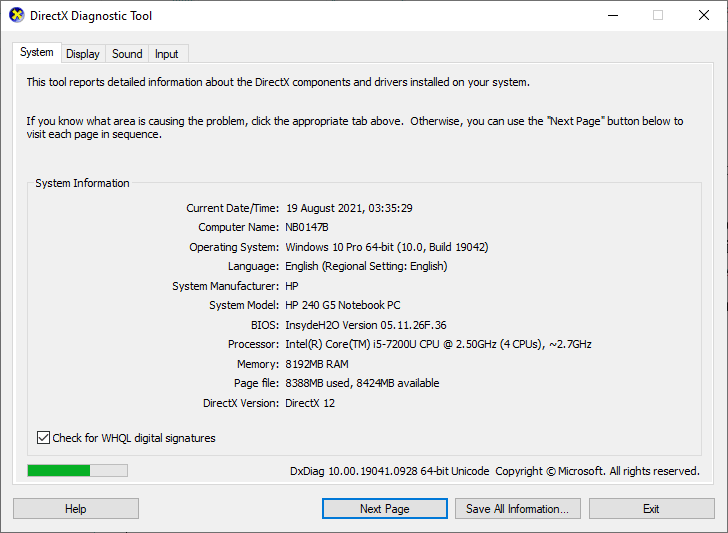
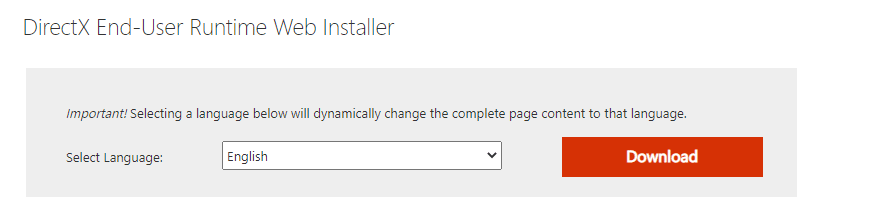
4. If you do not have DirectX 12 in your system, download and install it from the หน้าดาวน์โหลด DirectX โดยทำตามคำแนะนำบนหน้าจอ
After installing DirectX, check if the issue occurs again.
หมายเหตุ ทำให้มั่นใจ Check for WHQL digital signatures box is checked in System tab and in all tabs, check whether โลโก้ WHQL ตั้งเป็น ใช่.
วิธีที่ 11: ซ่อมแซม Microsoft Visual C++ Redistributable
Alternately, you can try to repair the Microsoft Visual C++ Redistributable packages to fix MultiVersus not launching issue as follows:
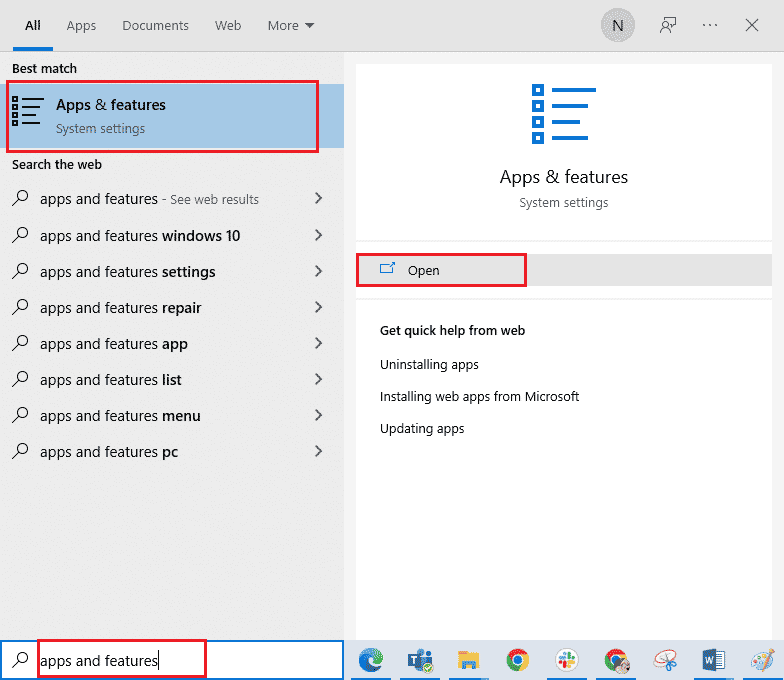
1. กดปุ่ม ปุ่ม windowsพิมพ์ แอพและคุณสมบัติจากนั้นคลิกที่ จุดเปิด.
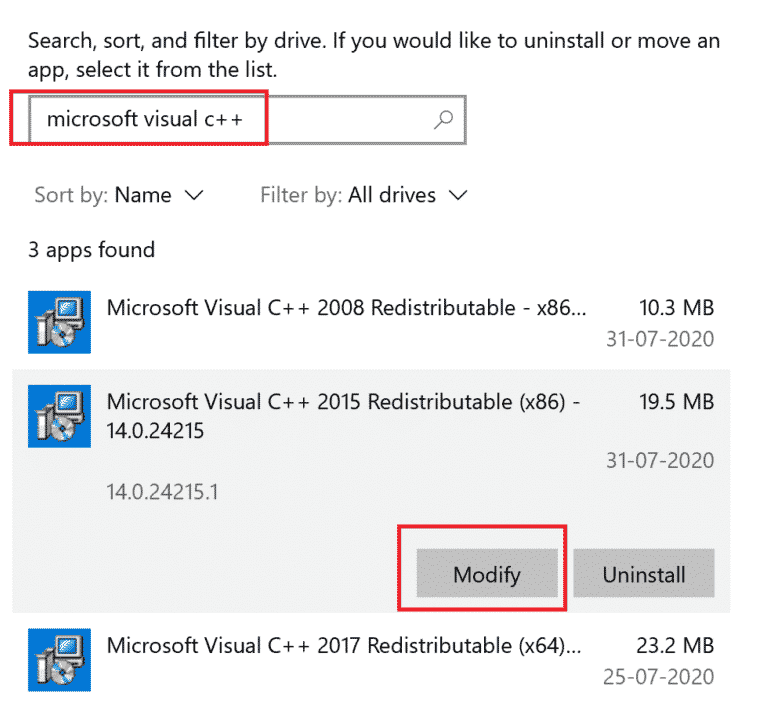
2. ค้นหา Microsoft Visual C ++ Redistributable แพ็คเกจ.
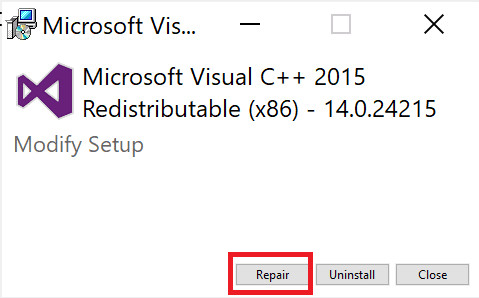
3. Then, select the package, and click on แก้ไข ตัวเลือก
4. จากนั้นคลิก ใช่ บน ควบคุมบัญชีผู้ใช้ กล่องโต้ตอบ
5. ในหน้าต่างป๊อปอัปที่ปรากฏขึ้น ให้คลิกที่ ซ่อมแซม. รอให้กระบวนการเสร็จสิ้น
6. Repeat the above steps to modify all the Microsoft Visual C++ Redistributable packages.
7. สุดท้าย รีสตาร์ทพีซี.
Open the application that you were unable to open previously. If this did not work, try reinstalling the C++ redistributable instead.
ยังอ่าน: แก้ไขการตั้งค่า Microsoft Visual C++ 2015 ที่แจกจ่ายต่อได้ล้มเหลวข้อผิดพลาด 0x80240017
วิธีที่ 12: ติดตั้ง Microsoft Visual C++ Redistributable ใหม่
If the previous method of repairing the Microsoft C++ Visual Redistributable did not fix MultiVersus won’t launch issue, then you will have to reinstall the redistributable. Follow the given steps to uninstall & then install these again.
1 เปิด แอพและคุณสมบัติ การตั้งค่าระบบ.
2 เลือก Microsoft Visual C ++ Redistributable package, then click on ถอนการติดตั้ง ตัวเลือก
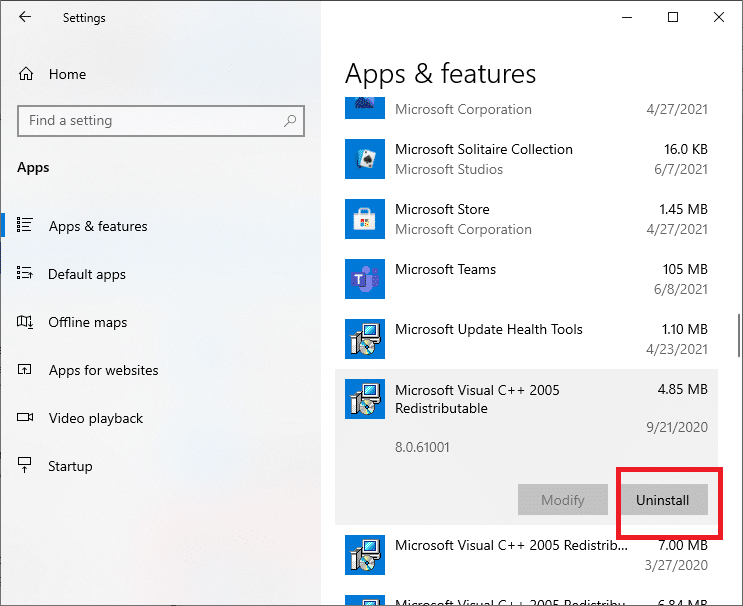
3 คลิกที่ ถอนการติดตั้ง option again to confirm and remove the package.
หมายเหตุ Make sure to uninstall all the Microsoft Visual C++ Redistributable packages.
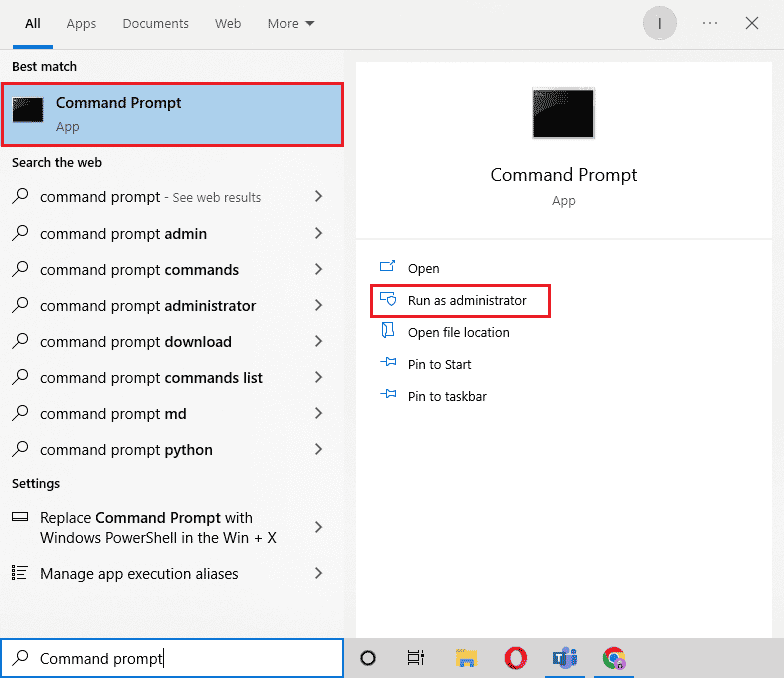
4. กดปุ่ม ปุ่ม windowsพิมพ์ พร้อมรับคำสั่งจากนั้นคลิกที่ เรียกใช้ในฐานะผู้ดูแล.
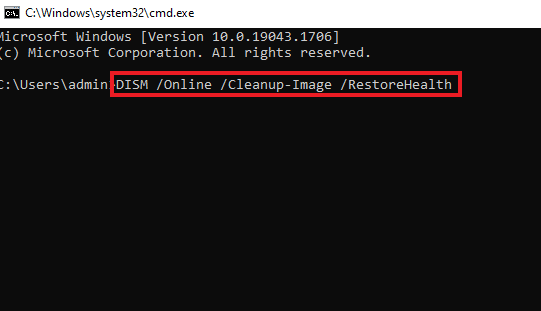
5. พิมพ์ข้อความต่อไปนี้ คำสั่ง และกด เข้าสู่ สำคัญ หลังจากแต่ละ:
DISM /online /Cleanup-Image /StartComponentCleanup
DISM /online /Cleanup-Image /RestoreHealth
6. เมื่อกระบวนการเสร็จสิ้น รีบูทพีซี.
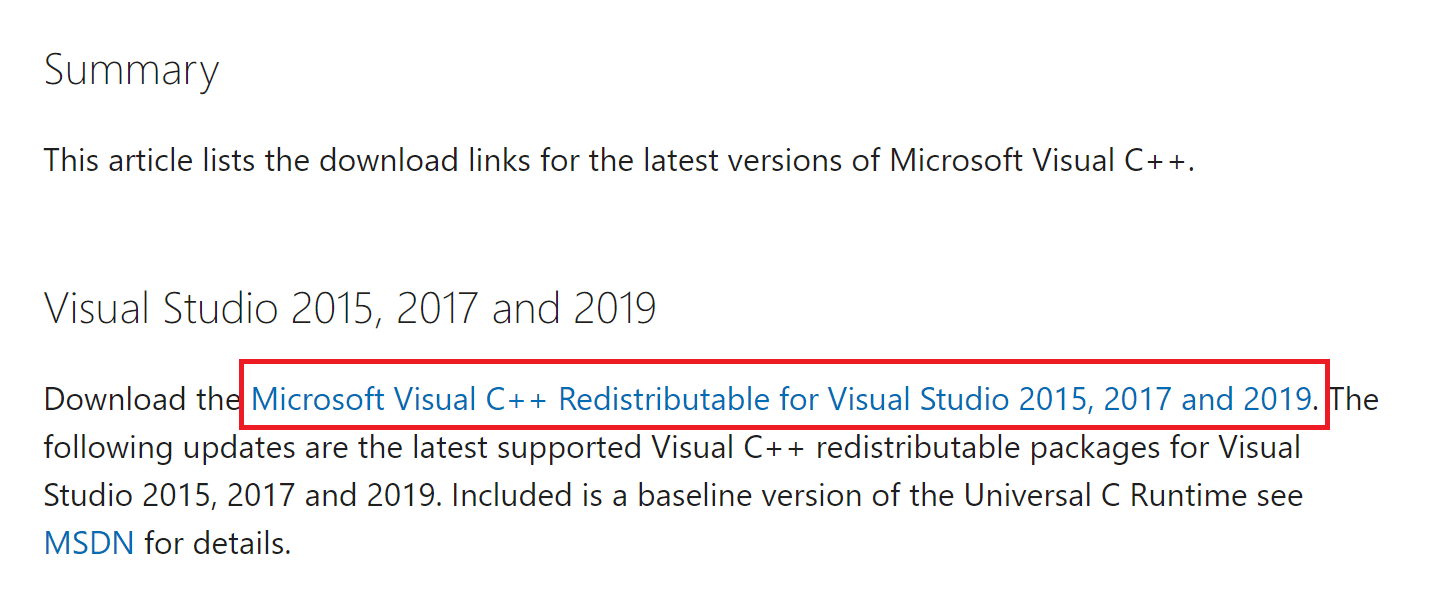
7. จากนั้นไปที่ Microsoft Visual C++ Redistributable webpage เพื่อดาวน์โหลดแพ็คเกจ C++ ล่าสุดดังที่แสดงไว้ที่นี่
8. เมื่อดาวน์โหลดแล้ว ให้เปิดไฟล์ ไฟล์ที่ดาวน์โหลด by double-clicking on it in ดาวน์โหลดของฉัน. การติดตั้ง แพ็คเกจโดยทำตามคำแนะนำบนหน้าจอ
9. Once the installation is complete, finally รีสตาร์ทพีซี.
ที่แนะนำ:
เราหวังว่าคู่มือนี้จะเป็นประโยชน์และคุณสามารถแก้ไขได้ MultiVersus not launching issue on your Windows 10 PC. Let us know which method worked for you the best. Feel free to reach out to us with your queries and suggestions via the comments section below.