- in หน้าต่าง by ผู้ดูแลระบบ
แก้ไขเมนู Start ไม่ทำงานใน Windows 10

If you have recently updated or upgraded to Windows 10, then chances are your Start Menu may not work properly, making it impossible for users to navigate around Windows 10. Users are experiencing various issues with Start Menu such as Start Menu does not open, Start Button is not working, or Start Menu freezes etc. If your Start Menu isn’t working then don’t worry as today we will see a way to fix this issue.
This exact cause is different for different users because each user has a different system configuration and environment. But the problem can be related to anything like corrupted user account or drivers, damaged system files, etc. So without wasting any time, let’s see How to Fix Start Menu Not Working in Windows 10 with the help of the below-listed tutorial.
ตรวจสอบให้แน่ใจว่าได้สร้างจุดคืนค่าในกรณีที่มีสิ่งผิดปกติเกิดขึ้น
To run Command Prompt as an administrator, press Ctrl + Shift + Esc to open Task Manager. Then click on เนื้อไม่มีมัน จากนั้นเลือก เรียกใช้งานใหม่. ชนิด cmd.exe และเครื่องหมายถูก “สร้างงานนี้ด้วยสิทธิ์ระดับผู้ดูแลระบบ” then click OK. Similarly, to open PowerShell, type powershell.exe and again checkmark the above field then hit Enter.

วิธีที่ 1: รีสตาร์ท Windows Explorer
1 กด Ctrl + Shift + Esc คีย์ร่วมกันเพื่อเปิดตัว ตัวจัดการงาน
2 หา explorer.exe ในรายการจากนั้นคลิกขวาที่มันและ เลือก สิ้นสุดงาน

3. ตอนนี้จะเป็นการปิด Explorer และเรียกใช้ใหม่ คลิก ไฟล์ > เรียกใช้งานใหม่
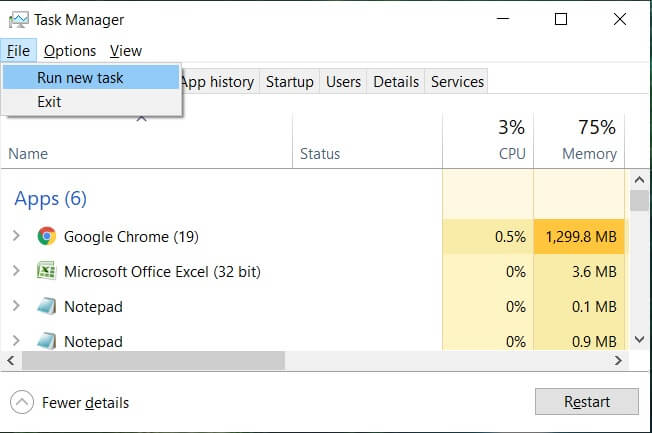
4 ประเภท explorer.exe และกดตกลงเพื่อรีสตาร์ท Explorer

5. Exit Task Manager and see if you’re able to Fix Start Menu Not Working in Windows 10.
6. If you’re still facing the issue, then log out from your account and re-login.
7 กด Ctrl+Shift+เดล key at the same time and click on Signout.
8. Type in your password to login to Windows and see if you’re able to fix the issue.
Method 2: Create a new local administrator account
If you’re signed with your Microsoft account, then first remove the link to that account by:
1. กด Windows Key + R จากนั้นพิมพ์ “MS-การตั้งค่า:” (โดยไม่ใส่เครื่องหมายอัญประกาศ) แล้วกด Enter
2 เลือก Account > Sign in with a local account instead.
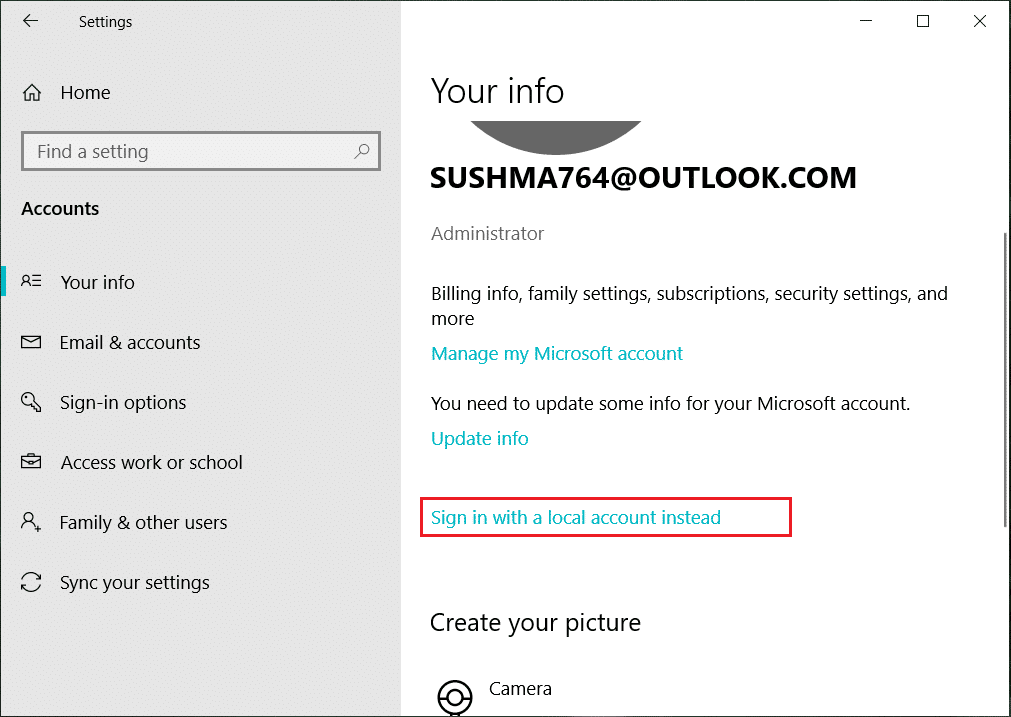
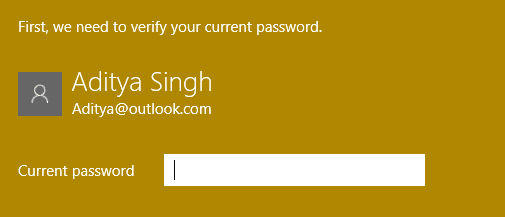
3. พิมพ์ของคุณ รหัสผ่านบัญชี Microsoft และคลิก ถัดไป
4. เลือกไฟล์ new account name and password, and then select Finish and sign out.
#1. Create the new administrator account:
1. กด Windows Key + I เพื่อเปิดการตั้งค่า จากนั้นคลิก บัญชี
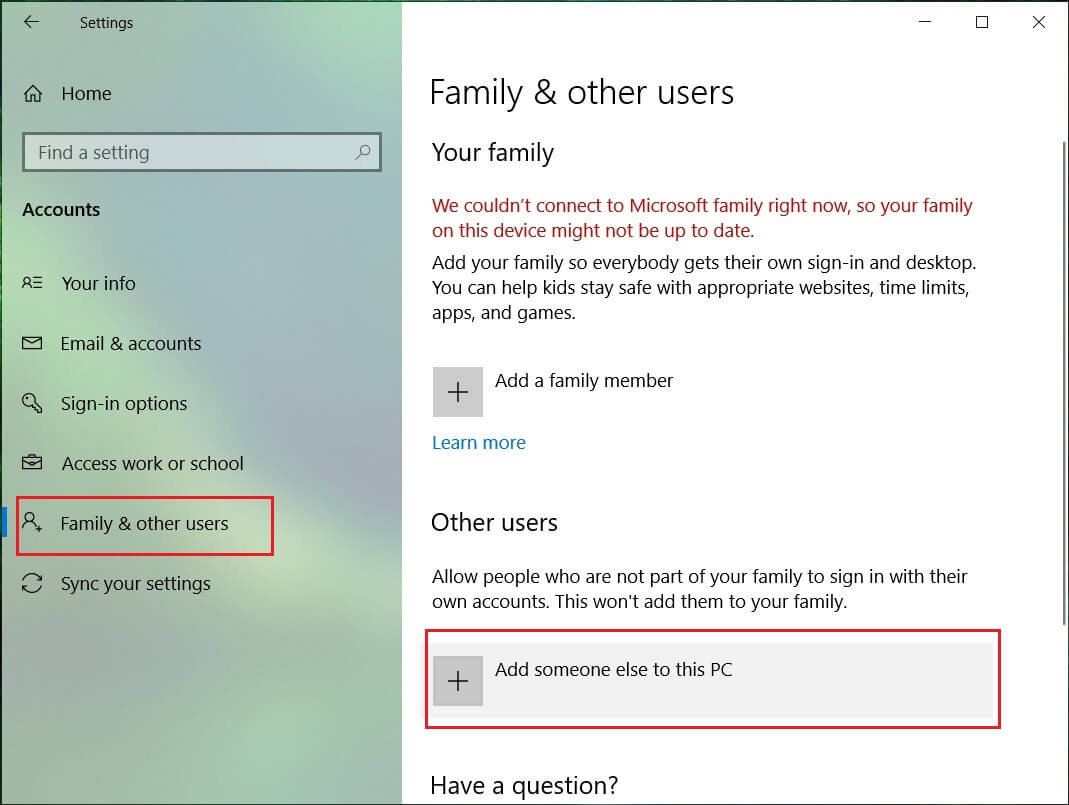
2. จากนั้นนำทางไปที่ ครอบครัวและคนอื่นๆ.
3. Under Other people click on “Add someone else to this PC."
4. Next, provide a name for the user and a password then select Next.
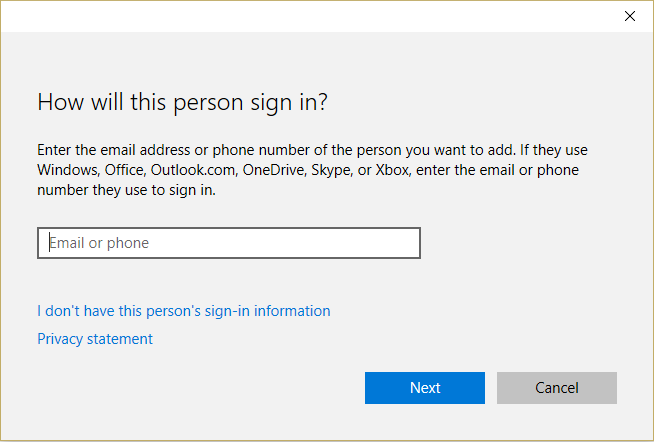
5 ตั้งค่า ชื่อผู้ใช้และรหัสผ่านจากนั้นเลือก ถัดไป > เสร็จสิ้น
#2. Next, make the new account an administrator account:
1. Again open หน้าต่างการตั้งค่า และคลิกที่ บัญชี.

2 ไปที่ แท็บครอบครัวและคนอื่น ๆ.
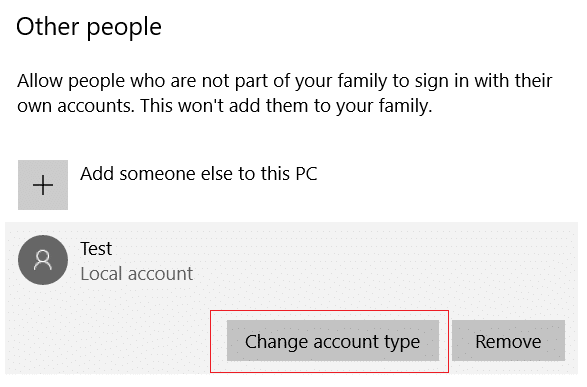
3. Other people choose the account you just created and then selected a เปลี่ยนประเภทบัญชี
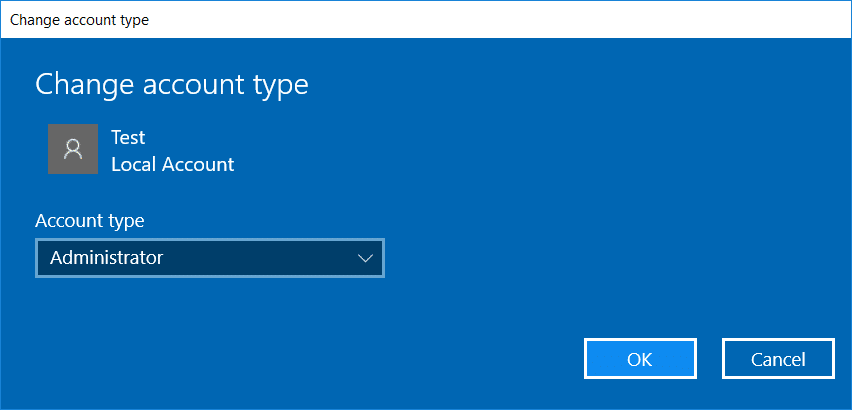
4. Under Account type, select ผู้บริหาร แล้วคลิก ตกลง
#3. If the issue persists try deleting the old administrator account:
1. Again go to Windows Settings then Account > Family & other people.
2. Under Other users, select the old administrator account, click ลบ และเลือก ลบบัญชีและข้อมูล

3. If you were using a Microsoft account to sign in before, you can associate it with the new administrator by following the next step.
4 ใน Windows Settings > Accounts, select Sign in with a Microsoft account instead and enter your account info.
Finally, you should be able to แก้ไขเมนู Start ไม่ทำงานใน Windows 10 as this step seems to fix the issue in most cases.
If you continue to experience Start Menu’s issue, it’s recommended to download and run Start Menu Troubleshooter.
1. Download and run Start Menu Troubleshooter.
2. ดับเบิลคลิกที่ ไฟล์ที่ดาวน์โหลด แล้วคลิก ถัดไป
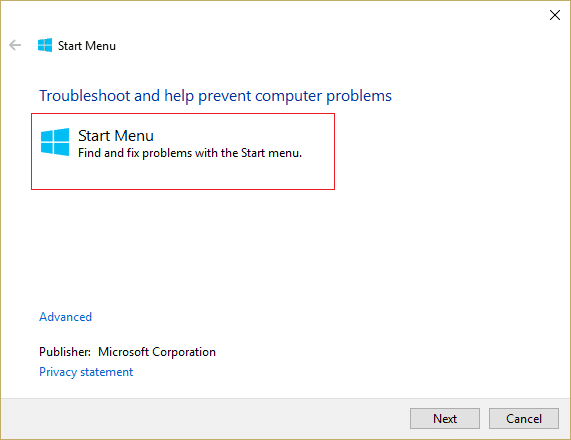
3. Let it finds and automatically Fixes Start Menu Not Working in Windows 10.
Method 4: Run System File Checker (SFC) and Check Disk
1. เปิดพร้อมรับคำสั่ง ผู้ใช้สามารถดำเนินการขั้นตอนนี้ได้โดยการค้นหา 'cmd' และกด Enter

2. ตอนนี้พิมพ์ต่อไปนี้ใน cmd แล้วกด Enter:
sfc /scannow sfc /scannow /offbootdir=c: /offwindir=c:windows

3. รอให้กระบวนการข้างต้นเสร็จสิ้นและเมื่อเสร็จแล้วให้รีสตาร์ทพีซีของคุณ
4. ถัดไป รัน CHKDSK จาก แก้ไขข้อผิดพลาดของระบบไฟล์ด้วย Check Disk Utility (CHKDSK)
5. ปล่อยให้กระบวนการข้างต้นเสร็จสมบูรณ์และรีบูตพีซีของคุณอีกครั้งเพื่อบันทึกการเปลี่ยนแปลง
Method 5: Force Cortana to Rebuild Settings
เปิด Command Prompt พร้อมสิทธิ์ผู้ดูแลระบบ then type the following one by one and hit Enter after each command:
CD /d "%LOCALAPPDATA%PackagesMicrosoft.Windows.Cortana_cw5n1h2txyewy"
Taskkill /F /IM SearchUI.exe
RD /S /Q Settings
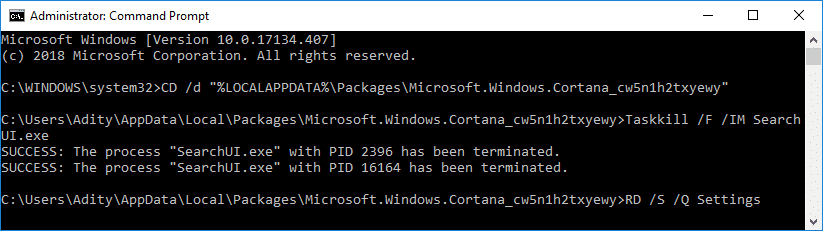
This will force Cortana to rebuild the settings and will Fix Start Menu and Cortana Not Working in Windows 10.
If the issue is still not resolved, follow this guide to fix any issues related to Cortana.
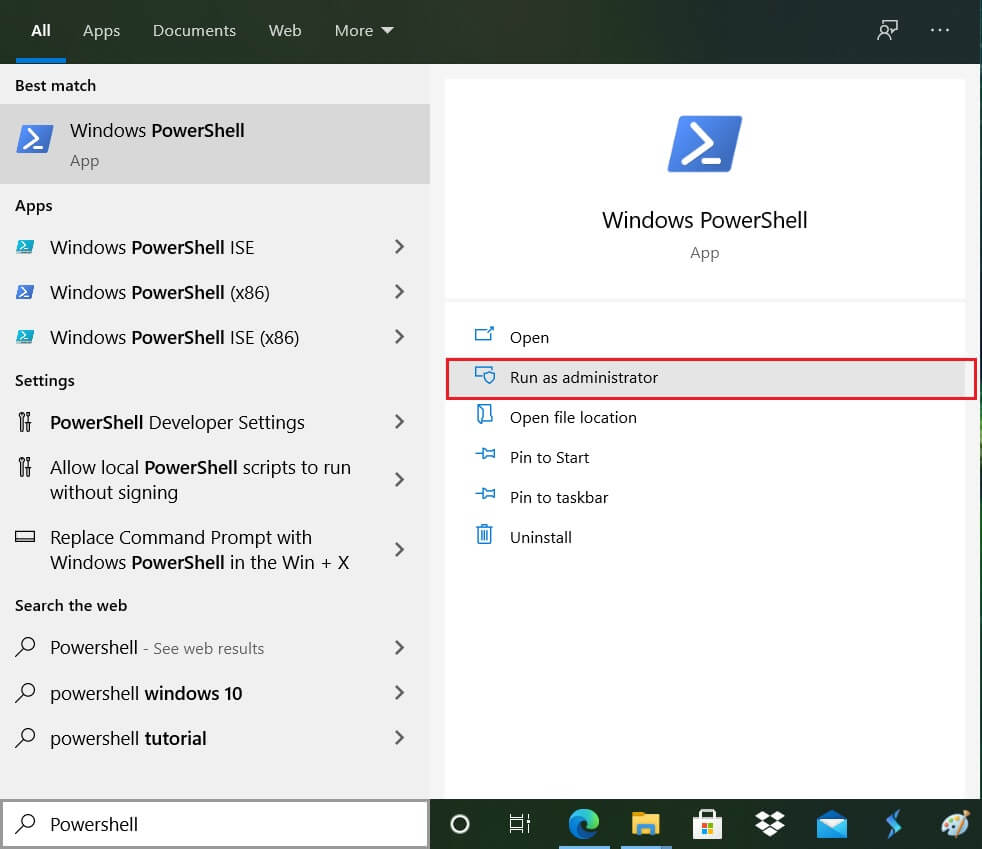
Method 6: Re-Register Windows App
1 ประเภท PowerShell ใน Windows Search จากนั้นคลิกขวาที่ PowerShell แล้วเลือก ทำงานเป็นผู้ดูแลระบบ
2. ตอนนี้พิมพ์คำสั่งต่อไปนี้ลงในหน้าต่าง PowerShell:
รับ - AppXPackage - AllUsers | Foreach {Add-AppxPackage -DisableDevelopmentMode -Register "$ ($ _. InstallLocation) AppXManifest.xml"}

3. รอให้ Powershell ดำเนินการคำสั่งข้างต้นและละเว้นข้อผิดพลาดบางประการที่อาจเกิดขึ้น
4. รีบูทพีซีของคุณเพื่อบันทึกการเปลี่ยนแปลง
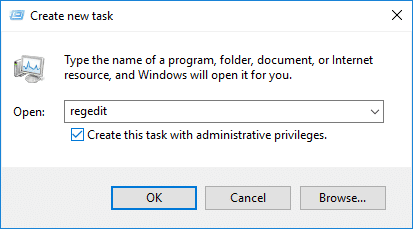
วิธีที่ 7: การแก้ไขรีจิสทรี
1. Press Ctrl + Shift + Esc to open Task Manager then click on เนื้อไม่มีมัน และเลือก เรียกใช้งานใหม่
2 ประเภท regedit และเครื่องหมายถูก “สร้างงานนี้ด้วยสิทธิ์ระดับผู้ดูแลระบบ” จากนั้นคลิกตกลง
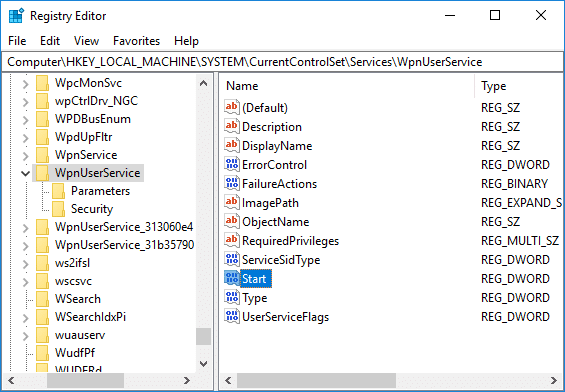
3. Now navigate to the following registry key in the Registry Editor:
ComputerHKEY_LOCAL_MACHINESYSTEMCurrentControlSetServicesWpnUserService
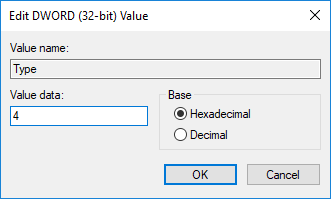
4. ตรวจสอบให้แน่ใจว่าได้เลือก WpnUserService then in the right window double-click on the Start DWORD.
5. Change its value to 4 then click ตกลง
6. รีบูทพีซีของคุณเพื่อบันทึกการเปลี่ยนแปลง
วิธีที่ 8: รีเฟรชหรือรีเซ็ต Windows 10
หมายเหตุ If you can’t access your PC, restart your PC a few times until you start ซ่อมอัตโนมัติ. จากนั้นนำทางไปยัง แก้ไขปัญหา > รีเซ็ตพีซีเครื่องนี้ > ลบทุกอย่าง
1. กด Windows Key + I เพื่อเปิด Settings จากนั้นคลิกที่ ไอคอนอัปเดตและความปลอดภัย
![]()
2. จากเมนูด้านซ้ายมือ ให้เลือก การฟื้นตัว
3 ภายใต้ รีเซ็ตพีซีเครื่องนี้, คลิกที่ "เริ่มต้นเลยปุ่ม "

4. เลือกตัวเลือกเพื่อ เก็บไฟล์ของฉัน.

5. For the next step, you might be asked to insert Windows 10 installation media, so ensure you have it ready.
6. Now, select your Windows version and click บนไดรฟ์ที่ติดตั้ง Windows เท่านั้น > remove my files.

ฮิต คลิกที่ ปุ่มรีเซ็ต.
6. ทำตามคำแนะนำบนหน้าจอเพื่อทำการรีเซ็ตให้เสร็จสิ้น
ที่แนะนำ:
นั่นคือคุณประสบความสำเร็จ แก้ไขเมนู Start ไม่ทำงานใน Windows 10 แต่ถ้าคุณยังคงมีข้อสงสัยเกี่ยวกับบทช่วยสอนนี้ อย่าลังเลที่จะถามพวกเขาในส่วนความคิดเห็น