- in หน้าต่าง by ผู้ดูแลระบบ
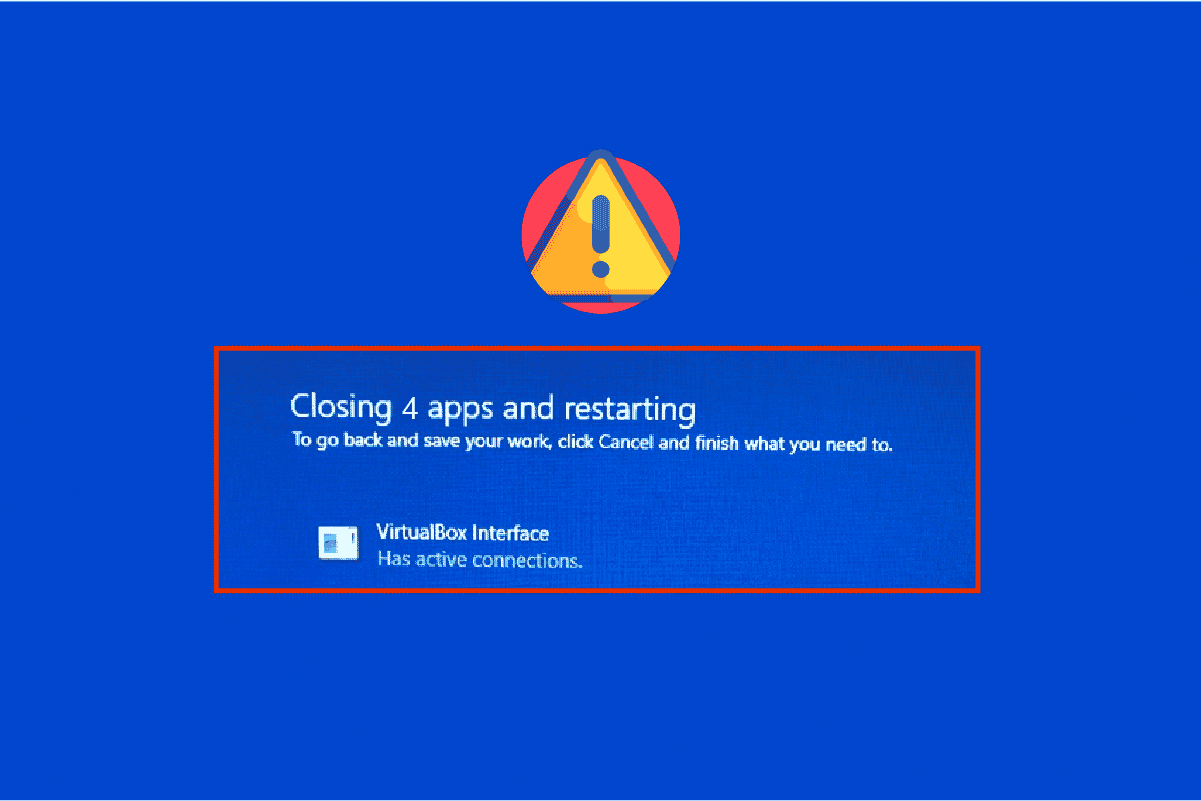
แก้ไขอินเทอร์เฟซ VirtualBox มีข้อความแสดงข้อผิดพลาดการเชื่อมต่อที่ใช้งานอยู่

You might face VirtualBox interface has active connections error message when you are shutting down your PC especially when you use the old version of the BlueStacks emulator. This is an issue encountered by the users when they try to shut down their computer but can’t. In addition, configuring the Task Manager priorities of the BlueStacks can also cause the error VirtualBox interface BlueStacks. If you are also the one who is facing the same error, this guide will help you fix the same with effective troubleshooting steps.
How to Fix VirtualBox Interface Has Active Connections Error Message
There are so many factors that contribute to VirtualBox interface unable to insert Virtual optical disk or Windows 10 shut down issue. A few of them are listed below.
- Conflicting background processes running on your PC.
- Startup tasks are interfering with BlueStacks.
- Inappropriate priorities are set to BlueStacks.
- Outdated emulator, Operating system, .NET framework, drivers on PC.
- Few apps are conflicting with BlueStacks.
- Conflicting user account and Windows version.
We have compiled a list of effective troubleshooting methods that will help you fix VirtualBox interface BlueStacks shutdown issue on your Windows 10 computer.
หมายเหตุ Before getting into the solution, make sure that you have not enabled the Notifications Mode in the BlueStacks.
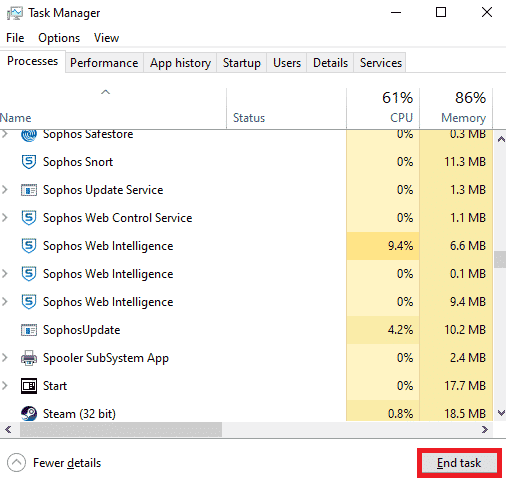
Method 1: Close BlueStack Processes
If BlueStacks is operating on your PC (even in the background), it makes your PC difficult in shutting down. In this case, exit the BlueStacks emulator completely with the use of Task Manager by closing all the processes which are related to BlueStacks forcefully by following our guide How to End Task in Windows 10. This will help you solve this issue. You can also create a batch file in achieving the functionality, follow the steps below to do it.
Now, shut down your PC and check if the error VirtualBox interface Windows 10 shut down issue is fixed. If the error is fixed, you could make a batch file and then click the batch file before shutting down your PC.
หมายเหตุ This function can also be done by creating a shutdown task either in a Group Policy Editor or in the Task Scheduler.
Now follow the given steps;
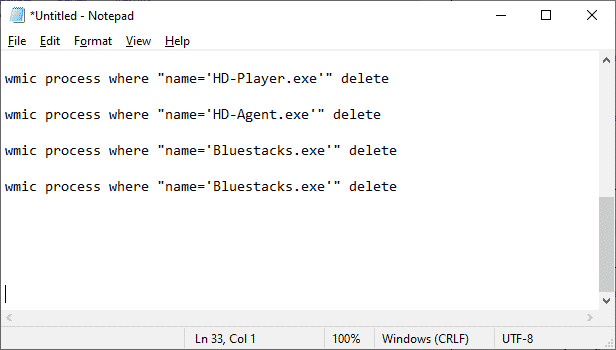
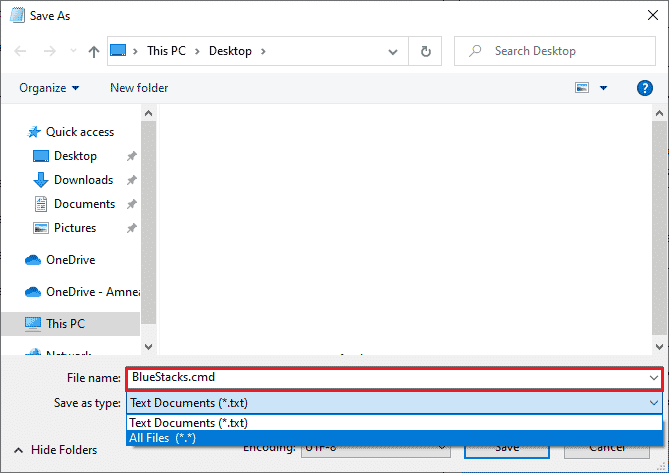
1. Copy the following text in a text editor for instance Notepad.
wmic process where "name="HD-Player.exe"" delete
wmic process where "name="HD-Agent.exe"" delete
wmic process where "name="Bluestacks.exe"" delete
wmic process where "name="Bluestacks.exe"" delete
2. จากนั้นคลิกที่ เนื้อไม่มีมัน แล้วเลือก บันทึกเป็น.
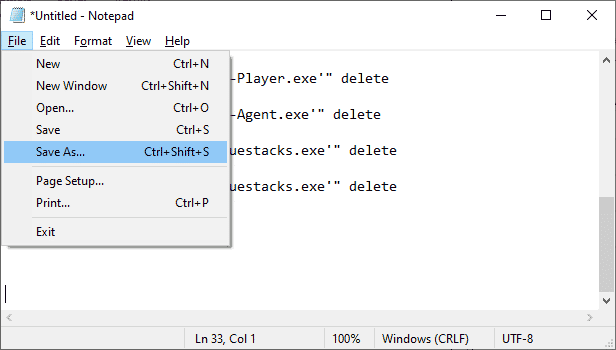
3. Now, change the dropdown menu of บันทึกเป็นประเภท ไปยัง ไฟล์ทั้งหมด, then save the file with the name having a CMD extension (example, Click it Before Shutting Down the Computer.cmd )
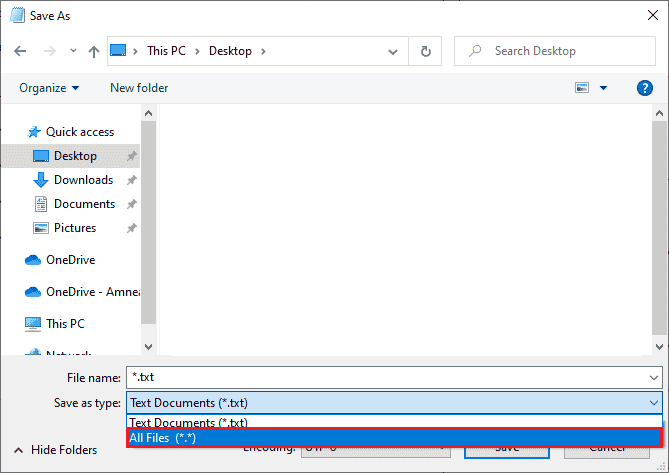
ฮิต คลิกที่ เนื้อไม่มีมัน now and then shut down the computer and check if the VirtualBox interface has active connections error message is fixed.
Method 2: Disable Startup Processes
If the first method did not fix VirtualBox interface has active connections error message, you can try disabling all the startup processes with the Task Manager, and several users have suggested that this task has helped them a lot. To implement the method, follow our guide on 4 Ways to Disable Startup Programs in Windows 10.
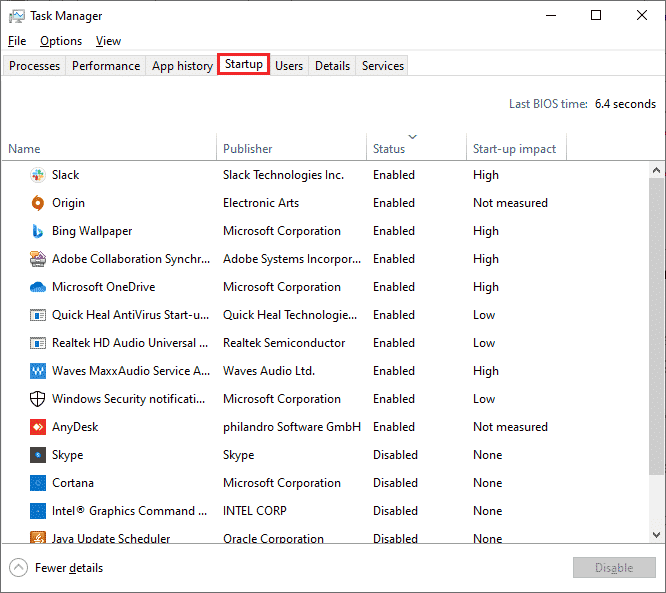
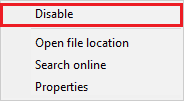
Click the start-up processes one by one and select ปิดการใช้งาน
When you are done disabling the tasks, restart your computer and check if the error VirtualBox interface error Windows 10 ได้รับการแก้ไข
ยังอ่าน: 5 วิธีแก้ไข Bluestacks Engine ไม่เริ่มทำงาน
Method 3: Modify Compatibility Setting
It is also possible that BlueStacks may not have enough security clearance to run on your PC. The security settings may be changed in the latest application update or Windows update. Follow the steps below to grant full control to BlueStacks.
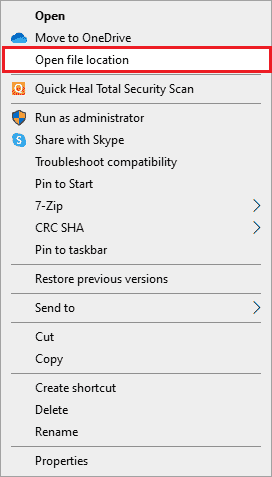
1. Right-click on the Desktop shortcut of BlueStacks และเลือก ตำแหน่งของแฟ้มที่เปิด in the option.
2 ค้นหา bluestacks.exe file and right-click on it.
3 เลือก คุณสมบัติ
4. ย้ายไปที่ Security tab of the Properties window and then click on the Edit button which is next to To change permissions, click Edit.
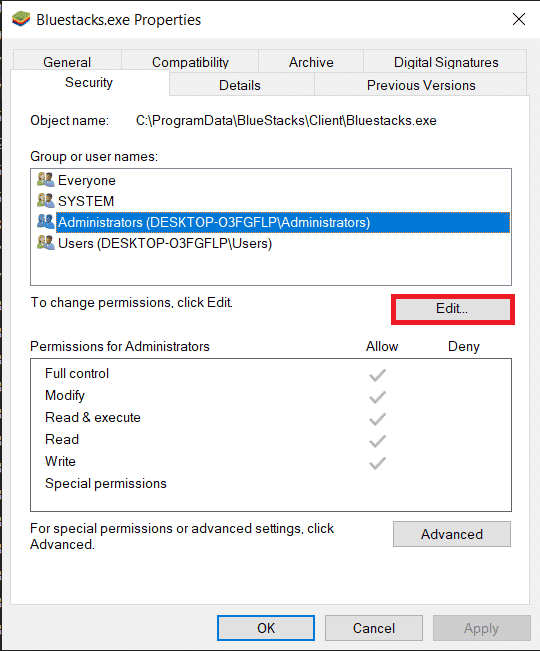
5. At first, เลือกชื่อผู้ใช้ของคุณ from the list of users which are displayed under Group or user names, and under Permissions for everyone, check the box in the Allow column for Full control.
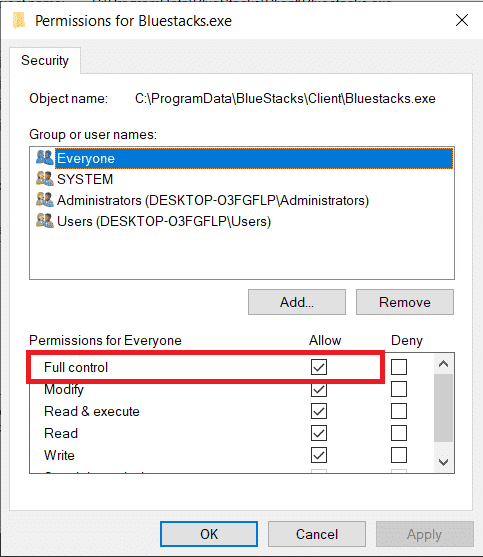
6 คลิกที่ ใช้ และ OK เพื่อบันทึกการเปลี่ยนแปลง
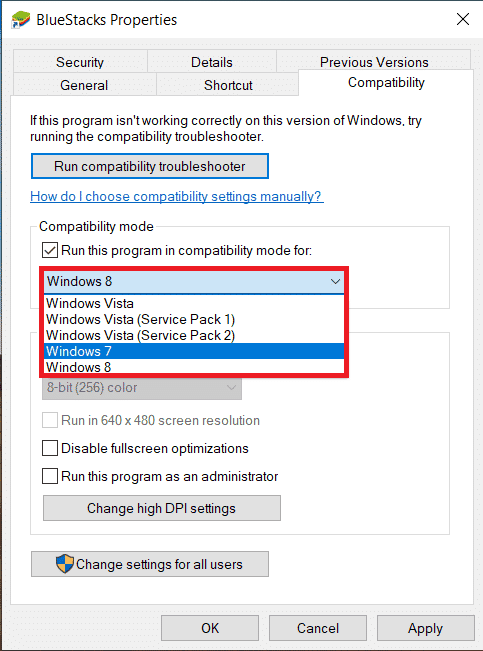
Check if the issue VirtualBox interface BlueStacks shutdown is fixed. If the issue is not fixed yet, you can try running BlueStacks in compatibility mode in another Windows version if you are facing this issue after updating to a specific Windows version. Follow the steps below to do it.
1. Right-click on the shortcut of BlueStacks ทางลัด ไอคอนแล้วเลือก คุณสมบัติ
2. เปลี่ยนเป็นไฟล์ ความเข้ากันได้ และคลิกที่ เรียกใช้โปรแกรมนี้ในโหมดความเข้ากันได้สำหรับ: กล่อง.
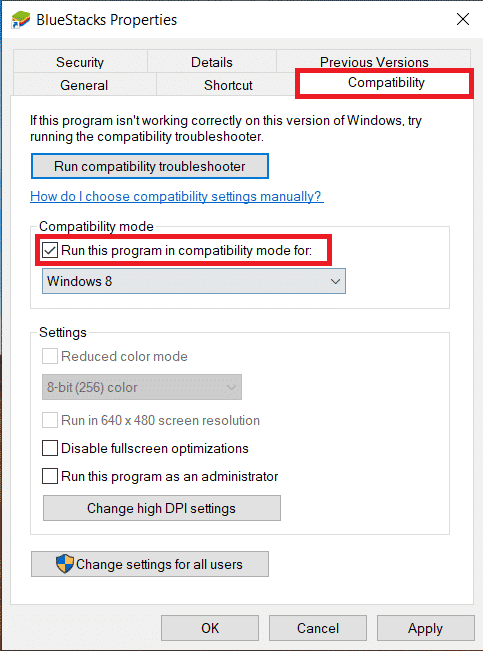
3. Select a Windows version that is appropriate to run Bluestacks in compatibility for and then click on ใช้ ซึ่งตามมาด้วย ตกลง
Method 4: Change Priorities of BlueStacks Processes
If the priorities of the BlueStacks processes are not set properly, you may face VirtualBox interface has active connections error message. If so, you can change the priorities of the BlueStacks processes in the Task Manager as instructed below.
หมายเหตุ Continue with great caution as changing the priorities of the processes carelessly may make your system unstable or extremely slow.
1 กด Ctrl + Shift + หลบหนี กุญแจ ร่วมกันเปิด ที่ Task Manager.
2. ตอนนี้เปลี่ยนเป็น รายละเอียด tab and then right-click on HD-Player,exe.
3. จากนั้นไปที่ กำหนดลำดับความสำคัญ ตัวเลือกแล้วเลือก เรียลไทม์
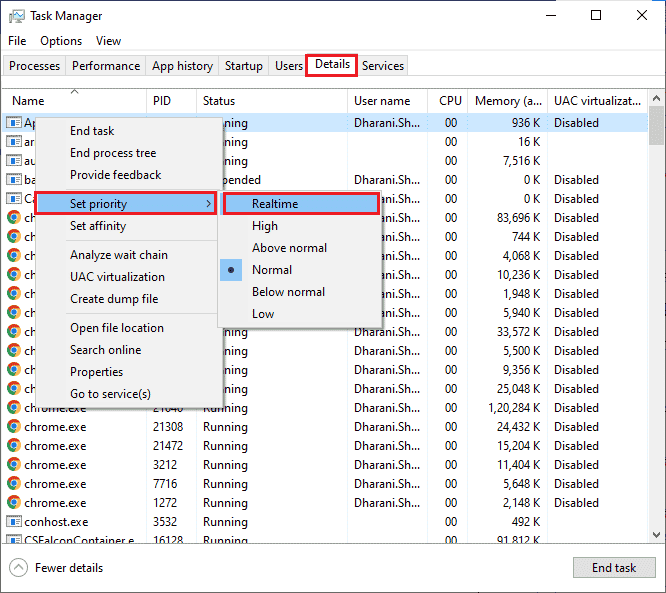
4. Now, set the priorities given below to the corresponding processes.
HD-Agent.exe        >> above normal
Bluestacks.exe      >> realtime
BstkSVC.exe          >> realtime
5. รีบูตเครื่องพีซี หลังจากปิด ที่ Task Manager and check if VirtualBox interface Windows 10 issue is solved.
6. If the issue is fixed, close all the open processes.
7. Now, open a text editor for instance Notepad, and then copy the following into it.
start "" /Realtime "C:Program FilesBlueStacksHD-Player.exe"
start "" /AboveNormal "C:Program FilesBlueStacksHD-Agent.exe"
start "" /Realtime "C:Program FilesBlueStacksBluestacks.exe"
start "" /Realtime "C:Program FilesBlueStacksBstkSVC.exe"
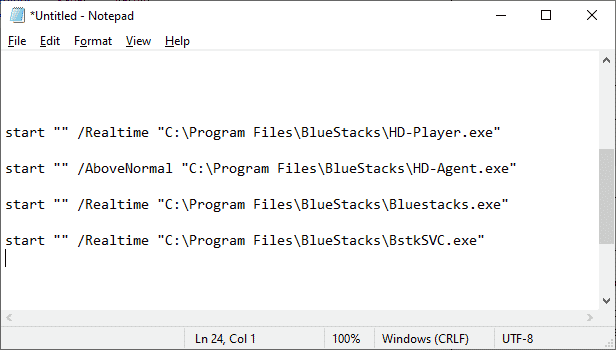
8. ตอนนี้เลือก บันทึกเป็น จาก เนื้อไม่มีมัน แถบเมนู.
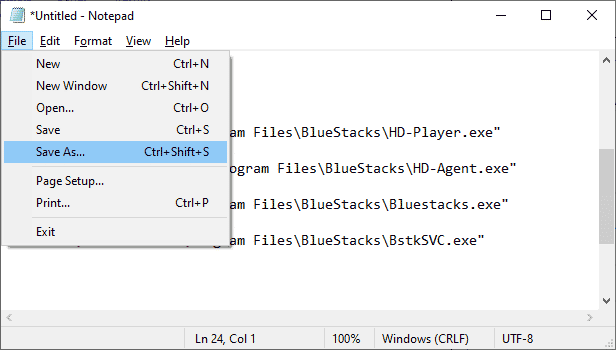
9. Now, change the dropdown menu of บันทึกเป็นประเภท ไปยัง ไฟล์ทั้งหมด, then save the file with the name having a CMD extension ( example, BlueStacks.cmd )
10. Launch the BlueStacks with the newly created command file and the issue will be fixed.
ยังอ่าน: 15 Best Virtual Mailbox Free Service Providers
Method 5: Turn On Virtualization (If Applicable)
Bluestacks is a virtualizing application. Some chipsets of AMD and Intel include a virtualization technology that boosts the performance while virtualization software like Bluestacks is being used at the time. Such software runs more smoothly without any strain with the use of technology like this. Many users reported that turning on Virtualization is resolving VirtualBox interface BlueStacks shutdown issue. You have to check if this is available on your system as all computers are not equipped with this technology.
Follow the steps below to check if your computer (Intel system) supports Virtualization technology.
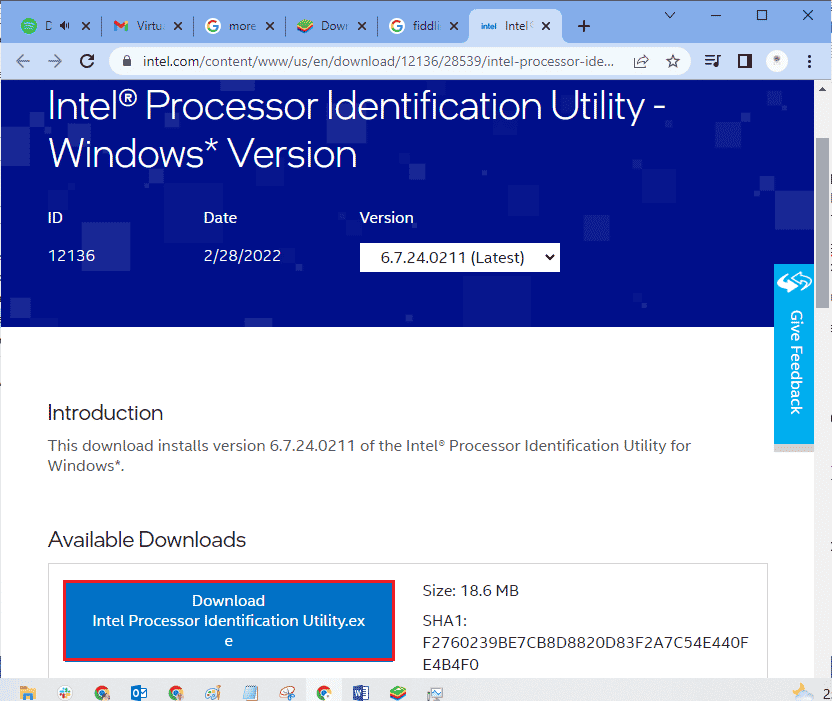
1 ดาวน์โหลด Processor Identification Utility of Intel by navigating to the เว็บไซต์อย่างเป็นทางการ และโดยคลิกที่ไฟล์ ดาวน์โหลด button which is on the left side.
2. Once downloaded the file, click the installation file from ดาวน์โหลดของฉัน and follow the instructions to install Processor Identification Utility บนพีซีของคุณ
3 เปิดตัว ใบสมัคร after installing it.
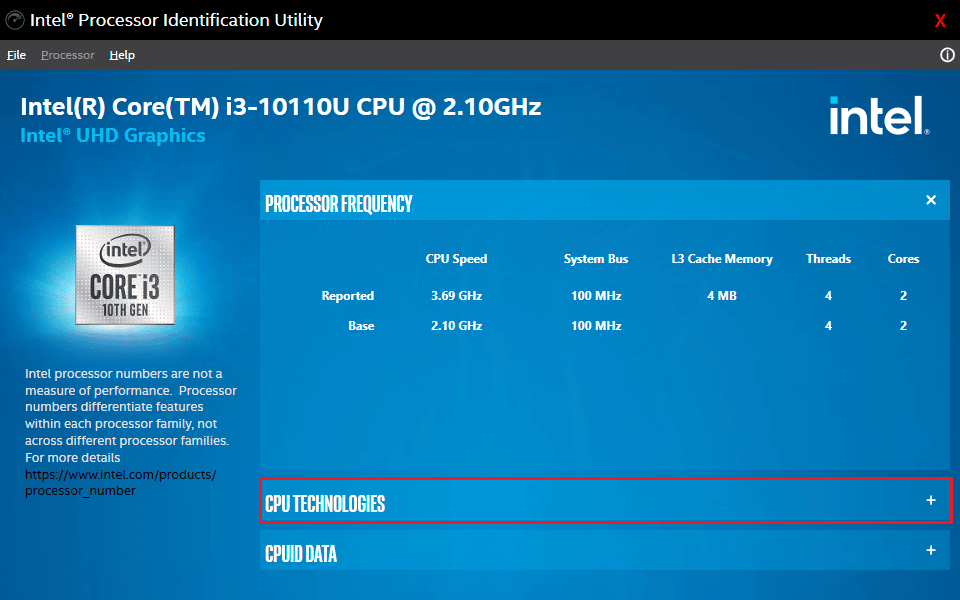
4 ขยาย CPU TECHNOLOGIES โดยการคลิกที่ + ไอคอน
5. สแกนรายการเทคโนโลยี CPU เพื่อหา Intel® Virtualization Technology, usually Intel® Virtualization Technology will be the very first item on the list.
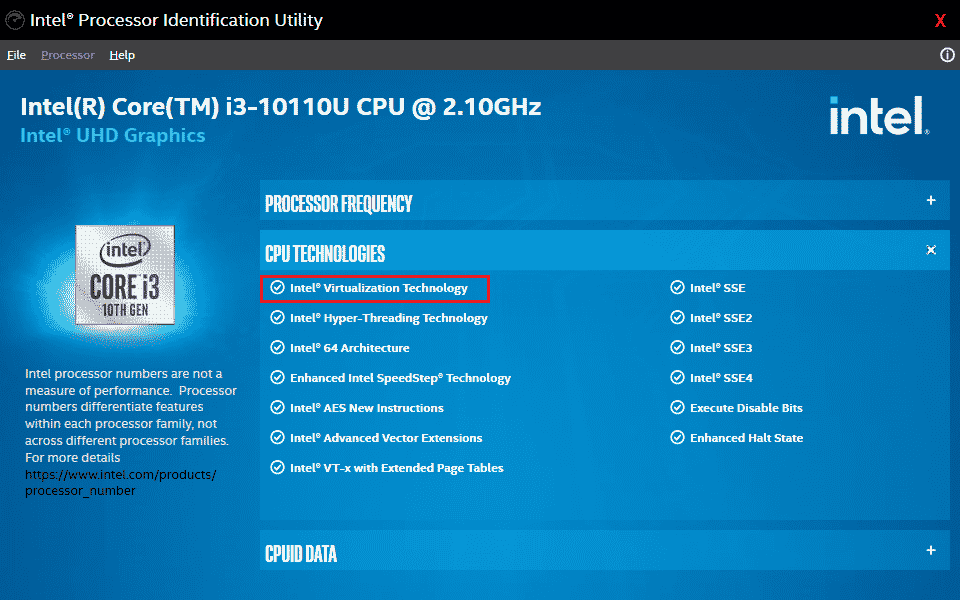
6. If the technology is supported on your computer, there will be a ใช่ next to it or a ช่องทำเครื่องหมาย to its left.
Follow the steps below to check your PC (AMD) supports Virtualization.
1 ดาวน์โหลด AMD Virtualization Technology and Hyper V files required for your PC.
ฮิต คลิกที่ ไฟล์. exe which is downloaded and follow the คำแนะนำบนหน้าจอ เพื่อติดตั้ง
3. Check if it supports Virtualization by opening the application. If it is supported you will receive a message ระบบเข้ากันได้กับ Hyper-V

If your PC supports Virtualization technology in Intel or AMD, follow the following steps to enable it. If not, move on to the next method.
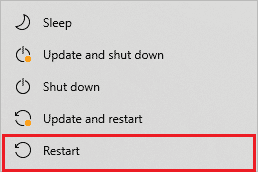
1. You can enable the Virtualization from the BIOS menu, for that you have to restart your computer.
ฮิต คลิกที่ เริ่มต้น button, now click on the ตัวเลือกพลังงาน จากนั้นเลือก เริ่มต้นใหม่
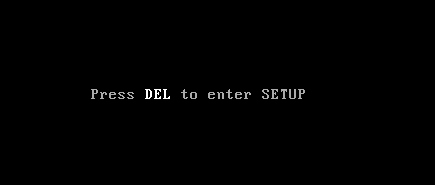
3. Press one of the following keys Esc, Del, F12, F10, or F8 repeatedly to enter the เมนูไบออส. The BIOS key is not similar to all manufacturers so check the BIOS key papers which came along with your computer. Or you can simply Goggle search for your BIOS key
4. In the BIOS menu, go to เทคโนโลยีการจำลองเสมือนหรือเทคโนโลยีการจำลองเสมือนของ Intel หรือ Intel VT สำหรับ Direct I/O หรือตัวเลือกอื่น ๆ ที่คล้ายกัน with the arrow keys and hit เข้าสู่ เพื่อเปิดใช้งาน
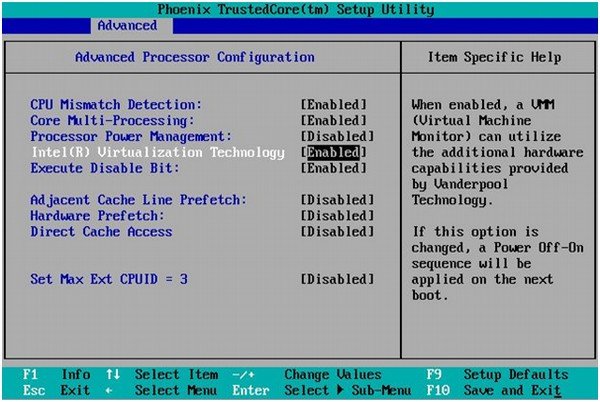
5. Exit BIOS after saving your changed settings. Now, your computer reboots automatically, after it is done check if the issue VirtualBox interface BlueStacks shutdown issue is fixed.
ยังอ่าน: วิธีเปิดใช้งานการจำลองเสมือนบน Windows 10
Method 6: Update BlueStacks Emulator
BlueStacks are being updated regularly to satisfy the technology advancements that are being made these days and fix the reported bugs like this one. So, updating the BlueStacks to the latest version may fix this issue. Follow the steps to update BlueStacks.
1 เปิดตัว BlueStacks emulator which is near the bottom right of the screen, open การตั้งค่า โดยคลิกที่ ไอคอนเกียร์
![]()
2 คลิกที่ เกี่ยวกับเรา which is in the left pane of the window.
3. ตอนนี้คลิกที่ ตรวจหาการปรับปรุง ปุ่ม
4. ใช้ the updates and then สังข์ เครื่องจำลอง.
5. Now close the emulator, from the system tray also, and then check if the issue VirtualBox interface has active connections error message ได้รับการแก้ไข
วิธีที่ 7: อัปเดต Windows
If there are any bugs in your PC, they can only be fixed after a Windows update. Microsoft releases regular updates to fix all these bugs thereby VirtualBox interface Windows 10 shut down issue will also be fixed. Hence, ensure if you have updated your Windows Operating System and if any updates are pending in action, use our guide How to Download and Install Windows 10 Latest Update
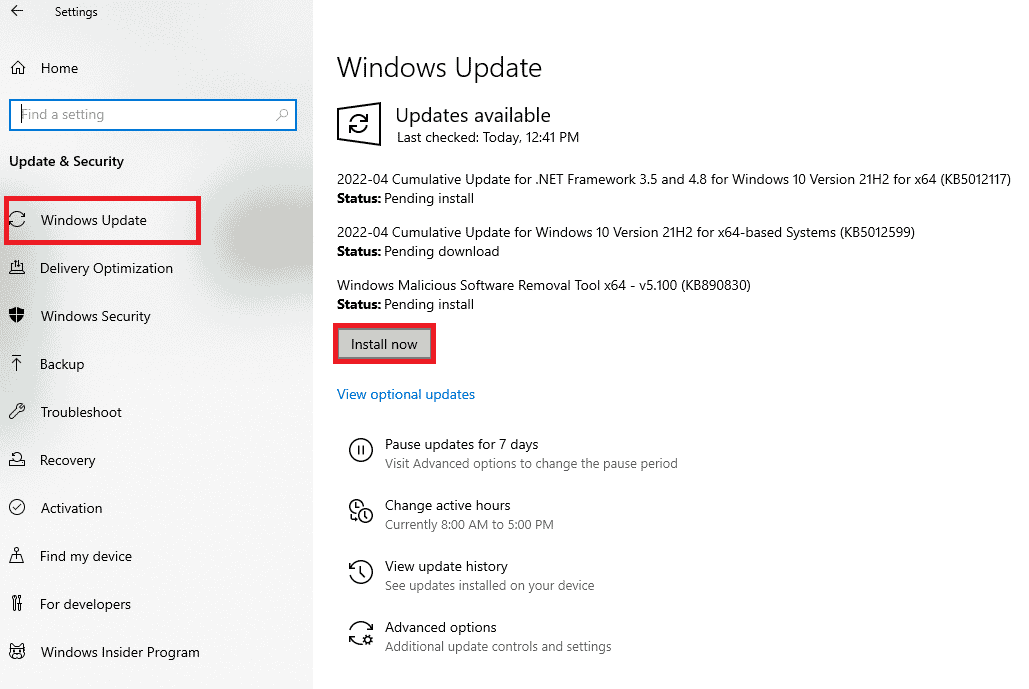
After updating your Windows Operating System, check whether VirtualBox interface BlueStacks shutdown issue is fixed.
วิธีที่ 8: อัปเดตไดรเวอร์กราฟิก
If your PC makes use of outdated graphics drivers, you must update all of them to fix any gaming issues. You can do this task either manually or by using third-party software. Check our guide 4 Ways to Update Graphics Drivers in Windows 10 to update all the drivers manually and check if VirtualBox interface has active connections error message issue is fixed.
ยังอ่าน: แก้ไขไดรเวอร์เครื่องพิมพ์ไม่พร้อมใช้งานบน Windows 10
วิธีที่ 9: ติดตั้งไดรเวอร์กราฟิกใหม่
When you still face the error after updating the Graphical drivers, then reinstall device drivers to fix any incompatibility problems. There are so many methods to reinstall drivers on Windows. Yet, if you are confused about how to implement the same, check our guide How to Uninstall and Reinstall Drivers on Windows 10 and implement the same.
After reinstalling GPU drivers, check if you can enjoy games without VirtualBox interface BlueStacks shutdown issue.
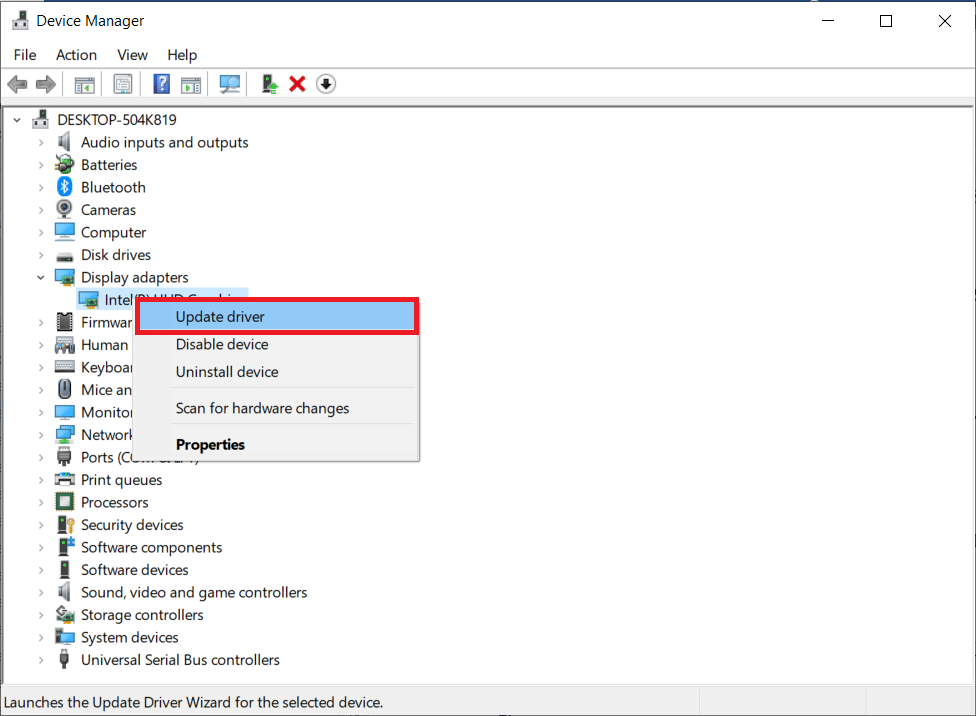
วิธีที่ 10: ย้อนกลับไดรเวอร์กราฟิก
หากไดรเวอร์กราฟิกเวอร์ชันปัจจุบันเข้ากันไม่ได้กับเกมของคุณ ก็จะไม่มีประโยชน์ในการอัปเดตหรือติดตั้งใหม่ สิ่งที่คุณต้องทำคือย้อนกลับไดรเวอร์ไปเป็นเวอร์ชันก่อนหน้าโดยทำตามคำแนะนำของเราวิธีการย้อนกลับไดรเวอร์ใน Windows 10
Check if you have fixed VirtualBox interface has active connections error message.
วิธีที่ 11: อัปเดต .NET Framework
.NET framework in Windows 10 computer is essential for uninterrupted service of modern apps and games. Many games have an auto-update feature for the .NET framework, and thus it will be updated automatically whenever an update is available. In another case, if an update prompts in your PC, you can manually install the latest version of the .NET framework, as discussed below, to fix VirtualBox interface Windows 10 issue.
1. ตรวจสอบ อัปเดตใหม่ for . NET Framework จาก เว็บไซต์ของ Microsoft อย่างเป็นทางการ.
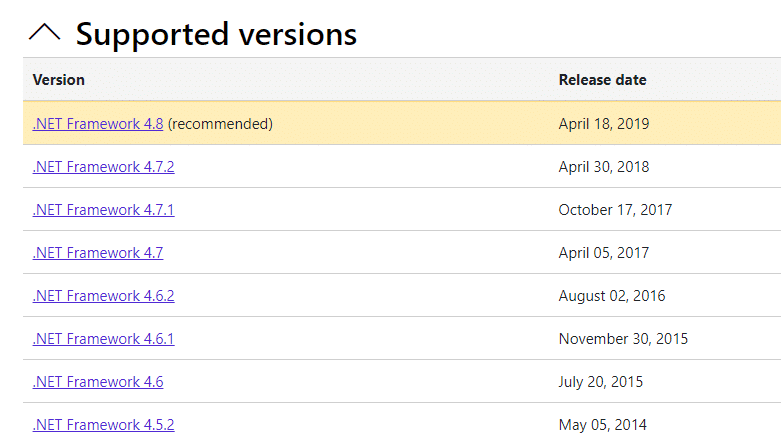
2. หากมีการอัพเดตใดๆ ให้คลิกที่ส่วนที่เกี่ยวข้อง/แนะนำ ลิงค์และคลิก ดาวน์โหลดรันไทม์ .NET Framework 4.8 ตัวเลือก
หมายเหตุ อย่าคลิกบน ดาวน์โหลดชุดนักพัฒนา .NET Framework 4.8 ตามที่นักพัฒนาซอฟต์แวร์ใช้
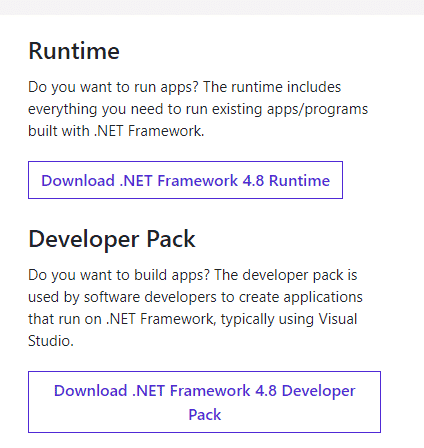
3 ไปที่ การดาวน์โหลดของฉัน double-click on the setup file to run the downloaded file, and follow the คำแนะนำบนหน้าจอ เพื่อติดตั้งกรอบงาน .NET บนพีซี Windows ของคุณสำเร็จ
4. Once done, check if you have fixed VirtualBox interface Windows 10 issue or not.
Method 12: Create New Administrator User
If none of the methods have helped you fix VirtualBox interface has active connections error message, there are some circumstances where your user account is corrupt or some of its configurations are inappropriate. In this case, you have to create a new administrator account as instructed below to fix the issue.
1 กด ปุ่ม Windows + I ร่วมกันเพื่อเปิด การตั้งค่า.
ฮิต คลิกที่ บัญชี การตั้งค่า
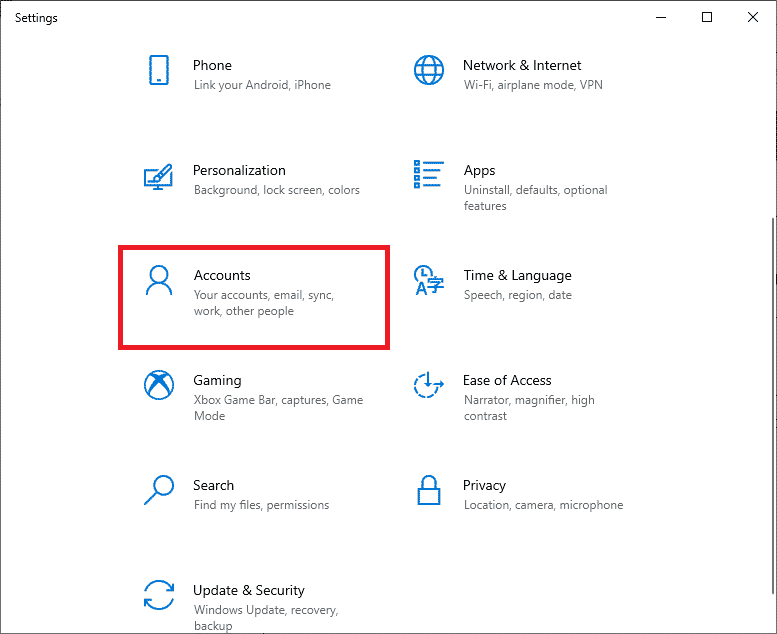
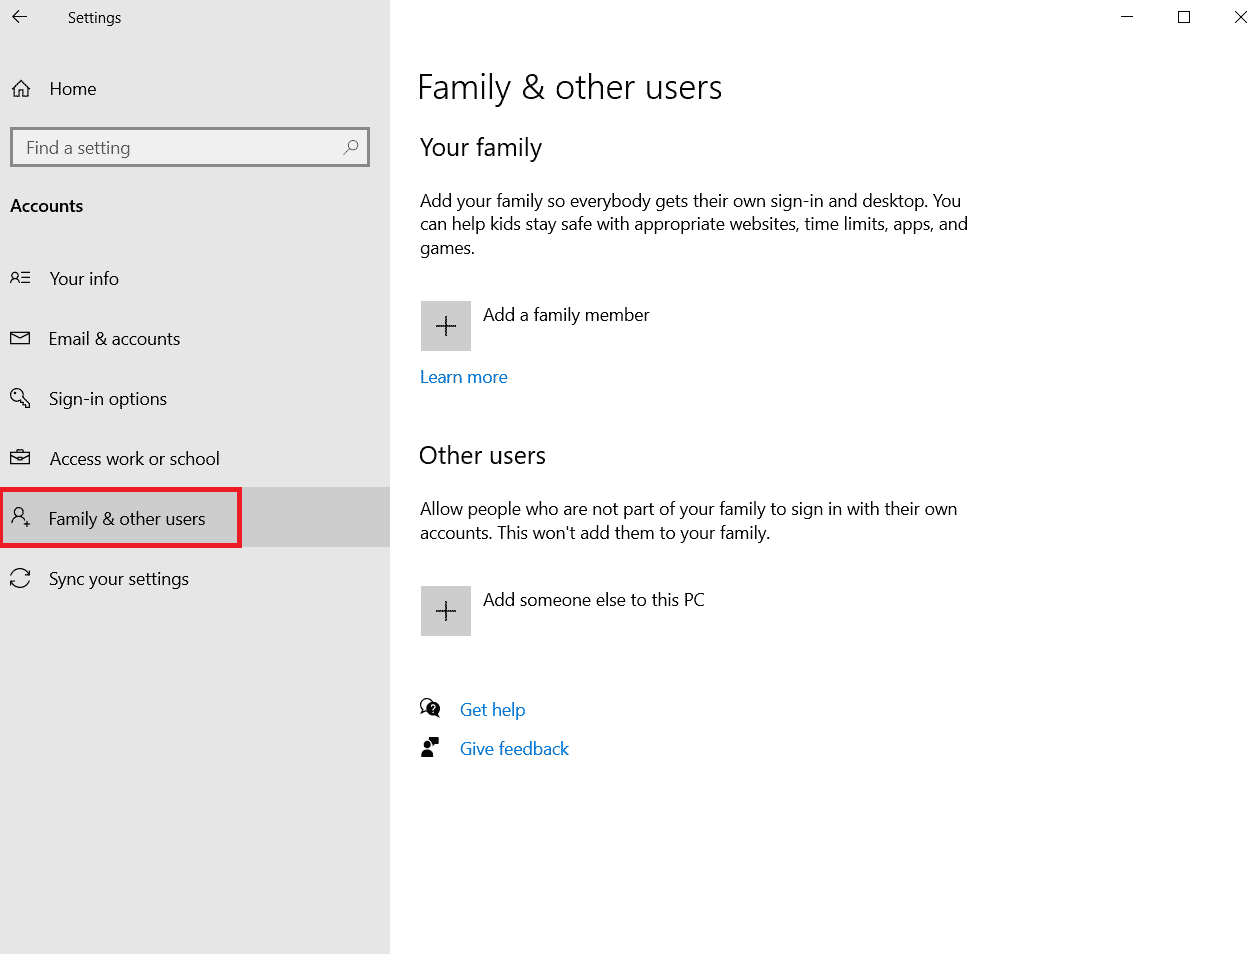
3 จากนั้นเลือก ครอบครัวและผู้ใช้อื่น ๆ menu from the left menu.
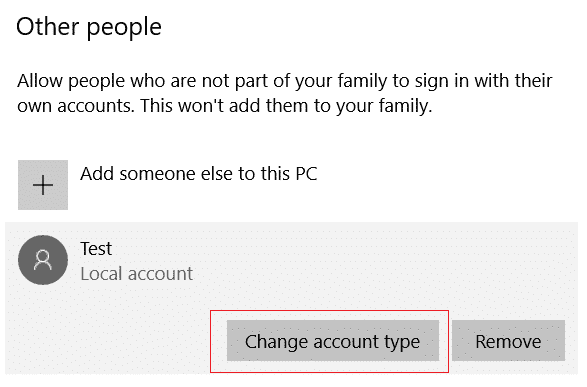
4. ภายใต้ บุคคลอื่น ๆ ให้เลือกบัญชีแล้วคลิก เปลี่ยนประเภทบัญชี.
หมายเหตุ If you do not find any account, then you can follow our guide to create a local account on Windows 10.
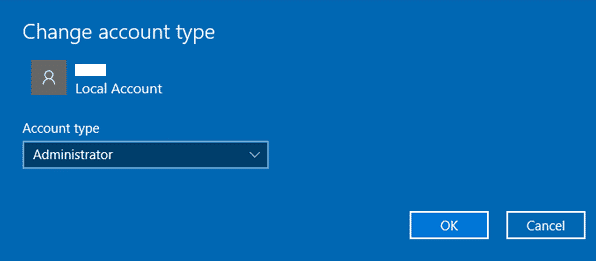
5 สุดท้ายเลือก ผู้บริหาร ภายใต้ ประเภทบัญชี และคลิก ตกลง
หมายเหตุ สิ่งนี้ใช้ไม่ได้กับผู้ใช้บัญชีมาตรฐาน
6. Finally, check if you have fixed VirtualBox interface BlueStacks problem or not.
ยังอ่าน: Fix Incorrect PSK Provided for Network SSID on Windows 10
Method 13: Uninstall Conflicted Apps in Safe Mode
Some applications and programs might interfere with BlueStacks during its operation. To confirm and to fix this, you have to boot to Safe Mode in Windows 10. The safe mode of Windows PC will shut all the non-essential tasks and runs with the most stable drivers. In safe mode, Windows PC will be in the most stable environment and hence you can find which app is conflicting with BlueStacks. You can boot your computer by following our guide How to Boot to Safe Mode in Windows 10 and once all the third-party software is disabled, check if you face the VirtualBox interface BlueStacks shutdown issue again.
If you do not face the problem, uninstall any recent program or application you have added to your computer.
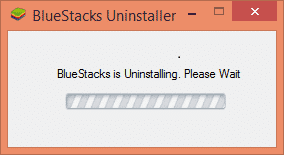
Method 14: Uninstall Bluestacks and Reinstall in Safe Mode
If none of the above methods fixed VirtualBox interface has active connections error message, the fault may be with the inherent bug in the application itself. In this case, you have to uninstall the current version of the application and replace it with the latest version of BlueStacks.
1. First of all, end all BlueStacks processes which may be running in the background.
2. If you have your BlueStacks open, close it by clicking on the ปุ่ม X which will be at the top right of your screen.
3. Now, remove the BlueStacks icon from your system tray by right-clicking on the BlueStacks icon and then clicking เลิก.
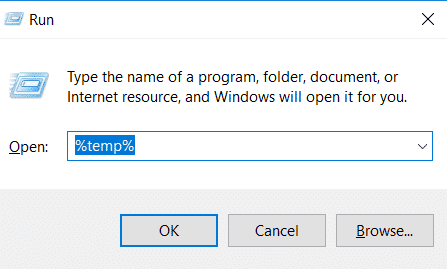
4. Delete all the temporary files on your computer as a precautionary measure. Follow the steps below to do it.
5 กด ปุ่ม Windows + R simultaneously to access the วิ่ง กล่องโต้ตอบและพิมพ์ % ชั่วคราว% in it and hit ใส่รหัส.
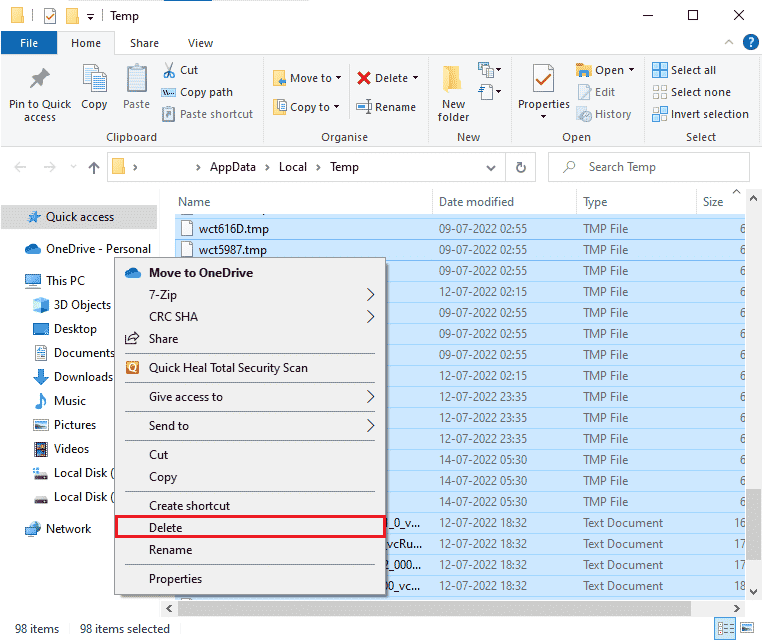
6. Select all the files, right-click on them and click on ลบ
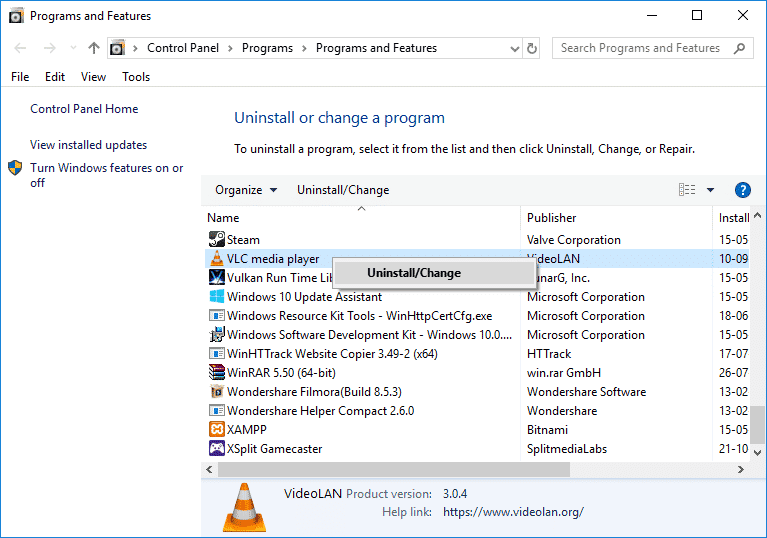
7. Use BlueStacks uninstaller to remove all the traces of it from your computer instead of following an unusual route to uninstall an application.
8 เยือน เว็บไซต์นี้ เพื่อดาวน์โหลด BlueStacks uninstaller tool.
9. After installing it, run it to remove all of its files. Grant for permissions if it asks for many. Click on the OK button on the final screen.
Now, reinstall BlueStacks by following these steps.
10 ไปที่ BlueStacks ดาวน์โหลดหน้า และดาวน์โหลดเวอร์ชันล่าสุด

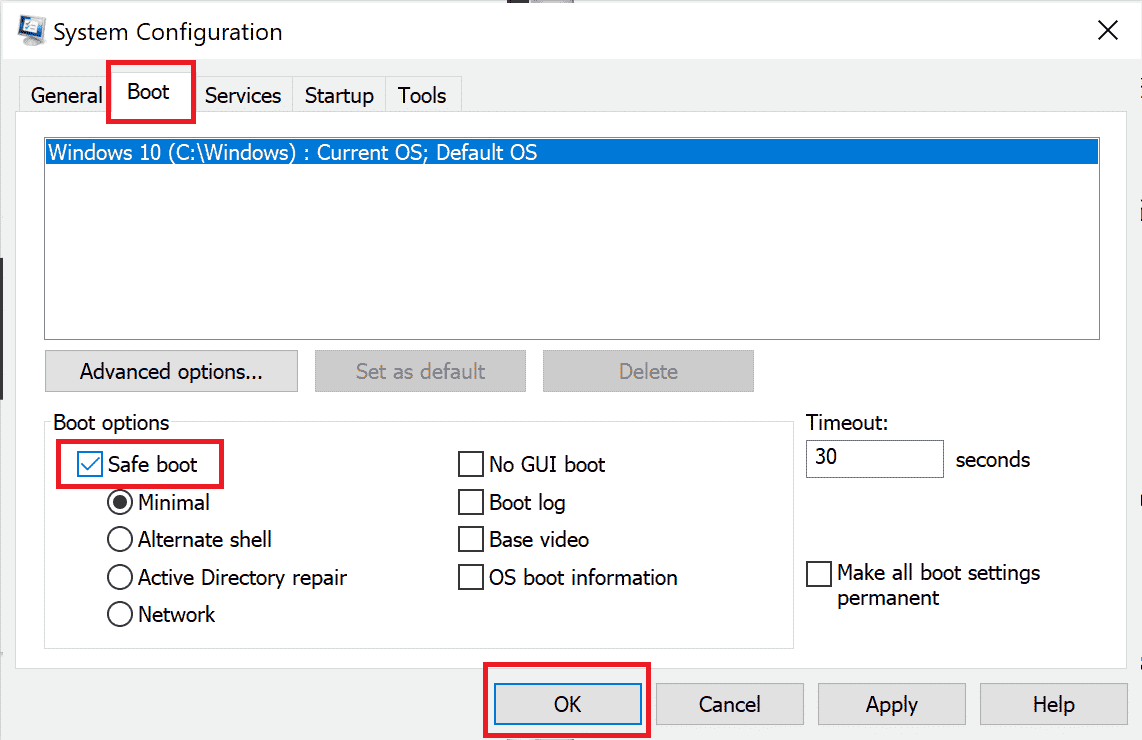
11. We will be installing the application after booting into Safe Mode.
12. เมื่อหน้าต่างเริ่มทำงานในเซฟโหมด ให้ไปที่ โฟลเดอร์ (ดาวน์โหลด) โดยที่คุณดาวน์โหลดไฟล์การติดตั้ง Bluestacks และเรียกใช้งาน ทำตามคำแนะนำบนหน้าจอเพื่อสิ้นสุดการติดตั้ง
13. ตอนนี้เราได้ติดตั้ง Bluestacks ใหม่แล้ว เราก็สามารถทำได้ ปิดเซฟโหมด และบูตกลับได้ตามปกติ
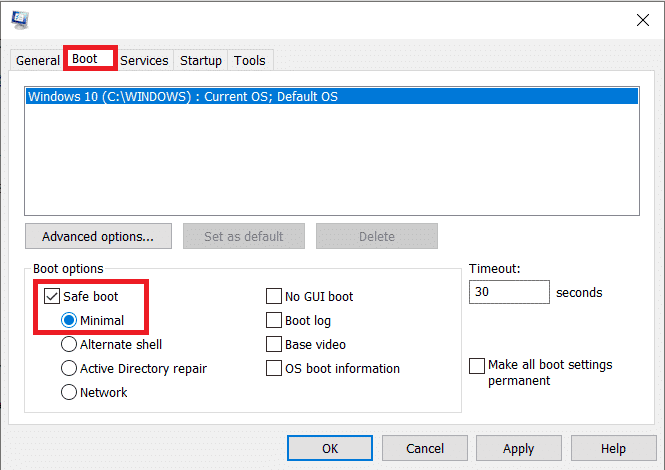
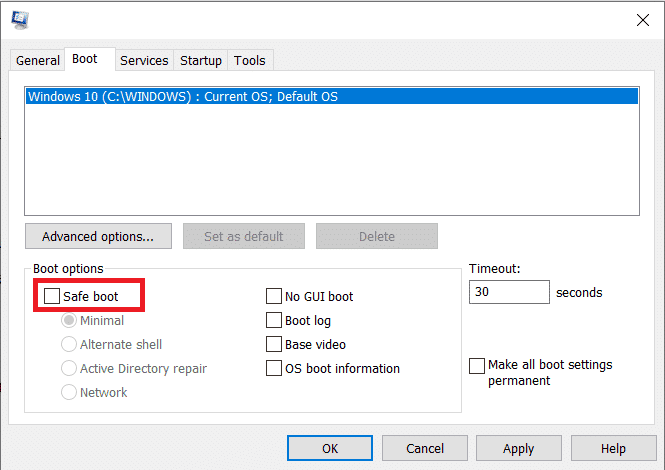
14. Open Run, type msconfig, and press enter. In the Boot tab, ยกเลิกการทำเครื่องหมายที่ช่องถัดจากเซฟโหมด และคลิกที่ OK.
15. สุดท้าย รีสตาร์ทพีซี and run Bluestacks to check if VirtualBox interface Windows 10 problem has been resolved.
ยังอ่าน: วิธีแก้ไขรหัสข้อผิดพลาด 0x80004005
Method 15: Restore Windows
The latest Windows update may not be compatible with BlueStacks which leads to the VirtualBox interface Windows 10 issue. Try recalling if this error started after updating your Windows, if so you can either wait for a new update or revert to the previous version which did not cause this error.
1 ไปที่ การตั้งค่า โดยกดปุ่ม ปุ่ม Windows + I พร้อมกัน
2 คลิกที่ การอัปเดตและความปลอดภัย การตั้งค่า
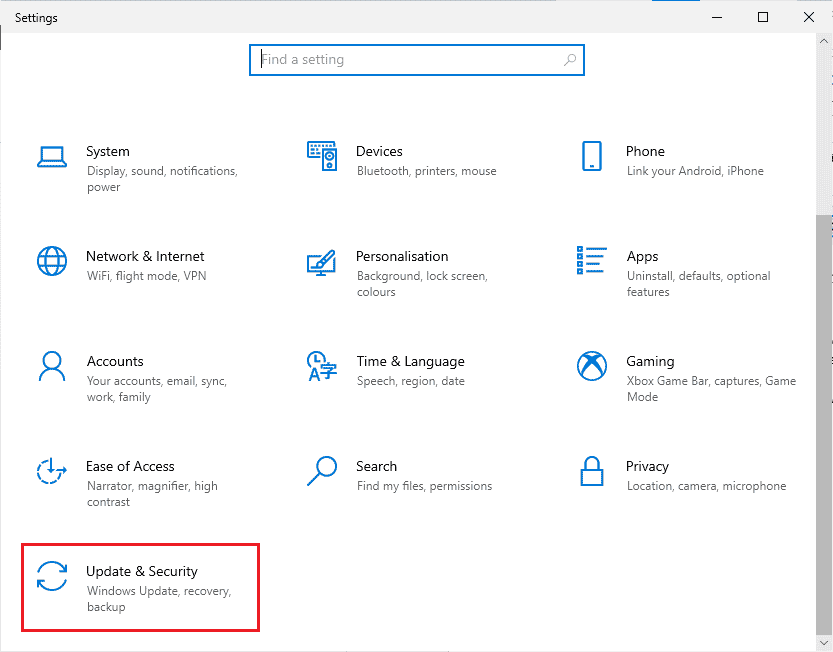
3. ตอนนี้มองหา การฟื้นตัว settings and click on it.
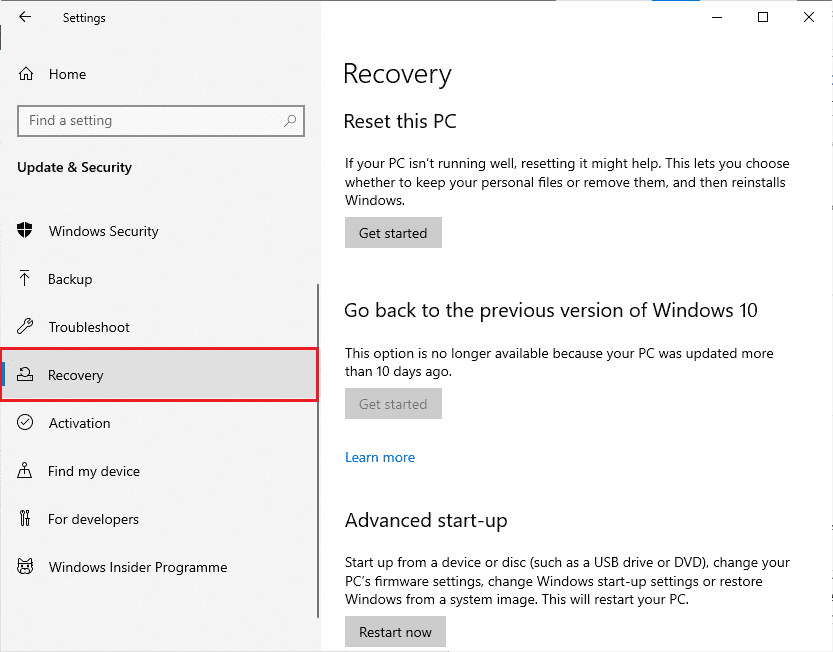
4. ตอนนี้คลิกที่ เริ่มต้นเลย button which will be under Go back to the previous version of Windows 10.
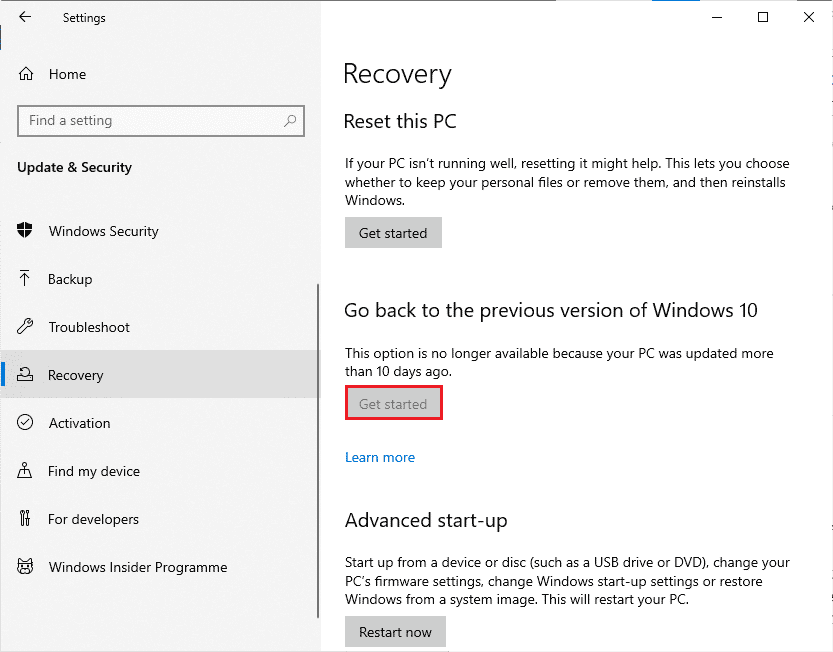
5. ปฏิบัติตาม คำแนะนำบนหน้าจอ to revert to the previous version of Windows.
6. If it has been 10 days since you last updated, the เริ่มต้นเลย option will be greyed out, in that case, you have to wait until you get the next update.
ยังอ่าน: แก้ไขข้อผิดพลาด Java Virtual Machine หรือ JVM ไม่พบ
Pro Tip: How to Shut Down VirtualBox
VirtualBox is an open-source application that allows users to run an additional operating system environment from the desktop of PCs or Macs. For example, a Windows user could use VirtualBox to run Windows XP, Mac OS X, and Windows 7. But you have to close a VirtualBox with the ปิดหน้านี้ command after using the VirtualBox virtual machine.
ฮิต คลิกที่ ปิดหน้านี้ button which will be in the upper right corner of the screen.
2. Choose the radio button labeled as ปิดเครื่อง
3. Check the box which is next to Restore current snapshot if you want to load the recent snapshot.
4. Begin the shutdown process by Clicking the OK ปุ่ม
5 เปิด เนื้อไม่มีมัน เมนูหรือ VirtualBox and เลือก ทางออก when the shutdown is completed.
ที่แนะนำ:
เราหวังว่าคู่มือนี้จะเป็นประโยชน์และคุณคงได้เรียนรู้วิธีแก้ไขแล้ว VirtualBox interface has active connections error message on Windows 10. Let us know how this article has helped you the best. Also, if you have any queries/suggestions regarding this article, then feel free to drop them in the comments section.