- in หน้าต่าง by ผู้ดูแลระบบ
Fix Windows 10 install Fails With Error C1900101-4000D

Fix Windows 10 install Fails With Error C1900101-4000D: If you’re trying to upgrade to Windows 10 but the install fails with error code C1900101-4000D then don’t worry as it occurs because the Windows installer cannot access important files required for installation. Sometimes this error is also caused because of a conflict during installation but you can’t be sure as there is no error message accompanying this error.
0xC1900101-0x4000D
The installation failed in the SECOND_BOOT phase with an error during MIGRATE_DATA operation
While there is no definite fix for this issue but users seem to be recommending a clean installation of Windows 10 which should only be used as a last resort. So without wasting any time let’s see How to Fix Windows 10 install Fails With Error C1900101-4000D with the help of below-listed troubleshooting guide.
Fix Windows 10 install Fails With Error C1900101-4000D
เบื้องต้น
a)Make sure to Update all drivers, including graphic, sound, BIOS, USB devices, printers, etc before the installing Windows 10.
b)Remove all external USB devices such as pen drive, external hard disk, USB keyboard & mouse, USB printer and all peripherals.
c)Use an ethernet cable instead of WiFi and disable WiFi until the update is complete.
Method 1: Temporarily Disable Antivirus and Firewall before attempting Upgrade
1.คลิกขวาที่ ไอคอนโปรแกรมป้องกันไวรัส จากถาดระบบแล้วเลือก ปิดการใช้งาน

2.จากนั้น เลือกกรอบเวลาที่ต้องการ โปรแกรมป้องกันไวรัสจะยังคงปิดใช้งานอยู่

หมายเหตุ เลือกระยะเวลาที่น้อยที่สุดที่เป็นไปได้ เช่น 15 นาทีหรือ 30 นาที
3.Once done, again try to upgrade your PC and check if the error resolves or not.
4.Type control in the Windows Search then click on แผงควบคุม จากผลการค้นหา

5.ถัดไป คลิกที่ ระบบและความปลอดภัย.
6.จากนั้นคลิกที่ ไฟร์วอลล์หน้าต่าง.

7. ตอนนี้จากบานหน้าต่างด้านซ้ายให้คลิกที่ เปิดหรือปิดไฟร์วอลล์ Windows

8.เลือกปิดไฟร์วอลล์ Windows แล้วรีสตาร์ทพีซีของคุณ Again try to upgrade your PC and see if you’re able to Fix Windows 10 install Fails With Error C1900101-4000D.
หากวิธีการข้างต้นไม่ได้ผล โปรดทำตามขั้นตอนเดียวกันนี้เพื่อเปิดไฟร์วอลล์อีกครั้ง
Method 2: Remove any hyphens from your computer or machine name
1.กดแป้น Windows + R แล้วพิมพ์ sysdm.cpl และกด Enter เพื่อเปิด คุณสมบัติของระบบ

2.Make sure you’re under แท็บชื่อคอมพิวเตอร์ จากนั้นคลิกที่ เปลี่ยนแปลง ที่ด้านล่าง
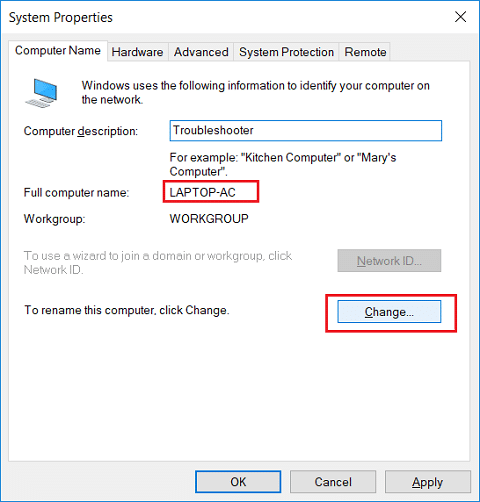
3.Make sure your machine name is simple no periods or hyphens or dashes.
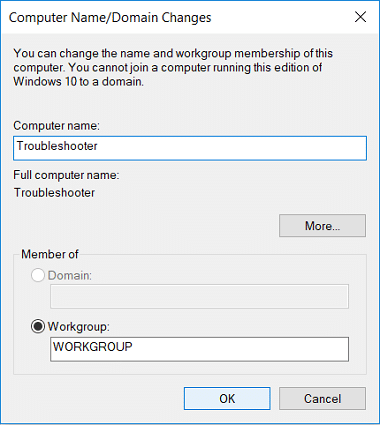
4.Click OK then Apply followed by OK.
5. รีบูตเครื่องพีซีของคุณเพื่อบันทึกการเปลี่ยนแปลง
วิธีที่ 3: ตรวจสอบให้แน่ใจว่า Windows เป็นเวอร์ชันล่าสุด
1.กด Windows Key + I จากนั้นเลือก อัปเดตและความปลอดภัย

2.ถัดไป คลิกอีกครั้ง ตรวจหาการปรับปรุง และตรวจสอบให้แน่ใจว่าได้ติดตั้งการอัปเดตที่ค้างอยู่

3. หลังจากติดตั้งการอัปเดตแล้ว ให้รีบูทพีซีของคุณและดูว่าคุณสามารถทำได้หรือไม่ Fix Windows 10 install Fails With Error C1900101-4000D.
วิธีที่ 4: ดำเนินการคลีนบูต
This would make sure that if any 3rd party application is conflicting with Windows update then you will be able to successfully install Windows Updates inside Clean Boot. Sometimes 3rd party software can conflict with Windows Update and therefore cause Windows Update to be Stuck. In order, Fix Windows 10 install Fails With Error C1900101-4000Dคุณต้องทำการคลีนบูตบนพีซีของคุณและวินิจฉัยปัญหาทีละขั้นตอน

วิธีที่ 5: อัปเกรดโดยใช้ Windows 10 Media Creation Tool
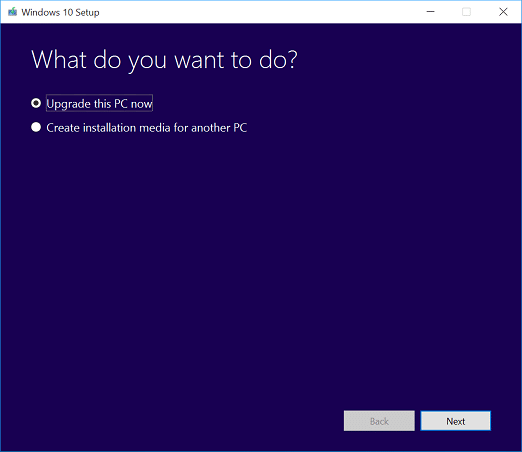
1.Download Media Creation Tool here.
2.Backup your data from system partition and save your license key.
3.Start the tool and choose to อัปเกรดพีซีเครื่องนี้ทันที
4.Accept the license terms.
5.After the installer is ready, choose to เก็บไฟล์และแอพส่วนตัว
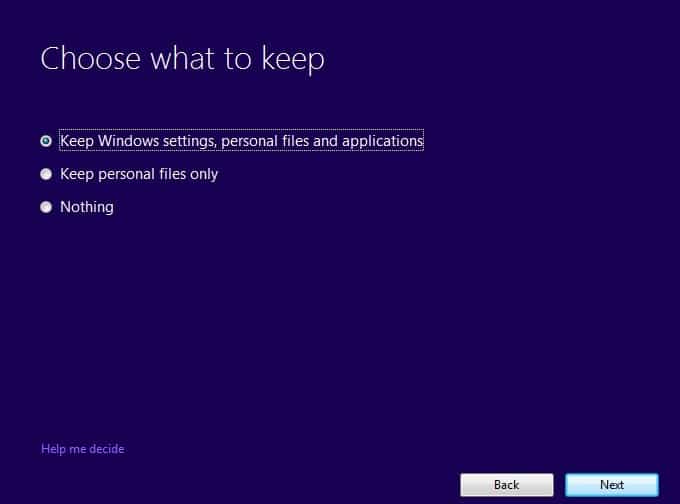
6.The PC will restart few times and your PC would be successfully upgraded.
วิธีที่ 6: เรียกใช้ SFC และ DISM
1.กด Windows Key + X จากนั้นคลิกที่ พรอมต์คำสั่ง (ผู้ดูแลระบบ)

2. พิมพ์คำสั่งต่อไปนี้ใน cmd แล้วกด Enter:
Sfc /scannow sfc /scannow /offbootdir=c: /offwindir=c:windows (หากด้านบนล้มเหลว ให้ลองใช้วิธีนี้)

3. รอให้กระบวนการข้างต้นเสร็จสิ้นและเมื่อเสร็จแล้วให้รีสตาร์ทพีซีของคุณ
4. เปิด cmd อีกครั้งแล้วพิมพ์คำสั่งต่อไปนี้แล้วกด Enter หลังจากแต่ละรายการ:
a) Dism /Online /Cleanup-Image /CheckHealth b) Dism /Online /Cleanup-Image /ScanHealth c) Dism /Online /Cleanup-Image / RestoreHealth

5. ปล่อยให้คำสั่ง DISM ทำงานและรอให้คำสั่งเสร็จสิ้น
6. หากคำสั่งข้างต้นไม่ได้ผล ให้ลองคำสั่งด้านล่าง:
Dism /Image:C:offline /Cleanup-Image /RestoreHealth /Source:c:testmountwindows Dism /Online /Cleanup-Image /RestoreHealth /แหล่งที่มา:c:testmountwindows /LimitAccess
หมายเหตุ แทนที่ C:RepairSourceWindows ด้วยตำแหน่งของแหล่งการซ่อมแซมของคุณ (แผ่นดิสก์การติดตั้งหรือการกู้คืน Windows)
7.รีบูตเครื่องพีซีของคุณเพื่อบันทึกการเปลี่ยนแปลงและดูว่าคุณสามารถ Fix Windows 10 install Fails With Error C1900101-4000D.
Method 7: Reset Windows Updates Components
1.กด Windows Key + X จากนั้นเลือก Command Prompt (Admin)
2. ตอนนี้พิมพ์คำสั่งต่อไปนี้เพื่อหยุด Windows Update Services แล้วกด Enter หลังจากแต่ละรายการ:
หยุดสุทธิ wuauserv
หยุดสุทธิ cryptSvc
บิตหยุดสุทธิ
msiserver หยุดสุทธิ

3. ถัดไป พิมพ์คำสั่งต่อไปนี้เพื่อเปลี่ยนชื่อโฟลเดอร์ SoftwareDistribution จากนั้นกด Enter:
ren C: WindowsSoftwareDistribution ซอฟต์แวร์Distribution.old
ren C: WindowsSystem32catroot2 catroot2.old

4. สุดท้าย ให้พิมพ์คำสั่งต่อไปนี้เพื่อเริ่ม Windows Update Services และกด Enter หลังจากแต่ละรายการ:
net start wuauserv
cryptSvc เริ่มต้นสุทธิ
บิตเริ่มต้นสุทธิ
msiserver เริ่มต้นสุทธิ

5. รีบูทพีซีของคุณเพื่อบันทึกการเปลี่ยนแปลงและตรวจสอบว่าคุณสามารถทำได้หรือไม่ Fix Windows 10 install Fails With Error C1900101-4000D.
Method 8: Delete Registry for Mounted Images
1.กดแป้น Windows + R แล้วพิมพ์ regedit และกด Enter เพื่อเปิด Registry Editor

2. ไปที่คีย์รีจิสทรีต่อไปนี้:
HKEY_LOCAL_MACHINESOFTWAREMicrosoftWIMMountMounted Images
3.Select Mounted Images then in the right window pane right-click on (Default) and select Delete.
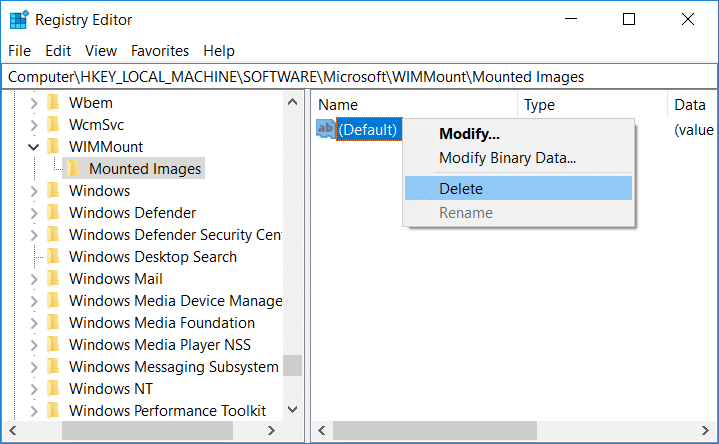
4. ออกจาก Registry Editor และรีบูทพีซีของคุณเพื่อบันทึกการเปลี่ยนแปลง
Method 9: Disable Wi-Fi Adapter and CD/DVD Drive
1.กดแป้น Windows + R แล้วพิมพ์ devmgmt.msc และกด Enter เพื่อเปิด Device Manager

2.Expand DVD/CD-ROM drivesจากนั้นคลิกขวาที่ .ของคุณ ไดรฟ์ CD / DVD และเลือก ปิดการใช้งานอุปกรณ์

3.Similarly, expand Network adapters then right-click on your WiFi อะแดปเตอร์และเลือก ปิดการใช้งานอุปกรณ์
4.Again try to run Windows 10 setup and see if you’re able to Fix Windows 10 install Fails With Error C1900101-4000D.
Method 10: Run Malwarebytes and AdwCleaner
Malwarebytes is a powerful on-demand scanner which should remove browser hijackers, adware and other types of malware from your PC. It is important to note that Malwarebytes will run alongside antivirus software without conflicts. To install and run Malwarebytes Anti-Malware, go to this article and follow each and every step.
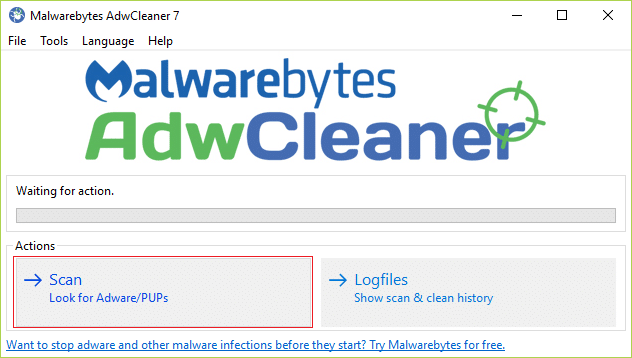
1.Download AdwCleaner from this link.
2.Once the download is complete, double-click on the adwcleaner.exe file เพื่อรันโปรแกรม
3.คลิกที่ “ฉันเห็นด้วย” เพื่อ ยอมรับข้อตกลงใบอนุญาต
4.ในหน้าจอถัดไป คลิก ปุ่มสแกน ภายใต้การดำเนินการ
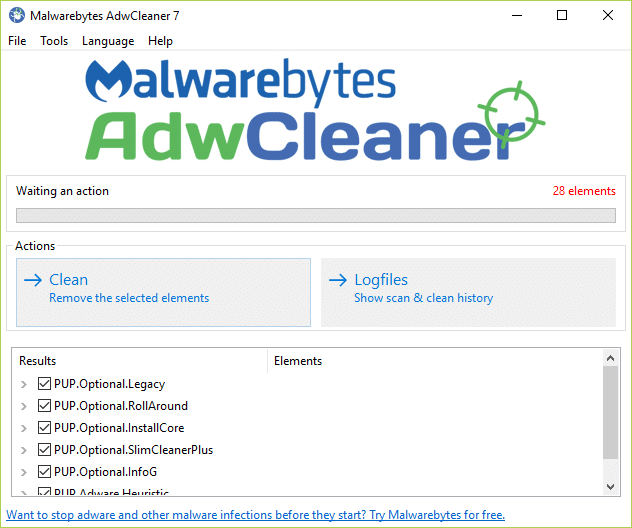
5.Now, wait for the AdwCleaner to search for PUPs and other malicious programs.
6.Once the scan is complete, click สะอาด in order to clean your system of such files.
7.Save any work you might be doing as your PC will need to reboot, click OK to reboot your PC.
8.Once the computer reboots, a log file will open which will list all of the files, folders, registry keys, etc that were removed in the previous step.
ที่แนะนำ:
นั่นคือคุณประสบความสำเร็จ Fix Windows 10 install Fails With Error C1900101-4000D แต่ถ้าคุณยังคงมีข้อสงสัยเกี่ยวกับคู่มือนี้ อย่าลังเลที่จะถามพวกเขาในส่วนความคิดเห็น