- in หน้าต่าง by ผู้ดูแลระบบ
Fix Windows Modules Installer Worker High CPU Usage
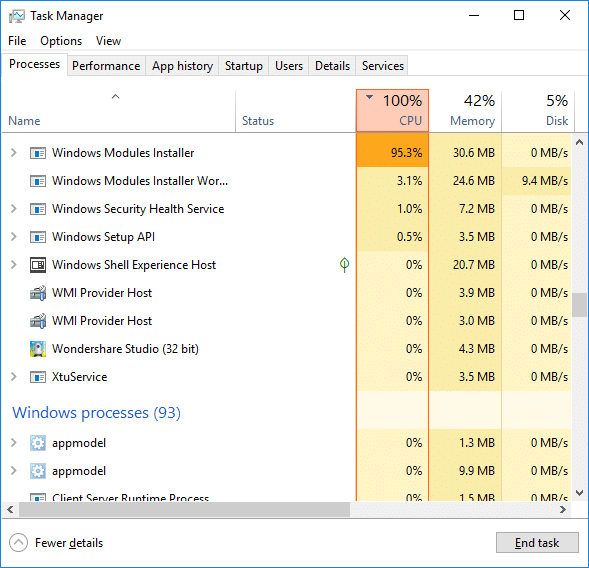
If you are facing the High CPU Usage by Windows Modules Installer Worker, then don’t worry as thousands of other users are also facing the similar problem and therefore, there are many working fixes which we will be discussing today in this article. To verify if you are facing this issue open Task Manager (Ctrl + Shift + Esc) and you will find that the Windows Modules Installer Worker is consuming High CPU or Disk Usage.

เคล็ดลับ Pro: You may leave your PC overnight or for a few hours to see the issue rectify itself once the Windows is finished downloading and installing updates.
What is Windows Modules Installer worker (WMIW)?
Windows Modules Installer worker (WMIW) is a service which takes cares of automatically installing Windows Update. According to its service description, WMIW is a system process that enables automatic installation, modification, and removal of Windows updates and optional components.
This process is responsible for finding new Windows Update automatically and installing them. As you might be aware that Windows 10 automatically install newer builds (i.e. 1803 etc.) via Windows Updates, so this process is responsible for installing these updates in the background.
Although this process is called Windows Modules Installer worker (WMIW) and you will see the same name in the Processes tab in the Task Manager, but if you switch to Details tab, then you will find the name of the file as TiWorker.exe.
Why Is Windows Modules Installer worker Using So Much CPU?
As Windows Modules Installer worker (TiWorker.exe) runs continuously in the background, sometimes it might utilize high CPU or disk usage when installing or uninstalling Windows Updates. But if its constantly using high CPU then the Windows Modules Installer worker may have become unresponsive while checking new updates. As a result, you may be experiencing lags, or your system might hang or freeze completely.
The first thing users do when they experience freezing, or lagging issues on their system is to restart their PC, but I assure you that this strategy won’t work in this case. This is because the issue will not resolve by itself until and unless you fix the underlying cause.
Fix Windows Modules Installer Worker High CPU Usage
ตรวจสอบให้แน่ใจว่าได้สร้างจุดคืนค่าในกรณีที่มีสิ่งผิดปกติเกิดขึ้น
Windows Modules Installer Worker (WMIW) is an important service, and it should not be disabled. WMIW or TiWorker.exe is not a virus or malware, and you cannot just delete this service from your PC. So without wasting any time let’s see How to Fix Windows Modules Installer Worker High CPU Usage ด้วยความช่วยเหลือของคู่มือการแก้ไขปัญหาที่แสดงด้านล่าง
วิธีที่ 1: เรียกใช้ตัวแก้ไขปัญหา Windows Update
1. กด Windows Key + I เพื่อเปิด การตั้งค่า จากนั้นคลิกที่ ไอคอนอัปเดตและความปลอดภัย
![]()
2. จากเมนูด้านซ้ายมือ ให้เลือก การแก้ไขปัญหาการ ภายใต้“ลุกขึ้นและวิ่ง" คลิกที่ Windows Update
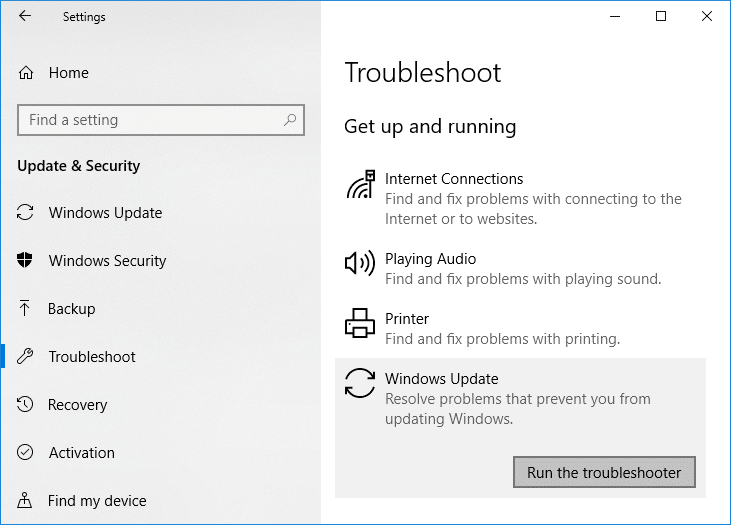
3. ตอนนี้คลิกที่ “เรียกใช้เครื่องมือแก้ปัญหา” ใต้ Windows Update
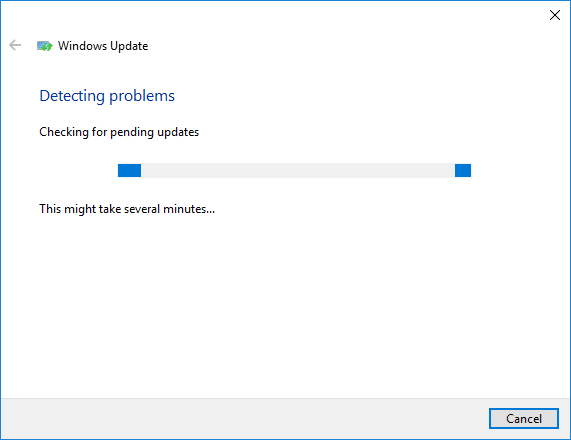
4. Let the troubleshooter run, and it will automatically fix any issues found with Windows Update taking forever.
Method 2: Manually Check for Windows Updates
1. กดปุ่ม Windows + I จากนั้นเลือก อัปเดตและความปลอดภัย
2. จากด้านซ้ายมือ เมนูให้คลิกที่ Windows Update
3. ตอนนี้คลิกที่ “ตรวจหาการปรับปรุง” เพื่อตรวจสอบการอัปเดตที่มีอยู่

4. หากมีการอัปเดตใด ๆ ที่รอดำเนินการ ให้คลิกที่ ดาวน์โหลดและติดตั้งการอัปเดต

5. เมื่อดาวน์โหลดการอัปเดตแล้ว ให้ติดตั้ง จากนั้น Windows ของคุณจะอัปเดต
Method 3: Configure Windows Update to Manual
ข้อควรระวัง: This method will switch Windows Update from automatically installing the new updates to the manual. This means you have to manually check for Windows Update (weekly or monthly) to keep your PC secure. But follow this method, and you can again set the Updates to Automatic once the issue is resolved.
1.กดแป้น Windows + R แล้วพิมพ์ services.msc และกด Enter

2. เลื่อนลงและค้นหา ของ Windows Installer โมดูล บริการในรายการ
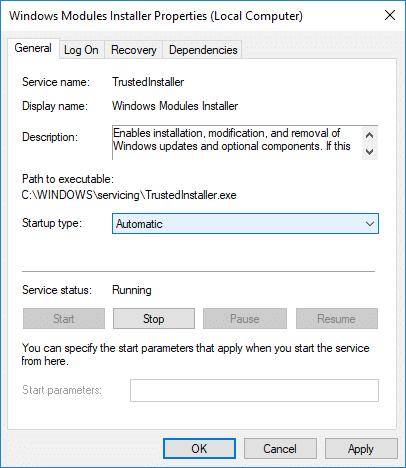
3 คลิกขวาที่ บริการติดตั้งโมดูล Windows และเลือก คุณสมบัติ
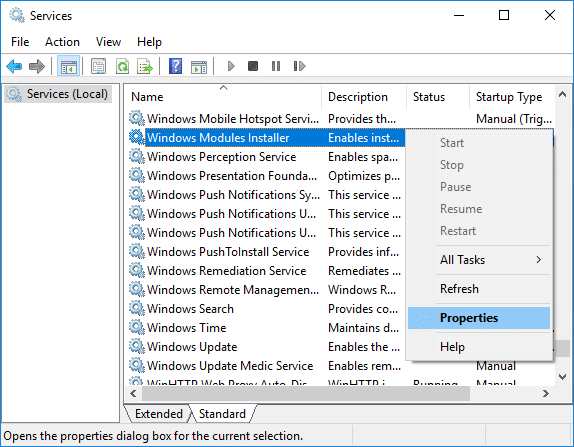
4 ตอนนี้คลิกที่ หยุด then from the ชนิดการเริ่มต้น drop-down select คู่มือ.
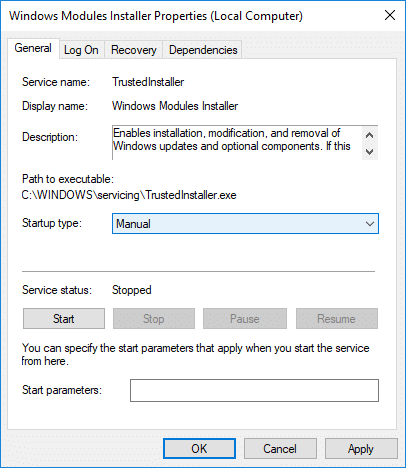
5. คลิก Apply ตามด้วย ตกลง
6. Similarly, follow the same step for the บริการ Windows Update
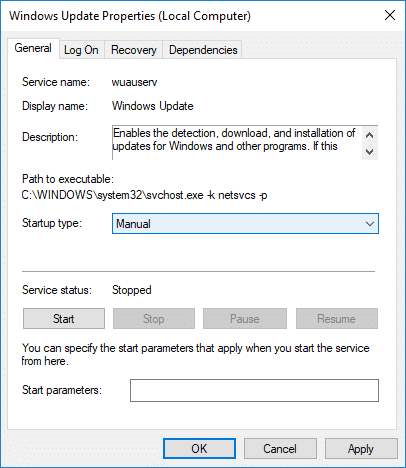
7. รีบูทพีซีของคุณเพื่อบันทึกการเปลี่ยนแปลง
8. อีกครั้ง ตรวจสอบ Windows Updates Manually และติดตั้งการอัปเดตที่ค้างอยู่
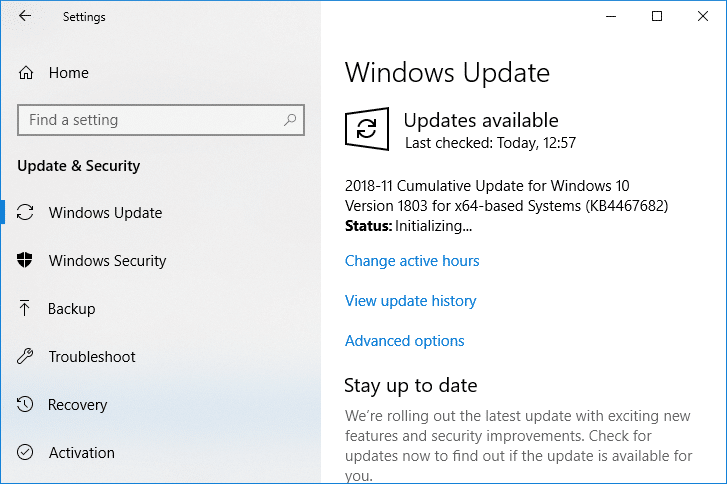
9. Once is done, again go back to services.msc window and open the Windows Modules Installer & Windows Update Properties หน้าต่าง
10 ตั้งค่า ชนิดการเริ่มต้น ไปยัง อัตโนมัติ และคลิก เริ่มต้น. Then click Apply followed by OK.
11. รีบูทพีซีของคุณเพื่อบันทึกการเปลี่ยนแปลง
วิธีที่ 4: เรียกใช้ตัวแก้ไขปัญหาการบำรุงรักษาระบบ
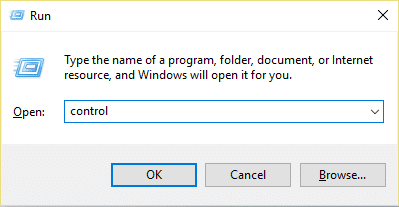
1. กด Windows Key + R จากนั้นพิมพ์ control แล้วกด Enter เพื่อเปิด แผงควบคุม
2. ค้นหา แก้ไขปัญหา และคลิกที่ การแก้ไขปัญหา.

3 จากนั้นคลิกที่ ดูทั้งหมด ในบานหน้าต่างด้านซ้าย
4 คลิกที่ “System Maintenance” เรียกใช้ System Maintenance Troubleshooter.

5. ตัวแก้ไขปัญหาอาจจะสามารถ Fix Windows Modules Installer Worker High CPU Usage, but if it didn’t, then you need to run System Performance Troubleshooter.
6. เปิดพร้อมรับคำสั่ง ผู้ใช้สามารถดำเนินการขั้นตอนนี้ได้โดยการค้นหา 'cmd' และกด Enter

7. พิมพ์คำสั่งต่อไปนี้ลงใน cmd แล้วกด Enter:
msdt.exe / id PerformanceDiagnostic
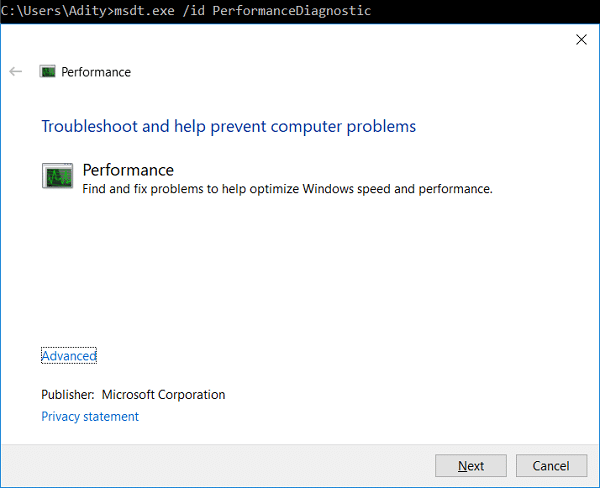
8. Follow the on-screen instruction to run the troubleshooter and fix any issues find the System.
9. Finally, exit the cmd and reboot your PC.
Method 5: Disable Automatic Maintenance
Sometimes Automatic Maintenance can conflict with the Windows Modules Installer Worker service, so try to disable Automatic Maintenance using this guide and see if this fixes your issue.
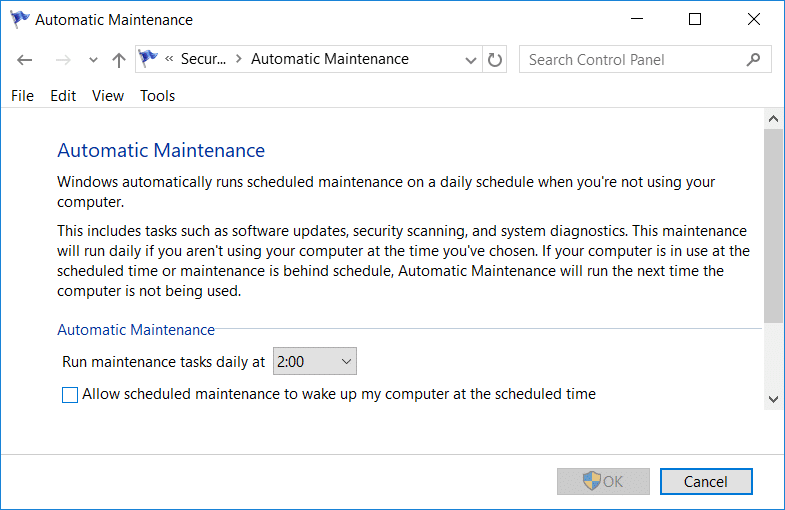
Although disabling Automatic Maintenance is not a good idea, but there might be some case where you need to actually disable it, for example, if your PC freezes during automatic maintenance or Windows Modules Installer Worker High CPU Usage issue then you should disable maintenance to troubleshoot the issue.
Method 6: Run System File Checker and DISM
1. เปิดพร้อมรับคำสั่ง ผู้ใช้สามารถดำเนินการขั้นตอนนี้ได้โดยการค้นหา 'cmd' และกด Enter
2. พิมพ์คำสั่งต่อไปนี้ใน cmd แล้วกด Enter:
Sfc /scannow sfc /scannow /offbootdir=c: /offwindir=c:windows (หากด้านบนล้มเหลว ให้ลองใช้วิธีนี้)

3. รอให้กระบวนการข้างต้นเสร็จสิ้นและเมื่อเสร็จแล้วให้รีสตาร์ทพีซีของคุณ
4. เปิด cmd อีกครั้งแล้วพิมพ์คำสั่งต่อไปนี้แล้วกด Enter หลังจากนั้น:
Dism /Online /Cleanup-Image /CheckHealth Dism /Online /Cleanup-Image /ScanHealth Dism /ออนไลน์ /Cleanup-Image /RestoreHealth

5. ปล่อยให้คำสั่ง DISM ทำงานและรอให้เสร็จสิ้น
6. หากคำสั่งข้างต้นใช้ไม่ได้ผล ให้ลองทำตามด้านล่างนี้:
Dism /Image:C:offline /Cleanup-Image /RestoreHealth /Source:c:testmountwindows Dism /Online /Cleanup-Image /RestoreHealth /แหล่งที่มา:c:testmountwindows /LimitAccess
หมายเหตุ แทนที่ C:RepairSourceWindows ด้วยแหล่งการซ่อมแซมของคุณ (การติดตั้ง Windows หรือแผ่นดิสก์การกู้คืน)
7. รีบูทพีซีของคุณเพื่อบันทึกการเปลี่ยนแปลงและดูว่าคุณสามารถทำได้หรือไม่ Fix Windows Modules Installer Worker High CPU Usage.
วิธีที่ 7: ดำเนินการคลีนบูต
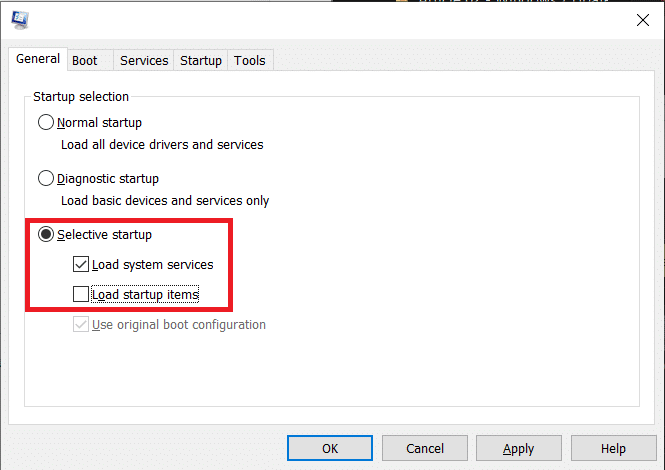
Sometimes 3rd party software can conflict with Windows and can cause the issue. To Fix Windows Modules Installer Worker High CPU Usage issueคุณต้องทำการคลีนบูตบนพีซีของคุณและวินิจฉัยปัญหาทีละขั้นตอน
Method 8: Set your WiFi as Metered Connection
หมายเหตุ This will stop Windows Automatic Update, and you will need to manually check for Updates.
1. กด Windows Key + I เพื่อเปิด การตั้งค่า จากนั้นคลิกที่ เครือข่ายและอินเทอร์เน็ต

2. จากเมนูด้านซ้ายมือ ให้เลือก Wi-Fi
3. Under Wi-Fi, คลิก on your currently connected network (WiFi).
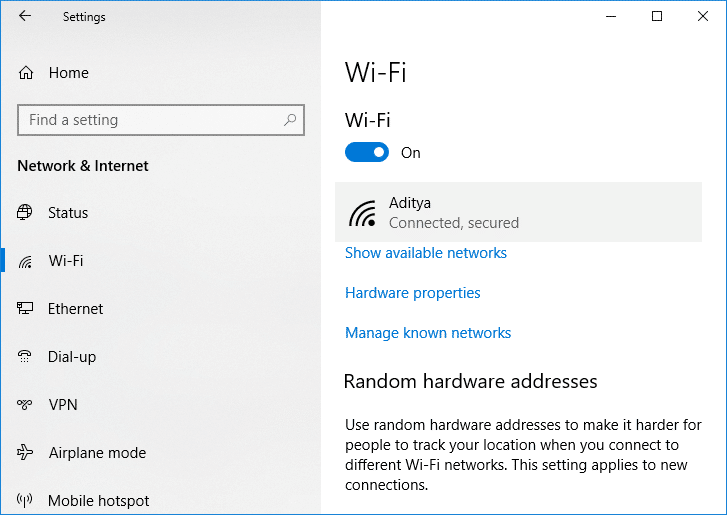
4. Scroll down to Metered connection and เปิดใช้งานการสลับ ภายใต้“ตั้งค่าเป็นมิเตอร์เชื่อมต่อ"
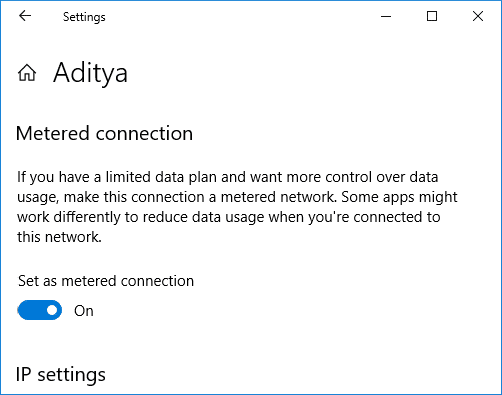
5. Close Settings and reboot your PC to save changes.
ที่แนะนำ:
เพียงเท่านี้คุณก็ประสบความสำเร็จแล้ว Fix Windows Modules Installer Worker High CPU Usage แต่ถ้าคุณยังคงมีข้อสงสัยเกี่ยวกับบทช่วยสอนนี้ อย่าลังเลที่จะถามพวกเขาในส่วนความคิดเห็น
