- in วิธีการ by ผู้ดูแลระบบ
How to Install Exodus Kodi (2022)

Exodus is a third-party Kodi addon that allows you to stream or watch movies, tv-series, or content online. Exodus is probably one of the oldest and well-known add-ons for Kodi, which is is why this add-on is reliable, and there are regular updates available for this add-on. Now the add-on doesn’t have its own server to host the media files as it simply links the media content on other platforms to Kodi.
Now a fair warning that most content available in Exodus is pirated and it is illegal to use Exodus add-on. This tutorial is only for educational purposes to test Exodus, and in no way, this should be used to stream or watch pirated material. If you still utilize Exodus, you are doing so on your own risk and can’t be held liable for any damages.
The new Kodi Krypton 17.6 is the benchmark for Kodi users, and in this guide, we will see how to install Exodus Kodi Addon on Kodi 17.6 Krypton. The below-listed steps work for Kodi (formerly known as XMBC) on PC, Amazon Fire TV Stick, Android, and other Kodi boxes. Also, Exodus is a third-party add-on, so naturally, there is no support available on the official Kodi forum.
Protect Yourself While Streaming & Downloading
Whenever you stream or download any movies, tv-series, or any content from Exodus Kodi, you should always use a VPN to protect your identity and keep your stream logs confidential. Also read How to Add IMDB on Kodi in Windows 10.. Your ISP or government might track what you are accessing online if you aren’t connected through a VPN. The recommend VPN is: IPVanish or ExpressVPN.
How to Install Exodus Kodi in 2022 (GUIDE)
ตรวจสอบให้แน่ใจว่าได้สร้างจุดคืนค่าในกรณีที่มีสิ่งผิดปกติเกิดขึ้น
If this is the first time you are installing a third-party add-on, you need to enable “แอพจากแหล่งที่ไม่รู้จัก” in Kodi App Settings. To do so open Kodi app then navigate to the following settings:
Settings > System Settings > Add-ons > Apps from Unknown Sources
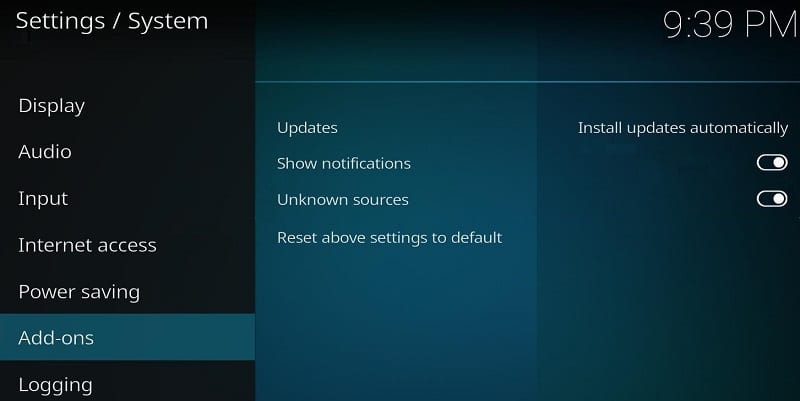
เปิดใช้งานการสลับ ถัดจาก“แอพจากแหล่งที่ไม่รู้จัก“, and once this setting is enabled, you can now download and install third-party Kodi add-ons that aren’t developed by the official Kodi developers.
#1. How to Install Exodus on Kodi 17.6 Krypton using Lazy Repository
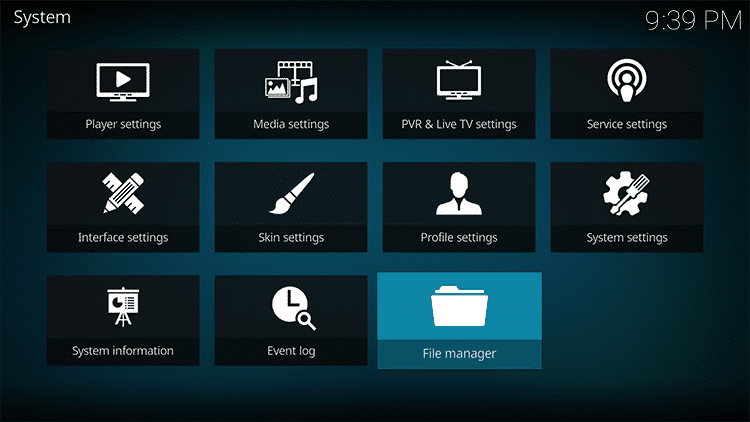
1. Open Kodi App then clicks on the การตั้งค่า (ไอคอนรูปเฟือง) on the top-left corner of your screen.
2. ในหน้าจอถัดไป ให้คลิกที่ ตัวจัดการไฟล์ จากนั้นดับเบิลคลิกที่ เพิ่มแหล่งที่มา
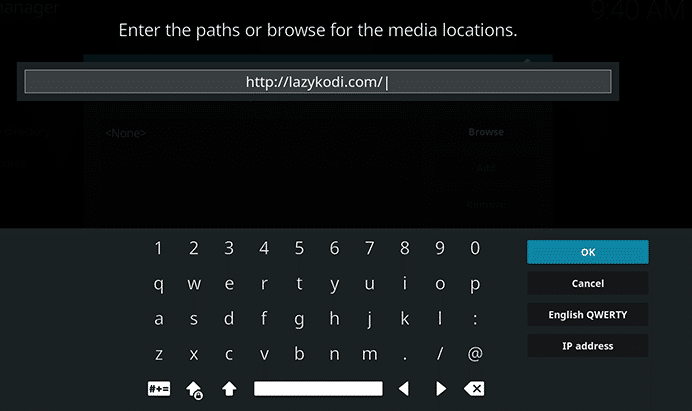
3. Now in place of “<None>” enter the following URL:
http://lazykodi.com/
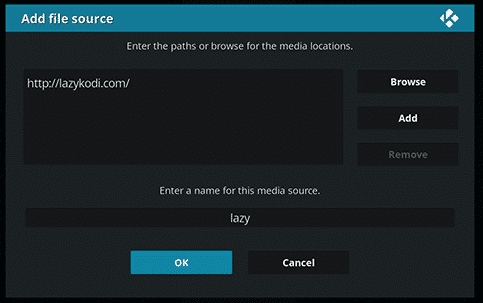
4. ตอนนี้ภายใต้ “ป้อนชื่อสำหรับแหล่งข้อมูลมีเดียนี้“, you need to give this source a name, for example, enter the lazy repo or lazy จากนั้นคลิกตกลง
หมายเหตุ You will need to enter a name that contains a part of the URL path.
5. Go back to the home screen or main menu of the Kodi app and then click on “Add-ons” from the left-hand sidebar and then click on the “ไอคอนแพ็คเกจ” on the upper left.
![]()
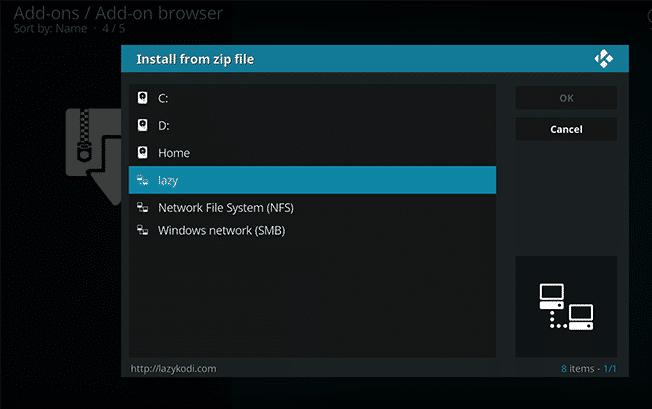
6. On the next screen, select the “ติดตั้งจากไฟล์ซิป"
![]()
7 เลือก Lazy repo or Laxy (the name you saved on step 4).
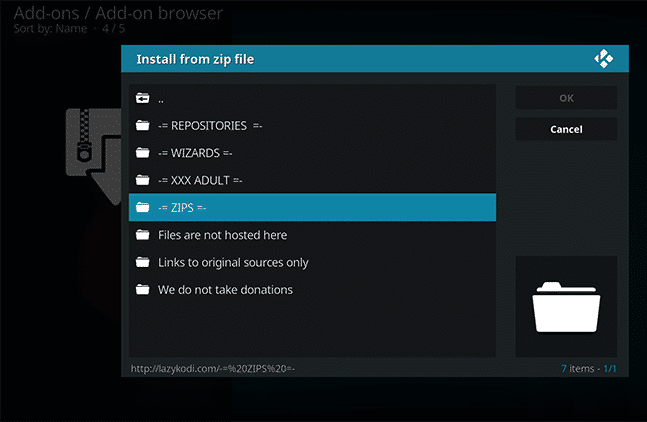
8 จากนั้นคลิกที่ “-= ZIPS =-” or “ZIPS” to install Kodi Bae repository for Exodus.
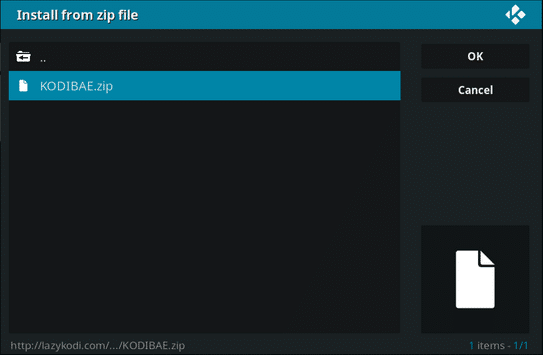
9. ในหน้าจอถัดไป เลือก “KODIBAE.zip” and then wait for the success notification.
10. Once finished, you will get a notification saying “Kodi Bae Repository Add-on installed” on the top-right of your screen.
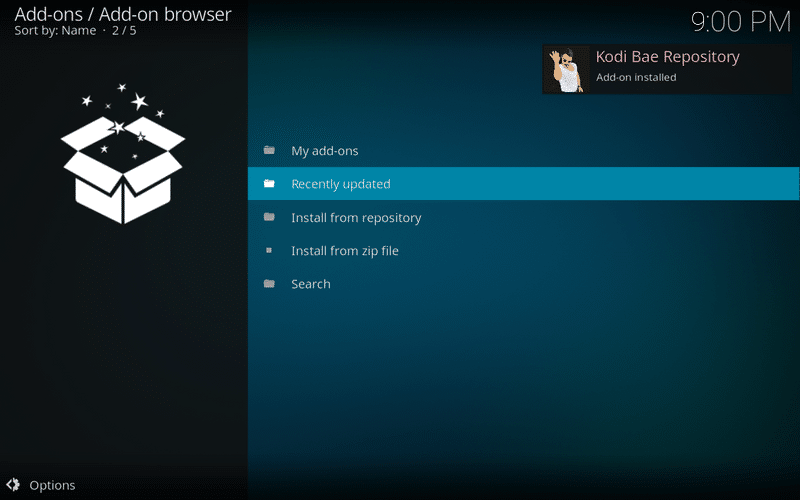
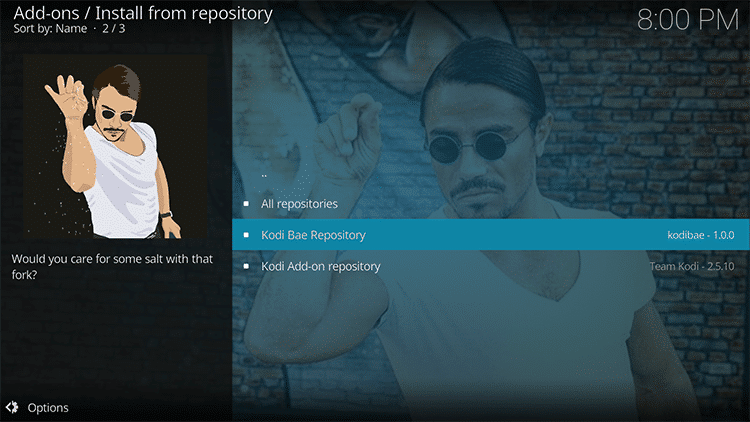
11. On the same screen (Add-ons / Add-on browser), click on “ติดตั้งจากที่เก็บ” จากรายการตัวเลือก
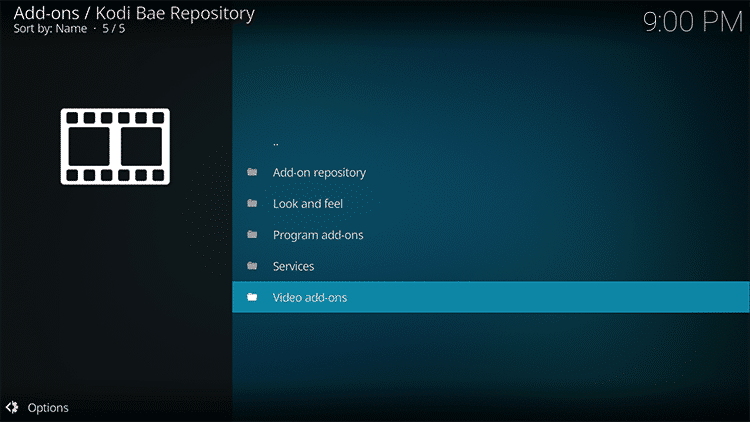
12. คลิกที่“Kodi Bae Repository"
13. Next, click “Add-on วิดีโอ” จากรายการตัวเลือก
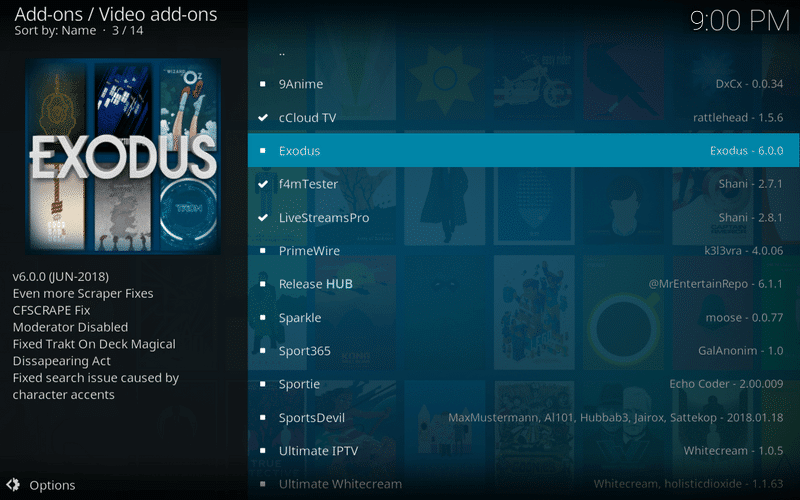
14. On this screen, you will see a list of available Kodi add-ons, select Exodus 6.0.0 from the list.
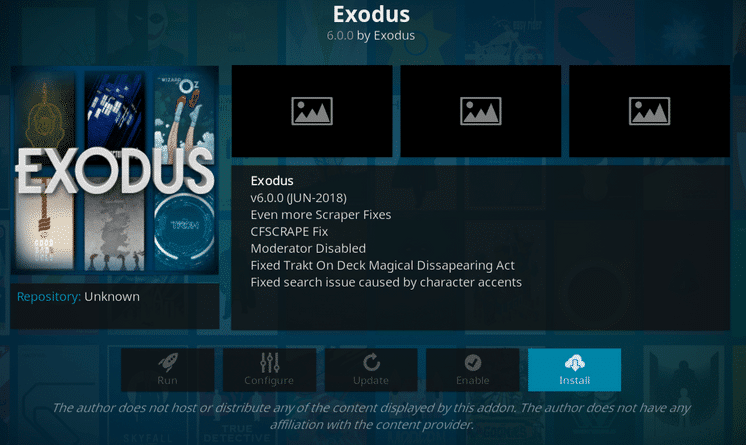
15 ในที่สุดคลิก การติดตั้ง and wait for the success notification saying “Add-on installed”. Once finished, you have successfully installed Exodus on Kodi 17.6 Krypton using Lazy Repository.
#2. How to Update Exodus on Kodi 17.6 Kryptop
If you are already using Exodus Kodi, then you can update your add-on to the latest version by following this guide.
1. Open Kodi app and then from the home screen, click on “Add-ons” from the left-hand side menu.
2. ตอนนี้คลิกที่ “Add-on วิดีโอ” from the list and then right-click on “พระธรรม” และเลือก ข้อมูล
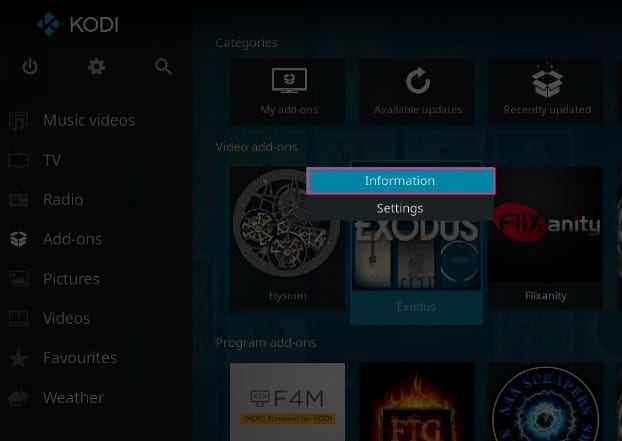
3. On the Exodos Addon information page, click on the “บันทึก” ที่ด้านล่างของหน้าจอ
![]()
4. If there is an update available for Exodus addon, it will be updated to the latest version, as of writing this guide the latest version of Exodus is 6.0.0.
#3. How to Install Exodus Kodi 17.6 with XvBMC Repository
1. Launch your Kodi Krypton app then click on การตั้งค่า (ไอคอนรูปเฟือง) จากนั้นเลือก ตัวจัดการไฟล์
2. Double-click on “เพิ่มแหล่งที่มา” and then click on ‘None”. Now instead of “<None>” enter the following URL:
http://archive.org/download/repository.xvbmc/
3. Name this media source as XvBMC และคลิกตกลง
หมายเหตุ You will need to enter a name which contains a part of the URL path.
4.From the Kodi home screen click on “Add-ons” from the left-hand menu and then click on the “ไอคอนแพ็คเกจ” on the upper left.
5. คลิกที่“ติดตั้งจากไฟล์ซิป” จากนั้นคลิกที่ XvBMC (the name you saved in step 3).
6. ตอนนี้เลือก repository.xvbmc-x.xx.zip และรอให้การติดตั้งเสร็จสิ้น
7. On the same screen, click on “ติดตั้งจากไฟล์ซิป” แล้วเลือก XvBMC (Add-ons) Repository.
8. คลิกที่“พื้นที่เก็บข้อมูลเสริม” from the list of options and then select tknorris Release Repository.
9. คลิกที่ “การติดตั้ง” icon from the bottom right corner of the screen.
10. Once the repository installation is successful, hit backspace twice to return to the “ติดตั้งจากพื้นที่เก็บข้อมูล” หน้าจอ
11. From the above screen, select tknorris Release Repository.
12. ตอนนี้ไปที่ Video Add-ons > Select Exodus > Hit Install.
13. Once the installation is successful, you get a success notification.
#4. Install Exodus Add-on on Kodi 17.6 Krypton using Kodi Bae Repository
Kodi Bae Repository is available for download via Github account. Although there are certain issues with the Kodi Bae repository, other add-ons present in this repo are working without any issues. This repository holds some very popular Kodi addons such as SportsDevil, Exodus, 9Anime, cCloud TV, etc. The problem with Kodi Bae repo is that the developers of some of the add-ons have stopped working and therefore many of the add-ons may contain dead links which might result in poor streaming.
1. Download the Kodi Bae Repository Zip file from this link.
2. After you have downloaded the above file, open your Kodi app and then click on Add-ons จากเมนูด้านซ้ายมือ
3. From the add-ons sub-menu click on ไอคอนแพ็คเกจ ที่มุมบนซ้ายของหน้าจอ
4. ถัดไป เลือก “ติดตั้งจากไฟล์ซิป"
5. Navigate to the zip file you downloaded on step 1 and then select the .zip file.
หมายเหตุ The filename of the zip you downloaded on step 1 will be plugin.video.exodus-xxx.zip, provided you didn’t rename it).
6. Wait for a few minutes so that upload and install of Exodus add-on are complete. Once finished, you will see a success notification with message “ติดตั้งโปรแกรมเสริม Exodus แล้ว” ที่มุมขวาบน
7. To access the Exodus Kodi add-on from the home page, navigate to Add-ons > Video add-ons > Exodus.
#5. How to Install Exodus on Kodi 17.6 Krypton using All Eyez on Me Repository
1. Open your Kodi App, then navigate to Settings > File Manager.
2. Double-click on “เพิ่มแหล่งที่มา” and then click None. And in place of “” enter the following URL:
http://highenergy.tk/repo/
3. Now you need to name this repository, give it a name as “All Eyez on Me Repo” and click OK. Again click OK to save this repo.
Note: You will need to enter a name which contains a part of the URL path.
4. Once done, you will see a notification with a success message.
5. From Kodi home screen, click on Add-ons from the left-hand menu and then click on “ไอคอนแพ็คเกจ"
6 เลือก“ติดตั้งจากไฟล์ซิป” จากนั้นเลือก“All Eyez on Me Repo” (the name you saved on step 3).
7. Next, select the zip file “repository.alleyezonme-1.4.zip” and once finished, you will see installation notification in the upper right corner of the screen.
8. On the same screen, click on “ติดตั้งจากที่เก็บ"และจากนั้นคลิกที่"All Eyez on Me repository” จากรายการ
9. Select Video add-ons and then click on “พระธรรม"
10. คลิกที่“การติดตั้ง” icon from the bottom right corner of the screen.
11. Wait for a moment, upload and install the Exodus add-on and finally, you will see a success notification.
#6. Install Exodus Add-on on Kodi version 16 Jarvis using Kodi Bae Repository
1. Download the zip file from this link.
2. Open your Kodi app then click System and then click on “Add-ons"
3. ในหน้าจอถัดไป ให้คลิกที่ “ติดตั้งจากไฟล์ Zip"
4. Navigate to the zip file you downloaded on step 1 and then select the file.
5. Wait for the notification which says “ติดตั้งโปรแกรมเสริม Exodus แล้ว"
6. To access the Exodus add-on from the home page navigate to Add-ons > Video add-ons > Exodus.
#7. How to Install Exodus Addon on Kodi Version 16 Jarvis [Updated 2018]
This is the updated version of the guide to installing Exodus on Kodi 16 after the fall of the Fusion Repository. You can also choose from the list of Top 10 Alternatives for Kodi Fusion Repository.
1. Open your Kodi app then navigate to System > File Manager.
2. Double-click on “เพิ่มแหล่งที่มา” and in the place of “<None>” enter the following URL:
http://kdil.co/repo/
3. ตอนนี้ภายใต้ “ป้อนชื่อสำหรับแหล่งข้อมูลมีเดียนี้“, you need to give this source a name, for example, enter ‘โคดิล เรโป'แล้วคลิกตกลง
หมายเหตุ You will need to enter a name which contains a part of the URL path.
4. On the Kodi home screen, click on “Add-ons” จากนั้นคลิกที่ “ไอคอนแพ็คเกจ” on the upper left corner.
5 เลือก“ติดตั้งจากไฟล์ซิป” and select ‘โคดิล เรโป‘ (the name you saved on step 4).
6. ตอนนี้เลือก “kodil.zip” and then wait for the success notification “Kodil Repository Add-on installed"
7. ถัดไป คลิกที่ “ติดตั้งจากที่เก็บ” จากรายการตัวเลือก
8. คลิกที่“ที่เก็บ Kodil"
9. Next, click “Add-on วิดีโอ” and select Exodus from the list of available Kodi add-ons.
10 ในที่สุดคลิก การติดตั้ง and wait for the Exodus add-on to install.
#8. How to uninstall Exodus on Kodi
1. On the Kodi home screen, navigate to Add-ons > My add-ons > Video Add-ons.
2. On the Video add-ons screen, select พระธรรม จากรายการตัวเลือก
3. Once you click on Exodus, click on the Uninstall button from the screen’s bottom right corner.
ที่แนะนำ:
นั่นคือคุณได้เรียนรู้สำเร็จแล้ว How to Install Exodus Kodi in 2022 แต่ถ้าคุณยังมีคำถามใดๆ เกี่ยวกับบทช่วยสอนนี้ โปรดอย่าลังเลที่จะถามพวกเขาในส่วนความคิดเห็น