Process and Compressed Memory is a Windows 10 feature responsible for memory compression (also referred to as RAM compression and memory compression). This feature basically utilizes data compression to reduce the size or number of paging request to and from the auxiliary storage. In short, this feature is designed to take less amount of disk space and memory but in this case the System and Compressed Memory process start using 100% Disk and Memory, causing the affected PC to become slow.

In Windows 10, a compressions store is added to the concept of Memory Manager, which is an in-memory collection of compressed pages. So whenever the memory starts to fill up, the System and Compressed Memory process will compress the unused pages instead of writing them to the disk. The benefit of this is the amount of memory used per process is reduced, which allows Windows 10 to maintain more programs or apps in physical memory.
The problem appears to be incorrect Virtual Memory settings. Someone changed the paging file size from automatic to a particular value, virus or malware, Google Chrome or Skype, corrupt system files etc. So without wasting any time let’s see how to actually Fix 100% Disk Usage by System and Compressed Memory with the help of below-listed troubleshooting guide.
[SOLVED] 100% Disk Usage by System and Compressed Memory
ตรวจสอบให้แน่ใจว่าได้สร้างจุดคืนค่า เผื่อในกรณีที่มีสิ่งผิดปกติเกิดขึ้น
วิธีที่ 1: ซ่อมแซมไฟล์ระบบที่เสียหาย
1. เปิดพร้อมรับคำสั่ง ผู้ใช้สามารถดำเนินการขั้นตอนนี้ได้โดยการค้นหา 'cmd' และกด Enter

2. ตอนนี้พิมพ์ต่อไปนี้ใน cmd แล้วกด Enter:
Sfc /scannow sfc /scannow /offbootdir=c: /offwindir=c:windows (หากด้านบนล้มเหลว ให้ลองใช้วิธีนี้)
![SFC scan now command prompt | [SOLVED] 100% Disk Usage by System and Compressed Memory](https://lbsite.org/wp-content/uploads/2023/01/SFC-scan-now-command-prompt.png)
3. รอให้กระบวนการข้างต้นเสร็จสิ้นและเมื่อเสร็จแล้วให้รีสตาร์ทพีซีของคุณ
4. เปิด cmd อีกครั้งแล้วพิมพ์คำสั่งต่อไปนี้แล้วกด Enter หลังจากนั้น:
Dism /Online /Cleanup-Image /CheckHealth Dism /Online /Cleanup-Image /ScanHealth Dism /ออนไลน์ /Cleanup-Image /RestoreHealth

5. ปล่อยให้คำสั่ง DISM ทำงานและรอให้เสร็จสิ้น
6. หากคำสั่งข้างต้นไม่ได้ผล ให้ลองคำสั่งด้านล่าง:
Dism /Image:C:offline /Cleanup-Image /RestoreHealth /Source:c:testmountwindows Dism /Online /Cleanup-Image /RestoreHealth /แหล่งที่มา:c:testmountwindows /LimitAccess
หมายเหตุ แทนที่ C:RepairSourceWindows ด้วยแหล่งการซ่อมแซมของคุณ (การติดตั้ง Windows หรือแผ่นดิสก์การกู้คืน)
7. รีบูทพีซีของคุณเพื่อบันทึกการเปลี่ยนแปลงและดูว่าคุณสามารถทำได้หรือไม่ Fix 100% Disk Usage by System and Compressed Memory Issue.
Method 2: Set Correct Paging File Size
1. กด Windows Key + R แล้วพิมพ์ sysdm.cpl และกด Enter เพื่อเปิด คุณสมบัติของระบบ

2. เปลี่ยนเป็นไฟล์ แท็บขั้นสูง จากนั้นคลิกที่ การตั้งค่าภายใต้ประสิทธิภาพ

3. Again switch to the Advanced tab and click Change under Virtual Memory.

4. เครื่องหมายถูก “จัดการขนาดแฟ้มเพจจิ้งสำหรับไดรฟ์ทั้งหมดโดยอัตโนมัติ"
![Checkmark Automatically manage paging file size for all drives | [SOLVED] 100% Disk Usage by System and Compressed Memory](https://lbsite.org/wp-content/uploads/2023/02/Checkmark-Automatically-manage-paging-file-size-for-all-drives.png)
5. Click OK, then click Apply followed by OK.
6. Select Yes to Restart your PC to save changes.
วิธีที่ 3: ปิดใช้งานการเริ่มต้นอย่างรวดเร็ว
1. กด Windows Key + R จากนั้นพิมพ์ control แล้วกด Enter เพื่อเปิด แผงควบคุม

2 คลิกที่ ฮาร์ดแวร์และเสียง จากนั้นคลิกที่ ตัวเลือก Power.

3. จากนั้น จากบานหน้าต่างด้านซ้าย เลือก "เลือกสิ่งที่ปุ่มเพาเวอร์ทำ"

4 ตอนนี้คลิกที่ "เปลี่ยนการตั้งค่าที่ไม่สามารถใช้งานได้ในขณะนี้"

5. ยกเลิกการเลือก “เปิดใช้งานการเริ่มต้นอย่างรวดเร็ว” และคลิกที่ บันทึกการเปลี่ยนแปลง
![Uncheck Turn on fast startup | [SOLVED] 100% Disk Usage by System and Compressed Memory](https://lbsite.org/wp-content/uploads/2023/01/Uncheck-Turn-on-fast-startup.png)
6. Restart your PC and see if you’re able to Fix 100% Disk Usage by System and Compressed Memory Issue.
วิธีที่ 4: ปิดใช้งาน Superfetch Service
1. กด Windows Key + R แล้วพิมพ์ services.msc และกด Enter

2 หา SuperFetch service from the list then right-click on it and select คุณสมบัติ

3. Under Service status, if the service is running, click on หยุด
4. ตอนนี้จาก การเริ่มต้น type drop-down select พิการ

5. คลิก Apply ตามด้วย ตกลง
6. รีบูทพีซีของคุณเพื่อบันทึกการเปลี่ยนแปลง
If the above method doesn’t disable Superfetch services then you can follow disable Superfetch using Registry:
1. กด Windows Key + R แล้วพิมพ์ regedit และกด Enter เพื่อเปิด Registry Editor

2. ไปที่คีย์รีจิสทรีต่อไปนี้:
HKEY_LOCAL_MACHINESYSTEMCurrentControlSetControlSession Managerการจัดการหน่วยความจำPrefetchParameters
3. Make sure you have selected ดึงพารามิเตอร์ล่วงหน้า จากนั้นในหน้าต่างด้านขวาให้ดับเบิลคลิก เปิดใช้งานSuperfetch คีย์และ change it’s value to 0 in the Value data field.

4. Click OK and close the Registry Editor.
5. รีสตาร์ทพีซีของคุณเพื่อบันทึกการเปลี่ยนแปลงและดูว่าคุณสามารถทำได้หรือไม่ Fix 100% Disk Usage by System and Compressed Memory Issue.
Method 5: Adjust your PC for Best Performance
1. กด Windows Key + R แล้วพิมพ์ sysdm.cpl และกด Enter เพื่อเปิด คุณสมบัติของระบบ
2. เปลี่ยนเป็นไฟล์ ระดับสูง จากนั้นคลิกที่ การตั้งค่า ภายใต้ ประสิทธิภาพ.
3. Under Visual Effects checkmark “ปรับเพื่อให้ได้ประสิทธิภาพที่ดีที่สุด"

4. คลิก Apply ตามด้วย ตกลง
5. Reboot your PC and see if you’re able to Fix 100% Disk Usage by System and Compressed Memory Issue.
Method 6: Kill the Speech Runtime Executable Process
1 กด Ctrl + Shift + Esc เพื่อเปิดตัวจัดการงาน
2 ใน แท็บกระบวนการค้นหา Speech Runtime Executable.
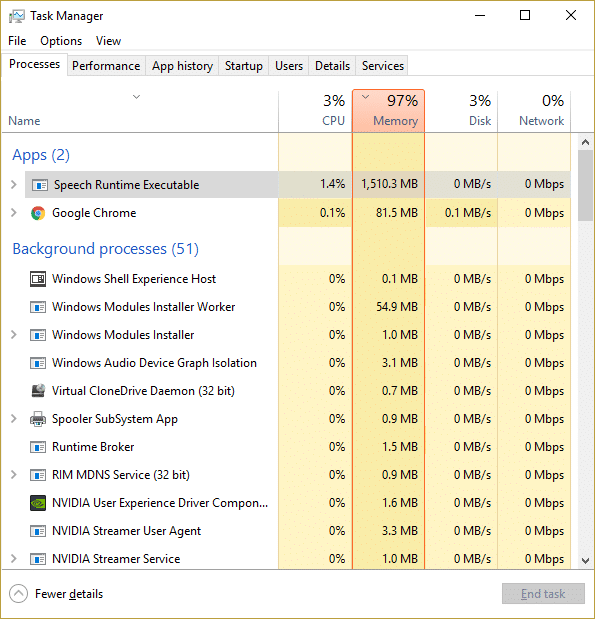
3. คลิกขวาที่มันแล้วเลือก งานสิ้นสุด.
วิธีที่ 7: เรียกใช้ CCleaner และ Malwarebytes
1 ดาวน์โหลดและติดตั้ง CCleaner & มัลแวร์ไบต์
2. เรียกใช้ Malwarebytes และปล่อยให้มันสแกนระบบของคุณเพื่อหาไฟล์ที่เป็นอันตราย หากพบมัลแวร์ มันจะลบออกโดยอัตโนมัติ

3. รัน CCleaner แล้วเลือก ทำความสะอาดแบบกำหนดเอง.
4. ภายใต้ Custom Clean ให้เลือก แท็บวินโดวส์ และเครื่องหมายถูกเป็นค่าเริ่มต้นแล้วคลิก วิเคราะห์.
![Select Custom Clean then checkmark default in Windows tab | [SOLVED] 100% Disk Usage by System and Compressed Memory](https://lbsite.org/wp-content/uploads/2023/01/Select-Custom-Clean-then-checkmark-default-in-Windows-tab.png)
5. เมื่อการวิเคราะห์เสร็จสิ้น ตรวจสอบให้แน่ใจว่าคุณจะลบไฟล์ที่จะลบออกอย่างแน่นอน

6. สุดท้ายคลิกที่ไฟล์ เรียกใช้ Cleaner ปุ่มและปล่อยให้ CCleaner ดำเนินการตามหลักสูตร
7. หากต้องการทำความสะอาดระบบของคุณเพิ่มเติม เลือกแท็บรีจิสทรีและตรวจสอบให้แน่ใจว่ามีการตรวจสอบสิ่งต่อไปนี้:

ฮิต คลิกที่ สแกนหาปัญหา และอนุญาตให้ CCleaner สแกน จากนั้นคลิกที่ แก้ไขปัญหาที่เลือก ปุ่ม
![Once scan for issues is completed click on Fix selected Issues | [SOLVED] 100% Disk Usage by System and Compressed Memory](https://lbsite.org/wp-content/uploads/2023/01/Once-scan-for-issues-is-completed-click-on-Fix-selected-Issues.png)
9. เมื่อ CCleaner ถาม “คุณต้องการเปลี่ยนแปลงการสำรองข้อมูลรีจิสทรีหรือไม่?" เลือกใช่.
10. เมื่อการสำรองข้อมูลของคุณเสร็จสิ้นแล้ว ให้คลิกที่ แก้ไขปัญหาที่เลือกทั้งหมด ปุ่ม
11. รีสตาร์ทพีซีของคุณเพื่อบันทึกการเปลี่ยนแปลง
Method 8: Change configuration of Google Chrome and Skype
สำหรับ Google Chrome: Navigate to the following under Chrome: Settings > Show Advanced Settings > Privacy > Use a prediction service to load pages more quickly. Disable the toggle next to “Use a prediction service to load pages.”

Change configuration For Skype
1. Make sure you have exited Skype, if not end task from Task Manager for Skype.
2. Press Windows Key + R then type the following and click OK:
C:Program Files (x86)SkypePhone
3 คลิกขวาที่ skype.exe และเลือก คุณสมบัติ

4. เปลี่ยนเป็น แท็บความปลอดภัย และคลิก แก้ไข

5 เลือก แพ็คเกจการใช้งานทั้งหมด under Group or user names then checkmark Write ภายใต้ อนุญาต

6. Click Apply, followed by OK and see if you’re able to Fix 100% Disk Usage by System and Compressed Memory Issue.
Method 9: Set Correct Permission for System and Compressed Memory Process
1. กด Windows Key + R แล้วพิมพ์ taskchd.msc and hit Enter to open Task Scheduler.

2. นำทางไปยังเส้นทางต่อไปนี้:
Task Scheduler Library > Microsoft > Windows > MemoryDiagnostic
![Double click on ProcessMemoryDiagnostic Events | [SOLVED] 100% Disk Usage by System and Compressed Memory](https://lbsite.org/wp-content/uploads/2023/02/Double-click-on-ProcessMemoryDiagnostic-Events.png)
3 ดับเบิลคลิกที่ ProcessMemoryDiagnostic Events แล้วคลิก เปลี่ยนผู้ใช้หรือกลุ่ม under Security Options.

4 คลิก ระดับสูง แล้วคลิก Find Now.

5. เลือกไฟล์ บัญชีผู้ดูแลระบบ from the list then click OK.

6. อีกครั้ง คลิกตกลง to add your administrator account.
7. Checkmark เรียกใช้ที่มีสิทธิ์สูงสุด จากนั้นคลิกตกลง

8. Follow the same steps for RunFullMemoryDiagnostic and close everything.
9. รีบูทพีซีของคุณเพื่อบันทึกการเปลี่ยนแปลง
Method 10: Disable System and Compressed Memory Process
1. กด Windows Key + R แล้วพิมพ์ taskchd.msc และกด Enter เพื่อเปิด ตัวกำหนดเวลางาน
2. นำทางไปยังเส้นทางต่อไปนี้:
Task Scheduler Library > Microsoft > Windows > MemoryDiagnostic
3 คลิกขวาที่ เรียกใช้ FullMemoryDiagnostic และเลือก ปิดการใช้งาน
![Right-click on RunFullMemoryDiagnostic and select Disable | [SOLVED] 100% Disk Usage by System and Compressed Memory](https://lbsite.org/wp-content/uploads/2023/02/Right-click-on-RunFullMemoryDiagnostic-and-select-Disable.png)
4. Close Task Scheduler and restart your PC.
ที่แนะนำ:
นั่นคือคุณประสบความสำเร็จ Fix 100% Disk Usage by System and Compressed Memory แต่ถ้าคุณยังมีคำถามใดๆ เกี่ยวกับโพสต์นี้ อย่าลังเลที่จะถามพวกเขาในส่วนความคิดเห็น

