Humans have always shown a keen interest in preserving their memories. Paintings, sculptures, monuments, epitaphs, etc. were some of the many historical means used by people to make sure that their stories aren’t forgotten and lost in oblivion. With the invention of the camera, pictures and videos became the most popular means to celebrate and commemorate the glory days. As technology became more and more advance and the world stepped into the digital age, the entire process of capturing memories in the form of photos and videos became extremely convenient.
In the present times, almost everyone owns a smartphone, and with that holds power to preserve their fond memories, capture moments of fun and frolic, and make a video of those once in a lifetime experiences. Although modern smartphones have significantly large memory storage, sometimes it just isn’t enough to store all the photos and videos that we would like to keep. This is where Google Photos comes in to play.
Cloud storage apps and services like Google Photos, Google Drive, Dropbox, OneDrive, etc. have become an absolute necessity in the present times. One of the reasons behind this is the drastic improvement of the smartphone camera. The camera on your device is capable of capturing stunning, high-resolution images that could give DSLRs a run for their money. You can also record full HD videos at a significantly high FPS (frames per second). As a result, the final size of the photos and videos are quite large.
Without a decent cloud storage drive, our device’s local memory would soon be full, and the best part is that most of the cloud storage apps offer their services for free. Android users, for example, get unlimited free storage to back up their photos and videos on Google Photos for free. However, Google Photos isn’t just a cloud storage server, and, in this article, we are going to explore the various features that Google Photos is packing and also deal with the problem of Google Photos not backing up.
Tingnan din:
10 Paraan para Ayusin ang Mga TikTok Video na Hindi Nagpe-play ang Isyu
8 Paraan para Ayusin ang Android Text Messages Stuck Downloading Error
Ayusin ang Google para sa Android na Mga Palabas na Offline na Isyu
11 Ways to Fix Desktop WhatsApp Not Opening on PC
Ayusin ang Android Hindi Tumatanggap ng Tamang PIN
What are the various services offered by Google Photos?
Google Photos was created by Android developers to solve the lack of storage issue in Android smartphones. It is a very useful app that allows users to back up their photos and videos on the cloud. All that you need to do is sign in with your Google account, and you will be allocated a designated space on the cloud server to store your media files.
The interface of Google Photos looks like some of the best gallery apps that you can find on Android. The photos and videos are automatically arranged and sorted according to their date and time of capture. This makes it easier to find the photo that you are looking for. You can also instantly share the photo with others, do some basic editing, and also download the image on your local storage whenever you want.
Sa nasabi kanina, Google Photos offers unlimited storage, given that you are willing to compromise a little with the quality. The app offers a choice between 15GB of free storage space for saving uncompressed original resolution photos, and videos or unlimited storage for saving photos and videos compressed to HD quality. The other salient features of the Google Photos isama
- It automatically syncs and backs up your photos and videos to the cloud.
- If the preferred upload quality is set to HD, then the app automatically compresses files to high quality and saves them on the cloud.
- You can create an album containing any number of pictures and generate a sharable link for the same. Any user with the link and access permission can view and download the images saved in the album. This is probably the best way to share a large number of photos and videos with multiple people.
- If you have a Google Pixel, then you wouldn’t even have to compromise with the upload quality; you can save an unlimited number of photos and videos in their original quality.
- Google Photos also helps you in making collages, short video presentations, and even animations.
- Apart from that, you can also create Motion photos, use the in-built editor, use the Free Up Space feature to eliminate duplicates, and conserve space.
- With the latest Google Lens integration, you can even perform a smart visual search on photos previously saved on the cloud.
Despite being such an advanced and efficient app, Google Photos isn’t perfect. However, just like every other app, Google Photos might act out at times. One of the most concerning problems is times when it stops uploading photos to the cloud. You wouldn’t even be aware that the automatic upload feature has stopped working, and your photos aren’t getting backed up. However, there is no reason to panic just yet as we are here to provide you with a number of solutions and fixes for this problem.
How to Fix the Problem of Google Photos Not Backing Up
As mentioned earlier, sometimes Google Photos stops backing up your photos and videos on the cloud. It either get stuck on “Waiting for sync” or “Backing up 1 of XYZ” and it takes forever to upload a single photo. The reason behind this could be an erroneous change of setting on your phone or a problem with Google servers itself. Whatever may be the reason, the problem must be fixed as soon as possible, because you wouldn’t want to risk losing your precious memories. Given below is a list of solutions that you can try to fix the problem of Google Photos not backing up.
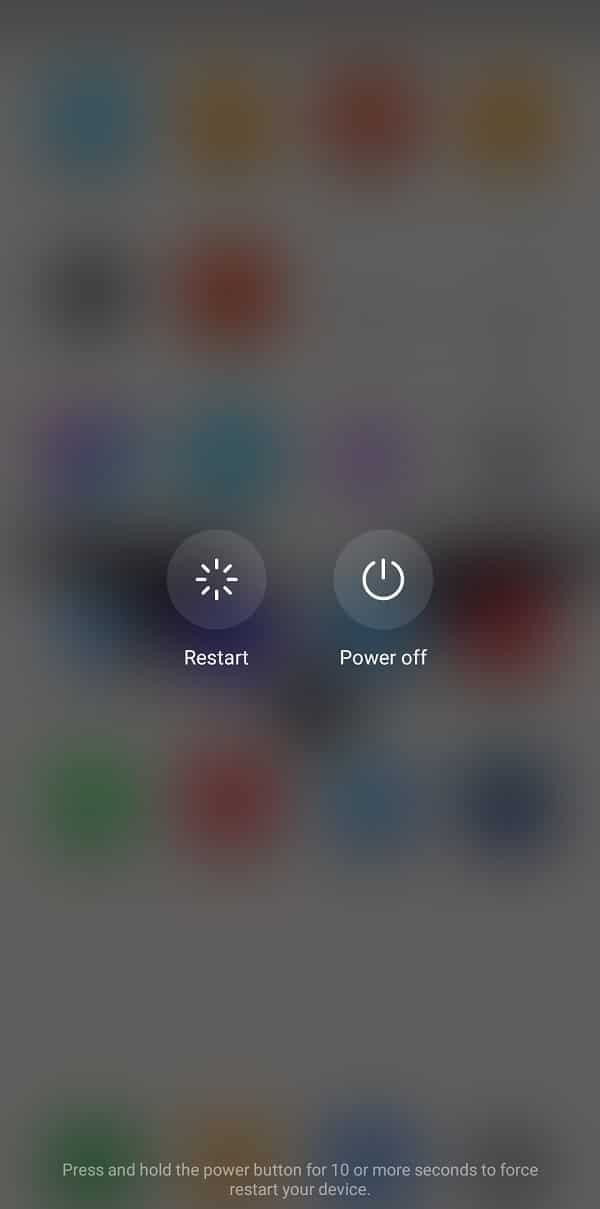
Solution 1: I-restart ang iyong device
If your Google photos app gets stuck while uploading a photo or video, it could be the result of a technical glitch. The easiest solution to this problem is to reboot/restart your device. The simple act of turning it off and on has the potential to fix any technical problem.
That is why it is usually the first item on the list of solutions for almost every problem that might occur on an electronic device. So, without thinking too much, press and hold your power button until the power menu pops up on the screen and tap on the Restart option. See if you’re able to fix Google Photos backup stuck issue. If that doesn’t work, proceed with the other solutions.
Solution 2: Check your Backup Status
In order to fix the problem, you need to figure out what is actually preventing your photos and videos from getting backed up. To get a clear idea of the exact nature of the problem, you need to check the status of your backup. Follow the steps given below to see how:
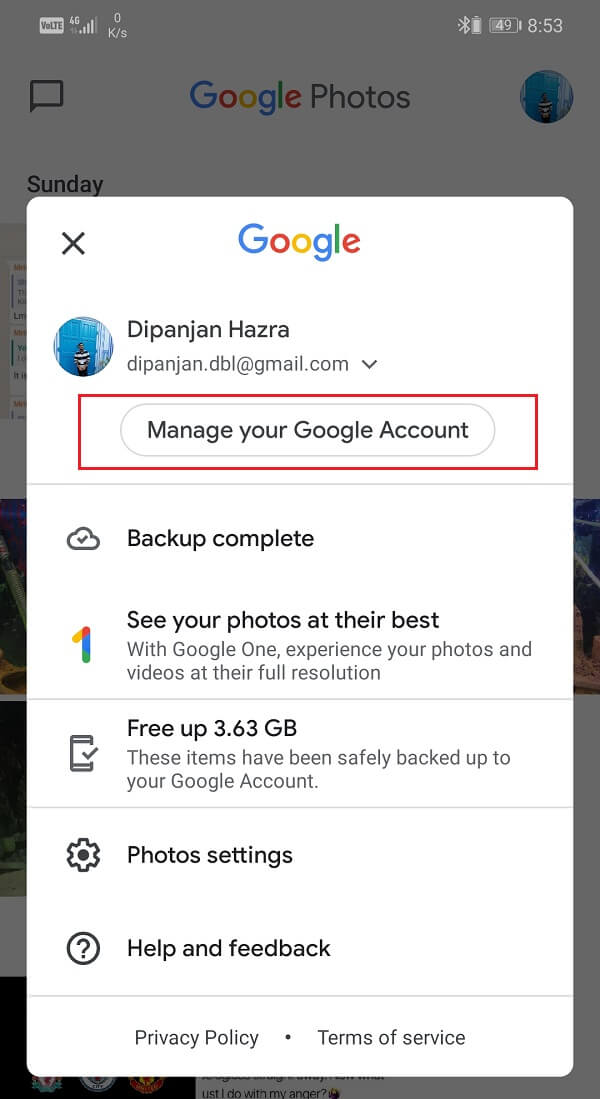
1. Una, buksan Google Photos sa iyong aparato.
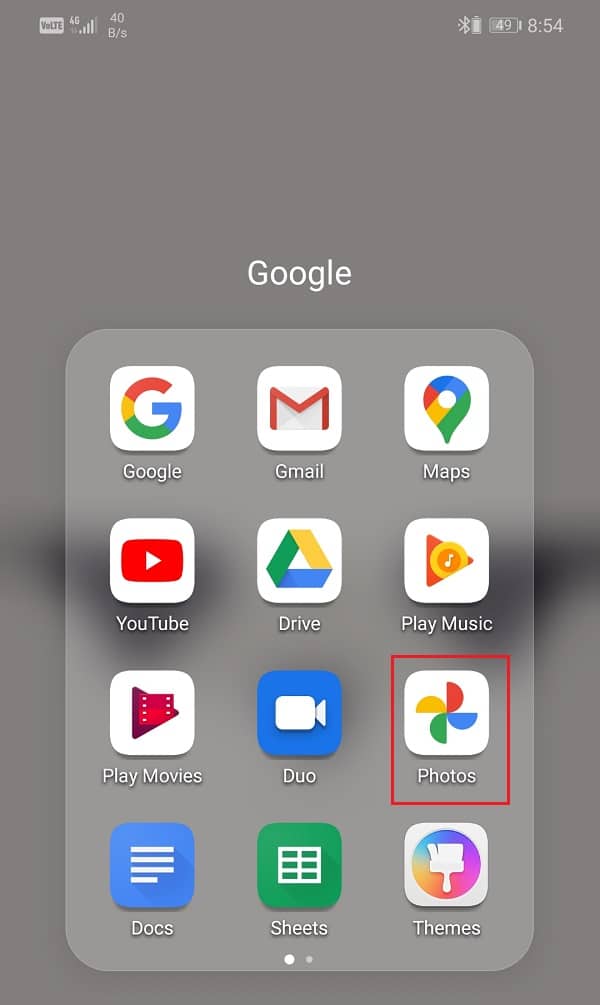
2. Ngayon i-tap ang iyong profile picture on the top right-hand corner.
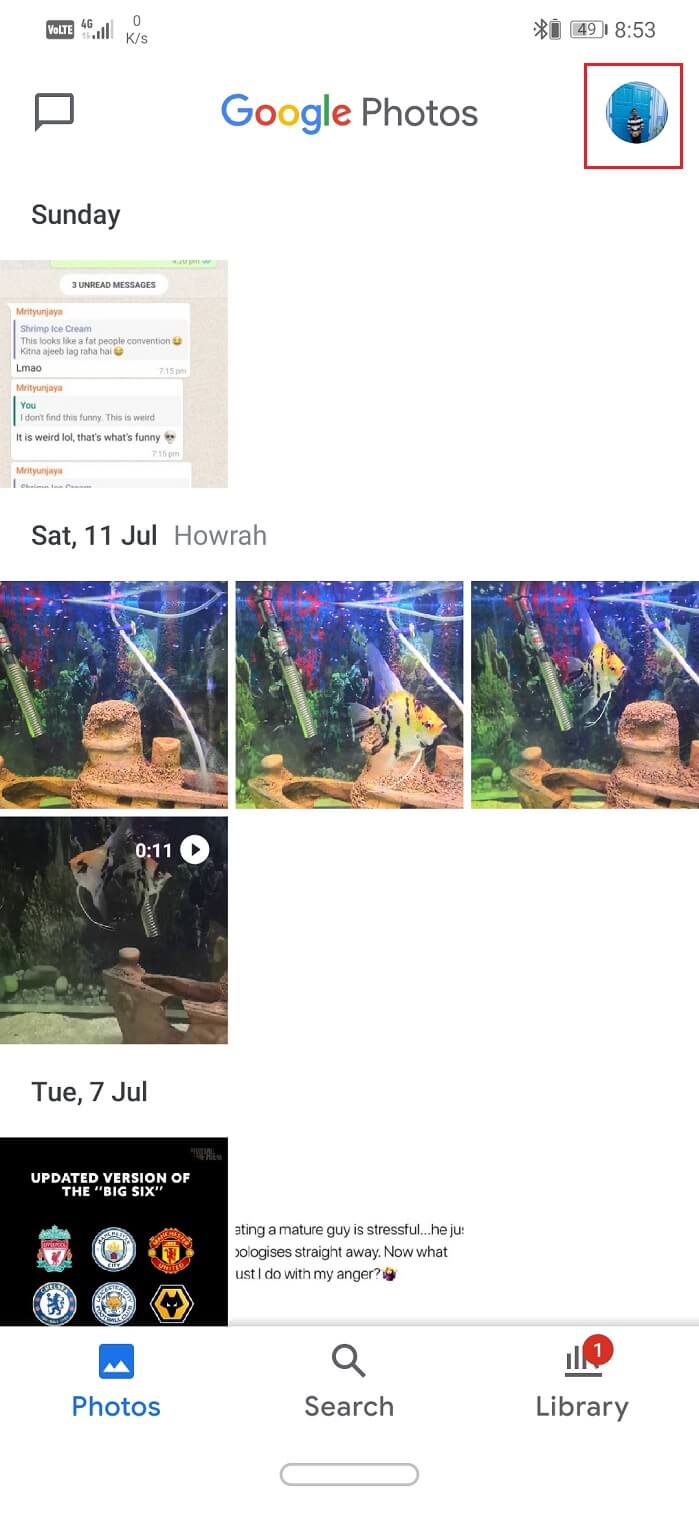
3. Here, you will find the Backup status just under the “Pamahalaan ang iyong Google Account” pagpipilian.
These are some of the messages that you can expect and the quick fix for them.
- “Waiting for connection” or “Waiting for Wi-Fi” – Try reconnecting to the Wi-Fi network or switching to your mobile data. In order to use your mobile data to upload photos and videos on the cloud, you need to enable it first. We will discuss this later in this article.
- “A photo or video was skipped” – There is an upper limit to the size of photos and videos that can be uploaded on Google Photos. Photos larger than 75 MB or 100 megapixels and videos larger than 10GB cannot be saved on the cloud. Make sure that the media files which you are trying to upload meet this requirement.
- “Back up and sync is off” – You must have accidentally disabled the auto-sync and back upsetting for Google Photos; all that you need to do is turn it back ON.
- “Backup up photos” or “Back up Complete” – Your photos are videos are getting uploaded at the moment or have already been uploaded.
Solution 3: Enable Auto-Sync Feature for Google Photos
Sa pamamagitan ng default, ang automatic sync setting for Google Photos is always enabled. However, it is possible that you might have accidentally turned it off. This will prevent Google Photos from uploading photos to the cloud. This setting needs to be enabled in order to upload and download photos from Google Photos. Follow the steps given below to see how:
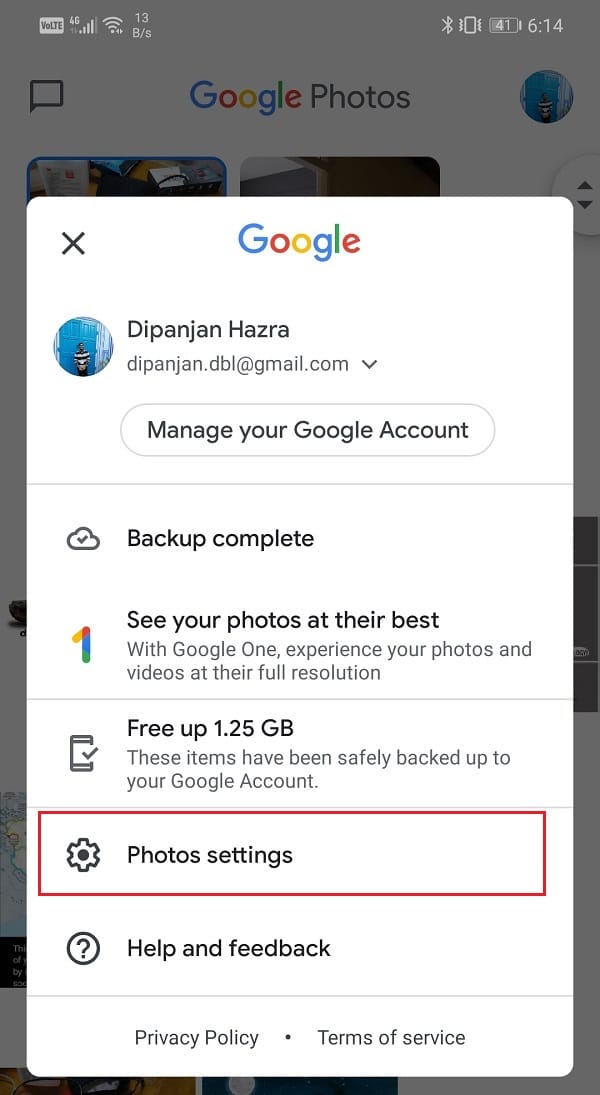
1. Una, buksan Google Photos sa iyong aparato.
2. Ngayon i-tap ang iyong larawan sa profile sa kanang bahagi sa itaas corner and i-click ang Mga Setting ng Mga Larawan pagpipilian.
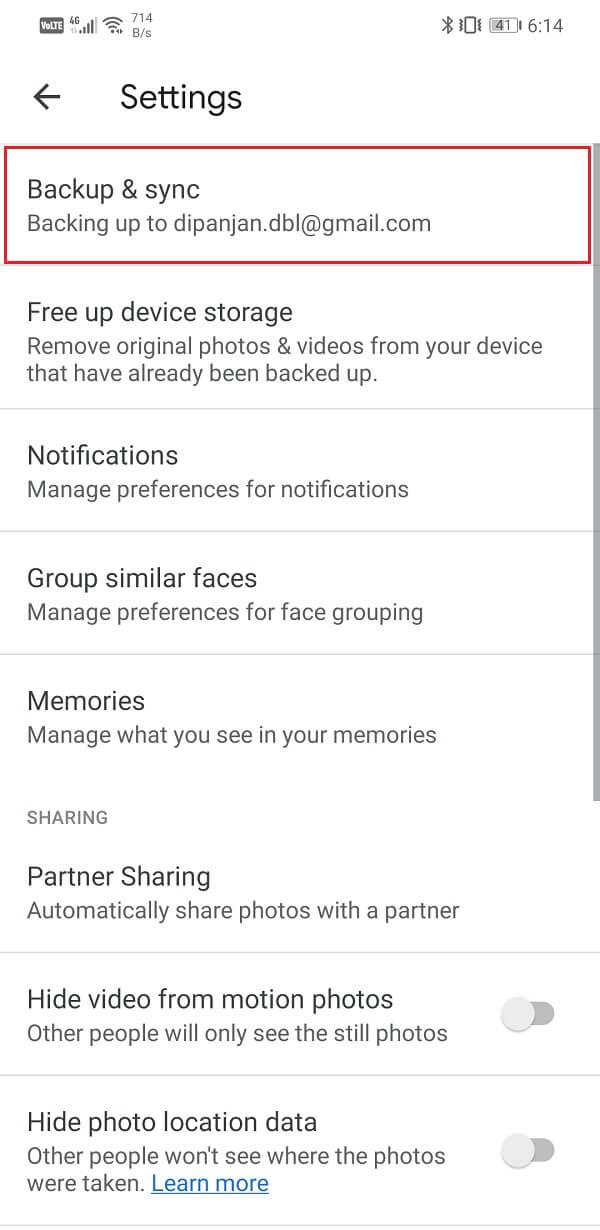
3. Dito, i-tap ang I-backup at i-sync pagpipilian.
4. Ngayon I-ON ang switch sa tabi ng Backup at sync setting para paganahin ito.
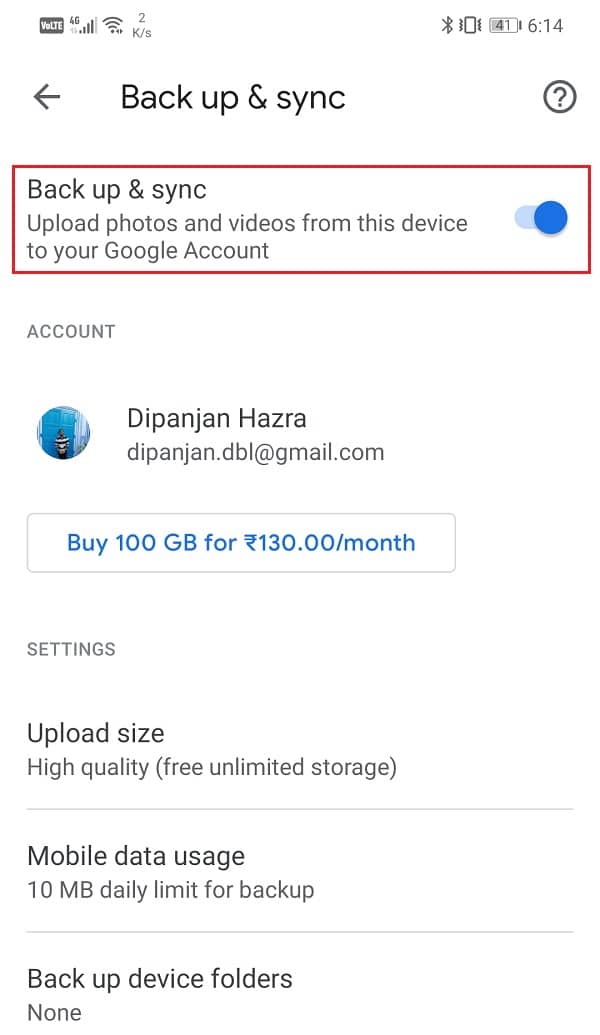
5. If this solves your problem, then you are all set, otherwise, proceed to the next solution in the list.
Solution 4: Make sure the Internet is working properly
Ang function ng Google Photos ay awtomatikong i-scan ang device para sa mga larawan at i-upload ito sa cloud storage, at kailangan nito ng stable na koneksyon sa internet para magawa ito. Tiyaking gumagana nang maayos ang Wi-Fi network kung saan ka nakakonekta. Ang pinakamadaling paraan upang suriin ang koneksyon sa internet ay ang buksan ang YouTube at tingnan kung nagpe-play ang isang video nang walang buffering.
Bukod doon, ang Google Photos ay may nakatakdang pang-araw-araw na limitasyon sa data para sa pag-upload ng mga larawan kung ginagamit mo ang iyong cellular data. Ang limitasyon ng data na ito ay umiiral upang matiyak na ang cellular data ay hindi natupok nang labis. Gayunpaman, kung hindi ina-upload ng Google Photos ang iyong mga larawan, iminumungkahi naming i-disable mo ang anumang uri ng mga paghihigpit sa data. Sundin ang mga hakbang na ibinigay sa ibaba upang makita kung paano:
1. bukas Google Photos sa iyong aparato.
2. Ngayon i-tap ang iyong larawan sa profile sa kanang sulok sa itaas.
3. Pagkatapos nito, i-click ang Mga Setting ng Mga Larawan opsyon pagkatapos ay i-tap ang Back up & sync pagpipilian.
4. Ngayon piliin ang Paggamit ng mobile data pagpipilian.
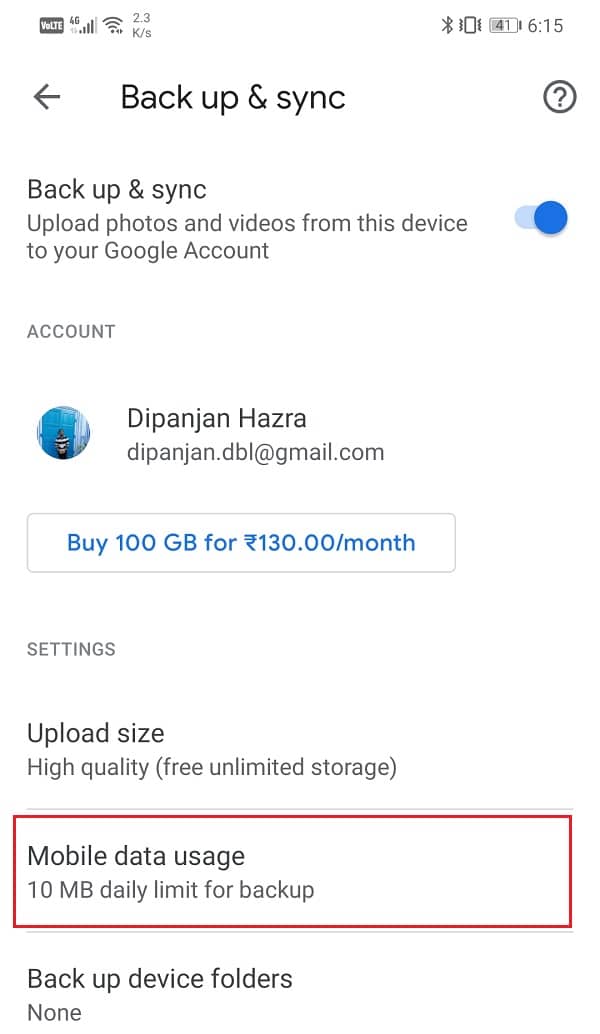
5. Dito, piliin ang walang hangganan pagpipilian sa ilalim ng Pang-araw-araw na limitasyon para sa tab na Backup.

Solution 5: Update the App
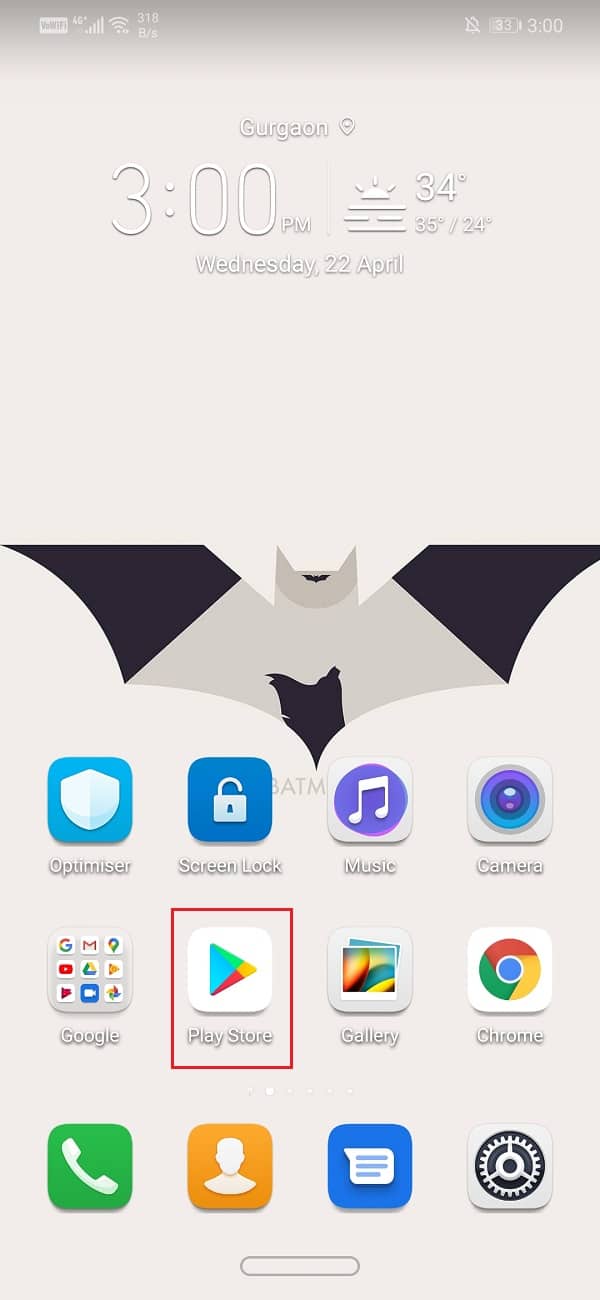
Sa tuwing magsisimulang kumilos ang isang app, sinasabi ng ginintuang panuntunan na i-update ito. Ito ay dahil kapag may naiulat na error, naglalabas ang mga developer ng app ng bagong update na may mga pag-aayos ng bug upang malutas ang iba't ibang uri ng mga problema. Posibleng ang pag-update sa Google Photos ay makakatulong sa iyong ayusin ang isyu ng mga larawang hindi ina-upload. Sundin ang mga hakbang na ibinigay sa ibaba para i-update ang Google Photos app.
1. Pumunta sa Play Store.
2. Sa kaliwang bahagi sa itaas, makikita mo tatlong pahalang na linya. Mag-click sa kanila.
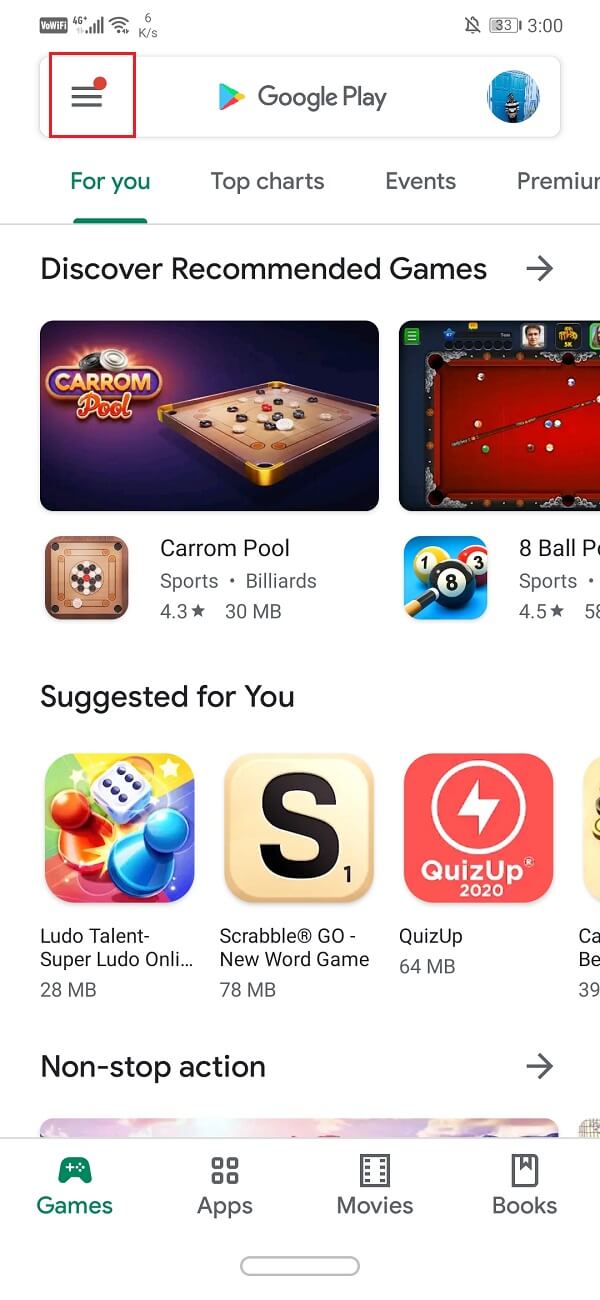
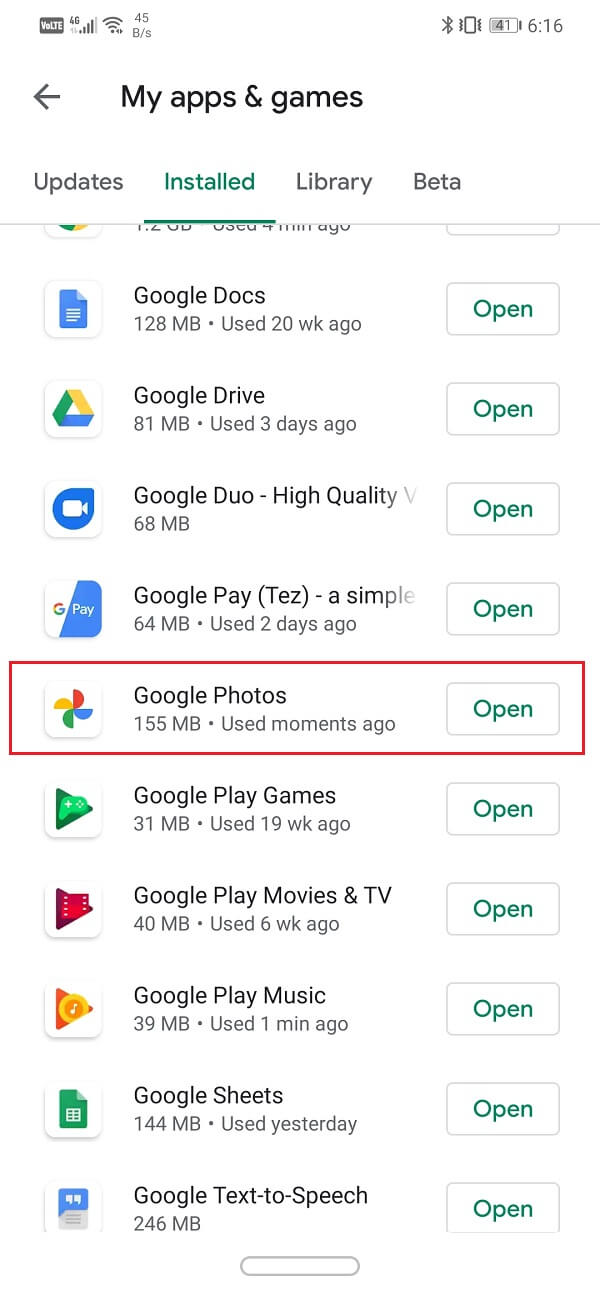
3. Ngayon, i-click ang "Aking Mga App at Laro" pagpipilian.
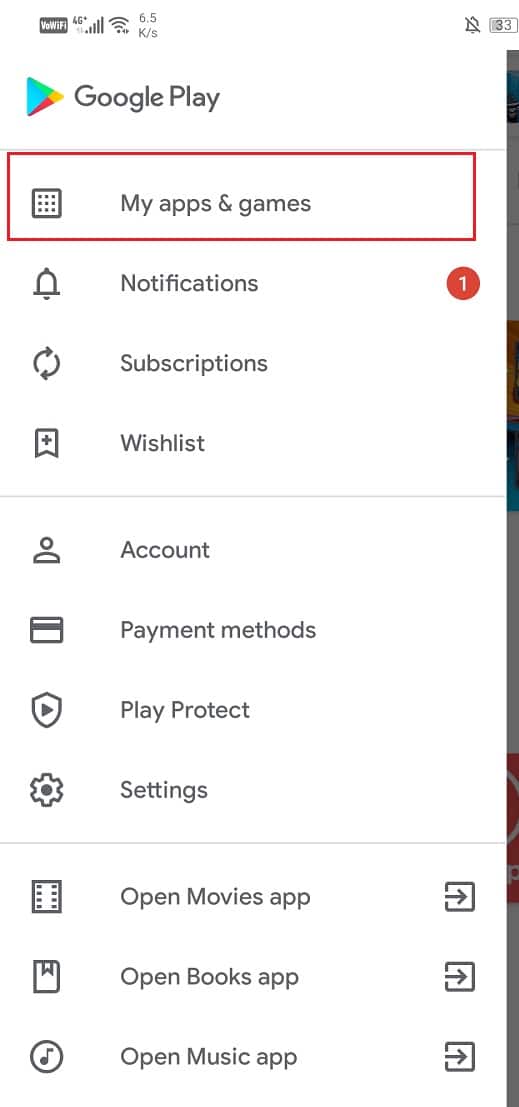
4. Maghanap para sa Google Photos at tingnan kung mayroong anumang mga nakabinbing update.
5. Kung oo, pagkatapos ay i-click ang update button.
6. Kapag na-update na ang app, tingnan kung ina-upload ang mga larawan gaya ng dati o hindi.
Solution 6: Clear Cache and Data for Google Photos
Ang isa pang klasikong solusyon sa lahat ng problemang nauugnay sa Android app ay malinaw na cache at data para sa hindi gumaganang app. Ang mga cache file ay binubuo ng bawat app upang bawasan ang oras ng paglo-load ng screen at gawing mas mabilis ang pagbukas ng app. Sa paglipas ng panahon, patuloy na tumataas ang dami ng mga cache file. Ang mga cache file na ito ay madalas na nasira at nagiging sanhi ng hindi paggana ng app. Ito ay isang magandang kasanayan upang tanggalin ang lumang cache at mga file ng data paminsan-minsan.
Ang paggawa nito ay hindi makakaapekto sa iyong mga larawan o video na naka-save sa cloud. Gagawa lang ito ng paraan para sa mga bagong cache file, na bubuo sa sandaling matanggal ang mga luma. Sundin ang mga hakbang na ibinigay sa ibaba para i-clear ang cache at data para sa Google Photos app.
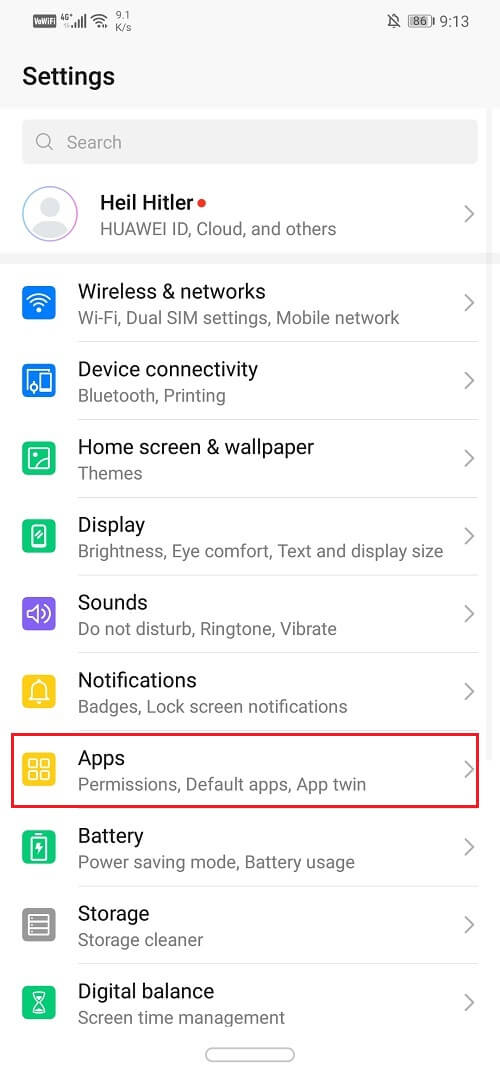
1. Pumunta sa Setting sa iyong telepono.
2. Mag-click sa Apps opsyon upang tingnan ang listahan ng mga naka-install na app sa iyong device.
3. Ngayon maghanap para sa Google Photos and tap on it to open the app settings. Then, click on the Imbakan pagpipilian.
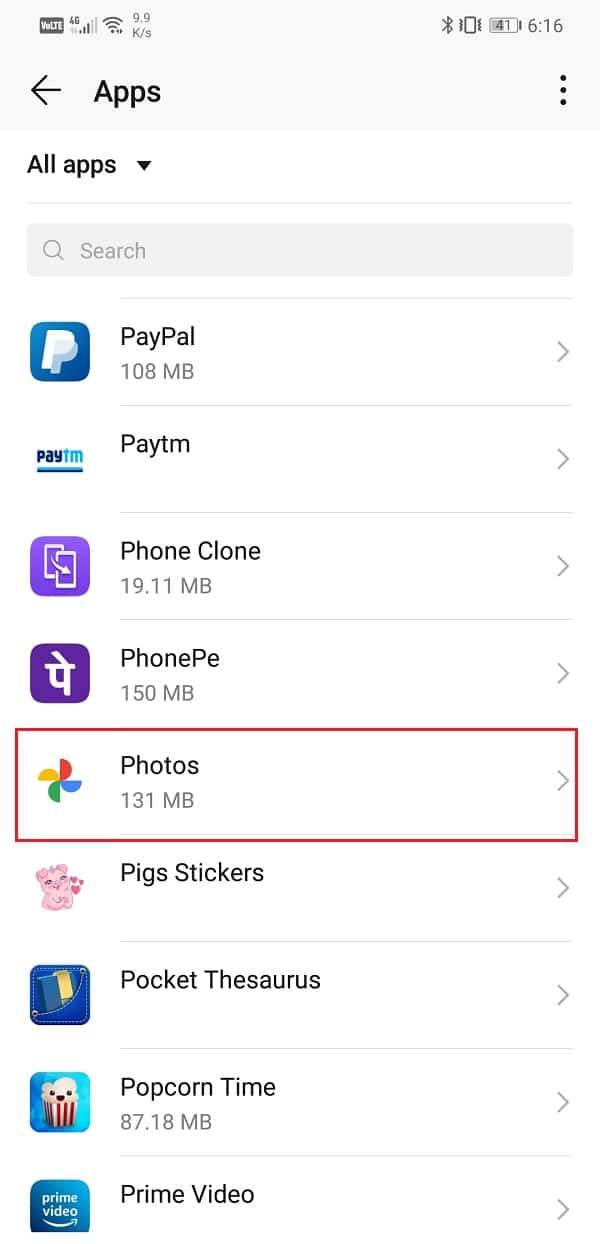
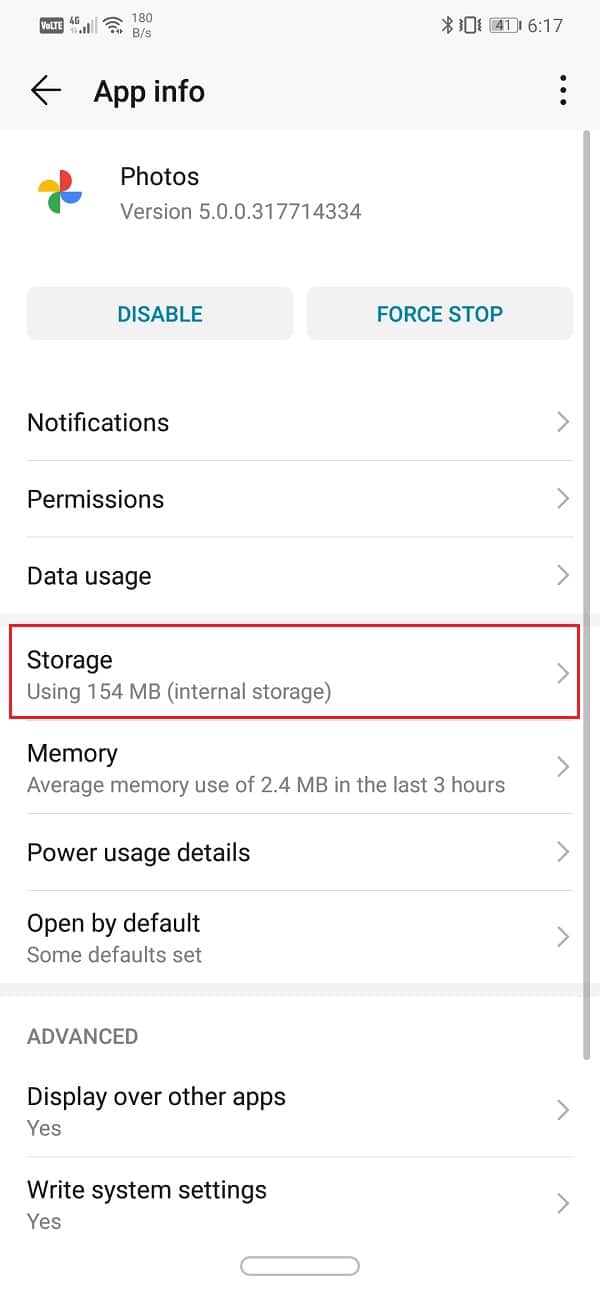
4. Dito, makikita mo ang opsyon na I-clear ang Cache at I-clear ang Data. Mag-click sa kani-kanilang mga pindutan, at ang mga cache file para sa Google Photos ay matatanggal.
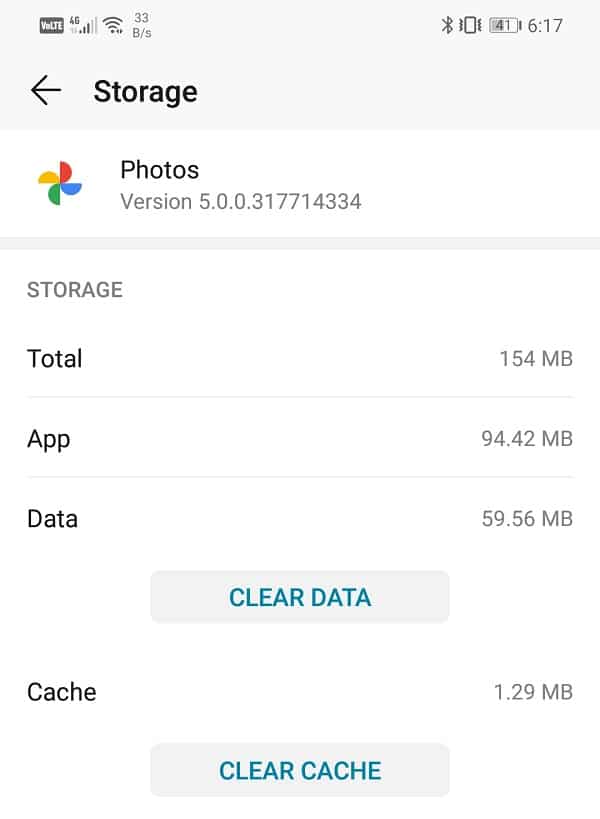
Now again try to sync Photos to Google Photos and see if you’re able to fix Google Photos backup stuck issue.
Gayundin Basahin: Restore Apps and Settings to a new Android phone from Google Backup
Solution 7: Change the Upload Quality of Photos
Just like every other cloud storage drive, Google Photos has certain storage restrictions. You are entitled to free 15 GB of storage space sa cloud upang i-upload ang iyong mga larawan. Higit pa rito, kailangan mong magbayad para sa anumang karagdagang espasyo na nais mong gamitin.
Ito, gayunpaman, ang mga tuntunin at kundisyon para sa pag-upload ng iyong mga larawan at video sa kanilang orihinal na kalidad, ibig sabihin, ang laki ng file ay nananatiling hindi nagbabago. Ang pakinabang ng pagpili sa opsyong ito ay walang pagkawala ng kalidad dahil sa compression, at makukuha mo ang eksaktong parehong larawan sa orihinal nitong resolution kapag na-download mo ito mula sa cloud. Posible na ang libreng puwang na ito na inilaan sa iyo ay ganap na naubos, at sa gayon, ang mga larawan ay hindi na ina-upload.
Ngayon, maaari kang magbayad para sa dagdag na espasyo o ikompromiso ang kalidad ng mga pag-upload upang patuloy na i-back up ang iyong mga larawan sa cloud. Ang Google Photos ay may dalawang alternatibong opsyon para sa Laki ng Upload, at ito ay "Igi"At"Ekspres".
The most interesting point about these options is that they offer unlimited storage space. If you are willing to compromise a little with the quality of the image, Google Photos will allow you to store as many photos or videos as you want. We would suggest you select a High-Quality option for future uploads. It compresses the image to a resolution of 16 MP, and videos are compressed to high definition.
In case you are planning to print these images, then the quality of the print would be good up to 24 x 16 in. This is quite good a deal in exchange for unlimited storage space. Follow the steps given below to alter your preference for the upload quality on Google Photos.
1. bukas Google Photos on your device then tap on your larawan ng profile sa kanang sulok sa itaas.
2. Pagkatapos nito, i-click ang Mga Setting ng Mga Larawan pagpipilian.
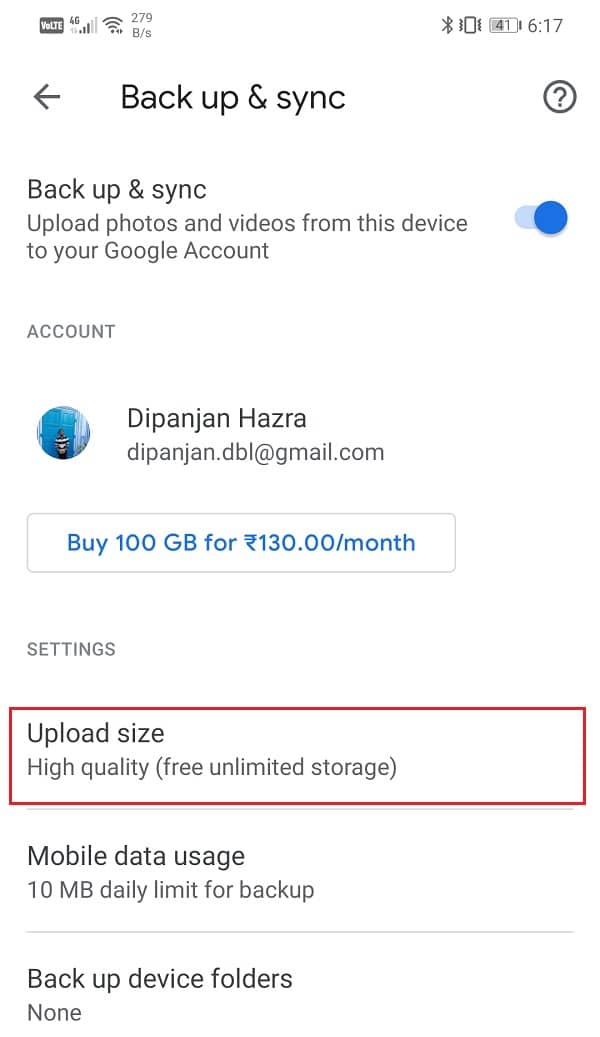
3. Dito, i-tap ang I-backup at i-sync pagpipilian.
4. Sa ilalim ng Mga Setting, makikita mo ang opsyon na tinatawag "Laki ng pag-upload". Pindutin mo.
5. Ngayon, mula sa ibinigay na mga opsyon, piliin Igi bilang iyong ginustong pagpipilian para sa mga update sa hinaharap.
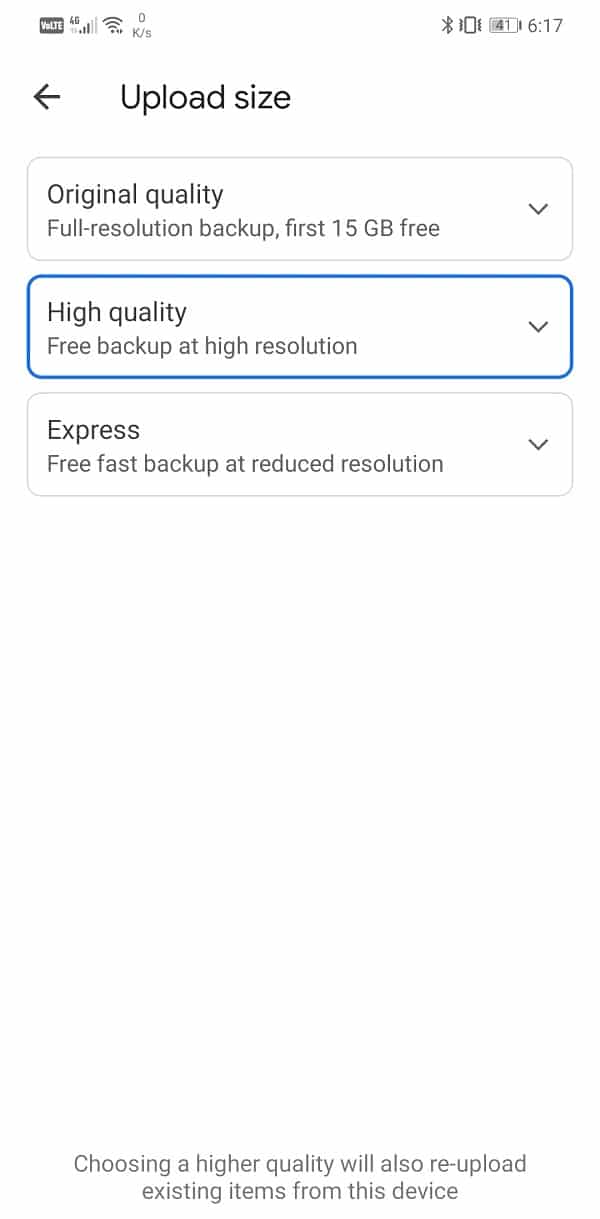
6. Bibigyan ka nito ng walang limitasyong espasyo sa imbakan at lutasin ang problema ng mga larawang hindi ina-upload sa Google Photos.
Solution 8: Piliting Itigil ang App
Even when you exit from some app, it keeps running in the background. Especially apps like Google Photos that have auto-sync feature are constantly running in the background, searching for any new photos and videos that need to be uploaded on the cloud. Sometimes, when an app is not working properly, the best way to fix it is by completely stopping the app and then starting again. The only way to make sure that an app has been completed closed is by force stopping it. Follow the steps given below to force stop Google Photos:
1. Una, buksan Setting sa iyong telepono pagkatapos tapikin ang Apps pagpipilian.
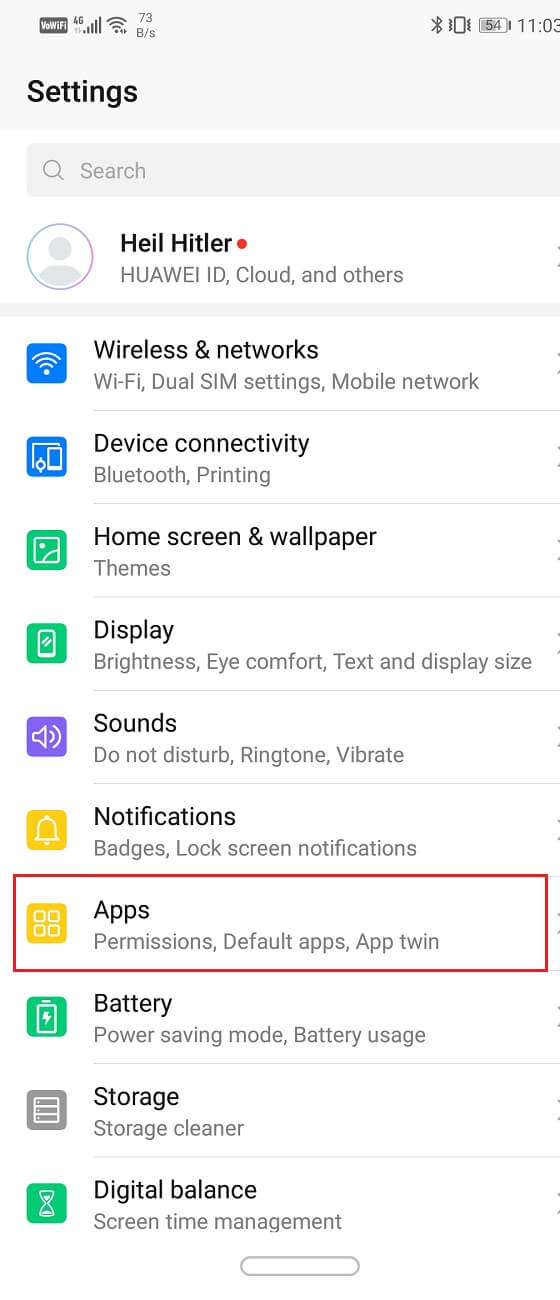
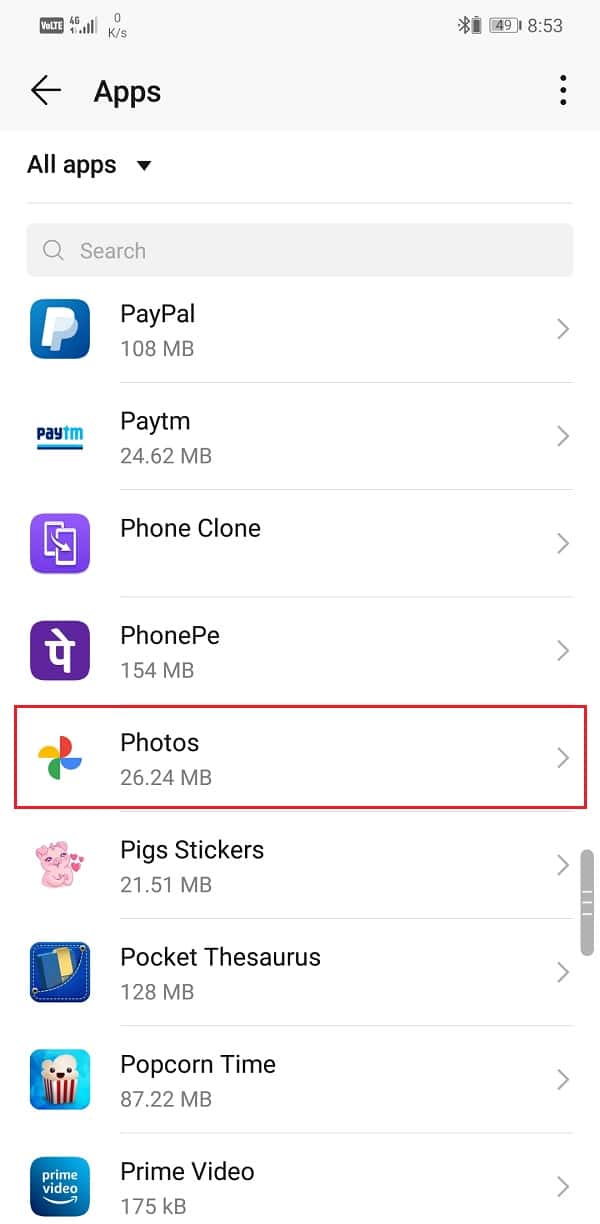
2. From the list of apps look for Google Photos at i-tap ito.
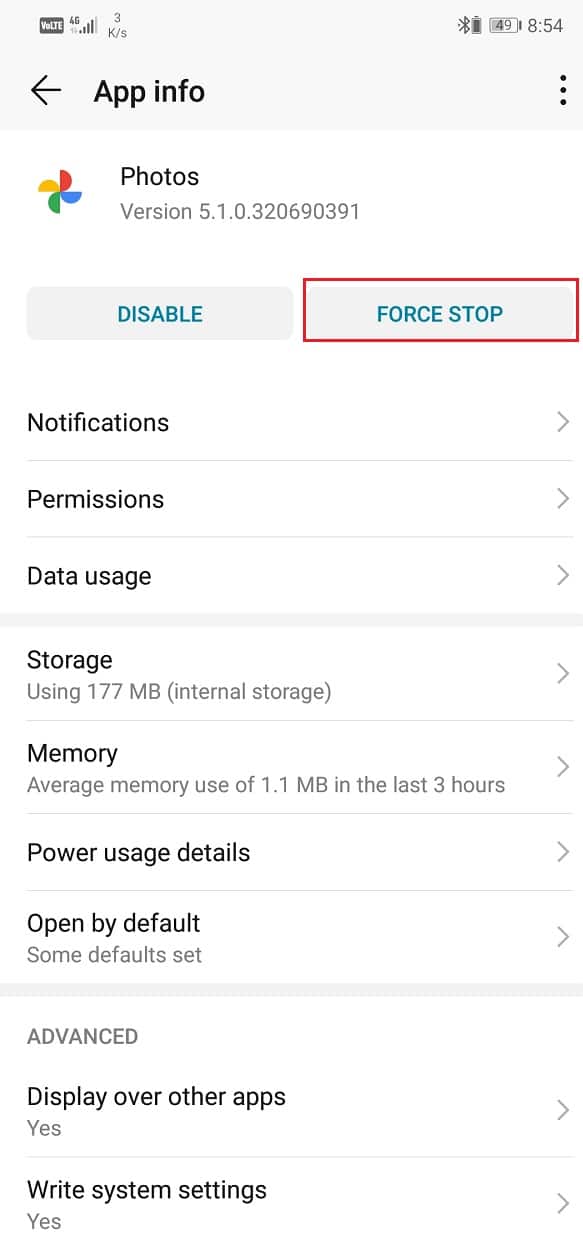
3. Ito ay magbubukas ng app settings for Google Photos. After that, tap on the Pwersa tumigil button.
4. Now open the app again and see if you’re able to fix Google Photos not backing up issue.
Solution 9: Sign Out and then Sign In to your Google Account
If none of the above methods, try removing your Google account that is linked to Google Photos and then sign-in again after rebooting your phone. Doing so might set things straight, and Google Photos might begin backing up your photos like it used to earlier. Follow the steps given below to remove your Google Account.
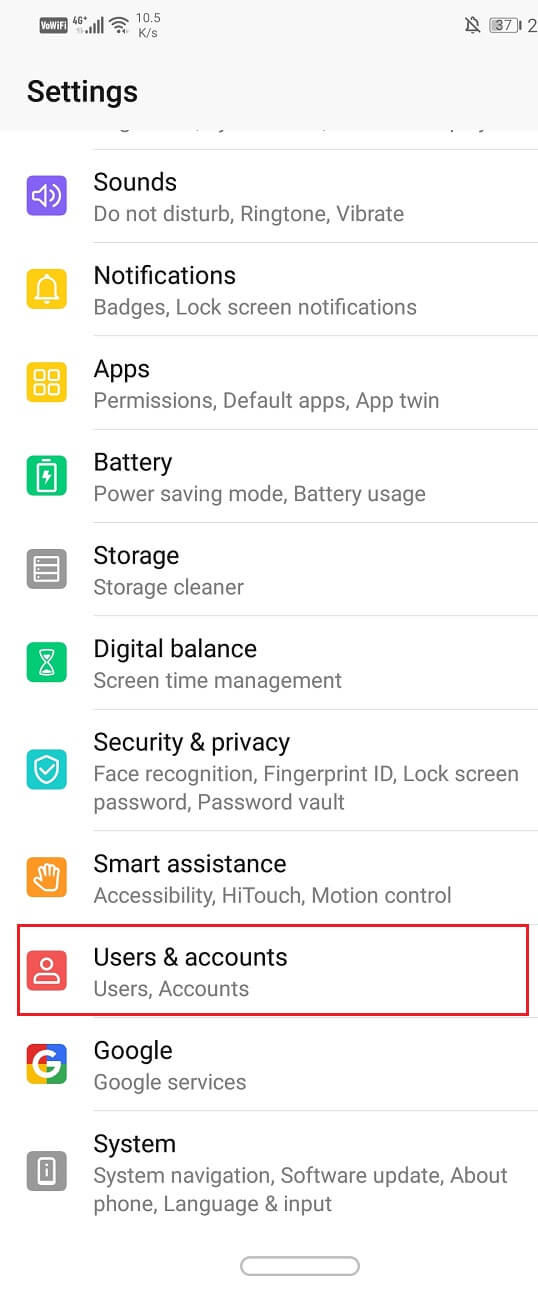
1. buksan ang Setting sa iyong telepono.
2. Ngayon mag-click sa Mga gumagamit at account.
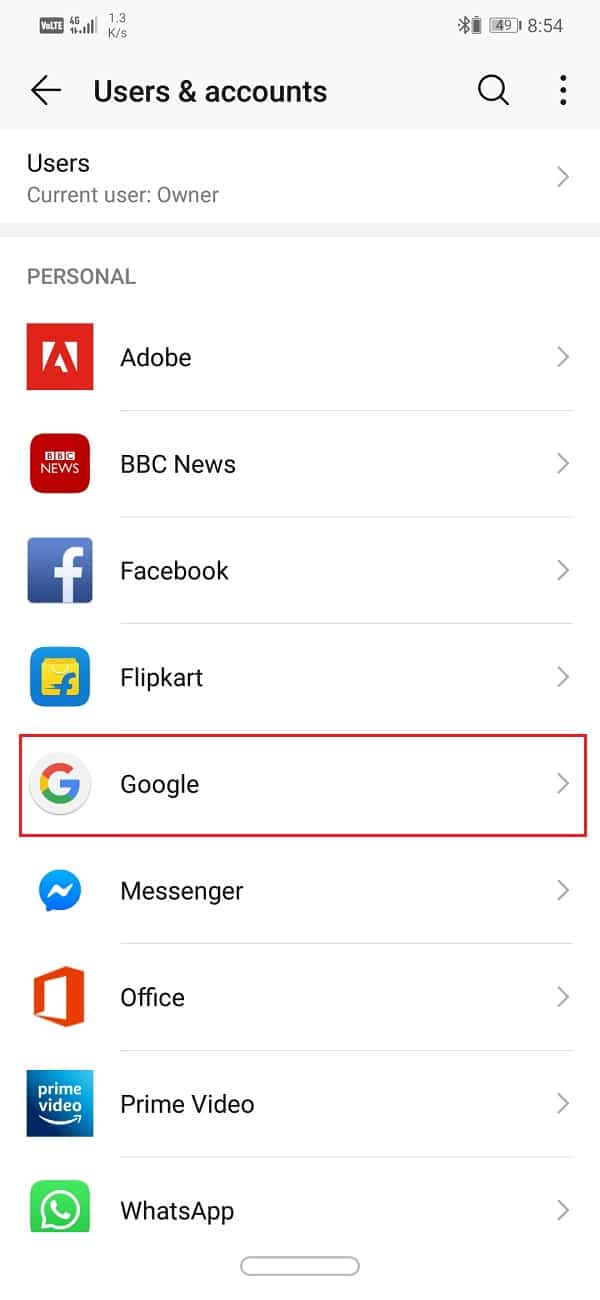
3. Ngayon piliin ang Google pagpipilian.
4. At the bottom of the screen, you will find the option to Alisin ang account, pindutin mo.
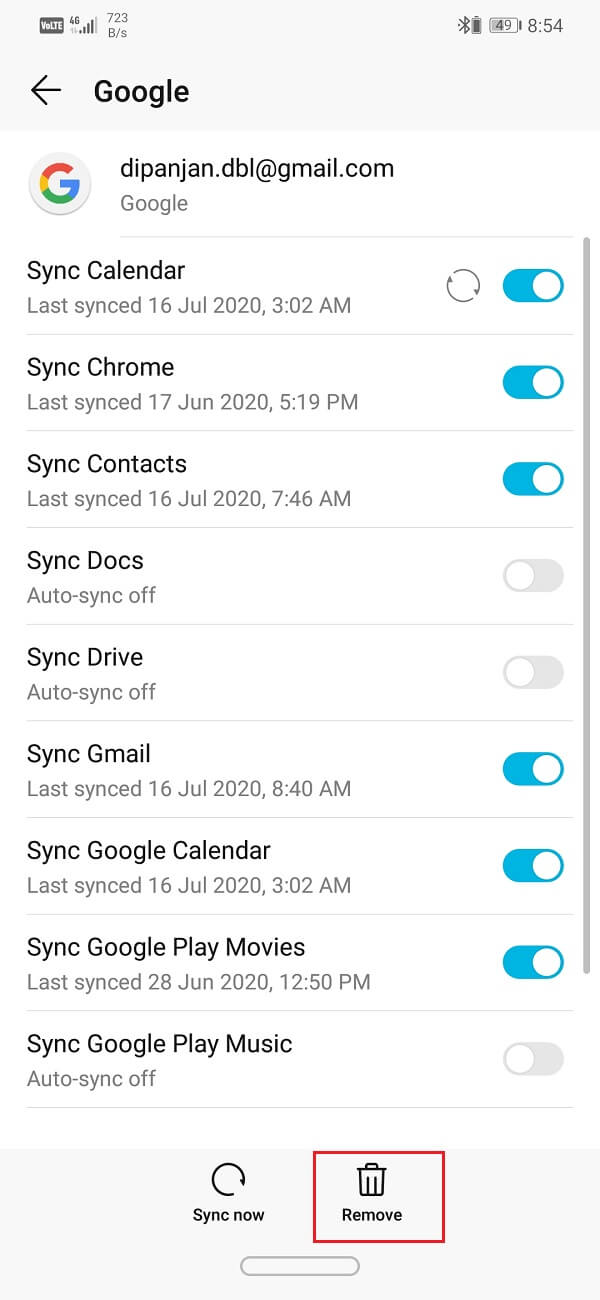
5. This will sign you out of your Gmail account.
6. I-reboot ang iyong aparato.
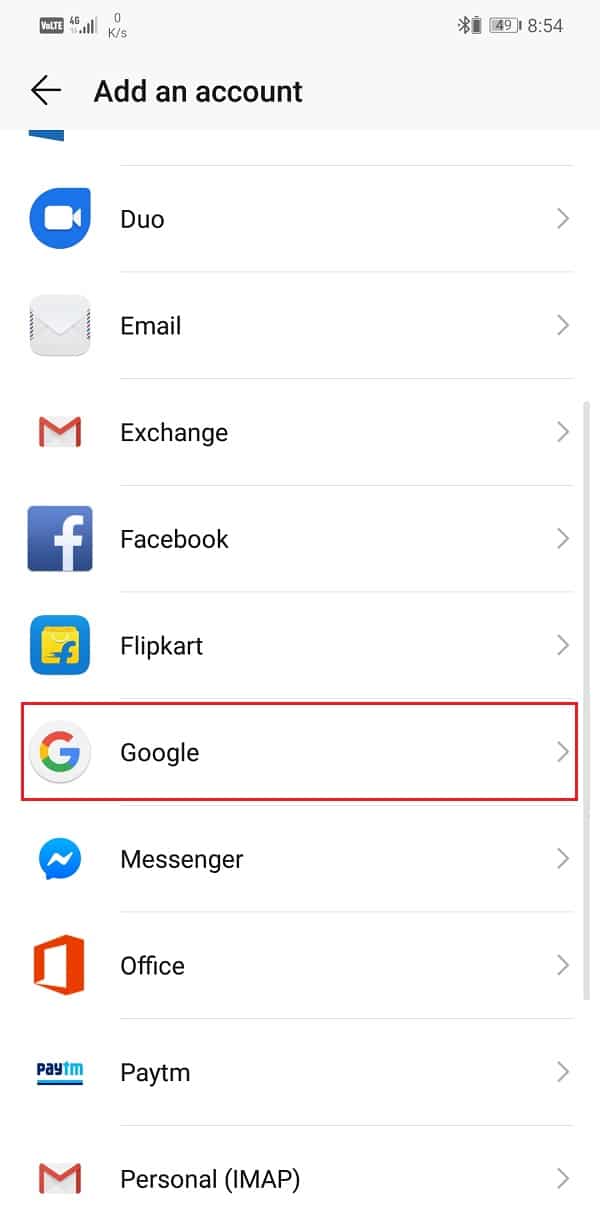
7. When your device starts again, head back to the Users and Settings section and tap on the add account option.
8. Mula sa listahan ng mga opsyon, piliin ang Google and sign in with your username and password.
9. Once everything has been set up again, check the backup status in Google Photos, and see if you’re able to fix the Google Photos backup stuck issue.
Solution 10: Manually Upload Photos and Videos
Although Google Photos is meant to upload your media files on the cloud automatically, there is an option to do so manually as well. If none of the above methods work and Google Photos still refuses to back up your photos and videos, this is the last resort. Manually backing up your files is at least better than losing them. Follow the steps given below to upload your photos and videos to the cloud manually.
1. buksan ang Google Photos app.
2. Ngayon mag-tap sa Aklatan pagpipilian sa ilalim ng screen.
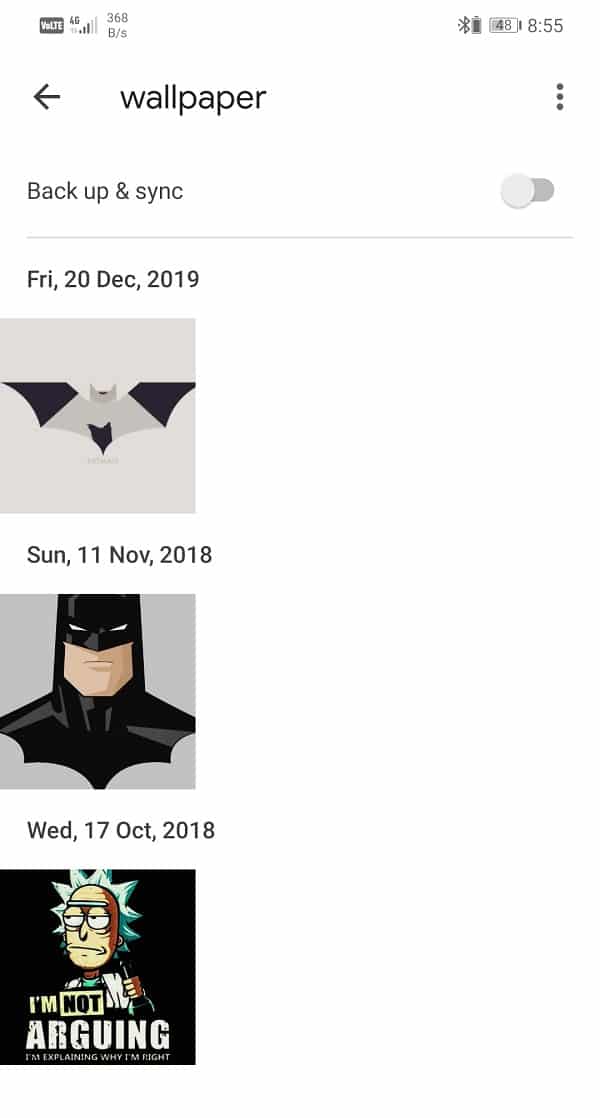
3. Sa ilalim ng “Photos on Device” tab, you can find the various folders that contain your photos and videos.
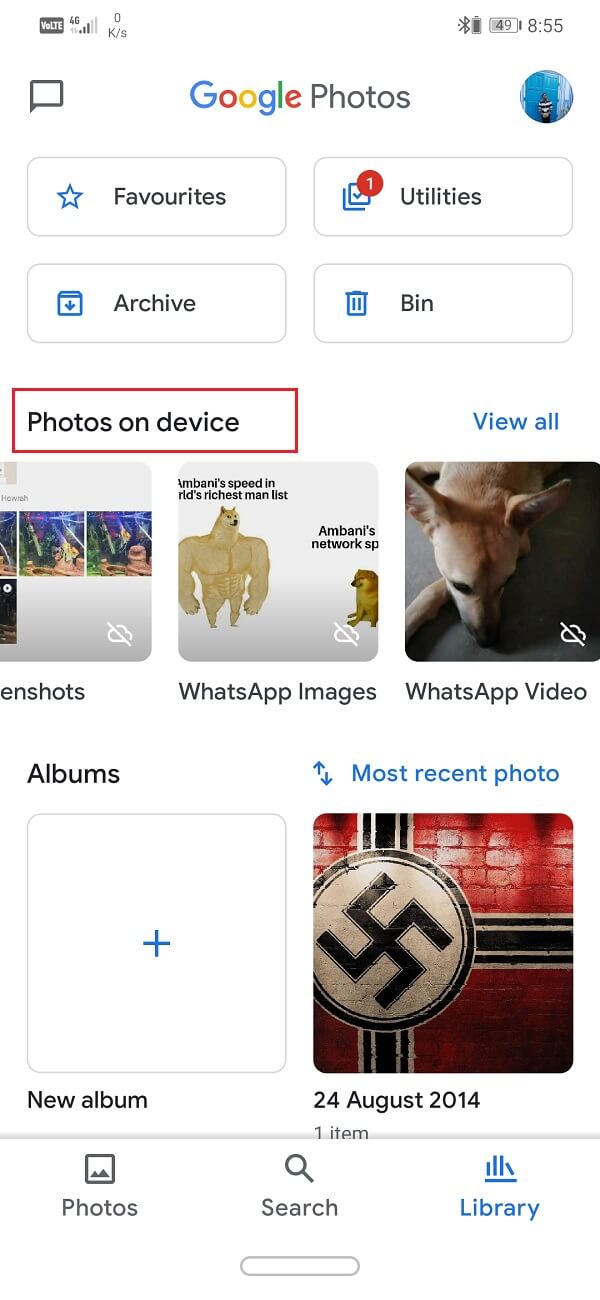
4. Look for the folder that contains the photo that you wish to upload and tap on it. You will notice an offline symbol on the bottom right corner of the folder that indicates some or all pictures in this folder has not been uploaded.
5. Now select the image that you wish to upload and then tap on the menu button (three vertical dots) on the top right corner.
6. Pagkatapos nito, i-click ang I-back up ngayon pagpipilian.
7. Your photo will now be uploaded on Google Photos.

Inirerekomenda:
With that, we come to the end of this article; we hope that these solutions prove to be helpful, and the problem of Google Photos not backing up is fixed. However, as mentioned earlier, sometimes the problem lies with Google servers, and there is nothing that you can do to fix it.
All you need to do is wait as they fix the problem on their end. You can write to Google support if you want an official acknowledgment of your problem. If the issue isn’t resolved even after a long time, you can try switching to an alternate cloud storage app like Dropbox or One Drive.

