Fix High CPU Usage by svchost.exe (netsvcs)
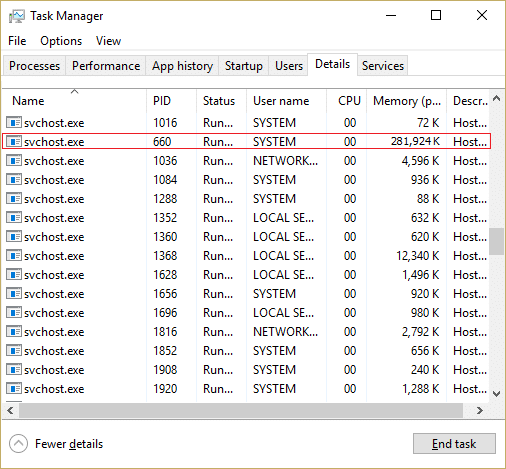
Svchost.exe (Service Host, or SvcHost) is a generic host process name for services that run from dynamic-link libraries. All the Windows internal services were moved into one .dll file instead of the .exe file, but you need an executable (.exe) file in order to load these .dll files; hence the svchost.exe process was created. Now you may notice that there were several instances of svchost.exe processes which are there because if one service fails it won’t bring down the Windows and all these services are organized into groups, and each svchost.exe instance is created for each such group.

Now the problem begins when svchost.exe (netsvcs) start taking almost all of the Windows resources and causes a High CPU usage. If you looked into Task Manager, you would find that a particular svchost.exe is taking up almost all the memory and creating a problem for other programs or applications. The computer becomes unstable as it becomes very sluggish and it starts freezing Windows randomly, then the user either has to reboot their system or force shutdown.
Svchost.exe High CPU Usage problem occurs mostly because of virus or malware infection on users PC. But the problem is not limited to only this as it generally depends on users system configuration and the environment. So without wasting any time let’ see how to actually Fix High CPU Usage by svchost.exe (netsvcs) with the below-listed troubleshooting guide.
Fix High CPU Usage by svchost.exe (netsvcs)
کچھ غلط ہونے کی صورت میں بحالی پوائنٹ بنانا یقینی بنائیں۔
طریقہ 1: CCleaner اور Malwarebytes چلائیں۔
1. ڈاؤن لوڈ اور انسٹال کریں CCleaner اور مال ویئر بائٹس۔
2. Malwarebytes چلائیں۔ اور اسے آپ کے سسٹم کو نقصان دہ فائلوں کے لیے اسکین کرنے دیں۔ اگر میلویئر پایا جاتا ہے، تو یہ انہیں خود بخود ہٹا دے گا۔

3. اب CCleaner چلائیں اور منتخب کریں۔ کسٹم کلین.
4. کسٹم کلین کے تحت، منتخب کریں۔ ونڈوز ٹیب اور ڈیفالٹس کو چیک کریں اور کلک کریں۔ تجزیہ.

5. تجزیہ مکمل ہونے کے بعد، اس بات کو یقینی بنائیں کہ آپ حذف ہونے والی فائلوں کو ہٹانے کے لیے یقینی ہیں۔

6. آخر میں ، پر کلک کریں کلینر چلائیں۔ بٹن اور CCleaner کو اپنا کورس چلانے دیں۔
7. اپنے سسٹم کو مزید صاف کرنے کے لیے، رجسٹری ٹیب کو منتخب کریں۔، اور یقینی بنائیں کہ درج ذیل چیک کیے گئے ہیں:

8. پر کلک کریں مسائل کے لیے اسکین کریں۔ بٹن دبائیں اور CCleaner کو اسکین کرنے کی اجازت دیں، پھر کلک کریں۔ منتخب کردہ مسائل کو درست کریں۔ بٹن پر کلک کرنا ہے۔

9. جب CCleaner پوچھتا ہے "کیا آپ رجسٹری میں بیک اپ تبدیلیاں چاہتے ہیں؟" ہاں منتخب کریں.
10. آپ کا بیک اپ مکمل ہونے کے بعد، پر کلک کریں۔ تمام منتخب مسائل کو ٹھیک کریں۔ بٹن پر کلک کرنا ہے۔
11. تبدیلیاں محفوظ کرنے کے لیے اپنے کمپیوٹر کو دوبارہ شروع کریں۔
Method 2: Disable the particular service that is causing High CPU
1. دبائیں Ctrl + Shift + Esc together to launch Task Manager.
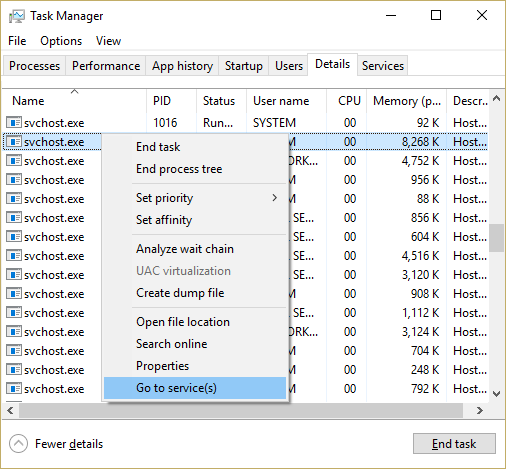
2. پر جائیں تفصیلات ٹیب and right-click on the high CPU usage SVCHOST.EXE process and choose Go to Service(s).
3. This would automatically take you to the Services tab, and you will notice that there are several highlighted services that run under the svchost.exe process.
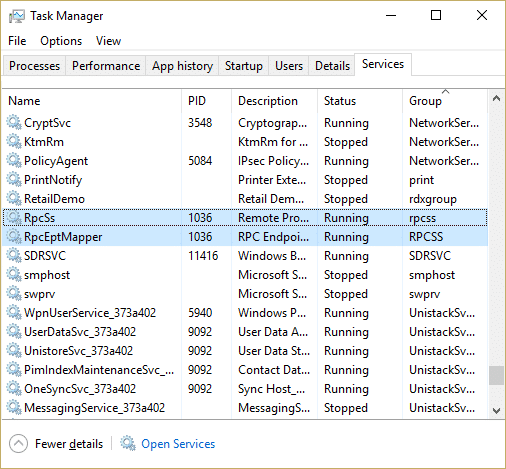
4. اب پر دائیں کلک کریں۔ highlighted service one by one and select Stop.
5. Do this until the high CPU usage by that particular svchost.exe process is fixed.
6. Once you have verified the services because of which this problem has occurred, it’s time to disable that service.
نوٹ: زیادہ تر وقت، ونڈوز اپ ڈیٹ سروس is the culprit service, but we will deal with it later on.
7. Windows Key + R دبائیں پھر ٹائپ کریں۔ services.msc اور داخل کریں.

8. Now find that particular service in this list then دائیں کلک کریں اس پر اور منتخب کریں پراپرٹیز.
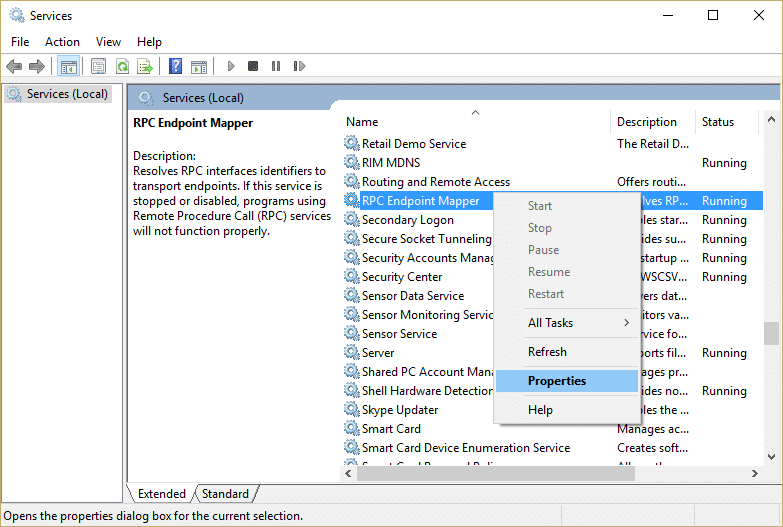
9. Click Stop if the service is running and then make sure Startup type is set to غیر فعال کریں and click Apply followed by OK.
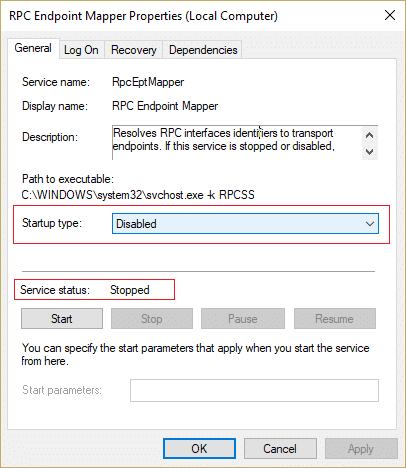
10. Reboot your PC to save changes and see if the issue is resolved or not
This would definitely Resolve High CPU Usage by svchost.exe (netsvcs). If you find it difficult to zero in on the particular svchost.exe file causing the issue, you could use a Microsoft program called عمل ایکسپلورر, which would help you find the cause of the problem.
Method 3: Clear Event Viewer Logs
1. Windows Key + R دبائیں پھر ٹائپ کریں۔ واقعہ wwr.msc اور کھولنے کے لئے درج کریں پر دبائیں وقوعہ کا شاہد.
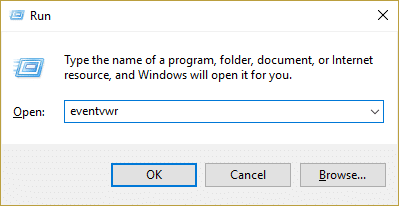
2. From the left-hand side menu, expand ونڈوز لاگز and then right-click on the subfolders one by one and choose فہرست صاف کر دو.
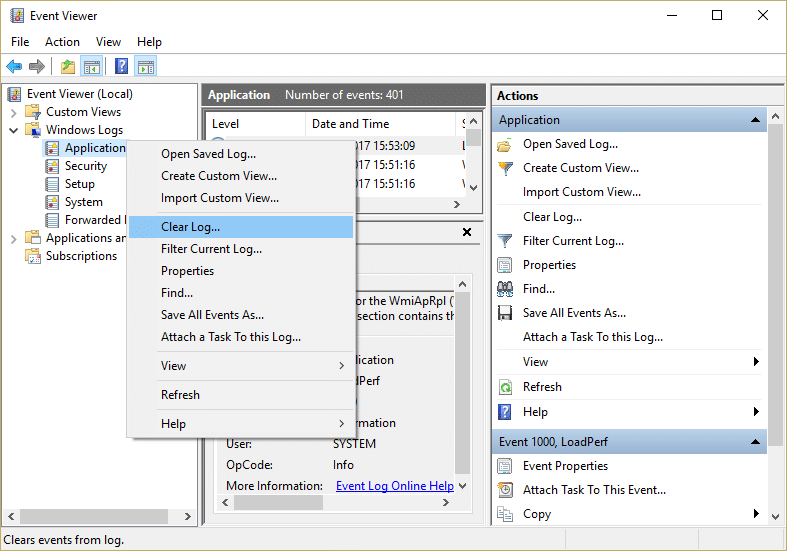
3. These subfolders will be Application, Security, Setup, System and Forwarded Events.
4. Make sure you clear the event logs for all the above folders.
5. تبدیلیاں محفوظ کرنے کے لیے اپنے پی سی کو ریبوٹ کریں۔
طریقہ 4: سافٹ ویئر ڈسٹری بیوشن فولڈر کا نام تبدیل کریں۔
1. Windows Key + X دبائیں پھر منتخب کریں۔ کمانڈ پرپیٹ (ایڈمن).
2. اب ونڈوز اپ ڈیٹ سروسز کو روکنے کے لیے درج ذیل کمانڈز ٹائپ کریں اور پھر ہر ایک کے بعد Enter دبائیں۔
نیٹ سٹاپ wuauserv
نیٹ سٹاپ کرپٹ ایس سی سی
نیٹ سٹاپ بٹس
نیٹ سٹاپ MSiserver
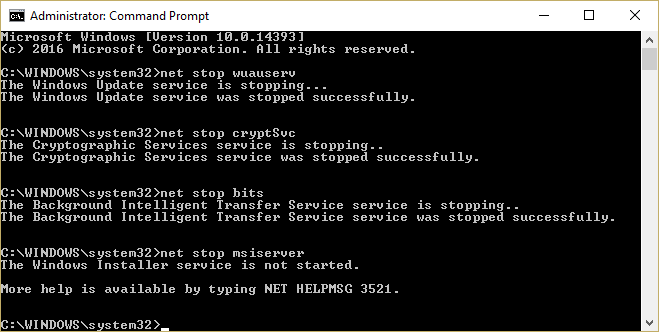
3. Next, type the following command to rename SoftwareDistribution Folder and then hit Enter:
رینجر سی: ونڈوز سرورز تقسیم
رینج سی: ونڈوز سیسٹم ایکس این ایکس ایکسٹیکٹوٹ ایکس اینیم ایکس بلیٹ 32.old

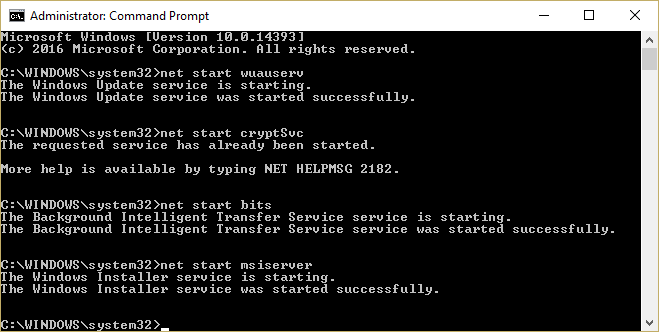
4. آخر میں، Windows Update Services کو شروع کرنے کے لیے درج ذیل کمانڈ ٹائپ کریں اور ہر ایک کے بعد Enter دبائیں۔
خالص آغاز wuauserv
خالص آغاز کرپٹ ایس ایس سی
خالص شروع بٹس
خالص آغاز msiserver
5. تبدیلیاں محفوظ کرنے کے لیے اپنے پی سی کو ریبوٹ کریں۔
طریقہ 5: ونڈوز اپ ڈیٹ ٹربل شوٹر چلائیں۔
1. Type “troubleshooting” in the Windows Search bar and click on خرابیوں کا سراغ لگانا.

2. اگلا، بائیں ونڈو سے، پین کو منتخب کریں۔ سب دیکھیں.
3. پھر کمپیوٹر کے مسائل حل کرنے کی فہرست سے منتخب کریں۔ ونڈوز اپ ڈیٹ.

4. آن اسکرین ہدایات پر عمل کریں اور اجازت دیں۔ ونڈوز اپ ڈیٹ ٹربل شوٹ رن۔

5. تبدیلیاں محفوظ کرنے کے لیے اپنے کمپیوٹر کو دوبارہ شروع کریں۔
This should help you fix High CPU Usage by svchost.exe (netsvcs) but if not then continue with the next method.
Method 6: Make sure to Update Windows
1. ونڈوز کی + I دبائیں پھر منتخب کریں۔ تازہ کاری اور سیکیورٹی۔
![]()
2. اگلا، کلک کریں۔ اپ ڈیٹس کی جانچ پڑتال کریں اور کسی بھی زیر التواء اپ ڈیٹس کو انسٹال کرنا یقینی بنائیں۔

3. After the updates are installed, reboot your PC to Fix High CPU Usage by svchost.exe (netsvcs).
Method 7: Disable the BITS and Windows Update service
1. Windows Key + R دبائیں پھر ٹائپ کریں۔ services.msc اور داخل کریں.

2. Now find بٹس اور ونڈوز اپ ڈیٹ in the list then right-click on them and select پراپرٹیز.
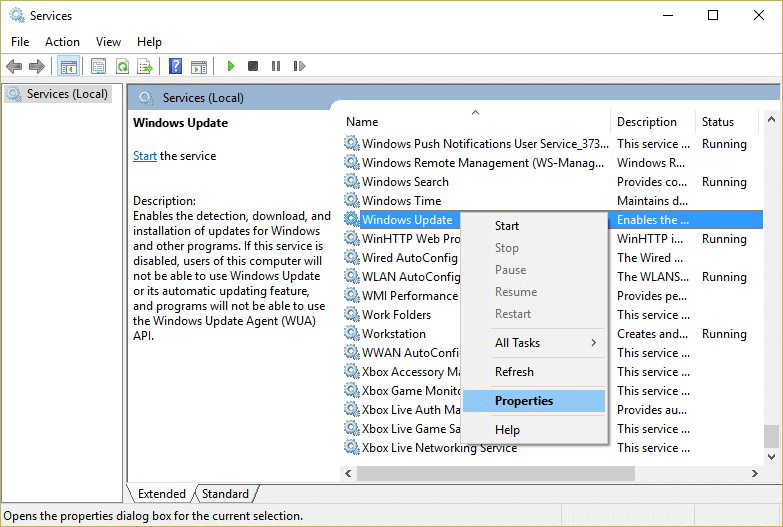
3. یقینی بنائیں سٹاپ پر کلک کریں۔ and then set up their Startup type to معذور
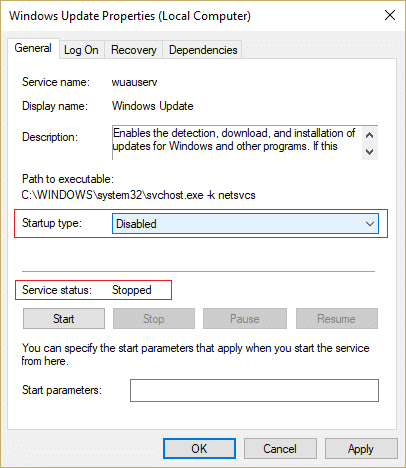
4. اپلائی پر کلک کریں، اس کے بعد ٹھیک ہے۔
5. تبدیلیاں محفوظ کرنے کے لیے اپنے پی سی کو ریبوٹ کریں۔
This should help you fix High CPU Usage by svchost.exe (netsvcs) but if not then continue with the next method.
Method 8: Download & Run RKill
Rkill is a program that was developed at BleepingComputer.com that attempts to terminate known malware processes so that your normal security software can then run and clean your computer of infections. When Rkill runs, it will kill malware processes and then remove incorrect executable associations and fixes policies that stop us from using certain tools when finished. It will display a log file that shows the processes that were terminated while the program was running. This should resolve High CPU Usage by svchost.exe issue.
یہاں سے Rkill ڈاؤن لوڈ کریں۔, install and run it.
طریقہ 9: Run System File Checker (SFC) and Check Disk (CHKDSK)
1. Windows Key + X دبائیں پھر کلک کریں۔ کمانڈ پرامپٹ (ایڈمن)۔

2. اب cmd میں درج ذیل کو ٹائپ کریں اور انٹر دبائیں:
Sfc /scannow sfc /scannow /offbootdir=c: /offwindir=c:windows (اگر اوپر ناکام ہوجاتا ہے تو اسے آزمائیں)

3. مندرجہ بالا عمل کے ختم ہونے کا انتظار کریں اور ایک بار مکمل ہونے کے بعد، اپنے کمپیوٹر کو دوبارہ شروع کریں۔
4. Next, run CHKDSK from چیک ڈسک یوٹیلیٹی (CHKDSK) کے ساتھ فائل سسٹم کی خرابیوں کو درست کریں۔
5. مندرجہ بالا عمل کو مکمل ہونے دیں اور تبدیلیوں کو بچانے کے لیے اپنے کمپیوٹر کو دوبارہ شروع کریں۔
Method 10: Run System and Maintenance Troubleshooter
1. Windows Key + X دبائیں اور پر کلک کریں۔ کنٹرول پینل.

2. ٹربل شوٹ تلاش کریں اور پر کلک کریں۔ خرابیوں کا سراغ لگانا.

3. اگلا، بائیں پین میں تمام دیکھیں پر کلک کریں۔
4. کلک کریں اور چلائیں۔ سسٹم مینٹیننس کے لیے ٹربل شوٹر.

5. The Troubleshooter may be able to Fix High CPU Usage by svchost.exe (netsvcs).
سفارش کی جاتی ہے:
That’s it you have successfully Fix High CPU Usage by svchost.exe (netsvcs) but if you still have any questions regarding this post then feel free to ask them in the comment’s section.